# Creating and Assigning Tasks
Use **Initiated By Me** to create task projects, add tasks, assign users, and organize work with due dates, priorities, labels, and subtasks.
| **Before you begin:** A task must belong to a task project. If the project does not already exist, create the project first. |
### Create a Task Project
1. Go to **Tasks**.
2. Click **Initiated By Me**. [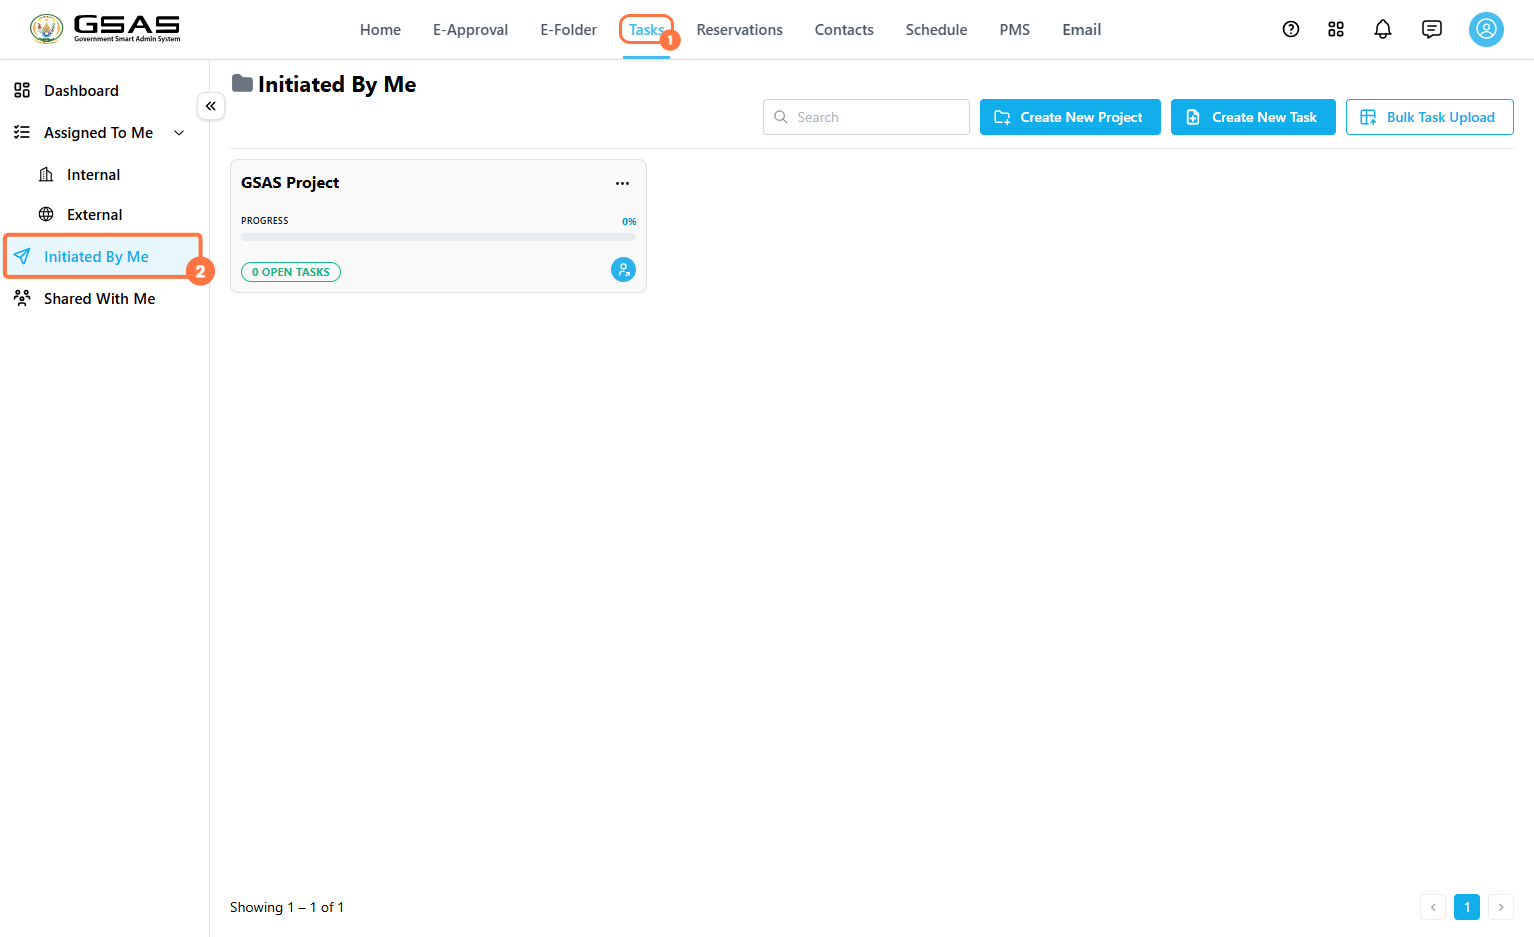](https://docs.smartadmin.rw/uploads/images/gallery/2026-08/z6vimage.png)
3. Click **Create New Project**. [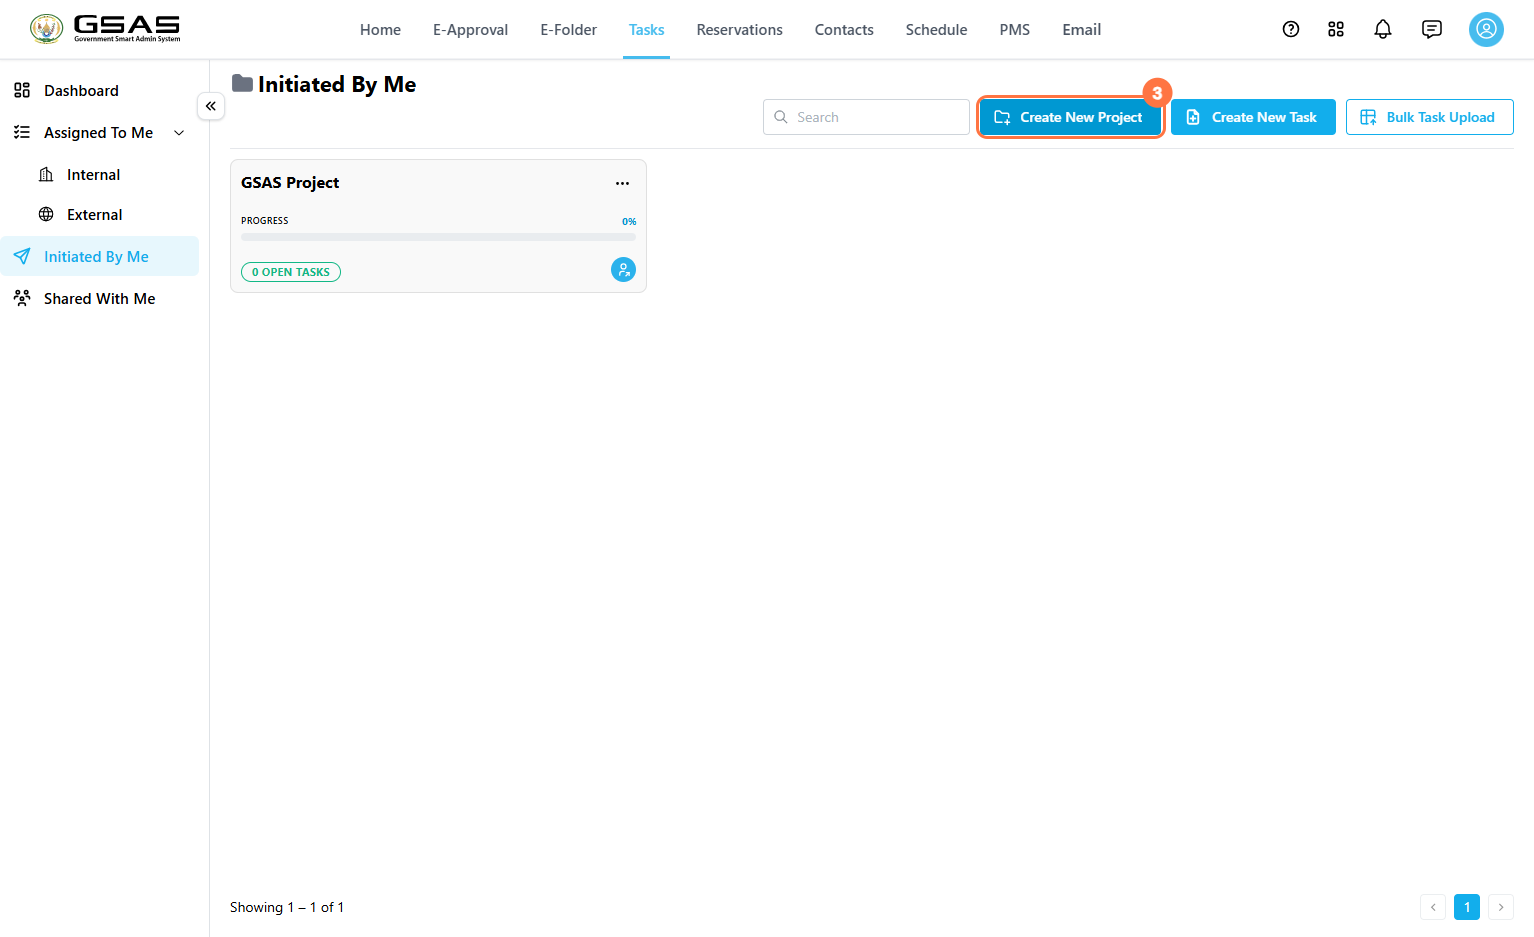](https://docs.smartadmin.rw/uploads/images/gallery/2026-08/dwdimage.png)
4. Enter the project **Name** and an optional **Description**.
5. Click **Create project**. [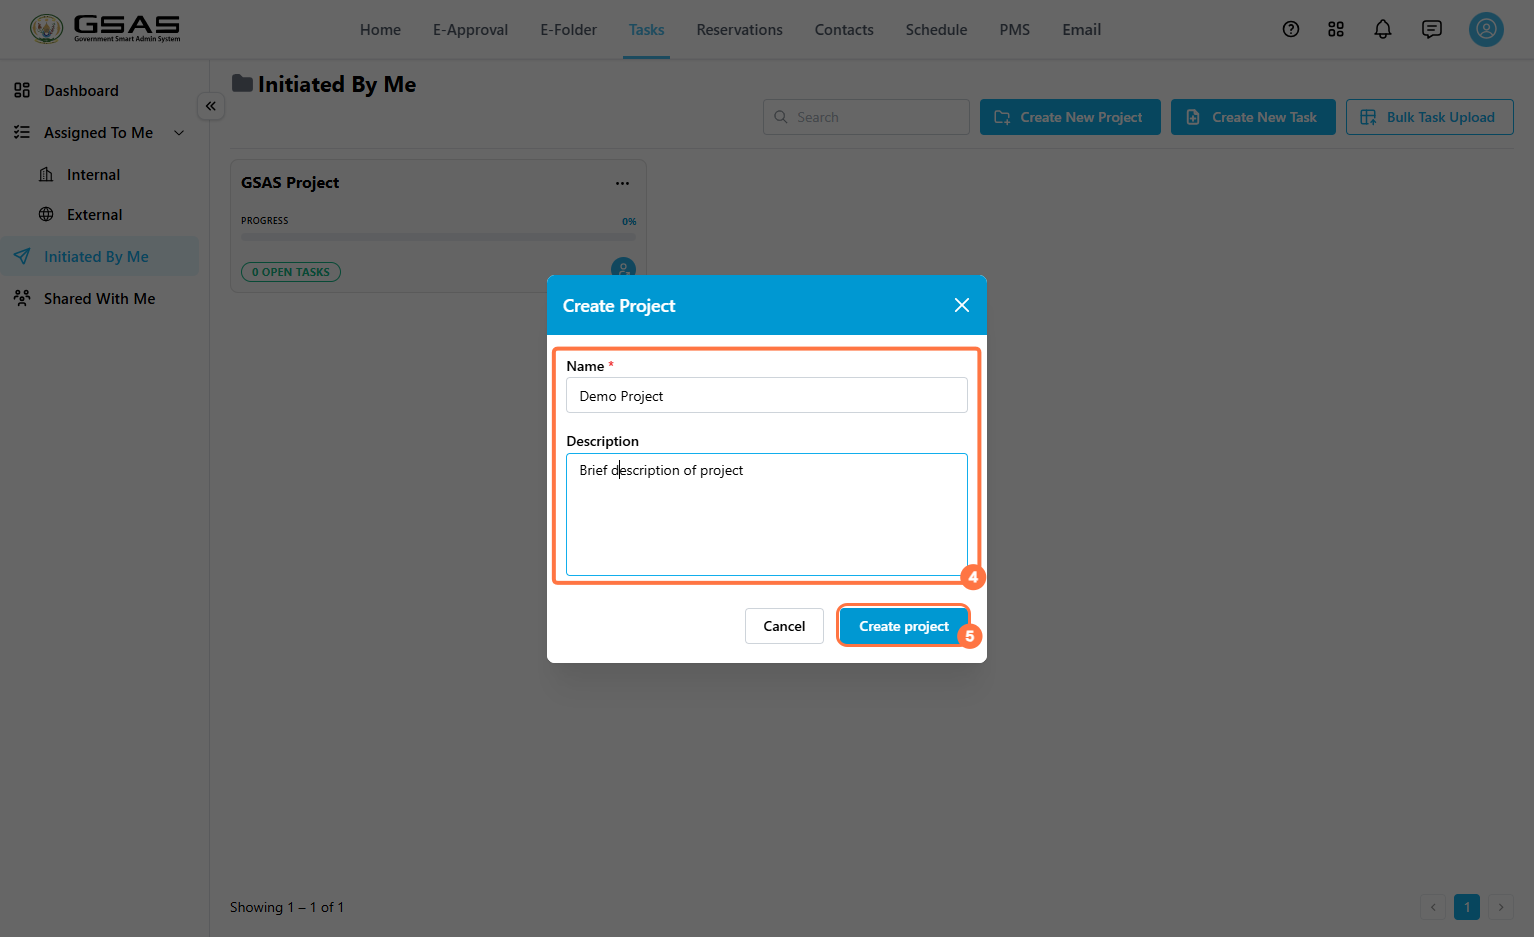](https://docs.smartadmin.rw/uploads/images/gallery/2026-08/R2timage.png)
---
### Create a Task
1. Click the project title to open its workspace. [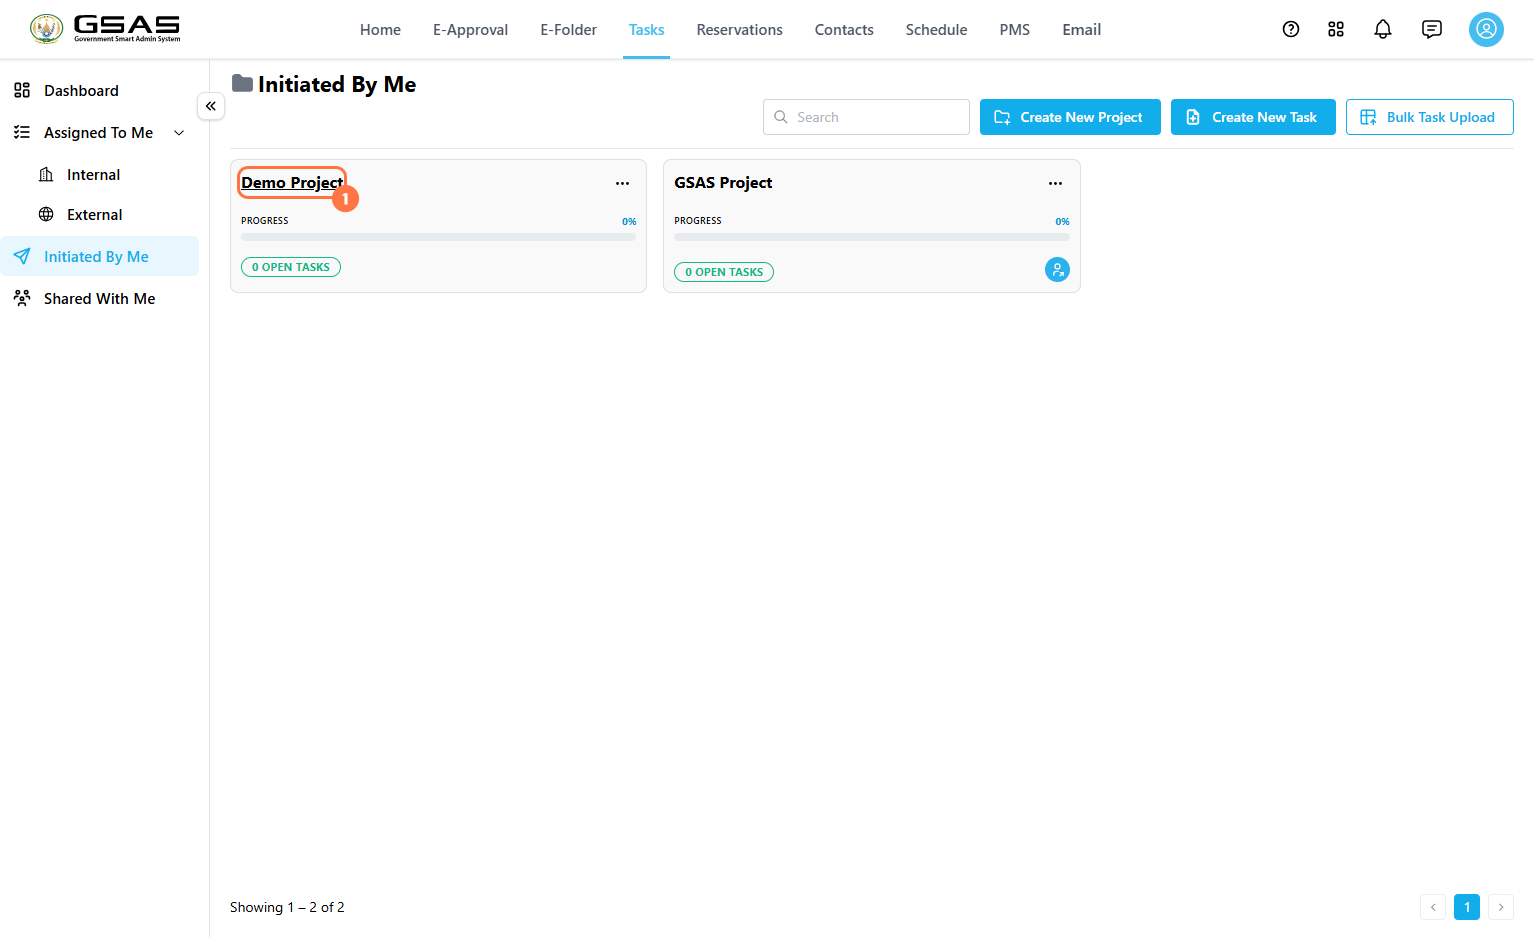](https://docs.smartadmin.rw/uploads/images/gallery/2026-08/po4image.png)
2. Click **Create New Task**. [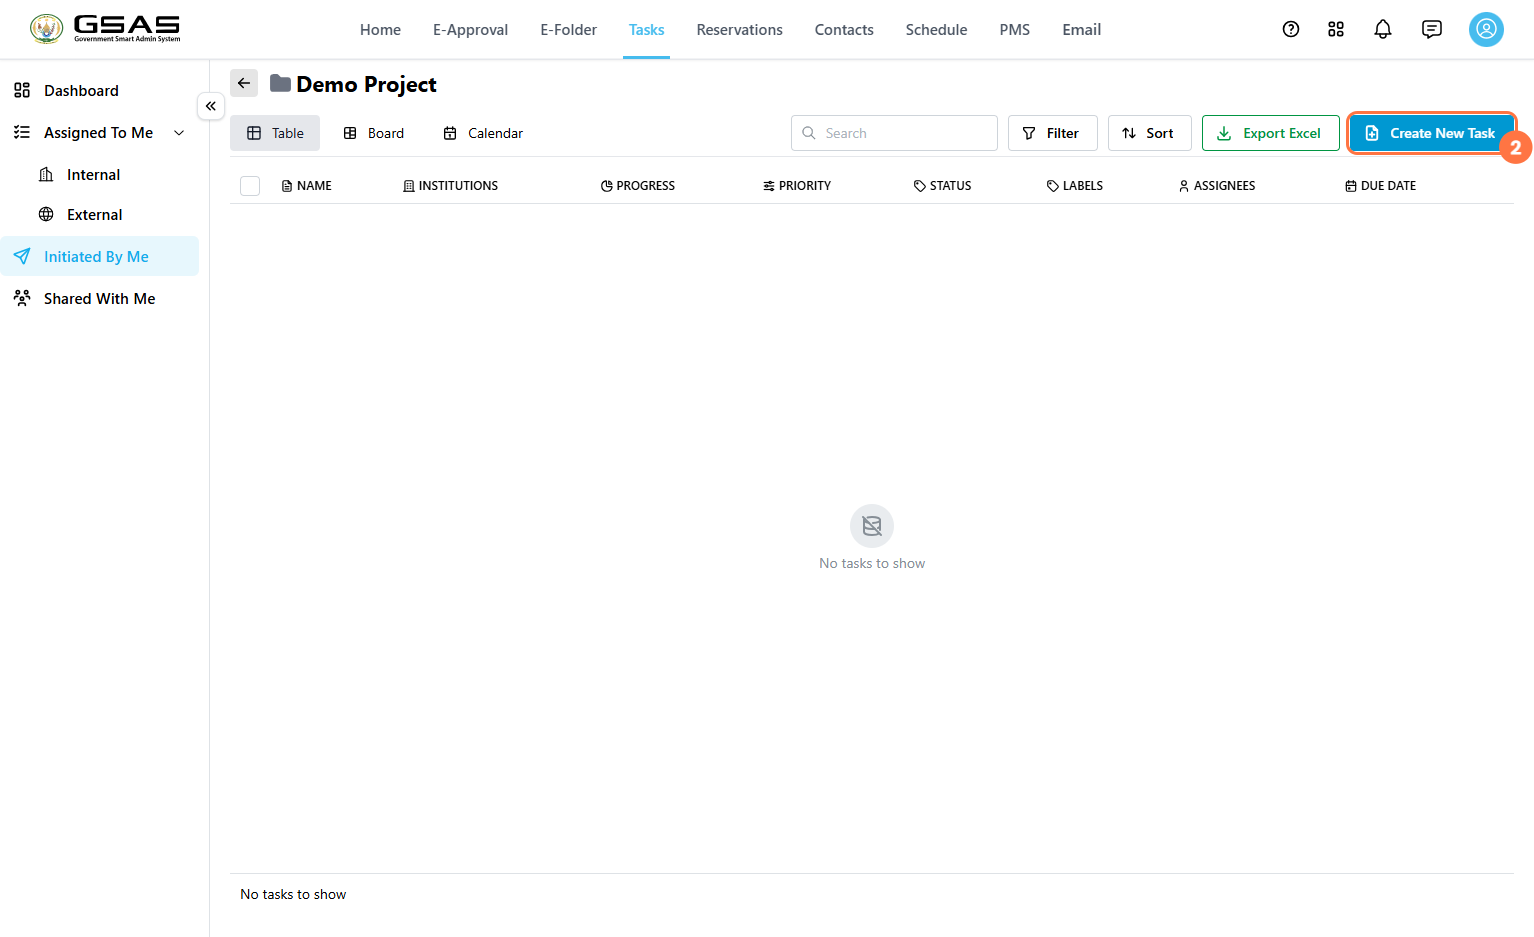](https://docs.smartadmin.rw/uploads/images/gallery/2026-08/8HCimage.png)
**3. Name and Status** — enter the task name, and set its **Status** (such as Backlog, Doing, Review, or Done) to reflect where it stands in the workflow.
[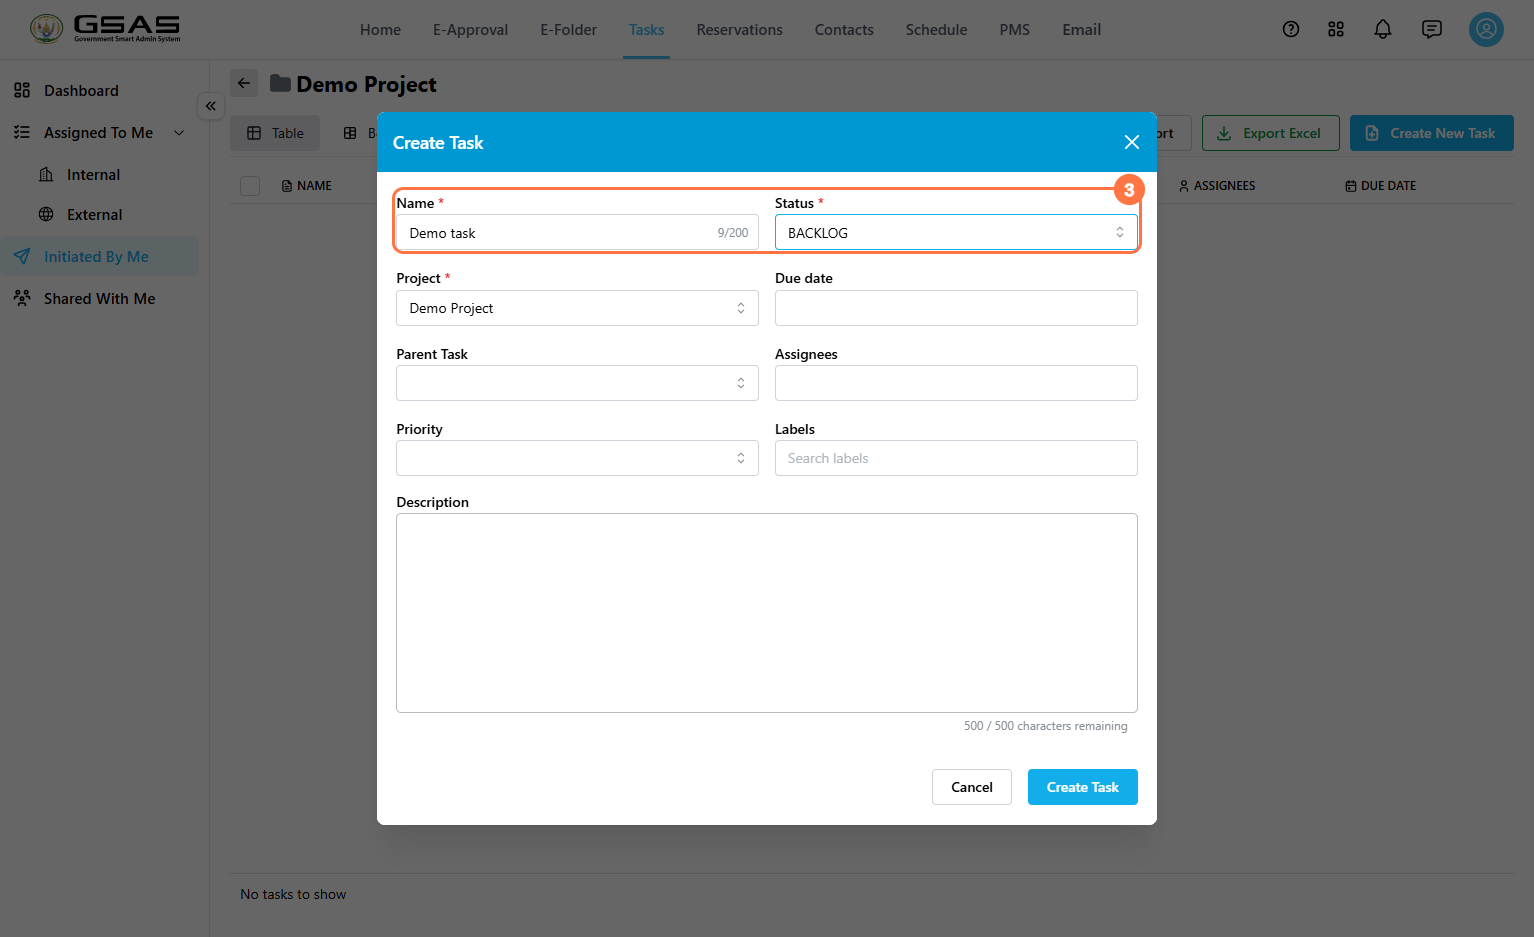](https://docs.smartadmin.rw/uploads/images/gallery/2026-08/VMtimage.png)
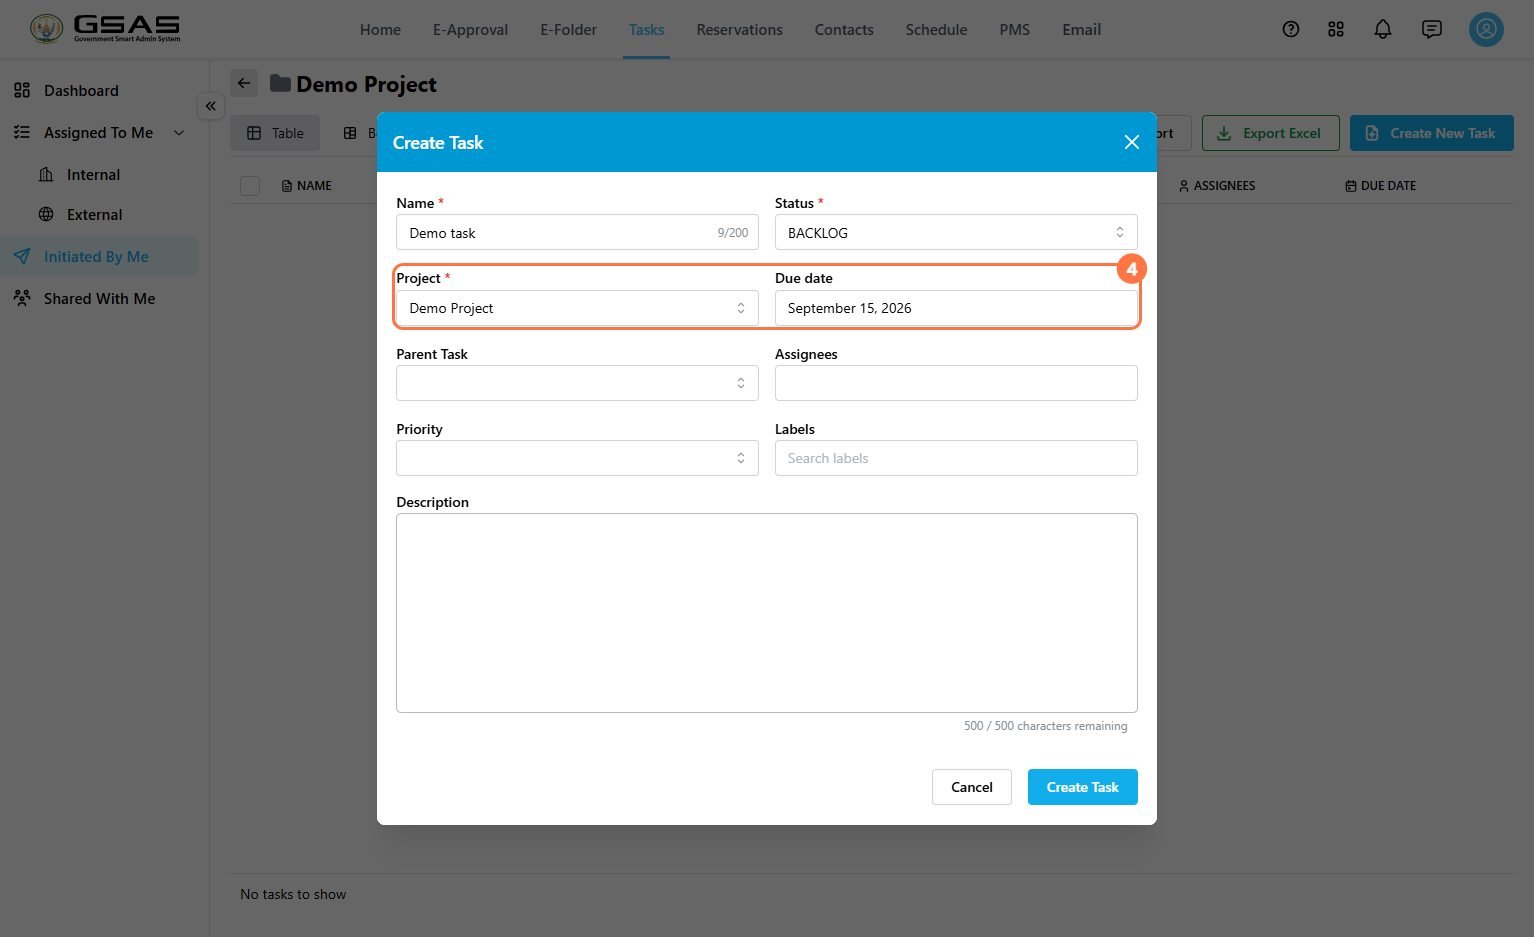
**4. Project and Due date** — the Project field auto-fills based on where you created the task; change it if needed. Click the Due date field to select a deadline from the calendar.
[](https://docs.smartadmin.rw/uploads/images/gallery/2026-08/piTimage.png)
Only fields with the red asterisk beside their name are mandatory. This means all fields after project are optional.
**Parent Task** is available in the same form, but only needs to be set when the task you're creating is a subtask of an existing one. Leave this field blank otherwise.
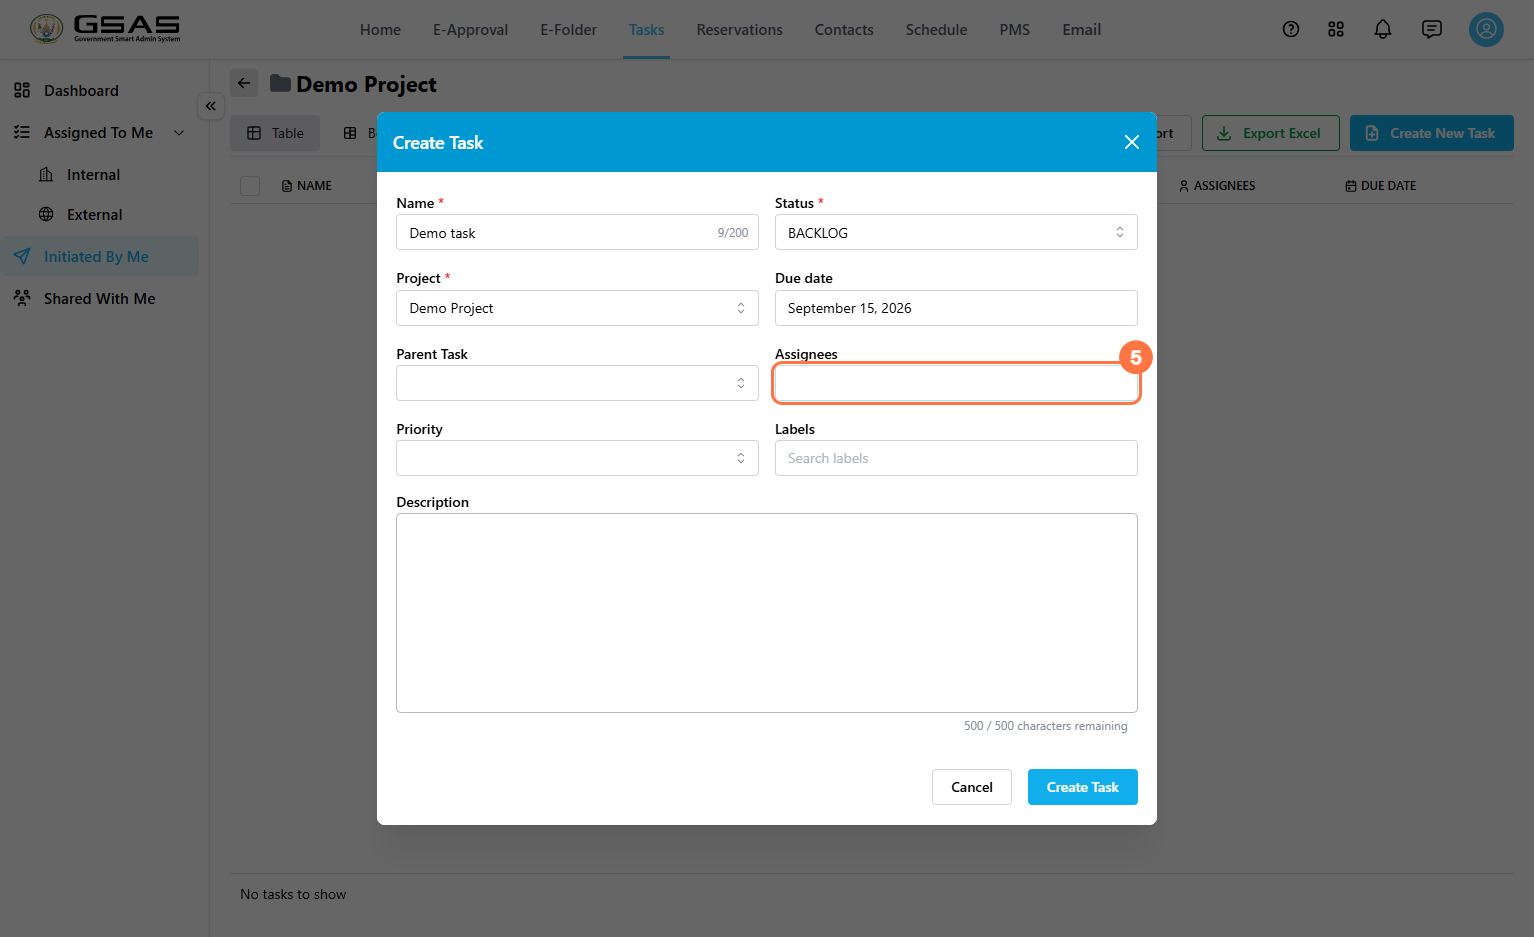
**5. Assignees** — click the Assignees field to open the Add Assignees window.
[](https://docs.smartadmin.rw/uploads/images/gallery/2026-08/2qIimage.png)
- **5.1** Select the organization.
- **5.2** Search for the user.
- **5.3** Click **Add** next to their name. [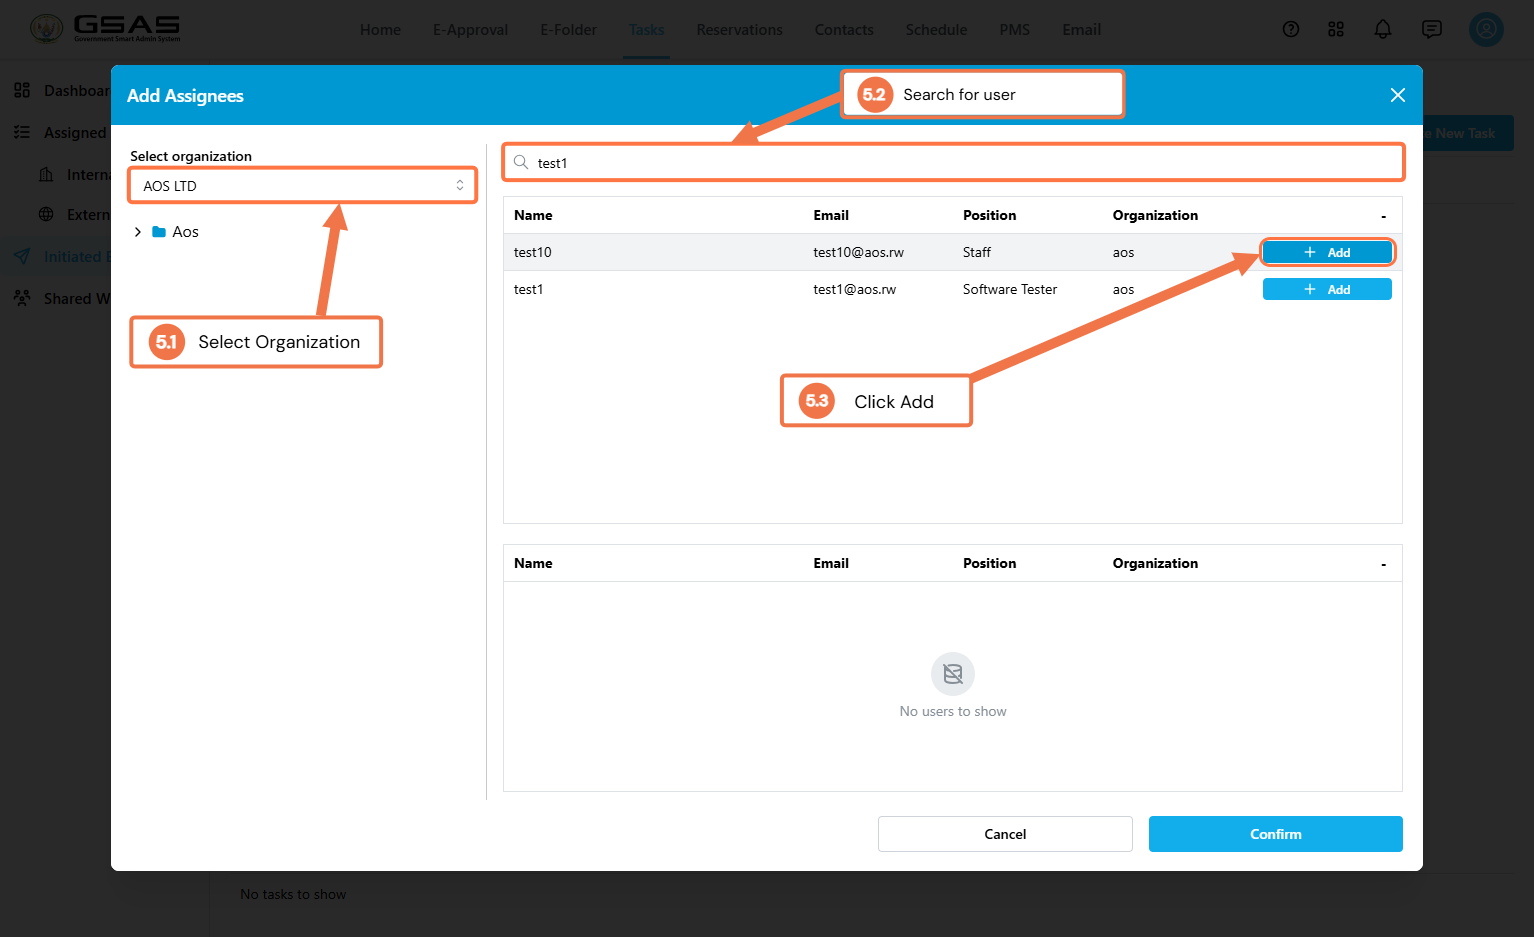](https://docs.smartadmin.rw/uploads/images/gallery/2026-08/NgXimage.png)
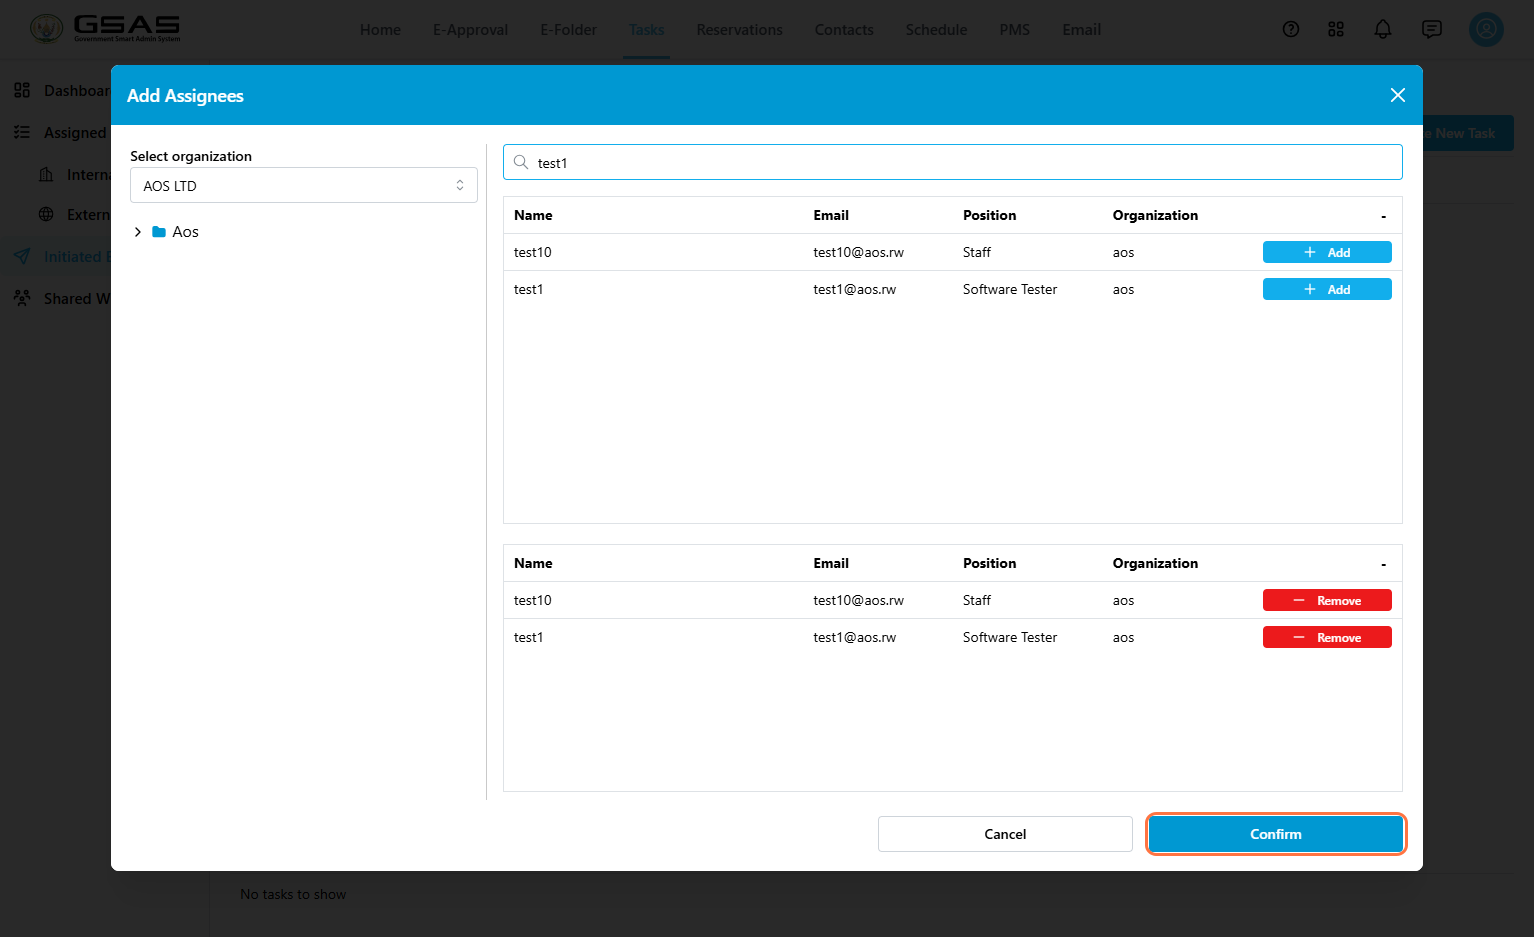
Review the selected users, then click **Confirm**.
[](https://docs.smartadmin.rw/uploads/images/gallery/2026-08/gT7image.png)
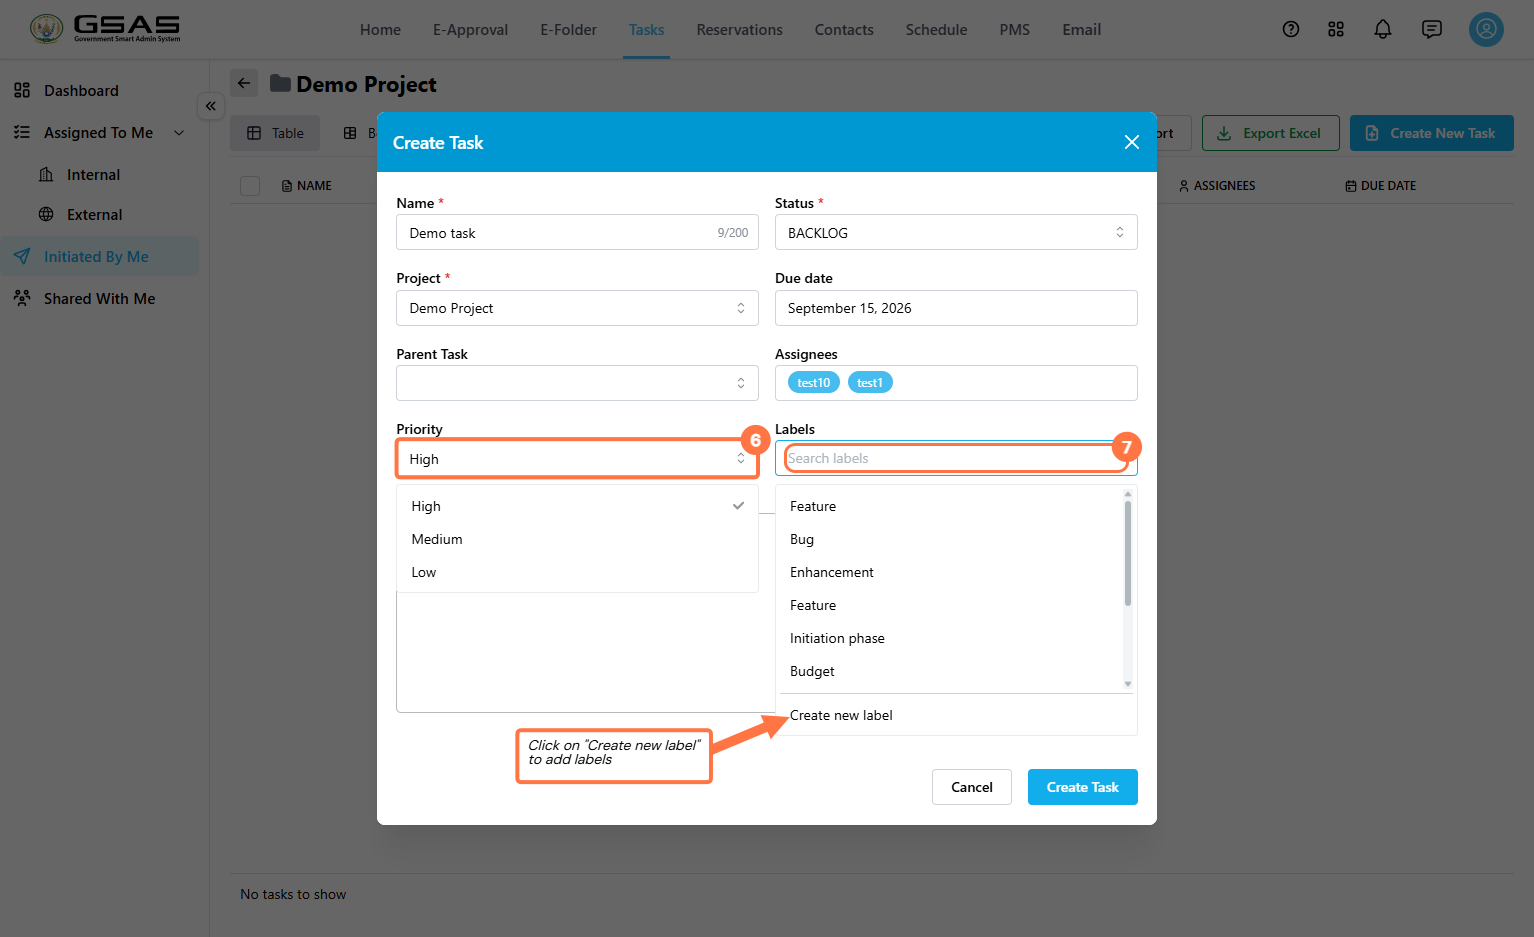
**6. Priority** sets how urgent the task is: High, Medium, or Low. It feeds into the Priority Breakdown chart on the dashboard.
**7. Labels** help you group related tasks and find them later through filtering. Select an existing label or click **Create new label** to add one.
[](https://docs.smartadmin.rw/uploads/images/gallery/2026-08/Bbhimage.png)
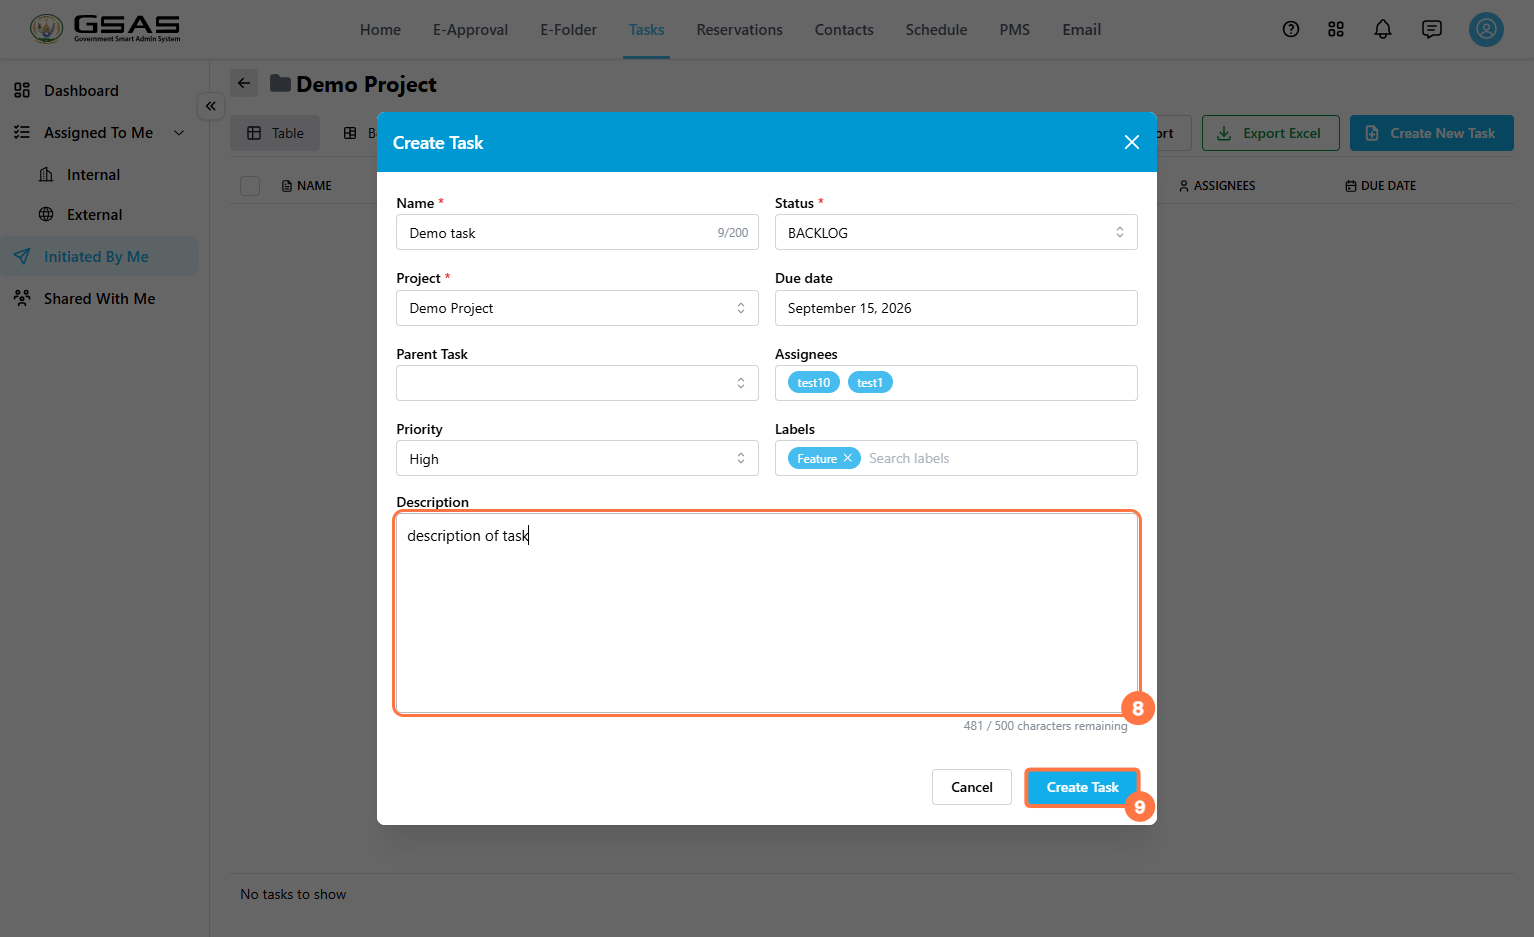
**8. Description** — enter an optional description explaining what needs to be done.
Once finished, click **Create Task** (9).
[](https://docs.smartadmin.rw/uploads/images/gallery/2026-08/2Xgimage.png)
---
### Open, Edit, or Delete a Task
- Click the **…** icon on the task row to view additional options, such as editing or deleting the task, only visible to the task creator. [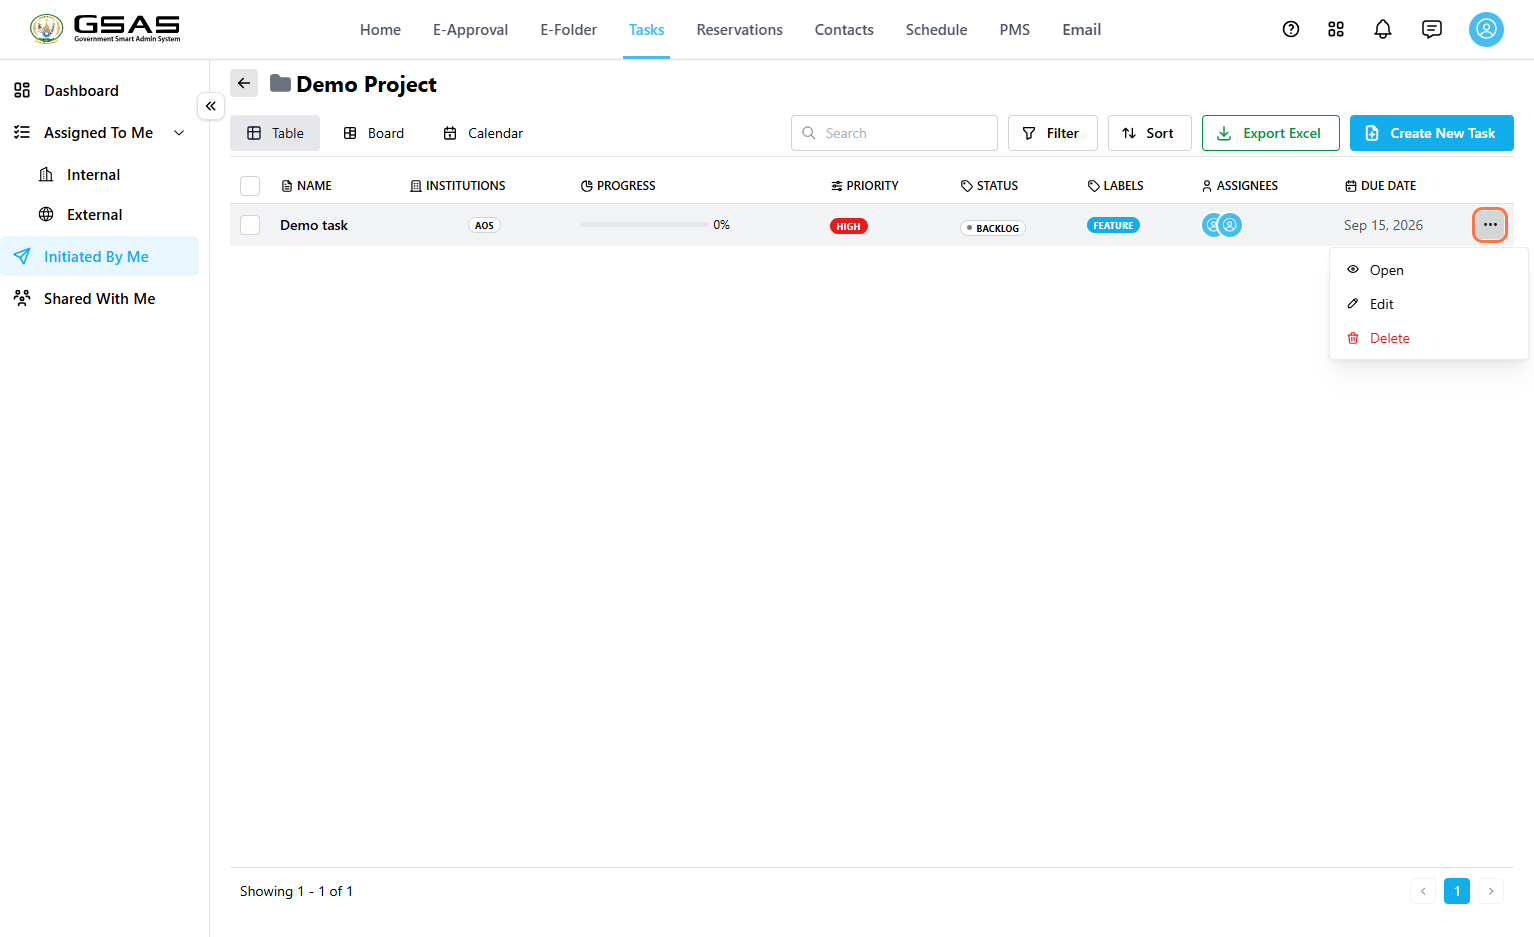](https://docs.smartadmin.rw/uploads/images/gallery/2026-08/eJrimage.png)
---
### Importing Tasks in Bulk
Use **Bulk Task Upload** to create multiple tasks at once from an Excel file. This is useful when you already have a list of existing tasks and want to add them to GSAS without entering each one manually.
##### 1. Open Bulk Task Upload
- Go to **Tasks >** **Initiated By Me** > **Bulk Task Upload**.
[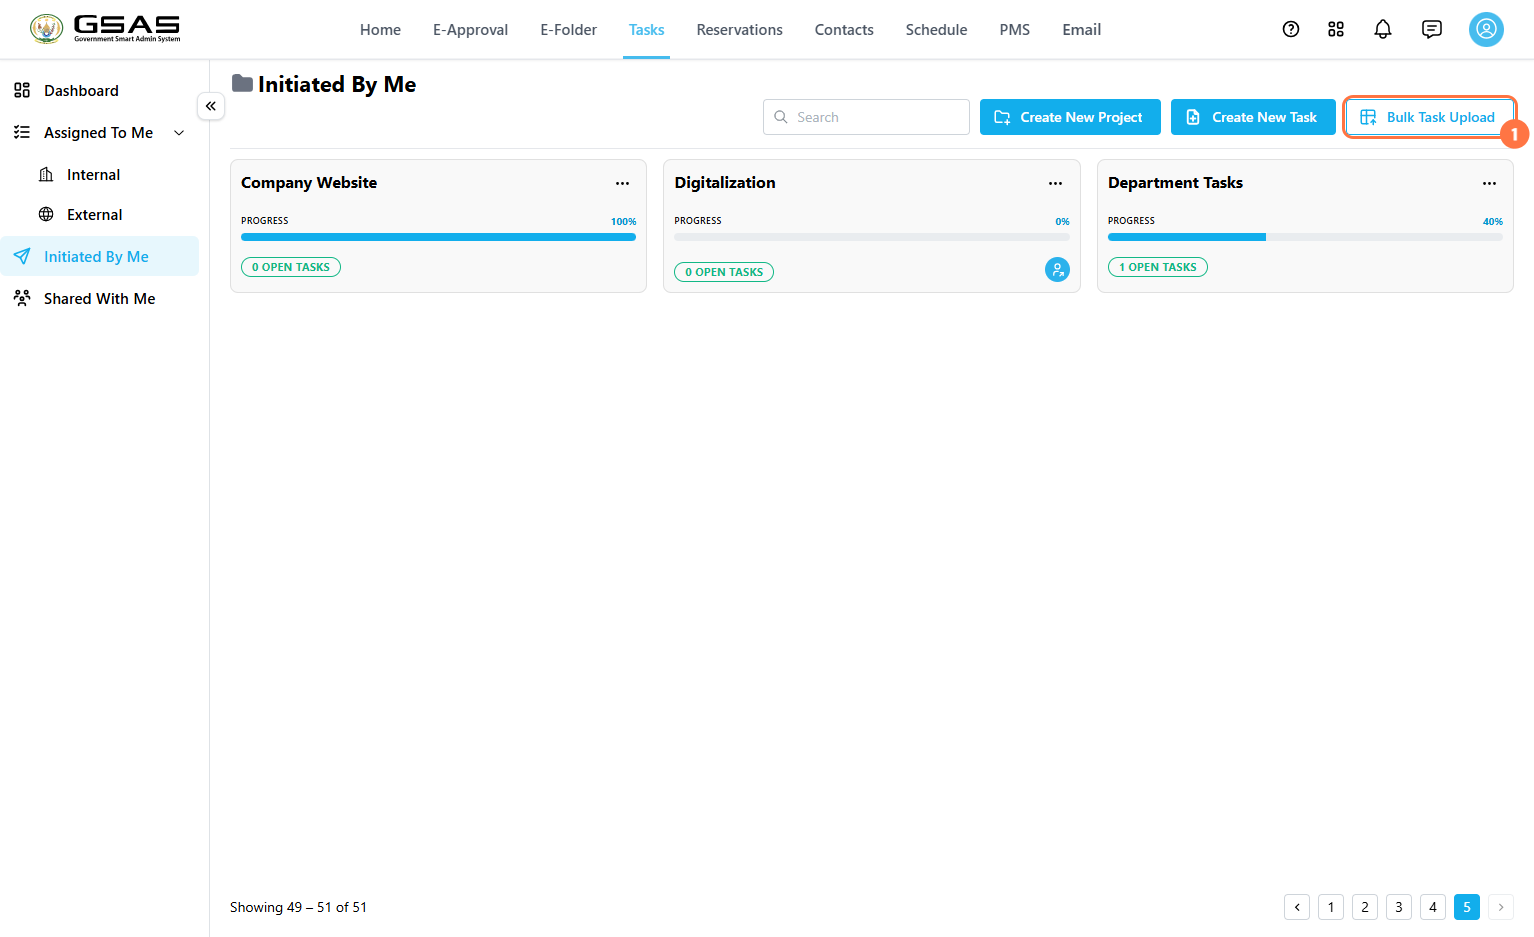](https://docs.smartadmin.rw/uploads/images/gallery/2026-08/FYqimage.png)
2\. Import Excel File
- In the **Import Tasks in Bulk** window, click **Click to browse.**[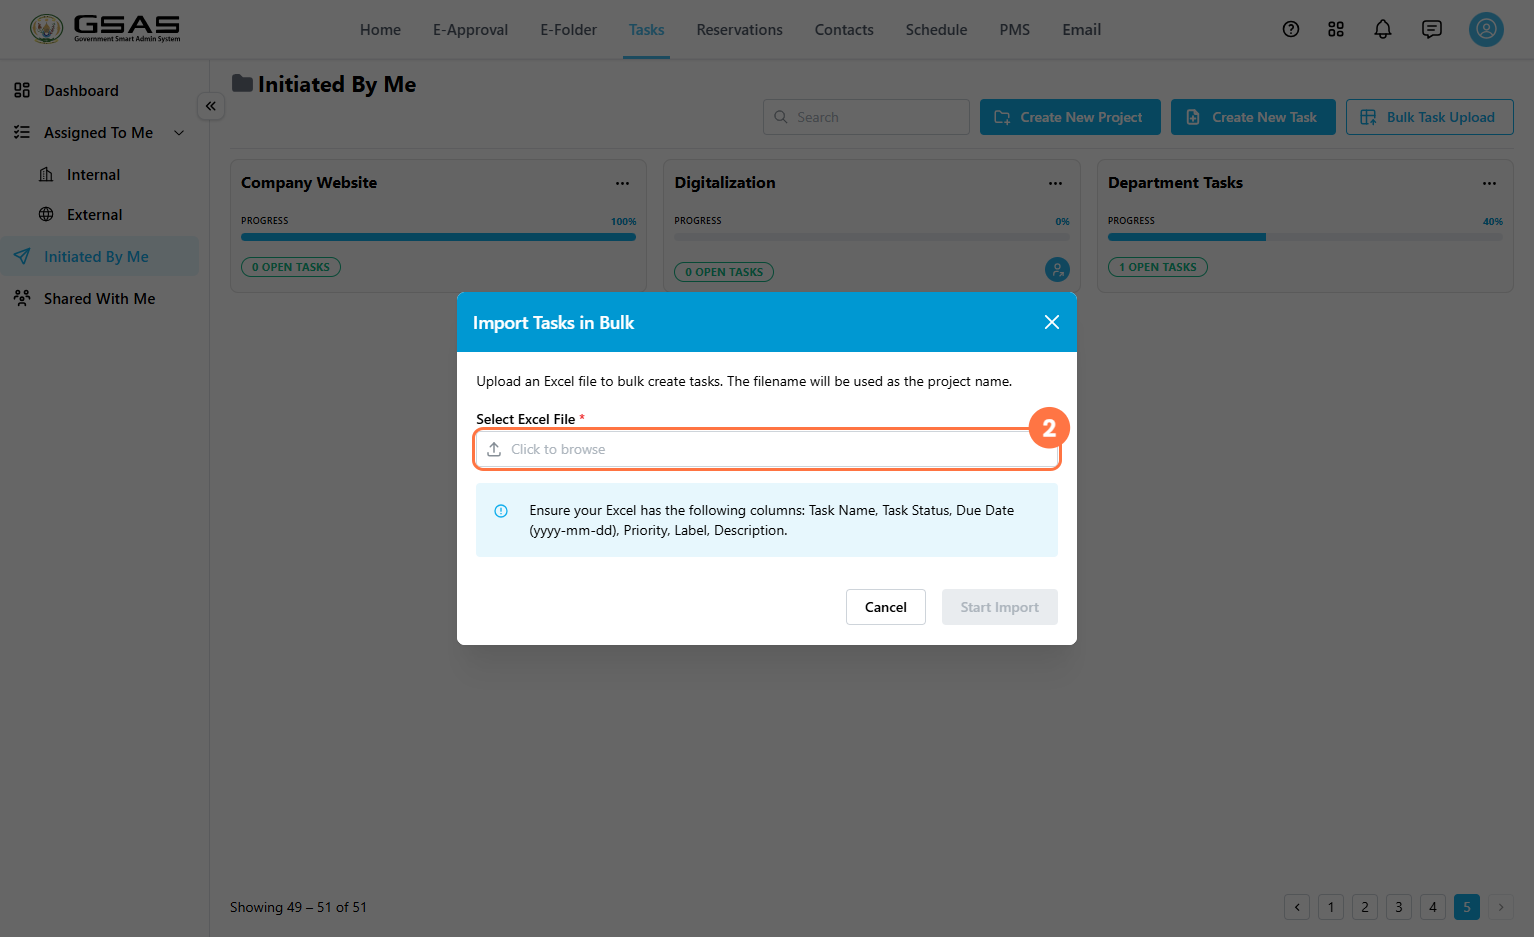](https://docs.smartadmin.rw/uploads/images/gallery/2026-08/u63image.png)
- Select the Excel file that contains the tasks you want to import and click **Start Import.** Ensure the file includes the required columns: Task Name, Task Status, Due Date (yyyy-mm-dd), Priority, Label, and Description. [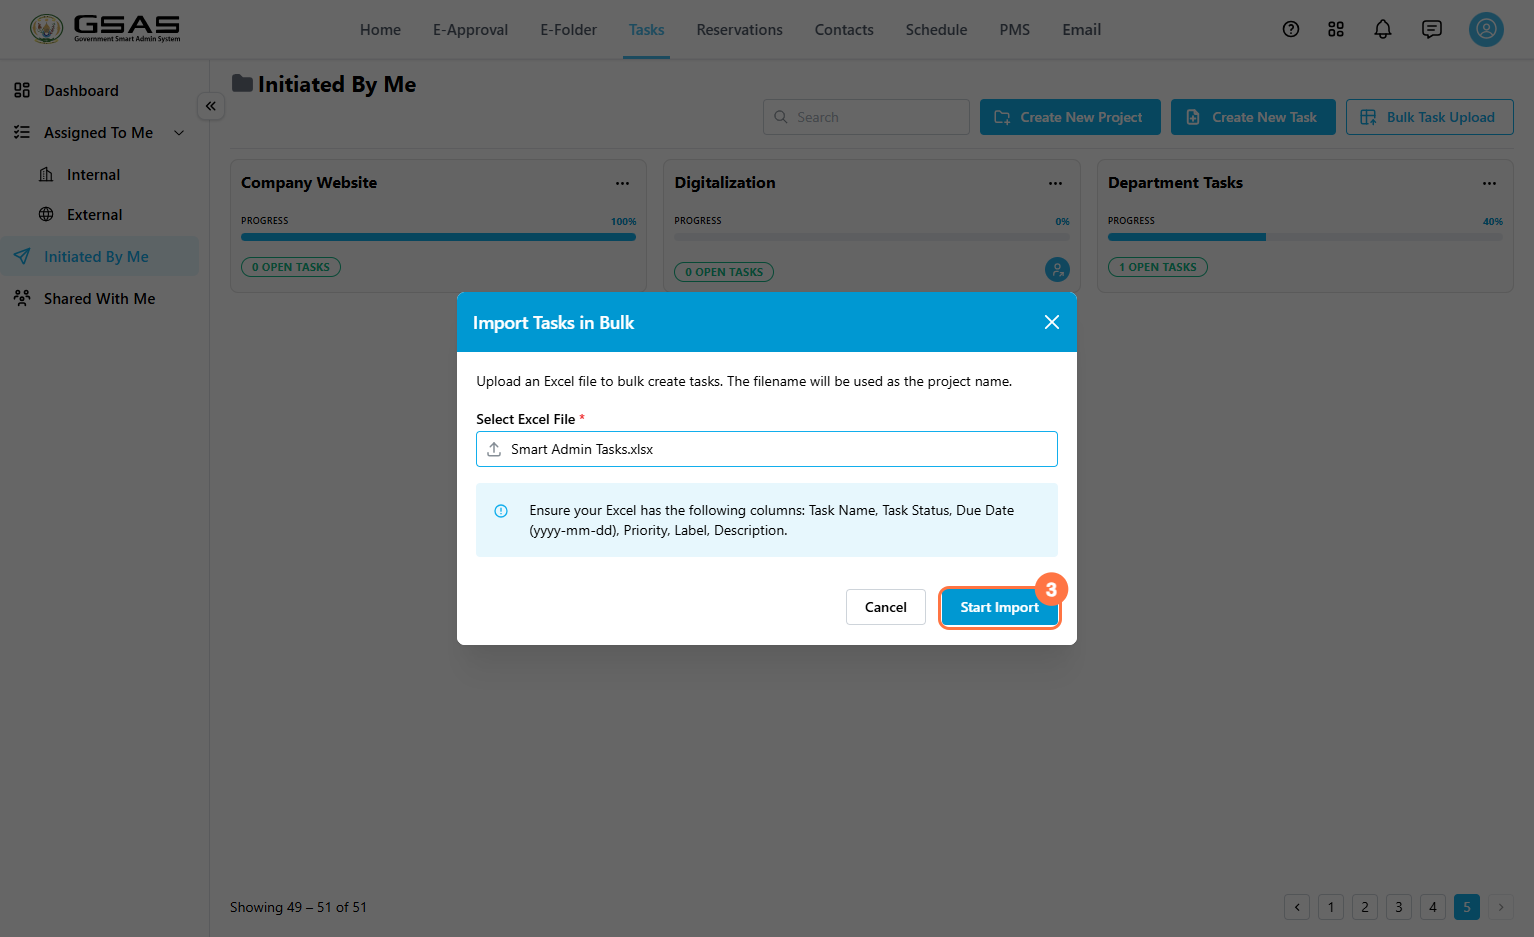](https://docs.smartadmin.rw/uploads/images/gallery/2026-08/abQimage.png)
- Confirm that the tasks were imported successfully. The import summary displays the number of processed rows and successfully created tasks. If any tasks could not be imported, the **Failure Report** lists the affected row and the reason for the failure. Review the details, then click Done to complete the process or close the pop up and retry. [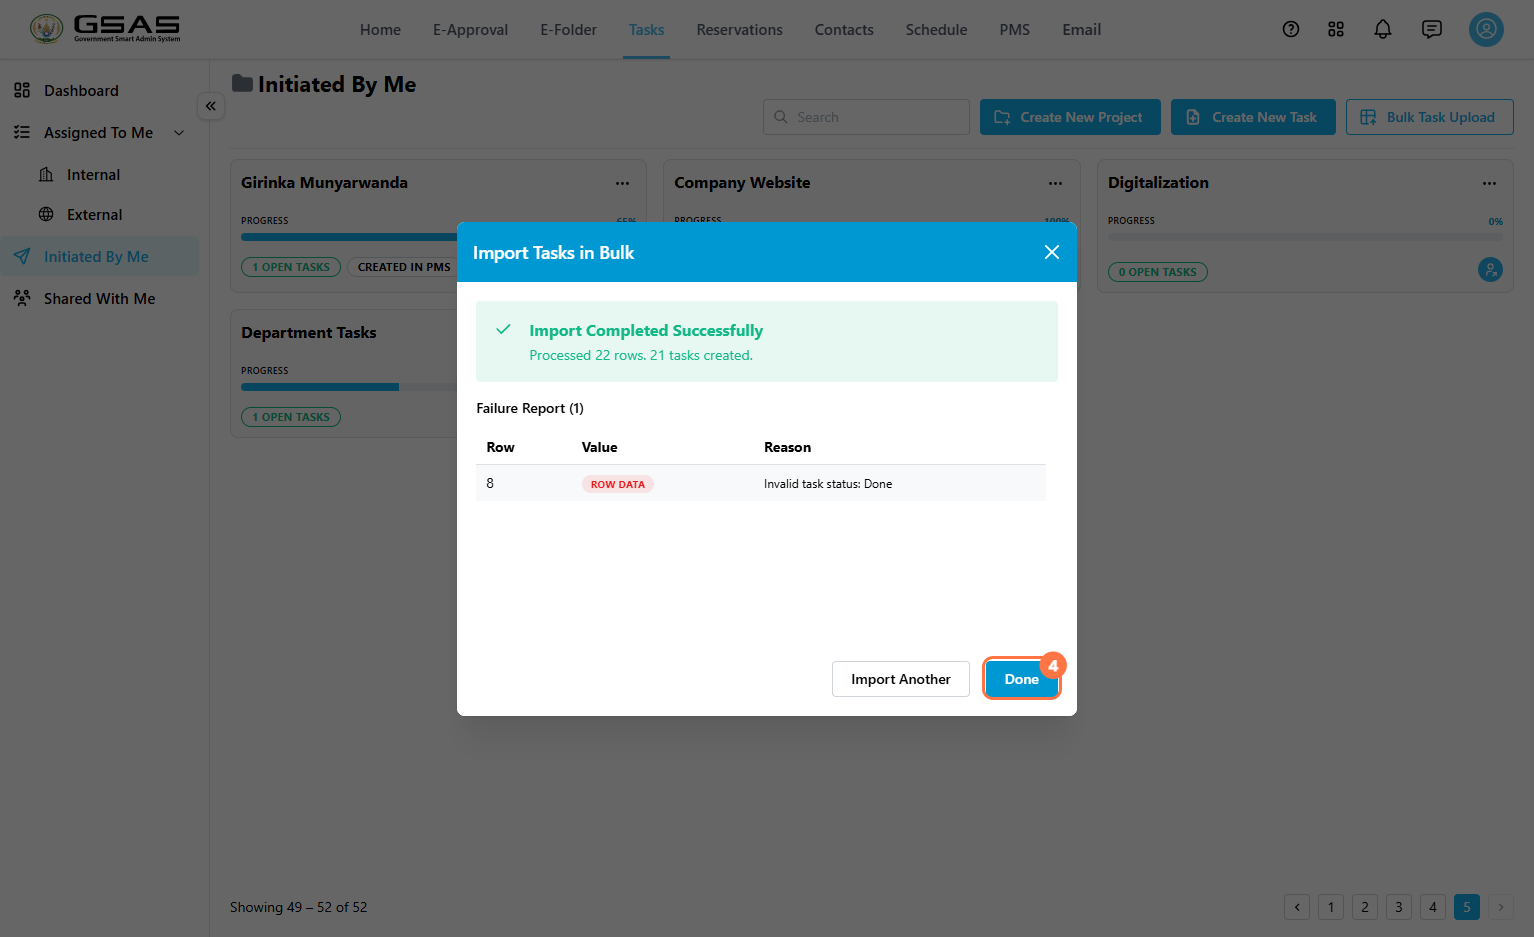](https://docs.smartadmin.rw/uploads/images/gallery/2026-08/VF7image.png)
4. Review the imported tasks
After the import is complete, GSAS creates a project using the Excel filename and lists the imported tasks inside it. Open the project to view the tasks.
[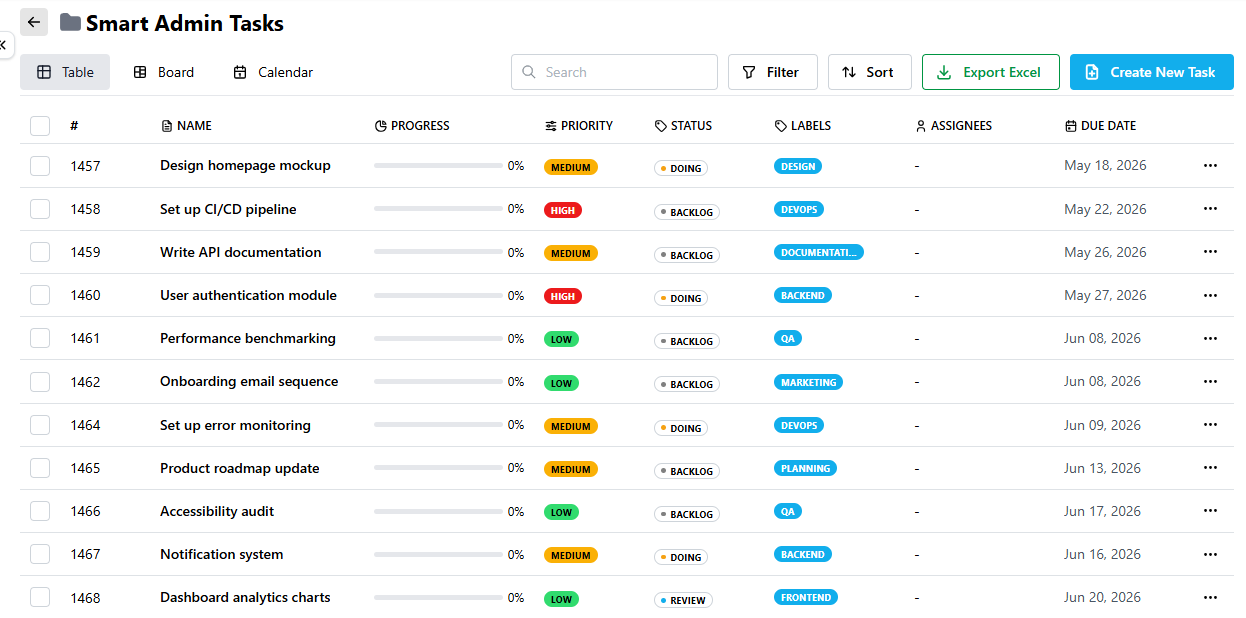](https://docs.smartadmin.rw/uploads/images/gallery/2026-08/5FWimage.png)
5. Manage imported tasks
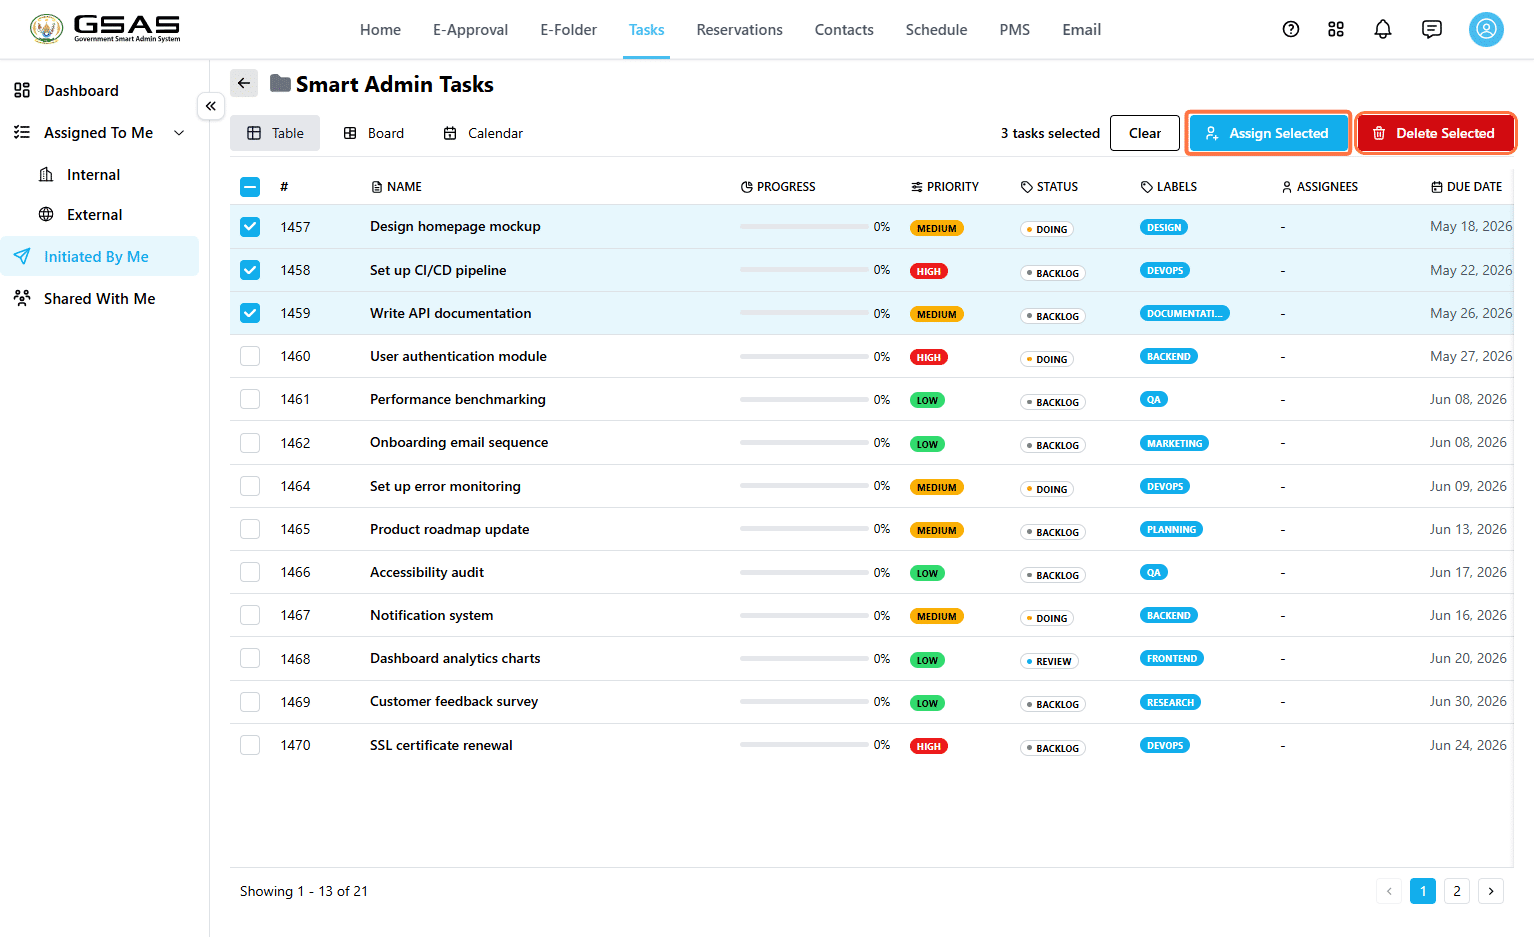
- Select one or more tasks using the checkboxes
- Click **Assign Selected** to assign multiple tasks to users at a time or **Delete Selected** to remove multiple tasks.
[](https://docs.smartadmin.rw/uploads/images/gallery/2026-08/BiFimage.png)
---
### How Task Fields Affect Dashboard Stats
| Field or Action | Where it appears |
|---|
| **Project** | Contributes to **Total Projects** and groups related tasks together. |
| **Task** | Contributes to **Total Tasks**. |
| **Status** | Affects **Ongoing Tasks**, **Completion Rate**, and the **Task Status Breakdown** chart. |
| **Due Date** | Affects **Overdue Tasks** and the **Tasks by Deadline** chart. |
| **Priority** | Affects the **Priority Breakdown** chart. |
| **Tip:** To keep dashboard statistics useful, set the task status, due date and priority when creating the task. |
---
### Related Pages
- See [**Navigating Tasks**](https://docs.smartadmin.rw/link/46#bkmrk-page-title) to understand dashboard cards, charts, filters, and task categories.
- See [**Responding to and Tracking Tasks**](https://docs.smartadmin.rw/link/44#bkmrk-page-title) to learn how you can keep track of the tasks you assign and how assigned users update task progress.