# GSAS User Guide
This guide covers everything you need to use the Government Smart Admin System, from logging in to submitting documents, booking facilities, and managing tasks. Browse by module below, or search for a specific feature.
**(Last Updated 2026/08/13)**
# Getting Started
System overview, login, account management and dashboard navigation.
# Overview
Smart Admin is a web-based platform designed to streamline administrative operations across government institutions. It brings together key functions; including document approvals, task management, facility reservations, contact management, scheduling, and internal file storage into a single unified system, enabling staff to manage their day-to-day responsibilities efficiently and transparently. The core features of Smart Admin include;
#### e-Approval
Submit approval requests, and track where they stand every step of the way. [Go to e-Approval →](https://docs.smartadmin.rw/books/gsas-user-guide/chapter/e-approval)
---
#### e-Folder
Keep your documents organized and accessible in one secure space, and share them with the right people when needed. [Go to e-Folder →](https://docs.smartadmin.rw/books/gsas-user-guide/chapter/e-folder)
---
#### Tasks
Assign work, follow up on progress, and keep everyone accountable without needing a separate check-in. [Go to Tasks →](https://docs.smartadmin.rw/books/gsas-user-guide/chapter/tasks)
---
#### Reservations
Book meeting rooms and shared facilities, and see what's already reserved before you plan around it. [Go to Reservations →](https://docs.smartadmin.rw/books/gsas-user-guide/chapter/reservations)
---
#### Schedule
Plan, see and receive reminders for your upcoming events and deadlines at a glance.
---
#### Contacts
Look up anyone using Smart Admin across your institution or any other one on the system. [Go to Contacts →](https://docs.smartadmin.rw/books/gsas-user-guide/chapter/contacts)
# How to login
---
Follow this quick guide to log into your account
| Step 1
### Open Smart Admin
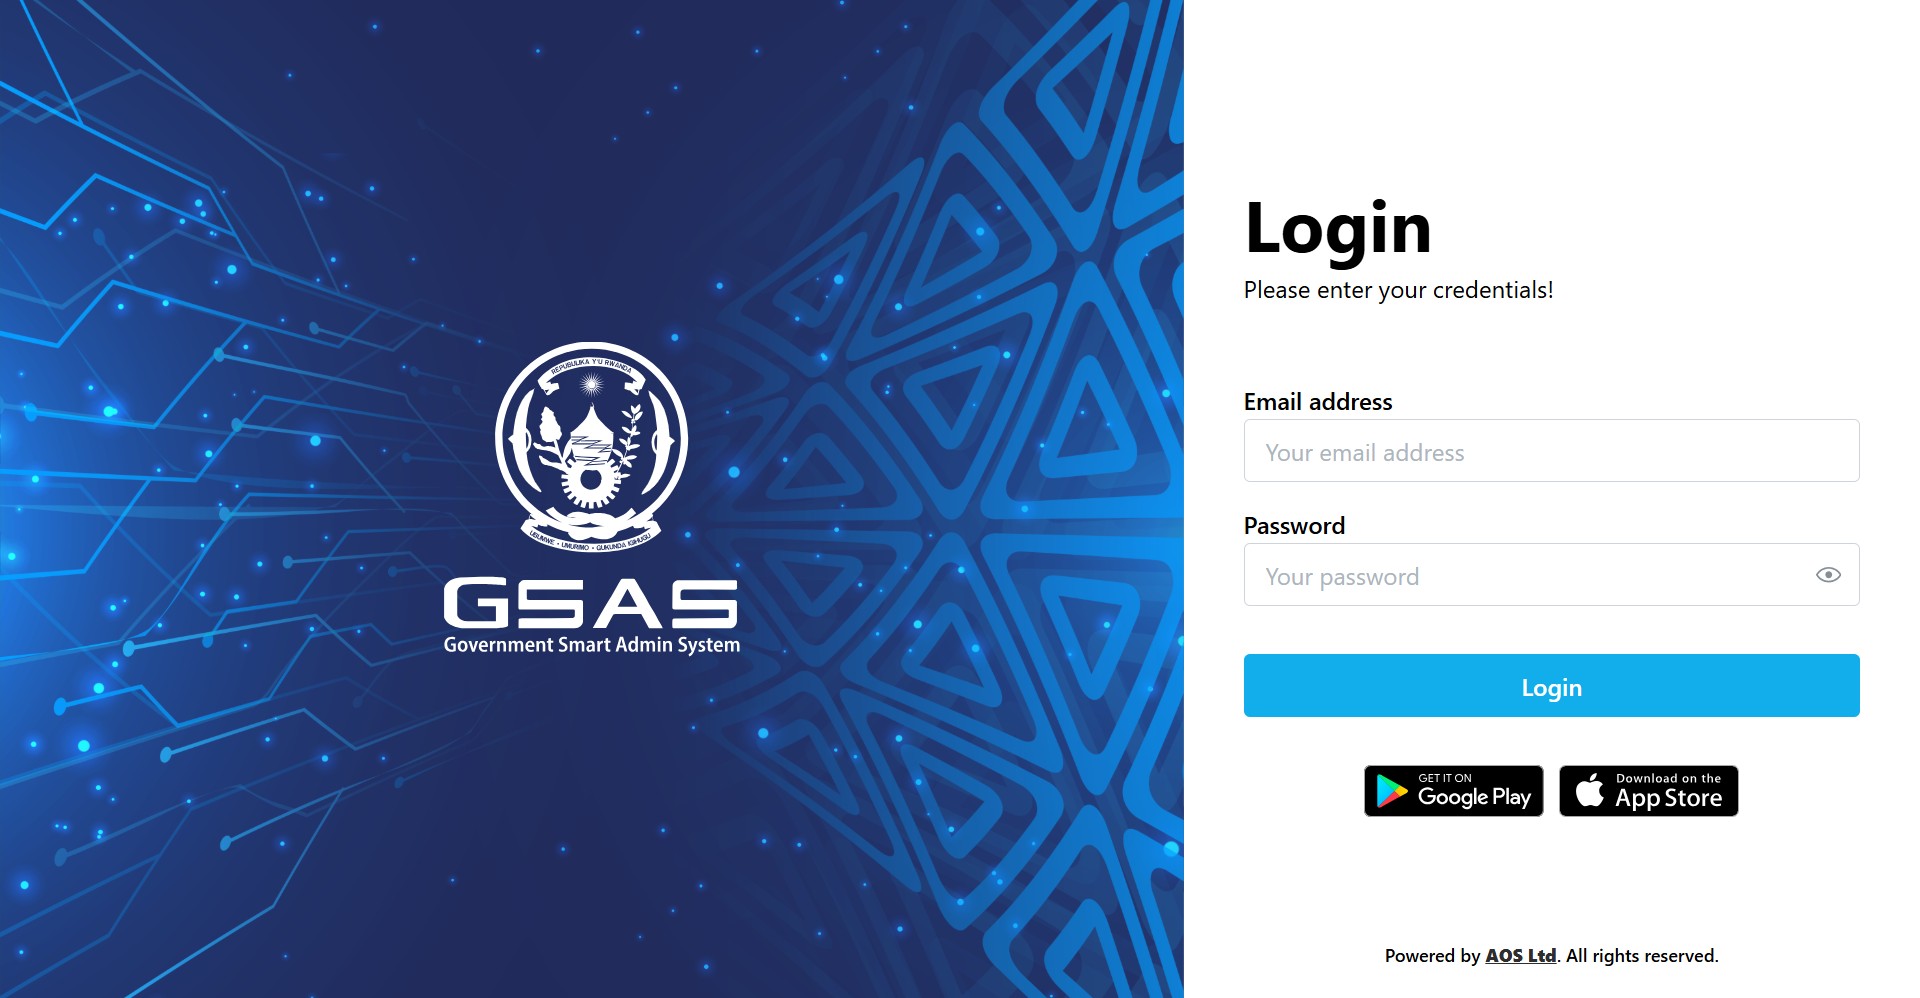
Navigate to your institution's Smart Admin URL in any web browser. You'll land on the login screen shown here.
|  |
---
| Step 2
### Enter your email address
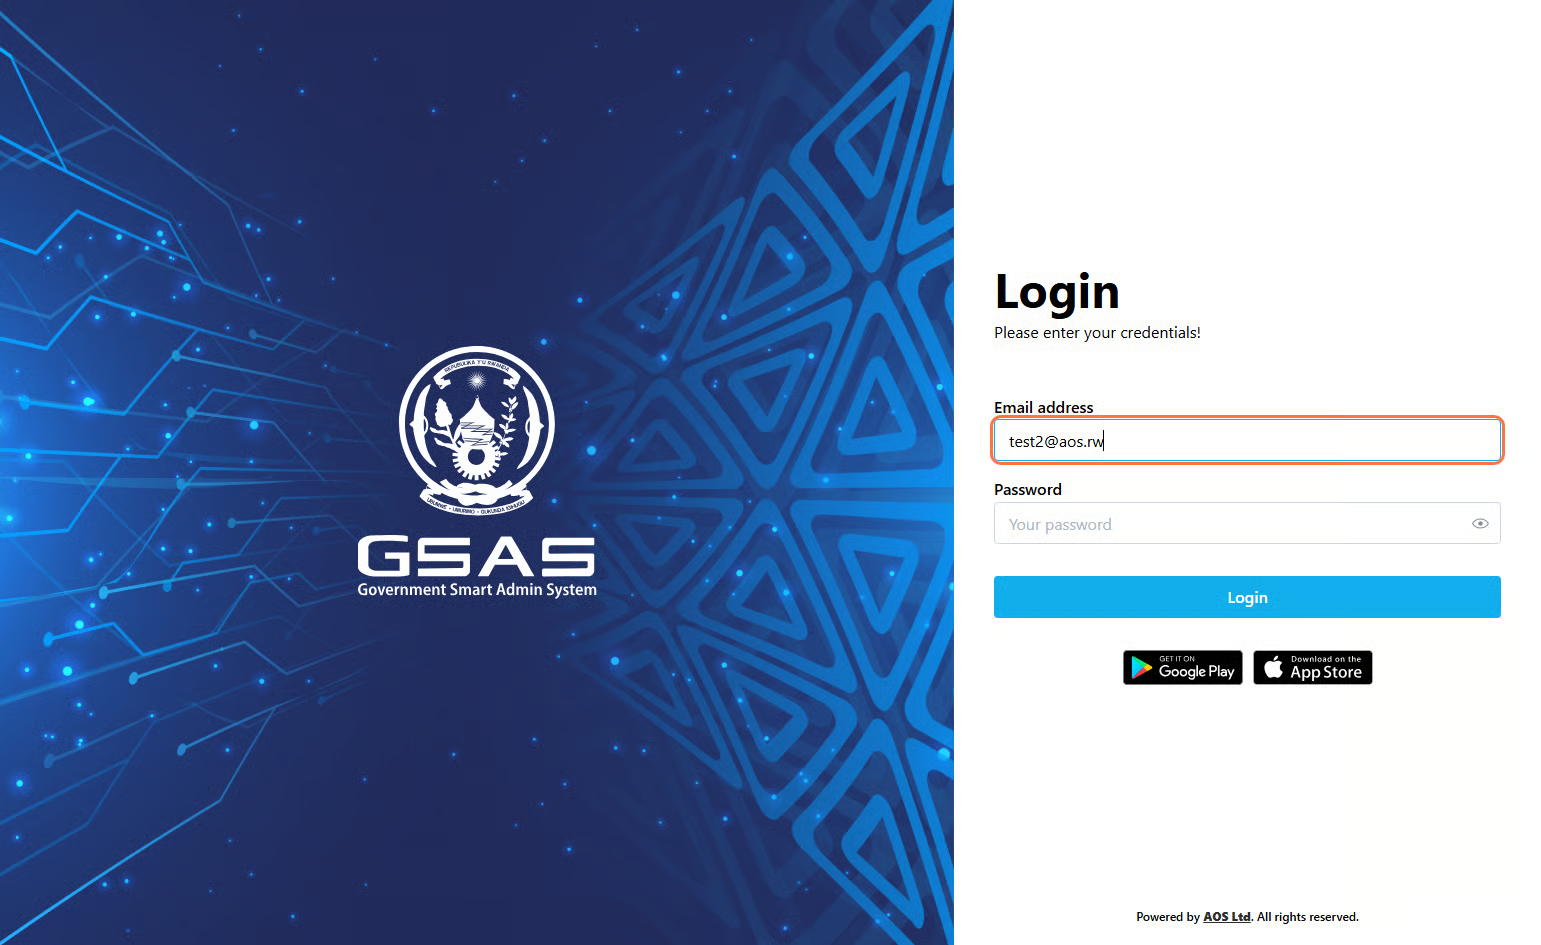
Type in the email address your administrator registered you with. If you're not sure which one to use, check with your IT department.
|  |
---
| Step 3
### Enter your password
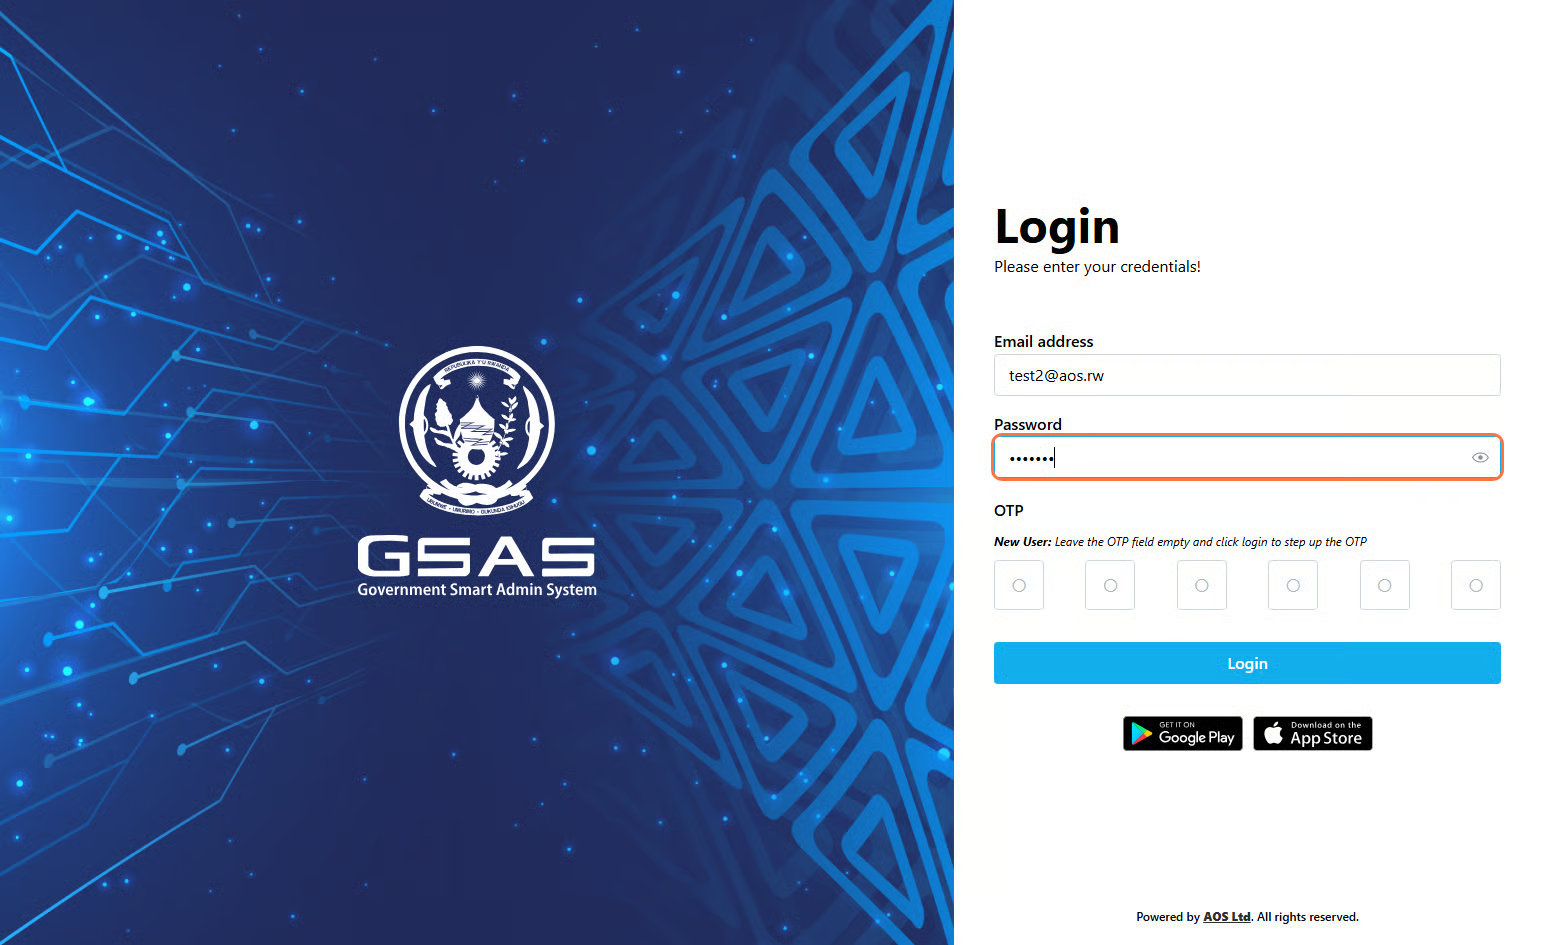
Type your password, then click **Login**
|  |
---
Step 4
### Authentication
If your account uses two-factor authentication, you'll be asked to confirm your identity.
#### ***First time login?*** (If you've logged in before, scroll down to the [**Returning User** ](https://docs.smartadmin.rw/books/gsas-user-guide/page/how-to-login/#bkmrk-returning-user)section.)
##### Follow these steps to set up your OTP:
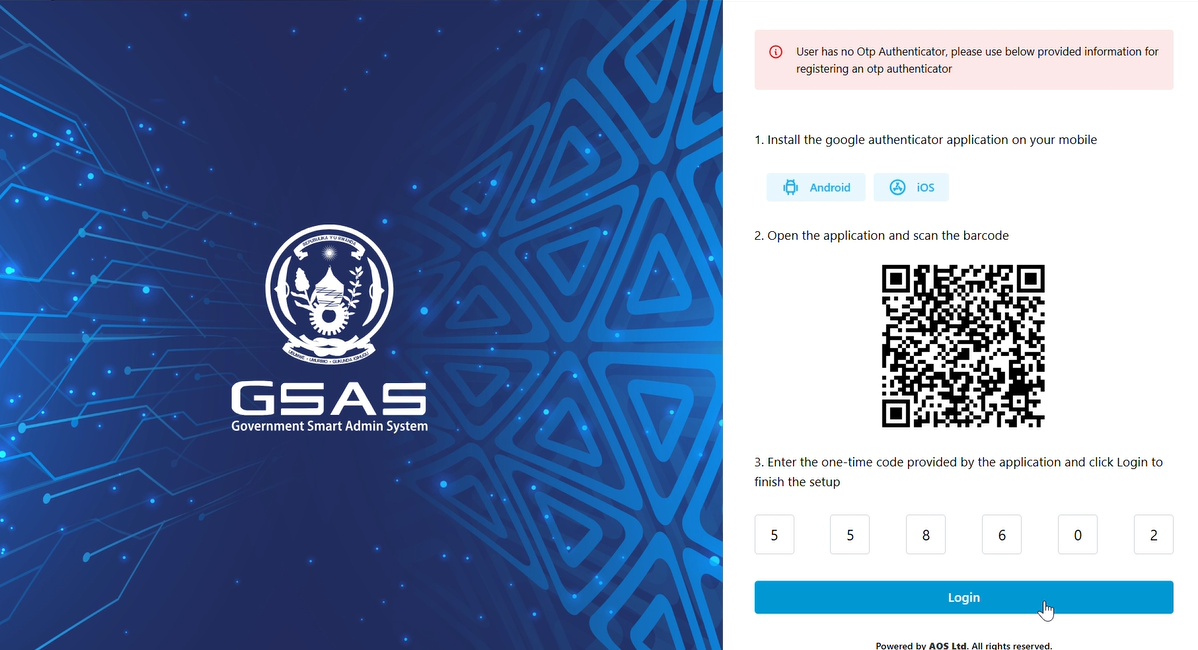
1. Leave the OTP field empty and click **Login.**
2. A QR code will appear, scan it using the Google Authenticator app, available on [Google Play](https://play.google.com/store/apps/details?id=com.google.android.apps.authenticator2) or [App Store](https://apps.apple.com/us/app/google-authenticator/id388497605). Your account is now saved in the app and will generate a new 6-digit code every 15 seconds.
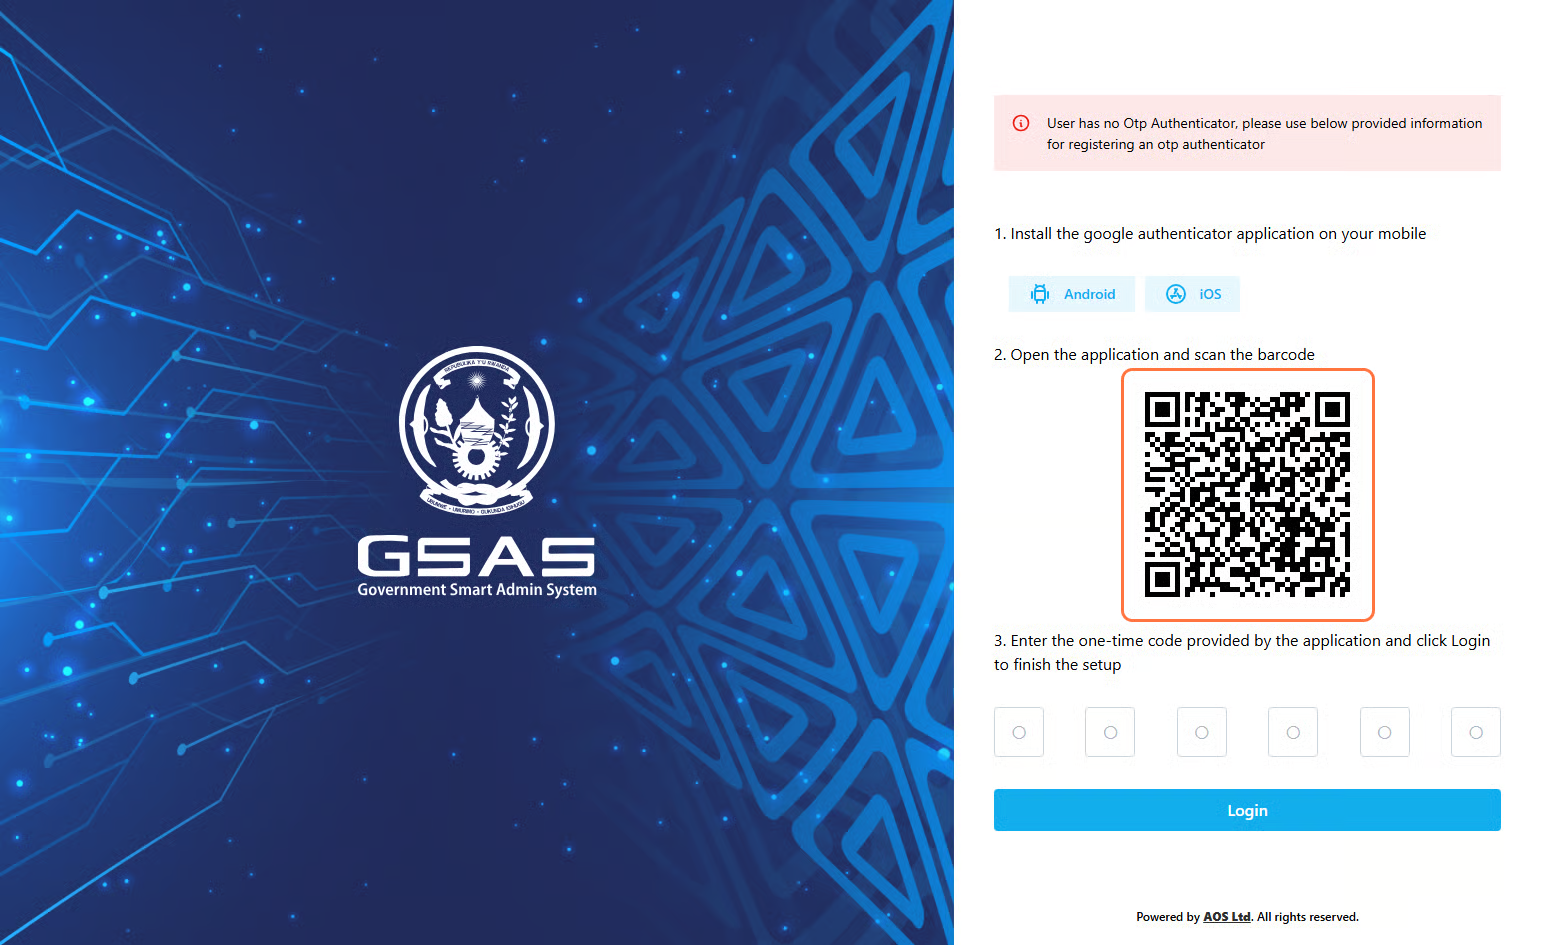
3. Enter the code displayed in your authenticator app and click **Login**.
[](https://docs.smartadmin.rw/uploads/images/gallery/2026-06/f7Hscreenshot-2026-06-02-172418.png)
#### ***Returning user?***
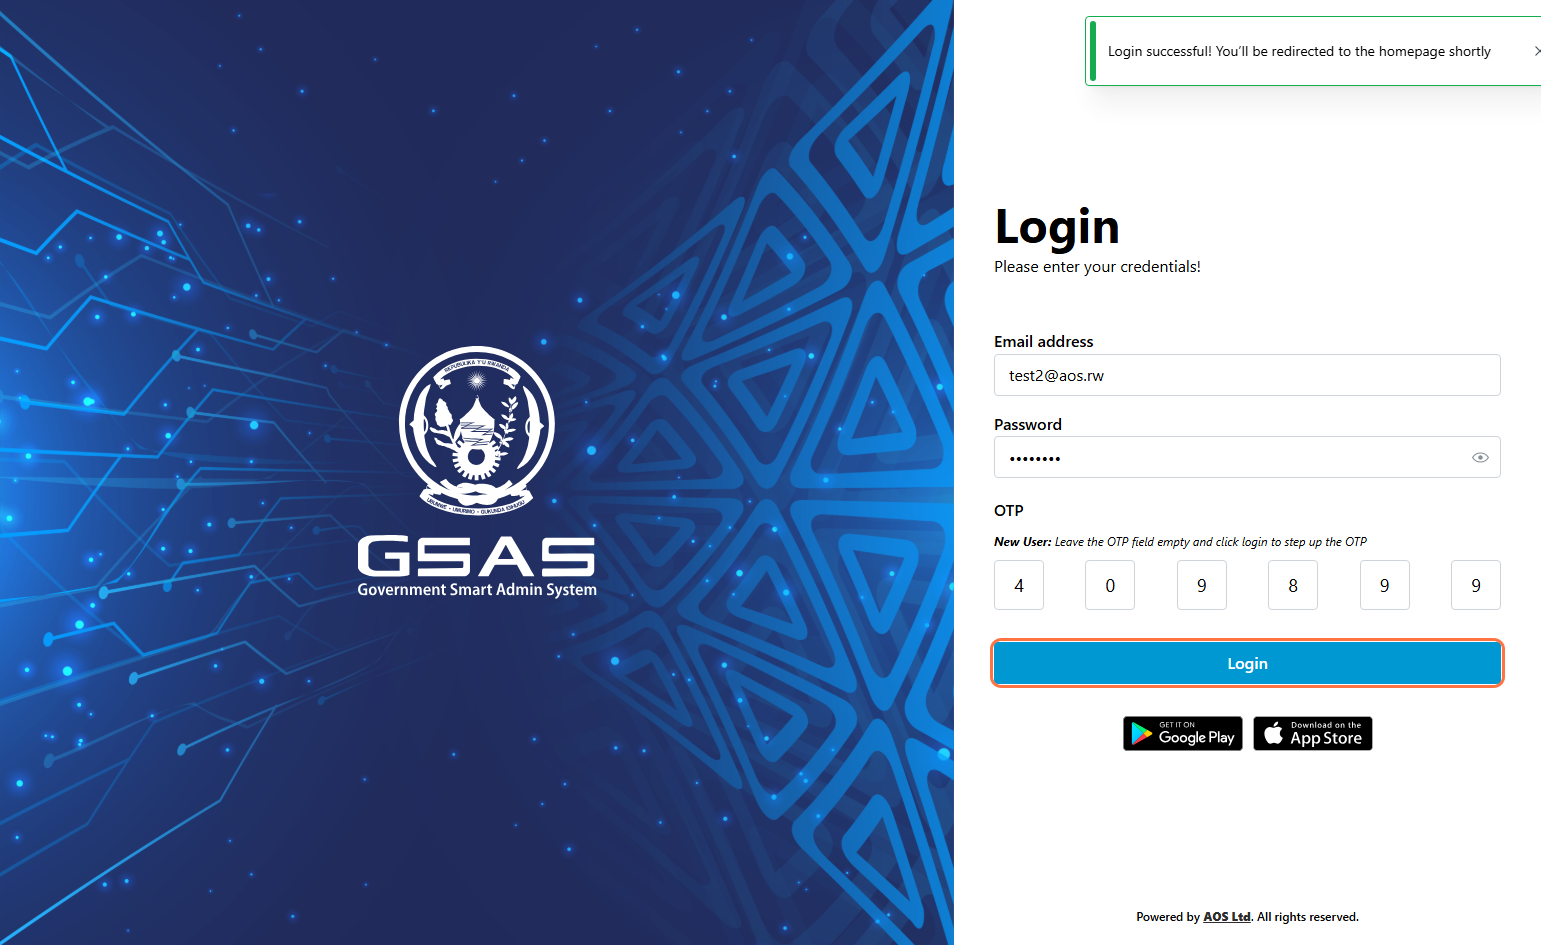
Open your Google Authenticator and view the current 6-digit code.
1. Enter it in the **OTP** field, just above the **Login** button.
2. Click **Login**.
[](https://docs.smartadmin.rw/uploads/images/gallery/2026-06/returninguser.png)
##### **Don't see an OTP field?** Your account is using Simple Authentication, skip the OTP step and click **Login** directly. For stronger account security, we recommend enabling OTP Authentication. Reach out to your administrator to get it set up.
---
| Step 5
### Access granted
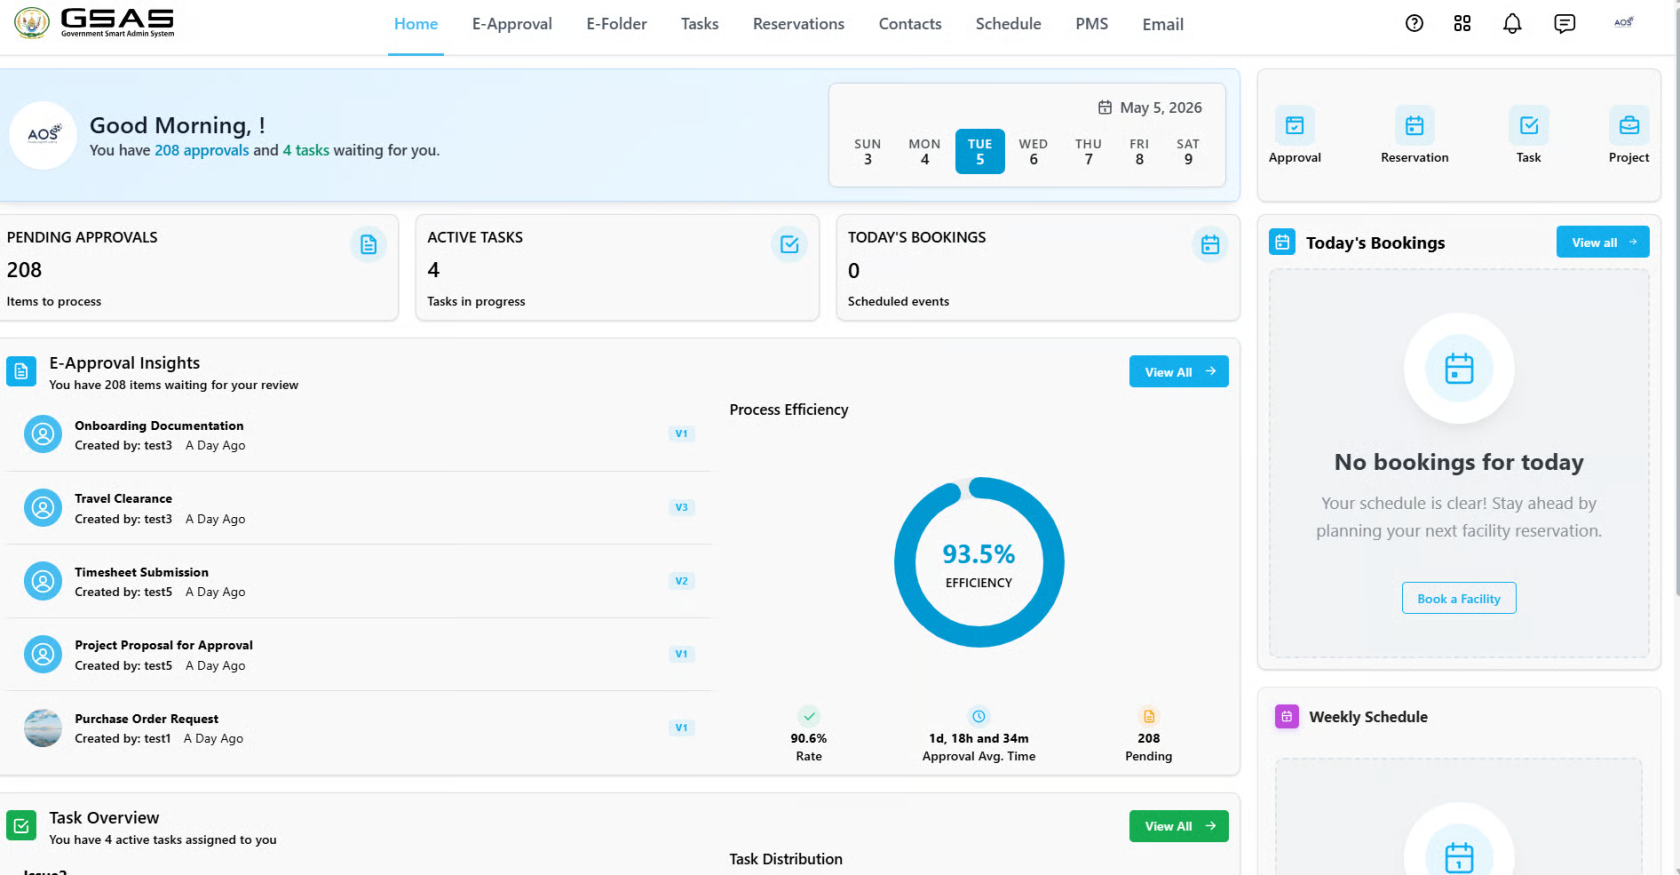
You'll be redirected to your dashboard upon successful login.
|
|
Make sure your laptop and phone are using a similar time zone. If not, update your time zone settings and ask your administrator to reset your OTP and sign in again as a first-time user.
2. **No user was found with provided information.**Possible cause:
- Your email address was entered incorrectly.
3. **Invalid credentials. Please contact your system administrator.**
- Call us or text us on **+250 792 108 784** or use our toll free number **4747.**
# Your dashboard
---
The Dashboard
When you log in, you are taken to your dashboard. It gives you a snapshot of your activity across the system so you can stay on top of pending items without navigating to each module individually.
---
What you'll find on your dashboard
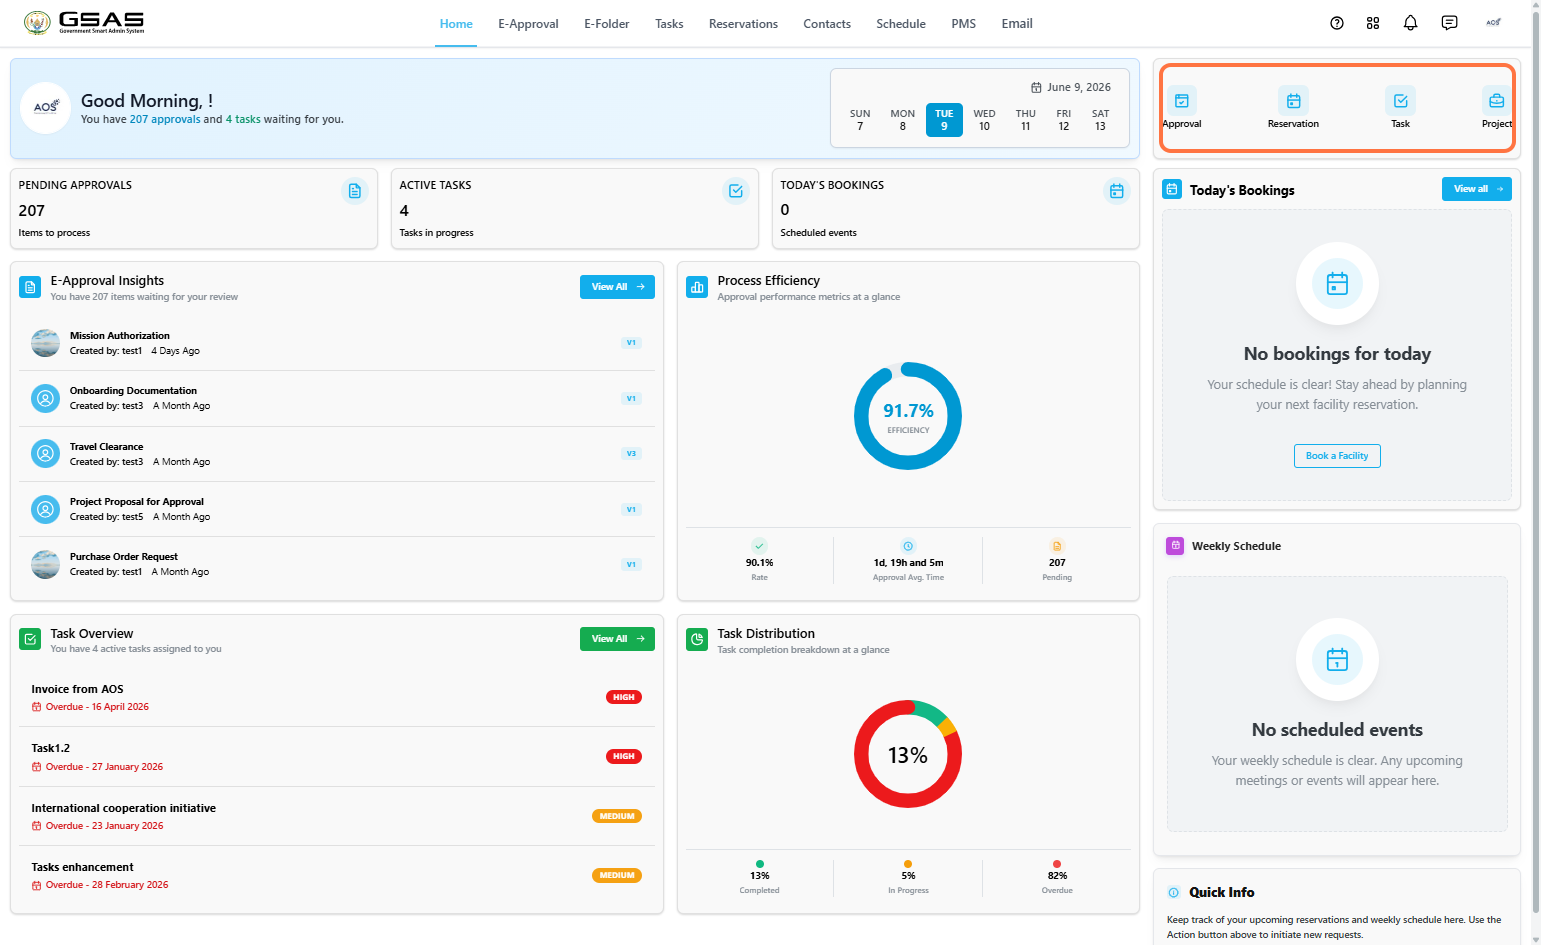
1\. Quick Access Shortcuts
Shortcuts to the Approval, Reservation, Task, and PMS modules in the top right corner of the page. Each shortcut lets you take action directly from the homepage; initiate an approval request, book a facility, create a task, or create a new project.
[](https://docs.smartadmin.rw/uploads/images/gallery/2026-06/shortcuts.png)
---
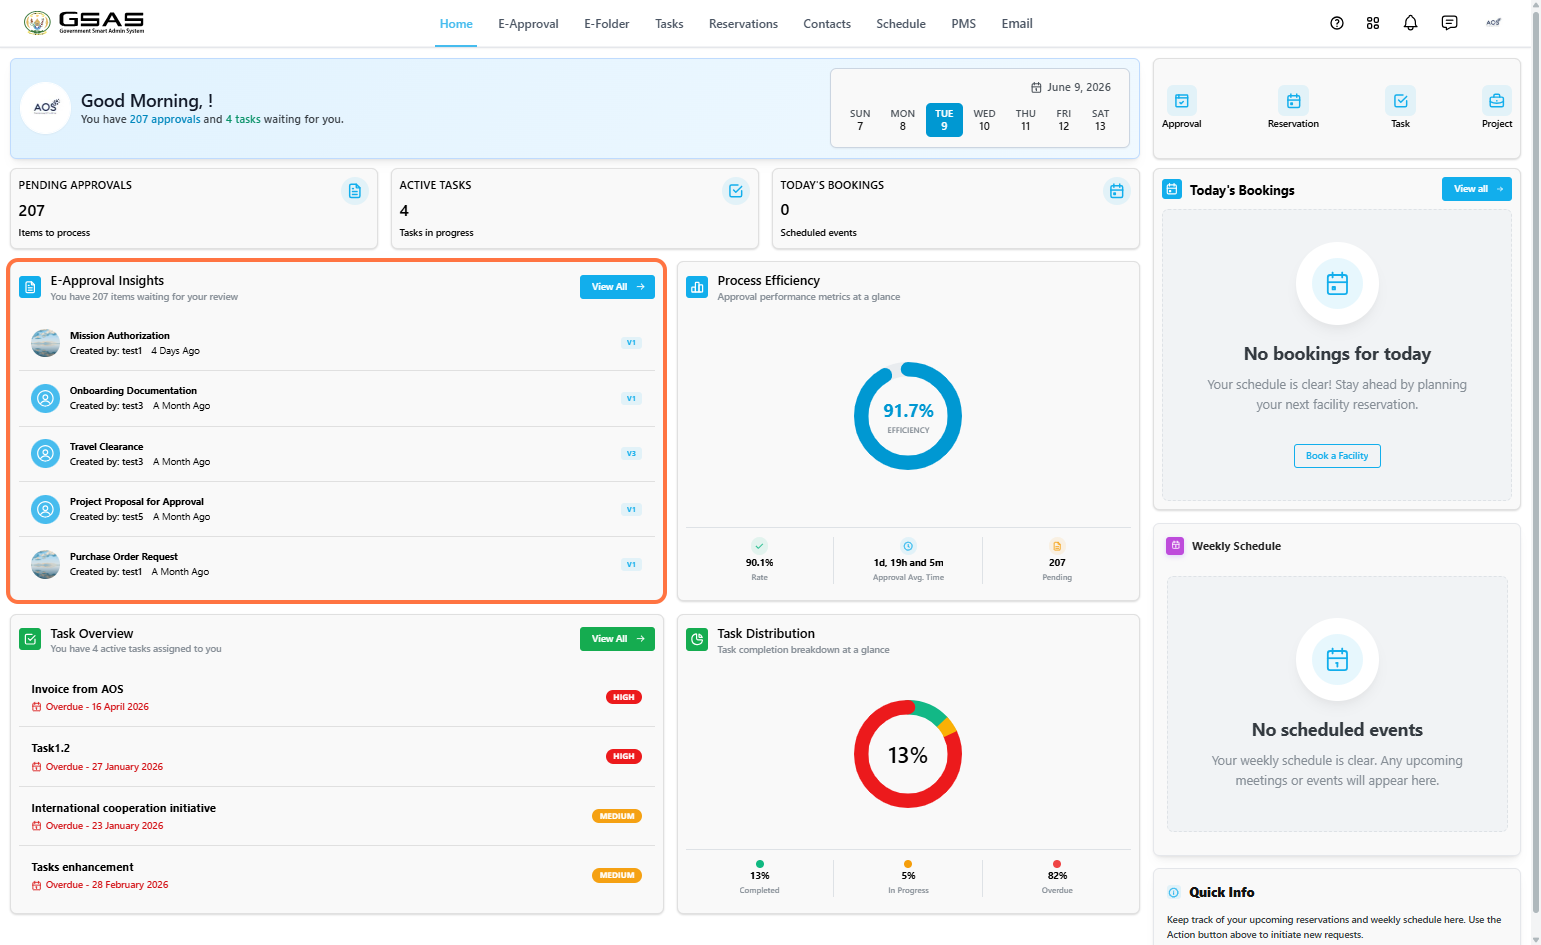
2\. E-Approval Insights
A list of the most recent approval requests waiting for your review. Click **View All** to go directly to your internal approval folder.
[](https://docs.smartadmin.rw/uploads/images/gallery/2026-06/insights.png)
---
3\. Process Efficiency
A visual overview of your approval performance, including your approval rate, average approval time, and number of pending items.
[](https://docs.smartadmin.rw/uploads/images/gallery/2026-06/eff.png)
---
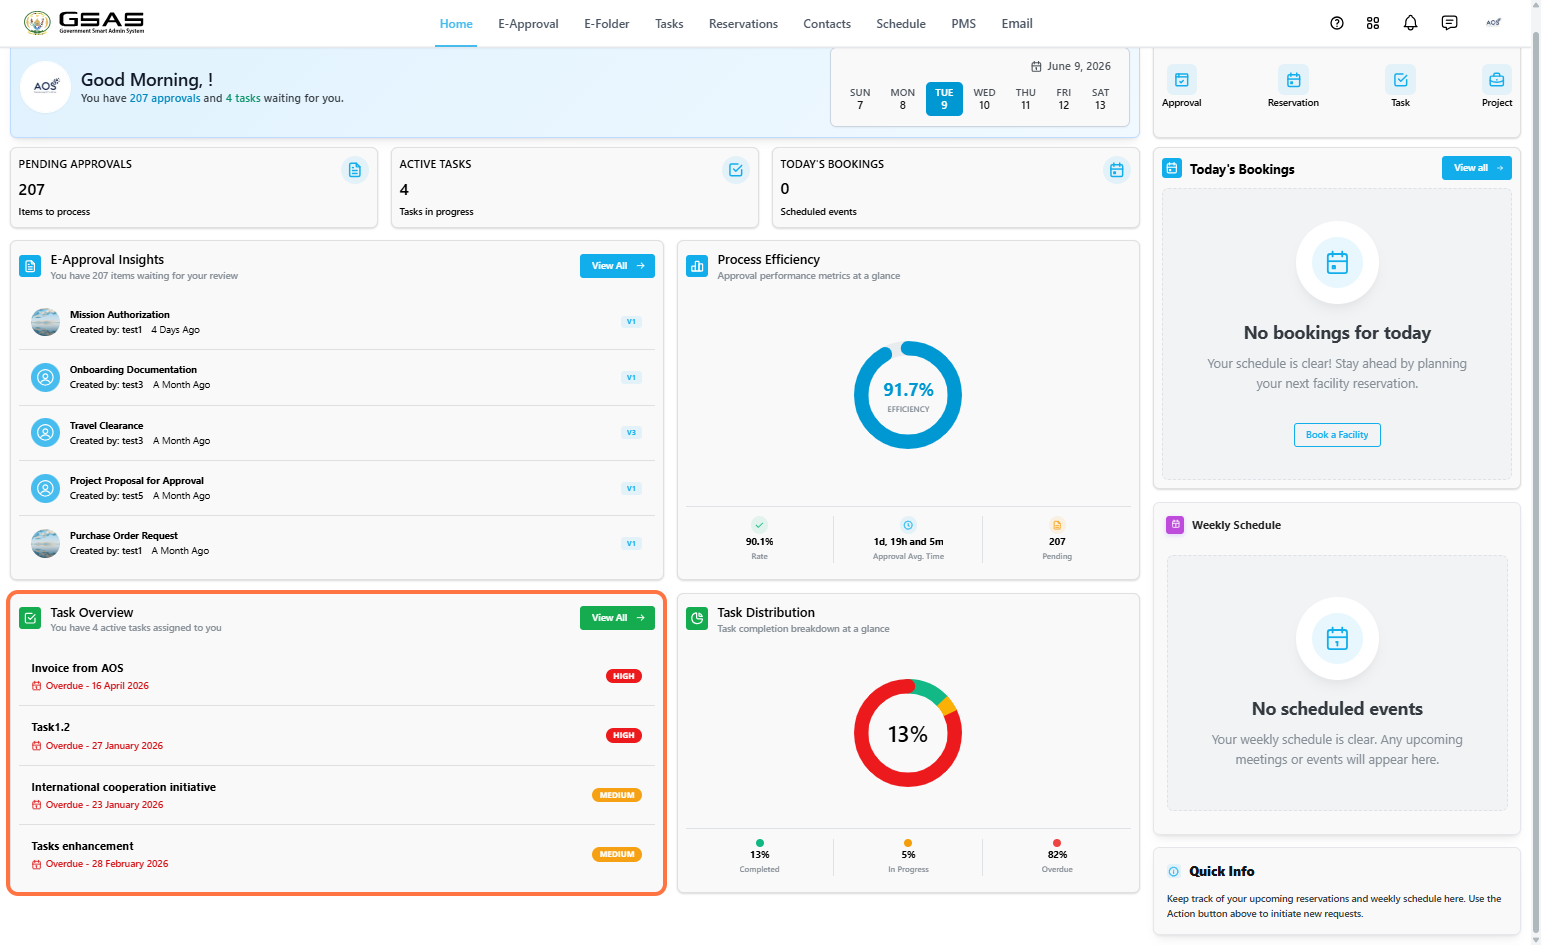
4\. Task Overview
A list of your active tasks with their due dates and priority levels. Click **View All** to tasks assigned to you.
[](https://docs.smartadmin.rw/uploads/images/gallery/2026-06/taskoverview.png)
---
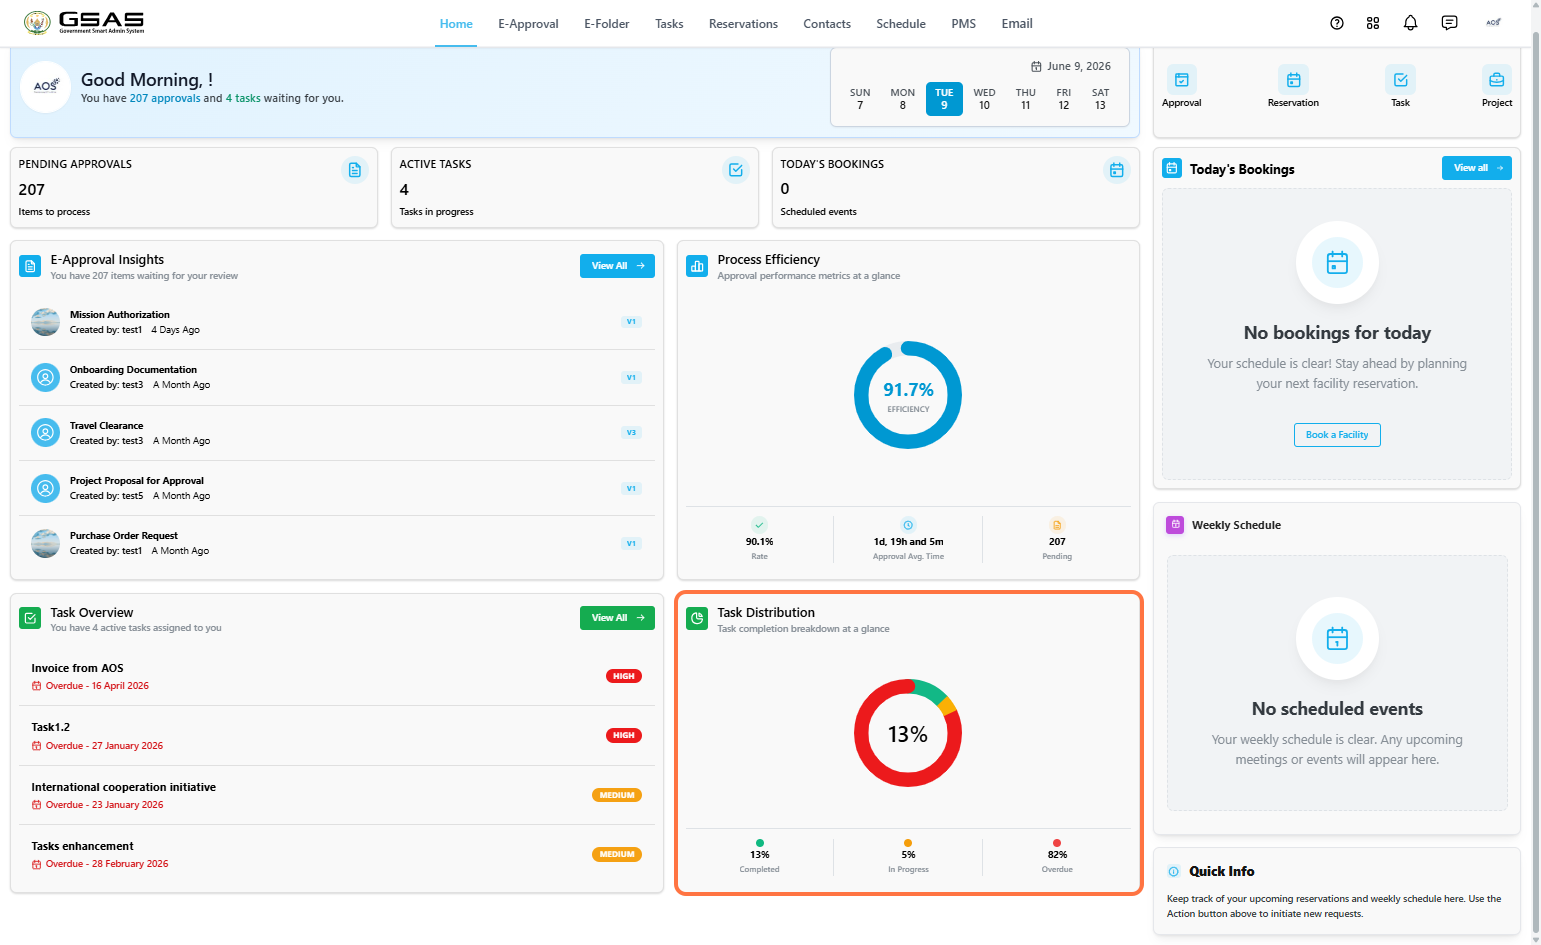
5\. Task Distribution
A breakdown of your tasks by status; completed, in progress, and overdue.
[](https://docs.smartadmin.rw/uploads/images/gallery/2026-06/taskdistribution.png)
---
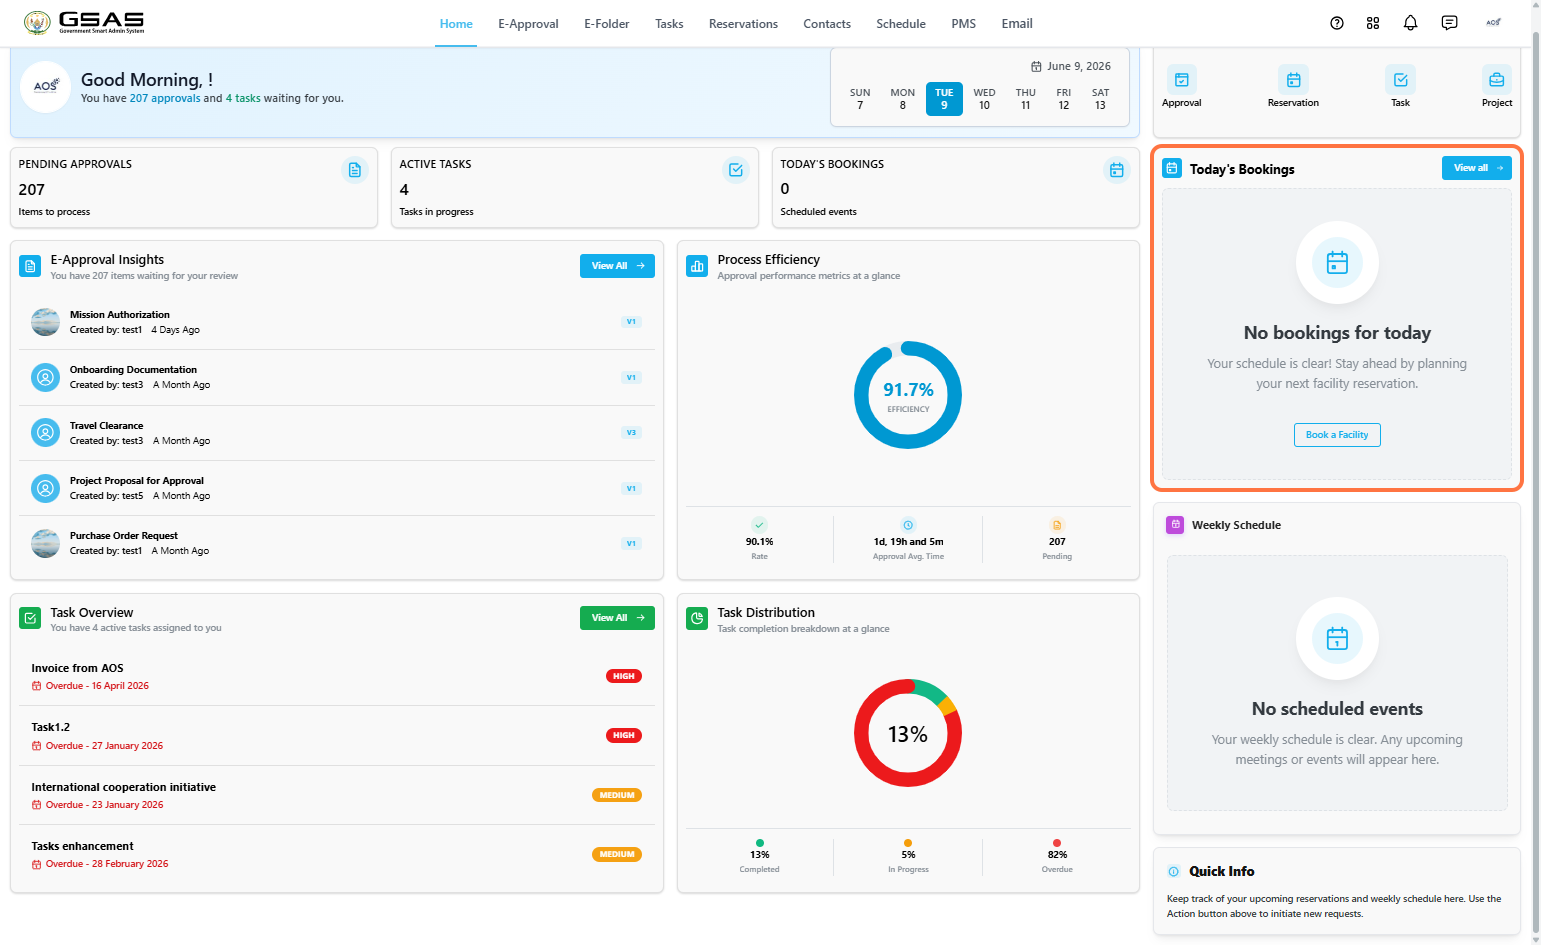
6\. Today's Bookings
A detailed view of your facility reservations for the day. Click **Book a Facility** to make a new reservation.
[](https://docs.smartadmin.rw/uploads/images/gallery/2026-06/bookings.png)
---
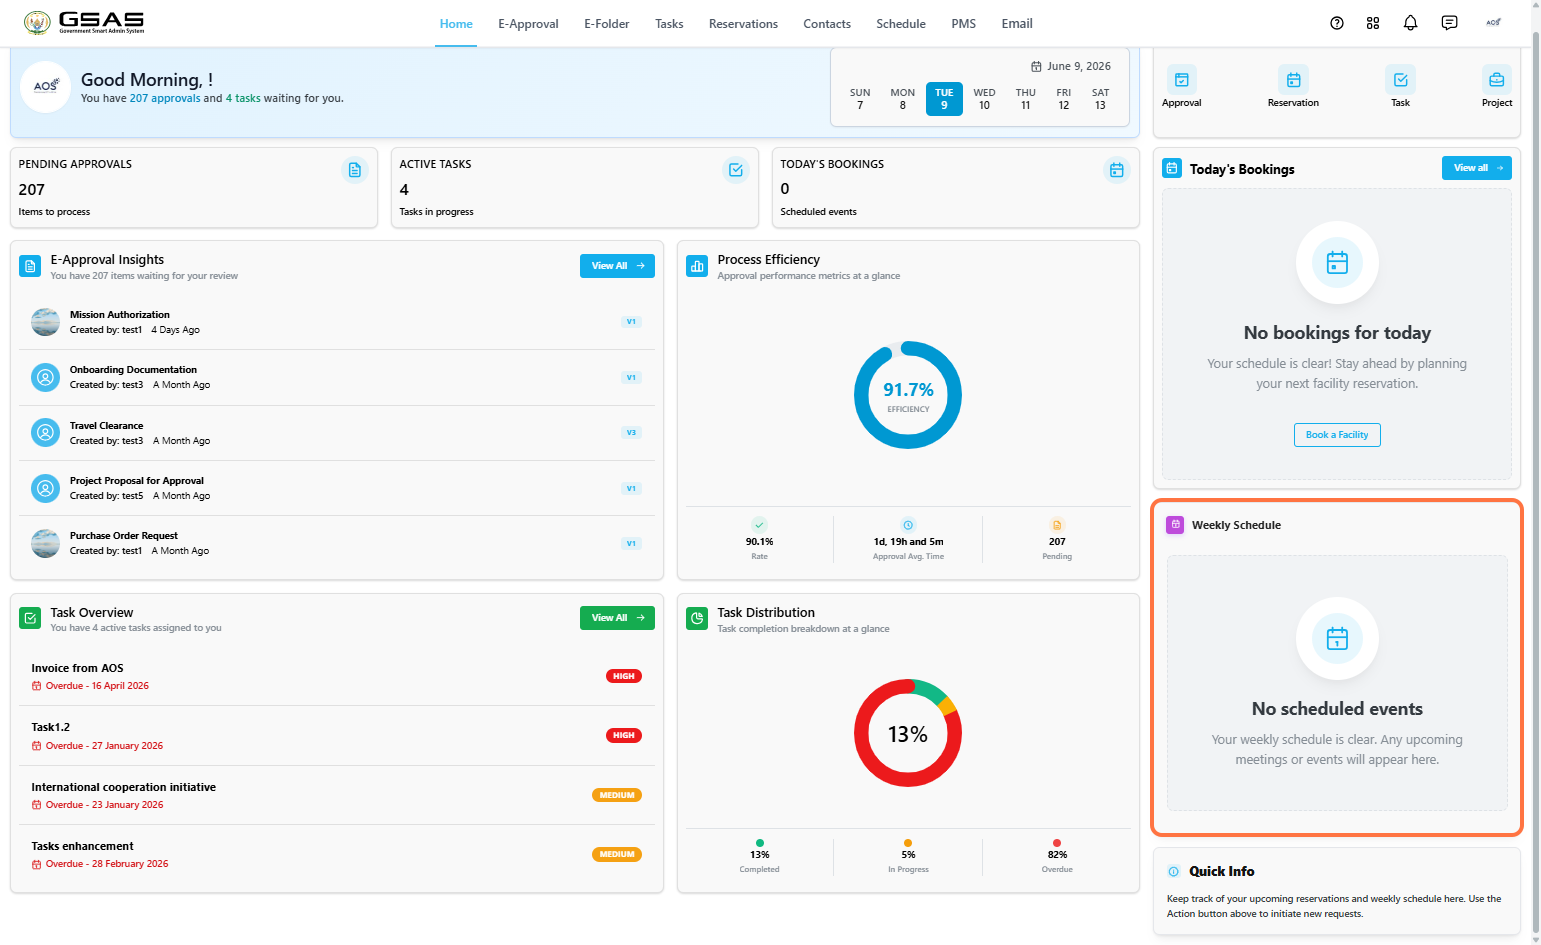
7\. Weekly Schedule
Any upcoming meetings or events scheduled for the week.
[](https://docs.smartadmin.rw/uploads/images/gallery/2026-06/sched.png)
---
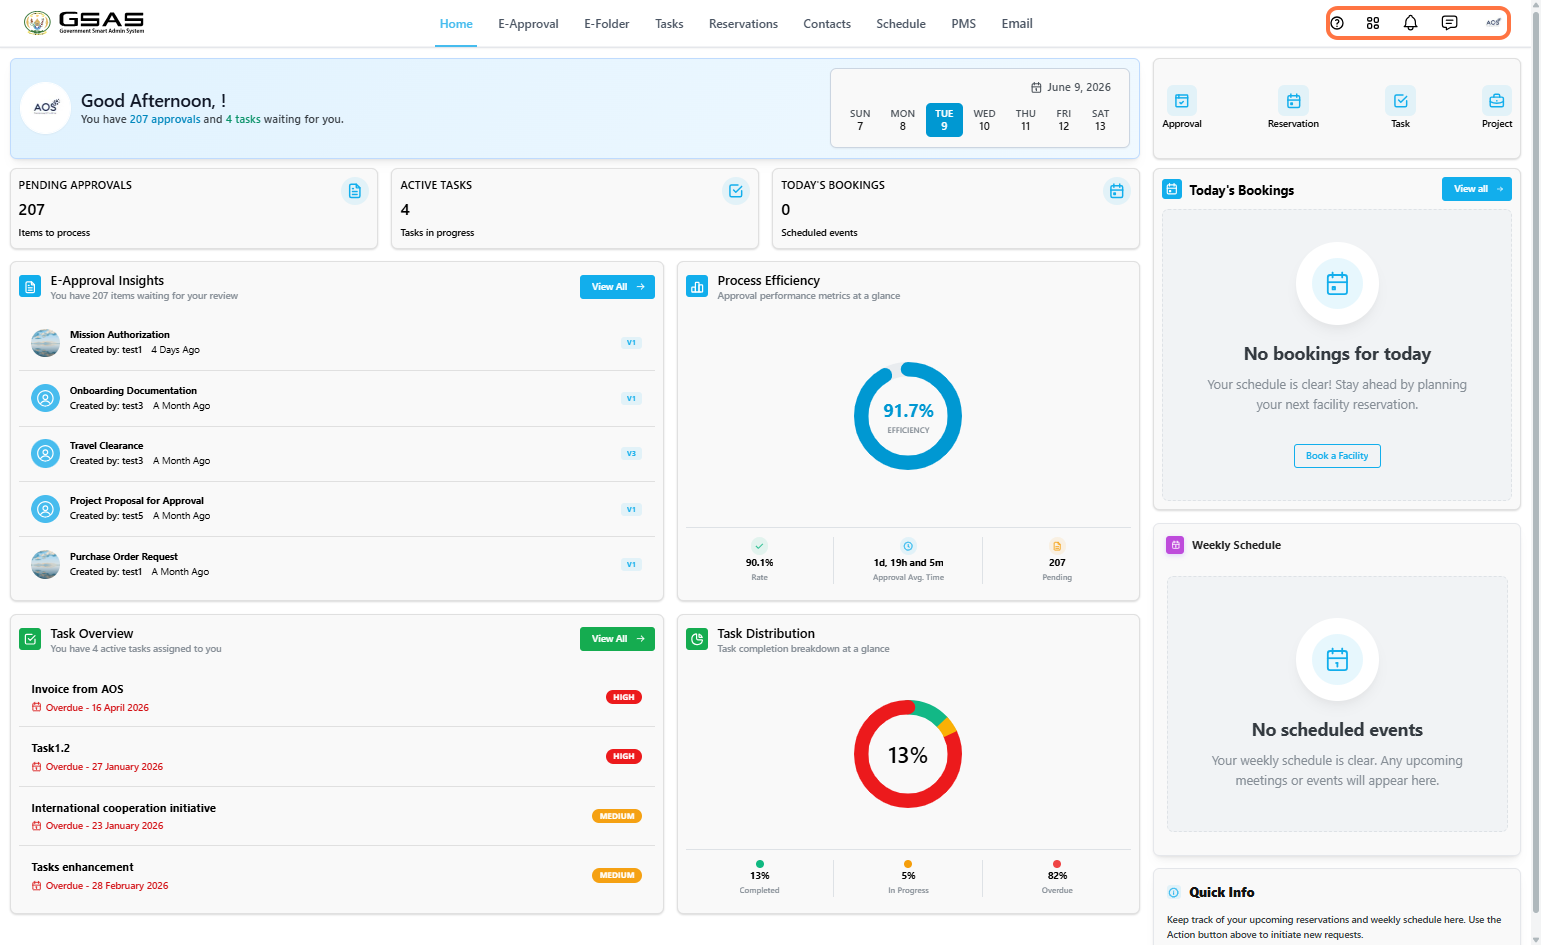
7\. Navigation Bar Icons
A few shortcuts sit in the top right corner of every page.
[](https://docs.smartadmin.rw/uploads/images/gallery/2026-06/cAjimage.png)
- The question mark icon drops down with links to the User Guide and a Contact Us modal with our phone number for any inquiries.
- Clicking the grid icon opens a dropdown with links to the GSAS mobile app for both iOS and Android.
- The bell icon opens your notifications panel.
- The chat icon redirects you to GSAS Talk, Smart Admin's messaging platform.
- The profile avatar opens a dropdown with your settings and a logout option.
---
# Your account and profile
---
Your Profile
Your profile page gives you an overview of your account and organizational details. Some fields are managed by your administrator, you can only edit a few fields yourself.
| **How your account is set up:** Once your account is synchronized to Smart Admin, the IT Administrator of your institution sets up your organizational details (department, position) and assigns you any relevant roles. |
### Accessing your profile
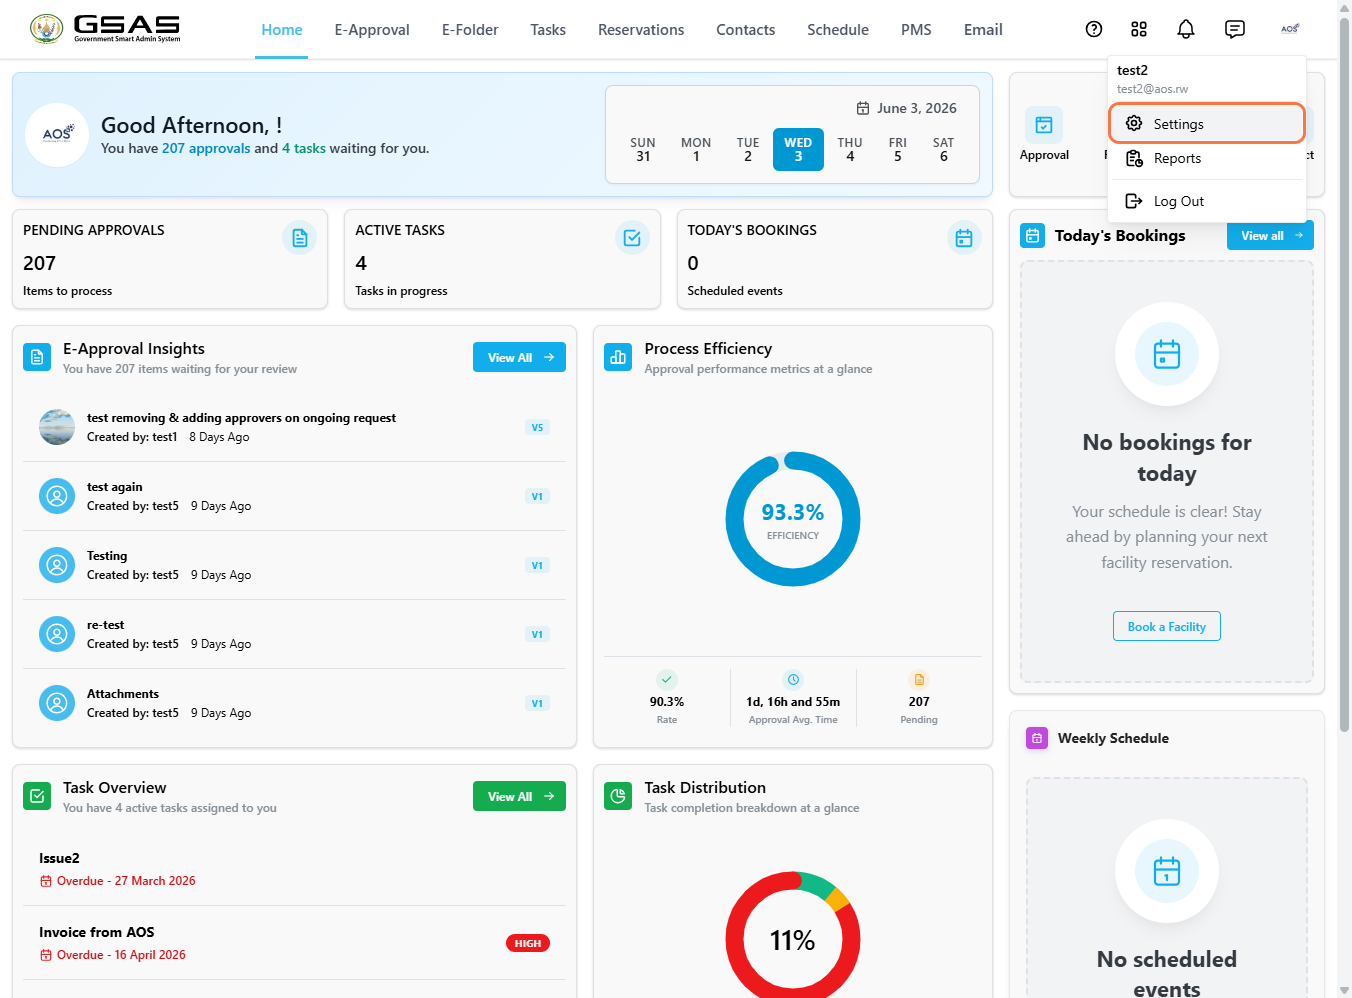
Click your avatar in the top right corner of the screen, then select **Settings** from the dropdown menu.
---
### Personal Information
These fields identify you within the system. Only **Phone Number** and **Fax** can be edited by you. All other fields are set by your administrator.
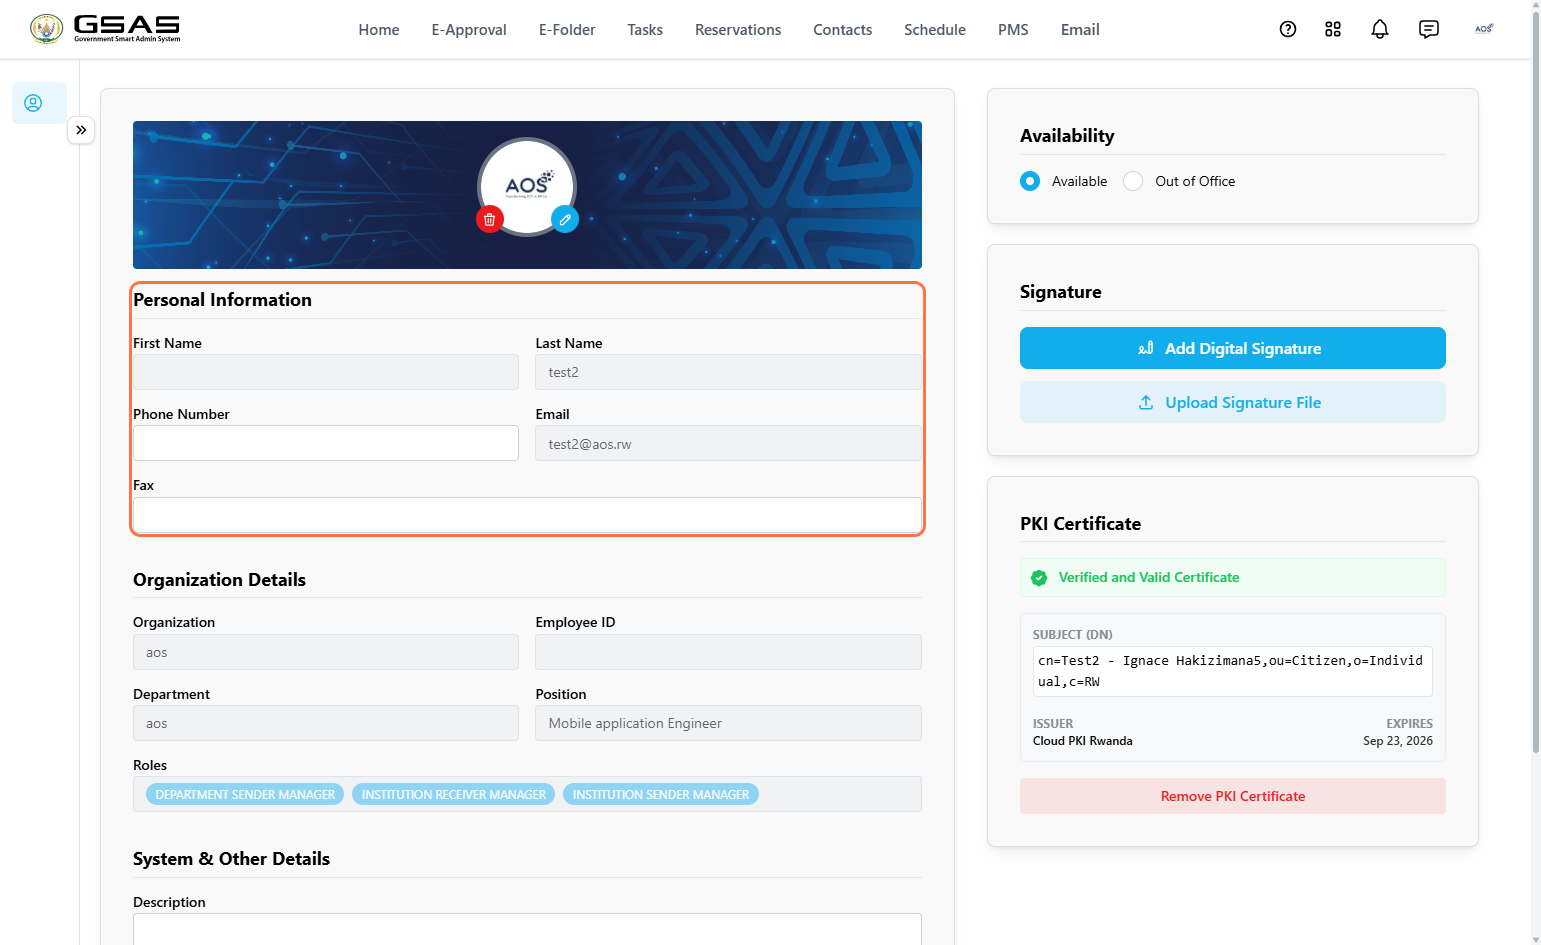
| First Name | Set by your administrator. Contact them if this needs to be corrected. |
| Last Name | Set by your administrator. Contact them if this needs to be corrected. |
| Phone Number | You can update this yourself at any time. |
| Email | Your login email. Not editable. |
| Fax | You can update this yourself at any time. |
---
### Organization Details
These fields reflect your place within the institution. They are all managed by your administrator, you cannot edit them yourself.
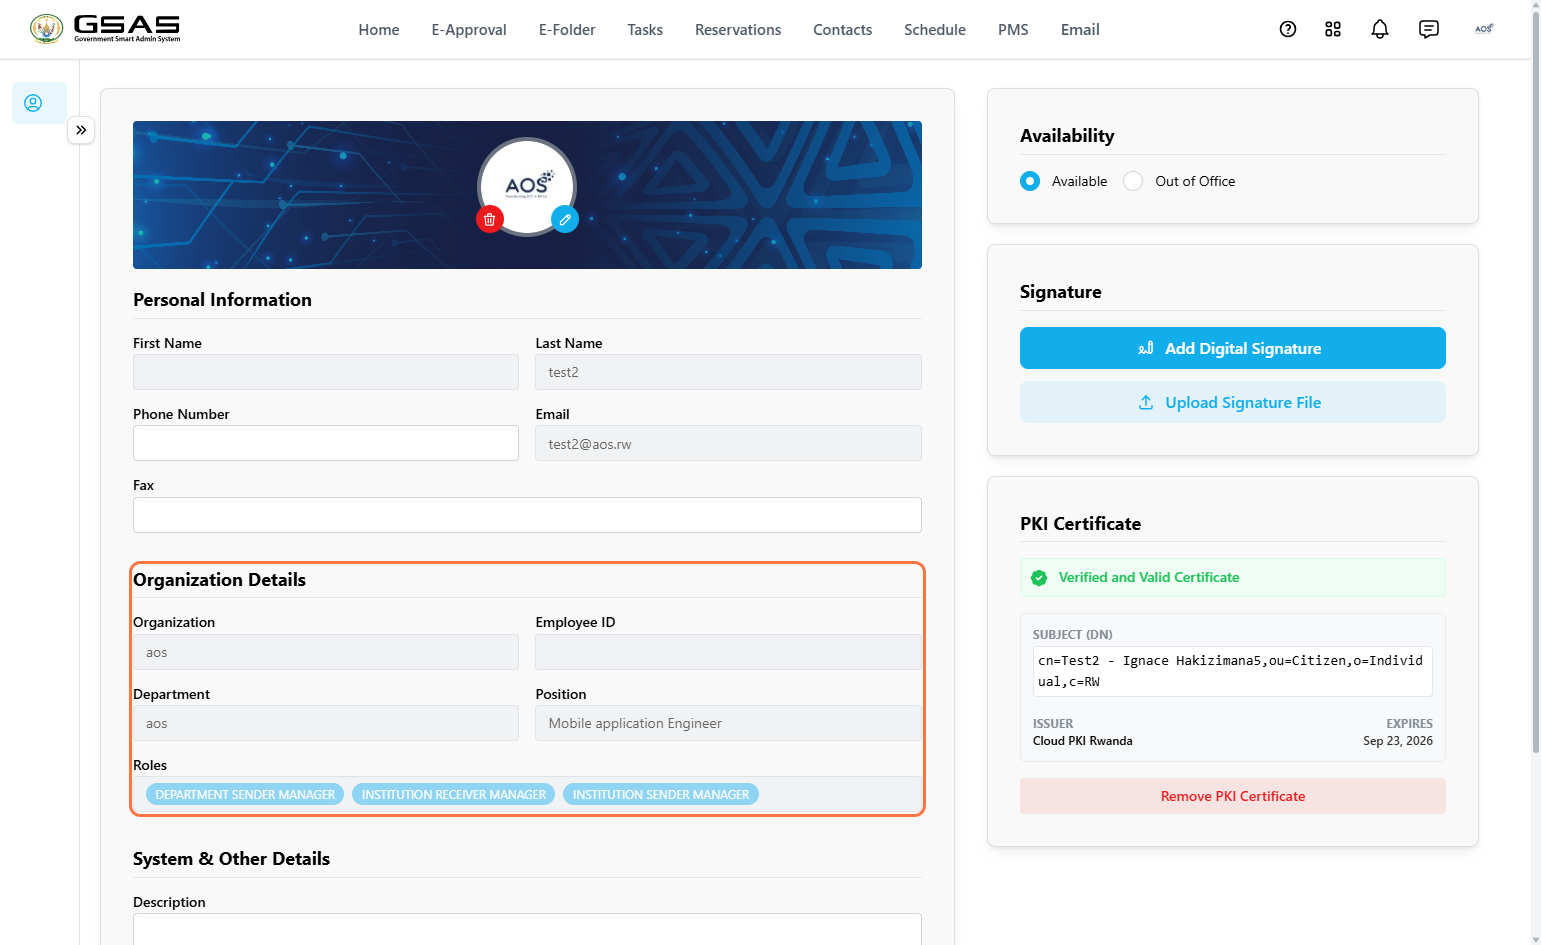
| Organization | The name of your institution. |
| Employee ID | Your employee identification number, if applicable. |
| Department | The department you have been assigned to by your administrator. |
| Position | Your job position within your department. Assigned by your admin. |
| Roles | Roles control what you can see and do in the system. Assigned by your administrator if applicable. |
---
### System & Other Details
Additional details about your account. Only **Description** can be edited by you.
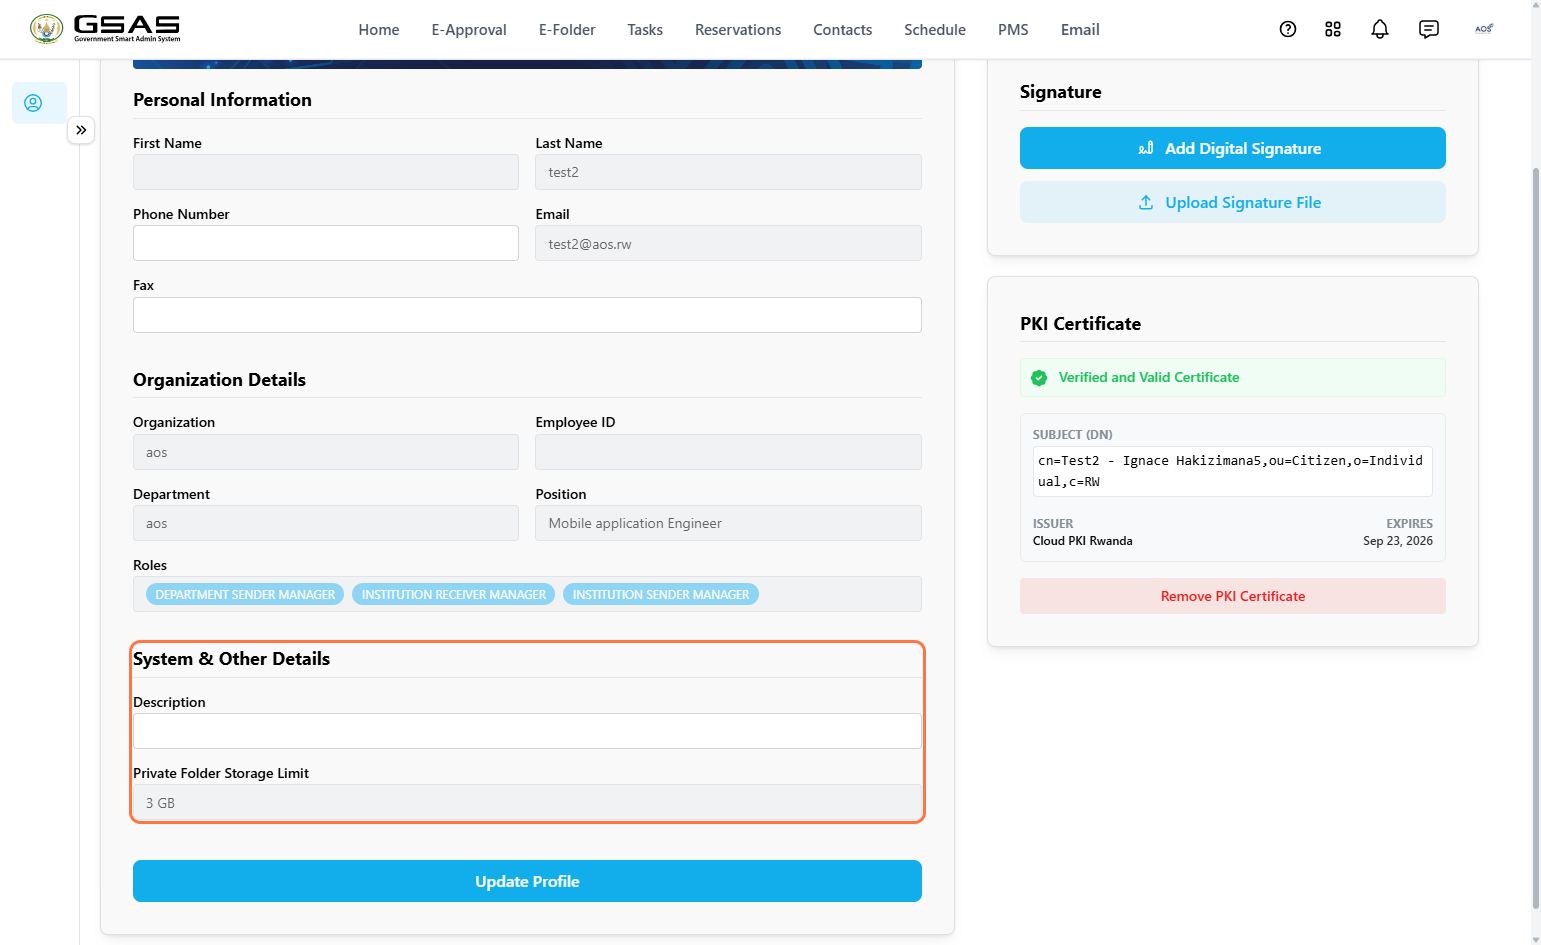
| Description | A short note about yourself. You can update this yourself at any time. |
| Private Folder Storage Limit | Displays the storage limit allocated to your account. The default is 1 GB, but your administrator can increase it if needed. |
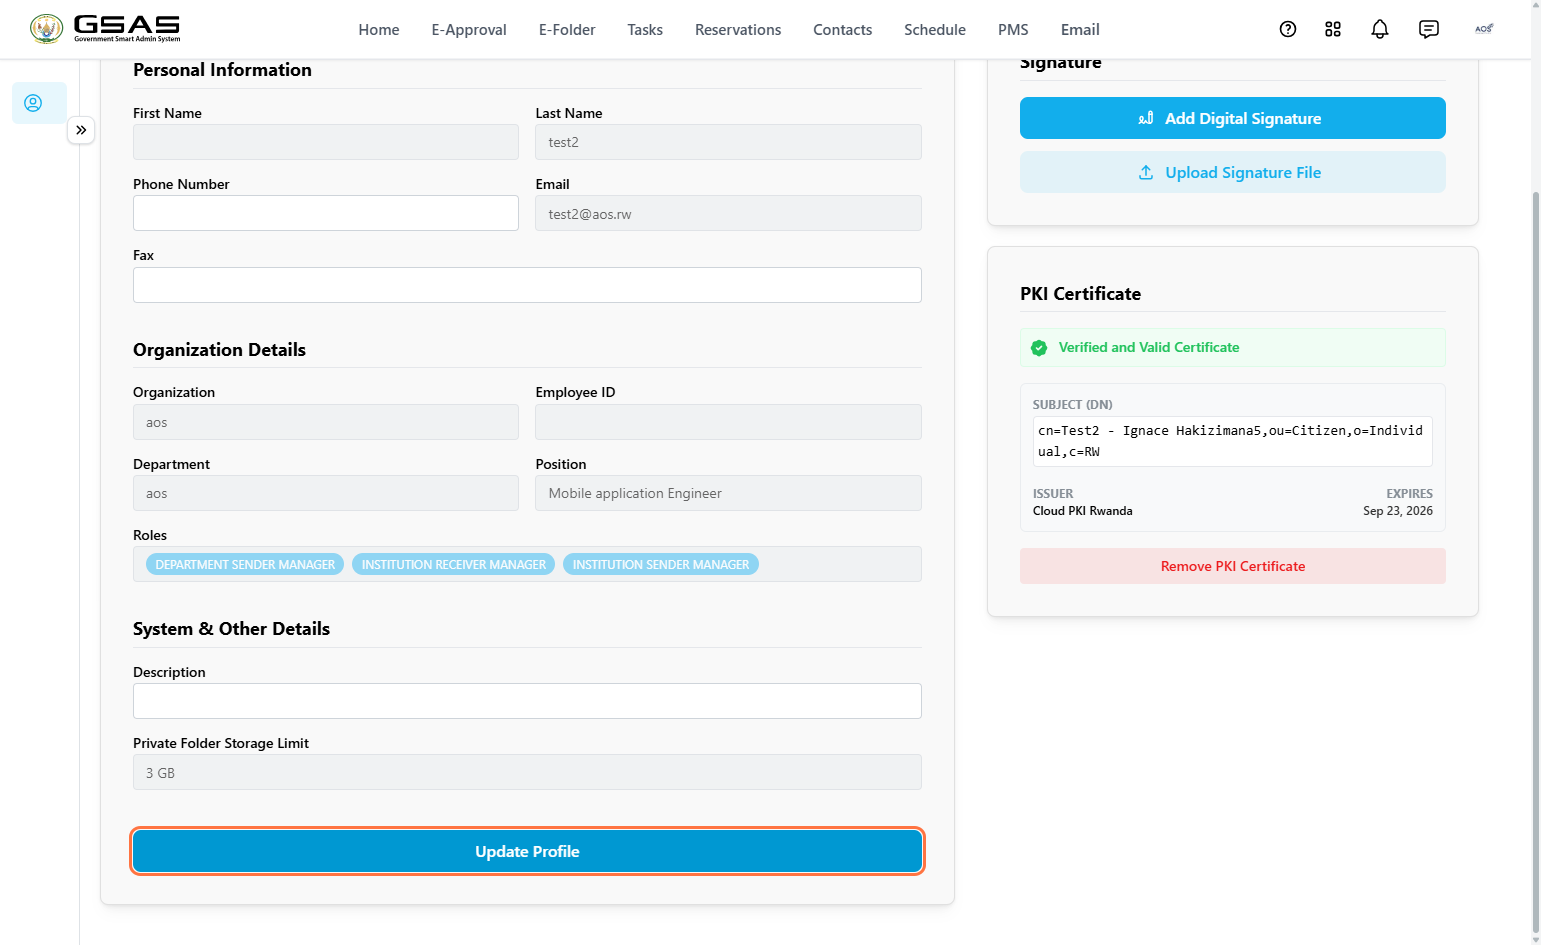
Once you have made your changes, click **Update Profile** at the bottom of the page to save.
[](https://docs.smartadmin.rw/uploads/images/gallery/2026-06/updateprofile.png)
---
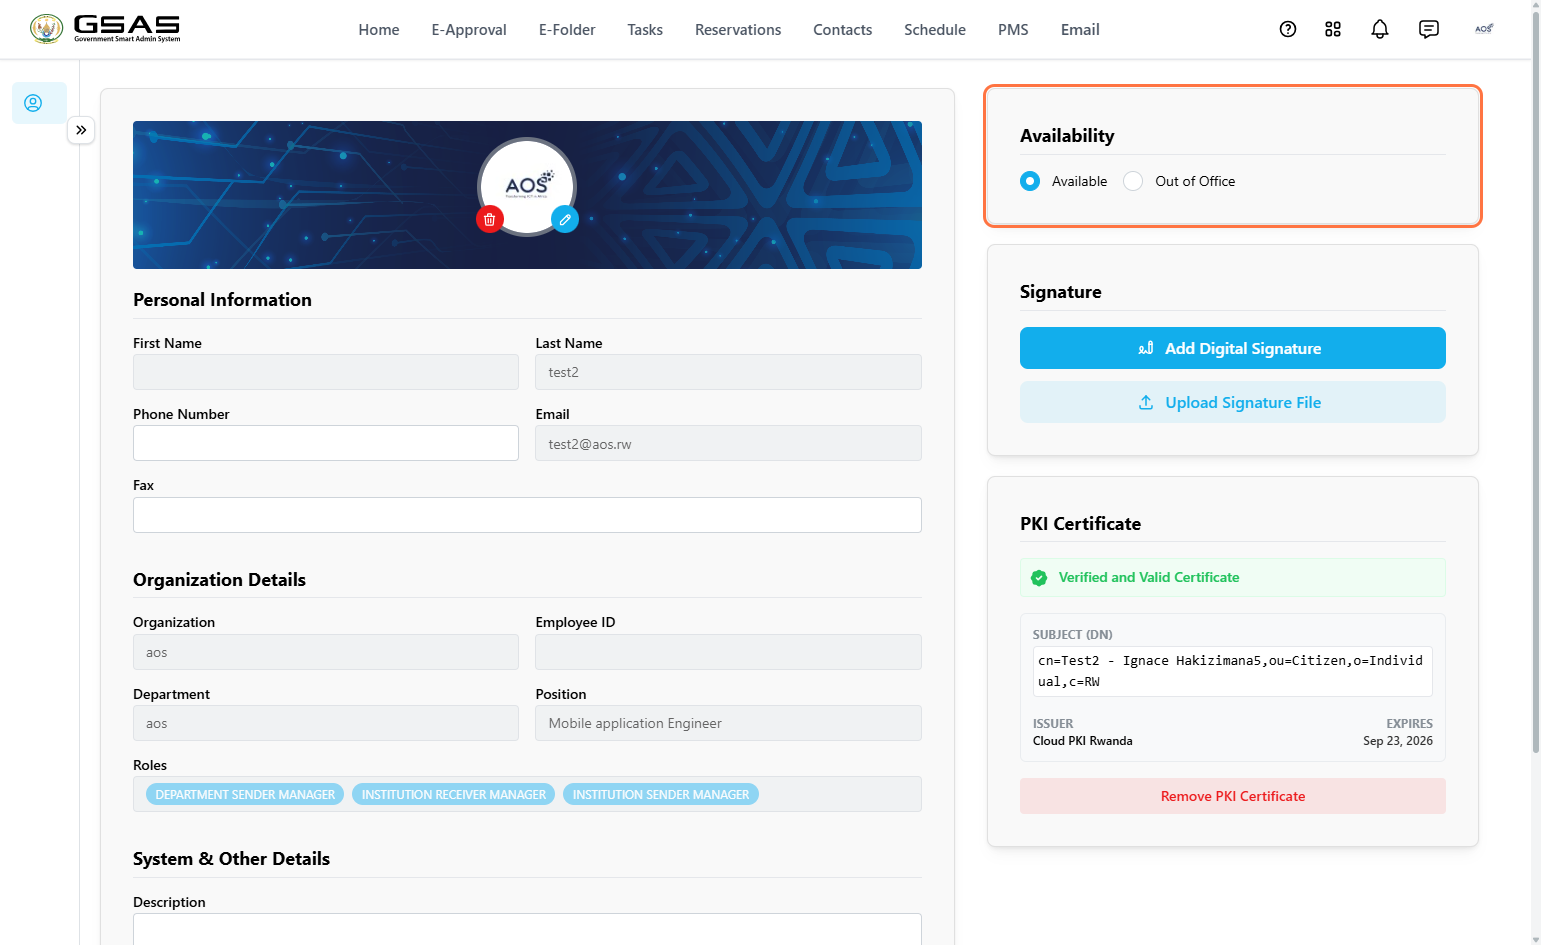
### Availability
The Availability panel on the right side of your profile lets the system know whether you are currently reachable or away.
[](https://docs.smartadmin.rw/uploads/images/gallery/2026-06/availabilty.png)
| Available | You are active and reachable. This is the default status. |
| Out of Office | Select this when you are away. You will be asked to assign a stand-in, set a date range, and provide a reason. All requests assigned to you while you are out-of-office will be sent to your stand-in. |
#### When you select **Out of Office**, a dialog will appear.
1. Search for and select a colleague to act as your stand-in,
2. Pick the dates you will be away, and enter a reason.
3. Confirm.
[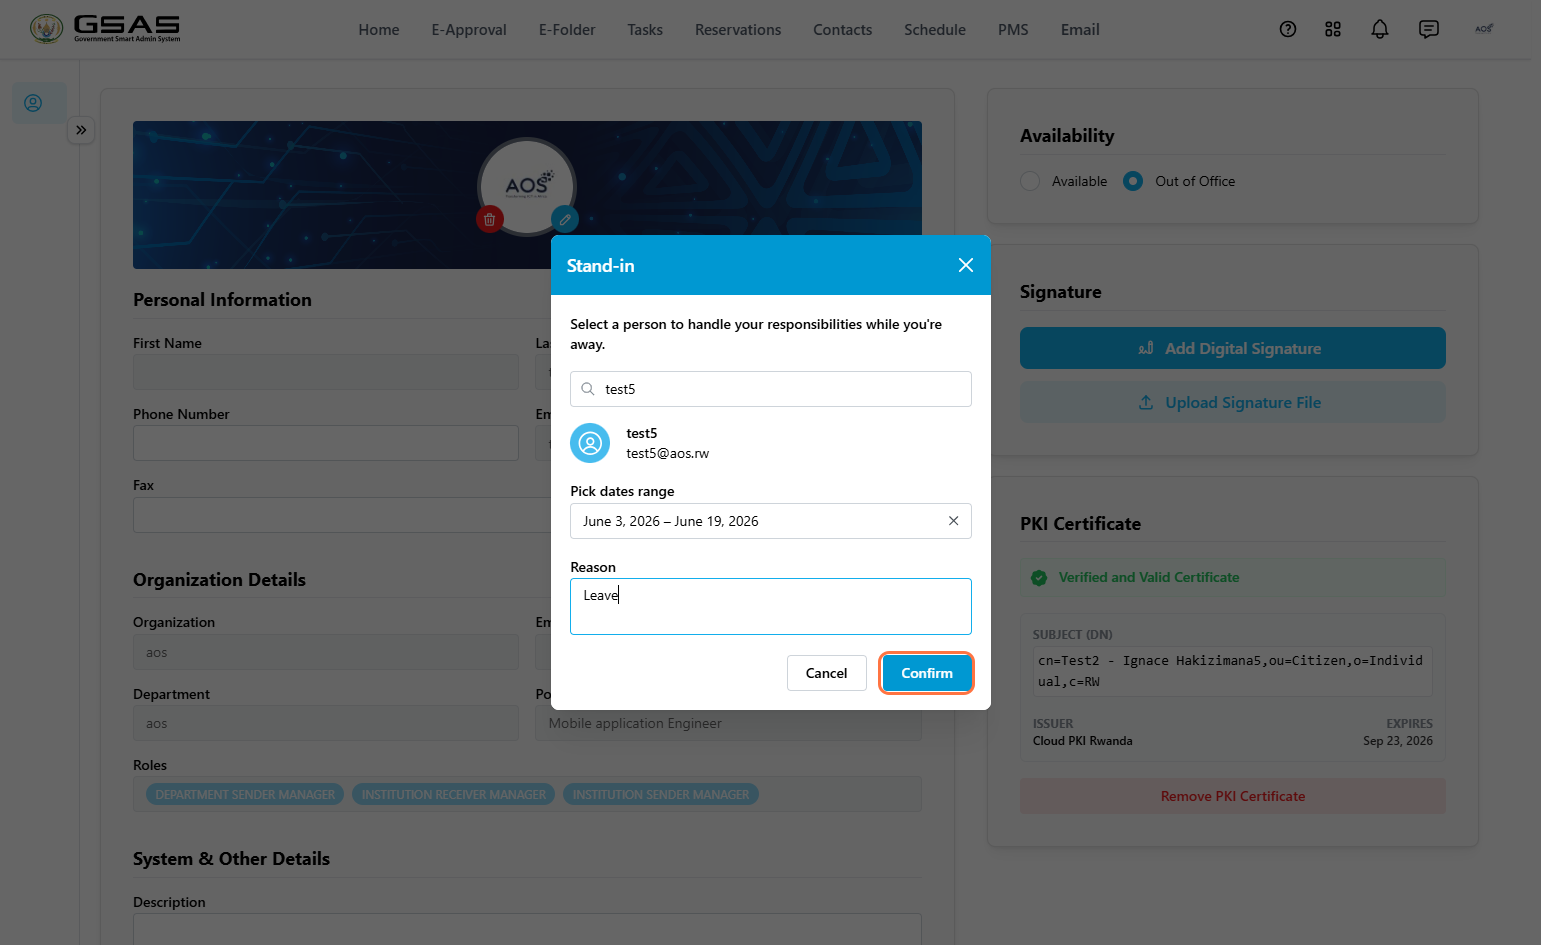](https://docs.smartadmin.rw/uploads/images/gallery/2026-06/fillindetailsconfirm.png)
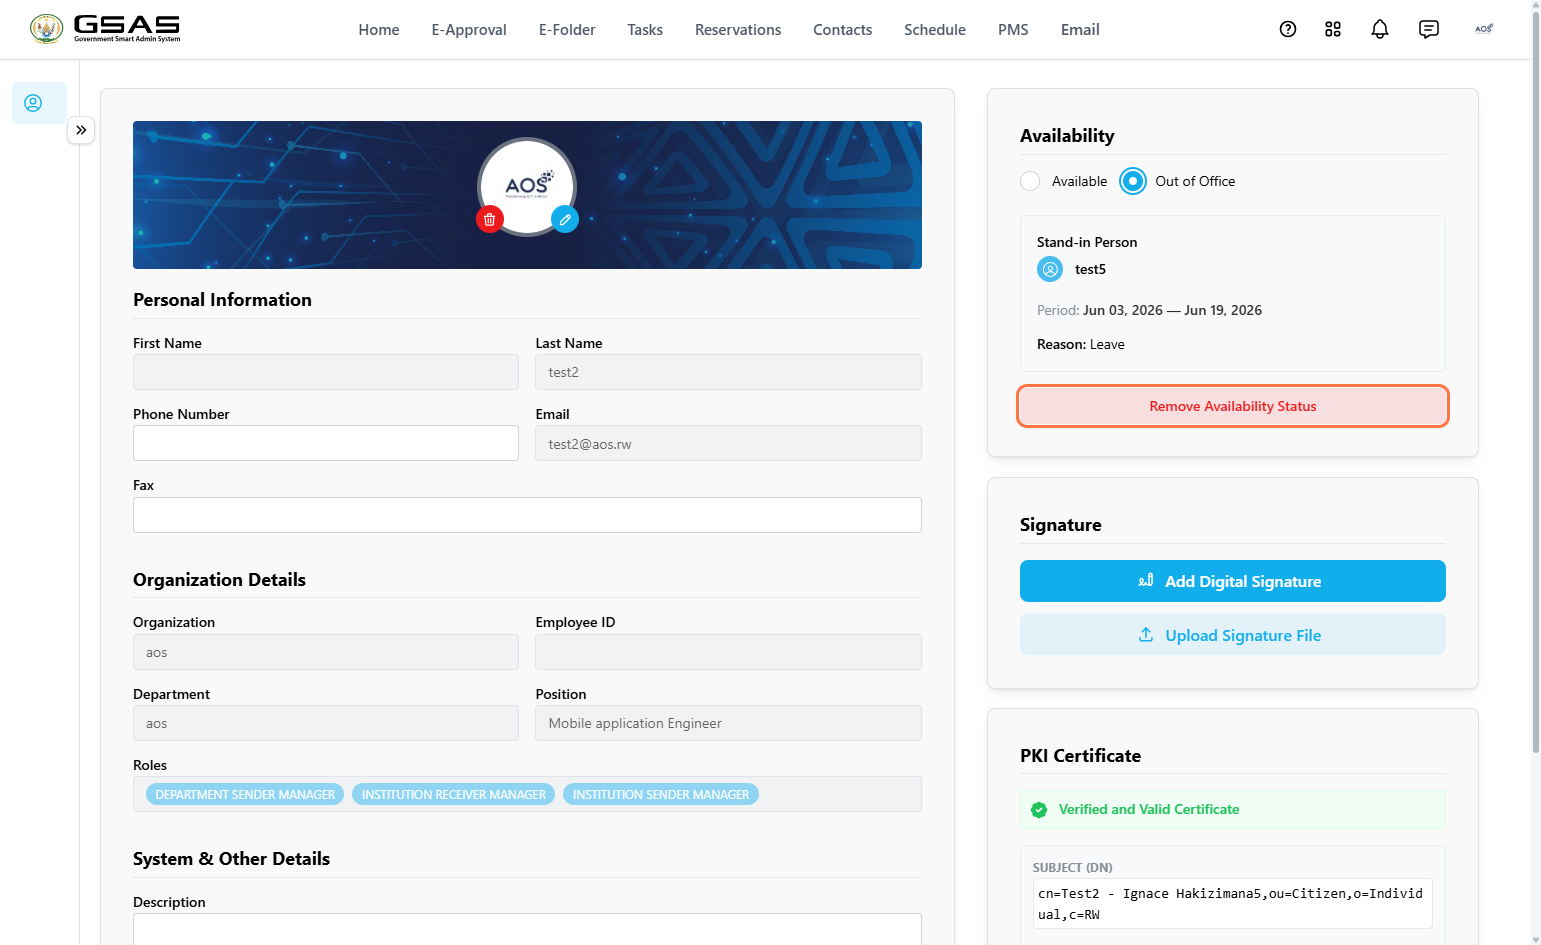
Once confirmed, your stand-in's name, the period, and the reason will appear in the Availability panel. To cancel your out-of-office status, click **Remove Availability Status**.
---
### Signature
Your signature is used when submitting forms and requests in the system. You can register it in two ways.
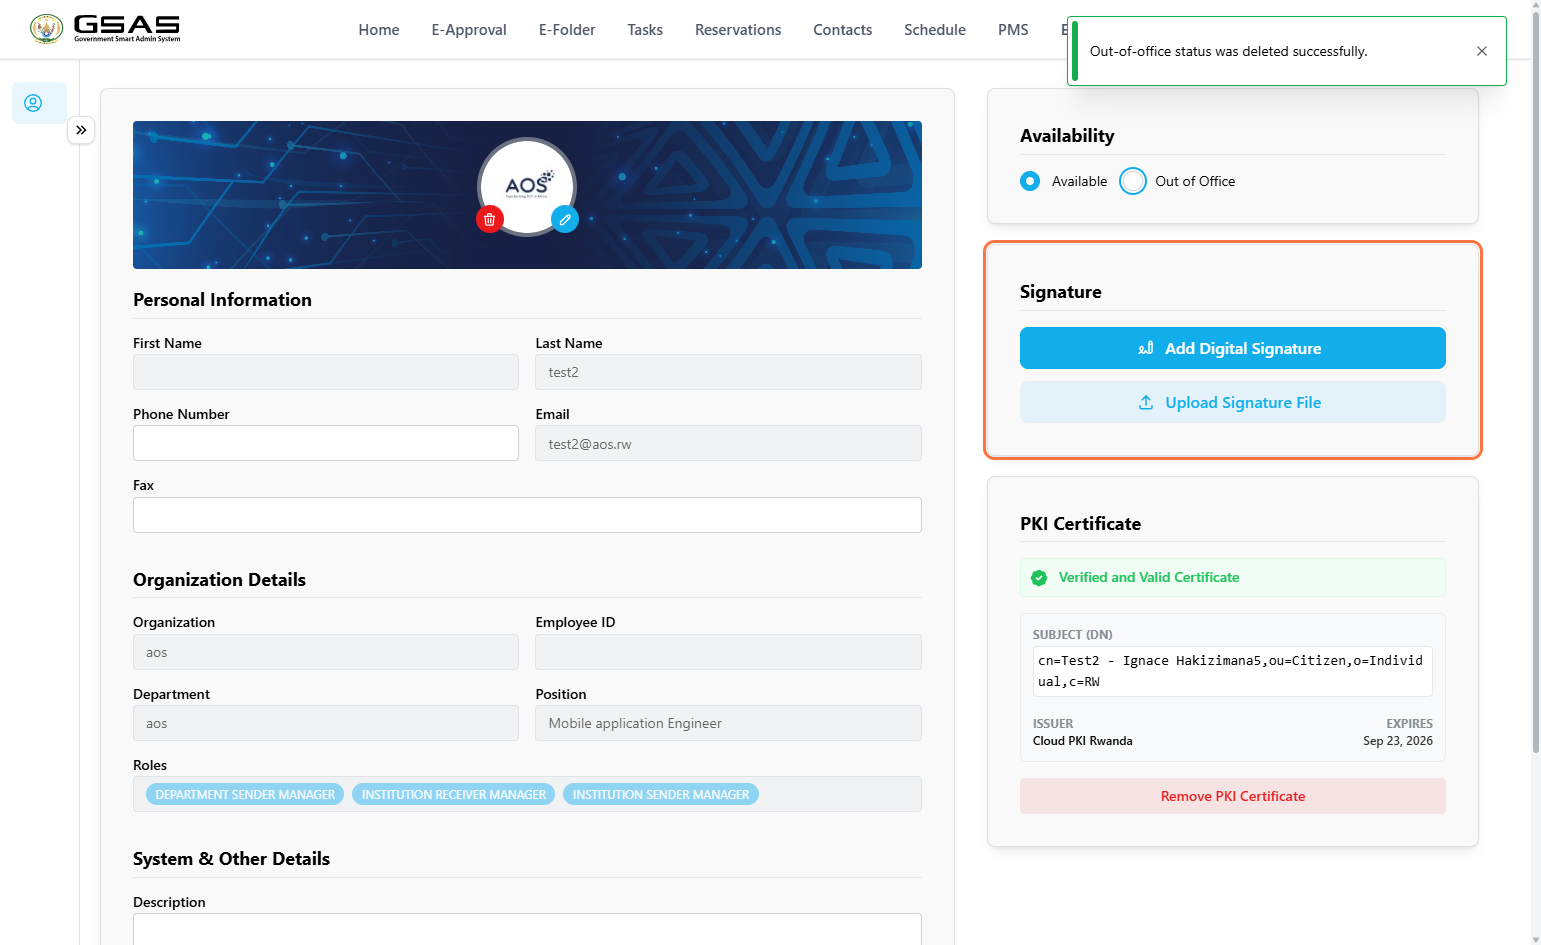
*Option 1 — Draw your signature*
1. Click **Add Digital Signature**. [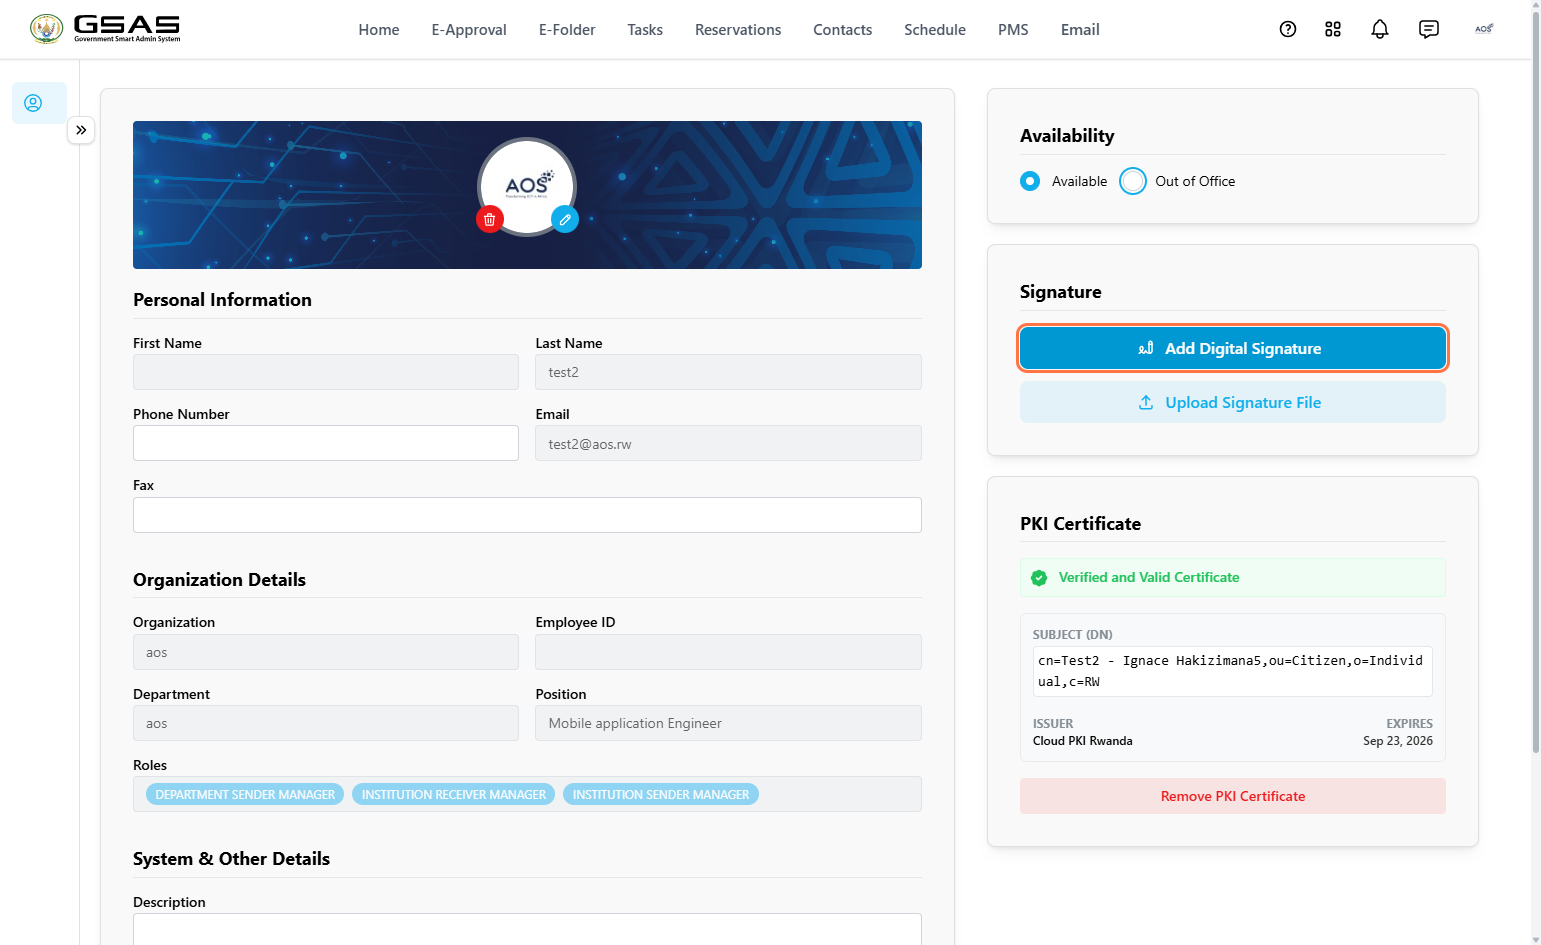](https://docs.smartadmin.rw/uploads/images/gallery/2026-06/addsigndig.png)
2. A drawing canvas will open, use your mouse or touchscreen to draw your signature, then click **Create** to save it. 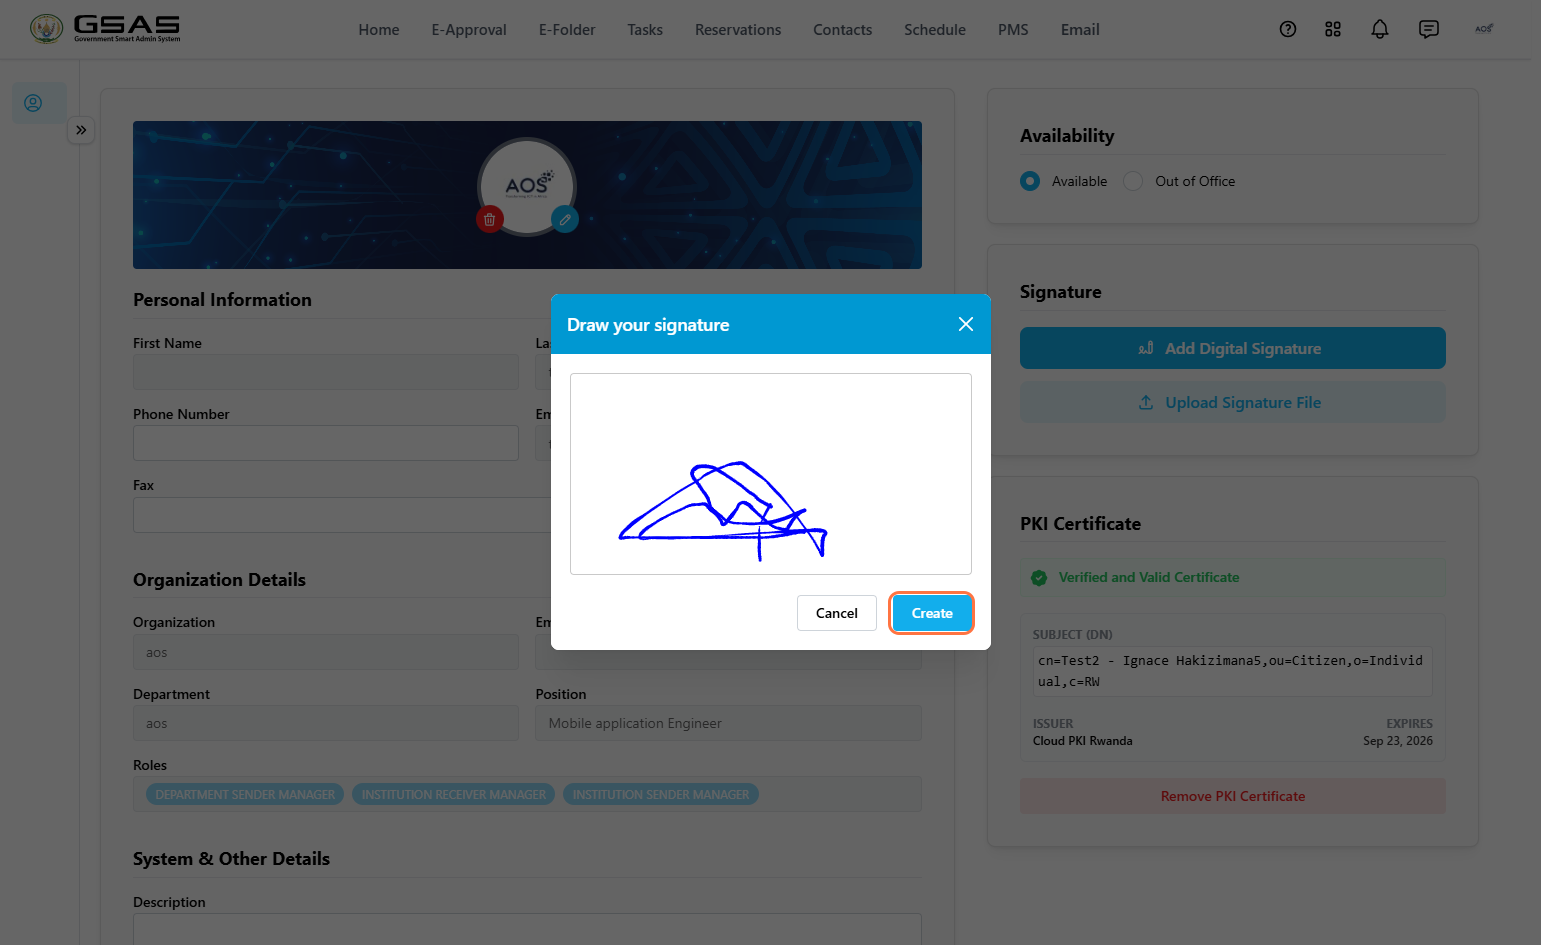
*Option 2 — Upload a signature file*
1. Click **Upload Signature File**. 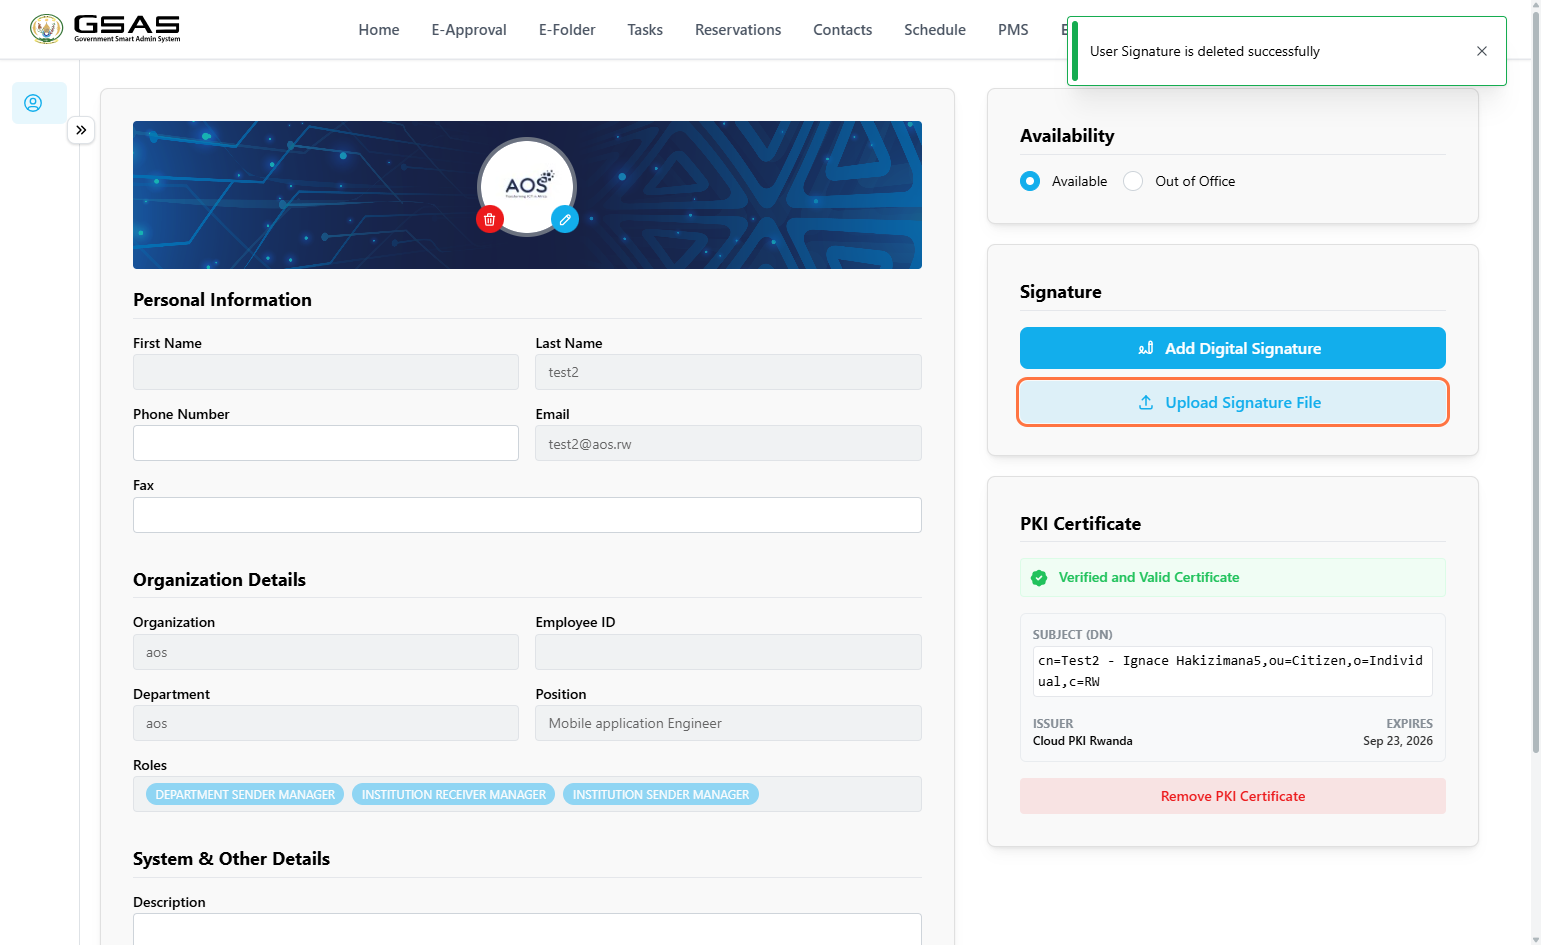
2. A dialog will open, drag and drop your signature file or click to select from your computer. A preview of the uploaded image will be shown. Click **Upload** to confirm. Once saved, your signature will appear in the panel. To remove it, click **Remove Signature**.
[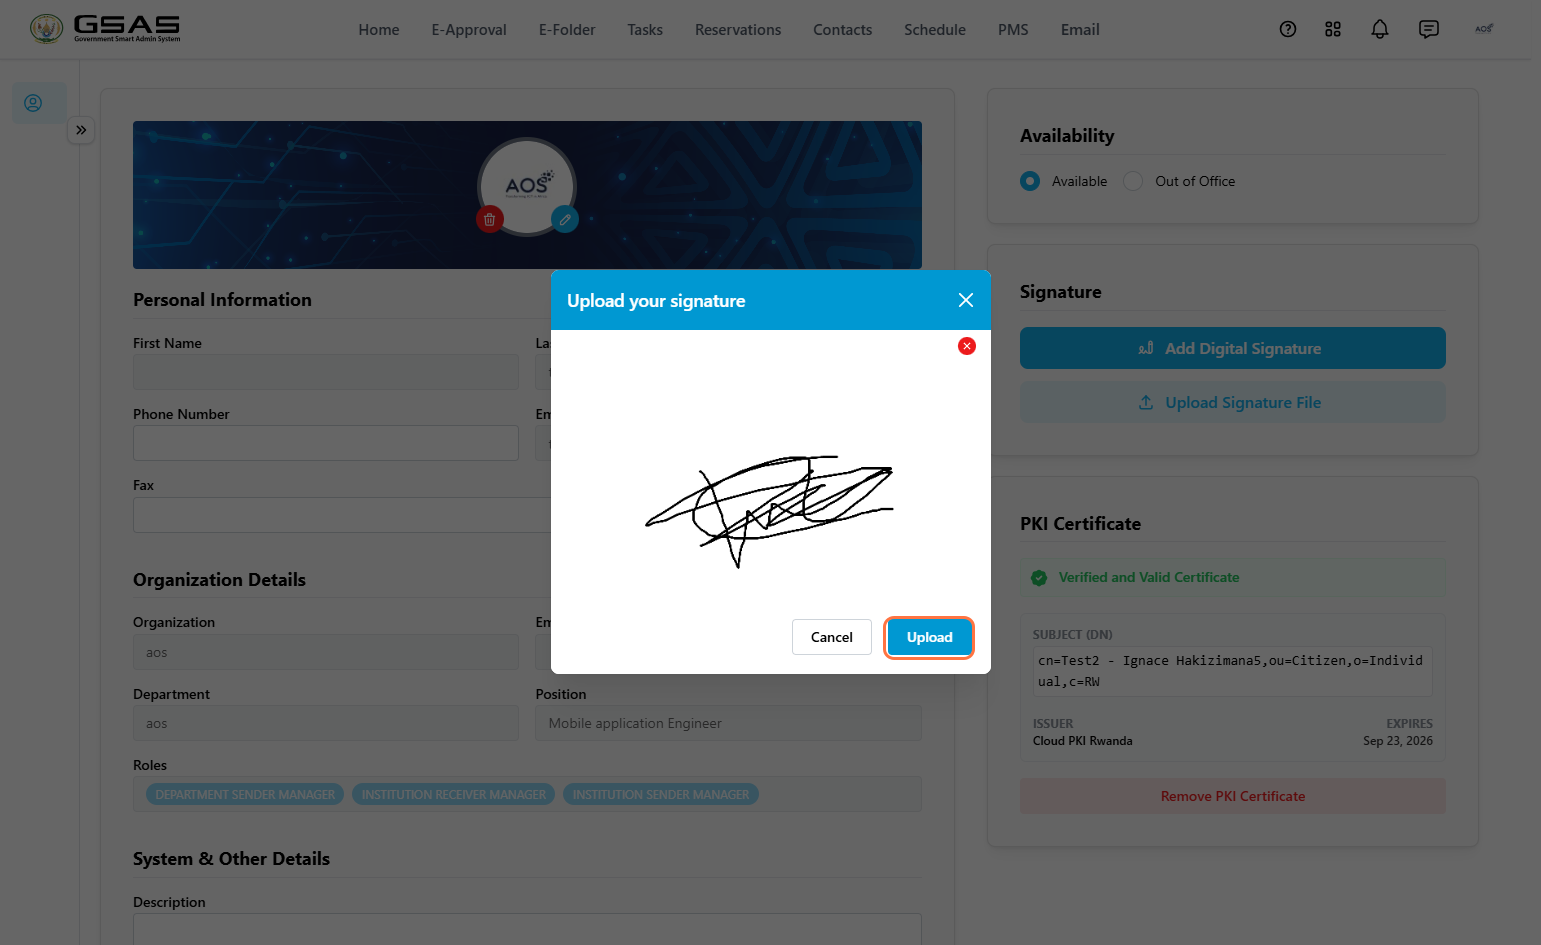](https://docs.smartadmin.rw/uploads/images/gallery/2026-06/uploadandsave.png)
---
### PKI Certificate
Some forms in the system are configured to require a PKI (Public Key Infrastructure) signature. If your account has one registered, it will appear in this panel with its verification status, subject details, issuer, and expiry date. (Scroll down to learn how to register your PKI).
[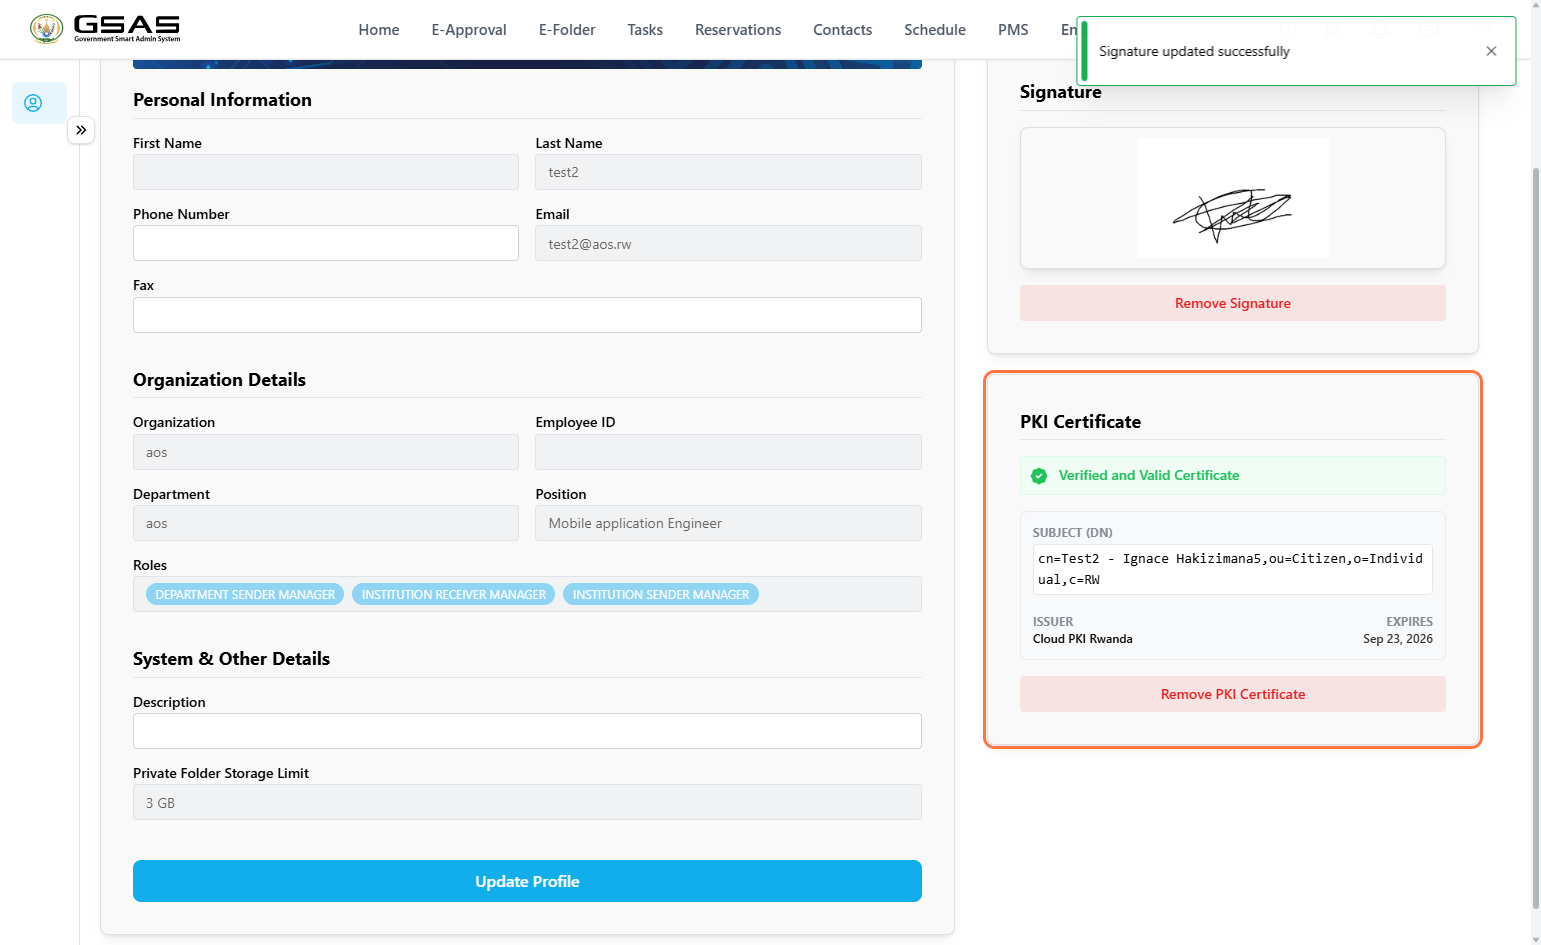](https://docs.smartadmin.rw/uploads/images/gallery/2026-06/pkifield.png)
How to register your Public Key Infrastructure (click to open)
1. Click on the **Add PKI Signature** button. [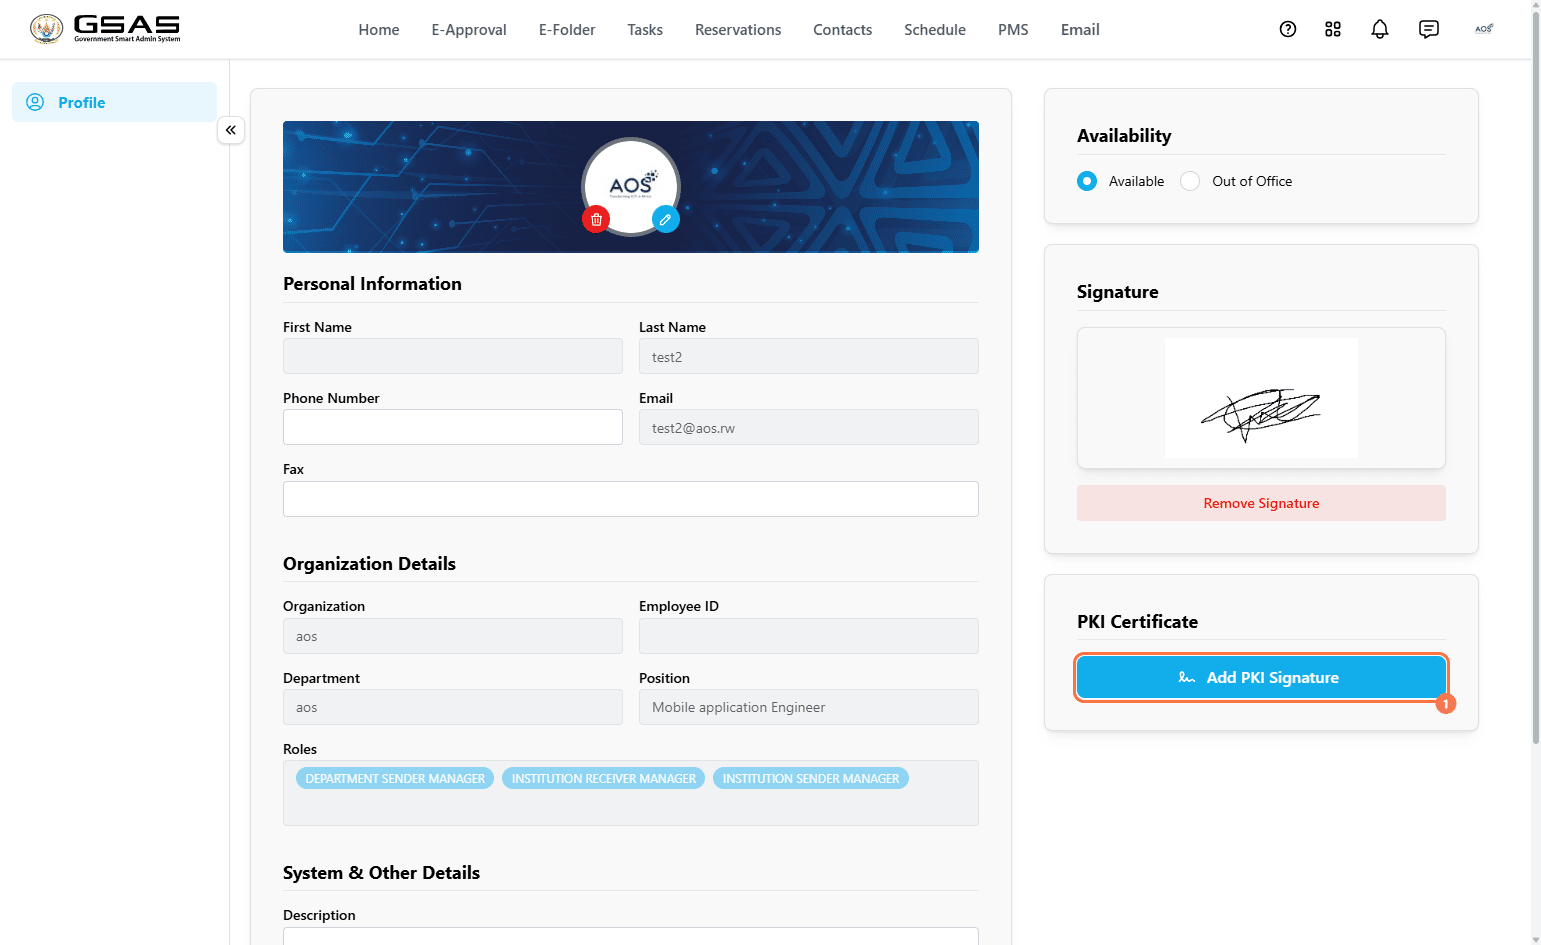](https://docs.smartadmin.rw/uploads/images/gallery/2026-06/addt.jpeg)
2. Enter your email address and National ID number, then click **Register**. [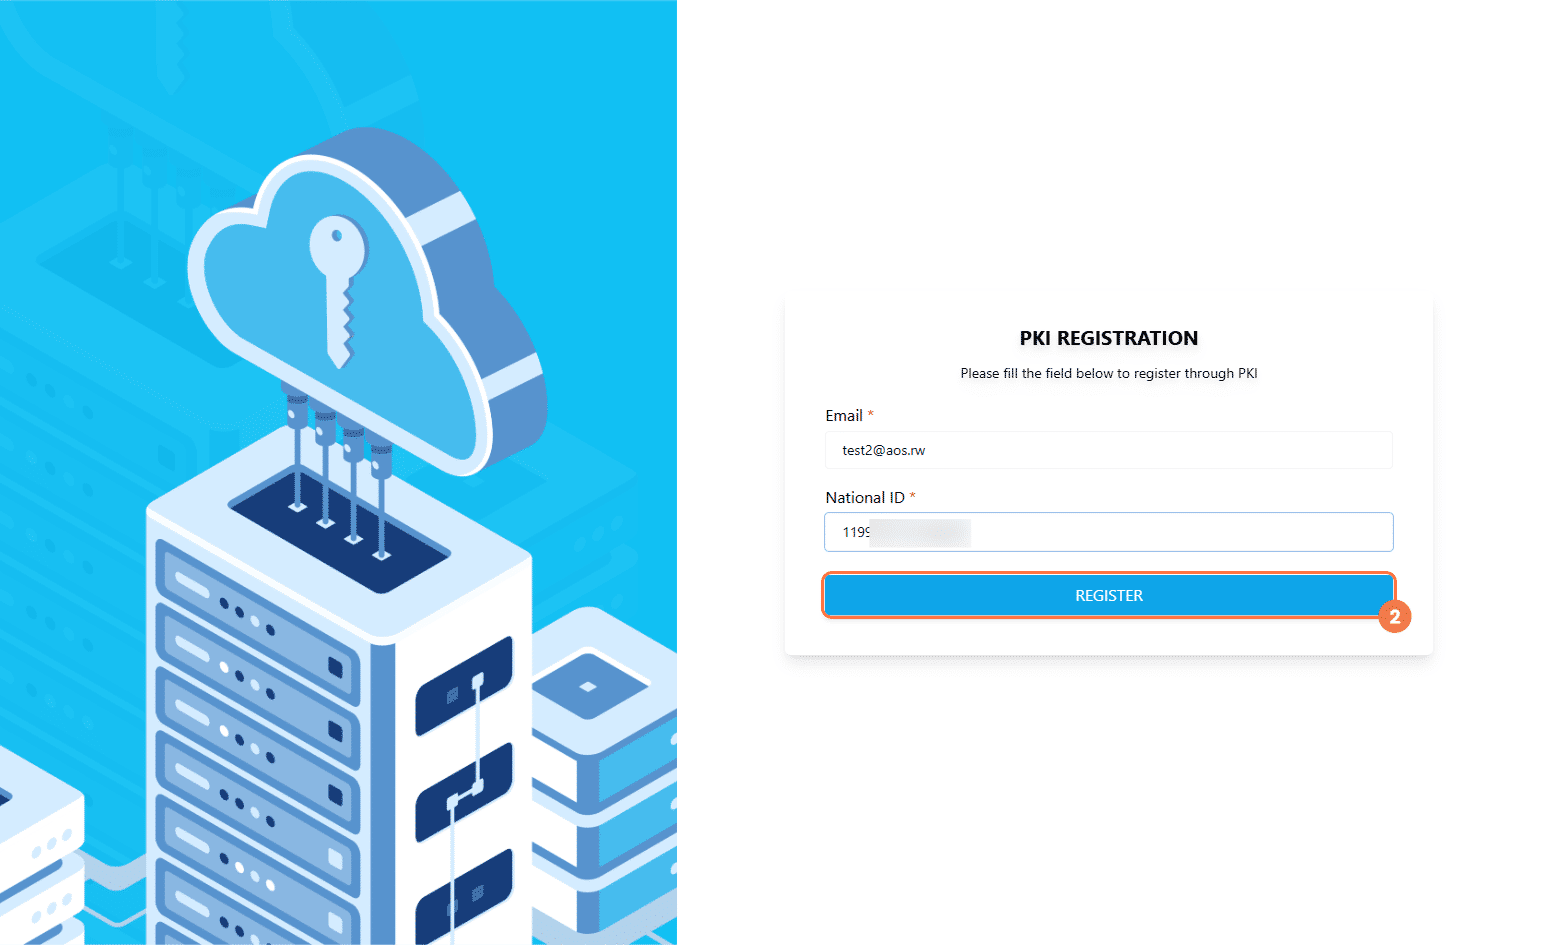](https://docs.smartadmin.rw/uploads/images/gallery/2026-06/register.jpeg)
3. Enter your email address and mobile phone number, then click **Send Code** to receive an authentication code. [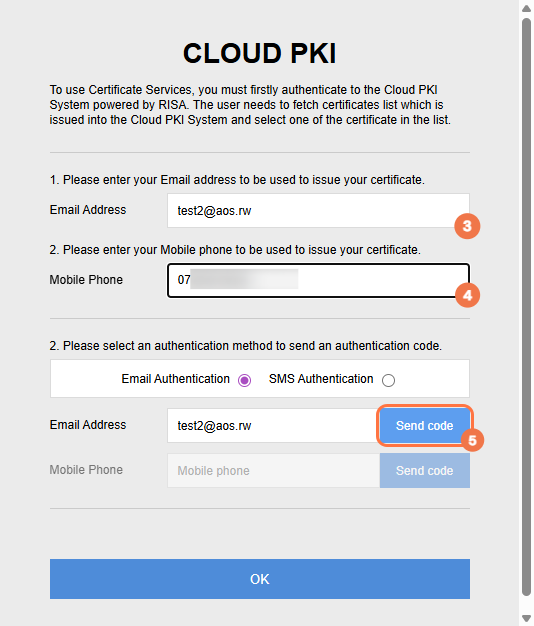](https://docs.smartadmin.rw/uploads/images/gallery/2026-06/cloudpki.jpeg)
4. Enter the authentication code you received, then click **OK**. | [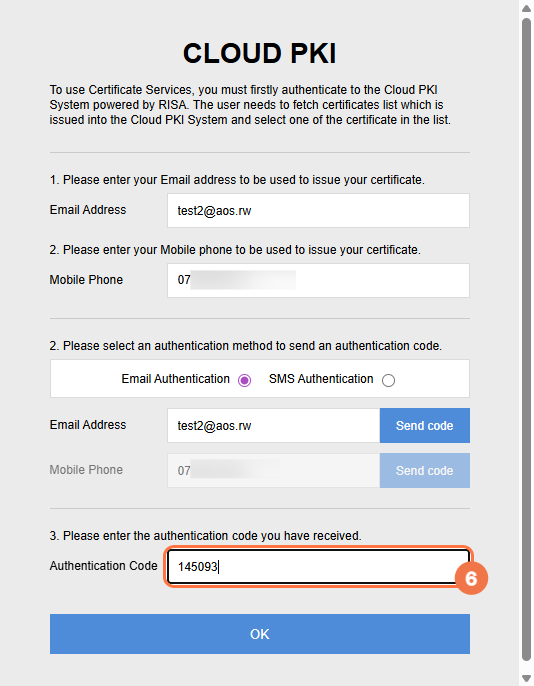](https://docs.smartadmin.rw/uploads/images/gallery/2026-06/cloudok.jpeg) | [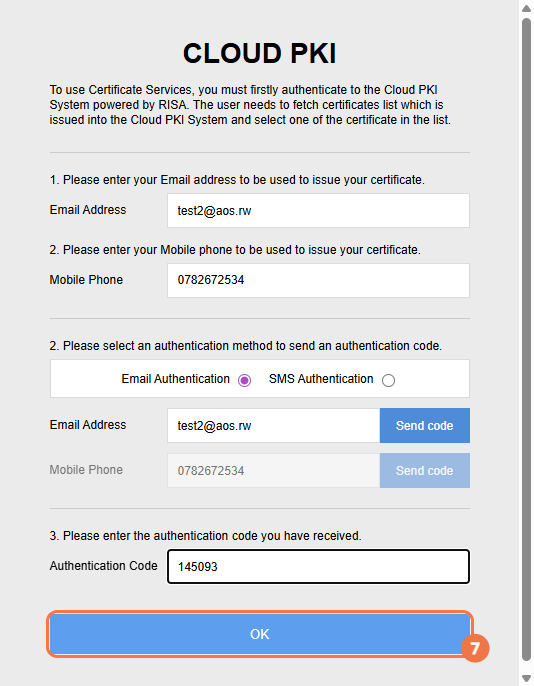](https://docs.smartadmin.rw/uploads/images/gallery/2026-06/okauth.jpeg) |
5. Click on your name to select your certificate, then enter your password and confirm. | [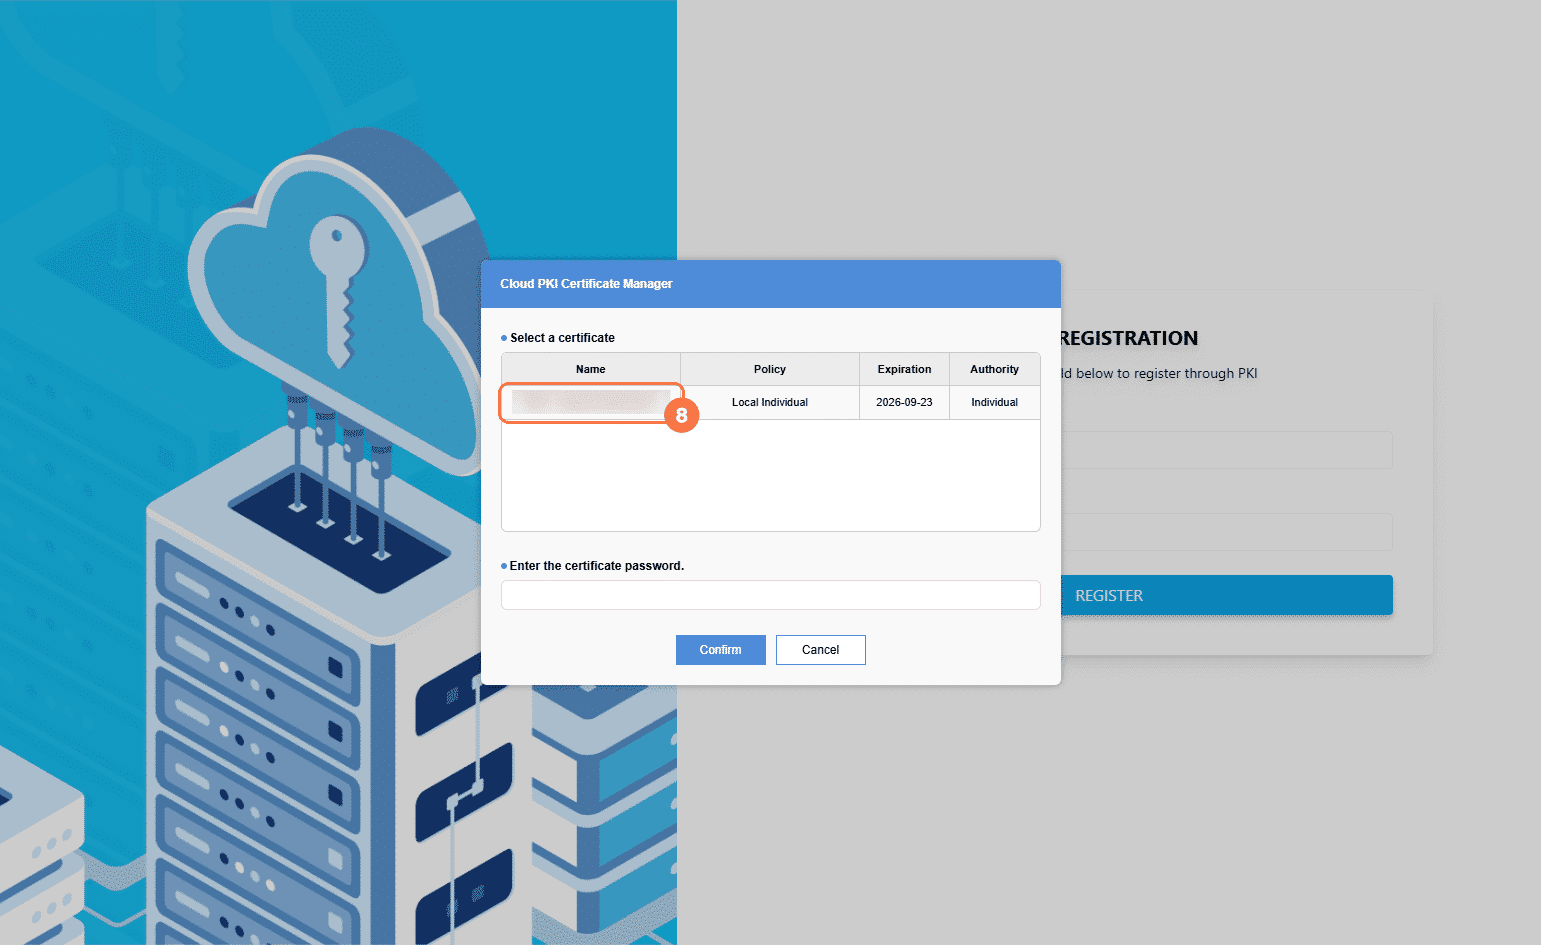](https://docs.smartadmin.rw/uploads/images/gallery/2026-06/tapname.jpeg) | [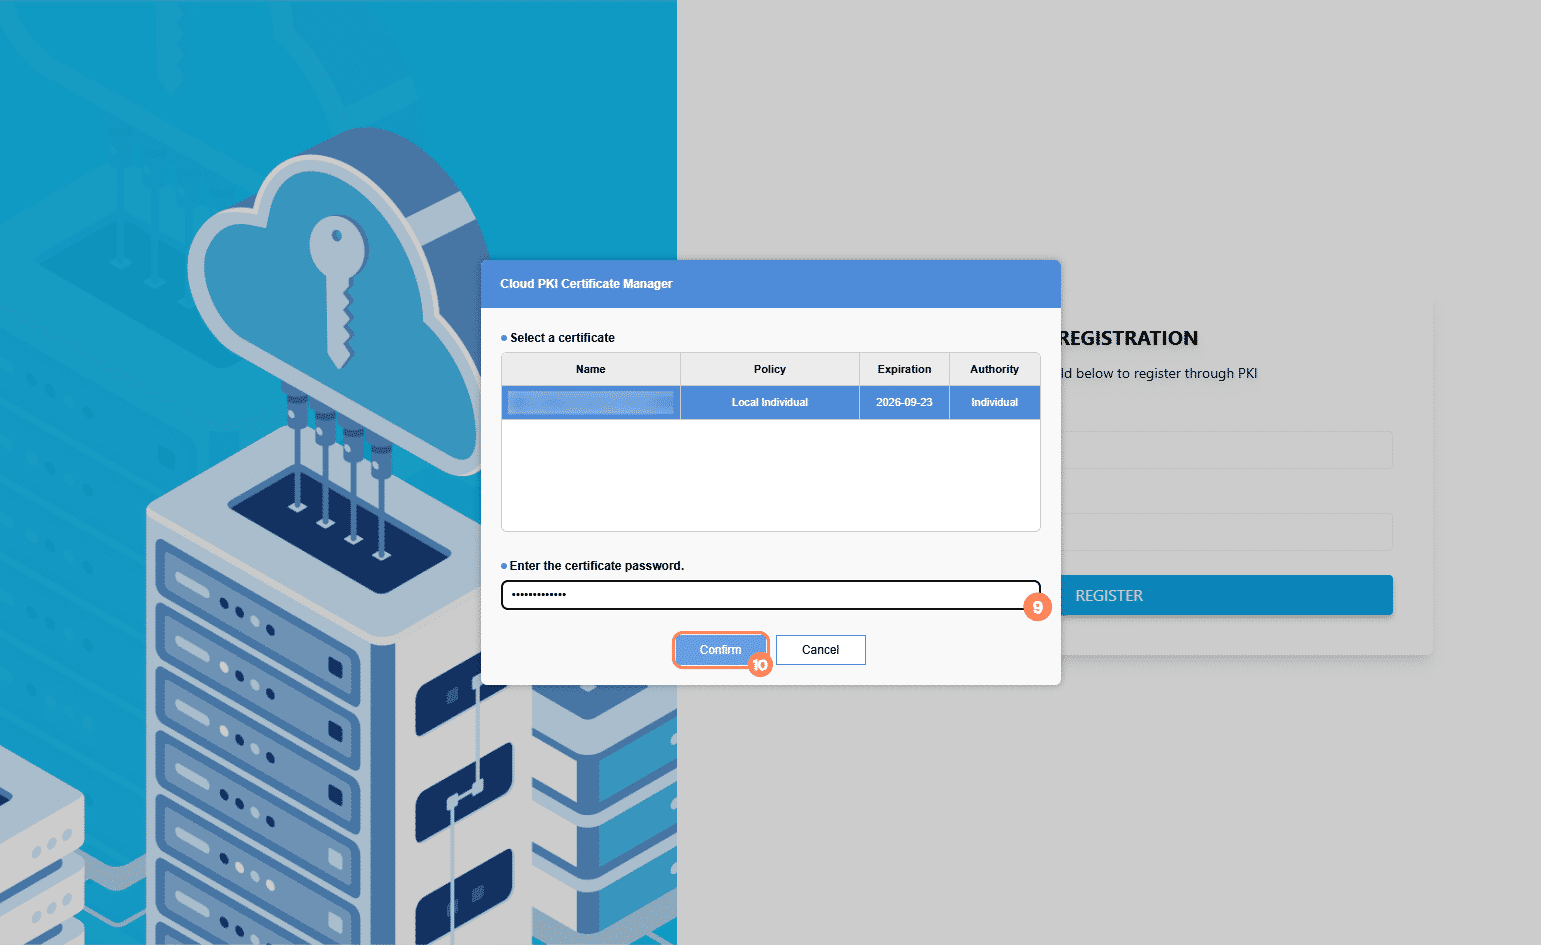](https://docs.smartadmin.rw/uploads/images/gallery/2026-06/passandcb.jpeg) |
A success message will appear. Re-login to your GSAS account to confirm that the certificate has been registered
| **Important:** If a form requires a PKI signature and you do not have one registered, you will not be able to sign it. Contact your administrator if you need guidance to set one up. |
# e-Approval
Submit documents for approval, track where they stand in the process, and sign off on the ones that land in your queue. This chapter covers the full approval workflow, from initiating a request to closing it out.
# Navigating e-Approval
---
The E-Approval module allows you to create and submit approval requests digitally within GSAS. Instead of handling physical documents around the office, everything is done within the system, from drafting and submitting a request to getting it approved and finalized.
Folder Reference
What each folder in the e-Approval module contains and what you can expect to find there.
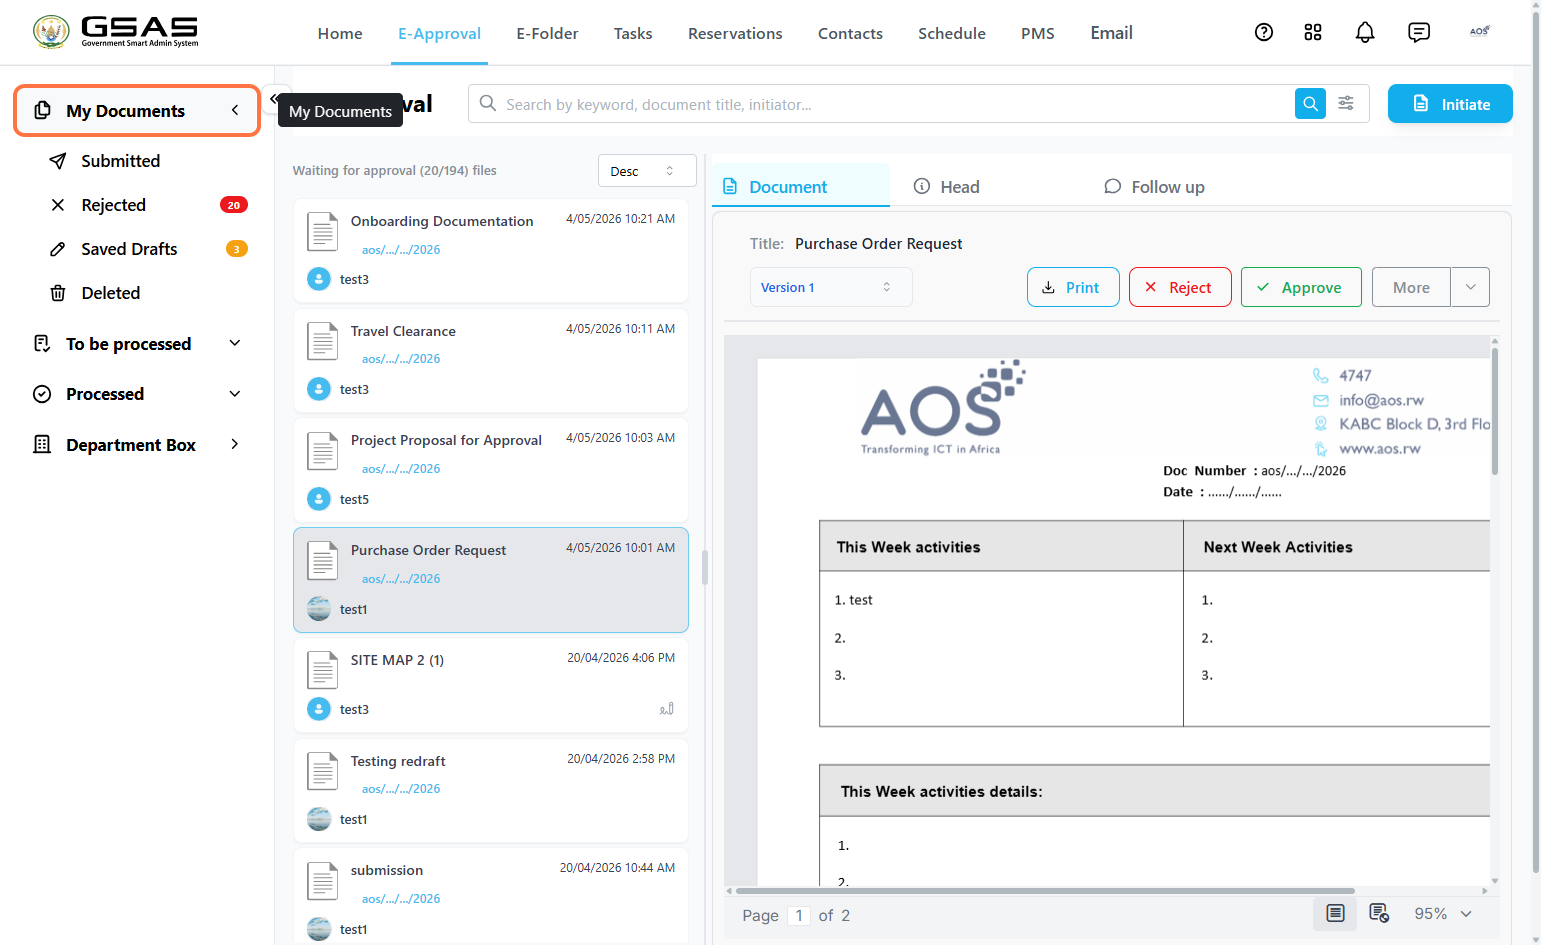
### My Documents
Documents you have created yourself.
[](https://docs.smartadmin.rw/uploads/images/gallery/2026-06/mydocs.png)
| Submitted | Documents you have submitted for approval. |
| Rejected | Documents that have been rejected by an approver. Once you edit and resubmit a rejected document, it is removed from this folder and updated to a new version. |
| Saved Drafts | Documents you have saved but not yet submitted. Also where reverted submissions are returned to for further editing. |
| Deleted | Drafts you have deleted. |
### To Be Processed
Documents assigned to you that require your action.
| Internal Approval | Internal requests waiting for your approval. You will be notified when a document reaches your turn in the approval line. |
| External Approval | Requests received from external institutions waiting for your approval. External approvals are only visible to you once the Receiver Manager of your institution forwards it to you. |
| On Hold | Documents you have placed on hold while you decide whether to approve or reject them. You can return to them at any time to take action. |
| Outgoing Sender Manager only | Approved documents ready to be dispatched to external institutions. Only visible to users with the Sender Manager role. |
### Processed
Documents you have already taken action on and are no longer waiting for your review.
[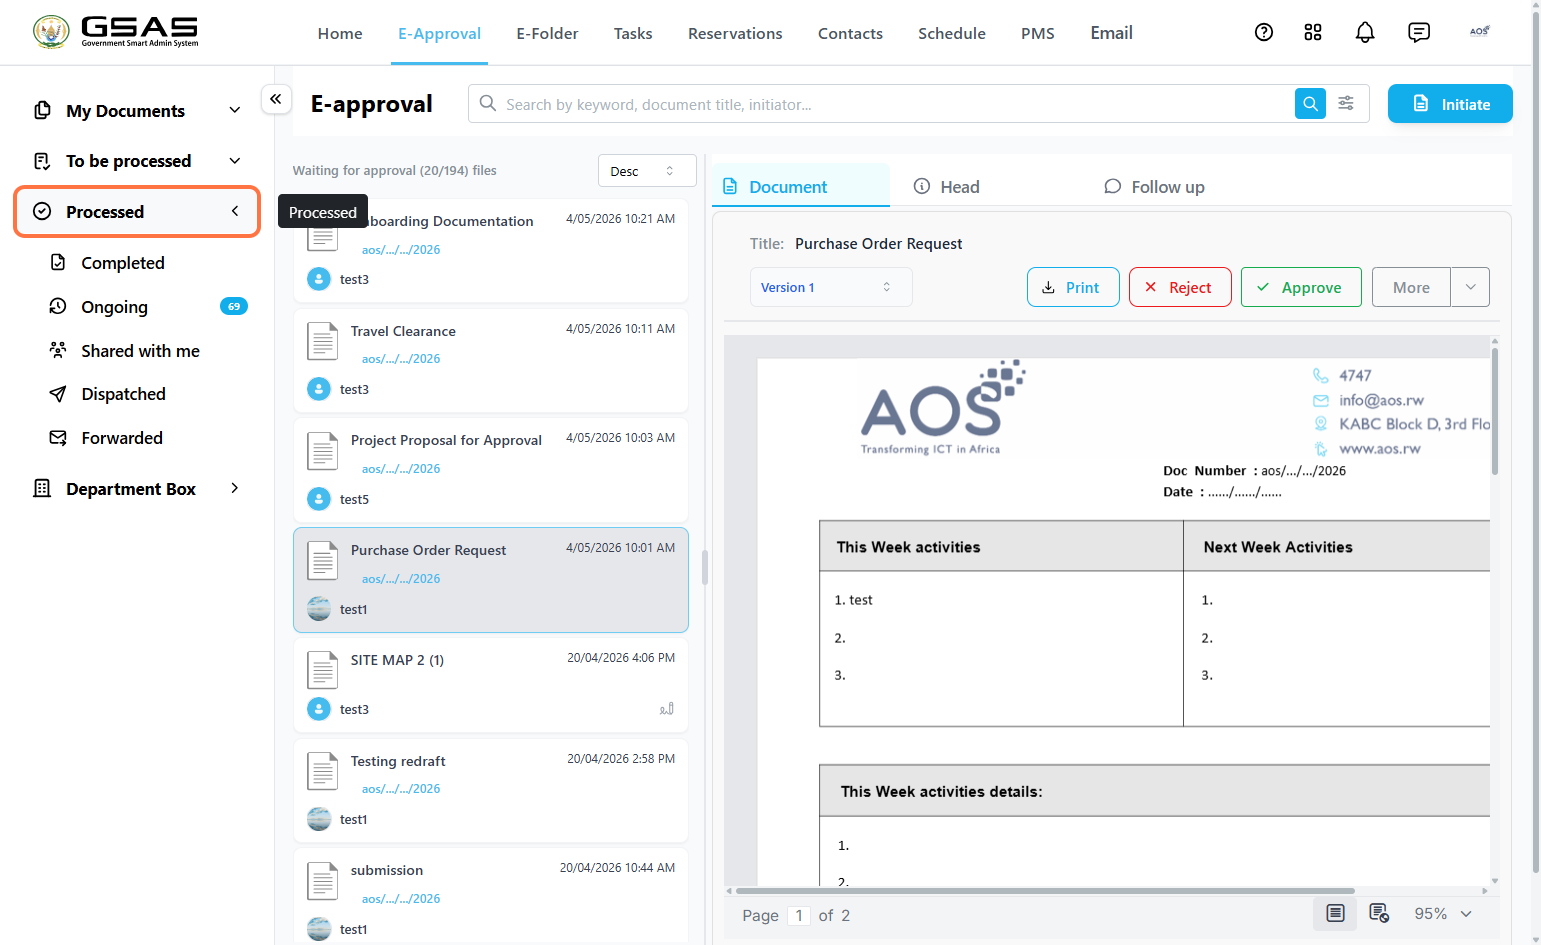](https://docs.smartadmin.rw/uploads/images/gallery/2026-06/processed.png)
| Completed | Documents that have been approved by all approvers in the line and are fully completed. |
| Ongoing | Documents you have already approved but are still moving through the remaining approvers in the line. |
| Shared with Me | Completed documents that other users have shared with you. |
| Dispatched Sender Manager only | Documents that have been sent out to external institutions from the Outgoing folder. Only visible to users with the Sender Manager role. |
| Forwarded | External documents you have received and forwarded on to other internal users. |
### Department Box
Official documents exchanged between your institution and external institutions, including physical documents registered for record-keeping. Visible to all users in your department.
[](https://docs.smartadmin.rw/uploads/images/gallery/2026-06/deptbox.png)
| Received Documents | Official documents received from external institutions. |
| Dispatched Documents | Official documents your institution has dispatched to external institutions. |
| Registered Received | All registered documents received from external institutions. |
| Registered Dispatched | All registered documents dispatched to external institutions. |
---
Searching and Filtering
Every folder in E-Approval has a search bar at the top to help you quickly find a document.
- Search
Type a keyword into the search bar to search by document title, then press **Enter** or click the search icon.
- Filters
Click the filter icon next to the search bar to open the filter panel. Available filters include:
| Document Title | Filter by the title of the document. |
| Document Reference Number | Filter by the reference number assigned once a document is completed. |
| Initiated By | Filter by the person who created the request. |
| Approved By | Filter by an approver who has acted on the request. |
| Form Name | Filter by the form template used to create the request. |
| Date From / Date To | Filter by a date range. |
| Attachments | Filter by whether the document has an attachment or not. |
| Document Status | Filter by the document's current status. |
| **Note:** Not all filters apply to every folder. |
Once you have set your filters, click **Search** to apply them. Click **Clear All** to reset the filter panel.
# Internal Approval Requests
---
Submitting an Internal Approval Request:
This page covers everything you need to get an internal approval request submitted.
Step 1
### Initiate
Click on the **Initiate** button in the top right corner of the E-Approval page.
[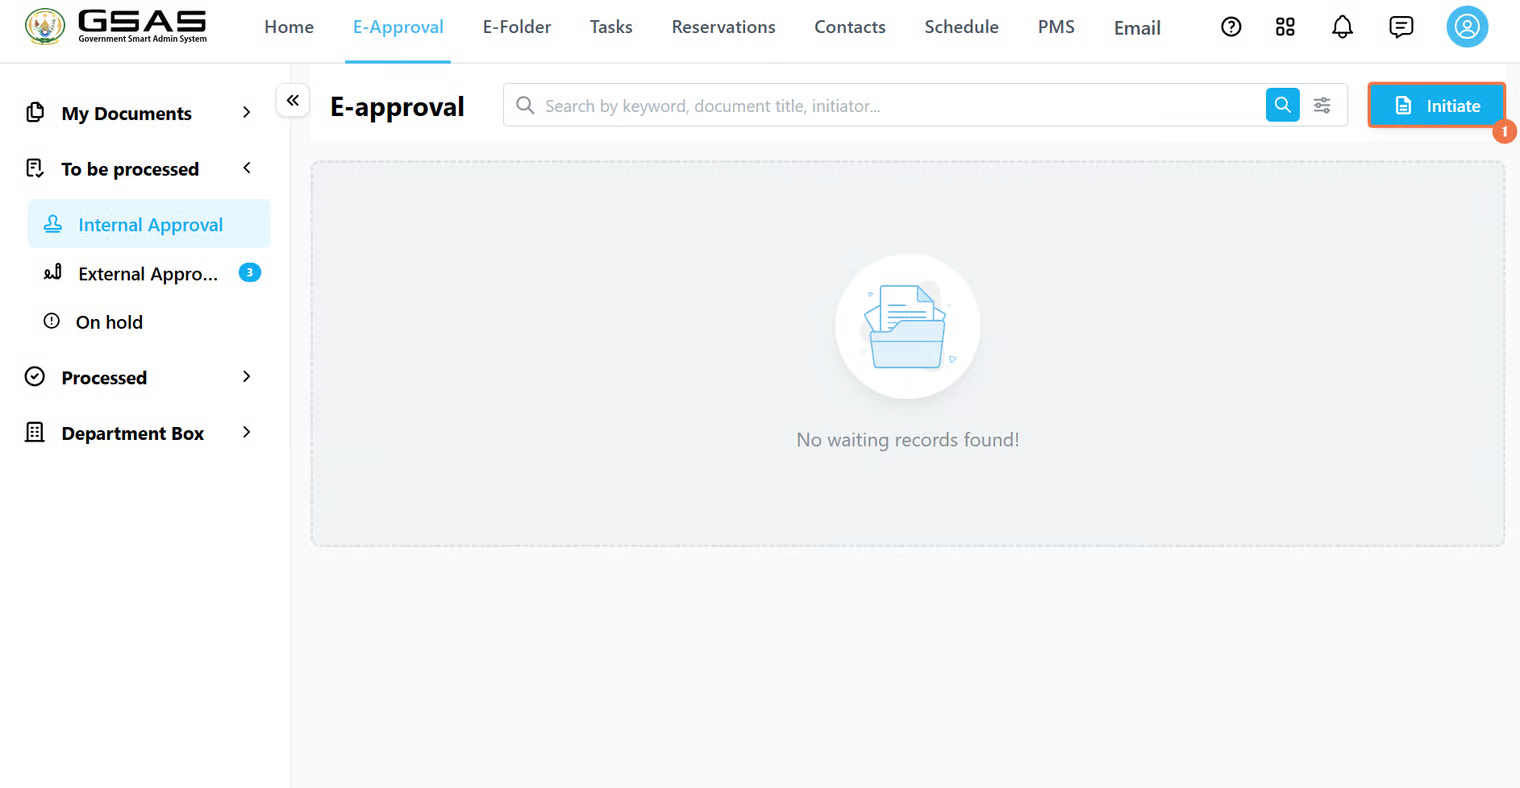](https://docs.smartadmin.rw/uploads/images/gallery/2026-06/4Spimage.png)
---
Step 2
### Choose a form template
A dialog will appear listing available templates. Select the one that matches your request type and click it to proceed.
Templates are organized into two tabs: **Documents** for forms created by your institution's administrator, and **Forms** for common templates shared across all institutions.
[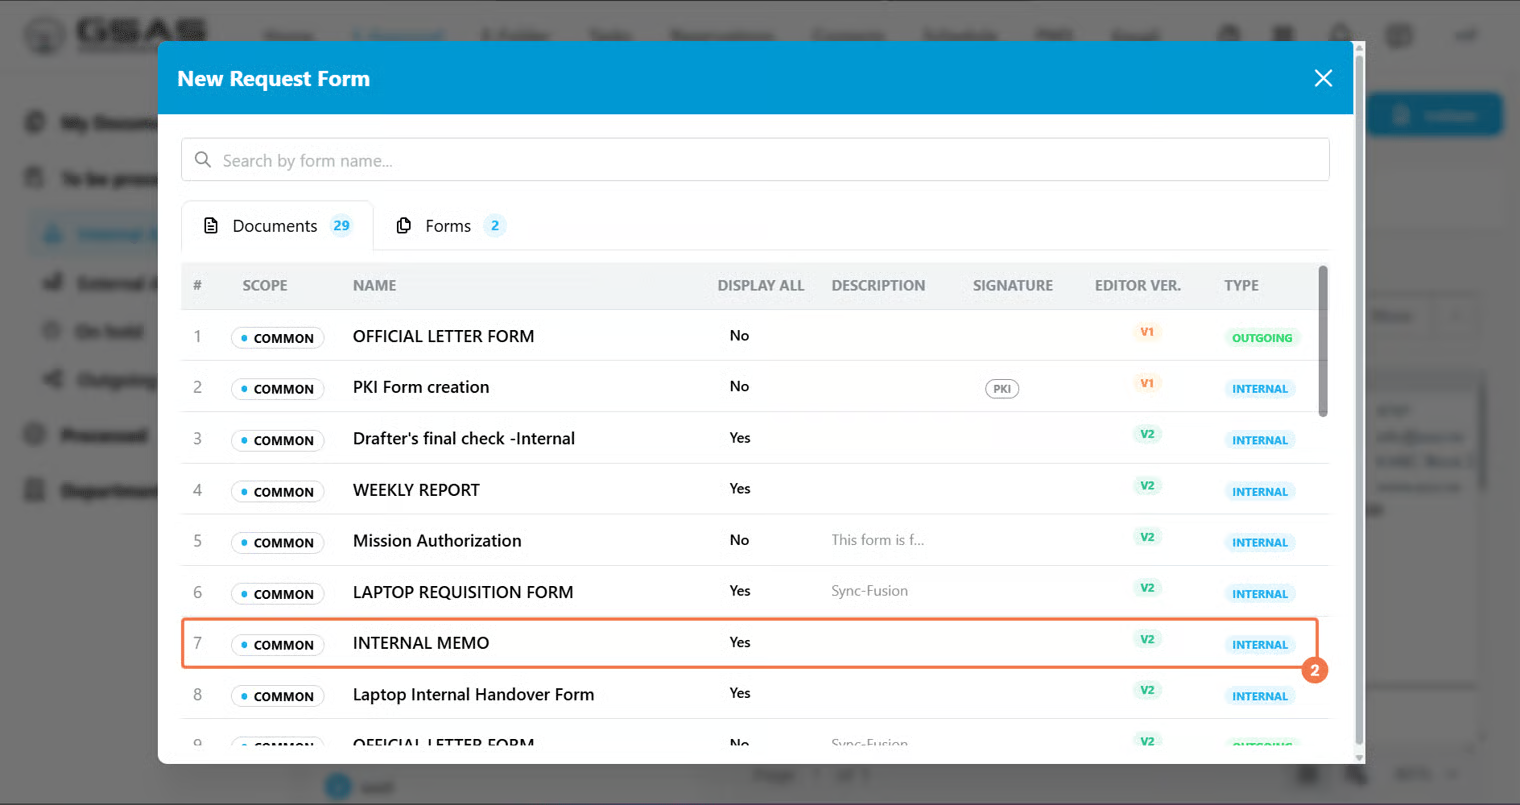](https://docs.smartadmin.rw/uploads/images/gallery/2026-06/80gimage.png)
*Not sure which template to pick? Use the columns in the list to guide you:*
| Scope | Whether the template is common to your whole institution or specific to your department |
| Display All | If Yes, all approvers' and the drafter's signatures appear on the completed document. If No, only the final approver's signature is shown. |
| Signature | Whether the form requires a PKI signature or not to be submitted/approved. (*If you choose to use a PKI form, you will be asked to enter your PKI password before you submit. Learn to register your PKI [here](https://docs.smartadmin.rw/books/gsas-user-guide/page/your-account-and-profile/#bkmrk-how-to-register-your))*
|
| Type | Whether the request is internal or outgoing. |
---
Step 3
### Fill in the Head tab
- Enter a **Title** for your request and optionally set a **Due Date**.
- You can also upload any supporting files in the **Attachments** area. This is not mandatory.
[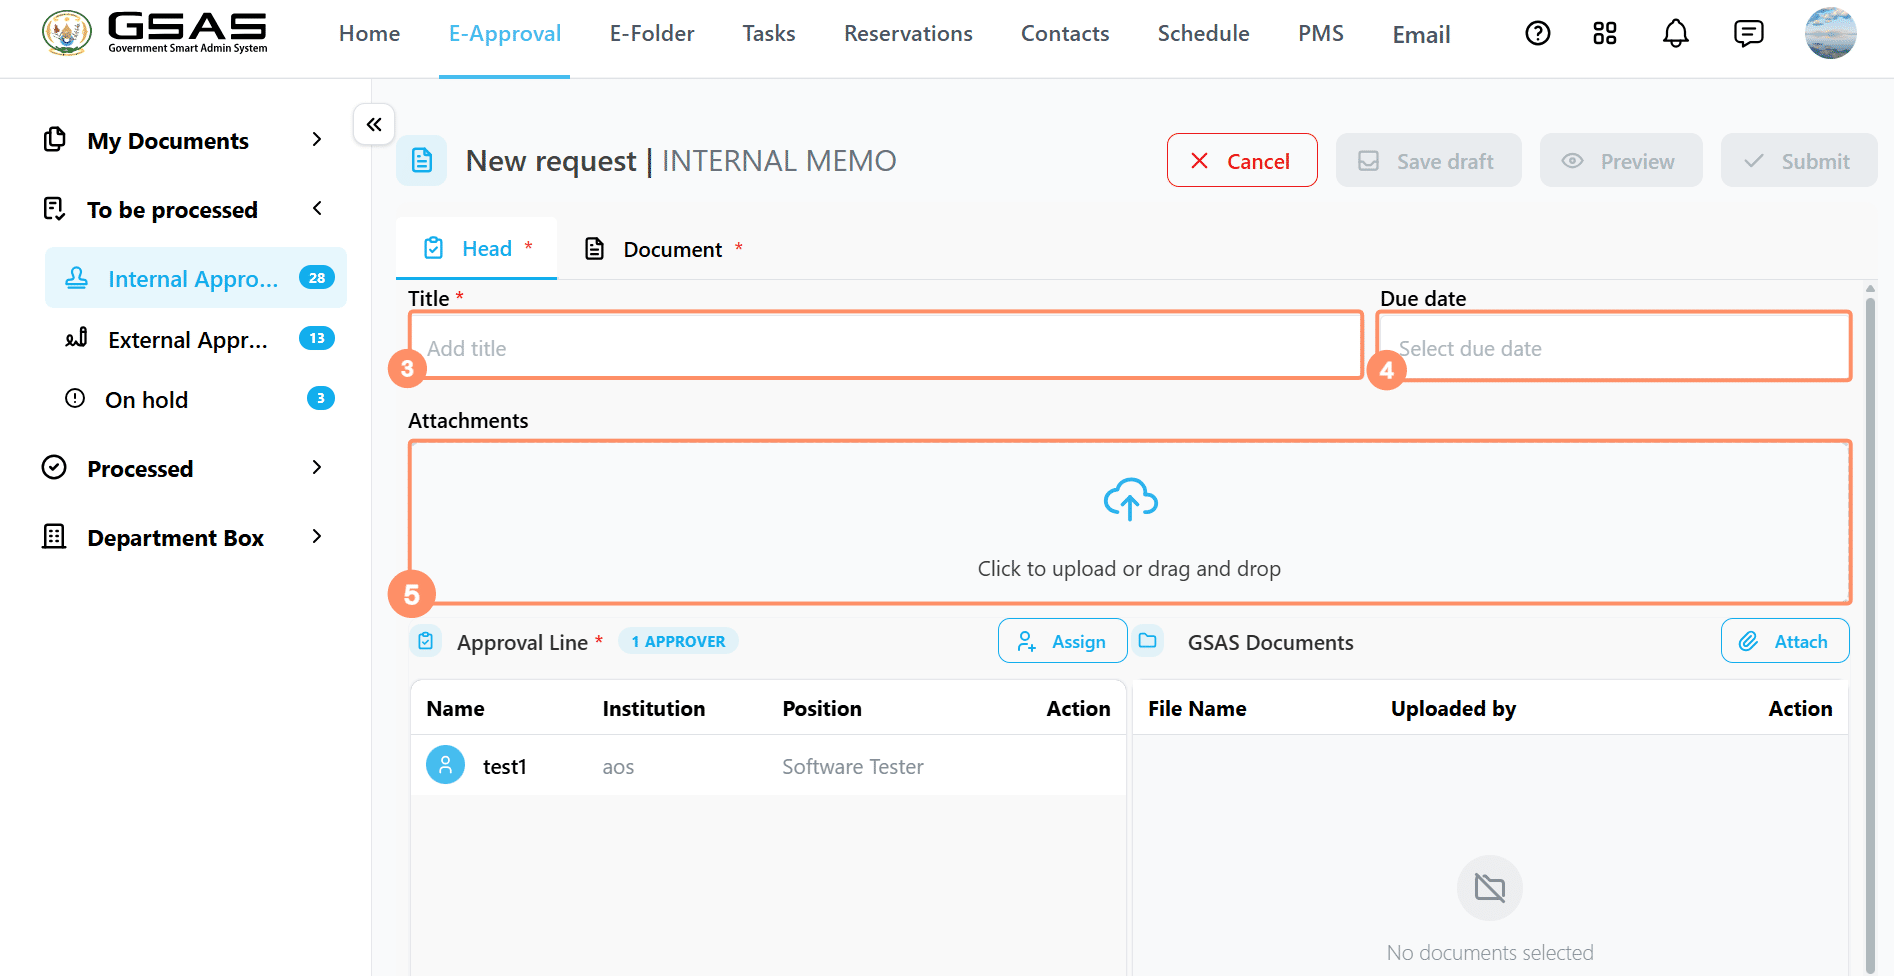](https://docs.smartadmin.rw/uploads/images/gallery/2026-06/details1.jpeg)
---
Step 4
### Assign approvers
- Click **Assign** to add approvers to the approval line.
[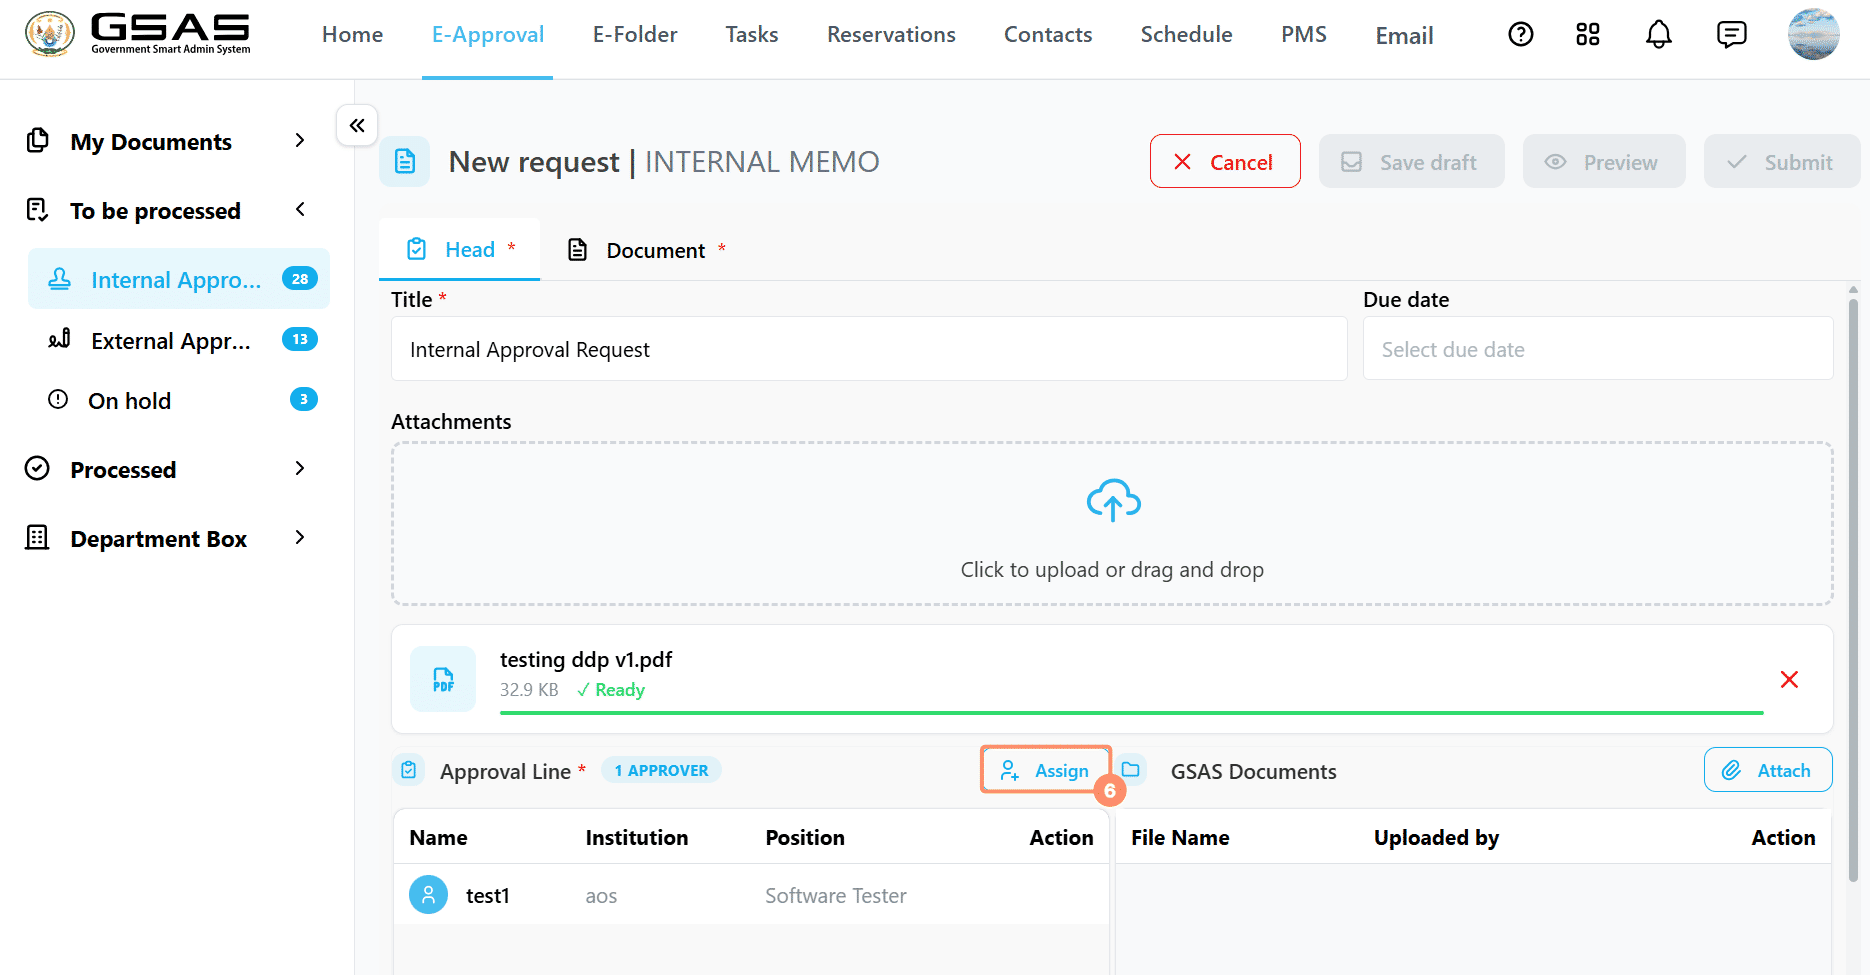](https://docs.smartadmin.rw/uploads/images/gallery/2026-06/ndKimage.png)
- Search for approvers to assign the request to and select them. You can assign people from within your institution or from other institutions that use the system (Select another institution using the **Search institutions...** dropdown on the left).
[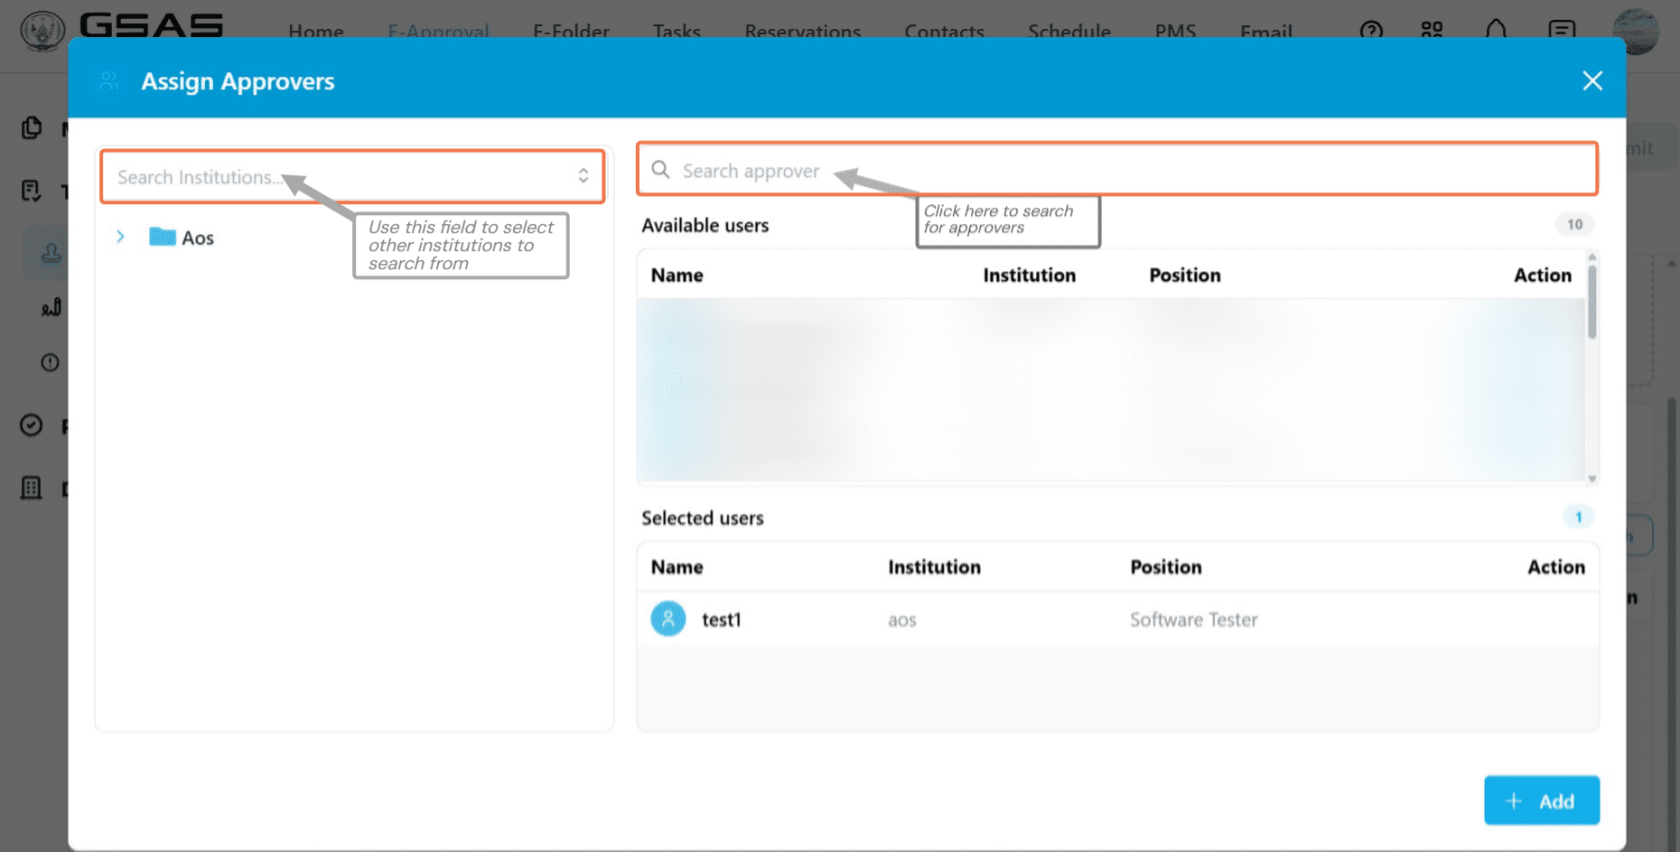](https://docs.smartadmin.rw/uploads/images/gallery/2026-06/2sCimage.png)
- Click on **Add** once you're done selecting the approvers.
- The request will move through the approvers in order.
- The next approver can only see the request once the previous one has approved.
- You must have at least one approver before submitting.
[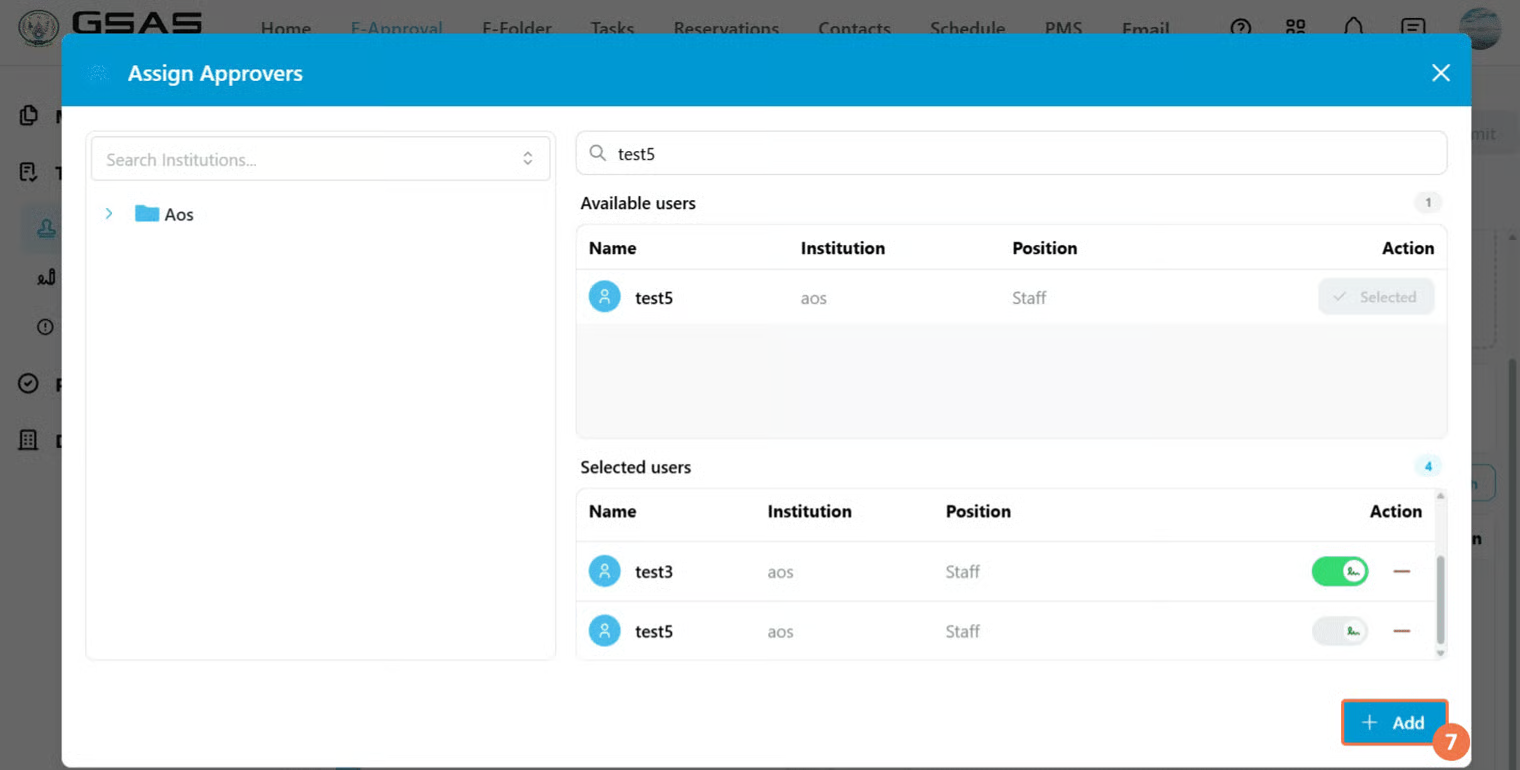](https://docs.smartadmin.rw/uploads/images/gallery/2026-06/nRximage.png)
---
### *Signatures*:
- Every assigned approver's signature appears on the document once they approve.
- If needed, remove any previously selected approver from the line of approval by clicking on this icon (**-**).
- Each approver has a signature toggle next to their position. The last approver's and your own signature are on by default and can not be turned off. You can toggle others on or off as needed.
Toggle on and off approvers' signatures (click to open)
The toggle looks like this when the approver's signature is **ON**
[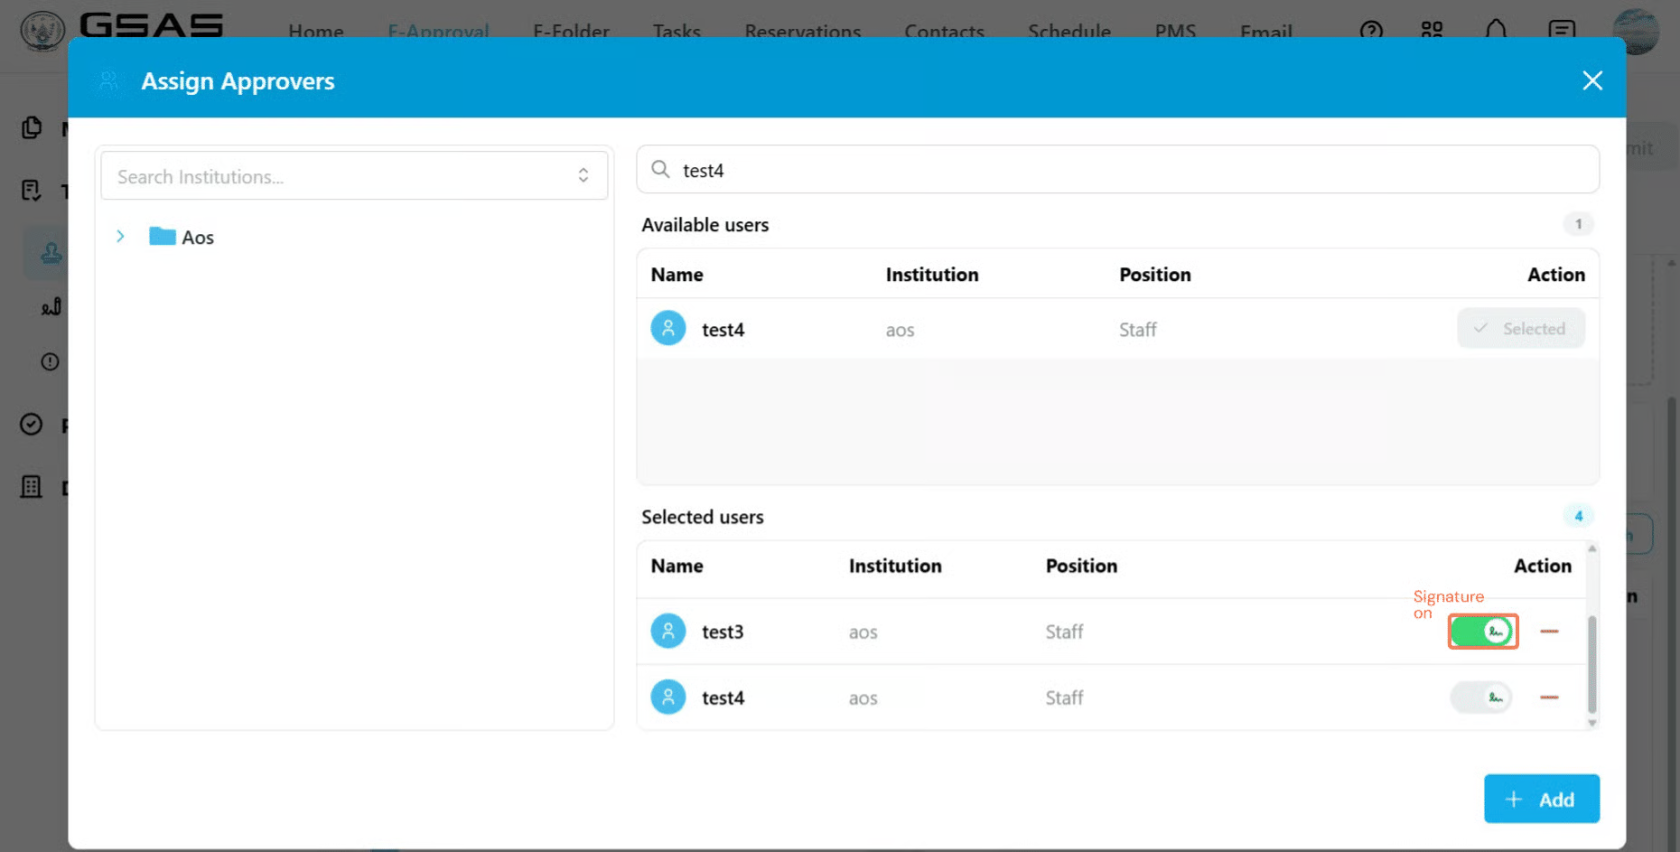](https://docs.smartadmin.rw/uploads/images/gallery/2026-06/Jmoimage.png)
---
The toggle looks like this if the approver's signature is **OFF**
[](https://docs.smartadmin.rw/uploads/images/gallery/2026-06/bDqimage.png)
Note that some forms are configured by your administrator to display only the final approver's signature, in which case this toggle will not appear.
|
---
Step 5
### Fill in the Document tab
- Click on the **Document** tab to edit the content of your request.
[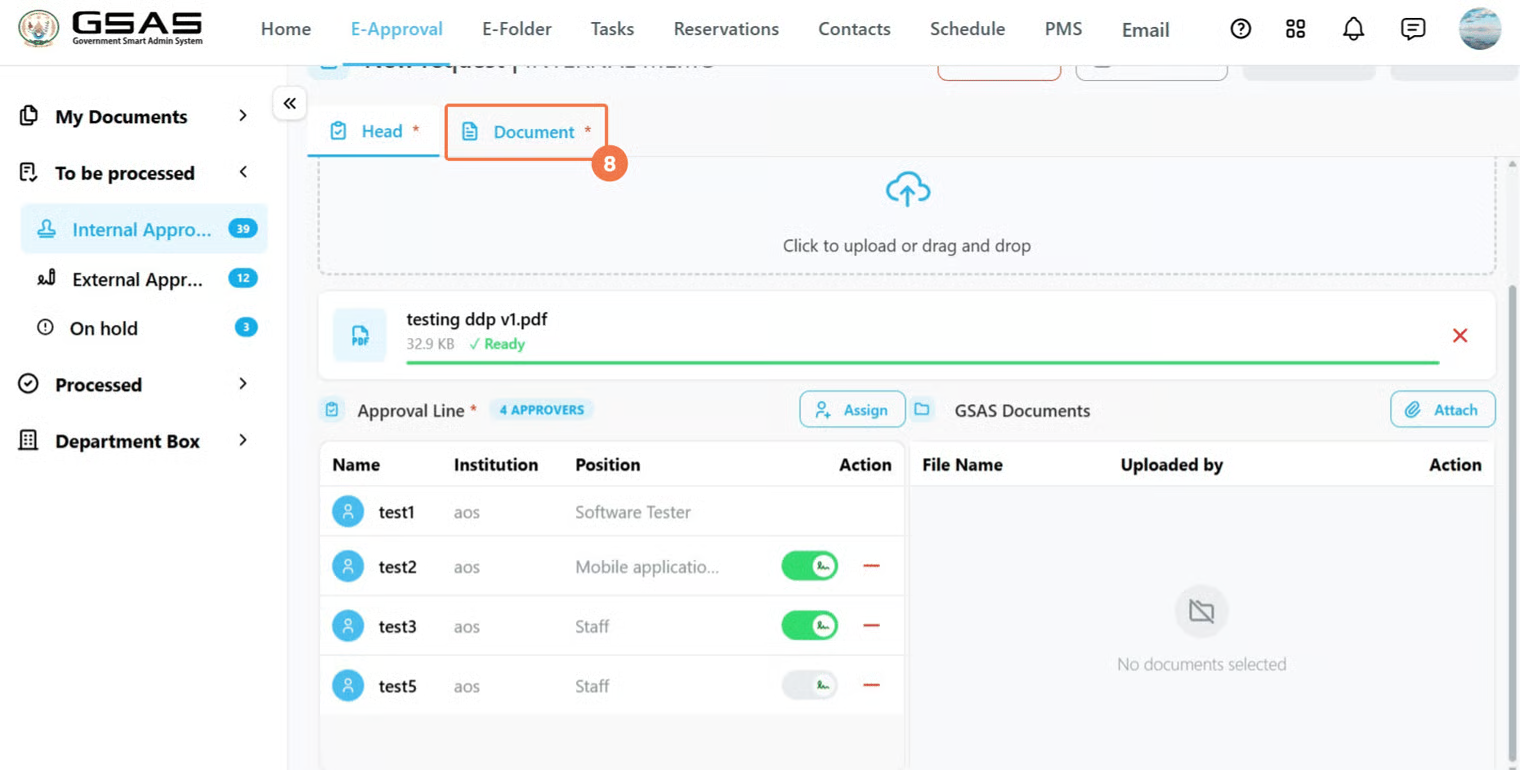](https://docs.smartadmin.rw/uploads/images/gallery/2026-06/lplimage.png)
- Enter your content directly or paste it in from elsewhere.
[](https://docs.smartadmin.rw/uploads/images/gallery/2026-06/MNBimage.png)
You do not need to add a date or leave space for signatures. The date & time of completion, and reference number of the document are generated automatically once the request is completed, and each approver's signature along with their date and time of signing appears on the form the moment they approve it.
---
Step 6
### Submit your request
- Once both tabs are filled in, click **Submit** in the top right corner. (You can **Preview** the document before submitting by clicking on the preview button).
[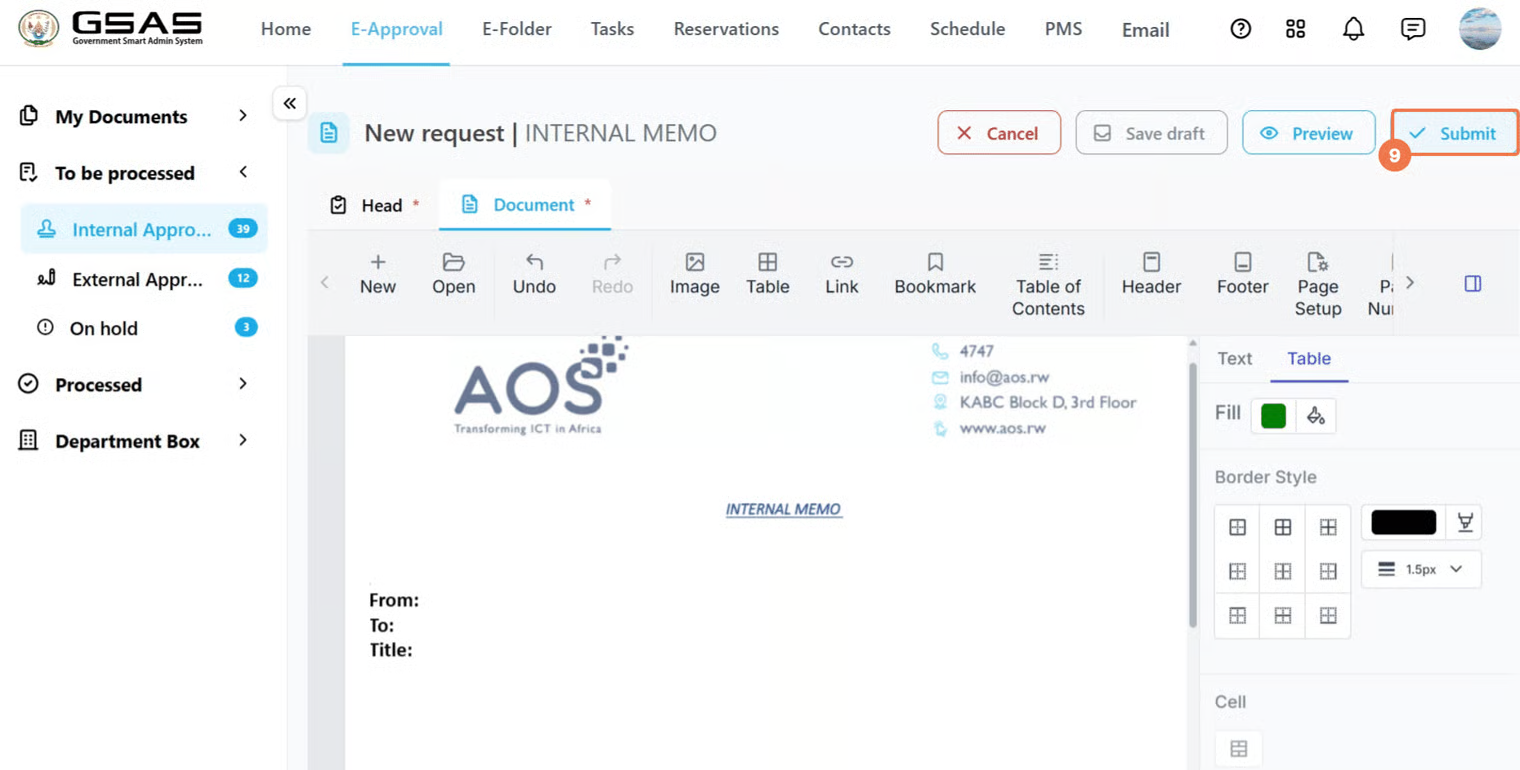](https://docs.smartadmin.rw/uploads/images/gallery/2026-06/0vtimage.png)
| ##### **Not ready to submit?** Click on the **Save Draft** button at any point to save your progress. You can find the document later under **My Documents → Saved Drafts** to continue editing before submitting.
|
- A confirmation dialog will appear, click **Submit** again to confirm.
[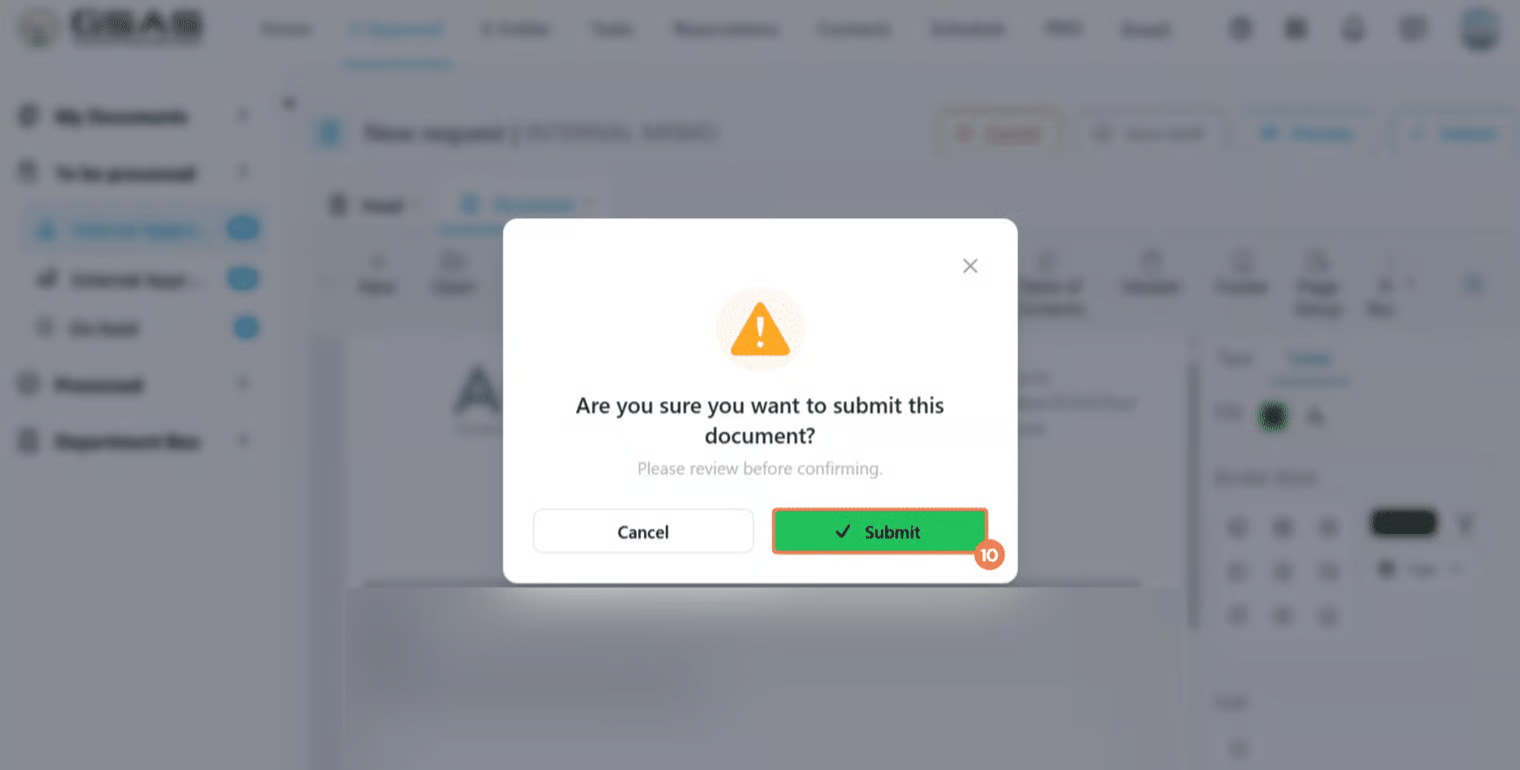](https://docs.smartadmin.rw/uploads/images/gallery/2026-06/Wdgimage.png)
- Your request will be submitted successfully and sent directly to the first approver in the line, they can view it from their **Internal Approval** folder if they're from your institution. If not, it will be in their **External Approval** folder.
[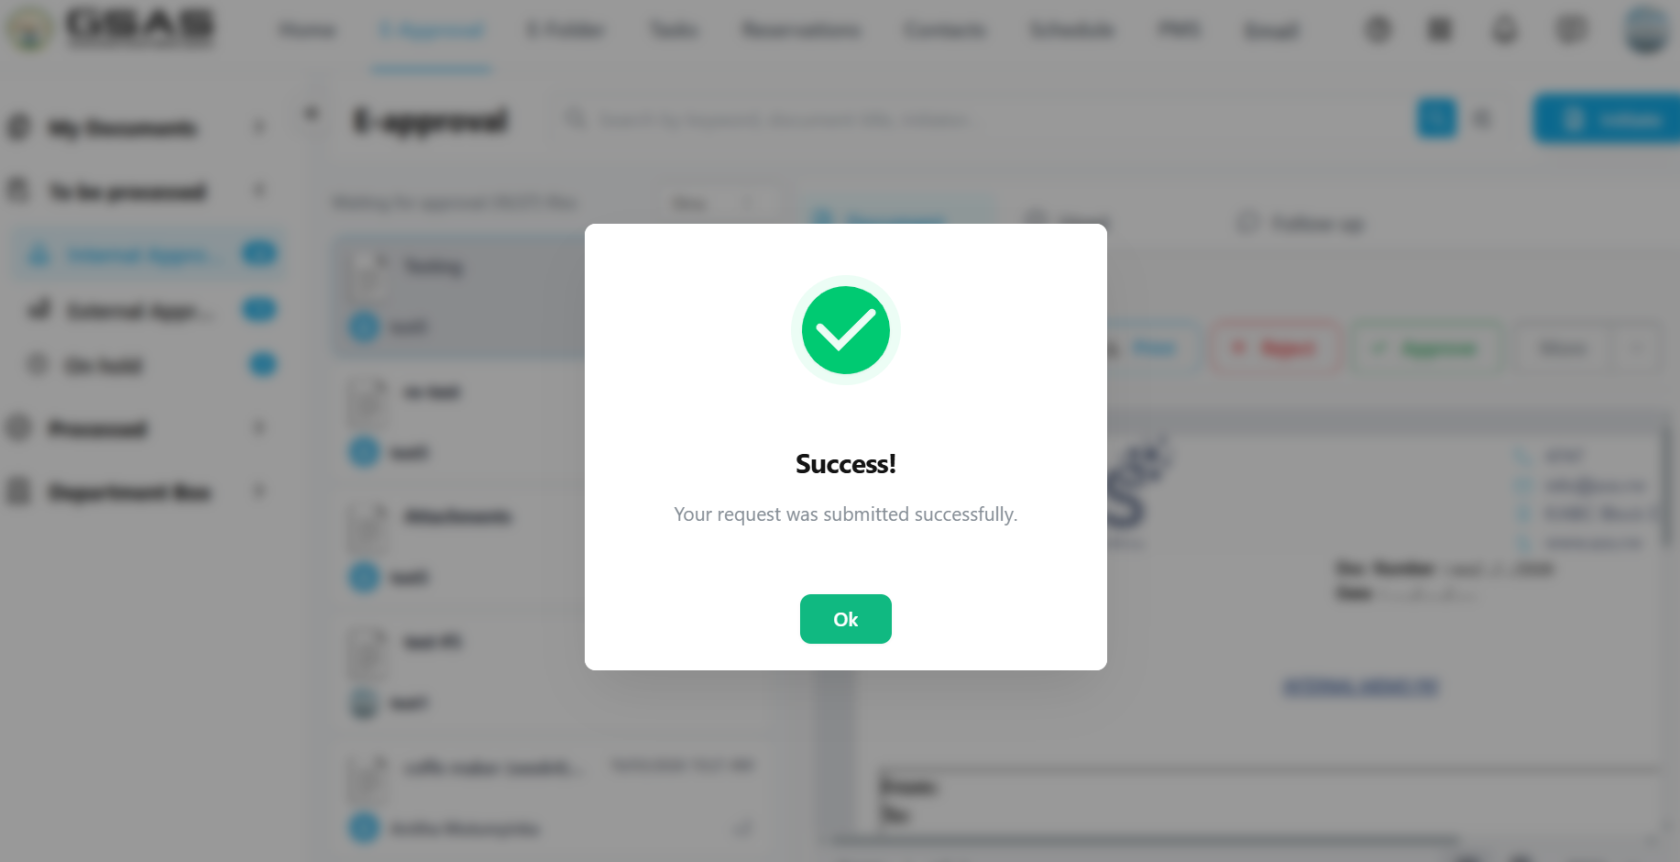](https://docs.smartadmin.rw/uploads/images/gallery/2026-06/RDcimage.png)
- It will appear under **My Documents → Submitted** on your side.
[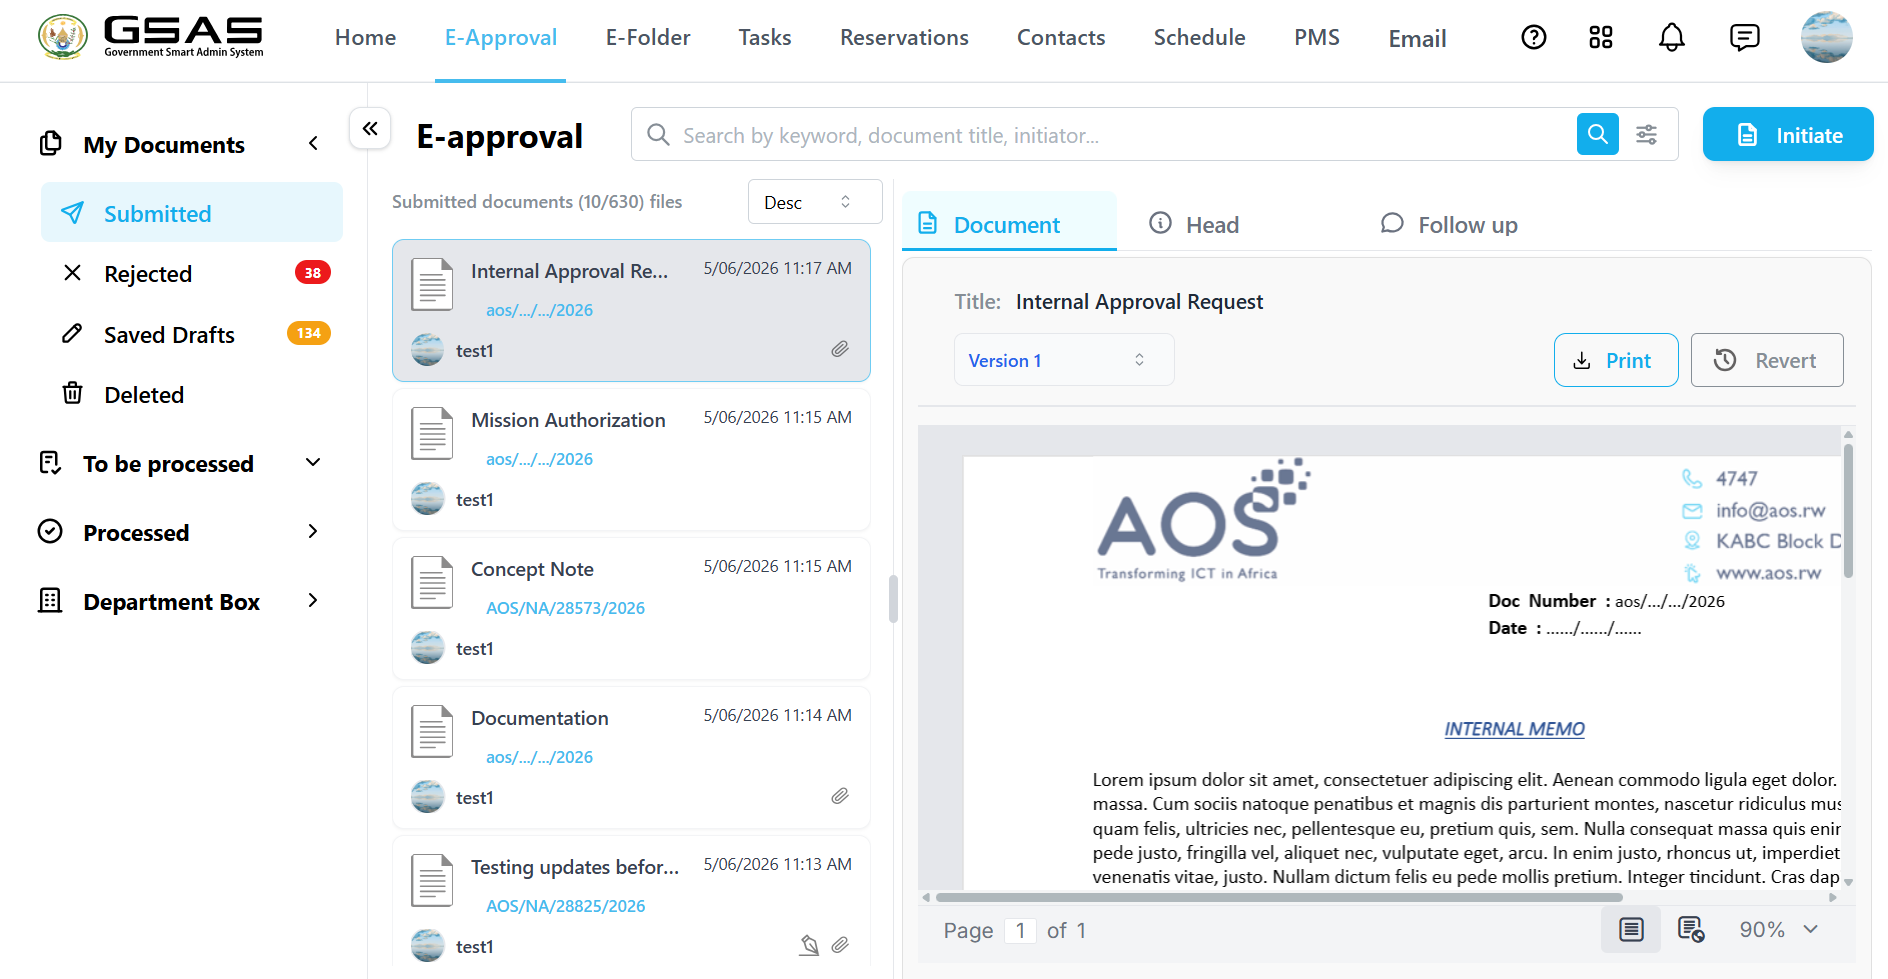](https://docs.smartadmin.rw/uploads/images/gallery/2026-06/CEPimage.png)
| ##### **Need to make further edits?** Click on the **Revert** button before any approver takes action. The document will be moved from **Submitted** to **Saved Drafts**. You can resubmit once you've made necessary changes. Your type will be updated from Drafter to **Redrafter** on the document.
|
---
***Proceed to the [Managing approval requests](https://docs.smartadmin.rw/books/gsas-user-guide/page/managing-approval-requests) page to learn how to keep track of your request after it's been submitted.***
# Outgoing Approval Requests
---
Submitting an Outgoing Approval Request
Outgoing requests are used when you need to send an official document to another institution, both those that use Smart Admin and those that do not. The process is largely the same as submitting an internal request, but with two key differences: you select a template with the type **Outgoing**, and you specify who the document is being sent to before submitting.
| **Before you begin:** This page focuses on what is unique to outgoing requests. If you have not tried submitting an internal request before, it is worth reading the [Internal Approval Requests](https://docs.smartadmin.rw/books/gsas-user-guide/page/internal-approval-requests) page first, it covers the shared steps in full detail. |
---
Step 1
### Choosing a template
Click **Initiate** and select a template from the list. For outgoing requests, look for templates with the type **Outgoing** in the last column.
[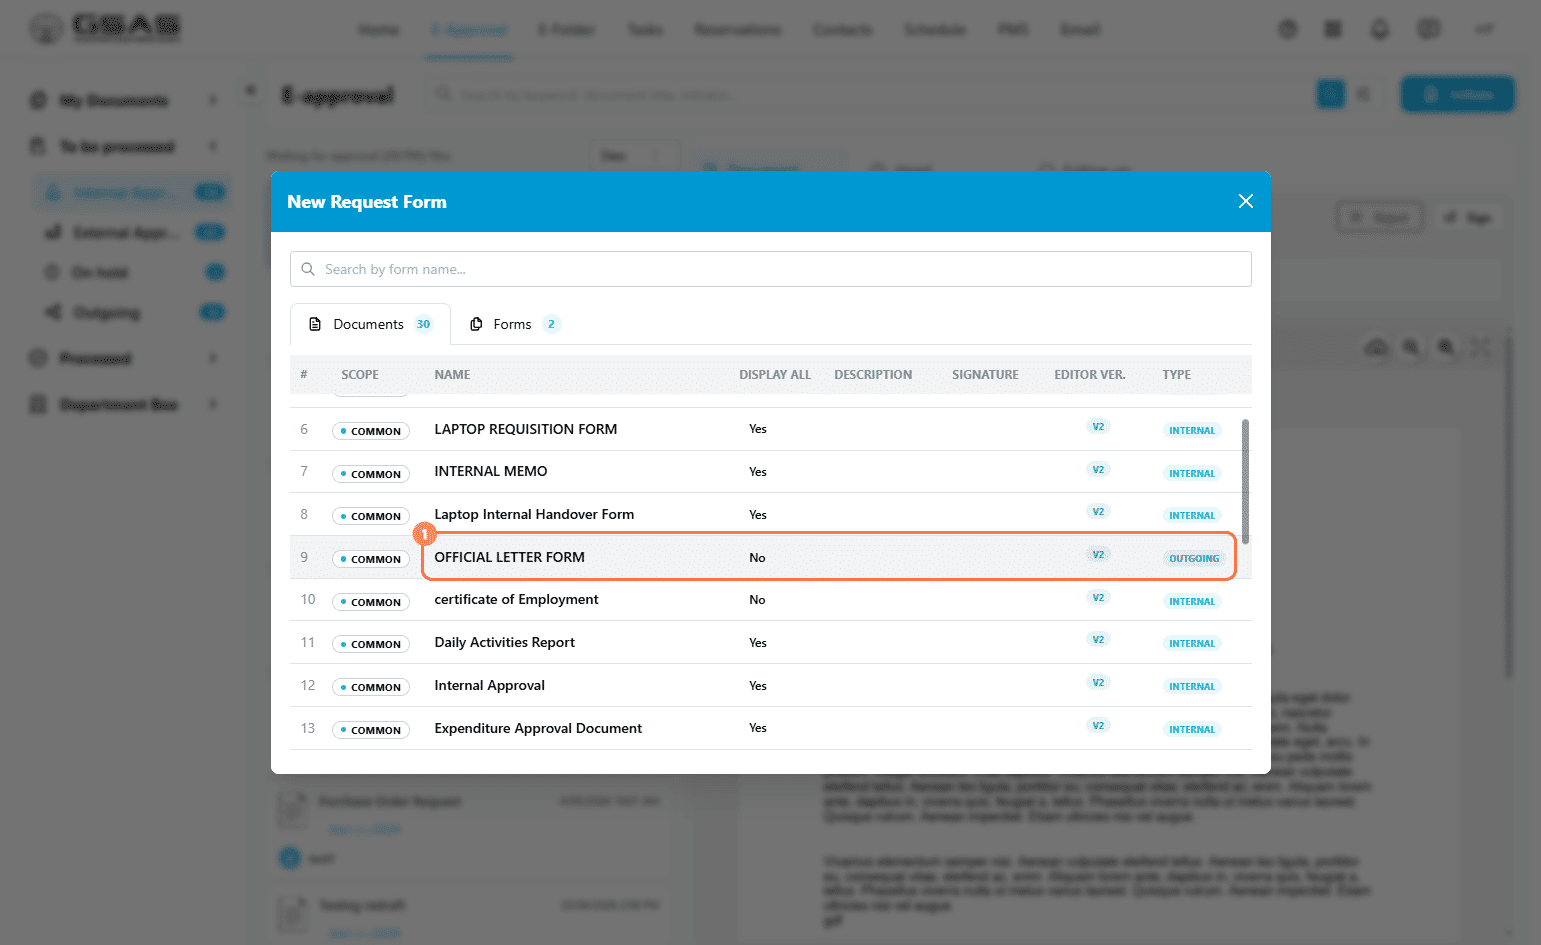](https://docs.smartadmin.rw/uploads/images/gallery/2026-06/MkEimage.png)
---
Step 2
### Filling in the Head tab
Fill in the title, due date, attachments, and aassignees as you would for an internal request. You can also attach documents from E-Folder using the **GSAS Documents** section on the right.
[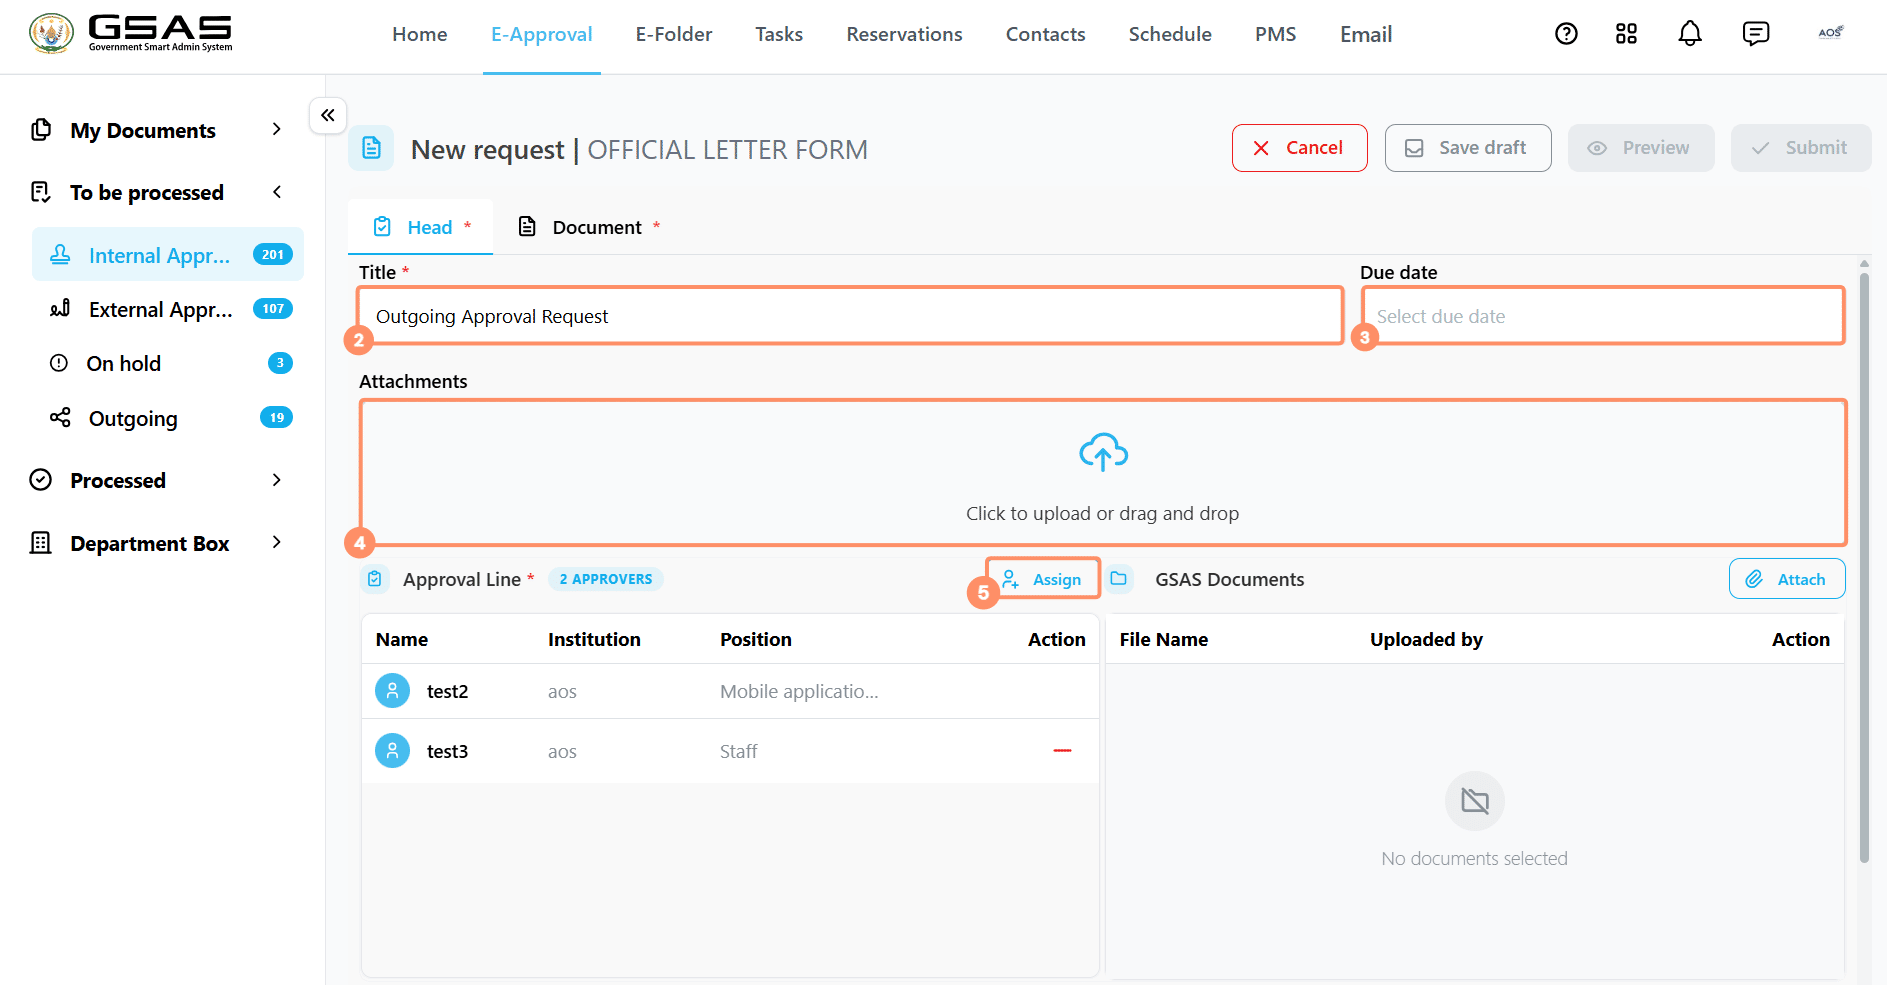](https://docs.smartadmin.rw/uploads/images/gallery/2026-06/dvnimage.png)
---
Step 3
### Adding recipients
You will see two sections — **Internal Recipients** for institutions and individuals who use Smart Admin, and **External Recipients** for those who do not. You can fill in one or both.
[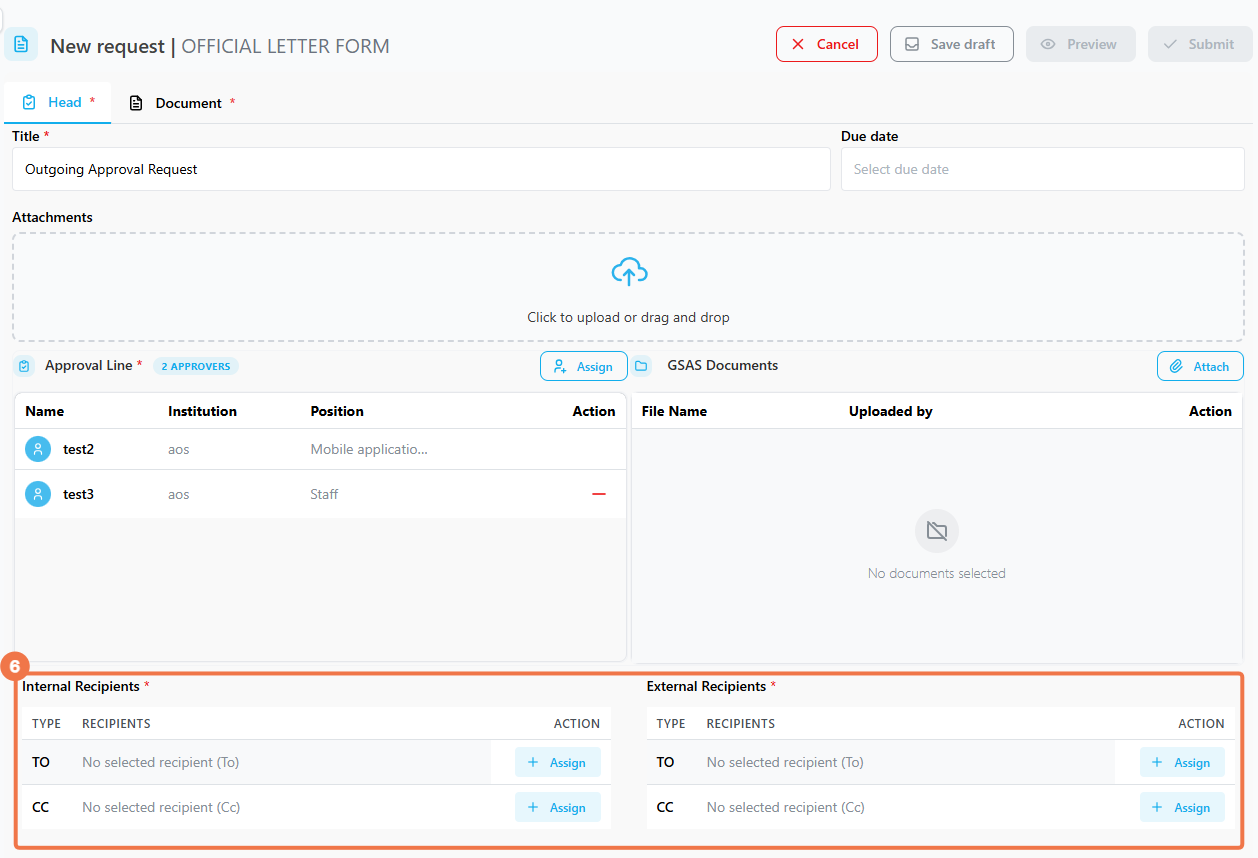](https://docs.smartadmin.rw/uploads/images/gallery/2026-06/xrpimage.png)
| #### 3.1 Internal Recipients/Public Institutions
Recipients that use Smart Admin
- Click **Assign** next to the **TO** or **CC** field.
[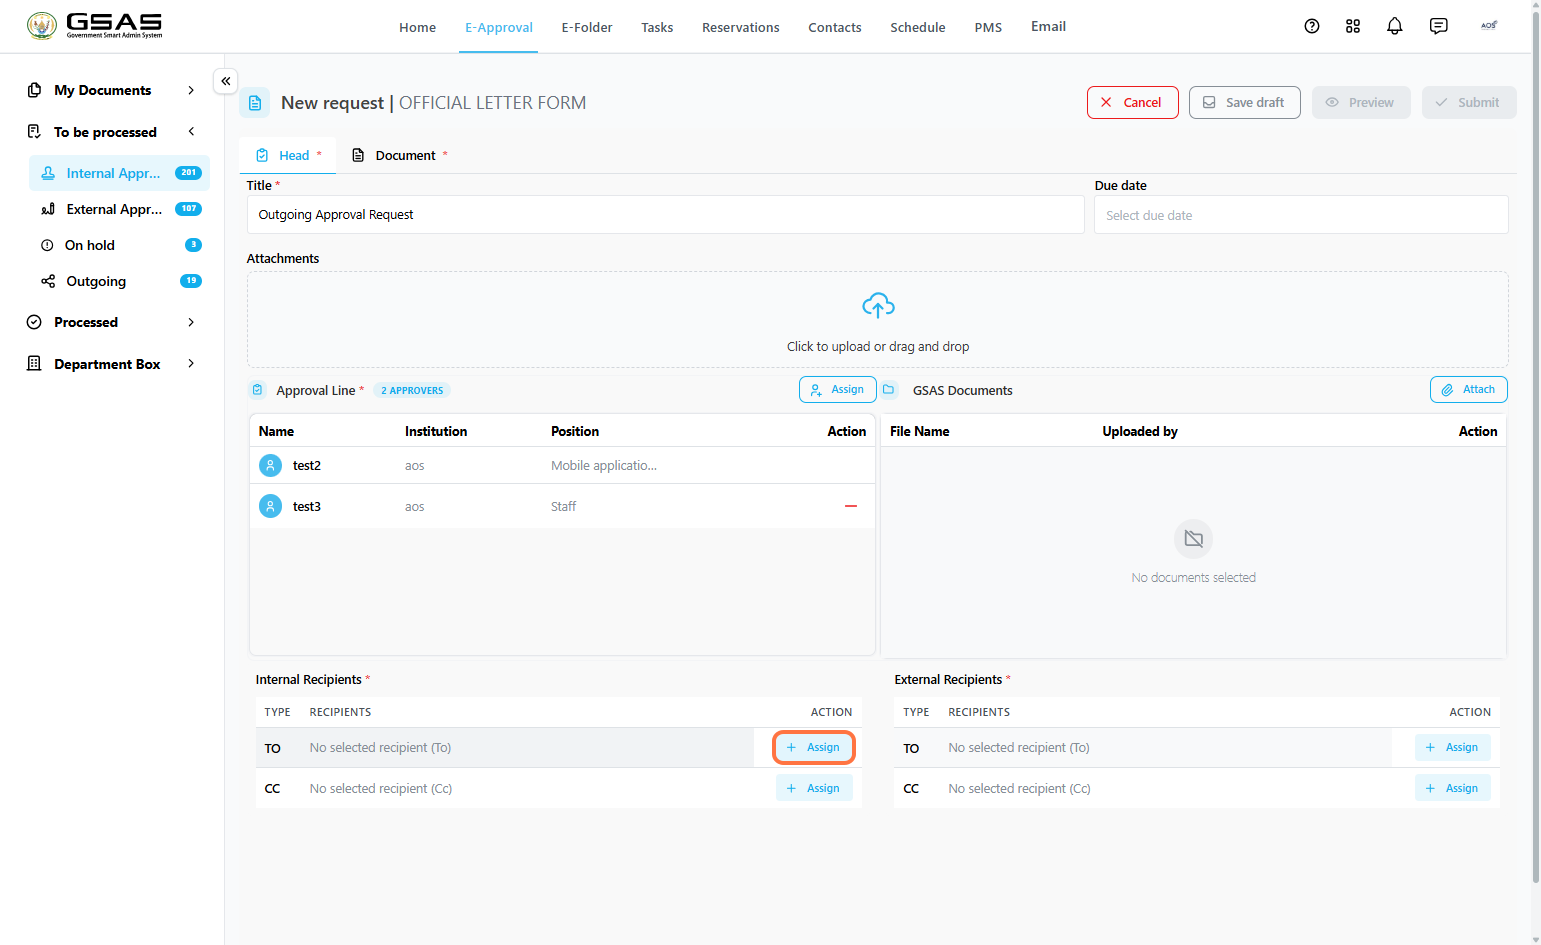](https://docs.smartadmin.rw/uploads/images/gallery/2026-06/WL3image.png)
- A dialog will appear with two tabs; **Institutions** to send to an institution as a whole, and **Individuals** to send to a specific person.
[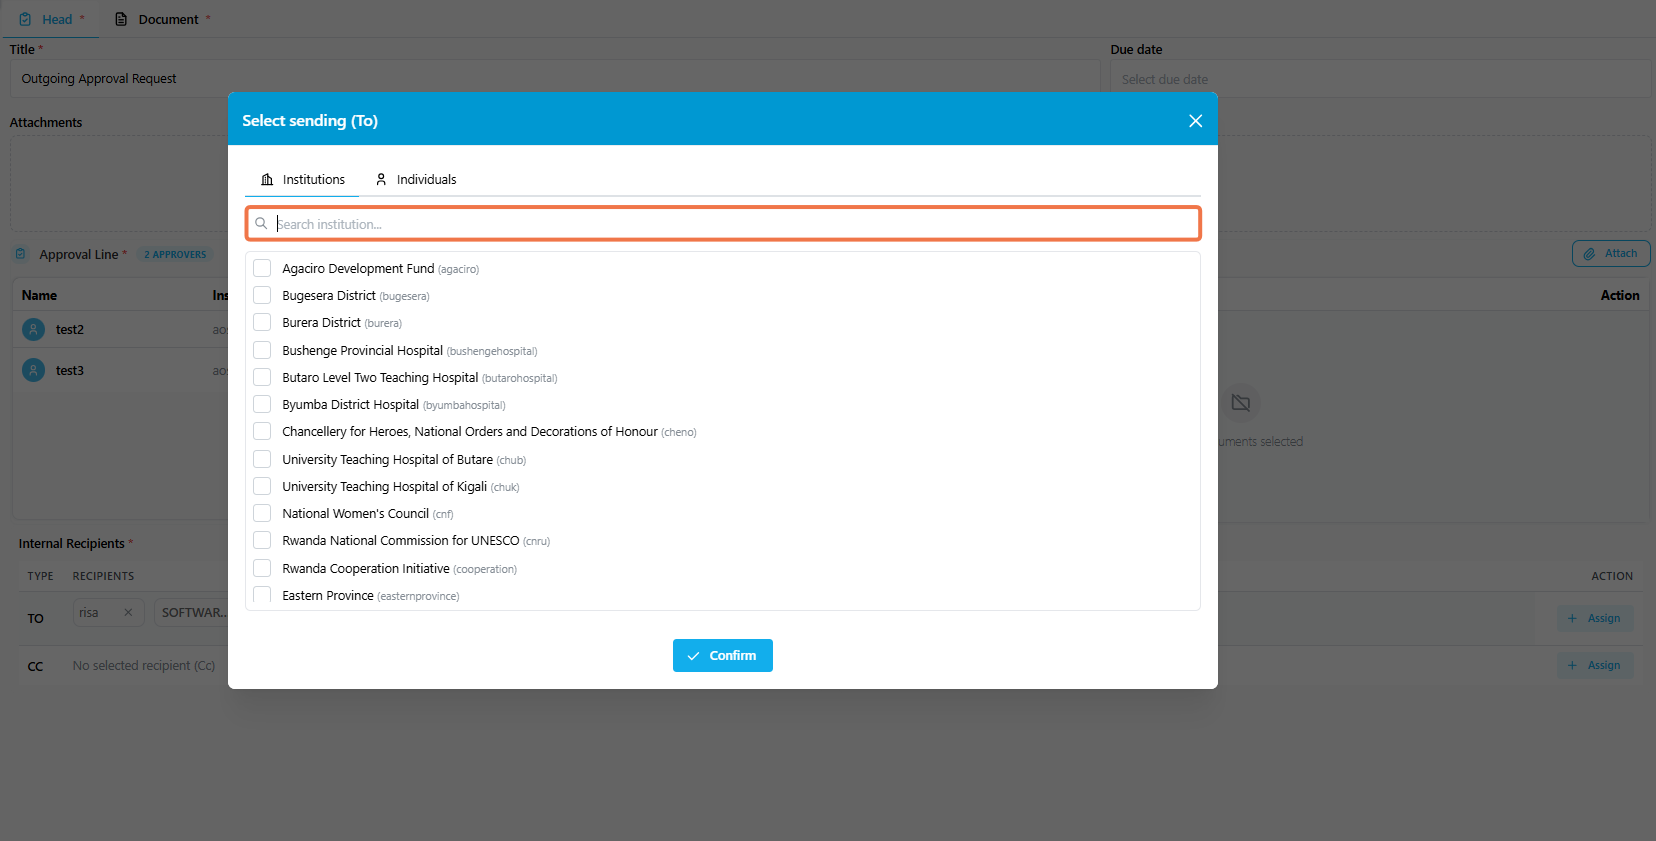](https://docs.smartadmin.rw/uploads/images/gallery/2026-06/eA8image.png)
*→ Send to an institution (Internal)*
- Under the **Institutions** tab, search for the institution by name or abbreviation, check the box next to it, then click **Confirm**.
[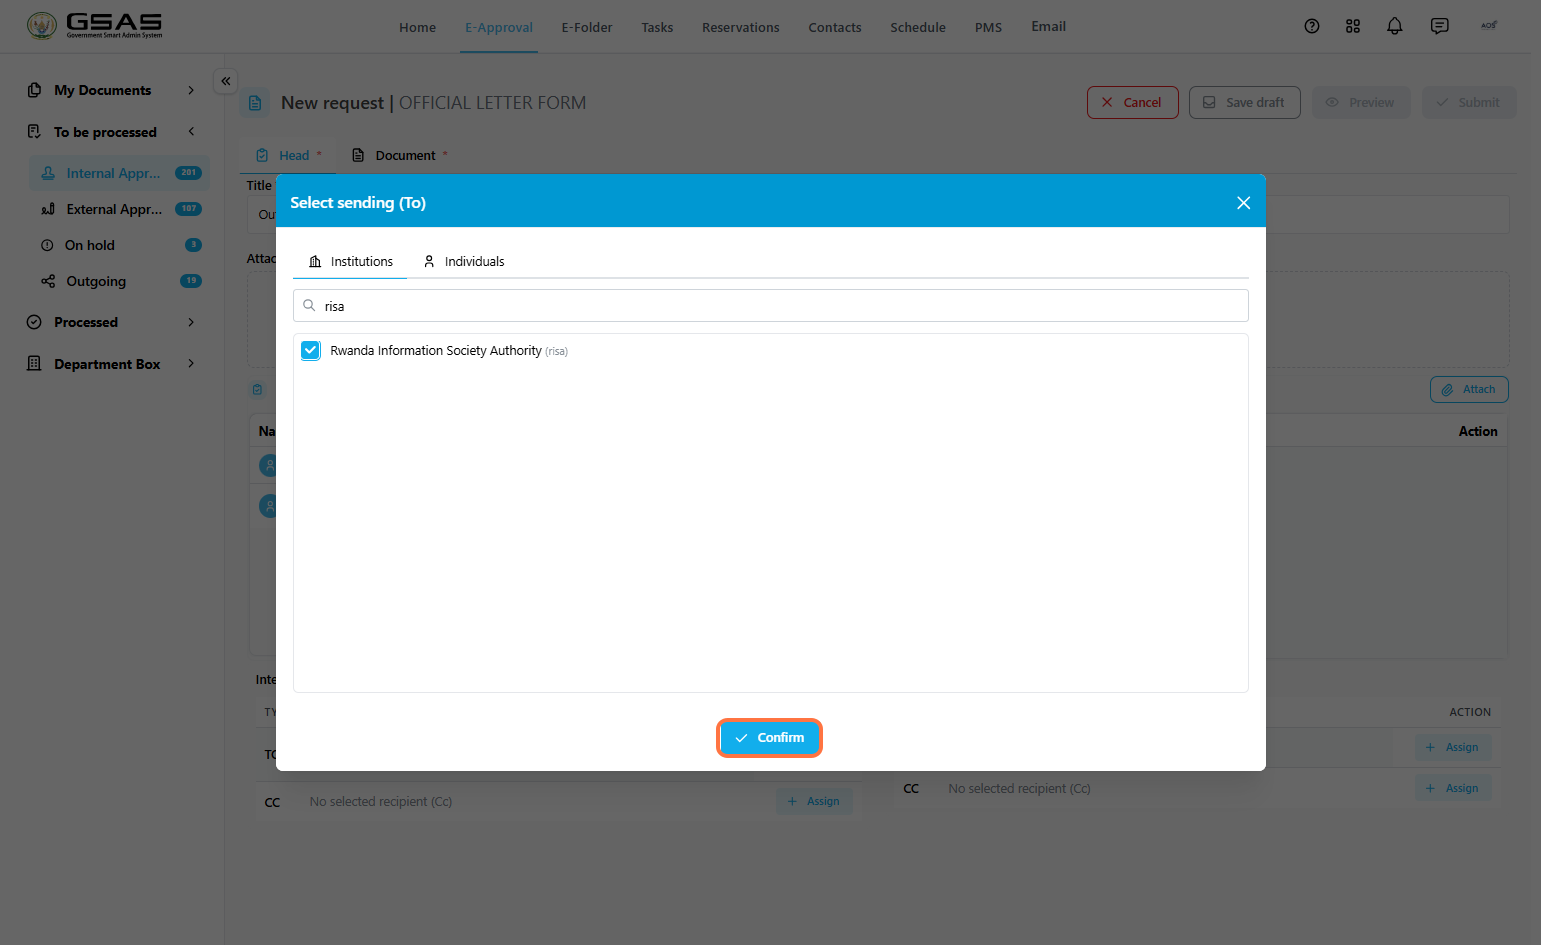](https://docs.smartadmin.rw/uploads/images/gallery/2026-06/ninimage.png)
*→ Send to an individual (Internal)*
- Under the **Individuals** tab, select the institution the person belongs to from the dropdown on the left.
[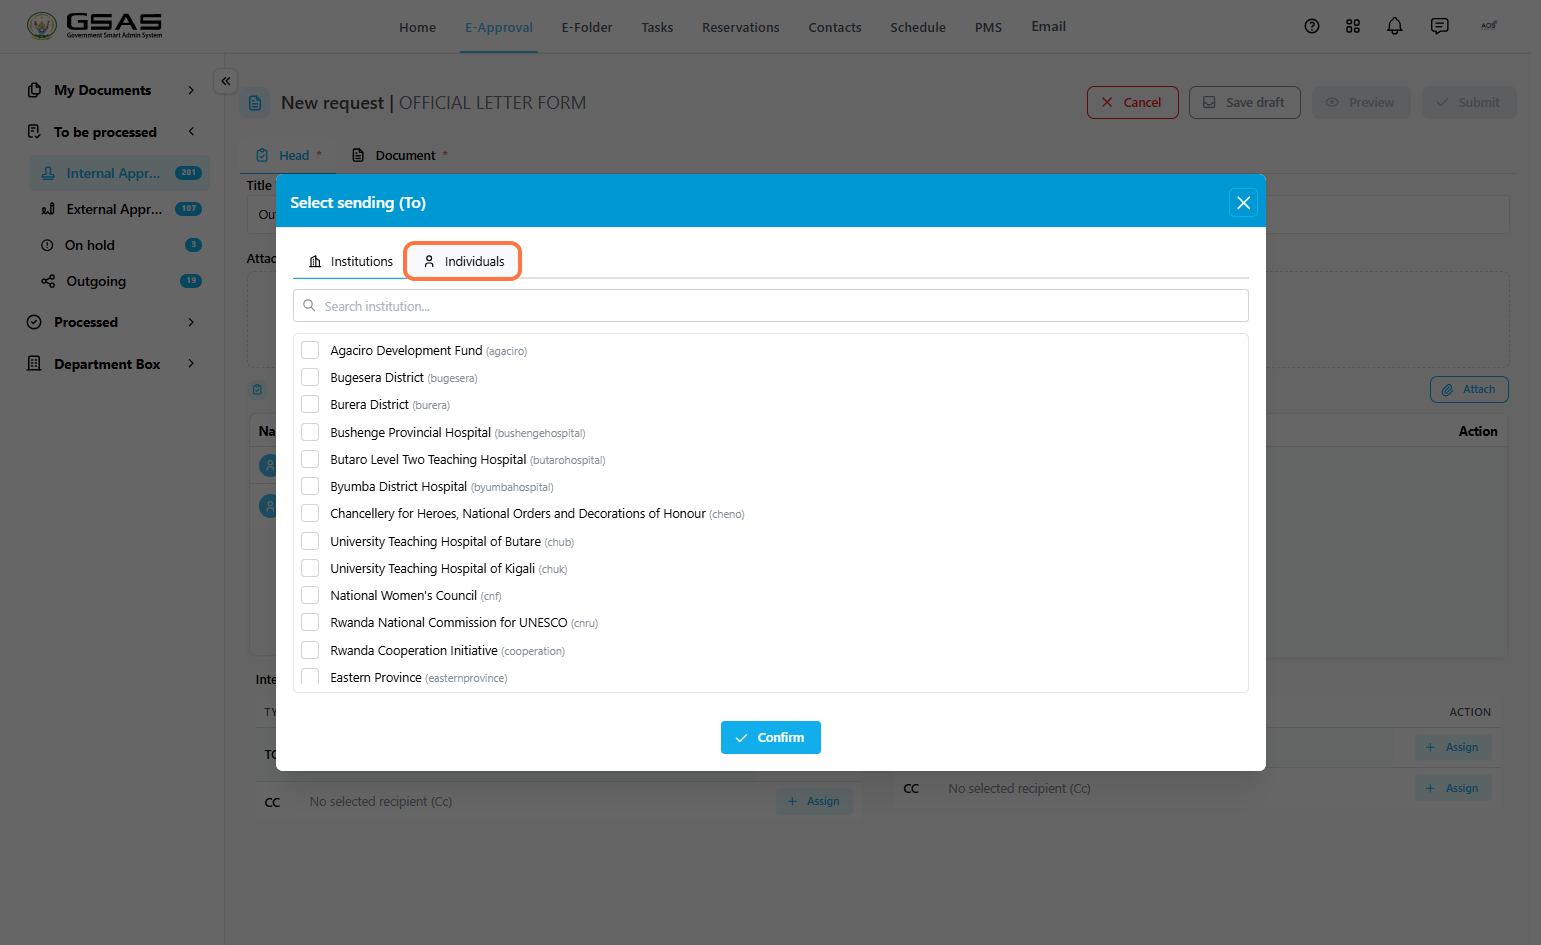](https://docs.smartadmin.rw/uploads/images/gallery/2026-06/WXXimage.png)
[](https://docs.smartadmin.rw/uploads/images/gallery/2026-06/LDDimage.png)
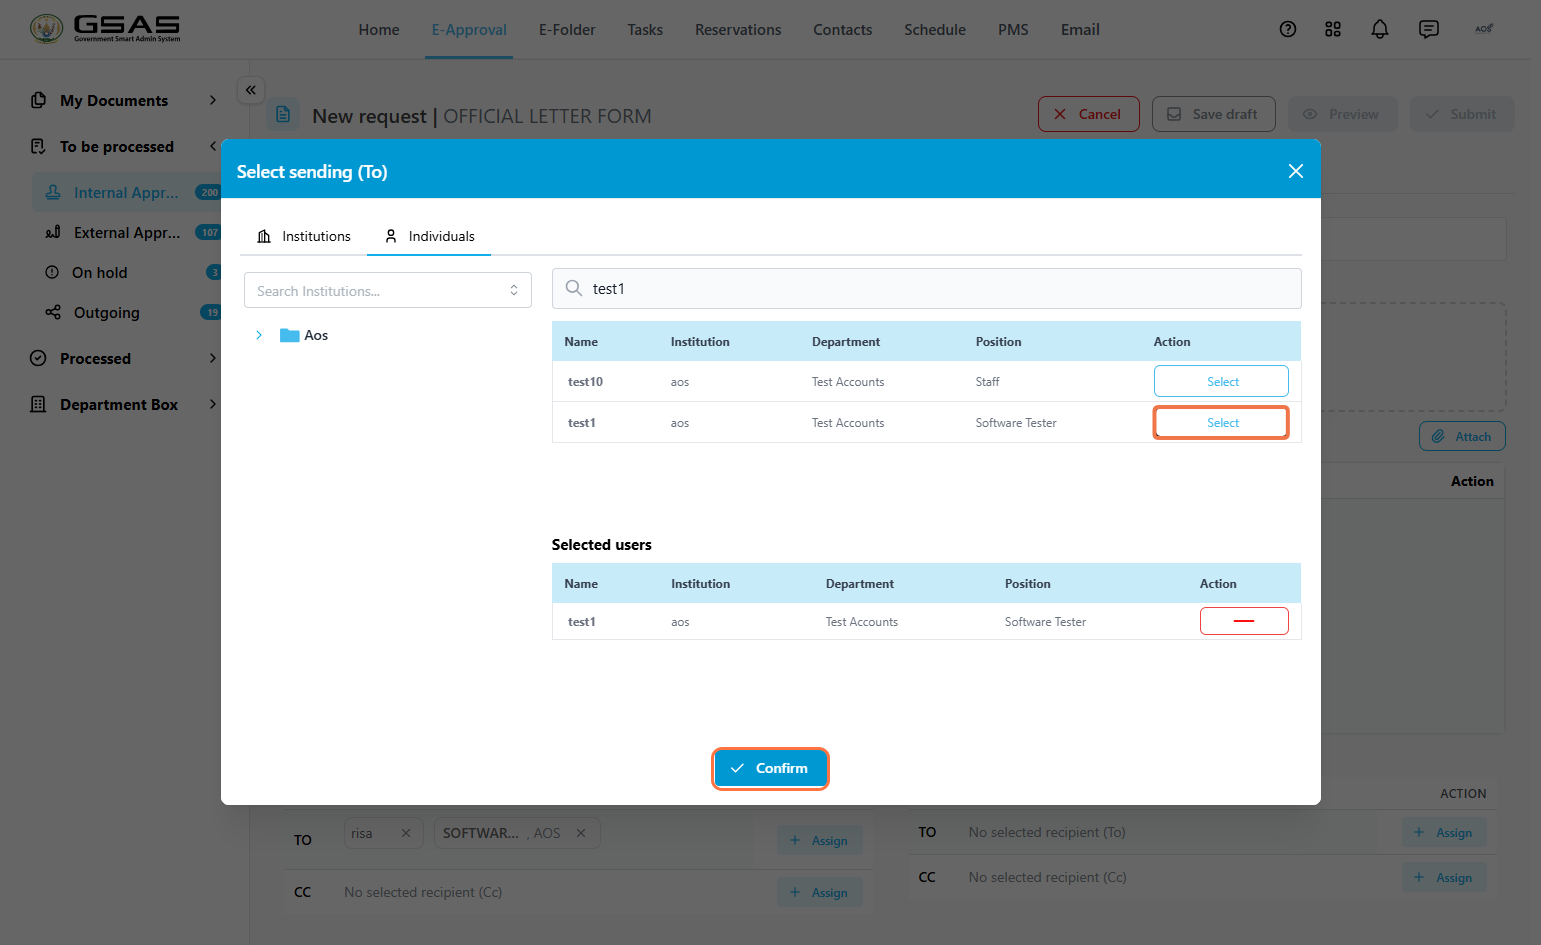
- The users from that institution will appear on the right; search by name, click **Select** next to the person you want to add, then click **Confirm**.
[](https://docs.smartadmin.rw/uploads/images/gallery/2026-06/nySimage.png)
***CC***
To copy someone in, click **Assign** next to the **CC** field and follow the same steps above.
|
| #### 3.2 External Recipients/Private Institutions
For recipients who do not use Smart Admin, their details have to be entered manually.
*→ Sending to an institution (External)*
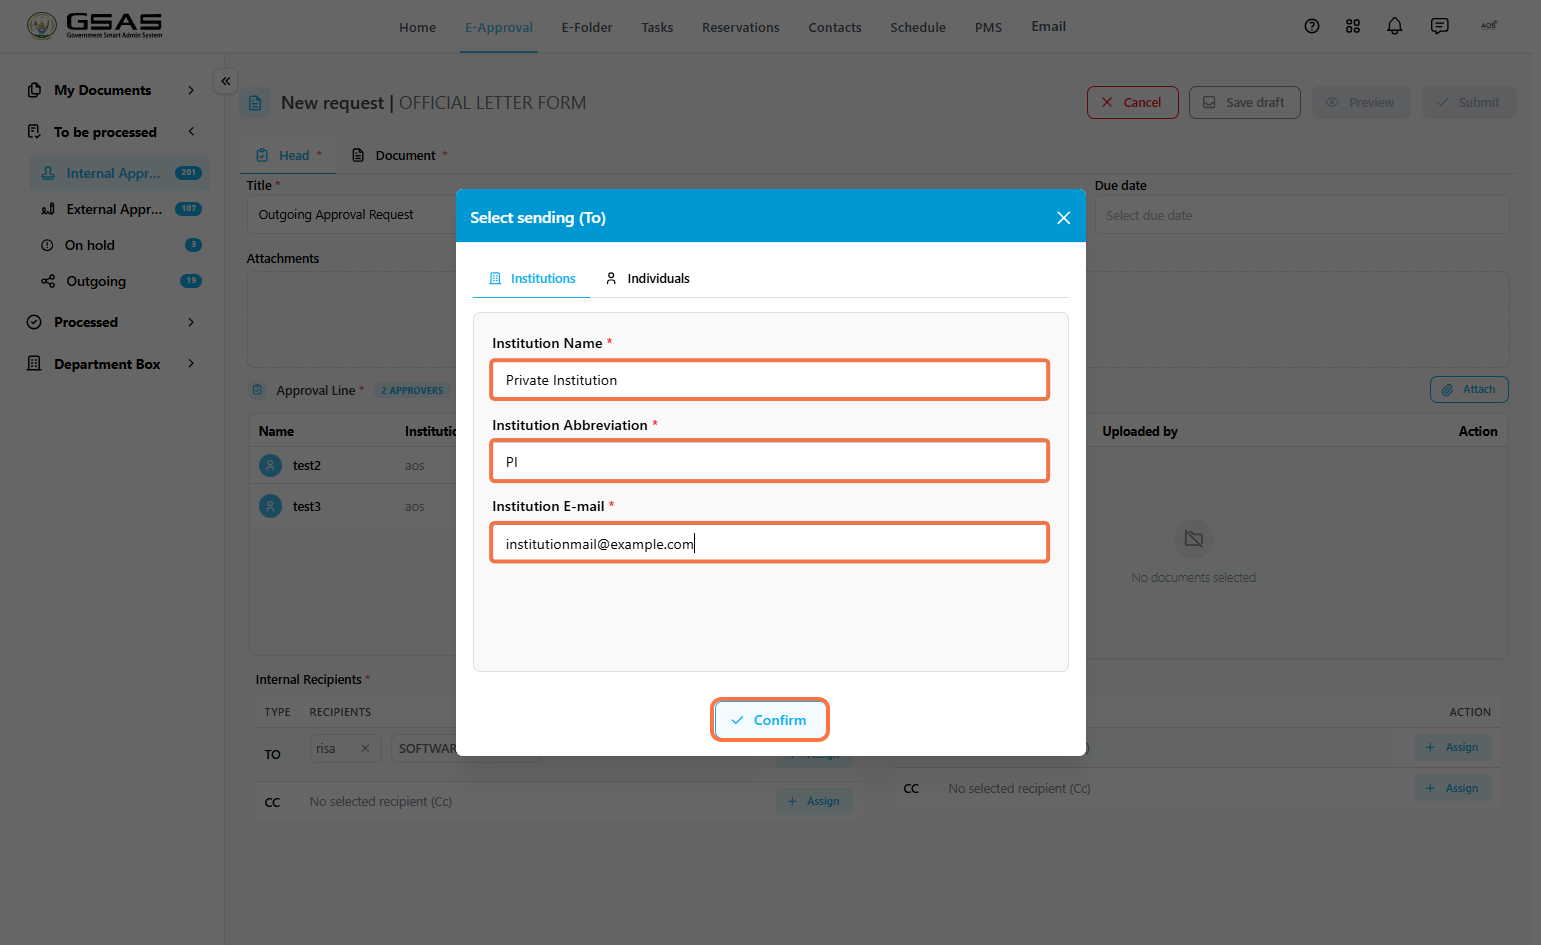
- Under the **Institutions** tab, enter the institution's name, abbreviation, and email address, then click **Confirm**.
[](https://docs.smartadmin.rw/uploads/images/gallery/2026-06/21Cimage.png)
*→ Sending to an individual (External)*
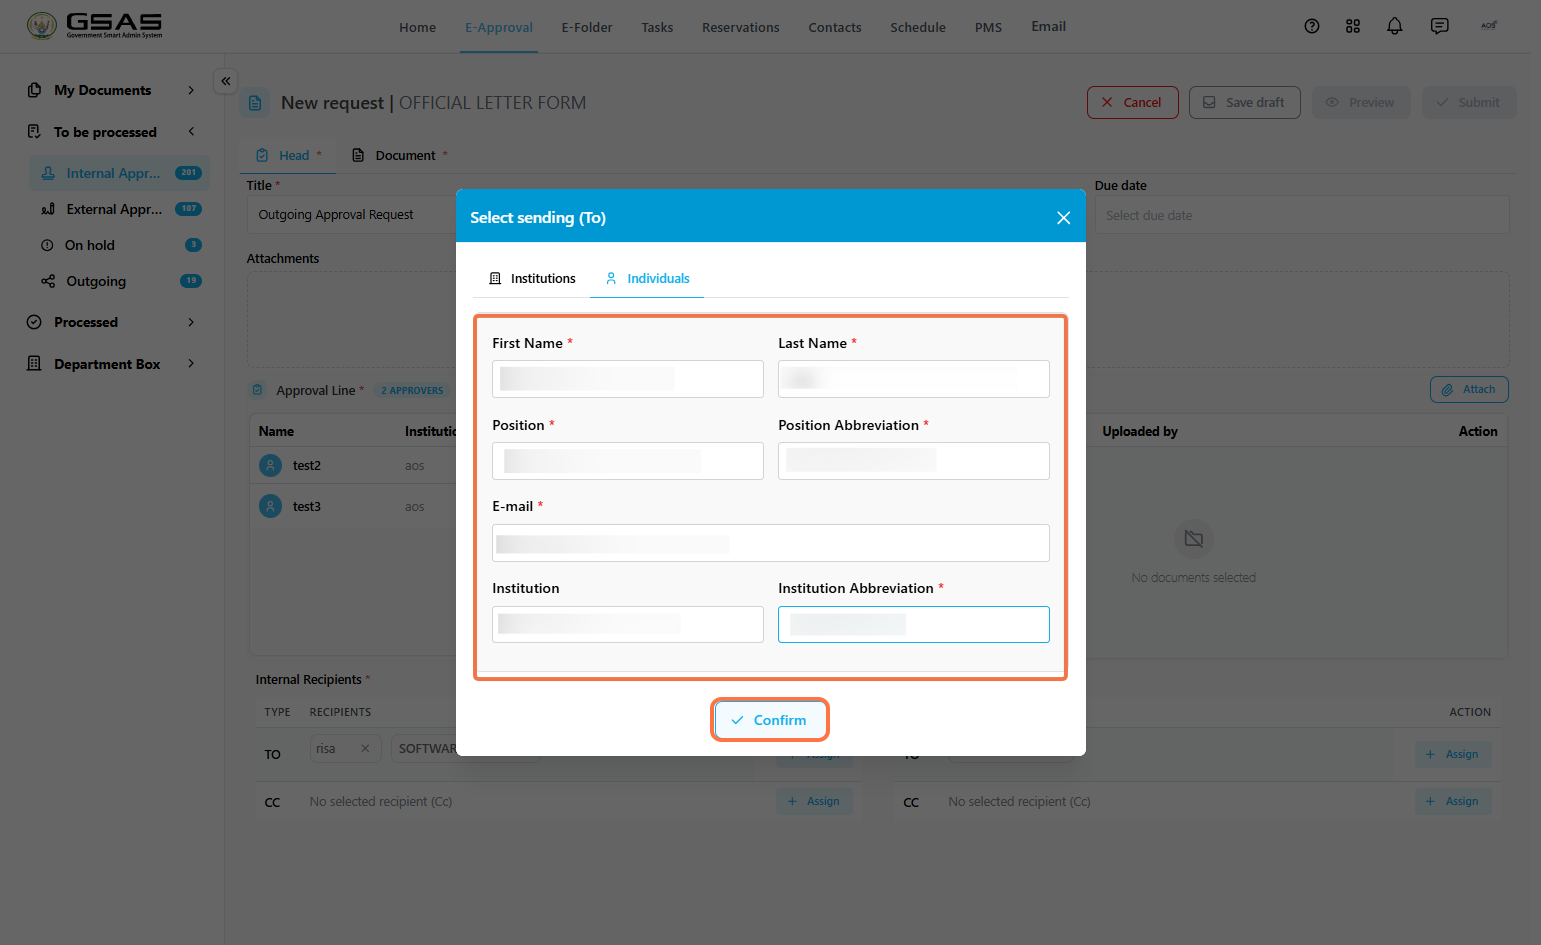
- Under the **Individuals** tab, enter their first name, last name, position, position abbreviation, email address, institution name, and institution abbreviation, then click **Confirm**.
[](https://docs.smartadmin.rw/uploads/images/gallery/2026-06/l99image.png)
|
---
Step 4
### Filling in the Document tab and submitting
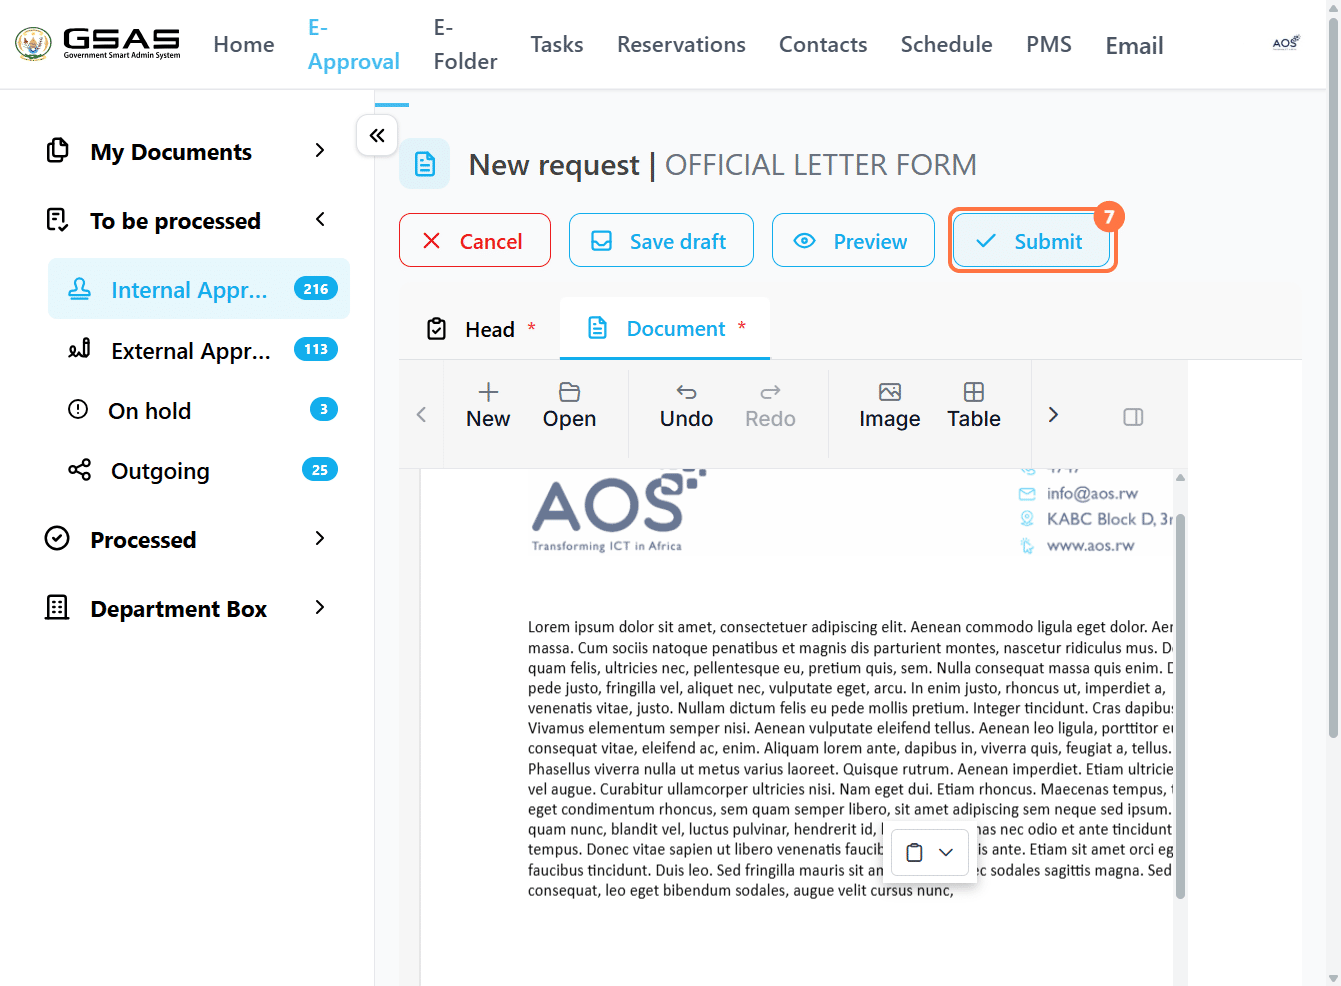
Fill in the content of the request in the **Document** tab just like it's done with [internal approvals](https://docs.smartadmin.rw/link/4#bkmrk-fill-in-the-document) and click **Submit**.
[](https://docs.smartadmin.rw/uploads/images/gallery/2026-08/59Nimage.png)
Enter a message to the external recipients, it will be included in the email sent to them along with your request, then submit.
[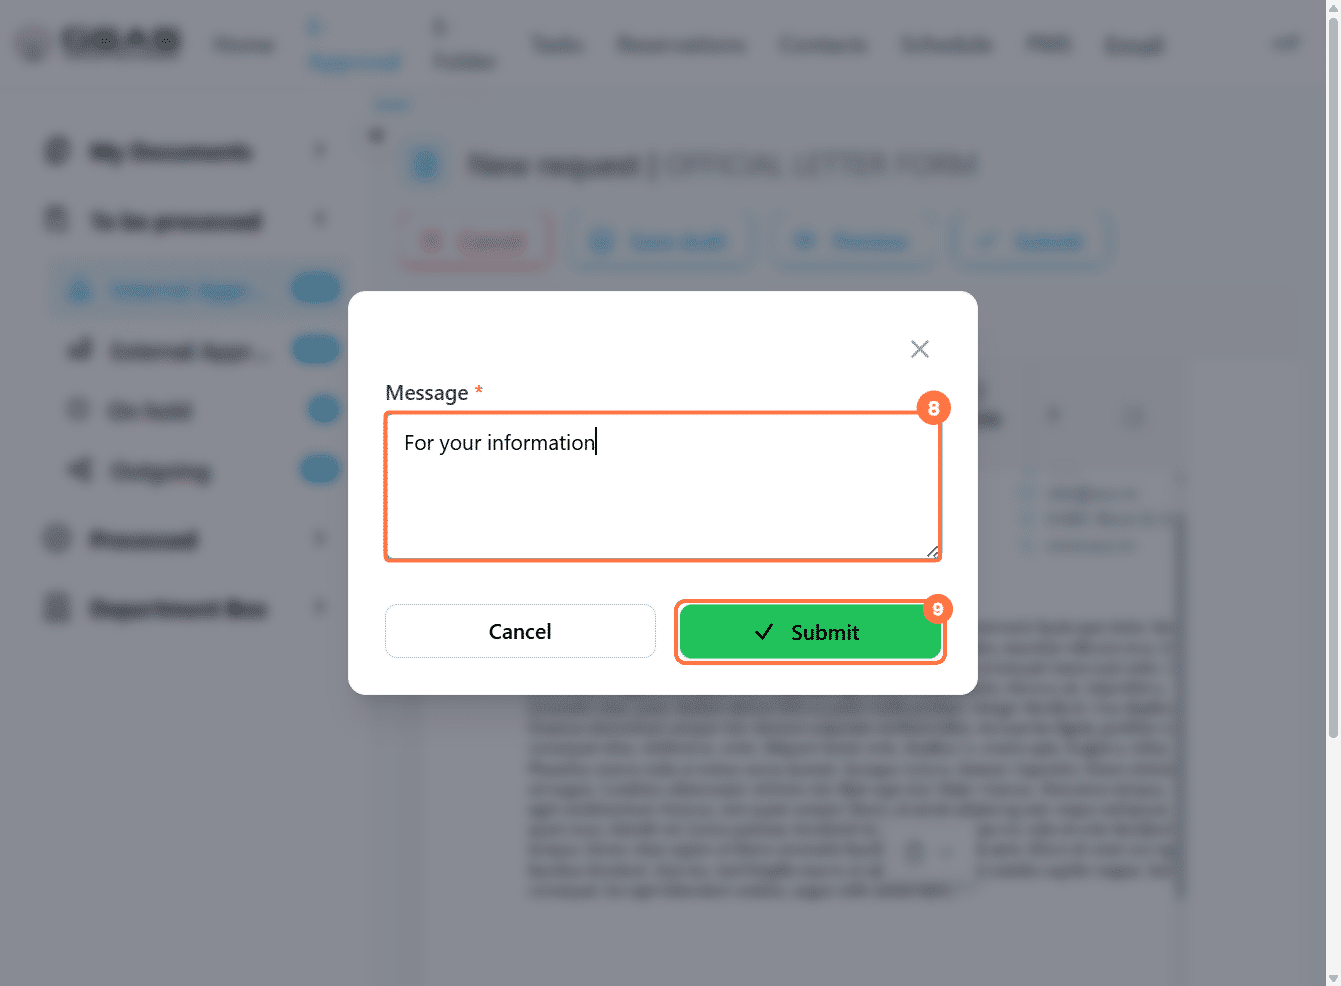](https://docs.smartadmin.rw/uploads/images/gallery/2026-08/mBAimage.png)
Once all approvers have approved, the request will appear in the Sender Manager's **Outgoing** folder to be dispatched. (See [Sender and Receiver Manager Controls](https://docs.smartadmin.rw/link/52#bkmrk-page-title)).
The addressed institutions and individuals will receive the request once it's been sent by the Sender Manager.
---
***Proceed to the [Managing approval requests](https://docs.smartadmin.rw/books/gsas-user-guide/page/managing-approval-requests) page to learn how to keep track of your request after it has been submitted.***
# Dynamic forms -Travel Clearance
---
Use this form to request official approval for international travel.
Step 1
### Initiate request
- From the **E-Approval** module, click **Initiate.**
- Select the **Forms** tab, then click **Travel clearance** from the list.
[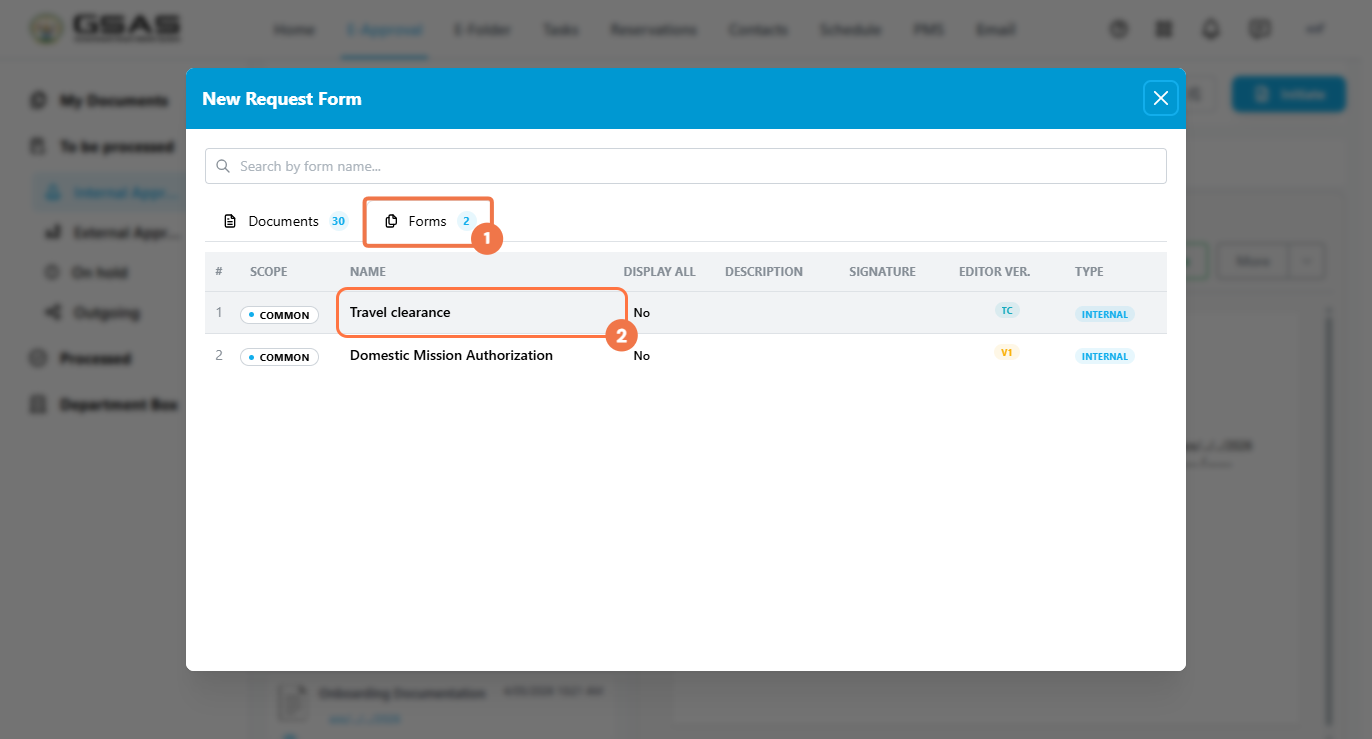](https://docs.smartadmin.rw/uploads/images/gallery/2026-06/WM6image.png)
---
Step 2
### Fill in the Head section
Enter a **Title** for the request and optionally set a **Due Date**. The **Approval Line** lists the approvers assigned to this request, click **Assign** to add approvers. Click **Next** when ready.
[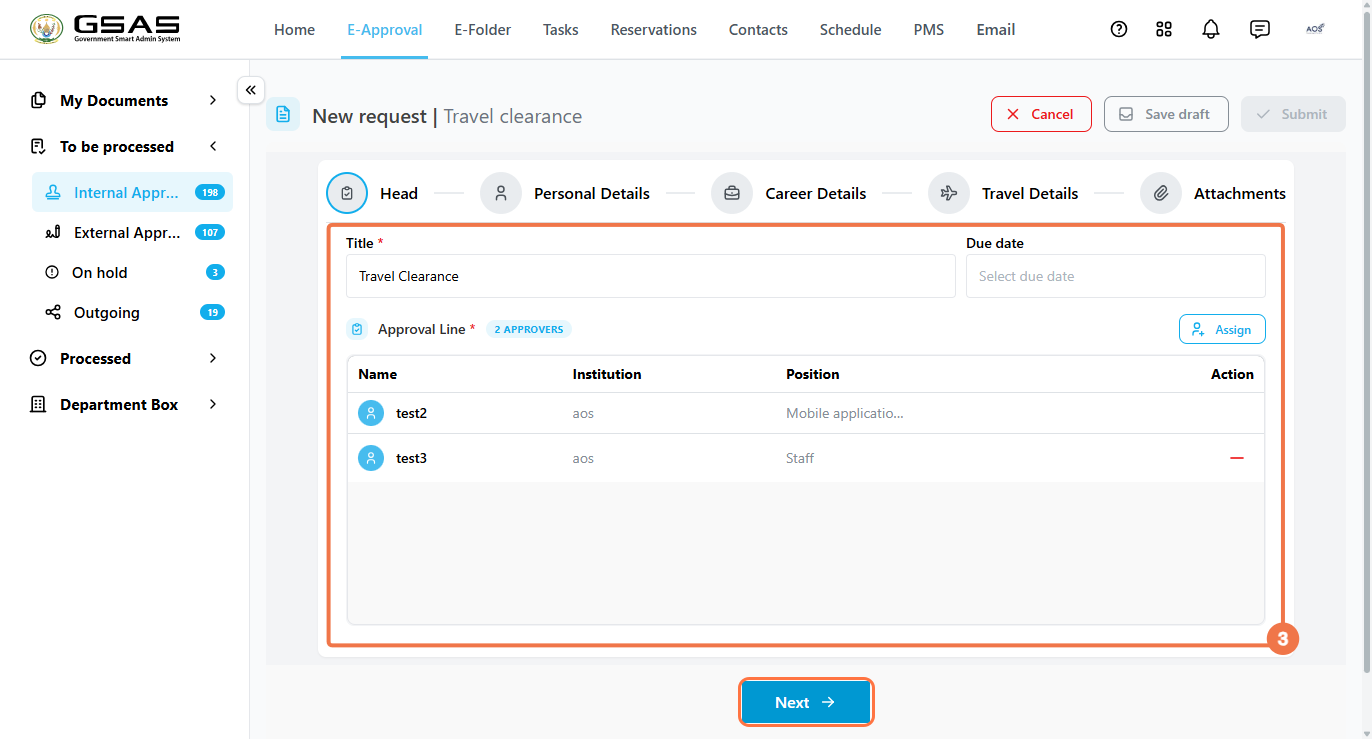](https://docs.smartadmin.rw/uploads/images/gallery/2026-06/z0Kimage.png)
---
Step 3
### Personal Details
- Fill in your **First Name**, **Middle Name** (optional), and **Last Name**, along with your **Email** and **Telephone**.
- Select your **Nationality** and enter your **National ID**.
- Under document information, select your **Document Type** (e.g. Ordinary passport) and provide the number associated with it, **Issued Country**, and **Expiry Date**. Click **Next** to continue.
[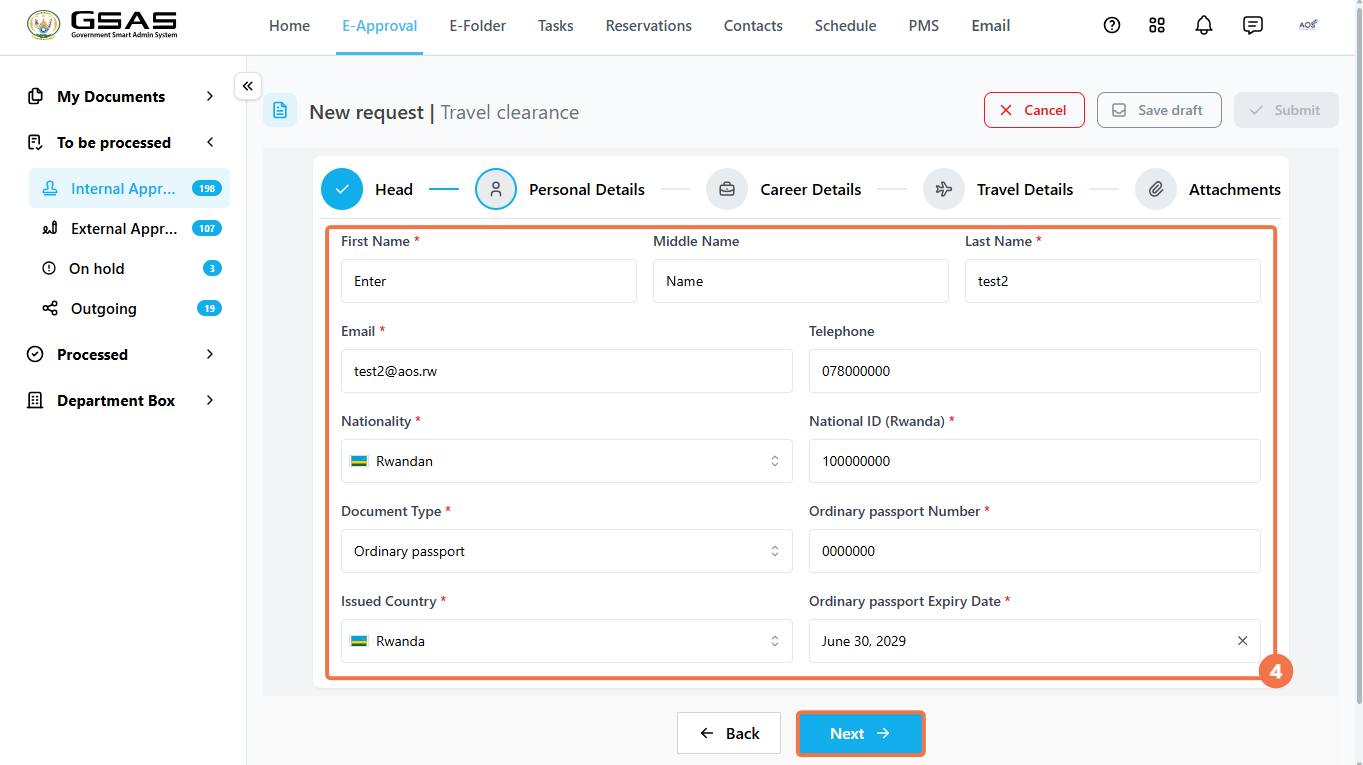](https://docs.smartadmin.rw/uploads/images/gallery/2026-06/igsimage.png)
---
Step 4
### Career Details
- Select your **Career Status** — *Serving*, *Retired*, or *Former*. If Retired or Former, provide the corresponding date in the **Retirement/Former Date** field.
- Enter your **Position** (if it was not automatically filled in) and optionally your **Occupation**. Click **Next** to continue.
[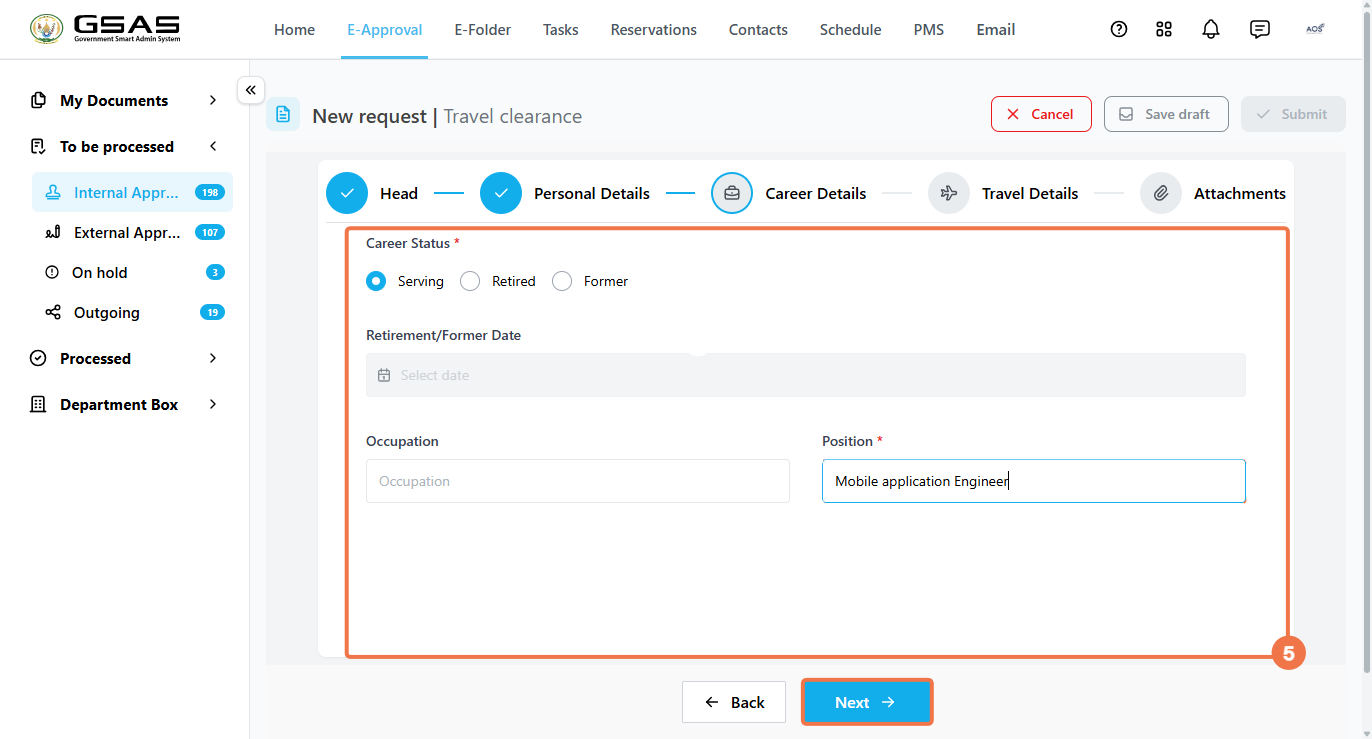](https://docs.smartadmin.rw/uploads/images/gallery/2026-06/UIrimage.png)
---
Step 5
### Travel Details
- Select the **Destination Country** and enter the **Destination City**.
- Set the **Departure Date** and **Returning Date**, then select a **Travel Reason**.
The fields that follow will change depending on the reason selected. If you choose:
***→*Mission*****:***
- Enter the *Mission Name* and select the *Mode of Travel*.
- Provide the *Invited by* and *Mission Funder*, then fill in the *Mission Objectives*, *Mission Outcome*, and *Mission Details*.
[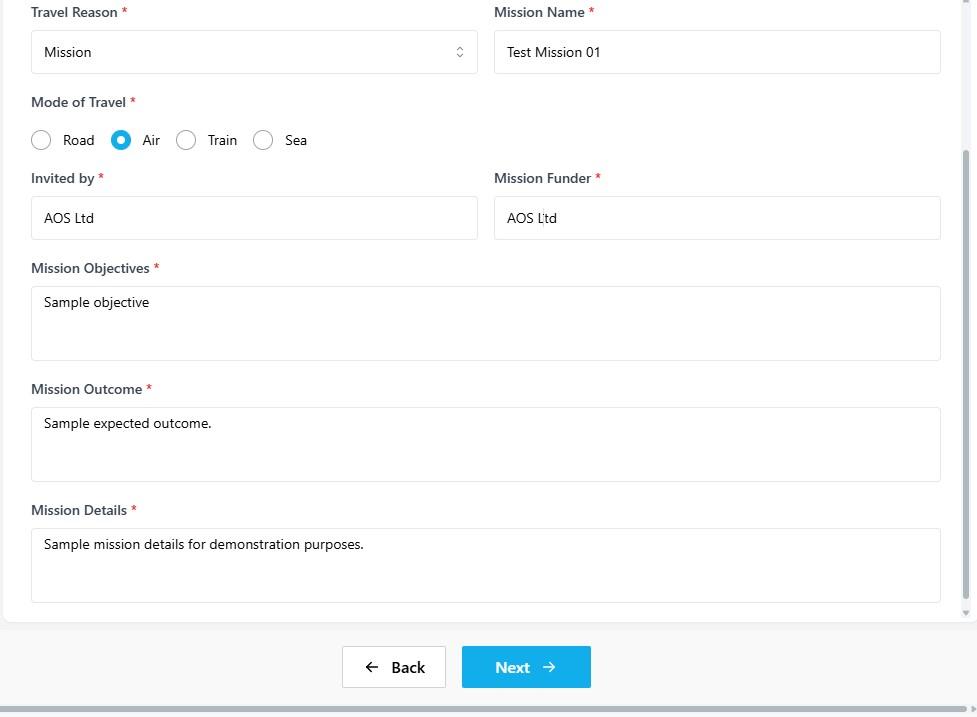](https://docs.smartadmin.rw/uploads/images/gallery/2026-06/1782296258305.jpeg)
***→* Meeting*****:***
- Enter the *Meeting Name* and select the *Mode of Travel*.
- Select the *Meeting Format*, enter your *Meeting Role*, and provide the *Invited by* and *Meeting Funder*. Fill in the *Meeting Objectives, Meeting Outcome*, and *Meeting Details.*
[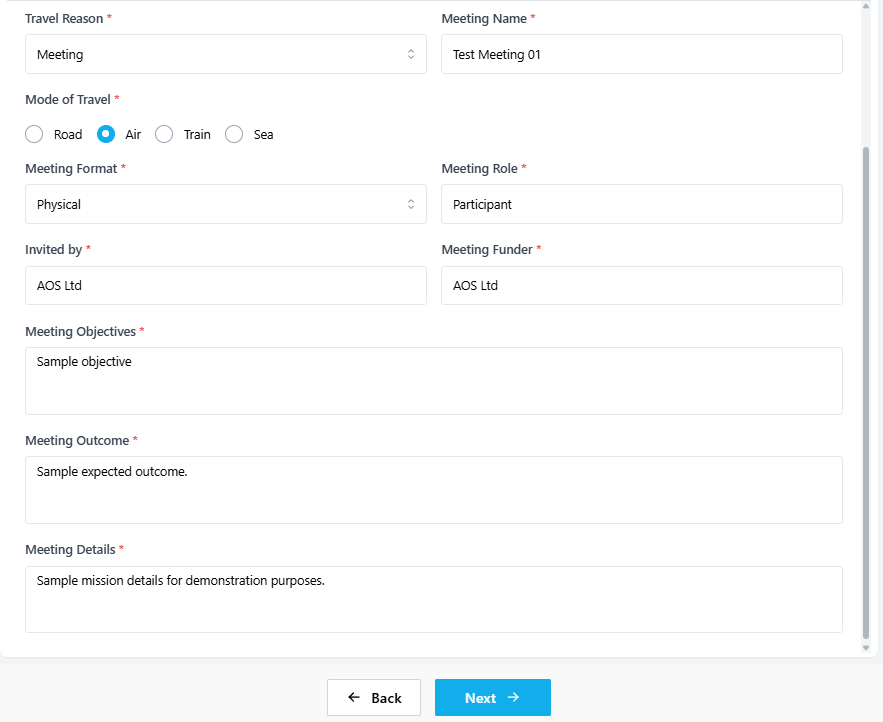](https://docs.smartadmin.rw/uploads/images/gallery/2026-06/7a265374-98ee-4120-80dc-0ede52b86121.png)
***→*Event:**
- Enter the *Event Name* and select the *Mode of Travel*.
- Select the *Event Format*, enter your *Event Role*, and provide the *Invited by* and *Event Funder*.
- Fill in the *Event Objectives, Event Outcome*, and *Event Details*.
[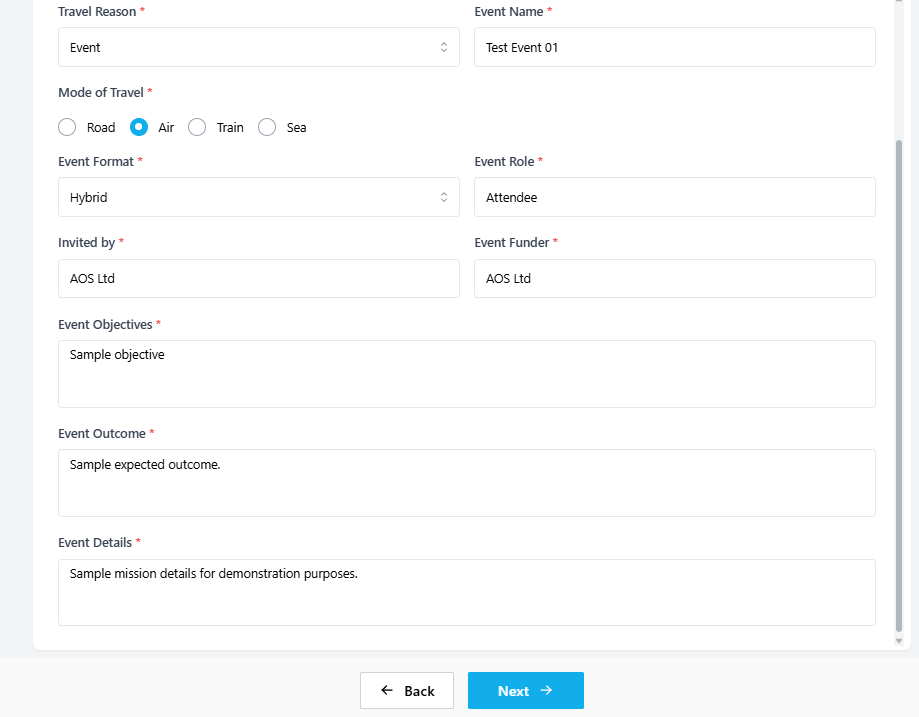](https://docs.smartadmin.rw/uploads/images/gallery/2026-06/820ef174-c248-4d49-add1-c7e3d6a0ae81.png)
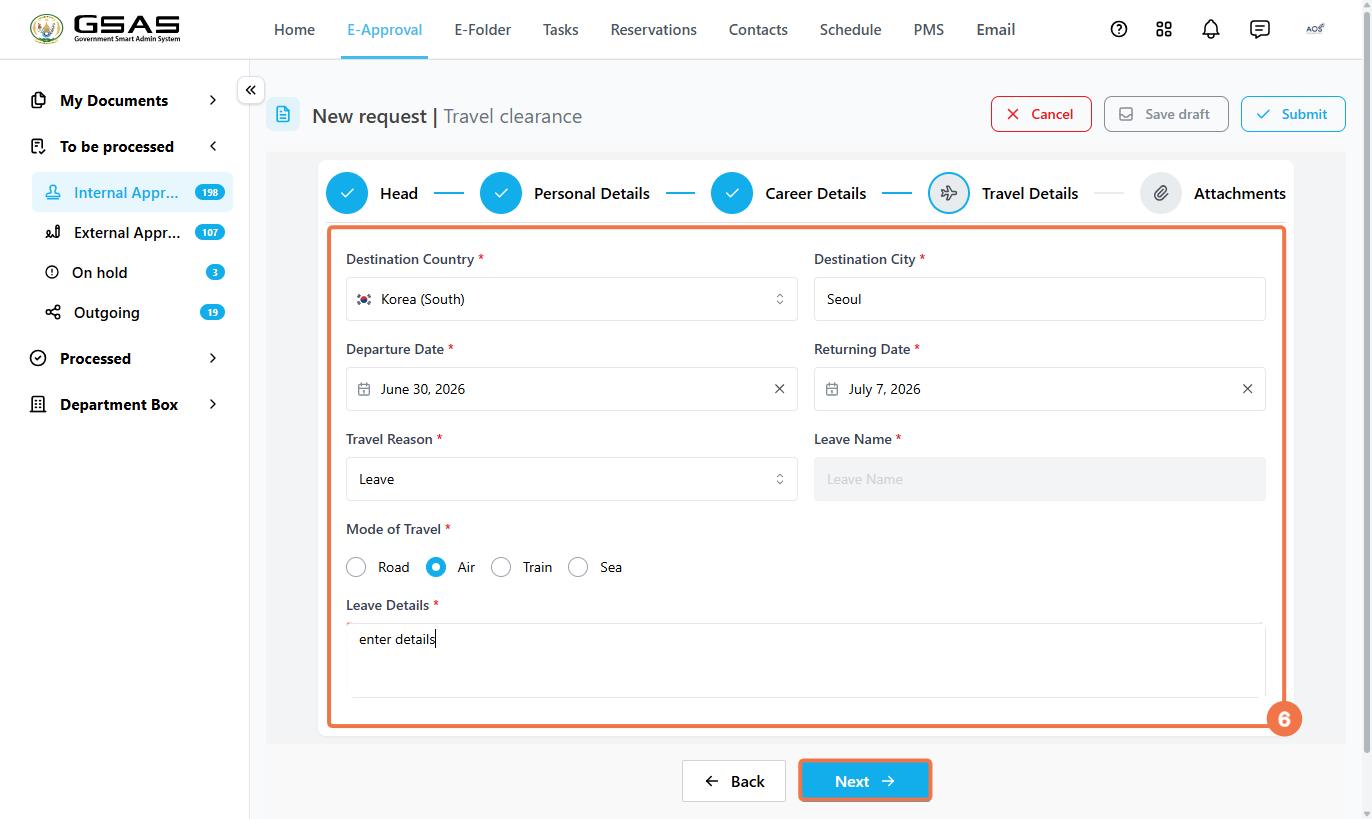
***→*Leave:**
- Select the *Mode of Travel* (Road, Air, Train, or Sea) and enter the *Leave Details* describing the purpose of the trip.
- The *Leave Name* field is not required for this option.
[](https://docs.smartadmin.rw/uploads/images/gallery/2026-06/bbVimage.png)
Click **Next** to proceed once all fields are completed.
---
Step 6
Attachments
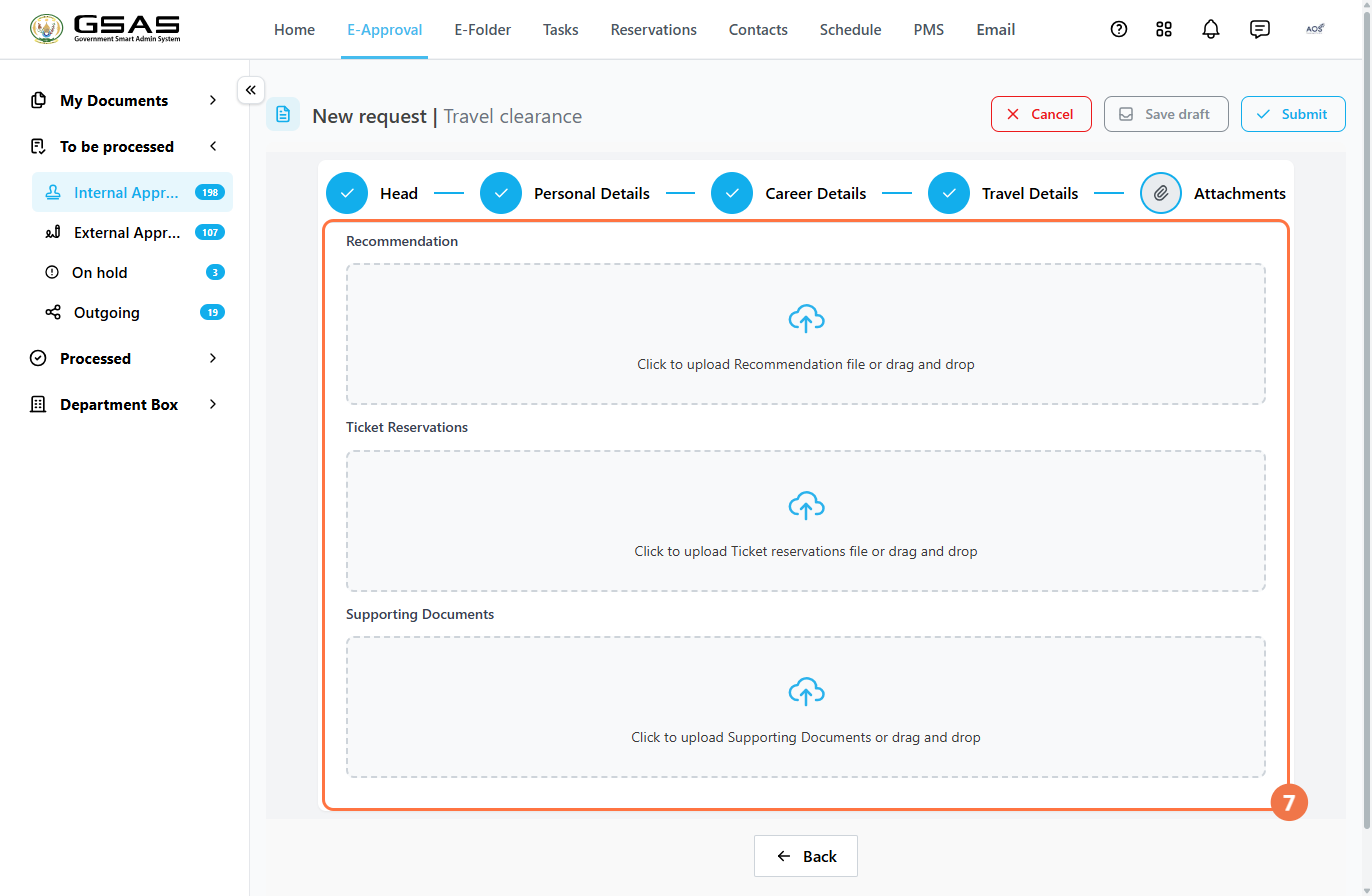
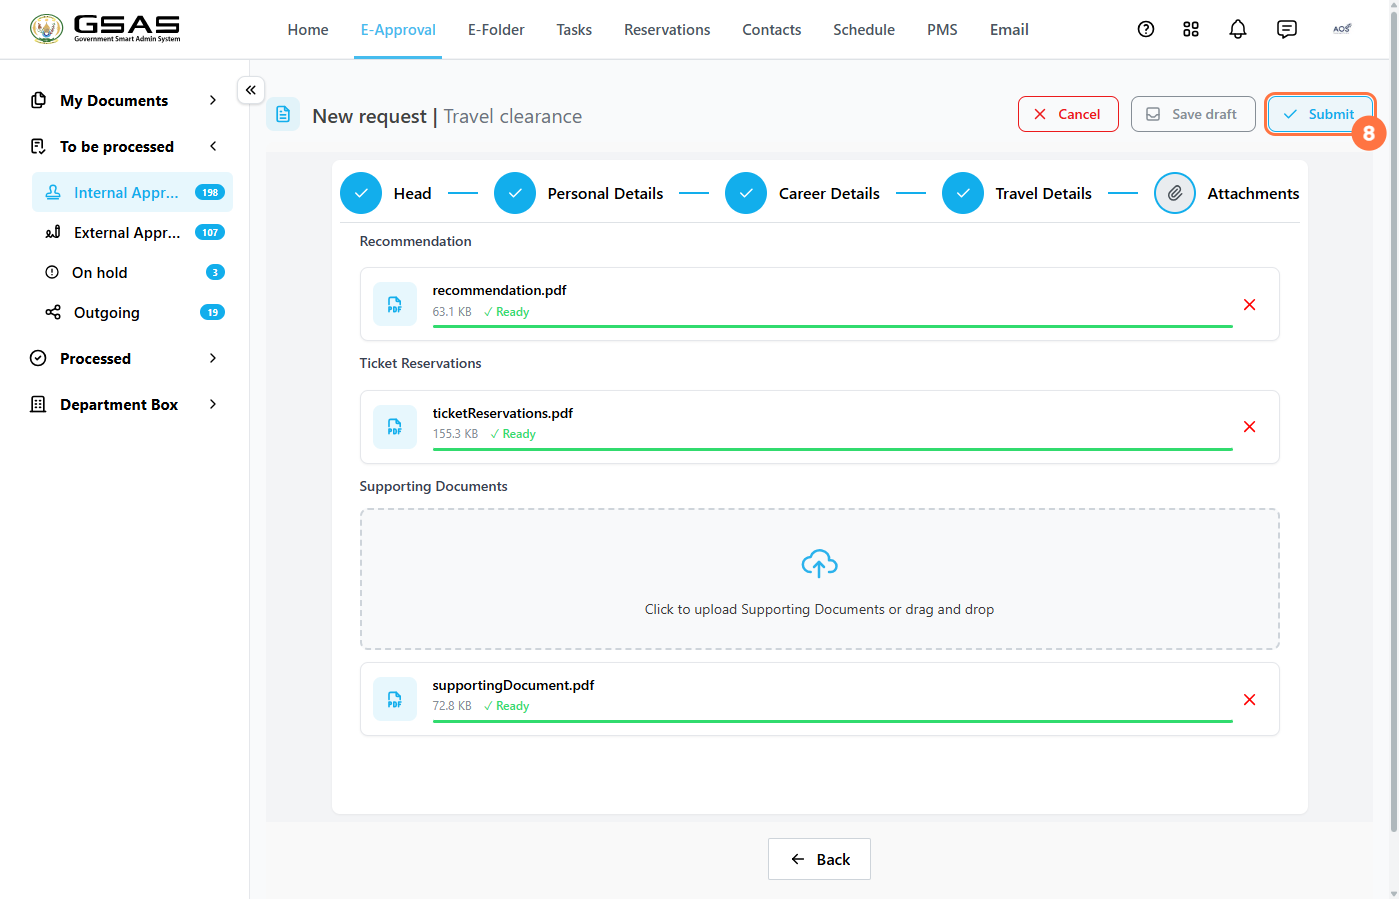
Attach any relevant documents to support your request. All attachment fields are optional. Upload files by clicking the upload area or dragging and dropping. Each file will display a green **Ready** status once successfully uploaded.
- **Recommendation** — upload a single recommendation letter.
- **Ticket Reservations** — upload a single file for travel booking confirmation.
- **Supporting Documents** — upload one or more additional files relevant to the request.
[](https://docs.smartadmin.rw/uploads/images/gallery/2026-06/o1himage.png)
---
Step 7
### Submit your Request
Once all sections are complete, click **Submit** in the top right corner. A confirmation dialog will appear, click **Submit** again to confirm and send the request for approval.
[](https://docs.smartadmin.rw/uploads/images/gallery/2026-06/tlJimage.png)
# Managing approval requests
---
This page covers what happens after you submit an approval request, how you can track it's progress and how you can respond to approval requests you have been assigned.
### Tracking your request as a drafter
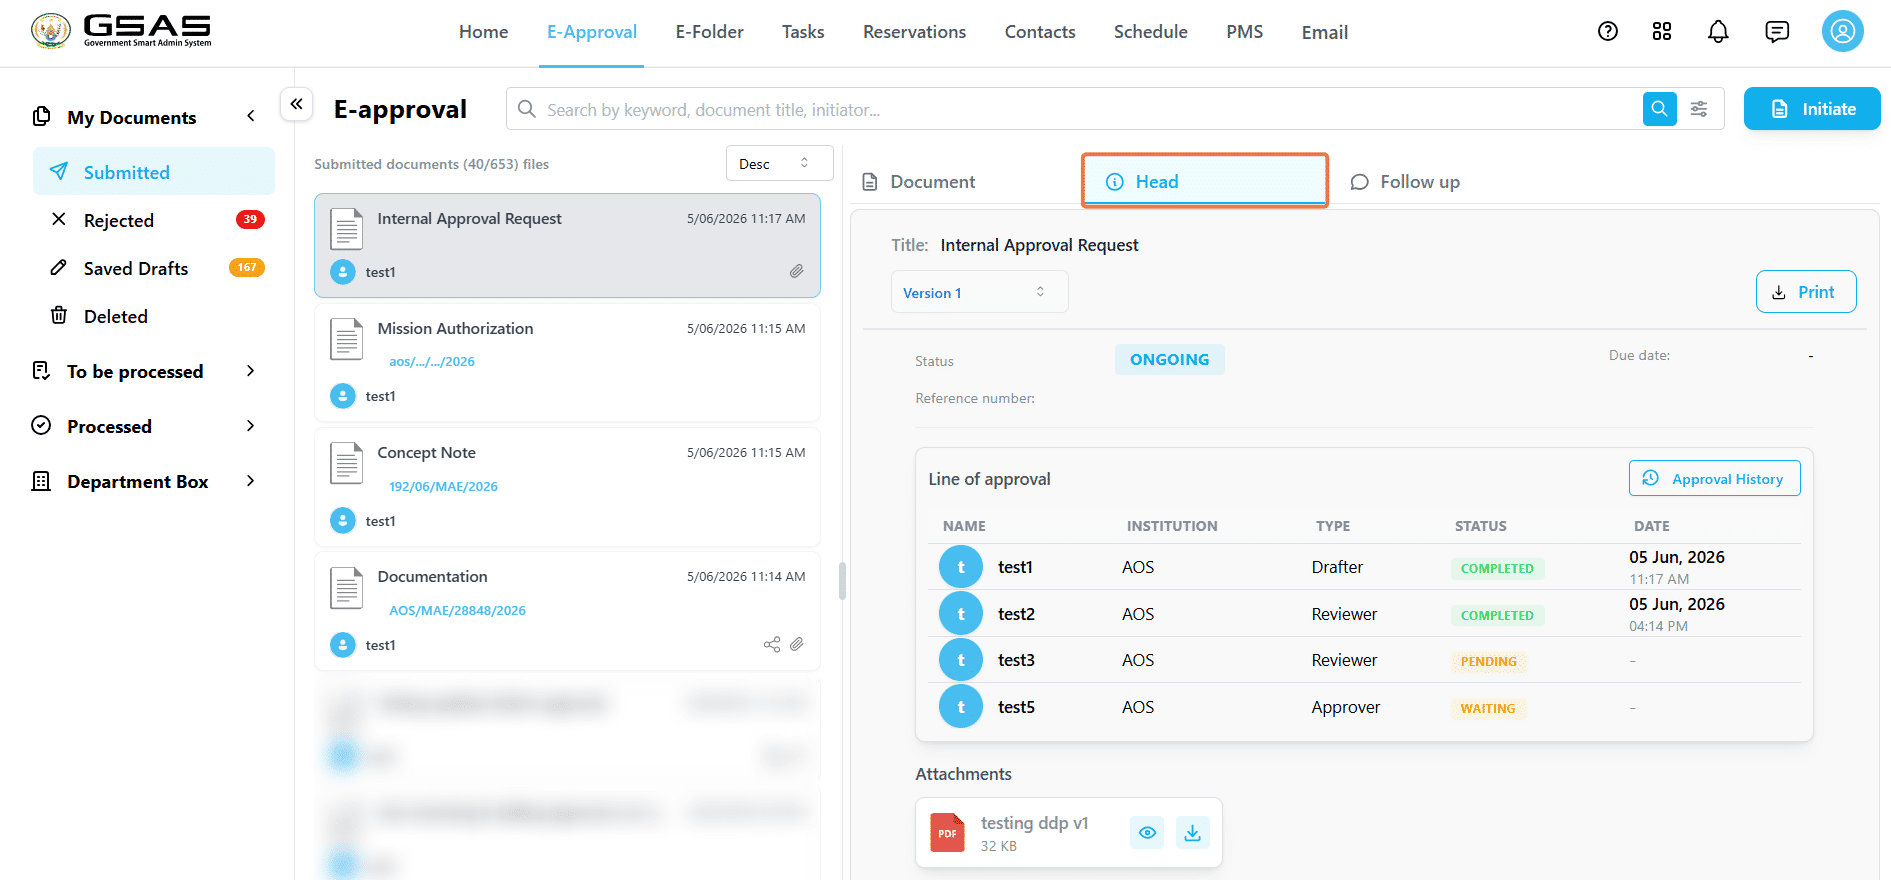
- Once submitted, your request appears under **My Documents → Submitted**. Click on it and open the **Head** tab to see a full picture of where the request stands; the approval line, each approver's status, and the date they acted.
[](https://docs.smartadmin.rw/uploads/images/gallery/2026-06/Xxtimage.png)
#### **→** Understanding request statuses
Each person in the approval line has an individual status that updates as the request moves forward.
| WAITING | The request has not yet reached this person. |
| PENDING | The request has reached this approver and is currently waiting for their action. |
| COMPLETED | This person has approved the request. The date and time of their action is recorded alongside their name. |
- If an approver approves your request, their status will update to completed, and the request will move to the next approver in the line of approval.
- If your request is rejected, you'll find it in **My Documents → Rejected**. The approver's reason for rejecting will appear as a comment icon alongside their date & time of rejection in the approval line, which you can see by clicking on the **View** icon.
[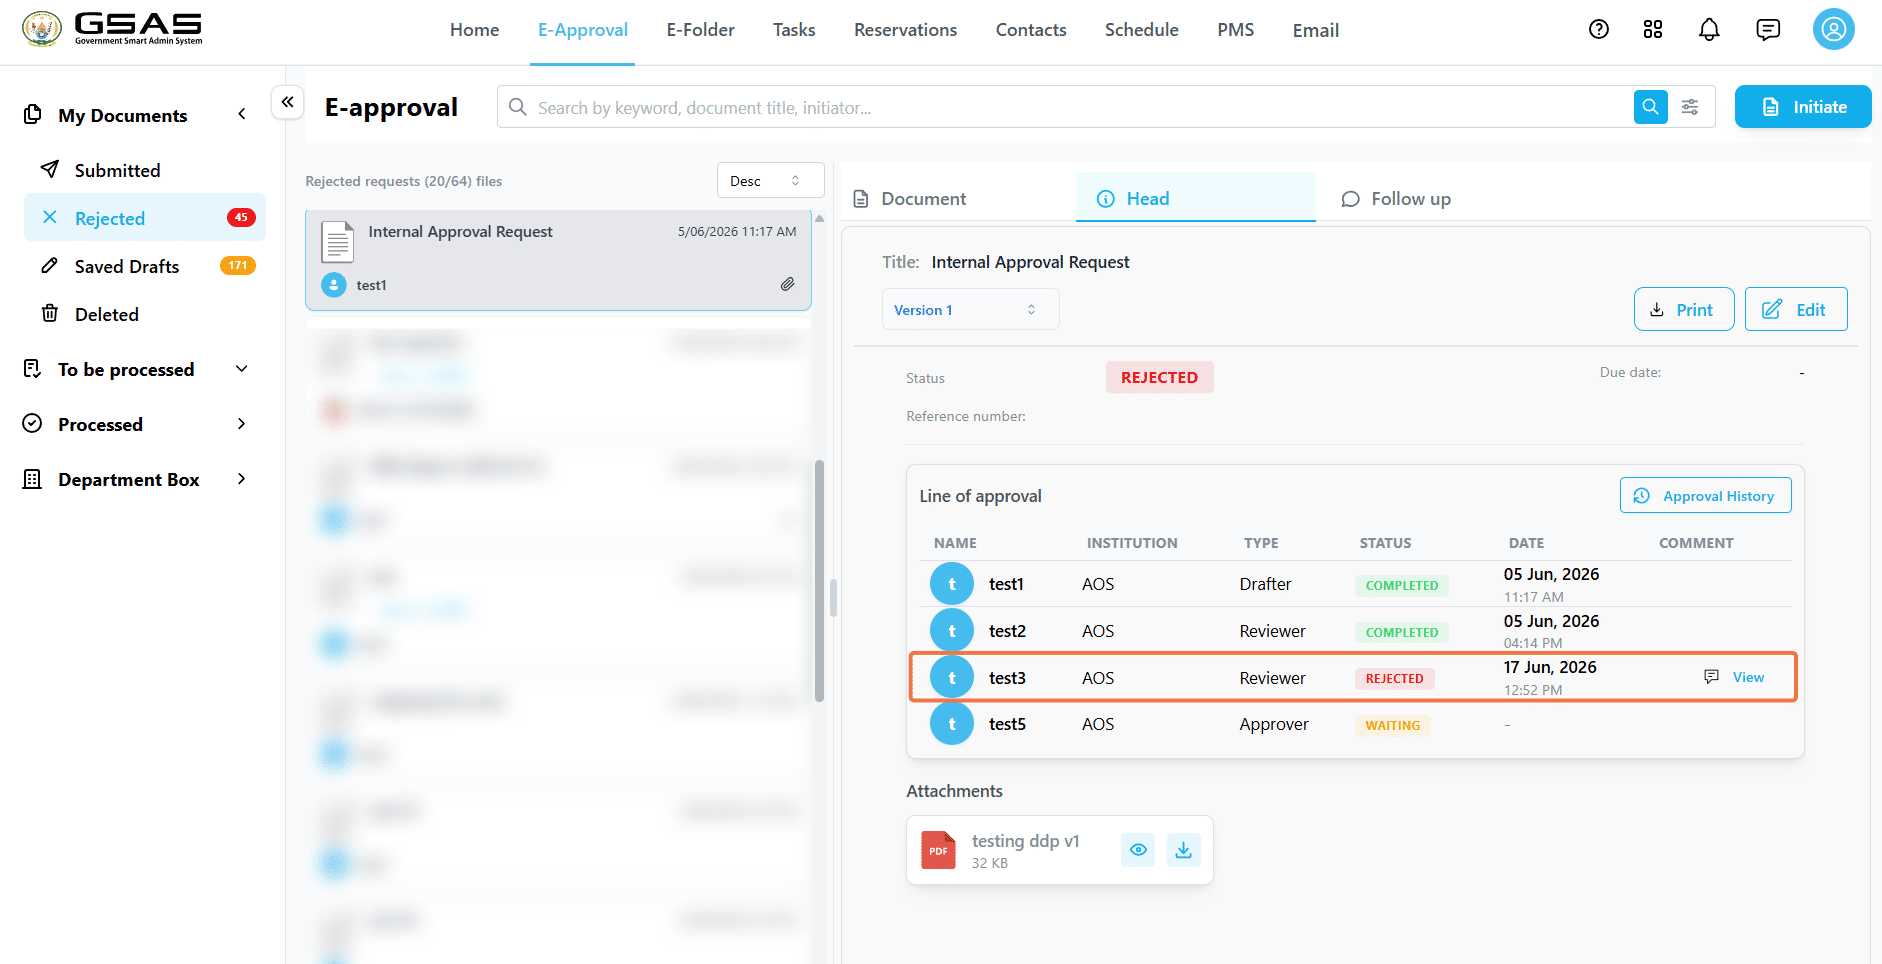](https://docs.smartadmin.rw/uploads/images/gallery/2026-06/dbqimage.png)
- Click on "Edit" to make the necessary changes, and resubmit.
- Once resubmitted, the request returns to the first approver again, and moves through the approval line in order.
If a request has been edited and resubmitted by you, it gets updated to a new version. The **Version** dropdown lets you view and compare with earlier versions of the document.
[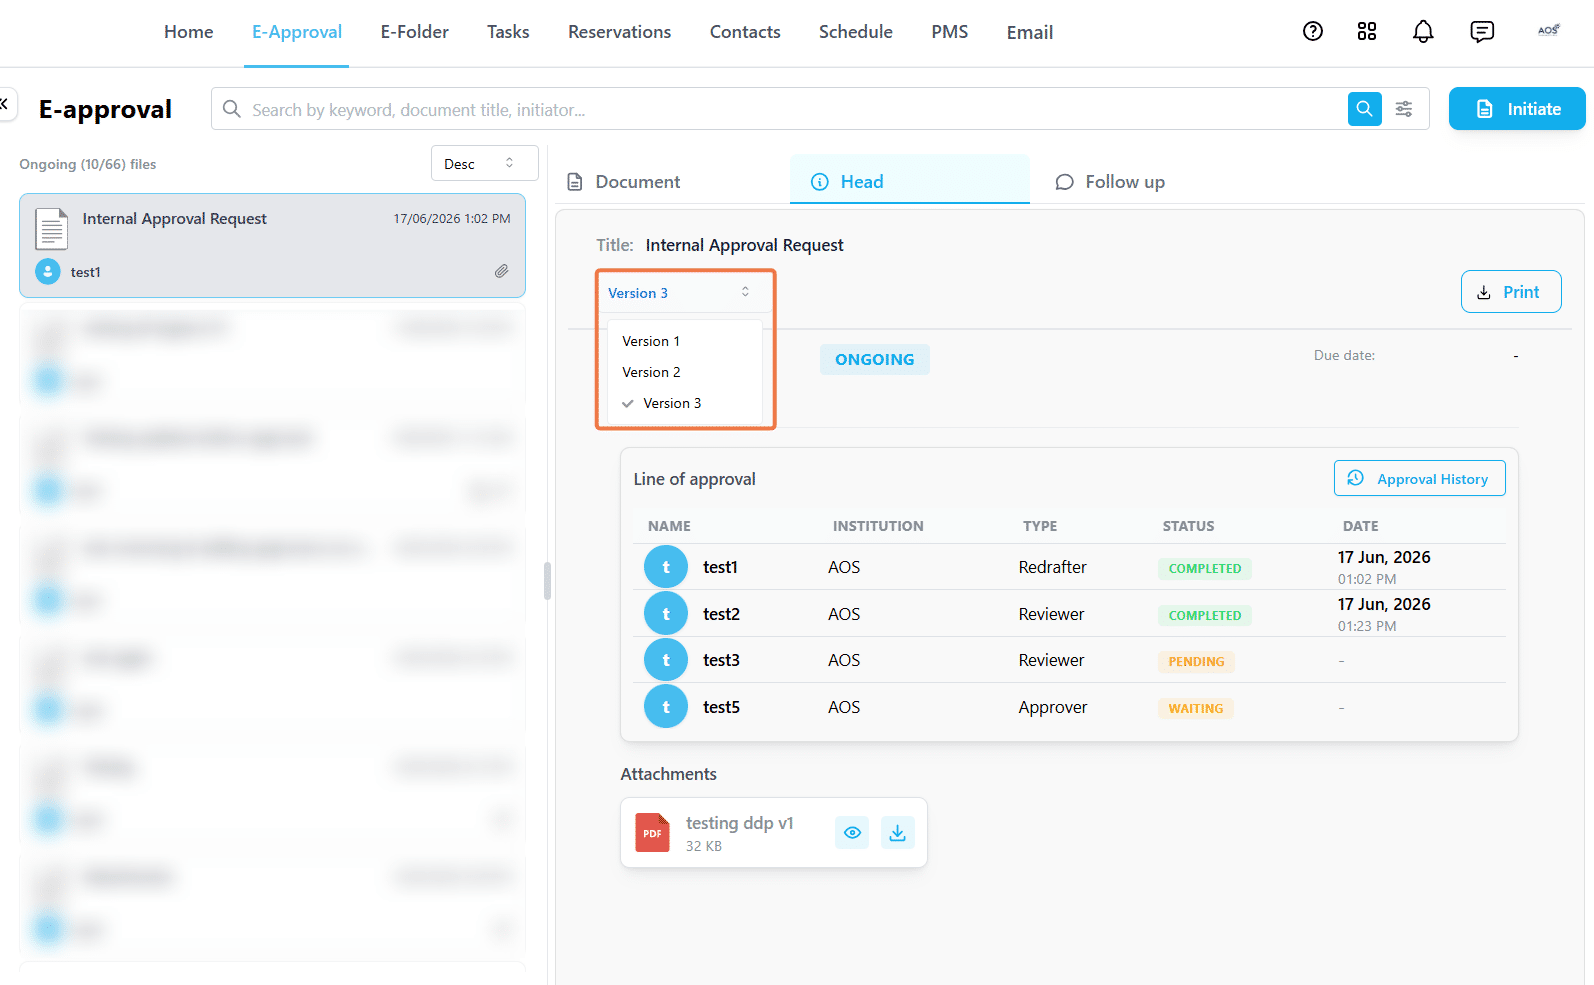](https://docs.smartadmin.rw/uploads/images/gallery/2026-06/XAWimage.png)
---
---
### Responding to a request as an approver
When a request reaches your turn in the approval line, you will be notified. You will find it in:
- **To Be Processed → Internal Approval** if a user from your institution assigned it to you, or
- **To Be Processed → External Approval** if a user from another institution assigned it to you.
Open the request and review its content before taking any of the following actions:
[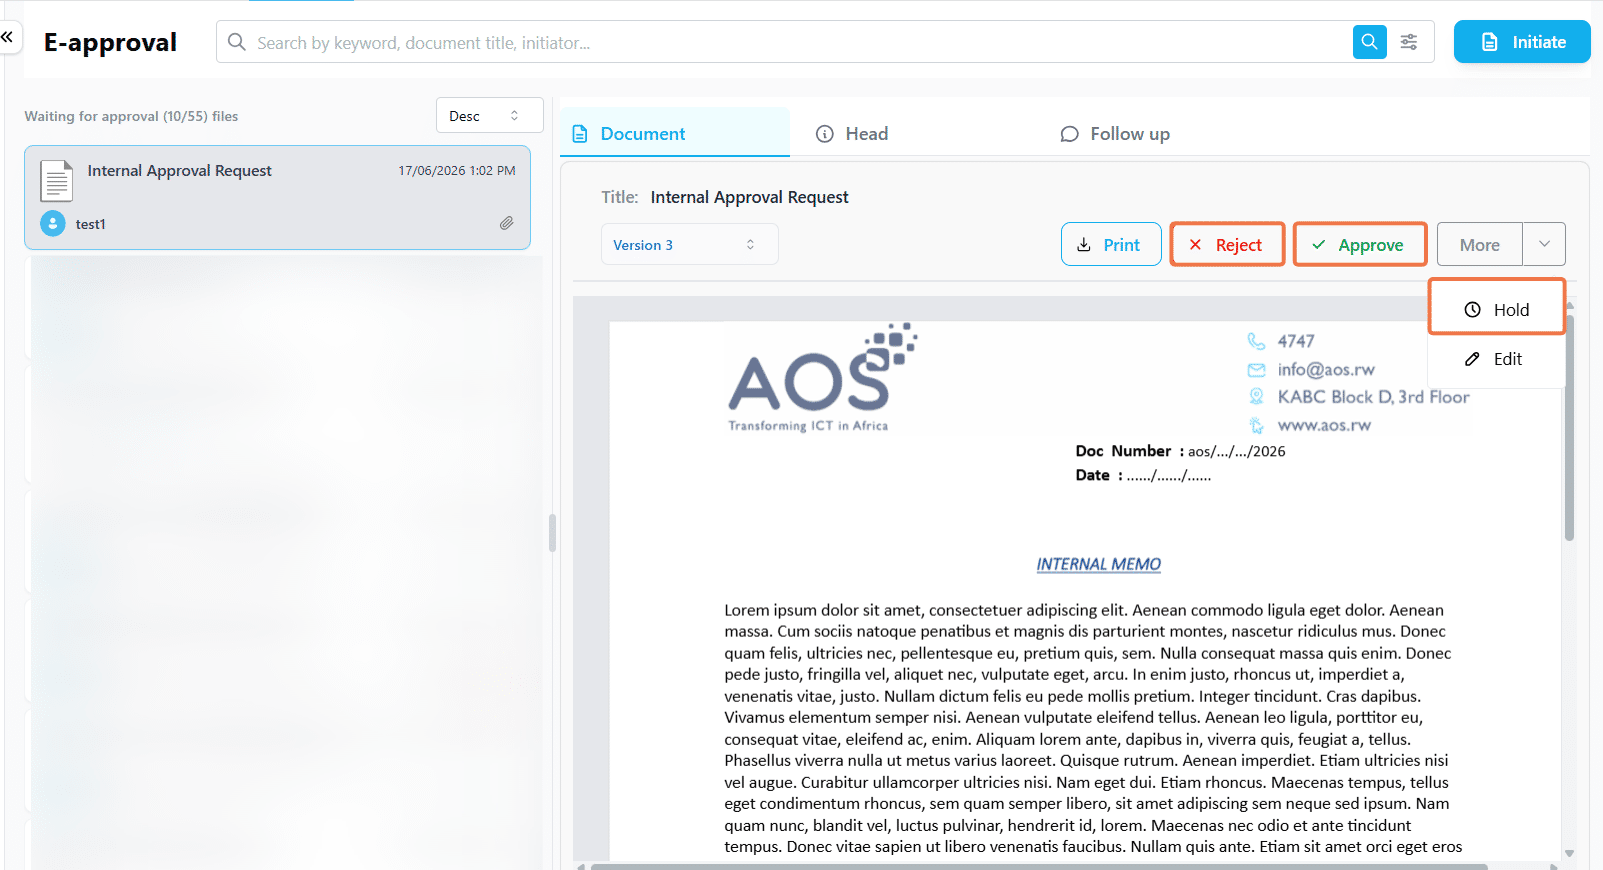](https://docs.smartadmin.rw/uploads/images/gallery/2026-06/x5Vimage.png)
| Approve | Approves the request and moves it to the next approver in line.
|
| Reject | Rejects the request after you leave a mandatory comment explaining the reason. The request will be in your **Rejected** folder until the drafter resubmits.
|
| Hold | Moves the request to your **On Hold** folder for quick access if you are not ready to act on it yet. The drafter is not notified. You can approve or reject it from the on hold folder at any time. *(Click on the **More** dropdown to see this option).* |
#### **→** Editing before approving
| **Important:** Some form templates are configured as editable by your admin. When forms are editable, you can make changes to the request's details or content before approving. When you edit and update a request, its version updates. Click the **Version** dropdown to compare with earlier versions. |
How to edit a request as an approver
- Open the request and click the **More** dropdown, then click **Edit**.
[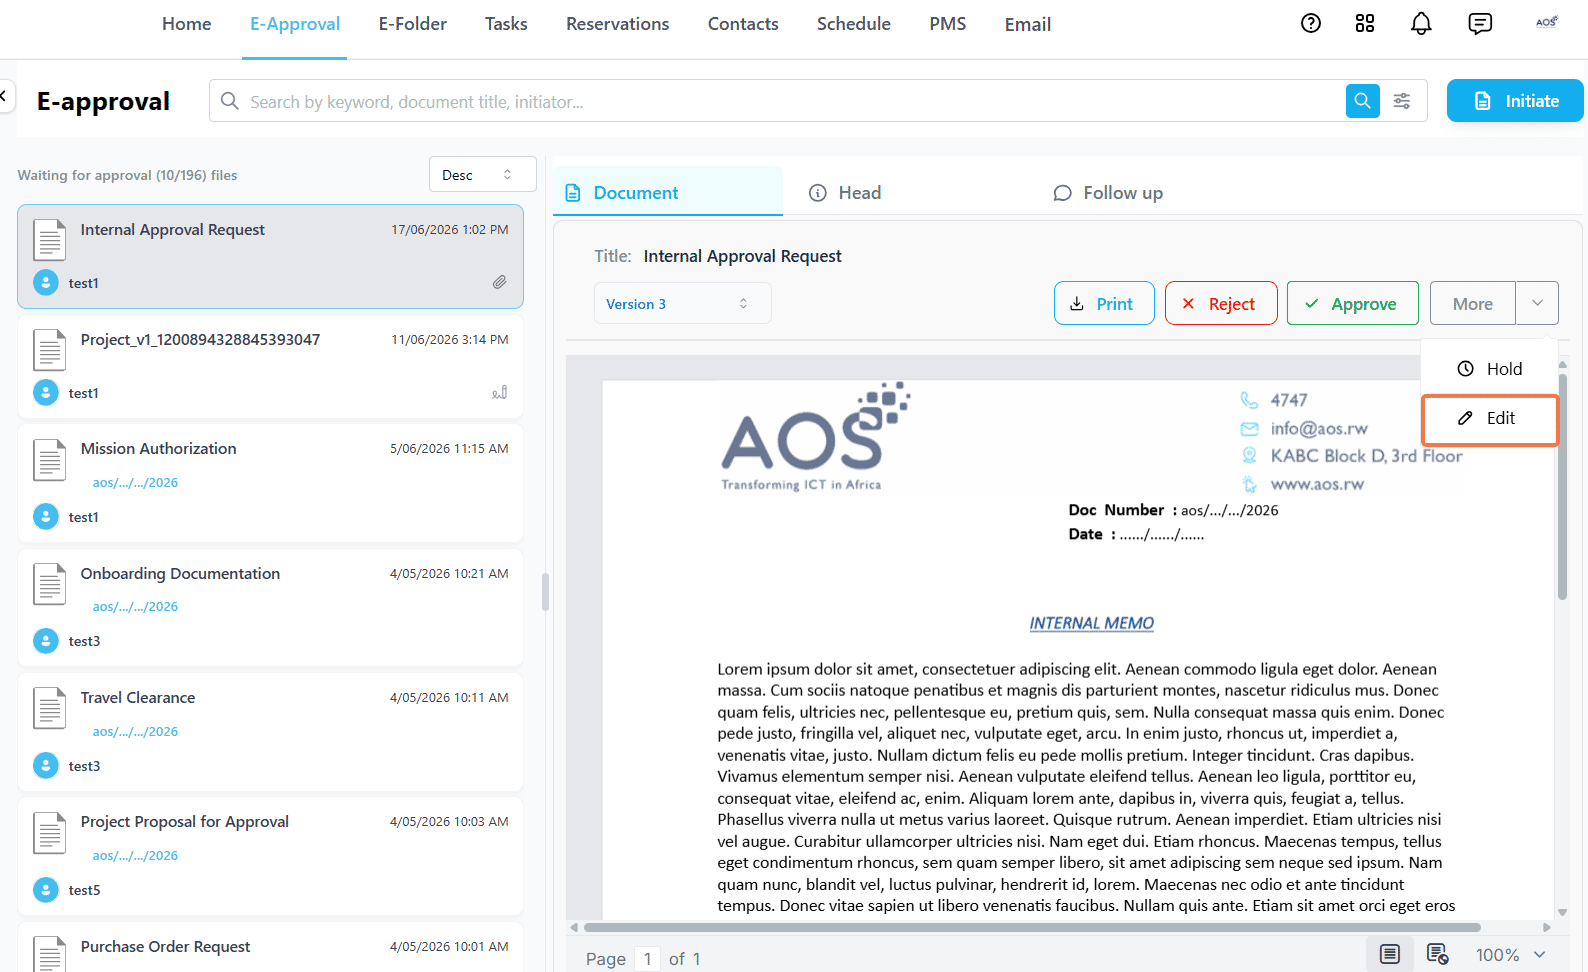](https://docs.smartadmin.rw/uploads/images/gallery/2026-06/iS7image.png)
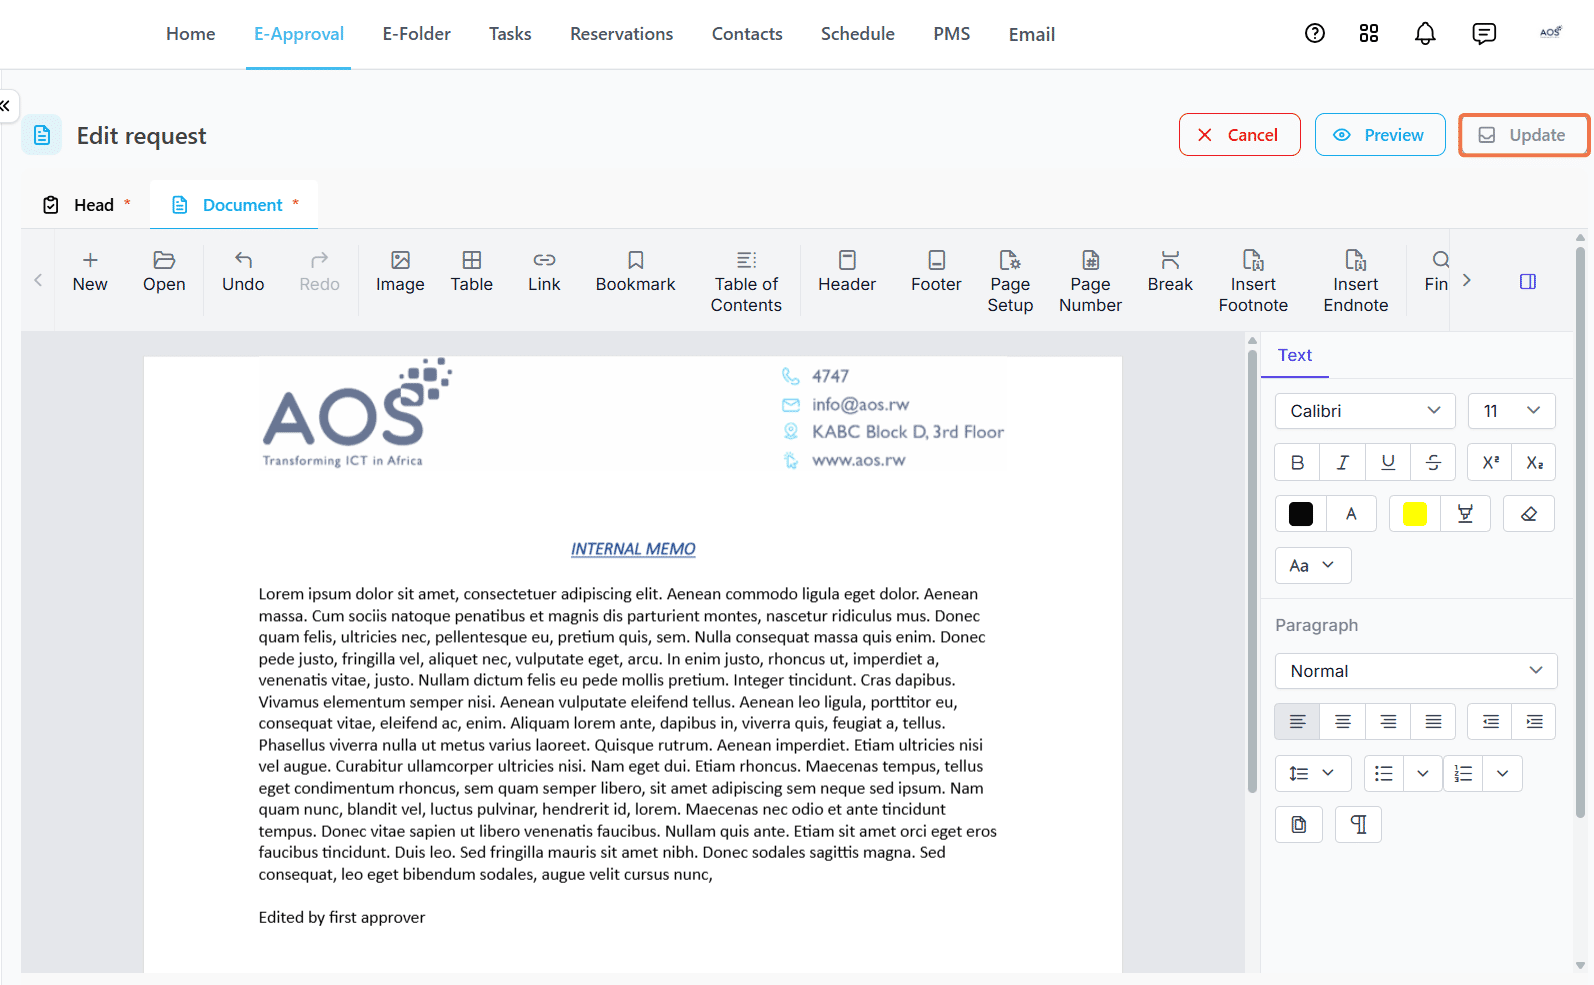
- Make any necessary changes on the **Head** or **Document** tab, then click **Update**.
[](https://docs.smartadmin.rw/uploads/images/gallery/2026-06/2Sfimage.png)
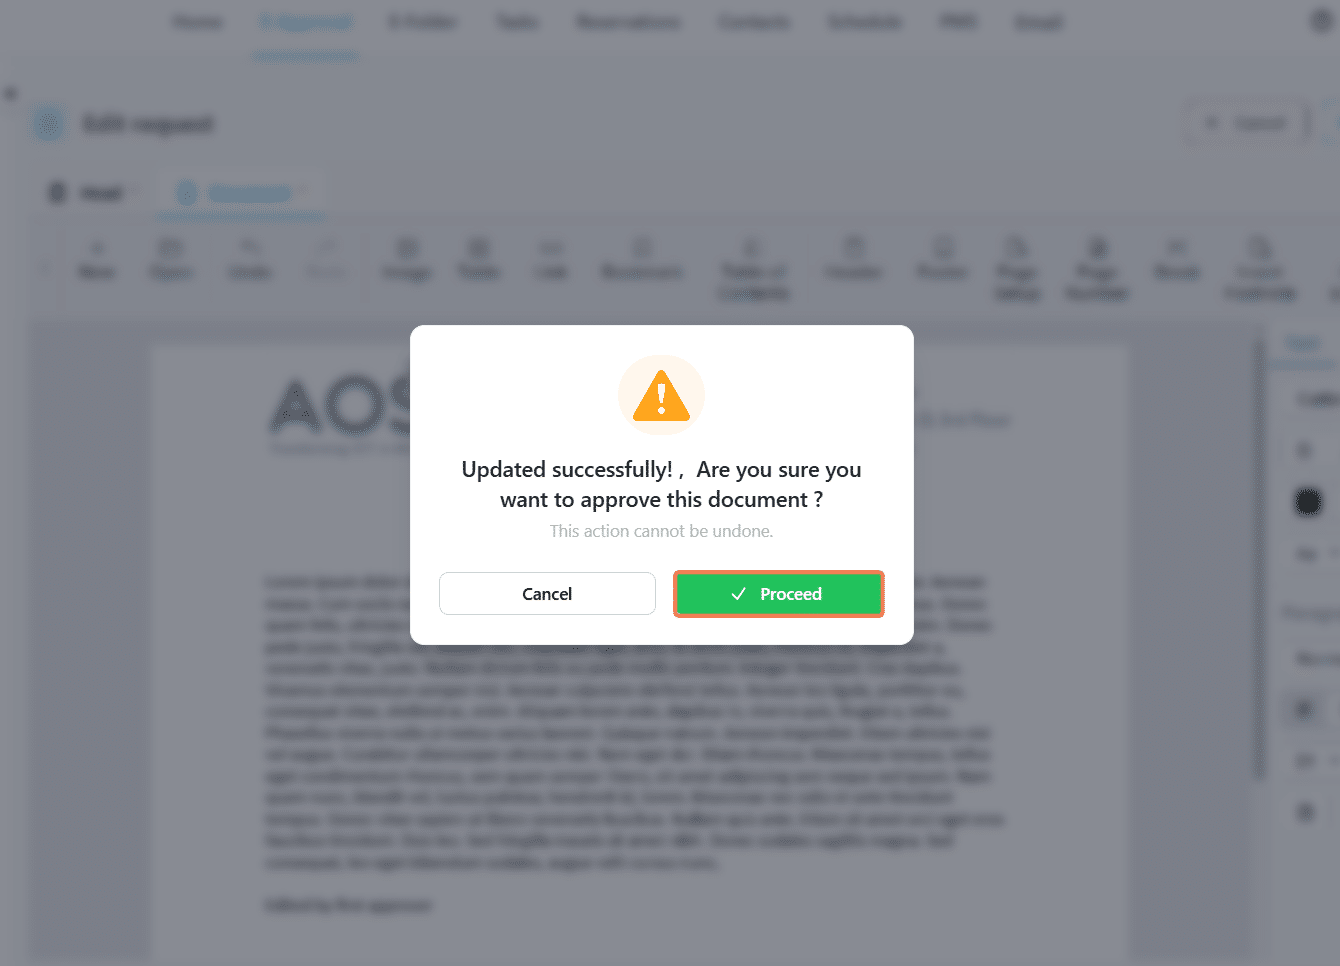
- A confirmation dialog will appear. Click **Proceed** to save the changes and approve the document, or **Cancel** to save the changes without approving.
[](https://docs.smartadmin.rw/uploads/images/gallery/2026-06/HKDimage.png)
The Sender Manager of your institution can edit the *details* of the request before sending, i.e. Attachments, Title, and Assigned institutions or individuals.
---
### Forwarded requests
- These are requests received from external institutions that your institution's Receiver Manager has forwarded to you for action.
- You will find them in your **External Approval** folder. As a recipient you can; **Forward** to any other relevant parties, **Confirm** receipt or **Reply** with a request of your own.
[](https://docs.smartadmin.rw/uploads/images/gallery/2026-06/S1cimage.png)
---
### Follow up
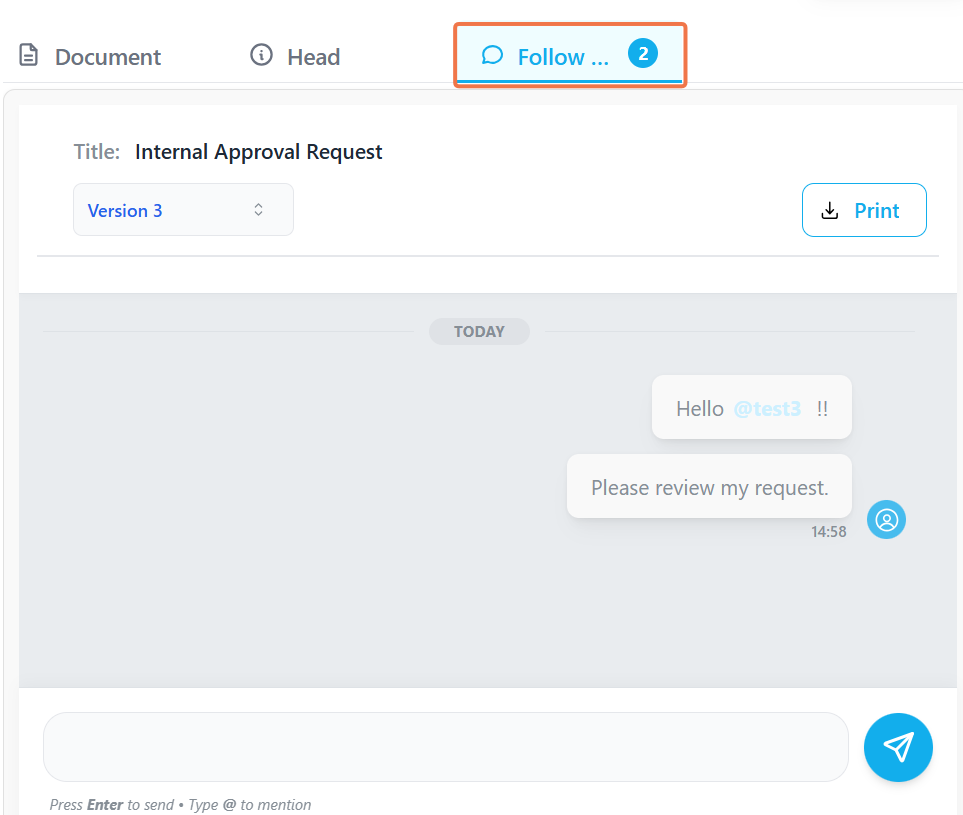
The **Follow Up** tab is available on any request to everyone in the approval line. Use it to ask questions or provide additional context at any point during the process.
[](https://docs.smartadmin.rw/uploads/images/gallery/2026-06/7YKimage.png)
---
### Sharing a completed request
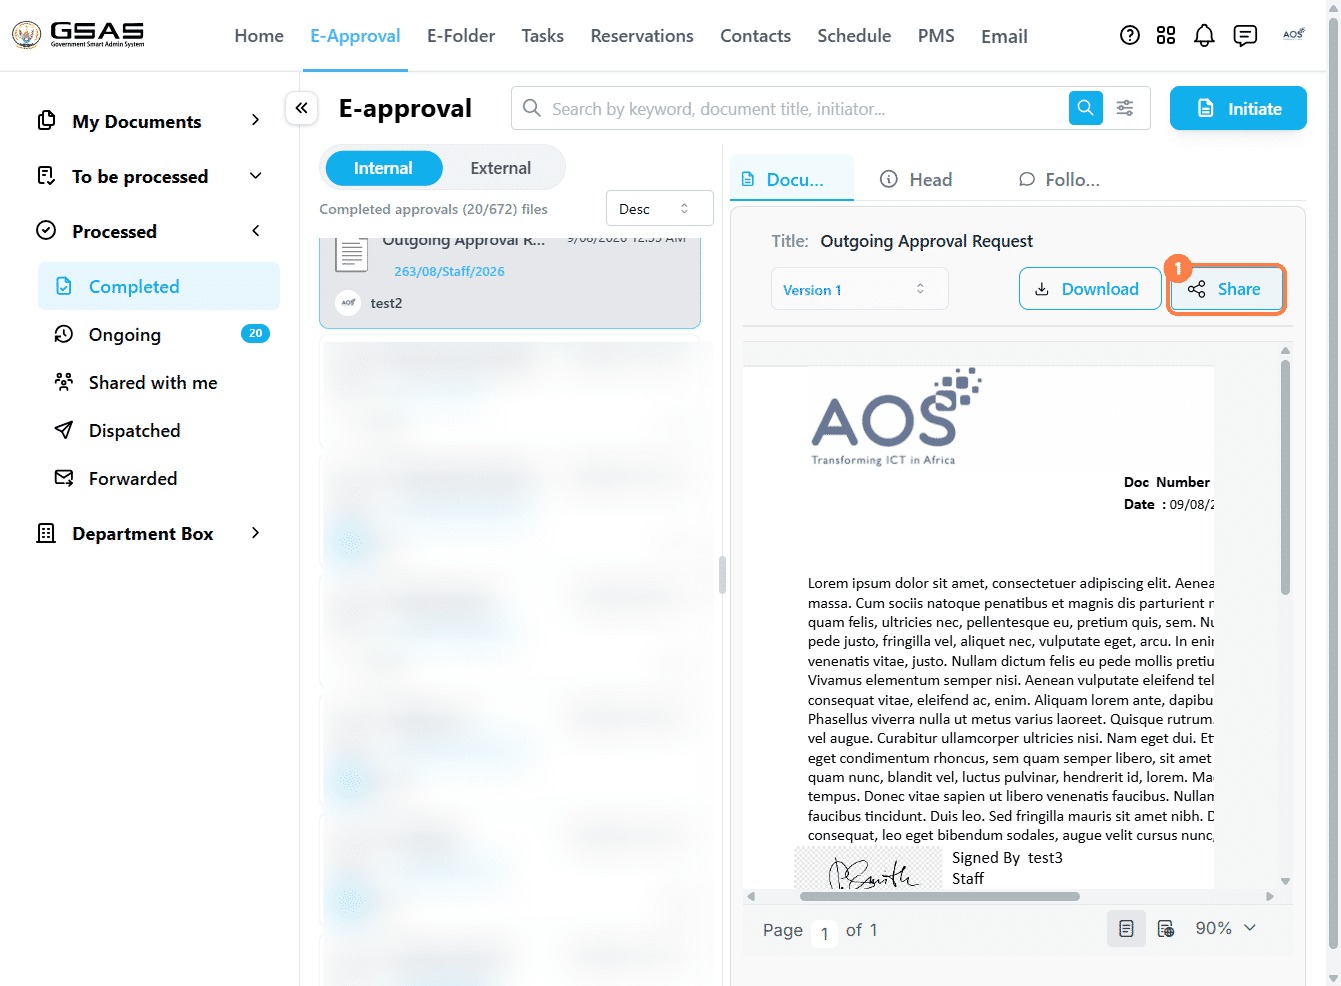
Once a document is completed, everyone with access to it (drafters, approvers) can share it with other users within their institution
[](https://docs.smartadmin.rw/uploads/images/gallery/2026-08/kuLimage.png)
The document can be shared either with a single user or a group of users.
[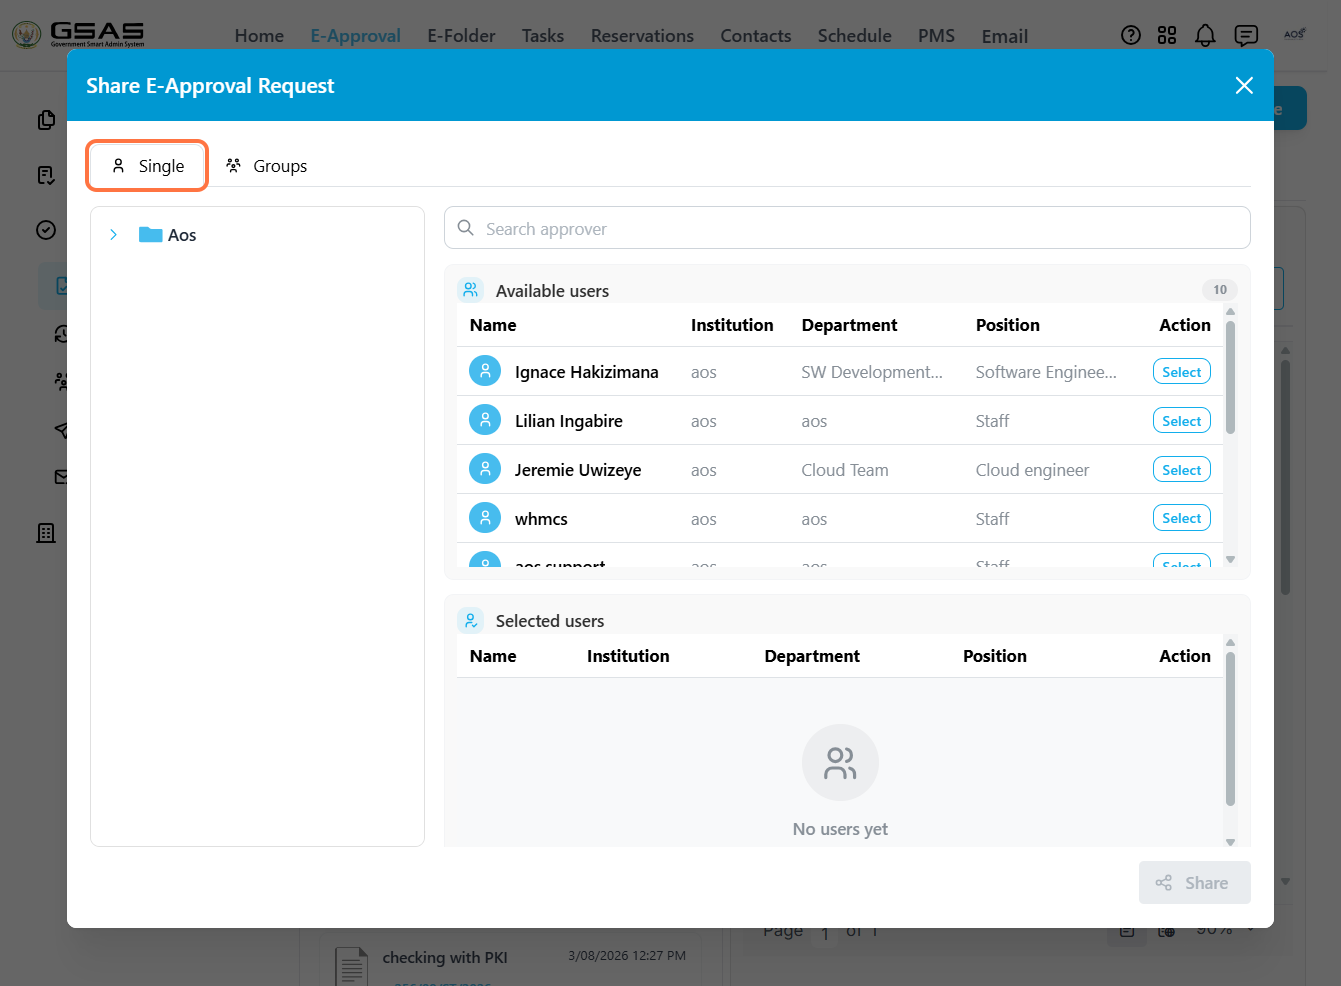](https://docs.smartadmin.rw/uploads/images/gallery/2026-08/sbHimage.png)
[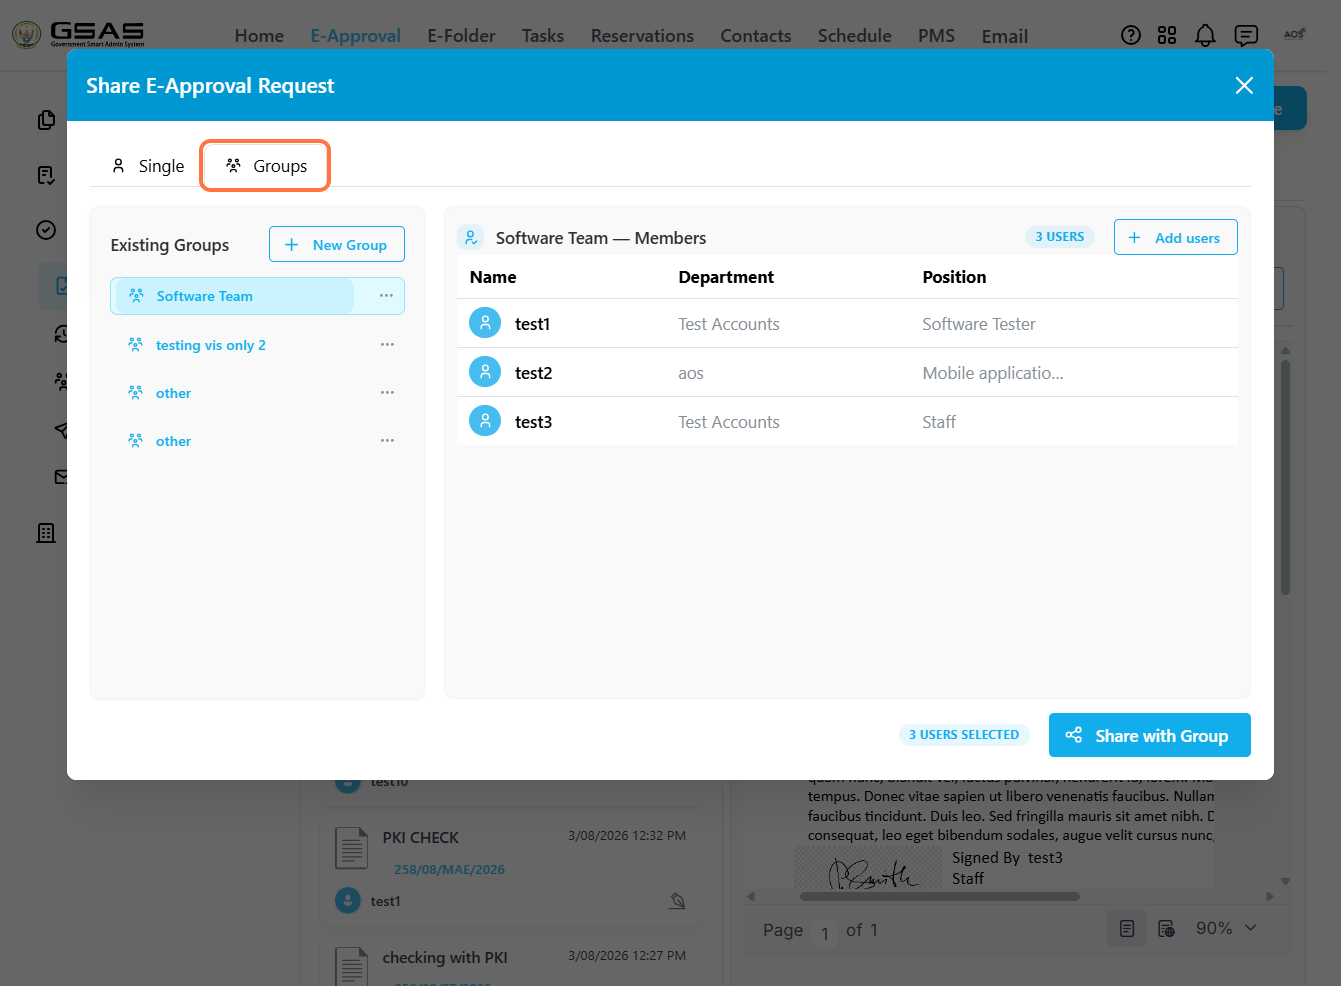](https://docs.smartadmin.rw/uploads/images/gallery/2026-08/8FTimage.png)
Click Share once you're done selecting recipients.
[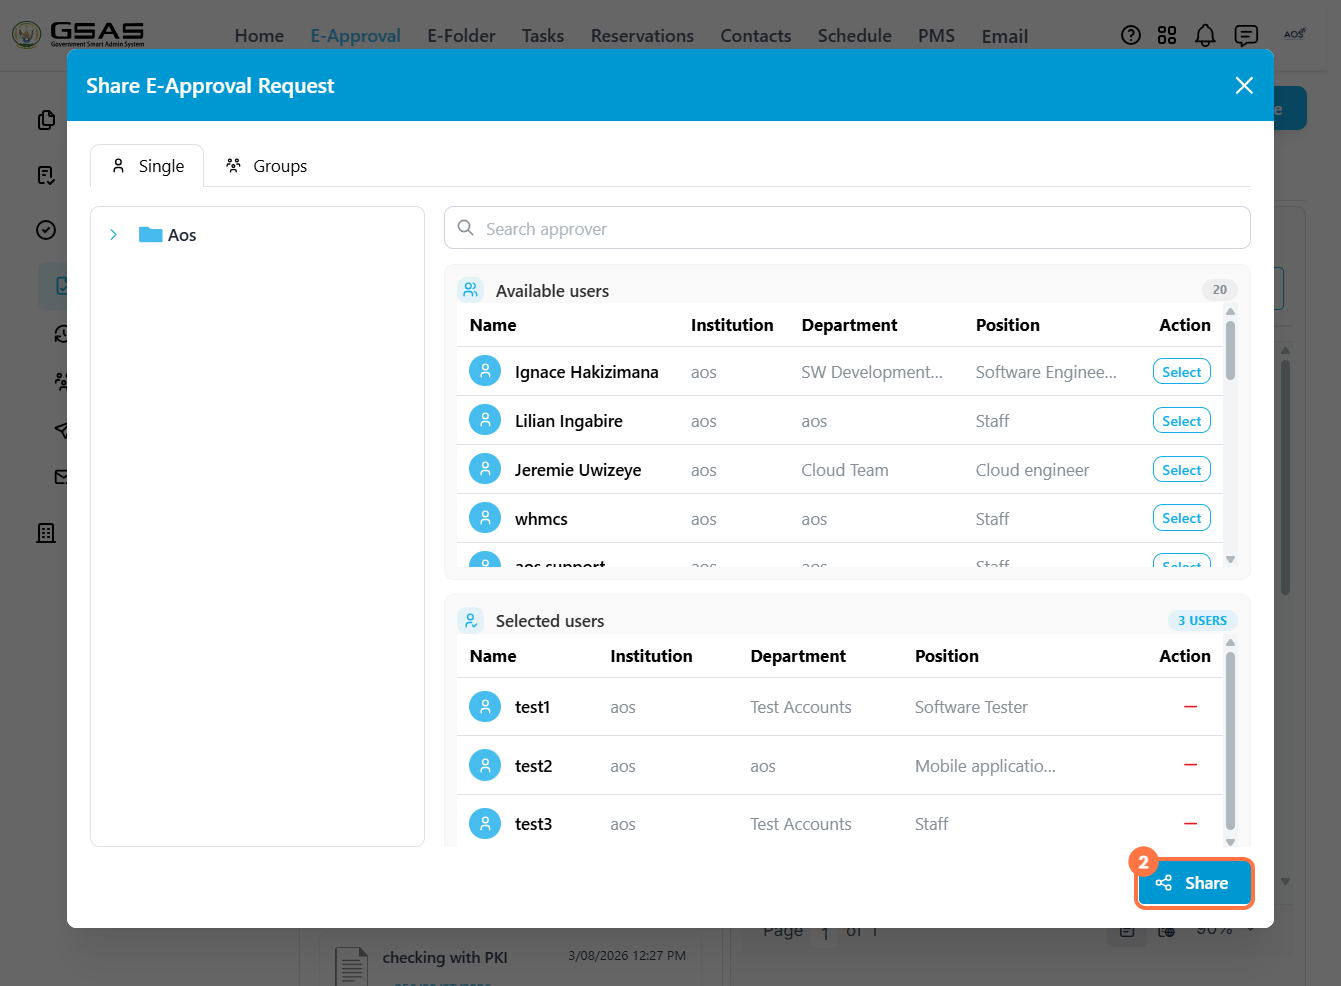](https://docs.smartadmin.rw/uploads/images/gallery/2026-08/8P4image.png)
Enter an optional message to the recipients, then click **Share**
[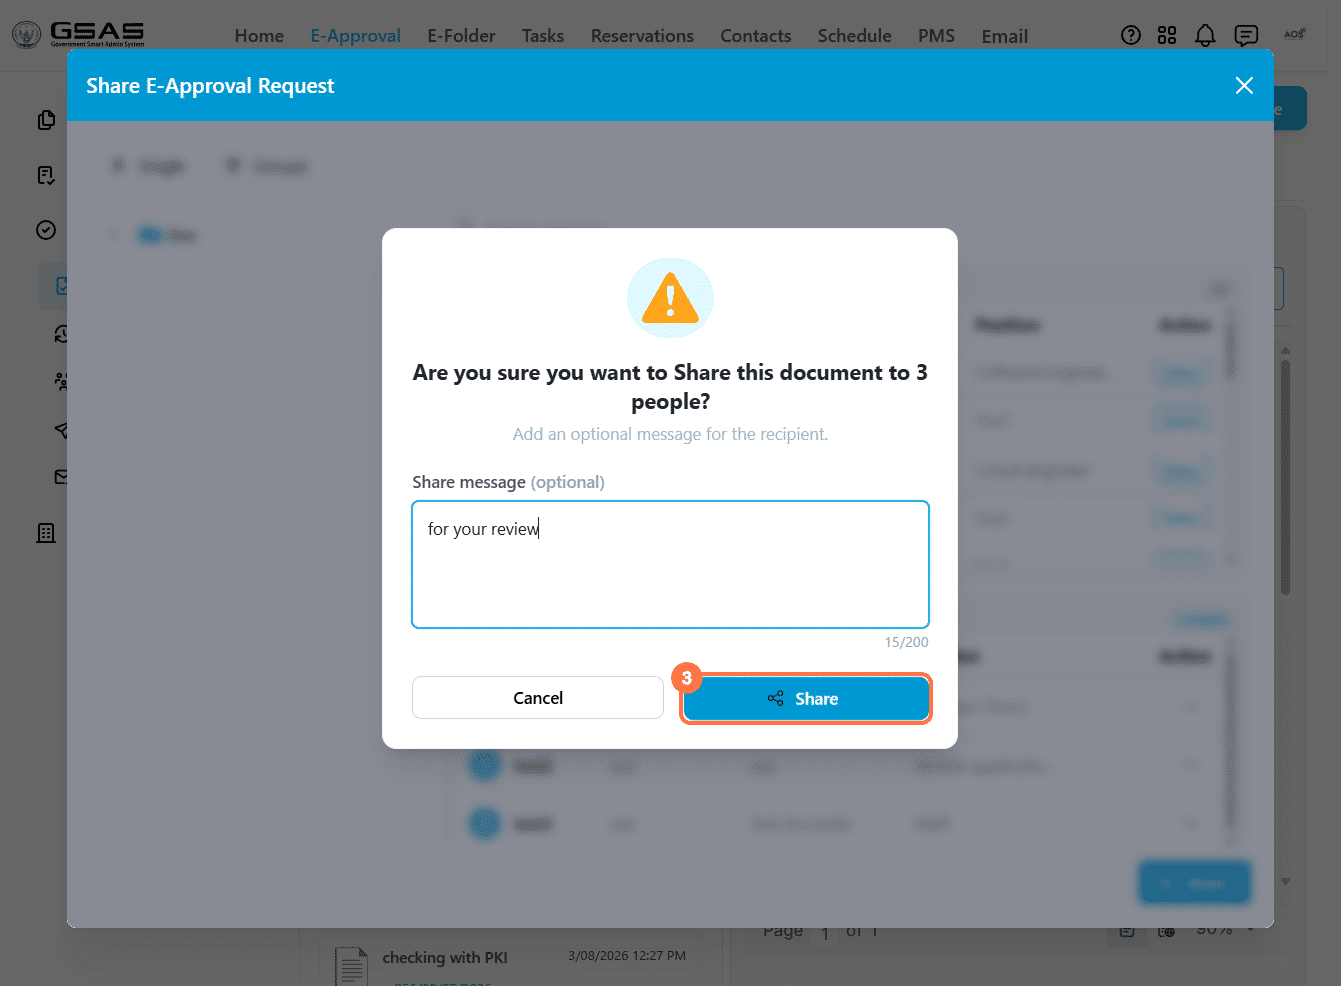](https://docs.smartadmin.rw/uploads/images/gallery/2026-08/7r8image.png)
[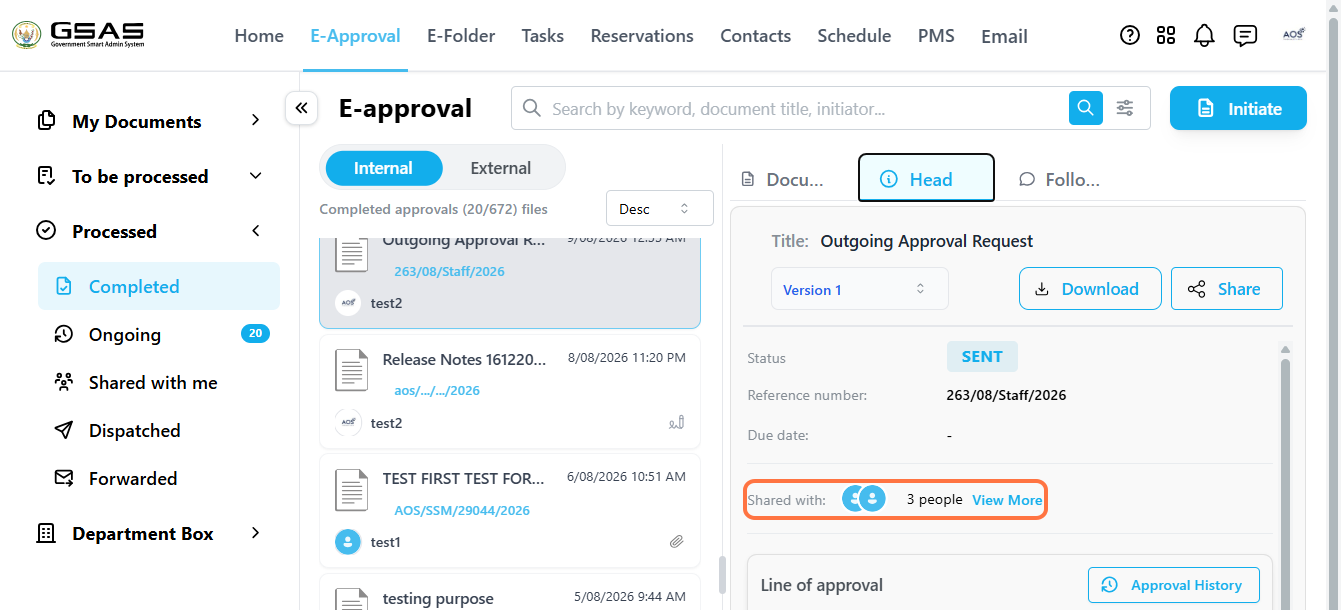](https://docs.smartadmin.rw/uploads/images/gallery/2026-08/b0bb687f-53c1-4dcf-a23c-4d71cdd87152.png)
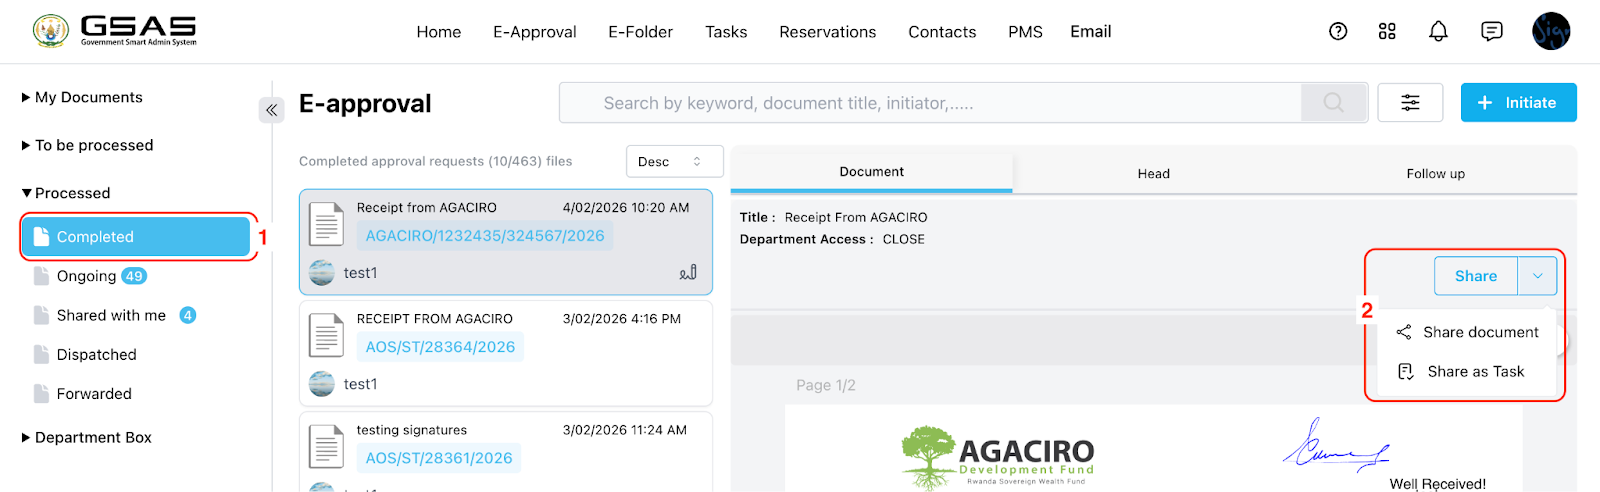
Recipients will find it in their **Processed → Shared with Me** folder, and they will also be able to share it. All people with access to the document will see who it has been shared with.
# Registering documents
---
This section outlines the steps for users to register incoming documents that were not received or sent through the Government Smart Administration System for archiving and sharing.
Step 1
Access eApproval
1. Navigate to the eApproval section of the system.
2. Go to the department box.
3. Go to Registered Received for documents received by your institution, or to Registered Dispatched for documents sent by your institution.
4. Click on the “Register” button to begin the document registration process.
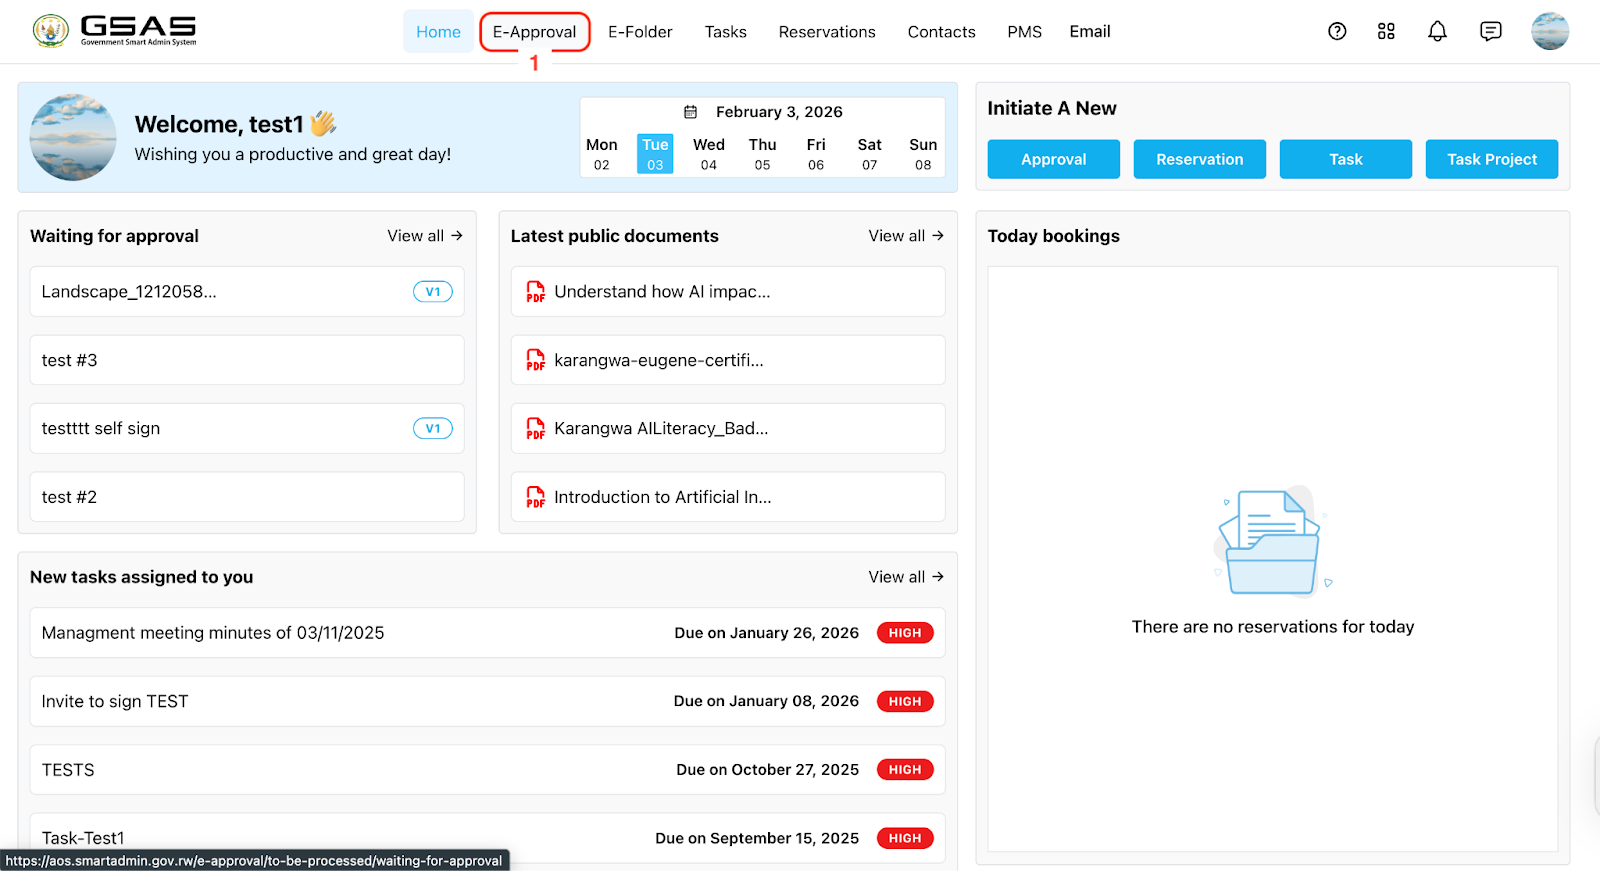
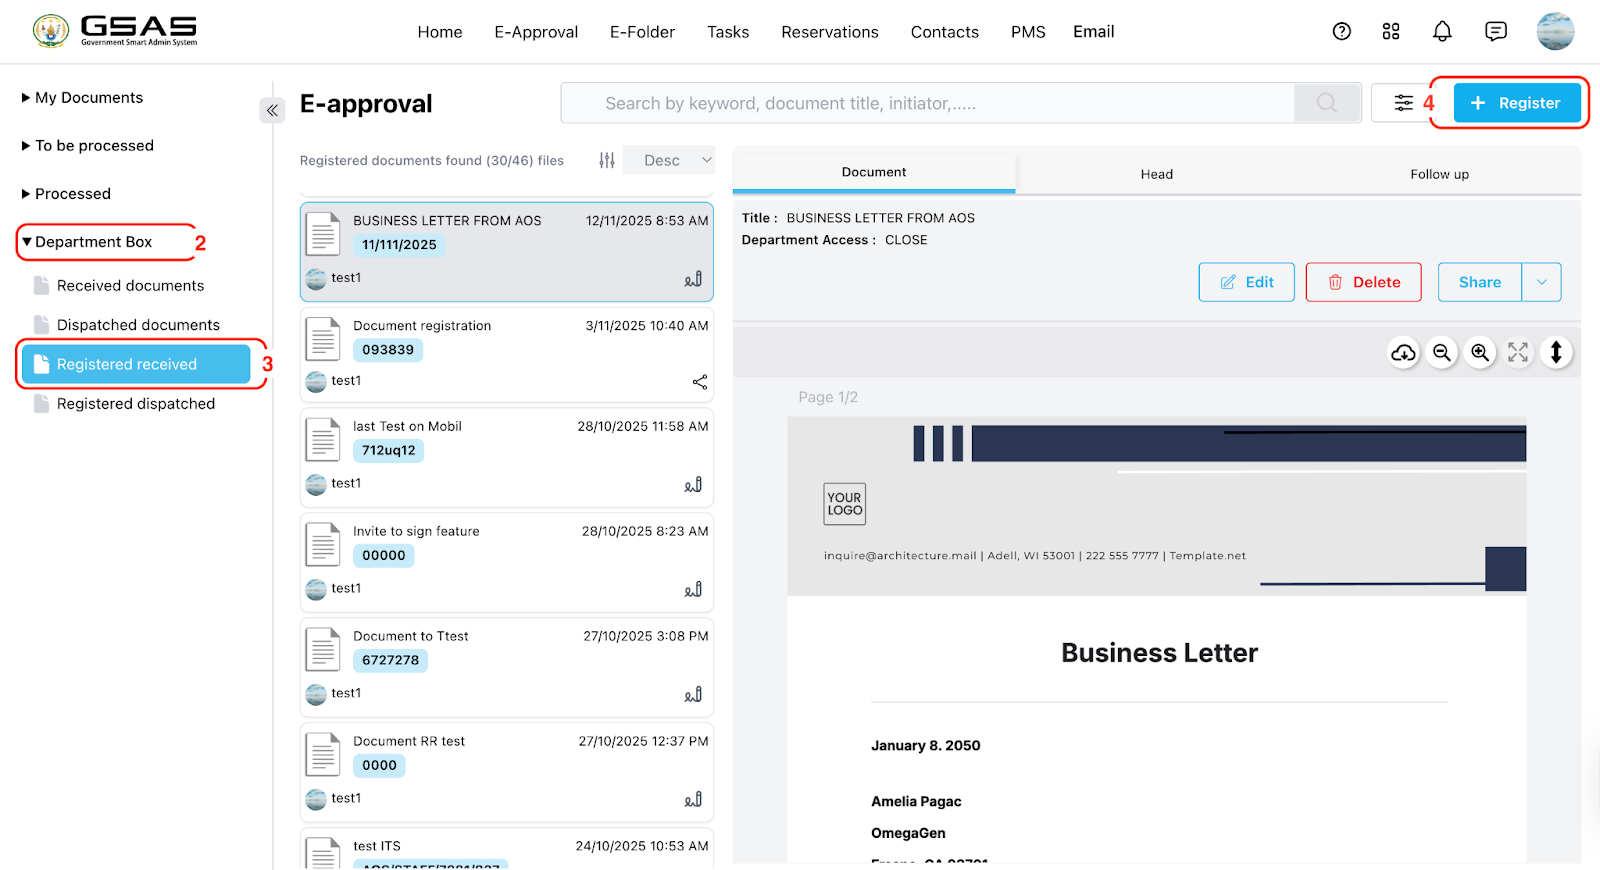
---
Step 2
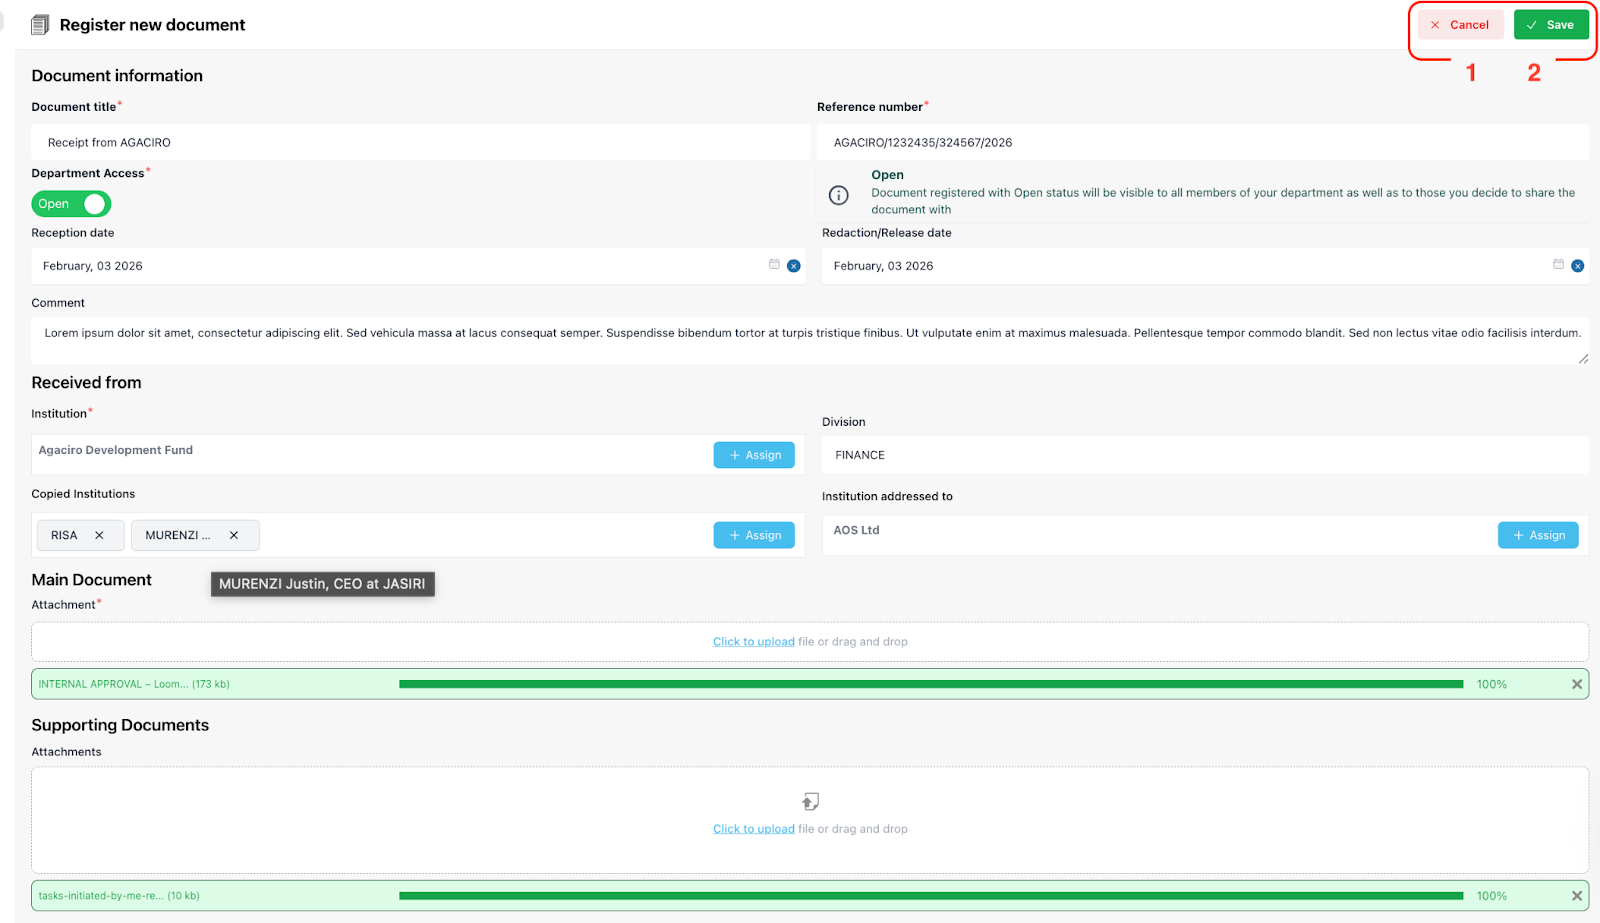
### Document Details Entry
1. Input the title of your document.
2. Add the document’s reference number.
3. Determine access to the document for other team members in your department. (Refer to the cautious message on the side.)
4. Add reception date
5. Add redaction date (Date of when the document is/will be handled)
6. Optionally, add comments summarizing your document.
7. Enter the institution name (e.g., AOS).
8. Specify the division (e.g., HR) if necessary.
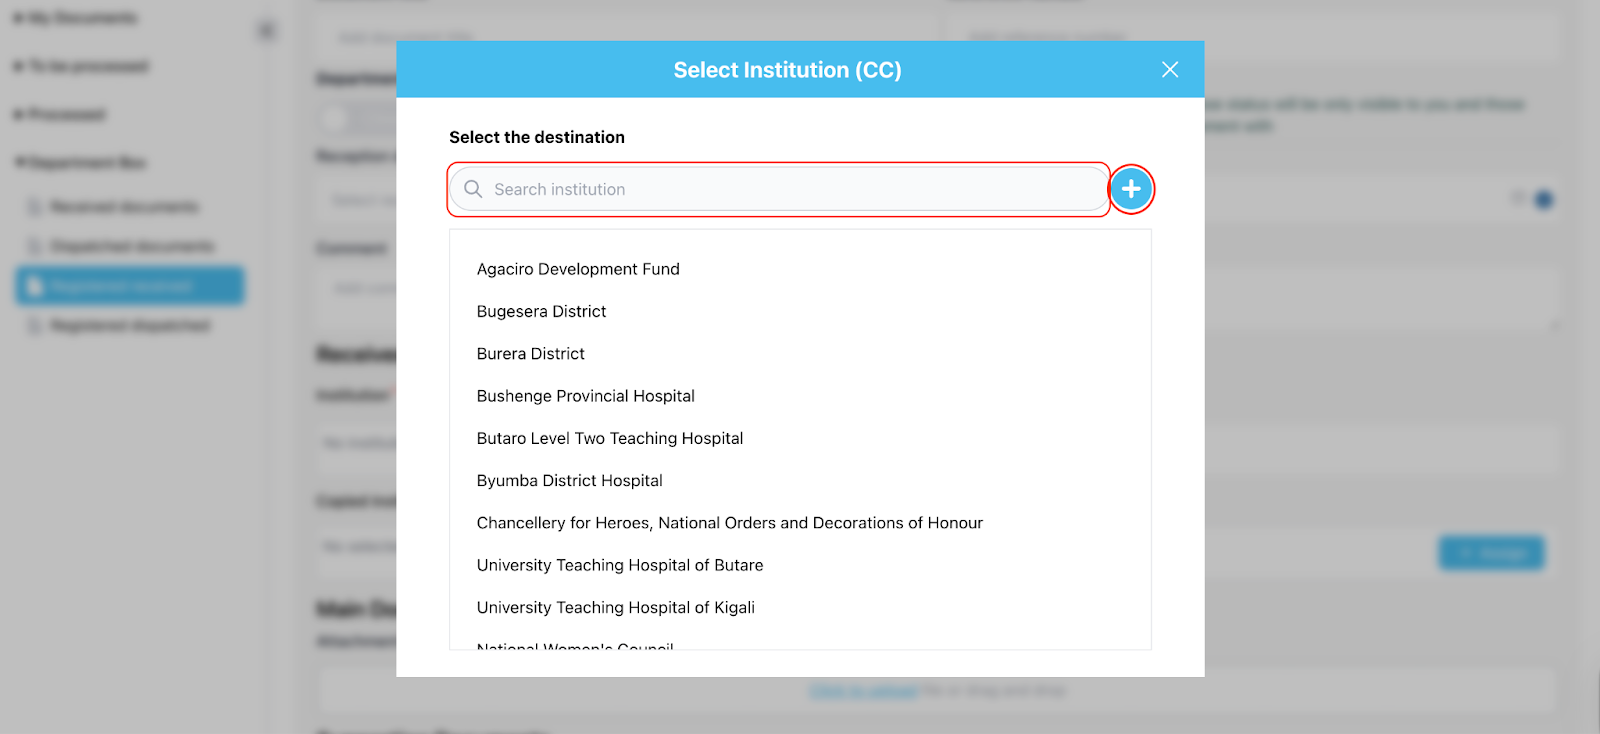
9. Select/Enter the copied institution or type it using the add (+) button.
10. Select/Enter the addressed institution or type it using the add (+) button.
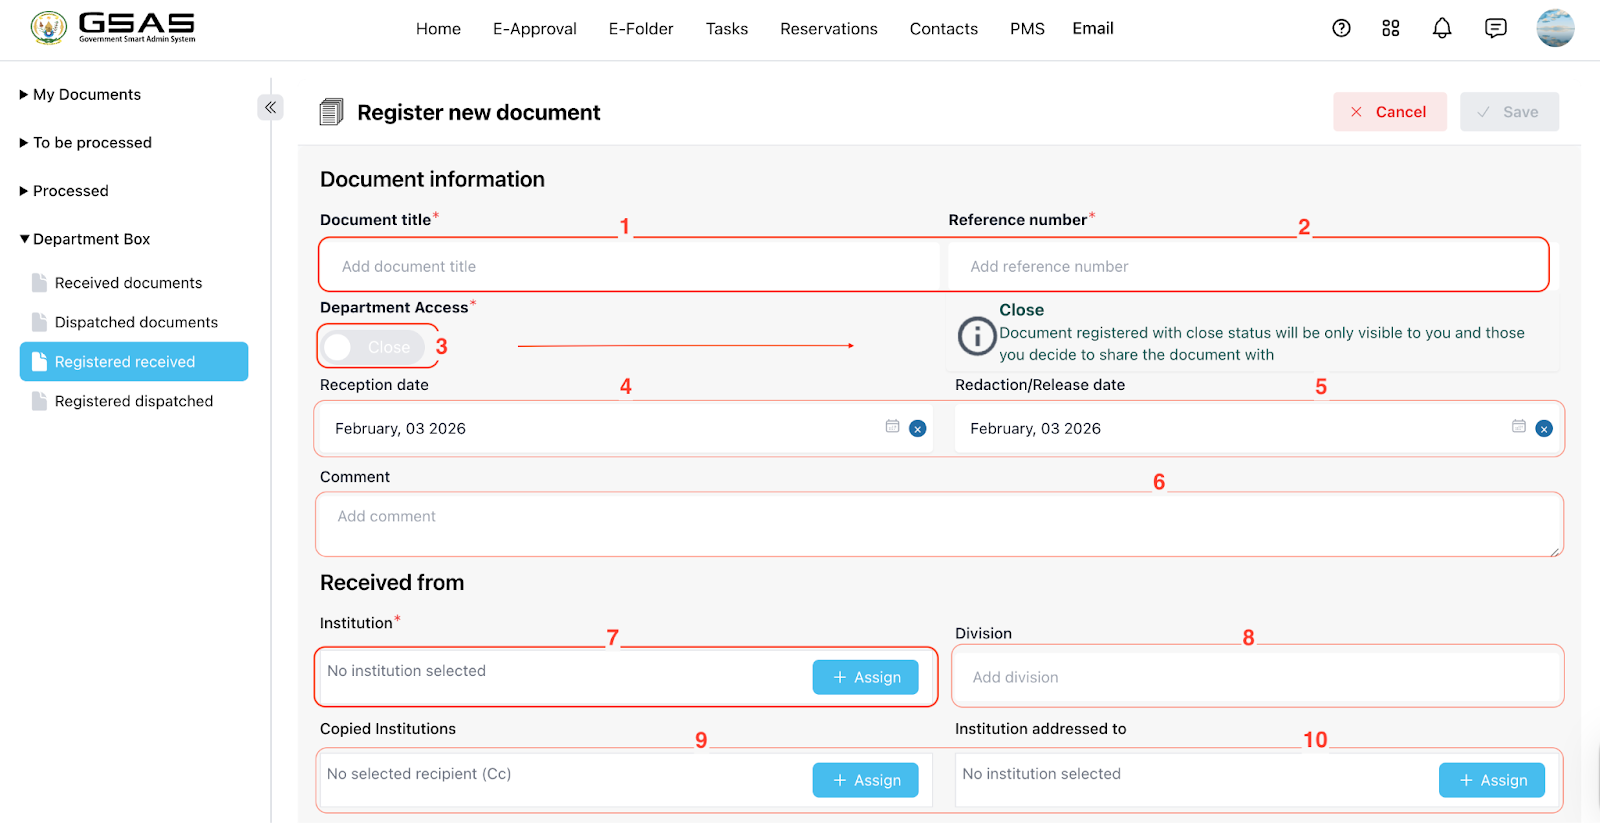
→ After clicking the “+ Assign” button, a new model will open.
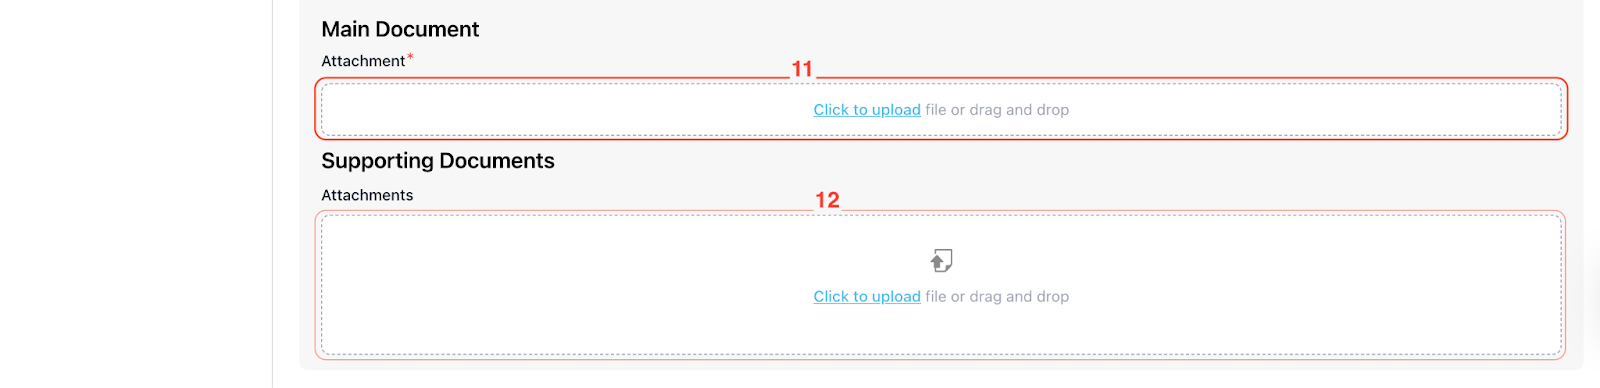
11. Attach the main PDF document.
12. If applicable, attach any supporting documents.
[](https://docs.smartadmin.rw/uploads/images/gallery/2026-06/X9kimage.png)
---
Step 4
Save the Document
1. Click ‘Cancel’ to stop the registration.
2. Click on 'save' to store the document in the system.
[](https://docs.smartadmin.rw/uploads/images/gallery/2026-06/jeHimage.png)
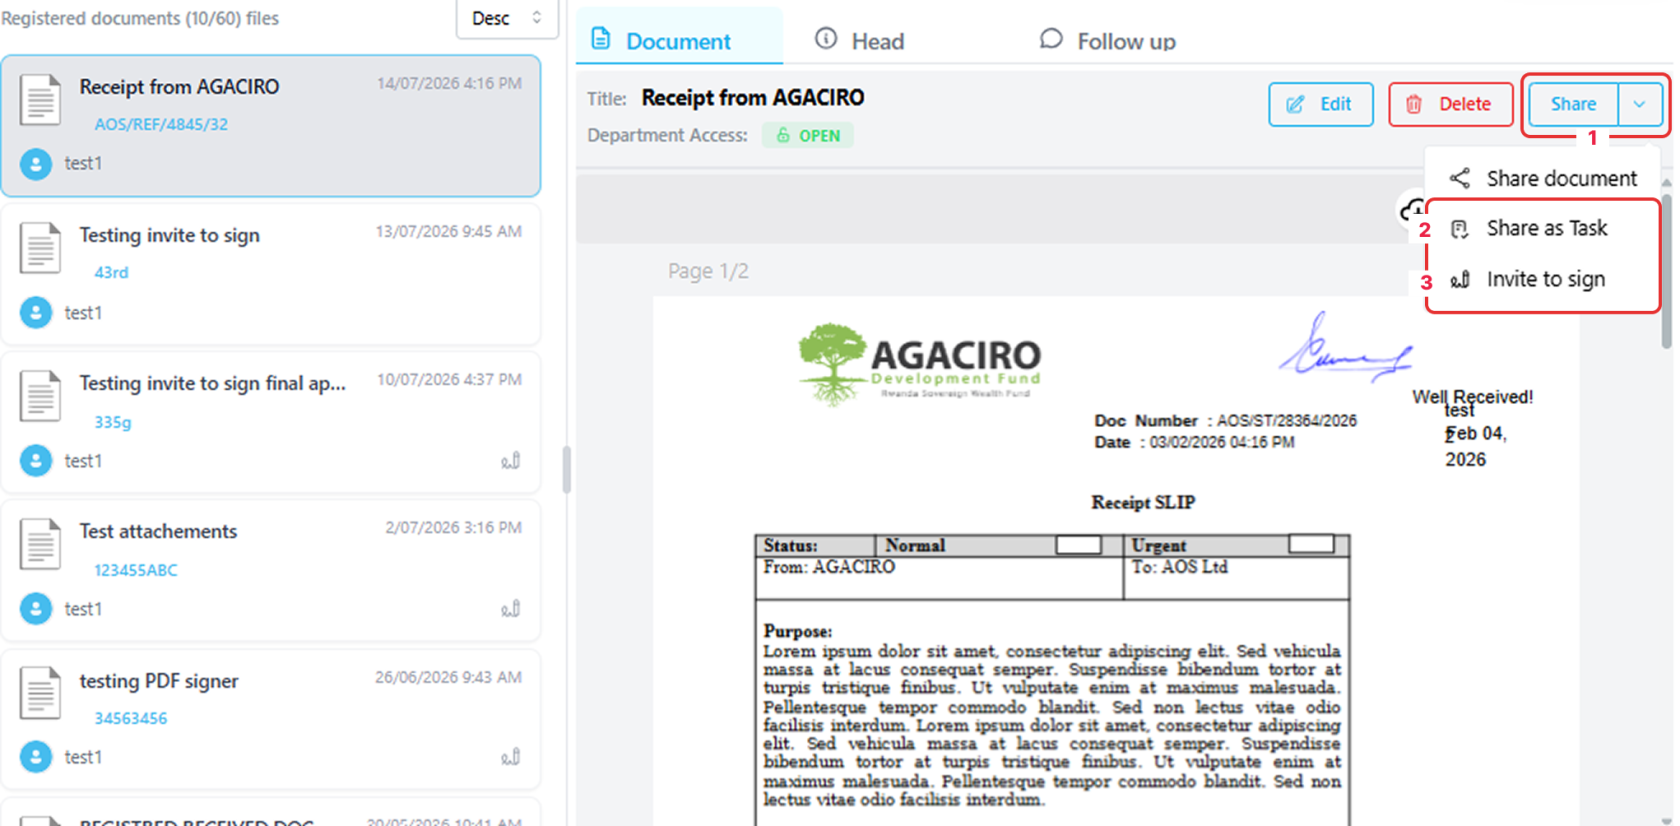
Once the document is saved, you will be able to find it in the folder. Members of your department will also be able to find it there if Department Access was set to open.
- You can click on the Share(1) dropdown to view actions that can be taken on the document.
- [Share as task](https://docs.smartadmin.rw/link/38#bkmrk-page-title) (2) and [Invite to sign](https://docs.smartadmin.rw/link/9#bkmrk-page-title) (3) are covered in the following pages.
[](https://docs.smartadmin.rw/uploads/images/gallery/2026-07/group-1-2.png)
# Invite to sign on Received PDF documents
---
This feature allows you to invite internal users to sign a PDF document directly within GSAS.
---
Step 1
Open the document
Navigate to **E-Approval → Department Box → Registered Received** and open the document you want to send for signing.
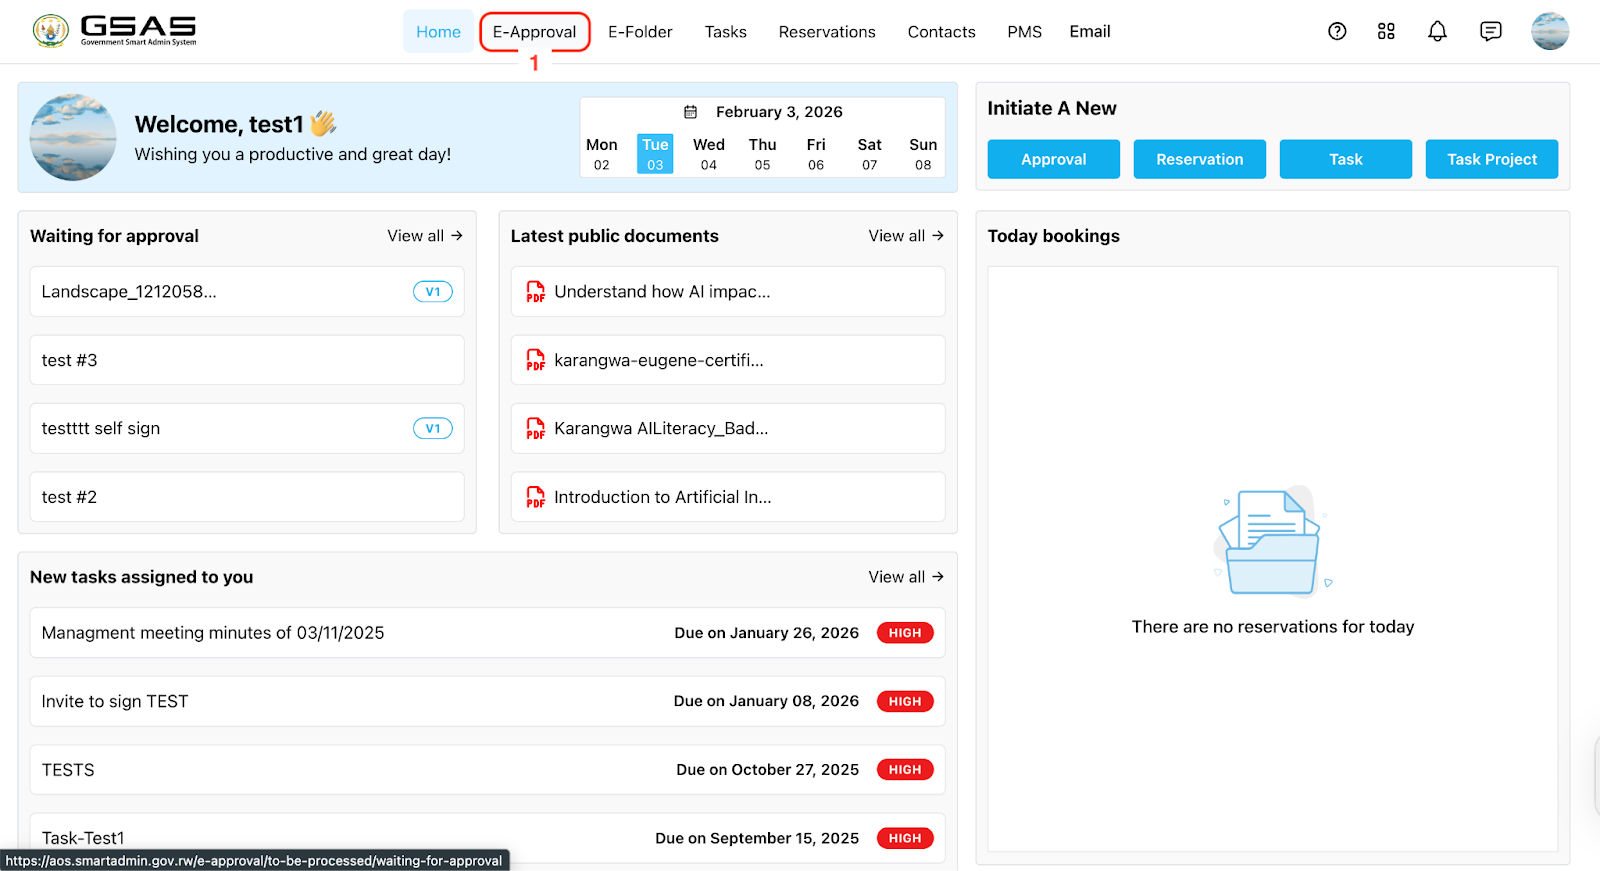 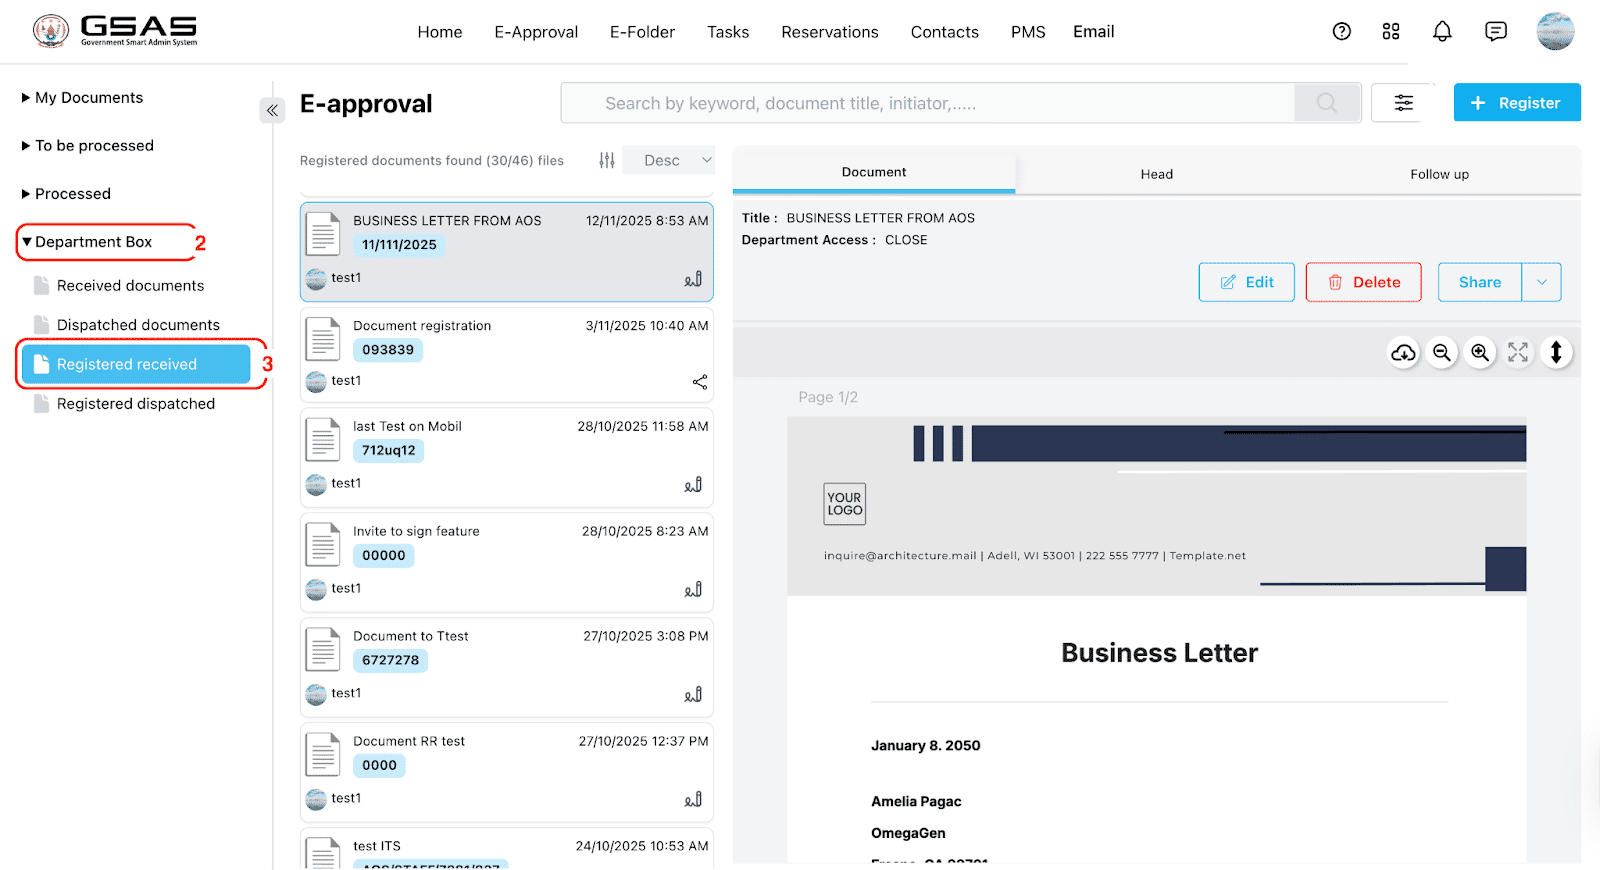
---
Step 2
### Share via Invite to Sign
Click **Share** and select **Invite to Sign** from the dropdown.
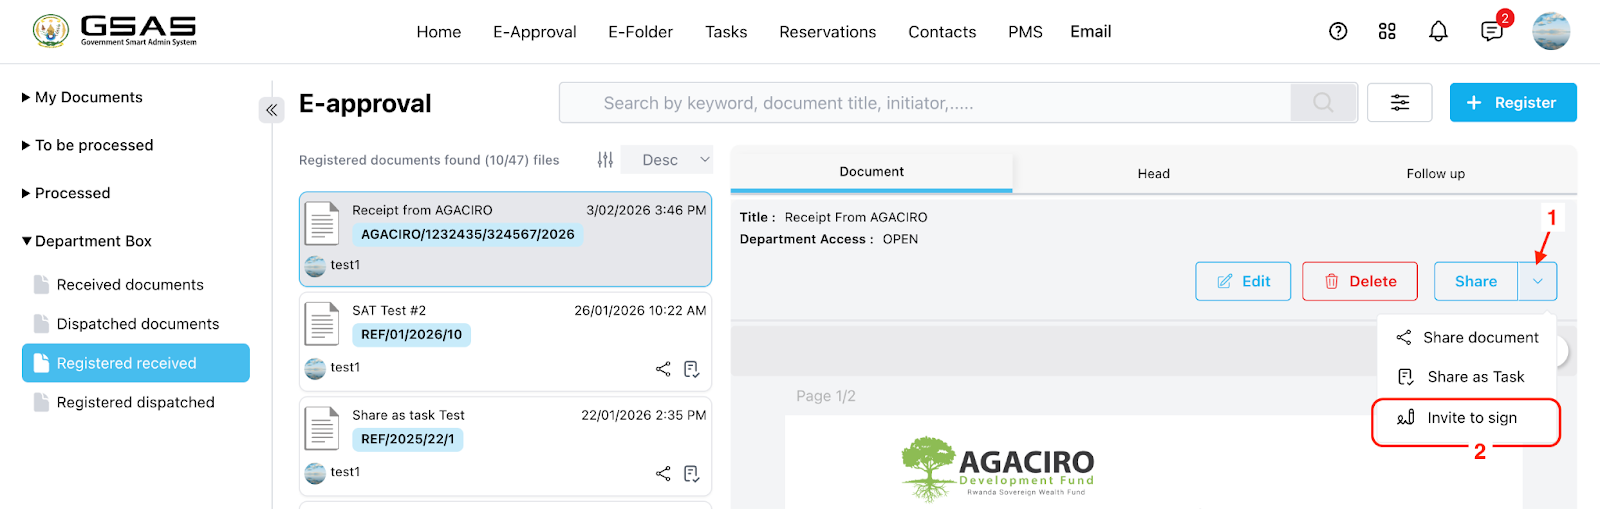
---
Step 3
### Assign signers
Search for the user(s) who need to sign the document, then drag and drop the signature field to the desired location on the document. Adjust the signature fields as needed, then click **Send Invitation** to notify the selected users.
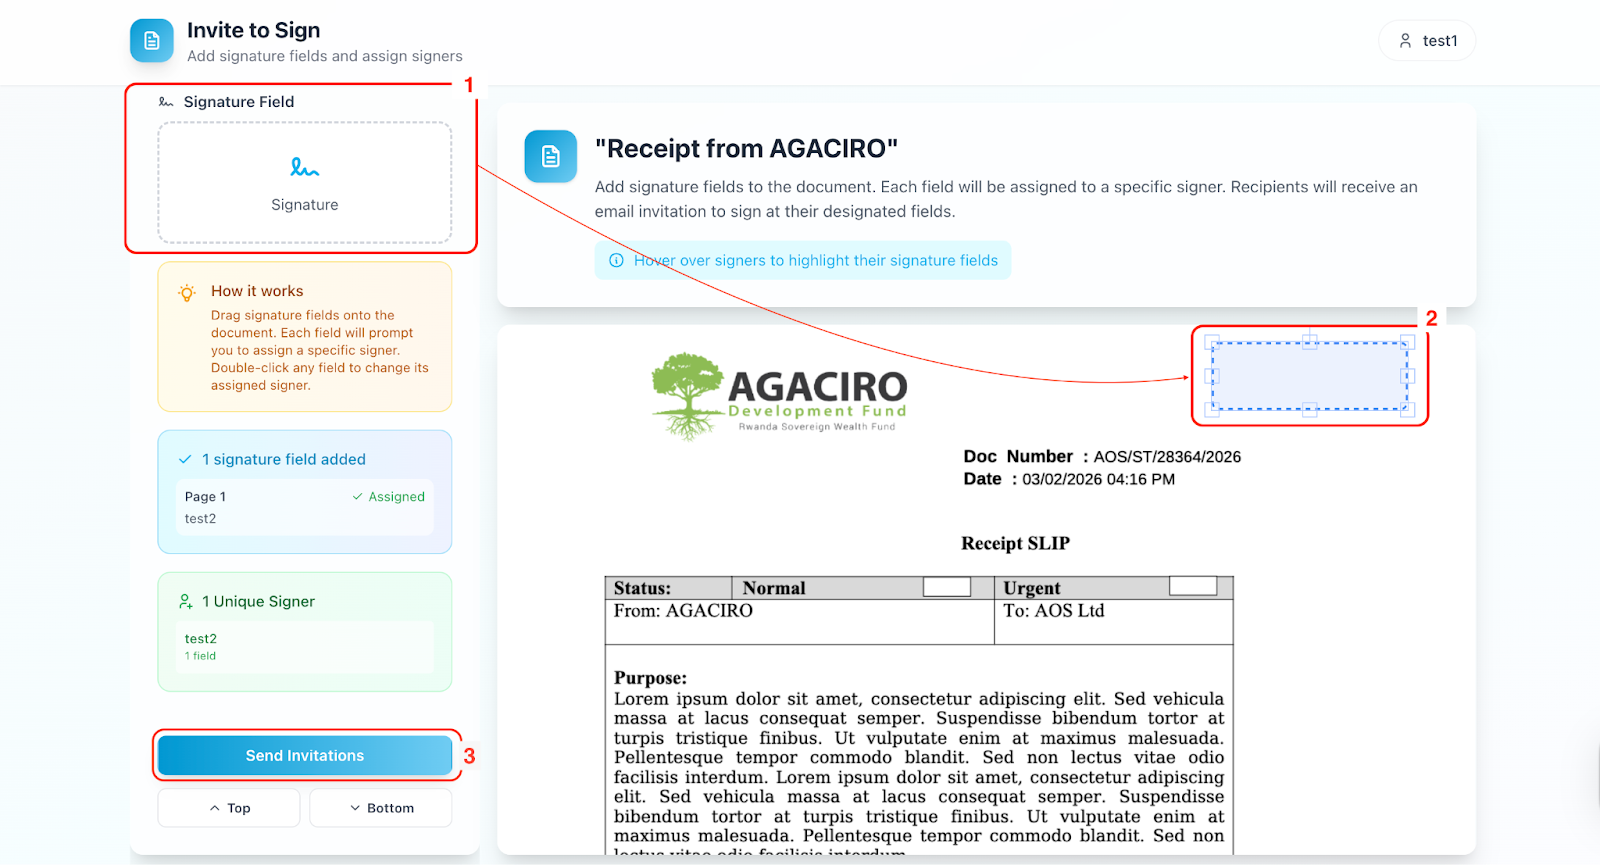
---
Step 4
### Signing the document
- The invited user will find the document in their **To Be Processed → Internal Approval** folder.
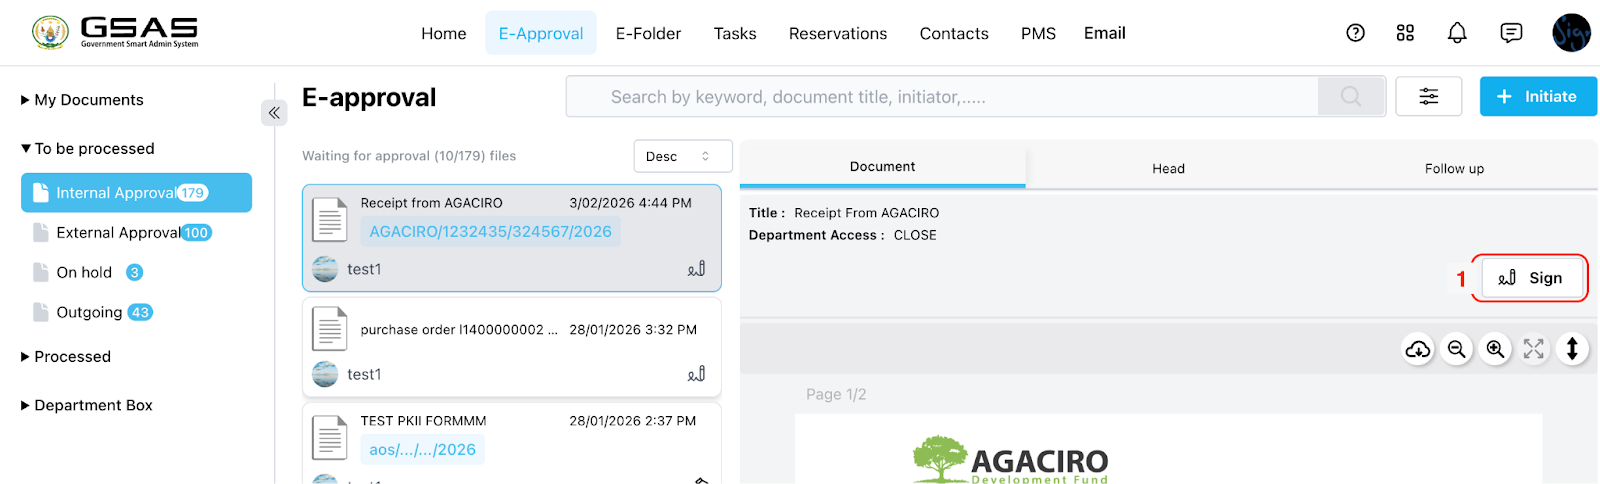
- They can open it and click **Sign**. In the newly opened tab, drag and drop their signature to the highlighted field.
- Other fields such as date, name, or custom text can also be added. Once done, click **Complete**.
---
Step 5
### Access the completed document
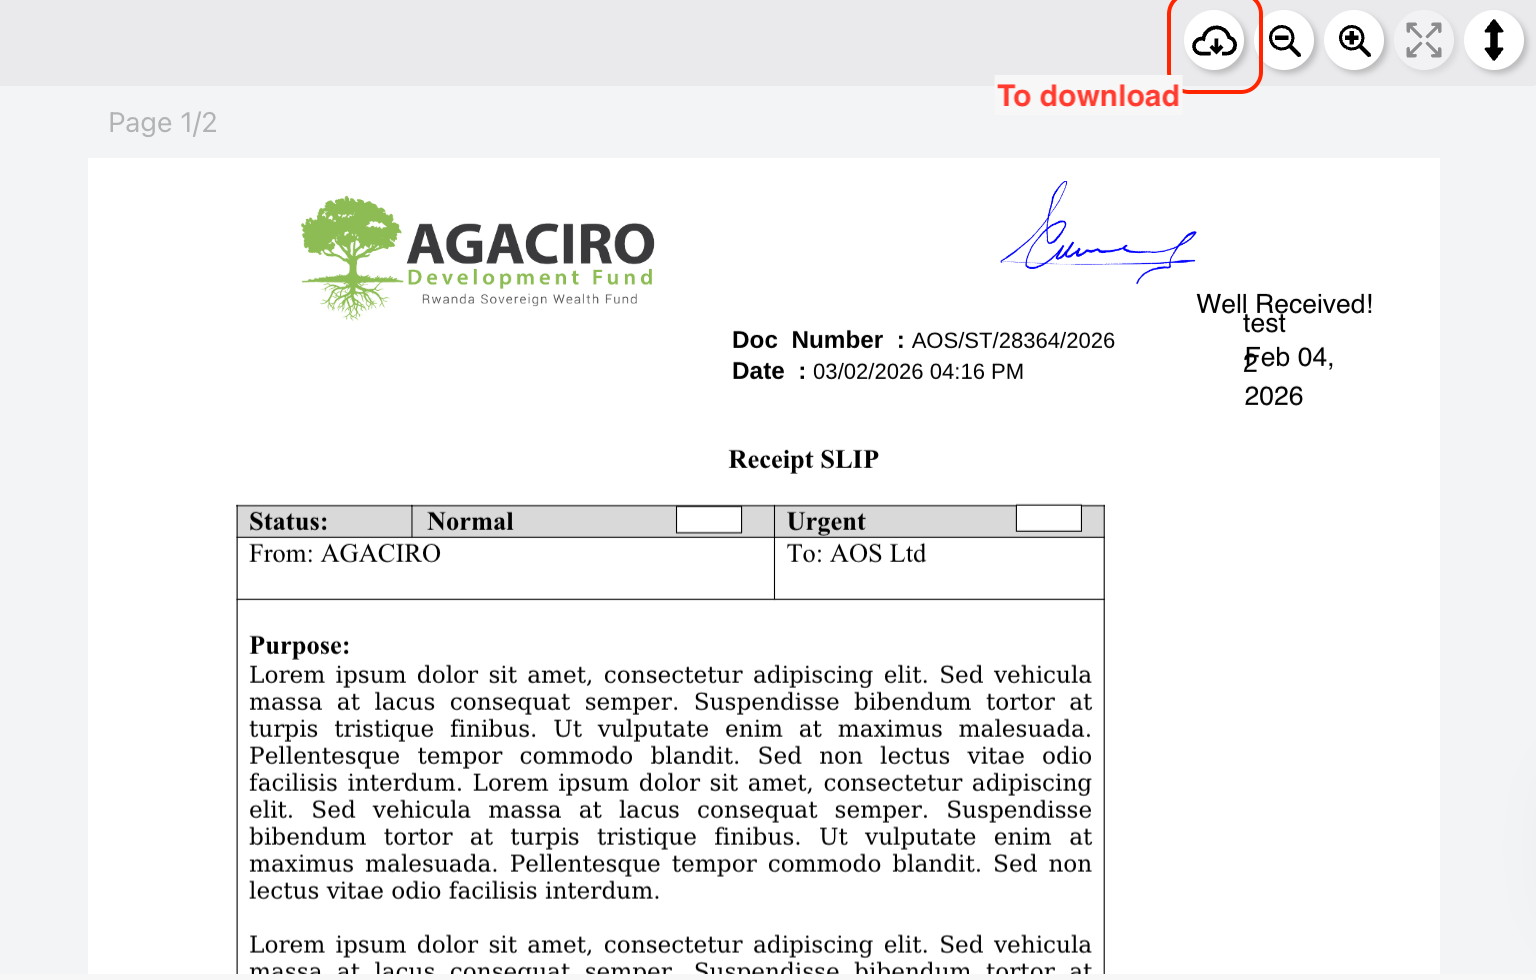
Once all signatures have been collected, the document is marked as complete. It can now be downloaded, shared, or viewed by the drafter or any of the signers from their **Completed** folder.
---
# Share document as Task
This page explains how to create a task directly from a registered document in **E-Approval**. The task is linked to the original document, assigned to selected users, and can be tracked from both the document view and the **Tasks** module.
| **Before you begin:** The document must already be registered under **Registered received** or **Registered dispatched**. See the [Registering documents](https://docs.smartadmin.rw/link/8#bkmrk-page-title) page to learn how to register documents. |
Step 1
### Open the registered document
- Go to **E-Approval**.
- Open **Department Box**.
- Click **Registered received** or **Registered dispatched**, depending on where the document was registered.
- Select the document you want to share as a task.
---
Step 2
### Share the document as a task
- Click the arrow next to the **Share** button.
- Select **Share as Task**. [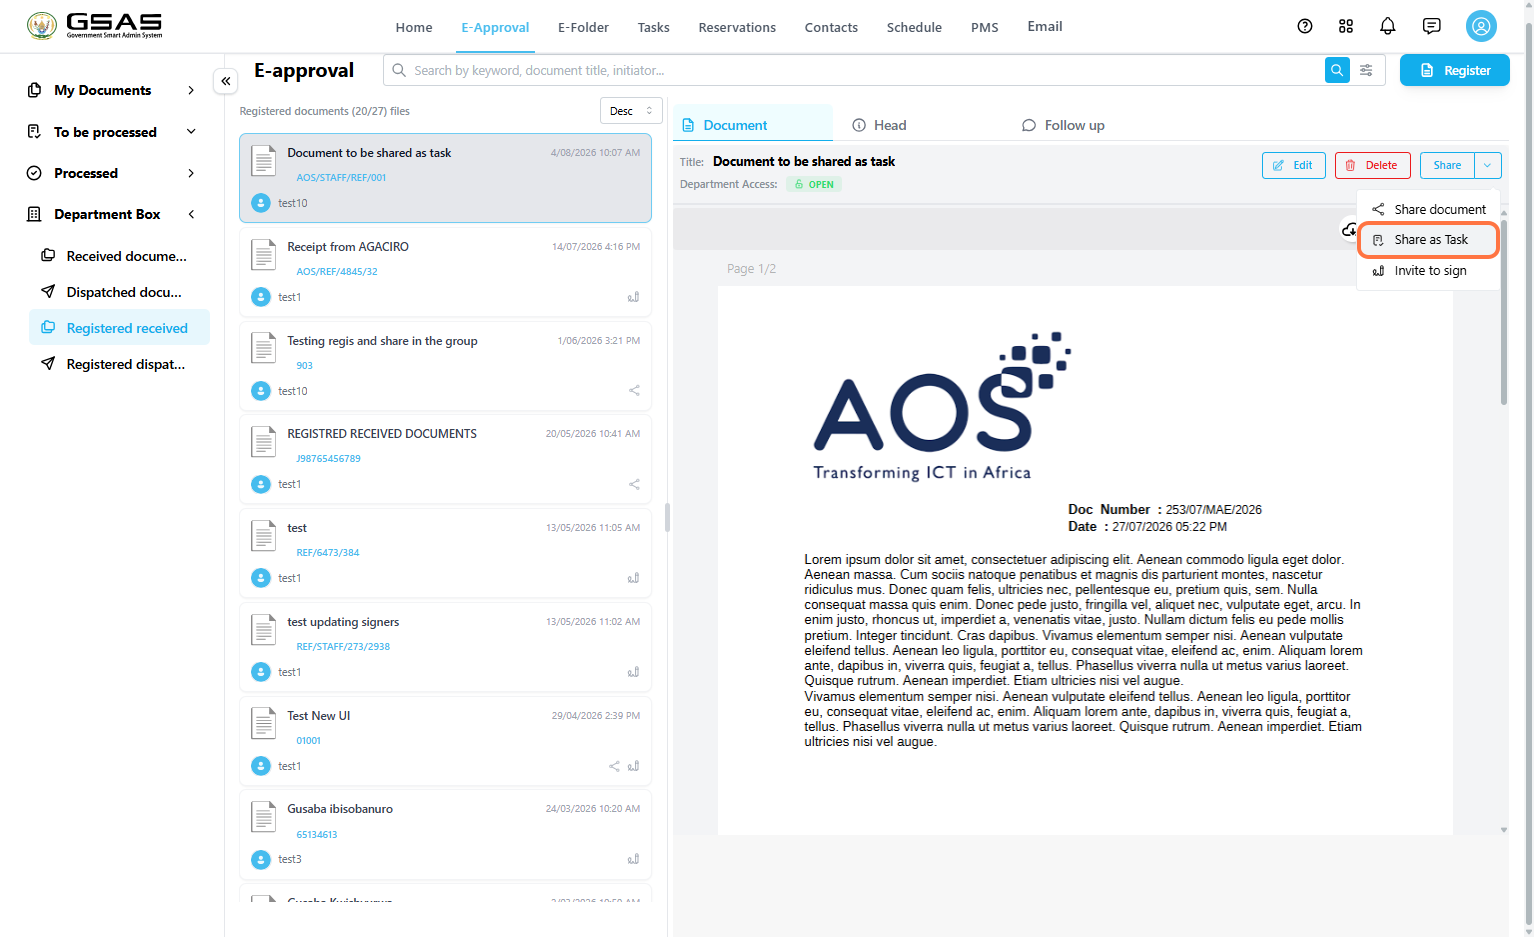](https://docs.smartadmin.rw/uploads/images/gallery/2026-08/82timage.png)
---
Step 3
### Fill in the task details
The **Create new Task** window opens. The task name is filled automatically as the document title.
1\. Select the task **Priority**.
[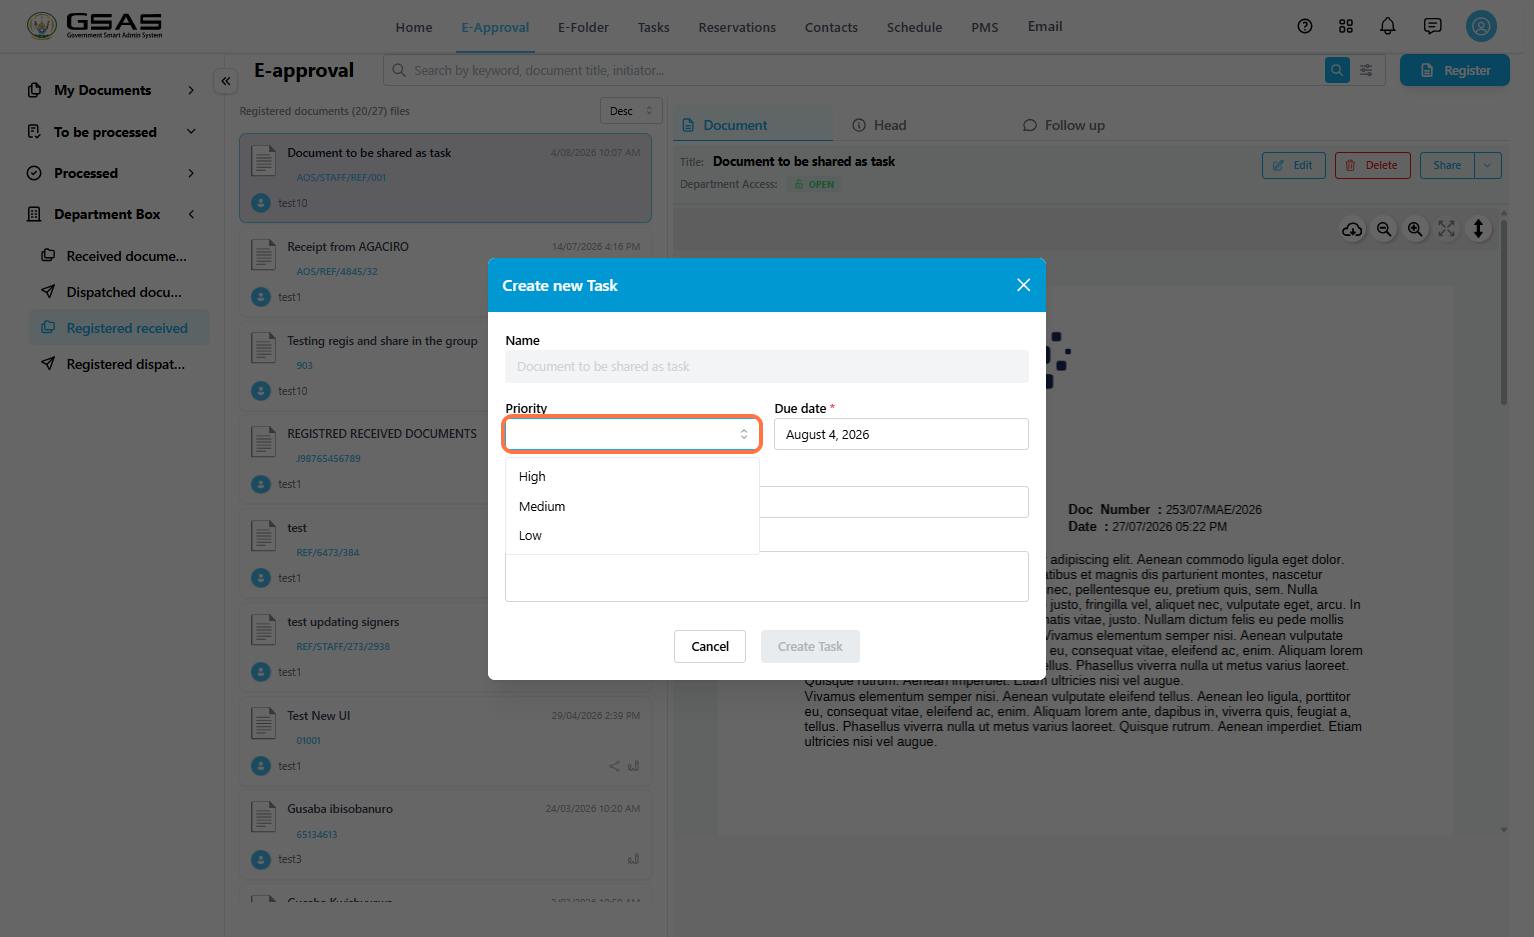](https://docs.smartadmin.rw/uploads/images/gallery/2026-08/I6himage.png)
2\. Click the **Due date** field and choose the deadline.
[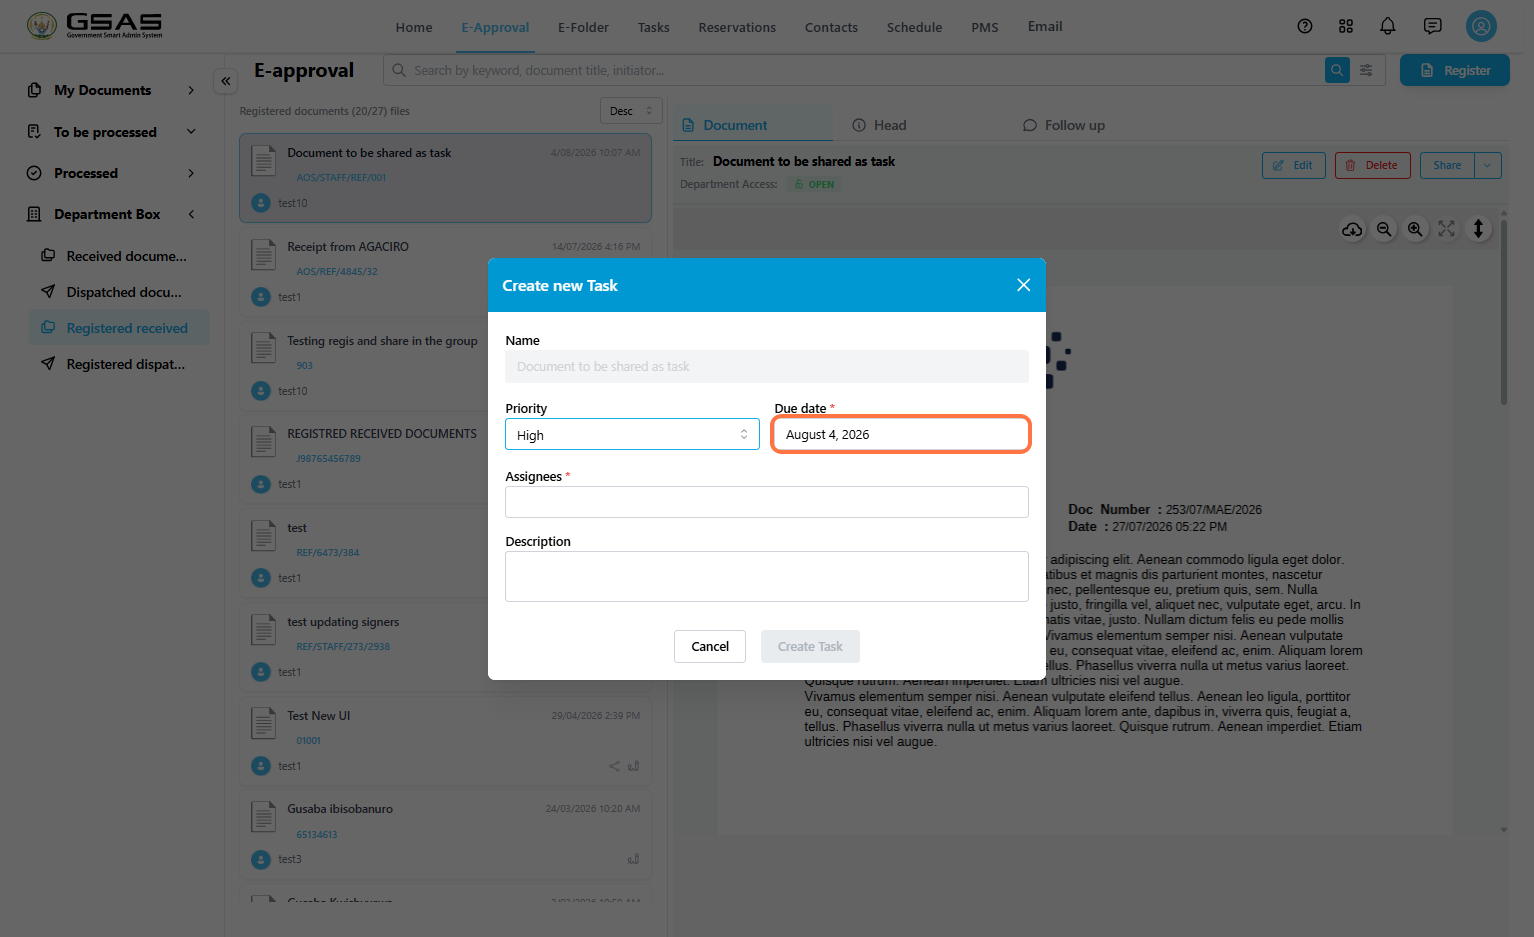](https://docs.smartadmin.rw/uploads/images/gallery/2026-08/q9limage.png)
3\. Click the **Assignees** field to add users.
4\. Search for the users you want to assign. Click **Select** next to the correct user.
[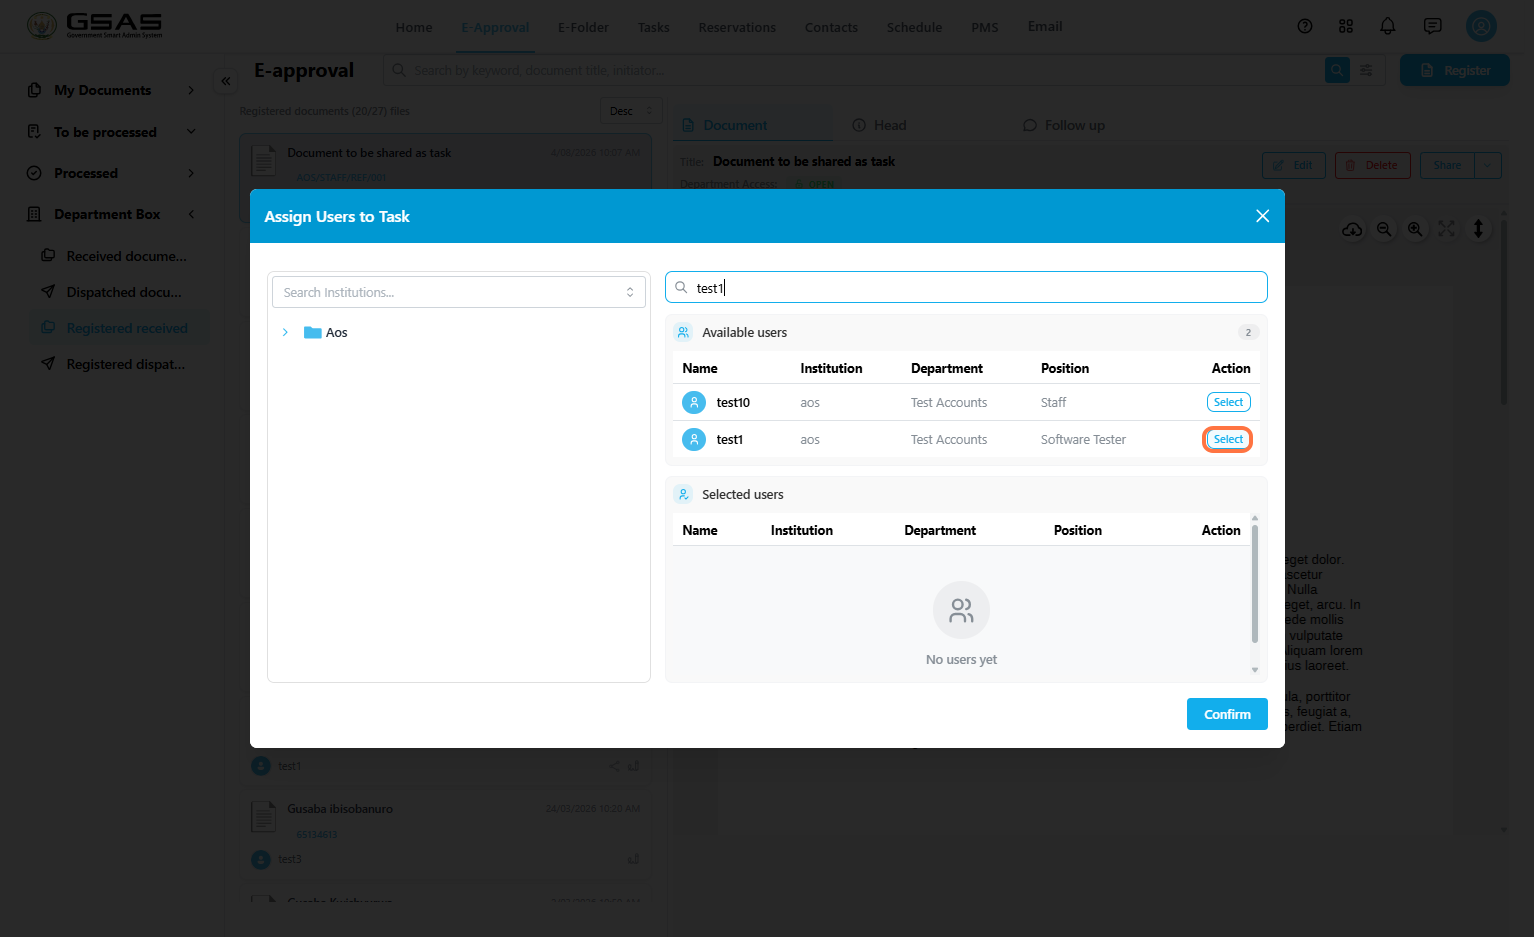](https://docs.smartadmin.rw/uploads/images/gallery/2026-08/bhOimage.png)
5\. Confirm that the user(s) appears under **Selected users**. And click **Confirm** once all assignees are selected.
[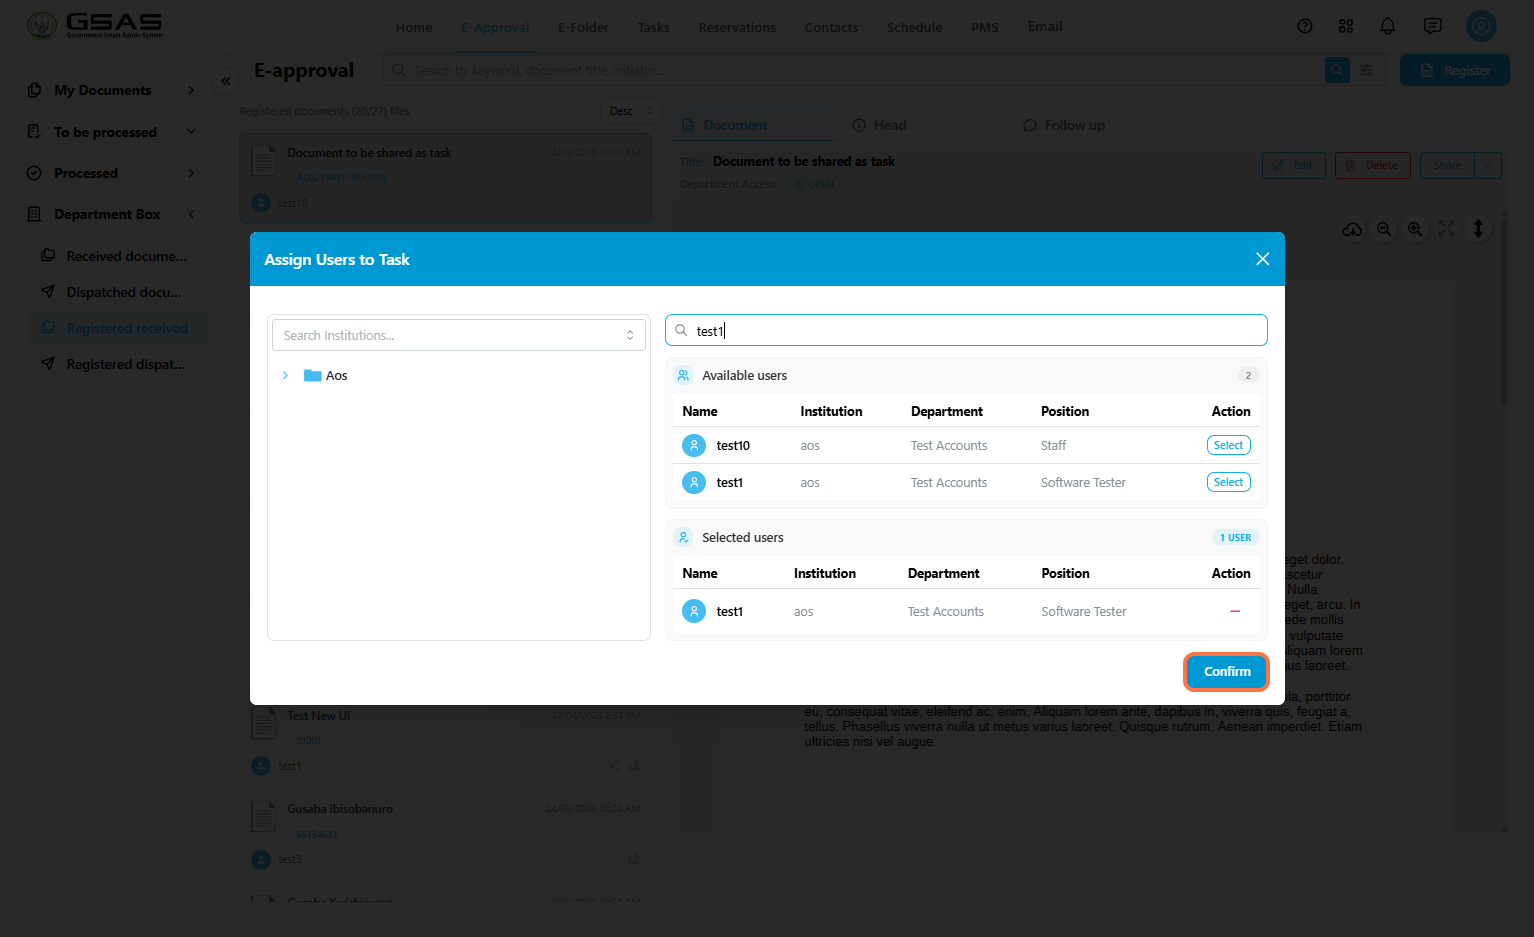](https://docs.smartadmin.rw/uploads/images/gallery/2026-08/rooimage.png)
6\. Optionally, enter a short **Description** explaining what the assignee needs to do.
[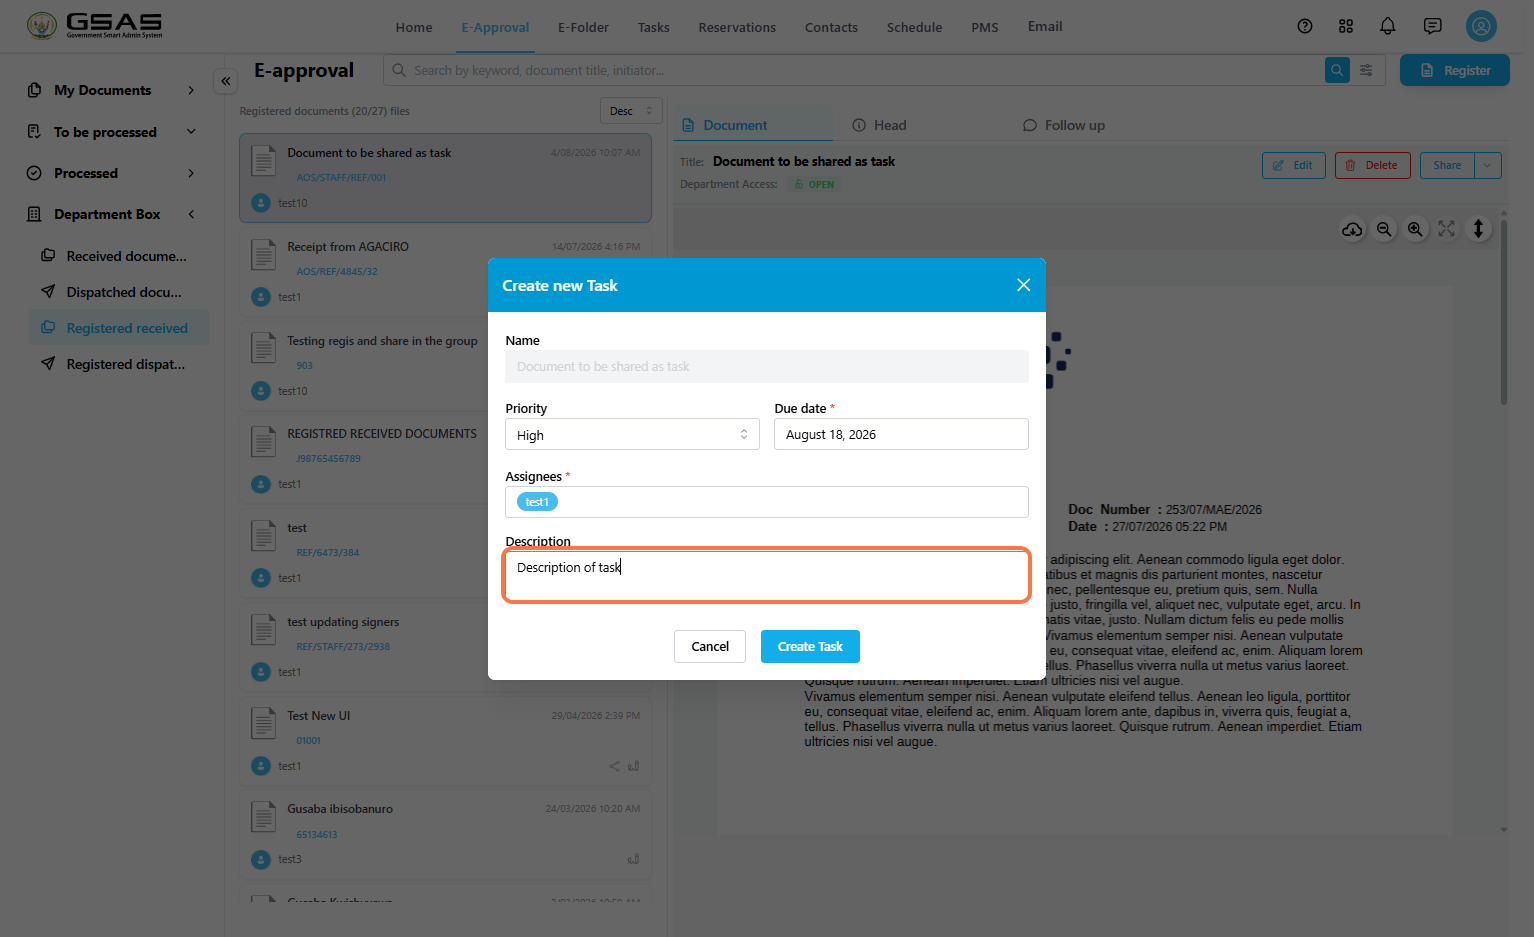](https://docs.smartadmin.rw/uploads/images/gallery/2026-08/7C6image.png)
---
Step 5
### Create the task
After the assignee and description are added, the **Create Task** button becomes active.
- Review the priority, due date, assignee, and description.
- Click **Create Task**. [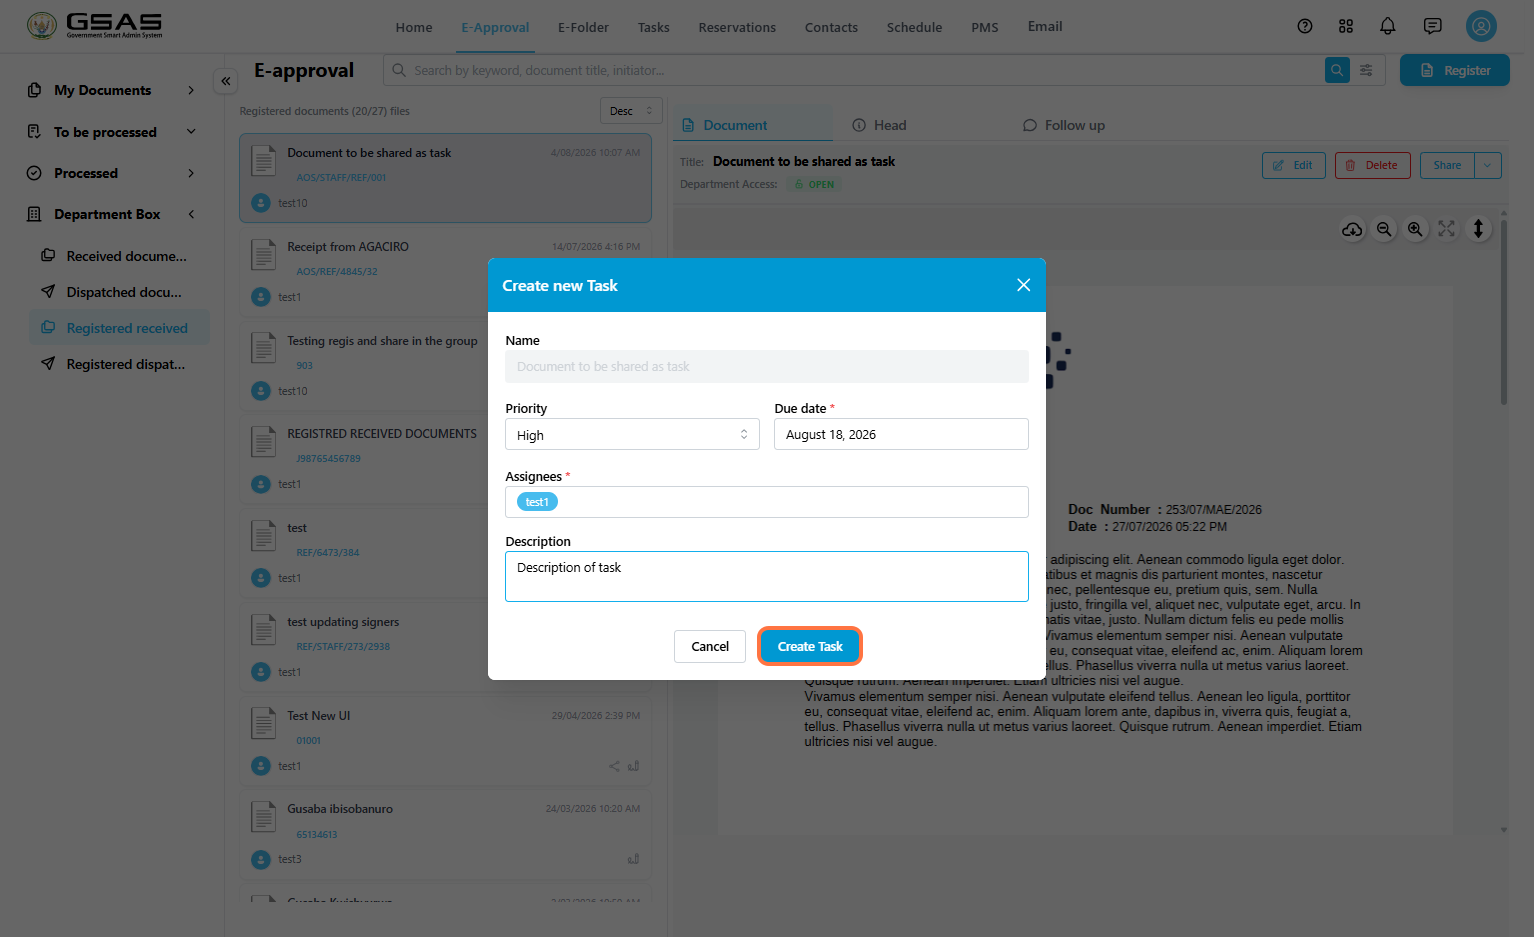](https://docs.smartadmin.rw/uploads/images/gallery/2026-08/mwIimage.png)
---
Step 6
### View the created task
After the task is created, the system creates or updates a related task project in the **Tasks** module.
- Go to **Tasks**.
- Click **Initiated By Me**.
- The task project containing the task is titled "**Registered\_Received\_Year**"
- Click the three-dot menu on the project card, then click **Open**. [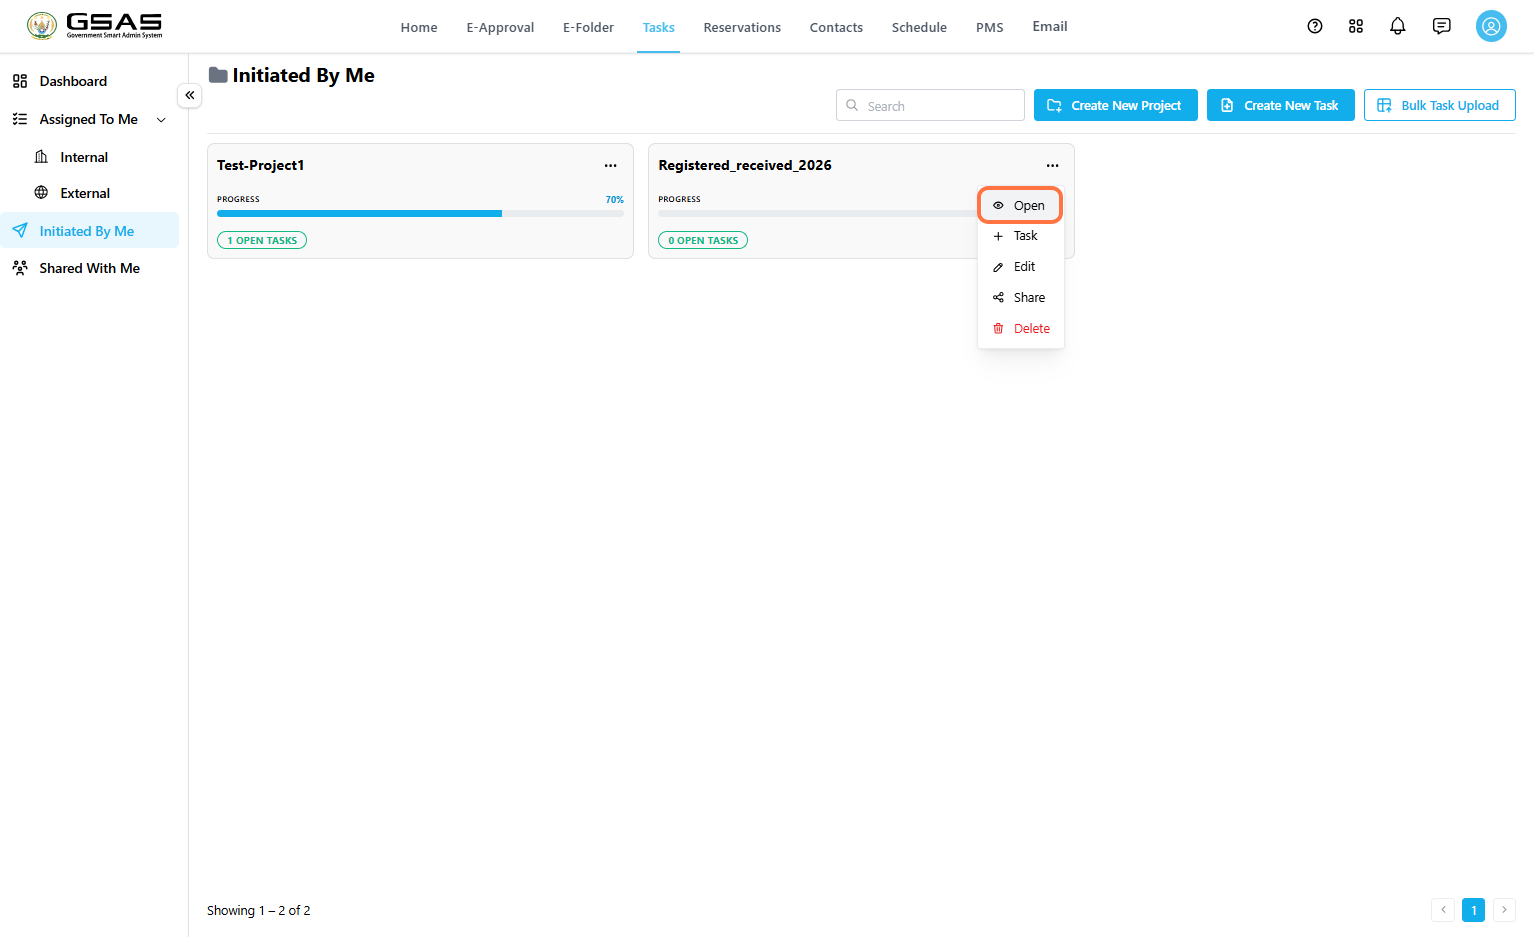](https://docs.smartadmin.rw/uploads/images/gallery/2026-08/S7Dimage.png)
Inside the project workspace, the task appears in the task table. You can view the task name, progress, priority, status, assignee, and due date.
[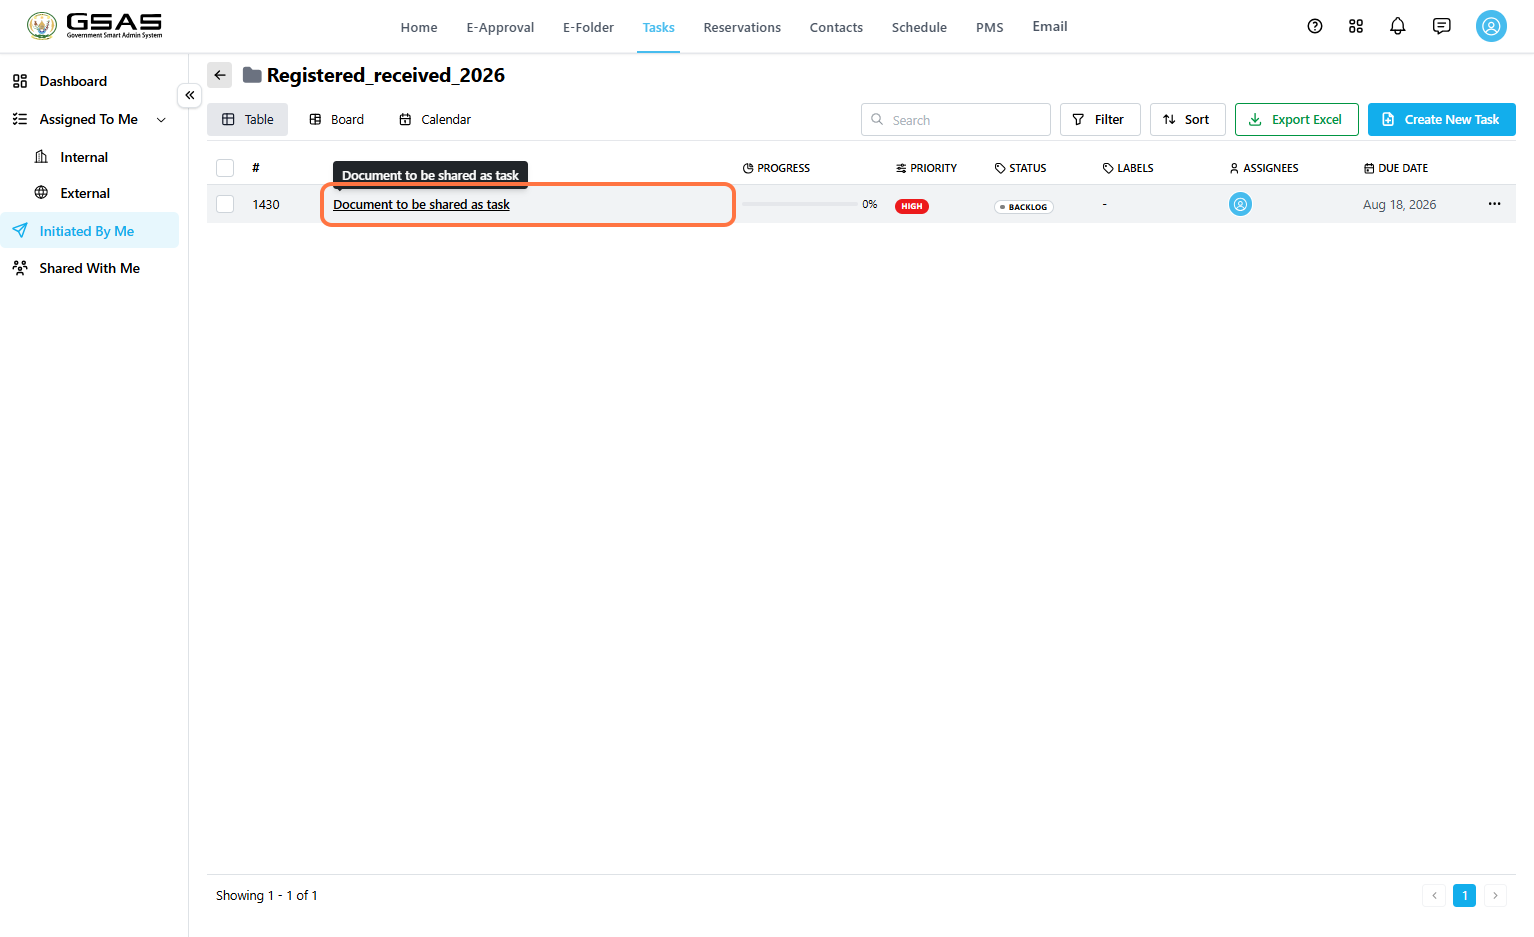](https://docs.smartadmin.rw/uploads/images/gallery/2026-08/rmVimage.png)
The task assignees will open the task from **Tasks → Assigned To Me - Internal** if it was assigned to them by a user within their institution or **External** if it was by a user from another institution.
***Proceed to the [Responding to and Tracking tasks](https://docs.smartadmin.rw/link/44#bkmrk-page-title) page to see how to update a task assigned to you.***
---
Step 7
### Track the task progress from the document
Return to the original document in **E-Approval**. The document displays task progress, completion percentage, and task status.
1. Select the original registered document.
2. Review the **Task progress** section.
3. Click **Details** to open the task details panel. [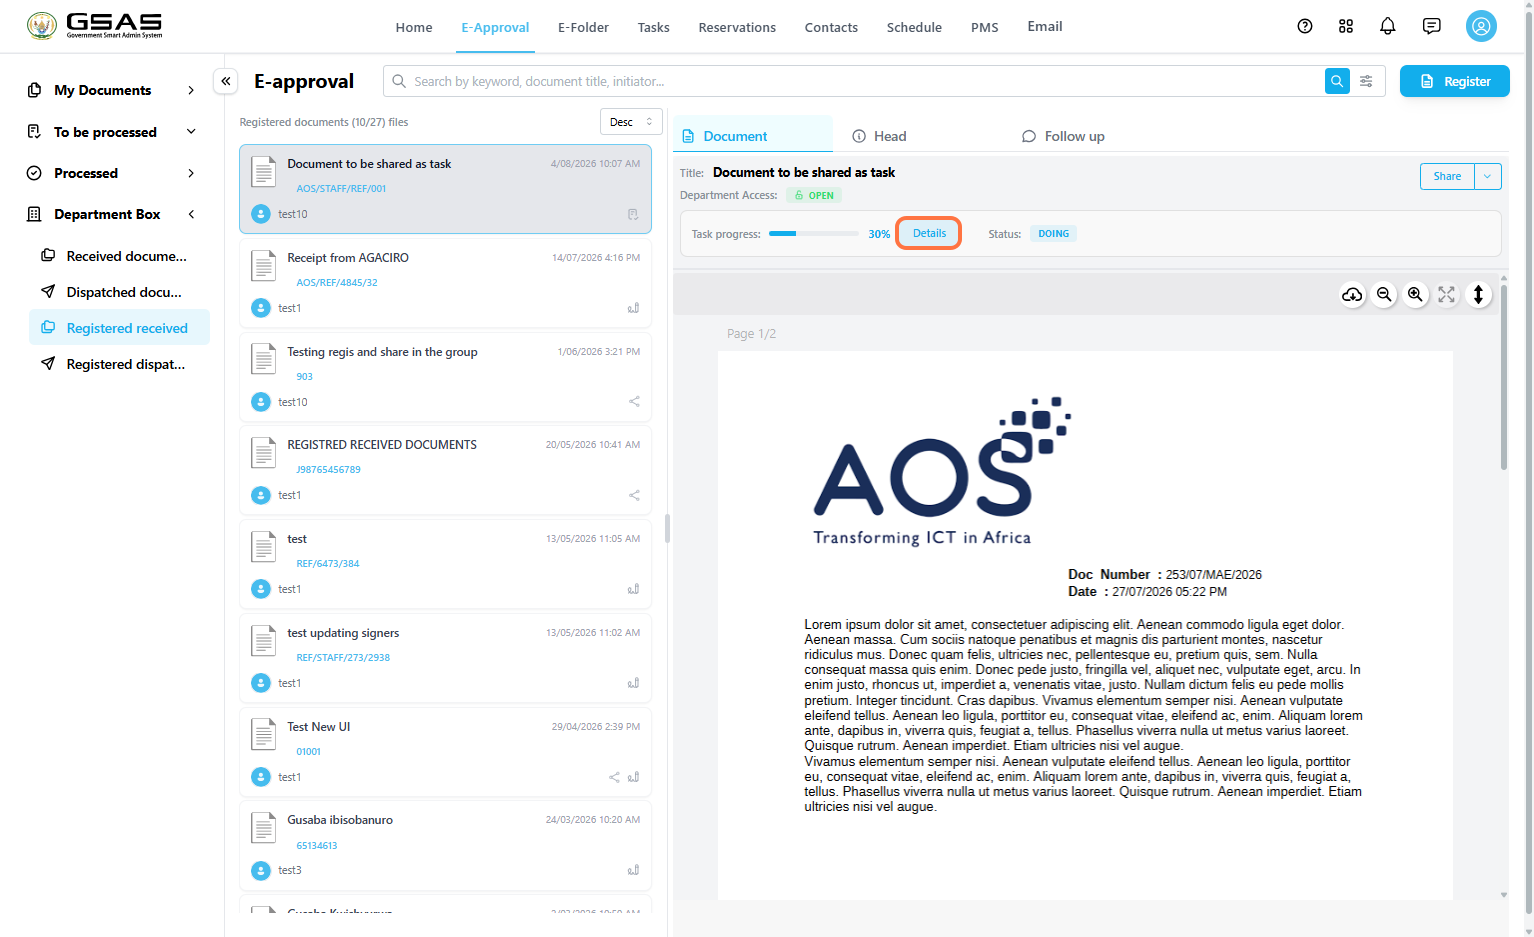](https://docs.smartadmin.rw/uploads/images/gallery/2026-08/JFGimage.png)
[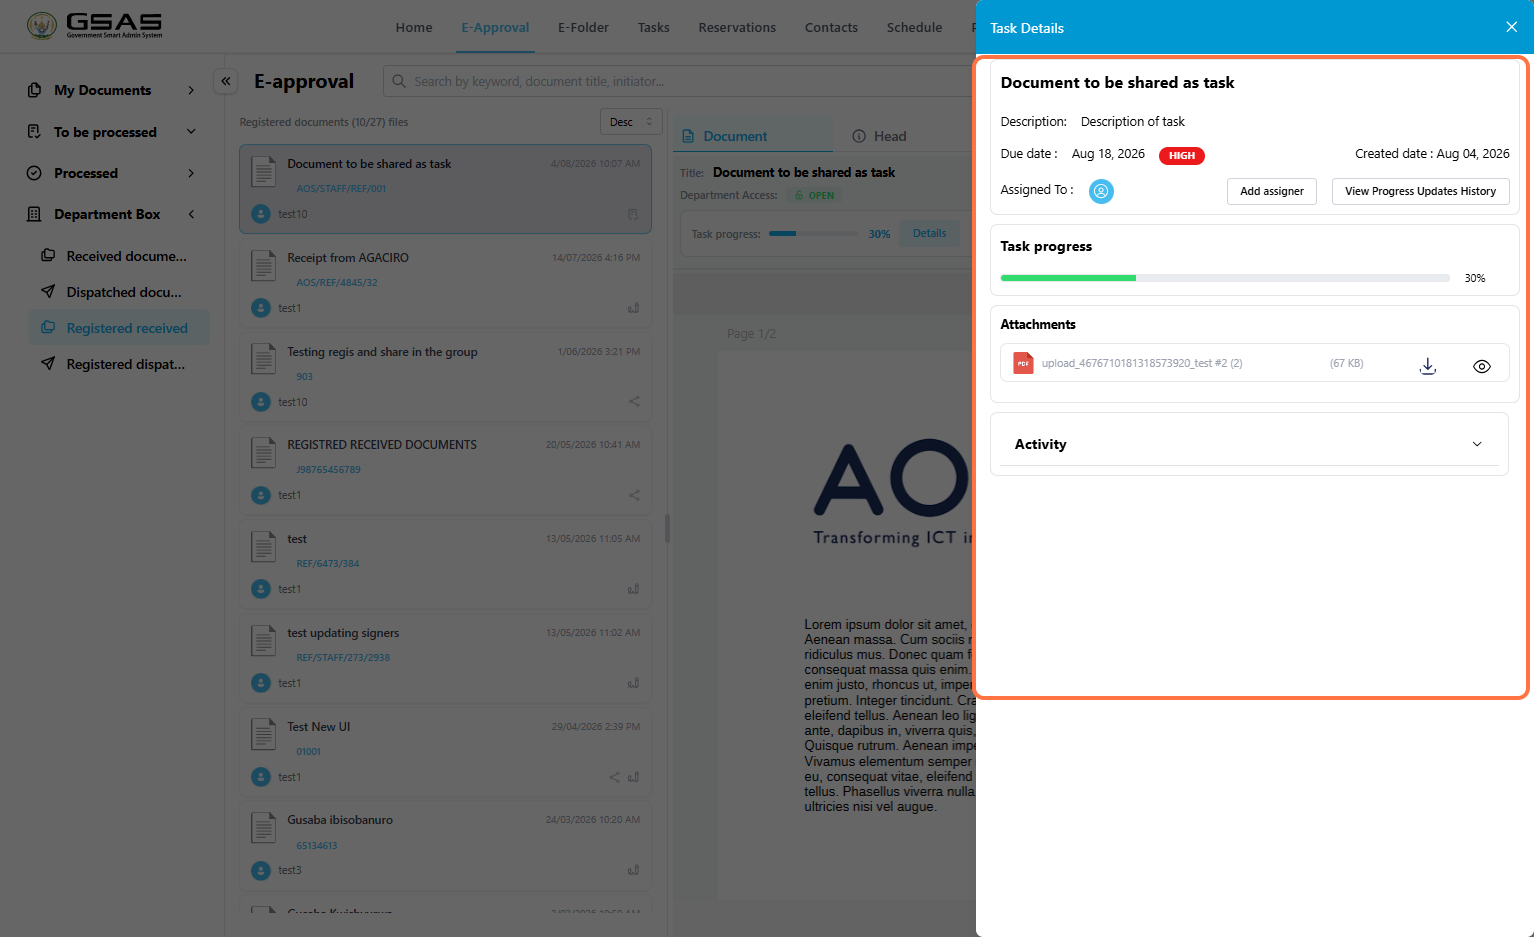](https://docs.smartadmin.rw/uploads/images/gallery/2026-08/Y3Nimage.png)
4\. Expand **Activity** to view recent task activity.
[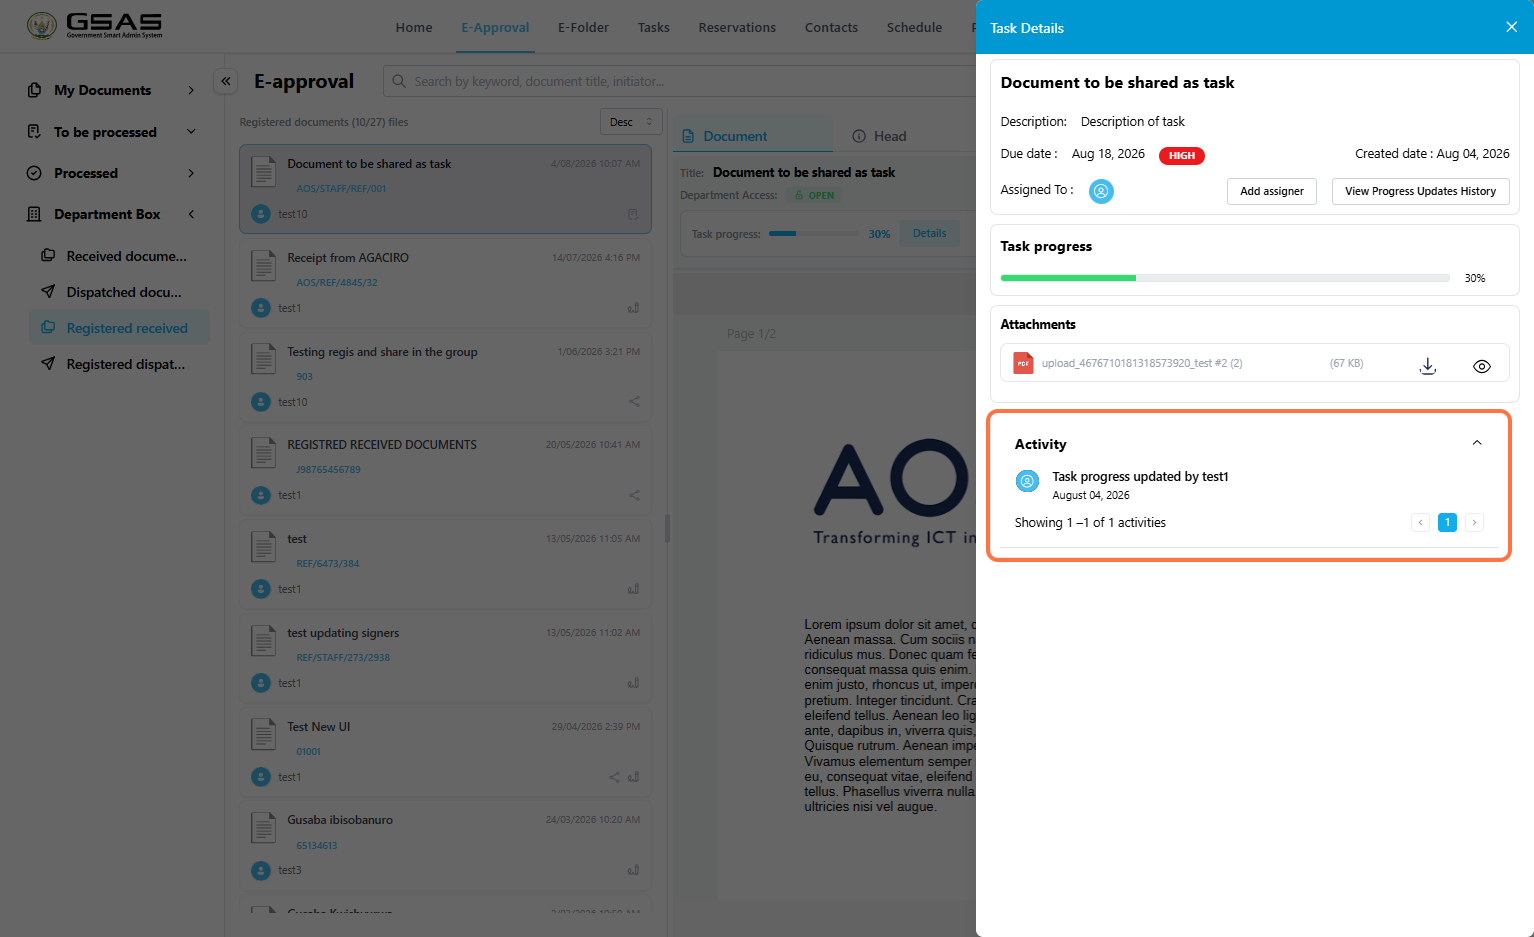](https://docs.smartadmin.rw/uploads/images/gallery/2026-08/zVsimage.png)
5\. Click **View Progress Updates History** to see submitted progress updates.
[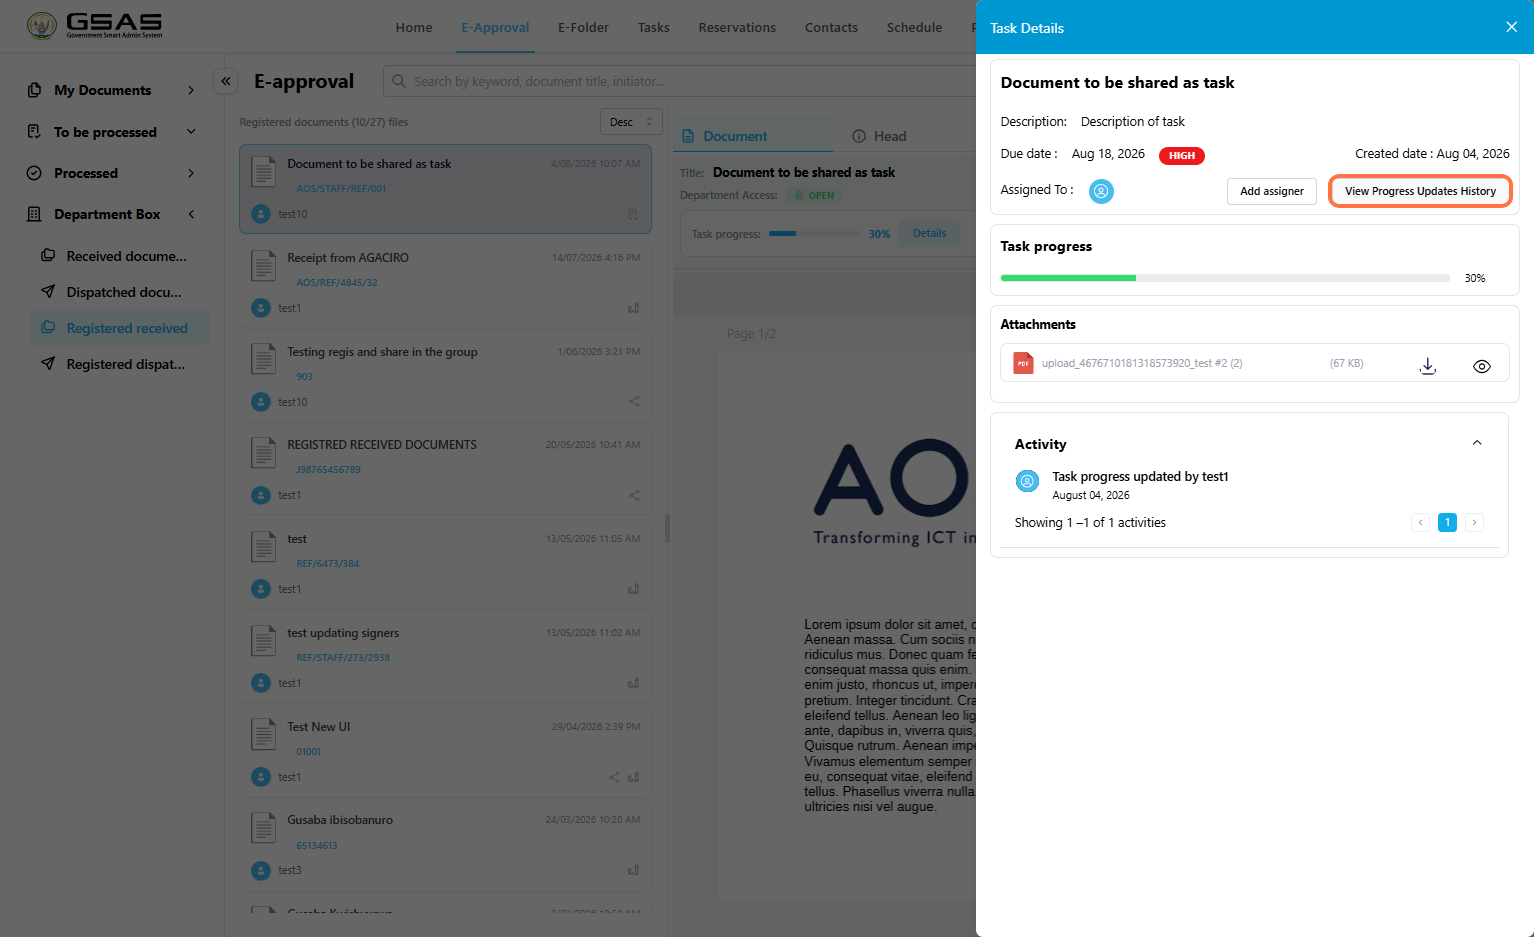](https://docs.smartadmin.rw/uploads/images/gallery/2026-08/AUAimage.png)
Review the update details, attachments, update date, and the user who submitted the update.
---
***Proceed to the [Responding to and Tracking tasks](https://docs.smartadmin.rw/link/44#bkmrk-page-title) page to see how to keep track of tasks you create and delegate from the Tasks module.***
# Sender and Receiver Manager Controls
---
### Sender Manager
Once an outgoing request has been approved by everyone in its approval line, it lands in the Sender Manager's **To Be Processed > Outgoing** folder. This is the last stop before the document actually leaves the institution.
[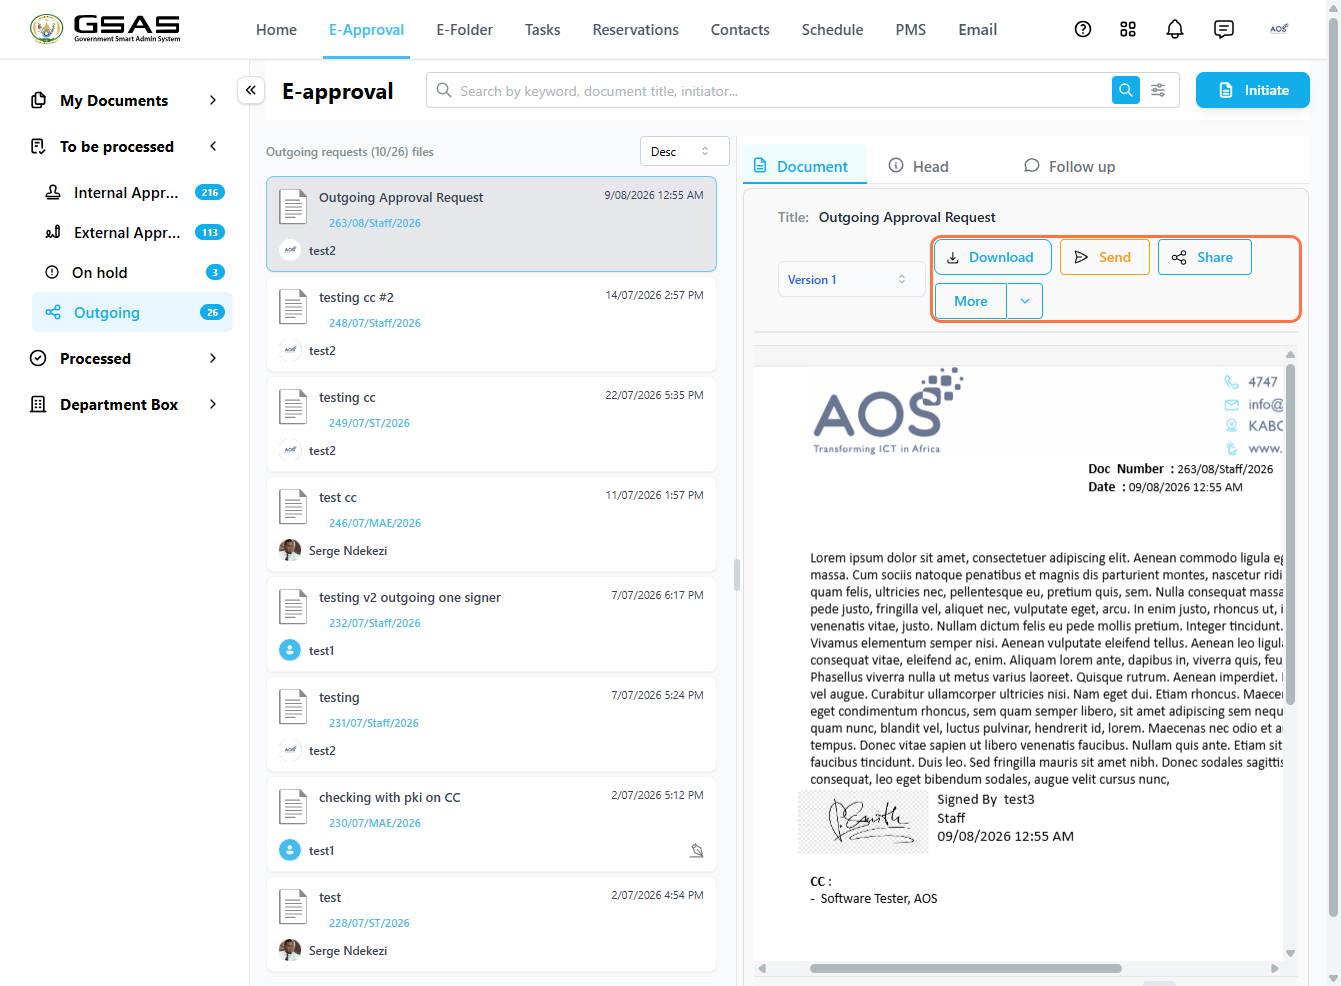](https://docs.smartadmin.rw/uploads/images/gallery/2026-08/F7Gimage.png)
| Send | Dispatches the document to the addressed institutions and/ or individuals electronically. |
| Mark as sent | Found under **More.** This logs that you've sent it by other means and moves it out of the Outgoing folder. |
| Share | Gives another user inside your own institution visibility into the document. |
| Edit | Found under **More**. Lets you make changes to the details of the document before sending. |
[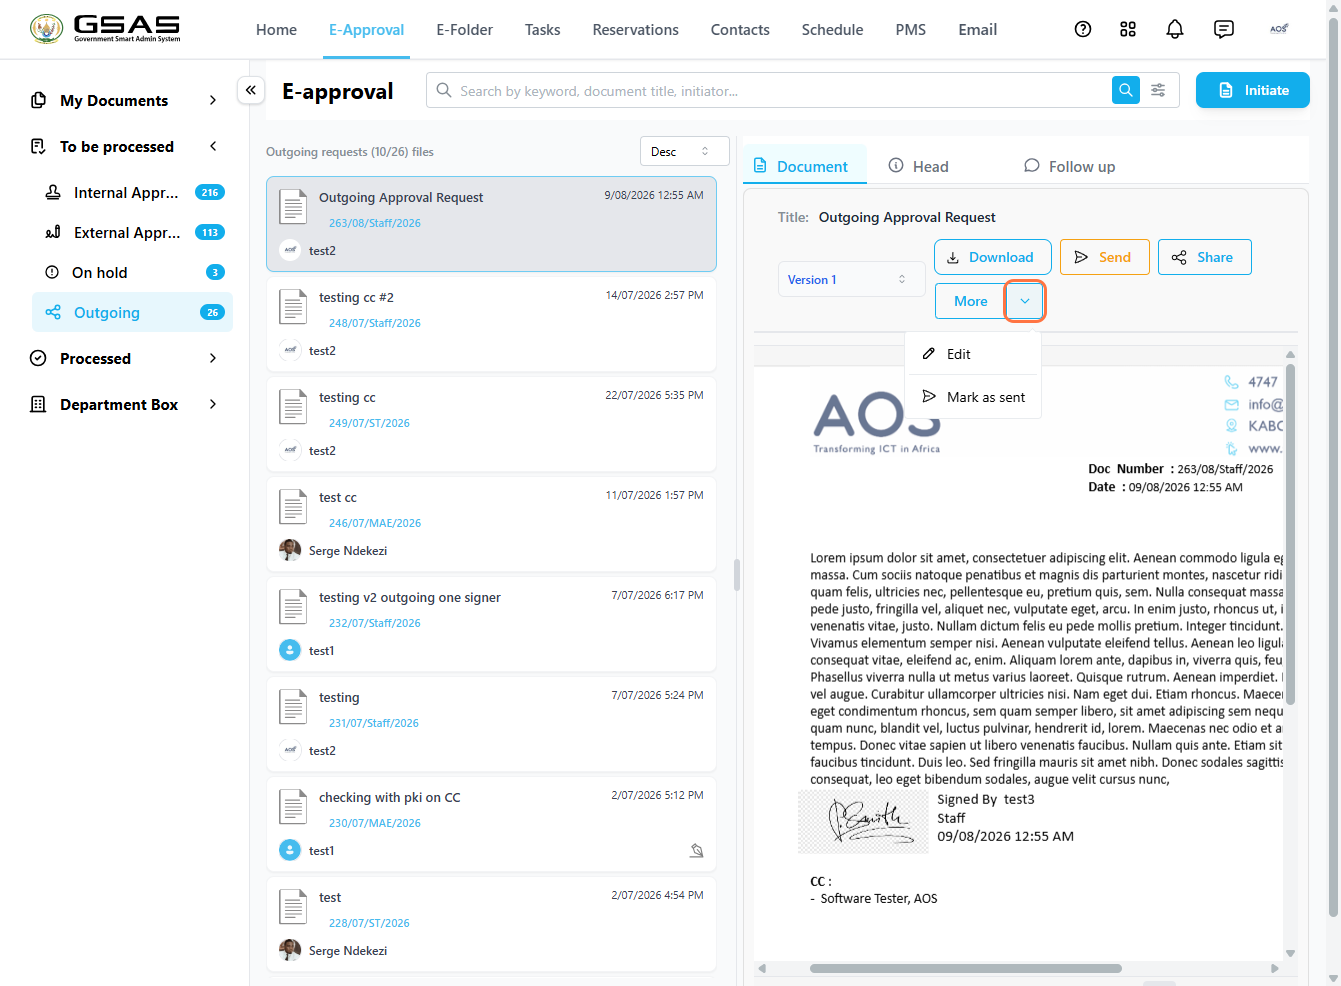](https://docs.smartadmin.rw/uploads/images/gallery/2026-08/6Qpimage.png)
| **Note:** Once a document is sent or marked as sent, it moves out of Outgoing and into **Processed > Dispatched**. |
---
### Receiver Manager
Every document your institution receives from an external institution lands first in the Receiver Manager's **To Be Processed > External Approval** folder before being routed to anyone else.
| Confirm | Acknowledges that the document has been officially received into the system. |
| Forward | Routes the document to whoever internally needs to see or act on it. |
| Reply | Opens a new [outgoing request](https://docs.smartadmin.rw/books/gsas-user-guide/page/submitting-an-outgoing-approval-request) addressed back to the external sender. |
[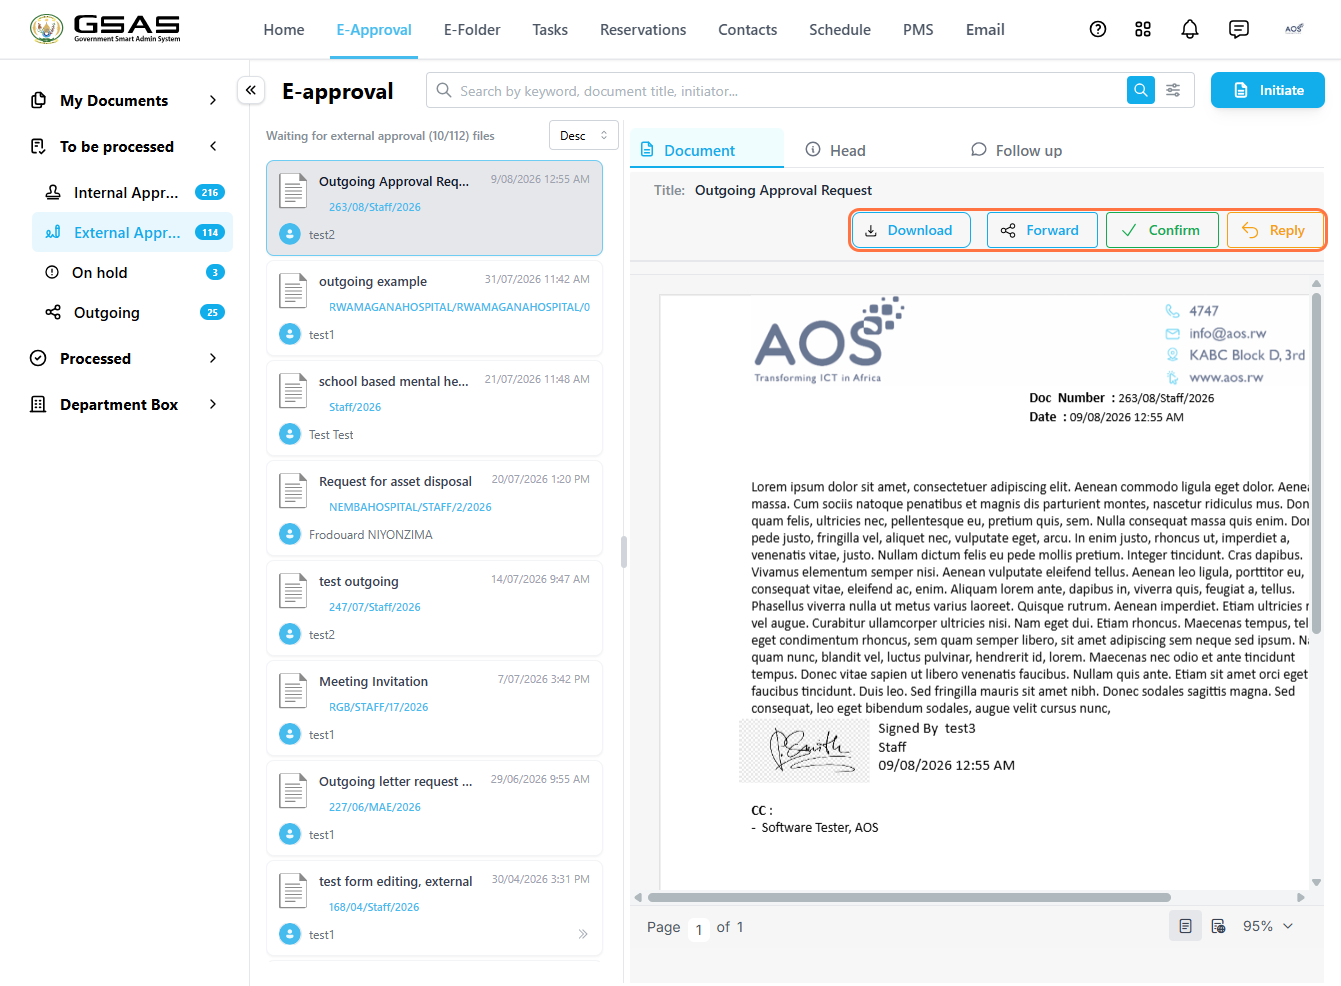](https://docs.smartadmin.rw/uploads/images/gallery/2026-08/bbmimage.png)
Forwarding a document
- Click **Forward**.
- Search for and select the people who need to see the document.
- Click **Forward** again, optionally add a message, then confirm.
---
### Receiving a Forwarded Document
If a document is forwarded to a user, it appears in their own **To Be Processed > External Approval** folder. They'll have the same options the Receiver Manager had; Download, Forward, and Reply except **Confirm**, since that's the Receiver Manager's responsibility alone.
---
# e-Folder
Store and organize your files, share them securely with colleagues or other users, and manage access privileges for files shared by you.
# Overview
---
E-Folder is a secure digital file storage for work documents integrated directly into the system. Upload, create, organize, and share documents all in one place, accessible from anywhere. Because it lives within the system, your work files are always where you need them, securely stored and easy to access.
---
Getting to E-Folder
Click the **E-Folder** tab in the top navigation bar. This opens the E-Folder home screen, which shows your four main folders, your storage usage, recent activity, and a summary of your collaborative groups.
[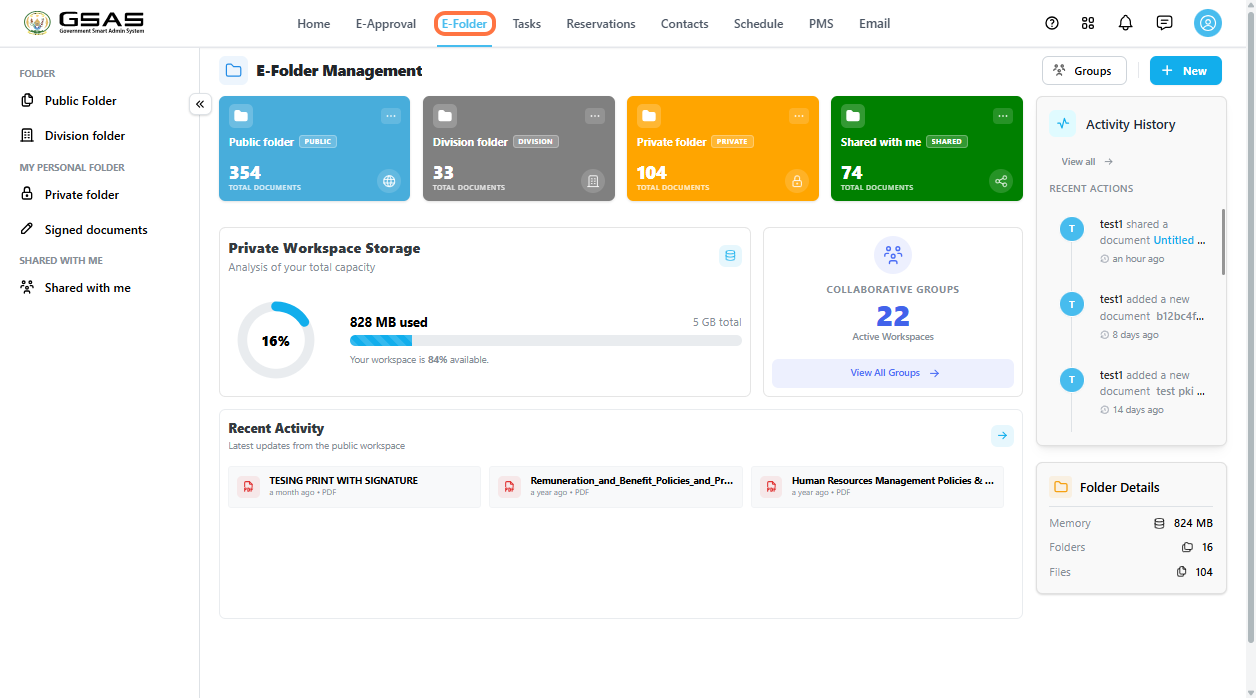](https://docs.smartadmin.rw/uploads/images/gallery/2026-06/0YCimage.png)
---
Your four main folders
Your files are organized across four main folders, each with a different audience and purpose.
| Public Folder | Contents are visible to all staff in your institution. Use it for documents that everyone should be able to access. |
| Division Folder | Contents shared with your department or division only. |
| Private Folder | Only you can see the content of this folder. Your personal storage for work files and folders. |
| Shared with Me | Contains files and folders that other users have shared directly with you. What you can do on the share documents depends on the permission the owner granted. See the note below. |
| **Note:** In the **Shared with Me** folder, what you can do with a file depends on the permission the owner gave you. With **Read** permission you can view and download the file. With **Write** permission you can also edit, export, and re-share it. |
---
Storage
The E-Folder home screen shows how much of your private storage you have used. Each user starts with a **1 GB** storage allowance. If you need more space, your institution's administrator (IT) can increase this limit.
---
Activity History
On the right side of the home screen, the **Activity History** panel shows a log of recent actions taken across your folders — such as documents added or updated. Click **View all** to see the full history.
---
Collaborative Groups
Groups are shared workspaces where users from one or more institutions can store and collaborate on files together. The home screen shows how many active groups you belong to. Click **View All Groups** to see them, or use the **Groups** button at the top right to manage your groups. Groups are covered in detail in the [*Groups*](https://docs.smartadmin.rw/link/40#bkmrk-page-title) page.
# Working with Files and Folders
---
This page walks you through the everyday tasks you will use in E-Folder. Most actions work the same way across the Public, Division, and Private folders, any differences are noted where they apply.
---
Opening a folder
1. From E-Folder, **double-click** the folder card you want to open.
2. Once inside, you will see the files and subfolders it contains. Use the **search bar** to find something by name, or click **Filter** to narrow the list.
[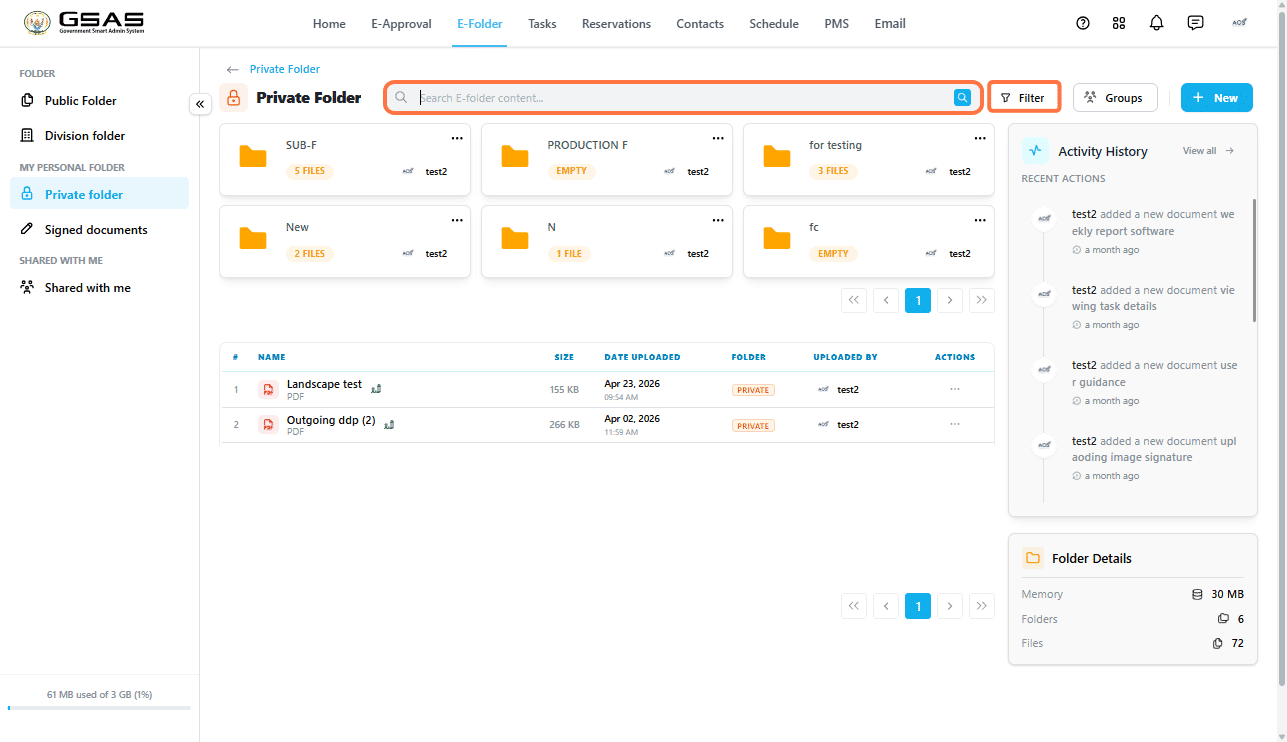](https://docs.smartadmin.rw/uploads/images/gallery/2026-06/sEoimage.png)
---
Creating a new folder
- Click **+ New** at the top right and select **New Folder**.
[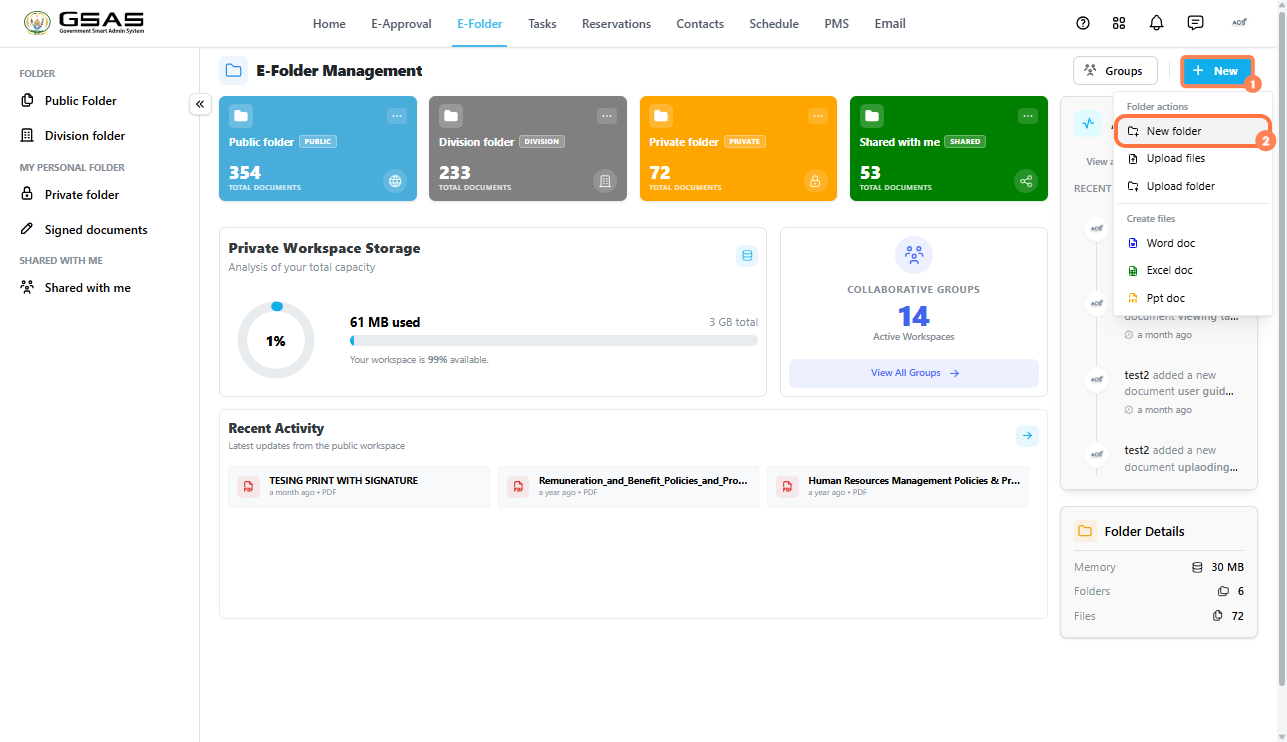](https://docs.smartadmin.rw/uploads/images/gallery/2026-06/vzcimage.png)
If you clicked **+ New** from the home screen, you will be asked to choose which folder to create it in. If you are already inside a folder, it will be created there.
- Enter a name for the folder and confirm.
[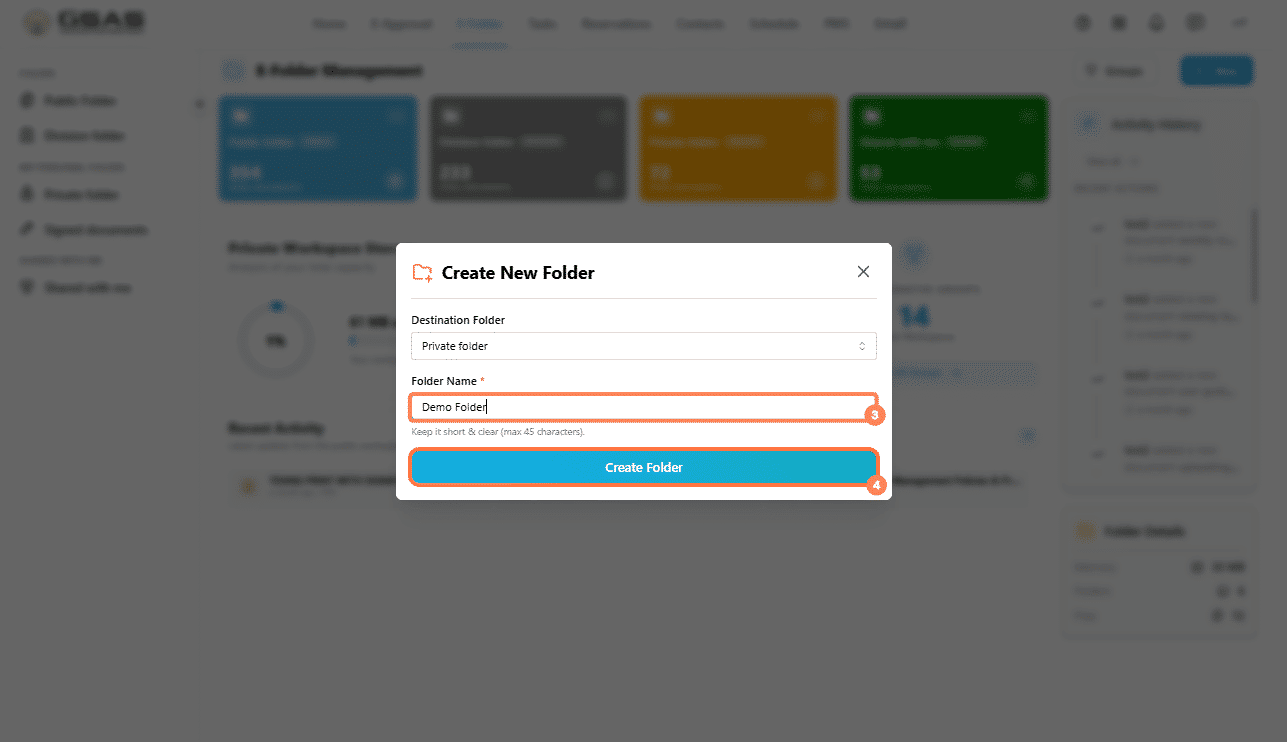](https://docs.smartadmin.rw/uploads/images/gallery/2026-06/phXimage.png)
---
Uploading files or a folder
1. Click **+ New** at the top right and select **Upload Files** or **Upload Folder**. [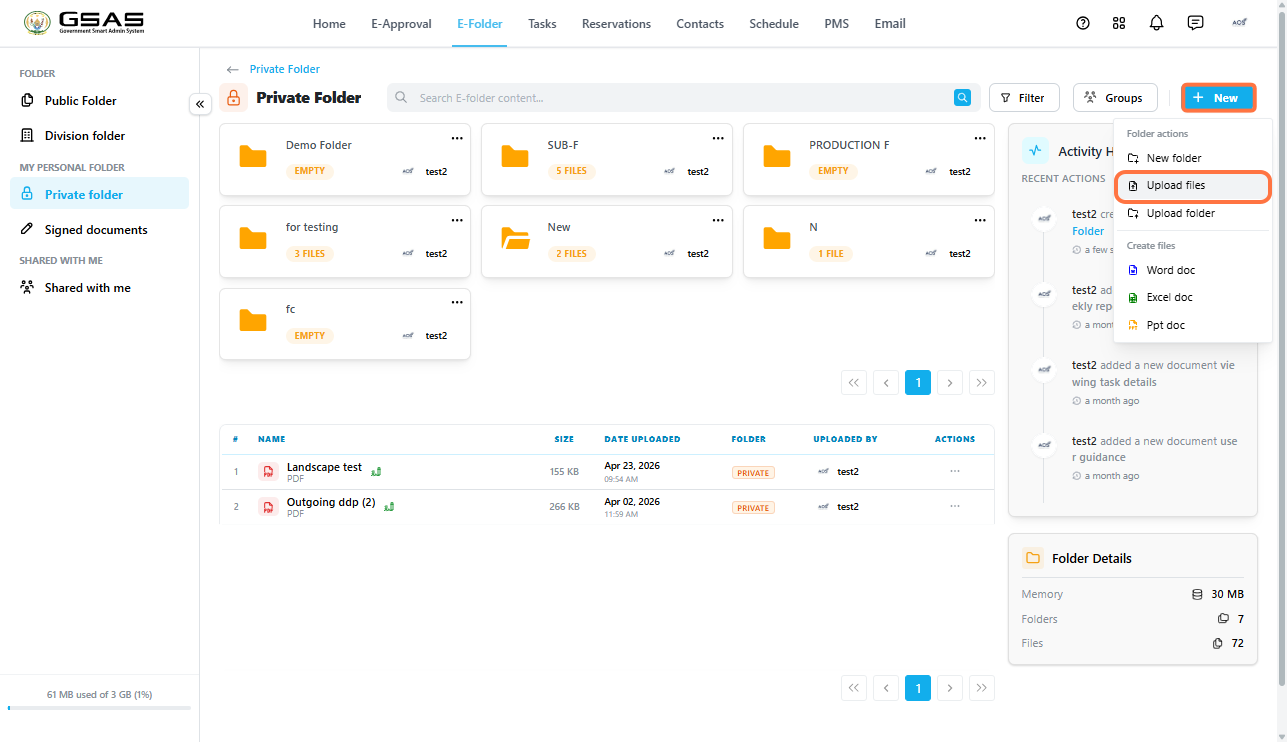](https://docs.smartadmin.rw/uploads/images/gallery/2026-06/pWnimage.png)
2. If prompted, choose the destination folder.
3. Browse your device, select the files or folder you want to upload, and confirm. [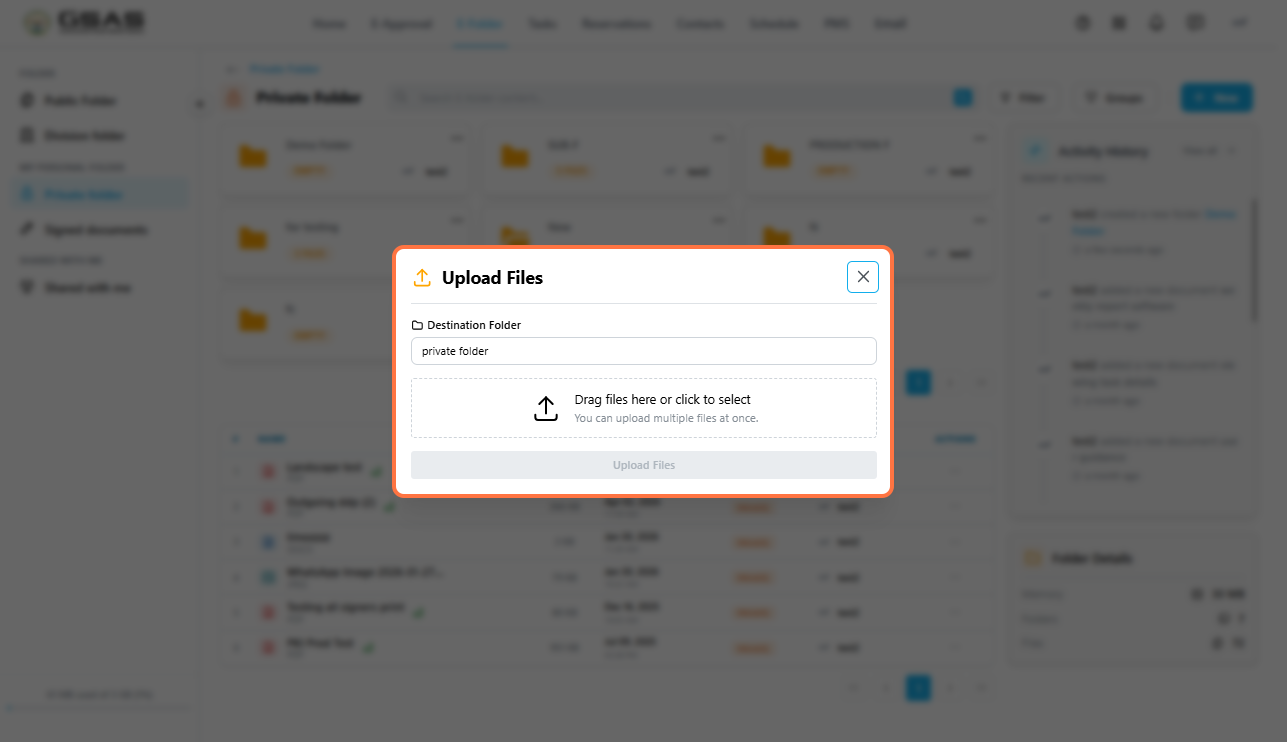](https://docs.smartadmin.rw/uploads/images/gallery/2026-06/WORimage.png)
---
Creating a document
You can create a Word, Excel, or PowerPoint document directly in E-Folder without uploading anything from your device.
1. Open the folder where you want the document to be.
2. Click **+ New** and select **Word doc**, **Excel doc**, or **Ppt doc**. [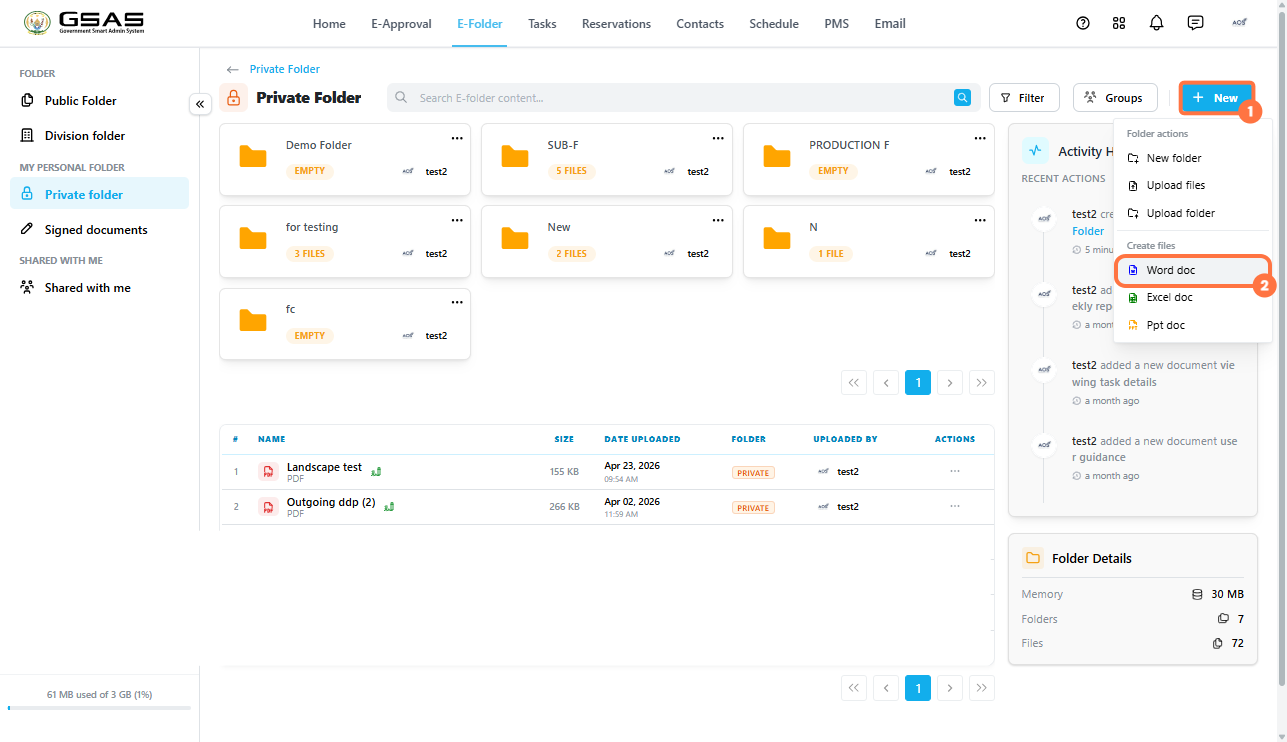](https://docs.smartadmin.rw/uploads/images/gallery/2026-06/a2uimage.png)
[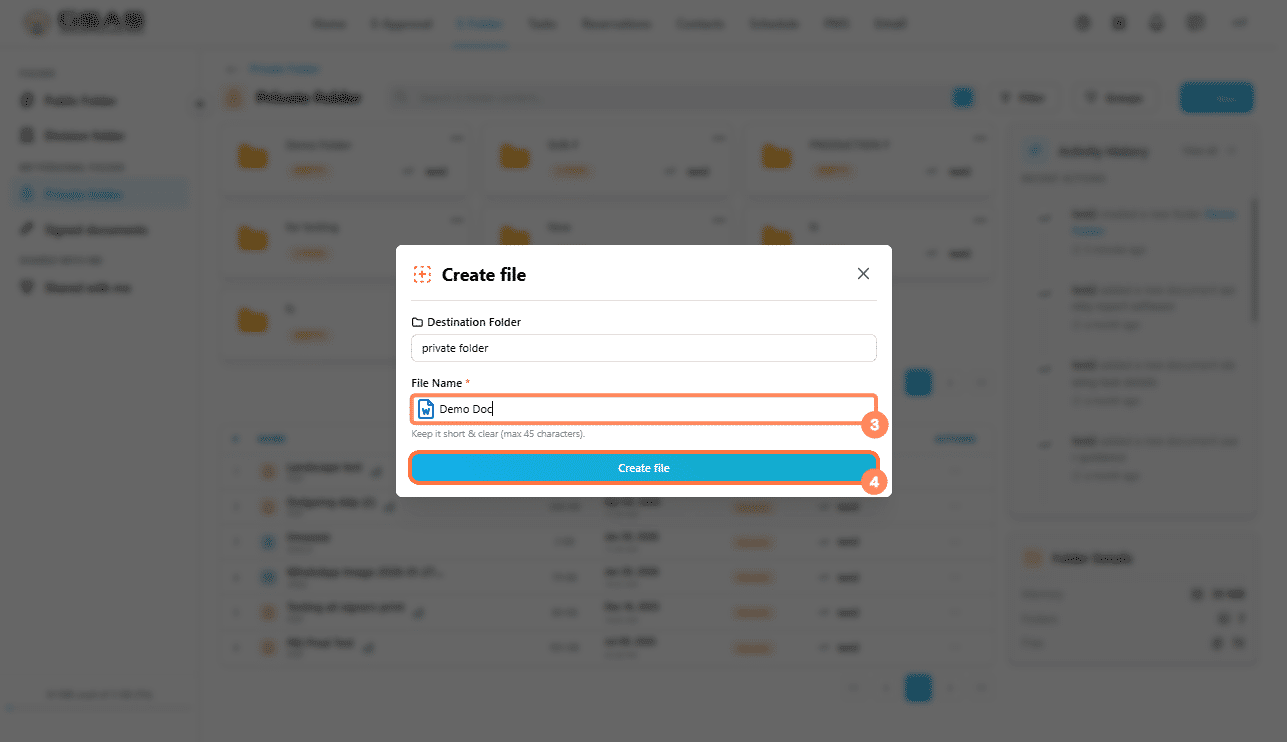](https://docs.smartadmin.rw/uploads/images/gallery/2026-06/mHmimage.png)
3. The document will open in the system ready for you to edit. [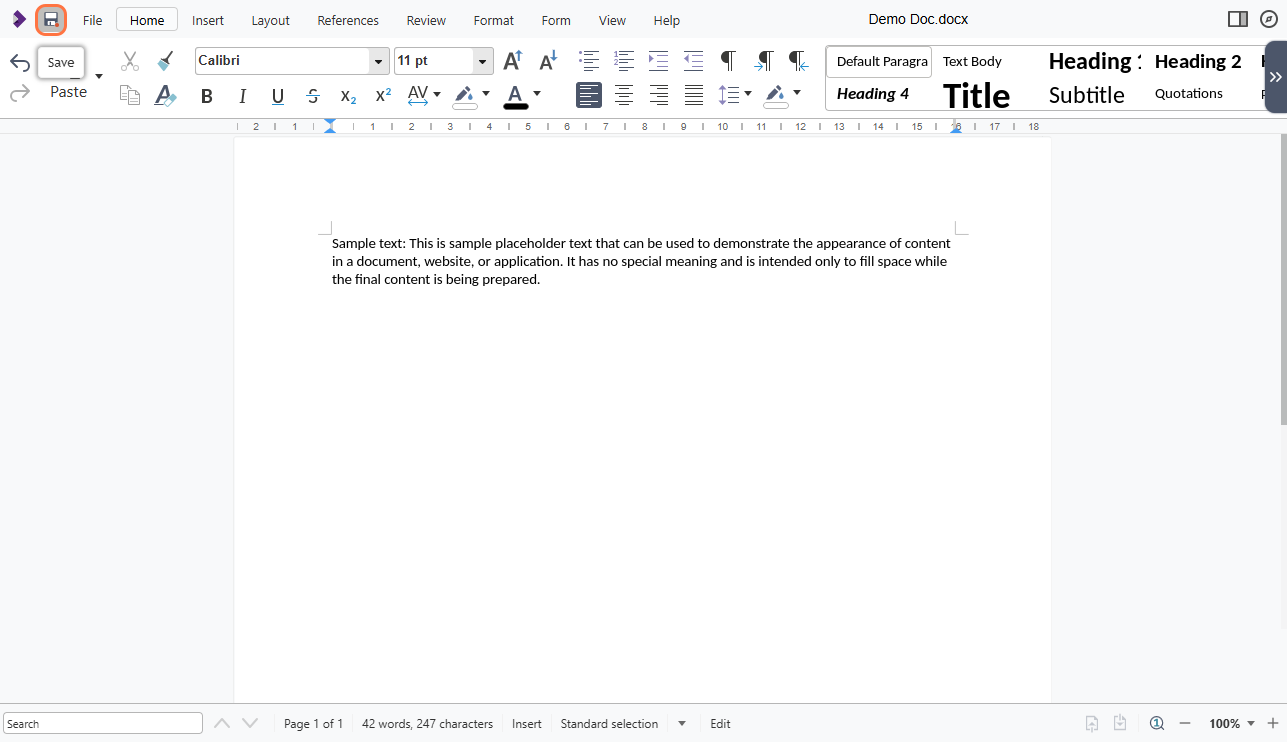](https://docs.smartadmin.rw/uploads/images/gallery/2026-06/spWimage.png)
| **Tip:** You can also click on the three dots icon (**···)** on any main folder from the home screen or on subfolders and choose any of these options: **Upload Files, Upload Folder, New Folder**. |
---
Moving a file
1. Click this icon **···** on the file and select **Move**. [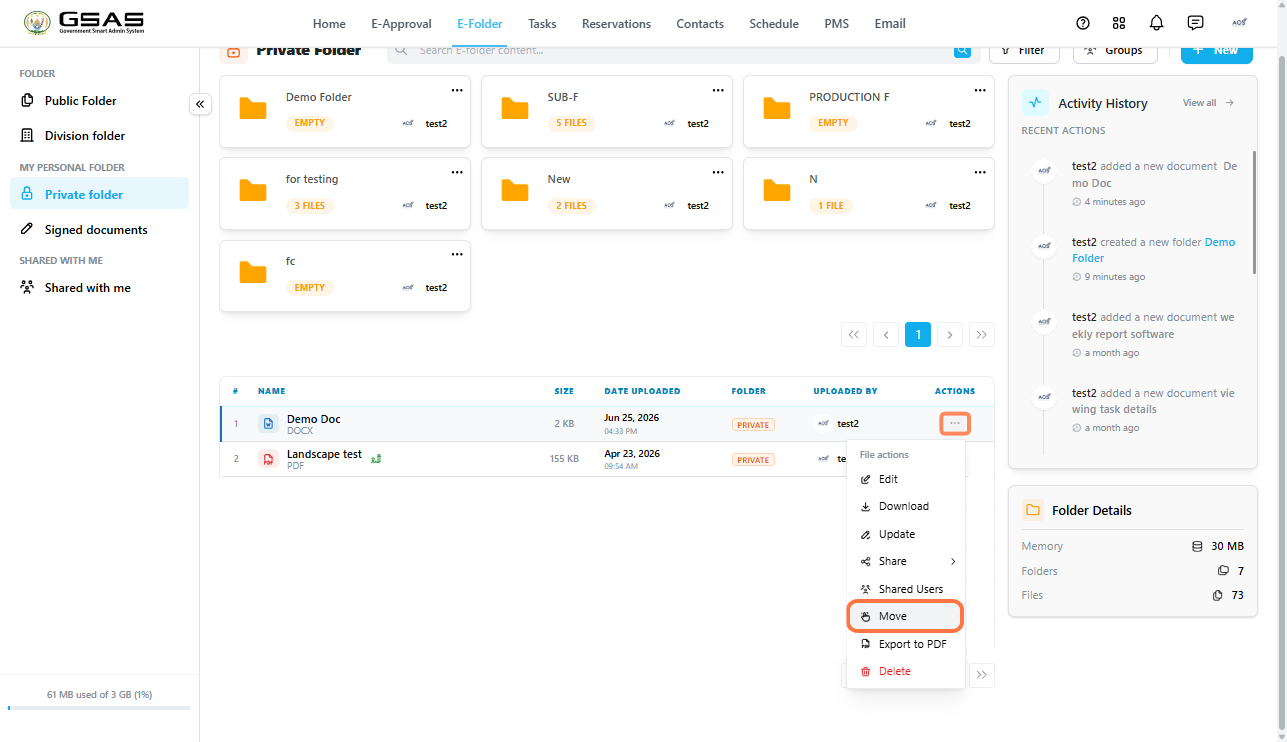](https://docs.smartadmin.rw/uploads/images/gallery/2026-06/APcimage.png)
2. A panel will open showing your folder structure , choose folder type (Public, Division, Private) then select the destination folder.
3. Confirm the move. The file will be removed from its current location and placed in the new one. [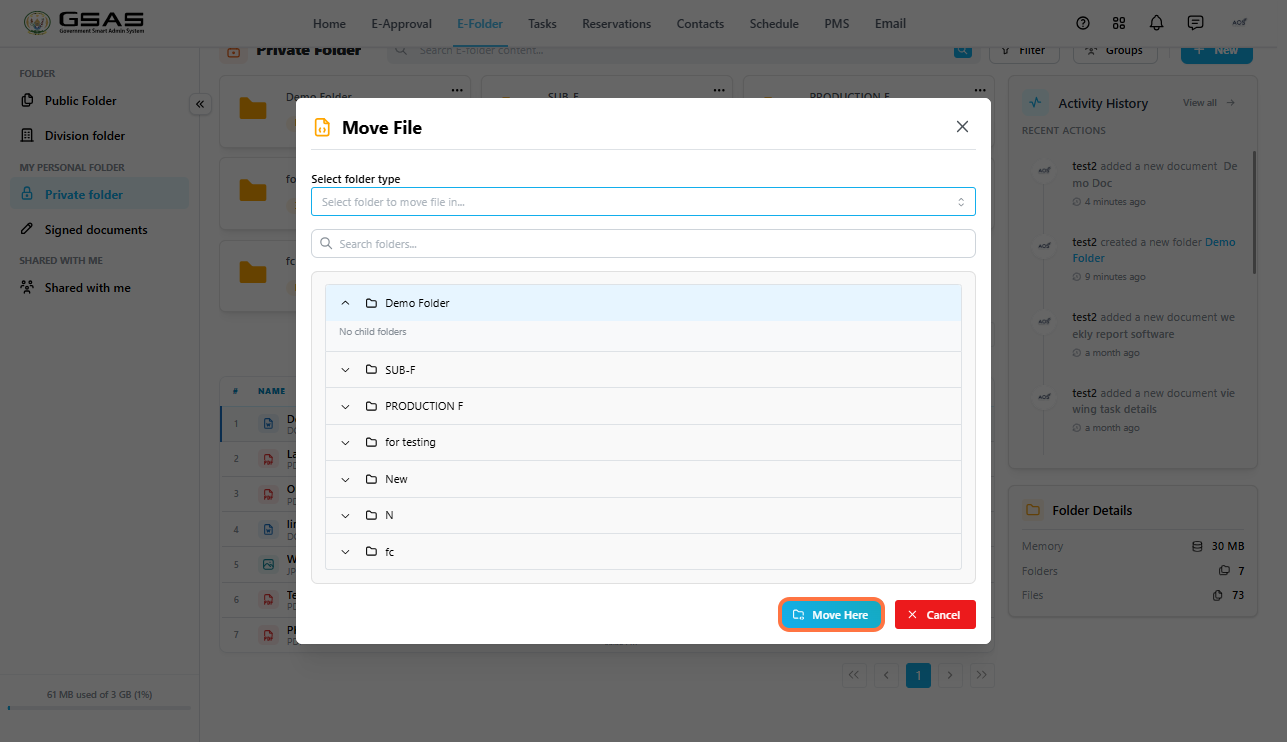](https://docs.smartadmin.rw/uploads/images/gallery/2026-06/kAQimage.png)
---
Downloading a file
1. Click on this icon **···** on the file and select **Download**.
2. The file will be saved to your device. [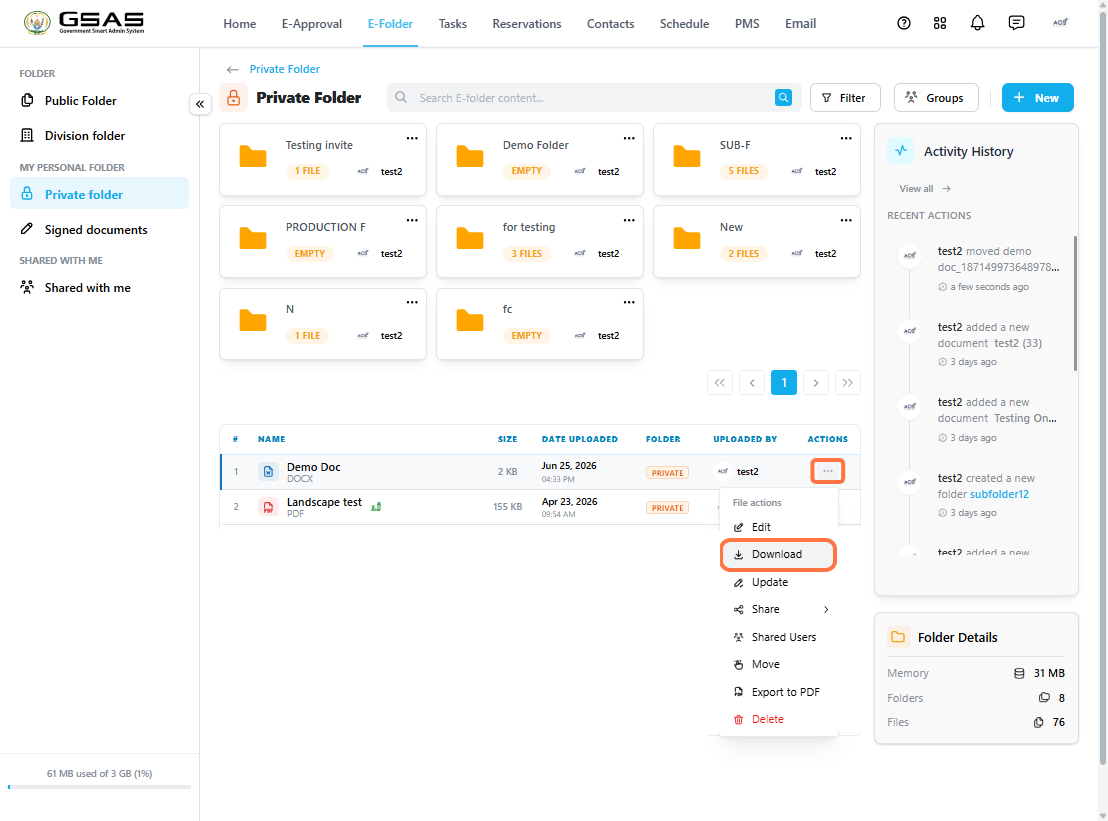](https://docs.smartadmin.rw/uploads/images/gallery/2026-06/qoBimage.png)
---
Exporting a file to PDF
1. Click on this icon **···** on the file and select **Export to PDF**.
2. A PDF version of the file will be saved in that same folder. [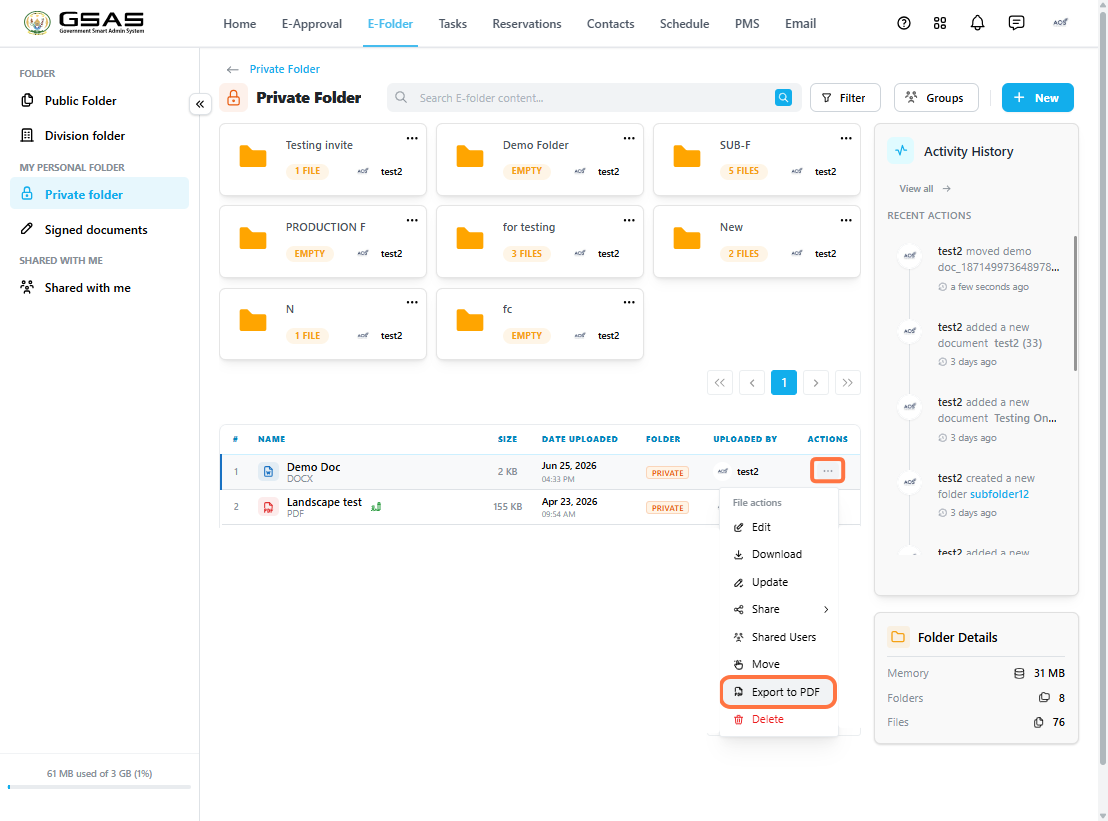](https://docs.smartadmin.rw/uploads/images/gallery/2026-06/e4Himage.png)
---
Sharing a file
1. Click on this icon **···** on the file and select **Share**.
2. Choose how you want to share it from the options that appear. [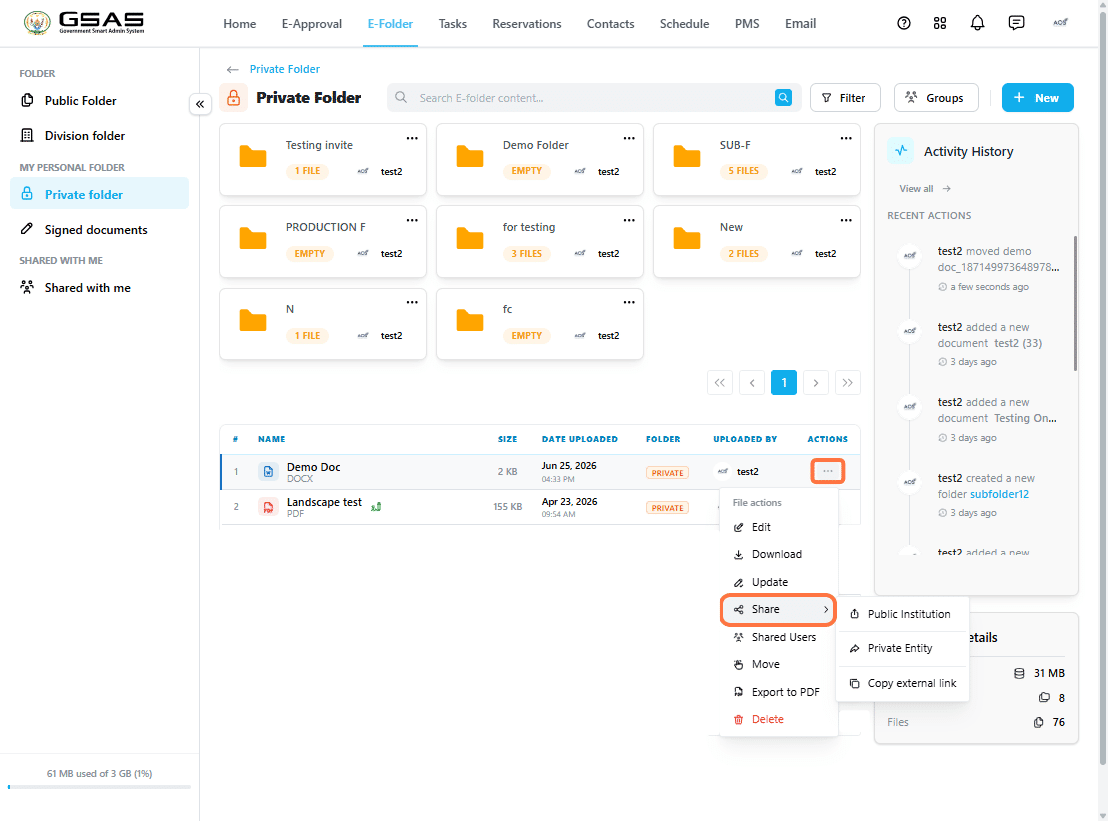](https://docs.smartadmin.rw/uploads/images/gallery/2026-06/FxAimage.png)
For full details on sharing options and permissions, see the [*Sharing Files and Folders*](https://docs.smartadmin.rw/link/39#bkmrk-page-title) page.
---
Deleting a file
1. Click on the three dots icon ( **··· )** on the file and select **Delete**. You can only delete files you own, i.e. files and folders you have created or uploaded.
2. A confirmation prompt will appear click **Delete** to proceed. [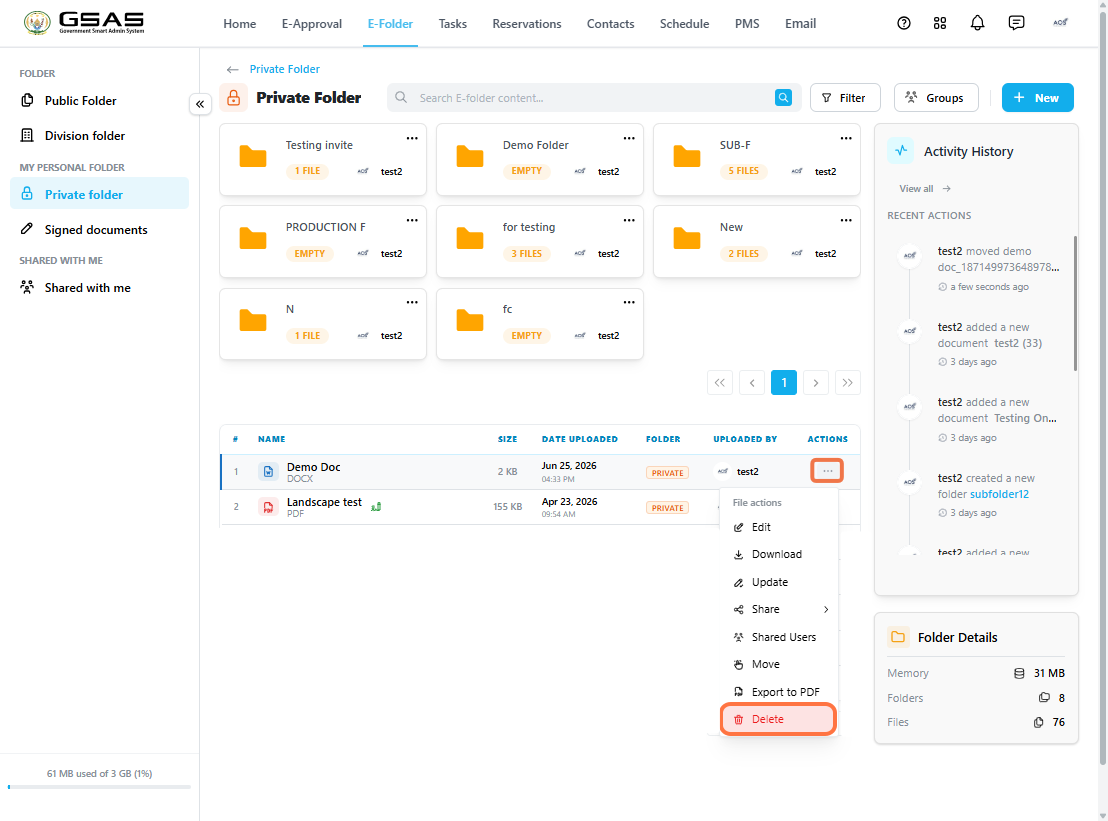](https://docs.smartadmin.rw/uploads/images/gallery/2026-06/VTMimage.png)
| **Warning:** Deletion is permanent. There is no recycle bin in E-Folder, so once a file is deleted it cannot be recovered. Make sure you no longer need it before proceeding. |
---
Working with Shared with Me
- You can not upload or create files within the **Shared with Me** folder. Only files and folders shared with you appear in this folder.
- Editing shared word, excel, or ppt files depends on the permissions granted by the file owner;
| **Read permission —** you can only open the file.
**Write permission —** you can edit, export to PDF, and share the file. |
# Sharing Files and Folders
---
Use sharing when internal or external system users, and non-system users need access to a file or folder from E-Folder. You can share both files and folders, and the access you give depends on the permission you select.
---
Step 1
Open the sharing options
1. Open the folder that contains the file or folder you want to share.
2. Click **···** on the item and point to **Share**, then choose the sharing option you want to use. [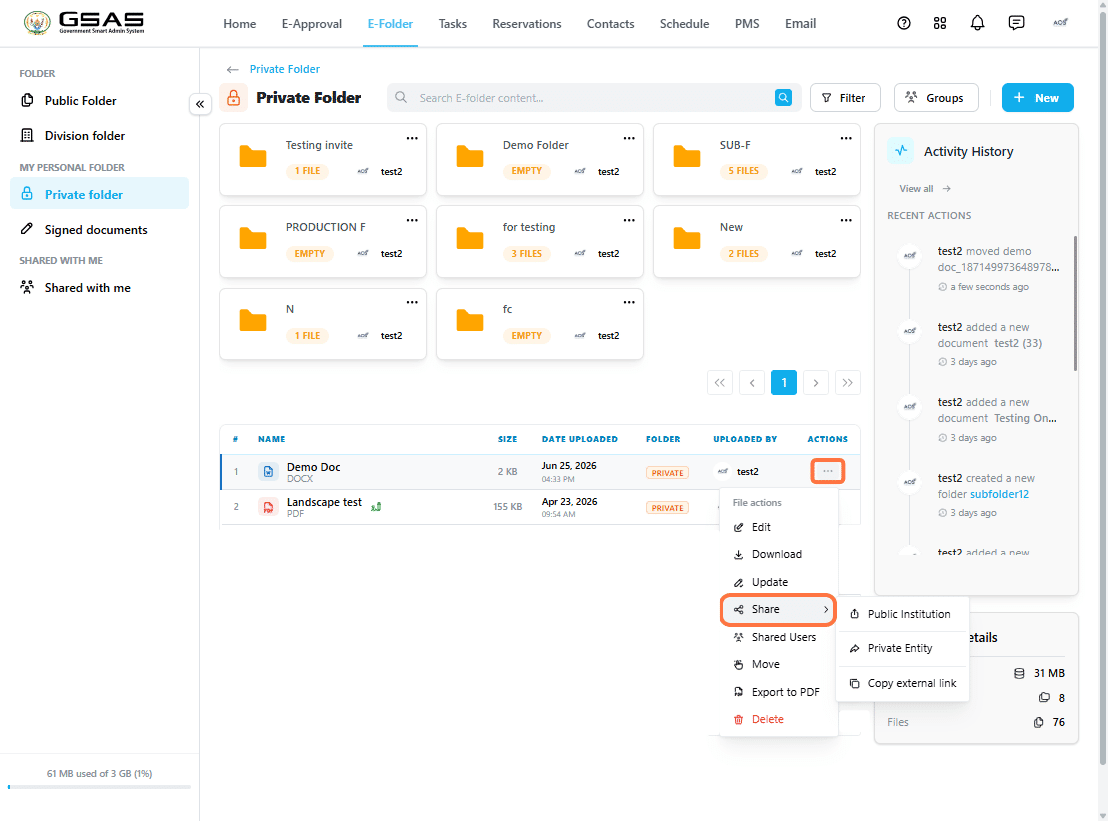](https://docs.smartadmin.rw/uploads/images/gallery/2026-07/ilqimage.png)
| Public Institution | Share with users from any institution that use the system. |
| Private Entity | Share folders and files externally by email. |
| Copy External Link | Copy a link that anyone can open in a browser to download the file. Available for files only. |
---
Step 2
Option 1: Share with users from a Public Institution
Use this option to share with one or more users who have accounts in the system.
1. Select **Public Institution**. [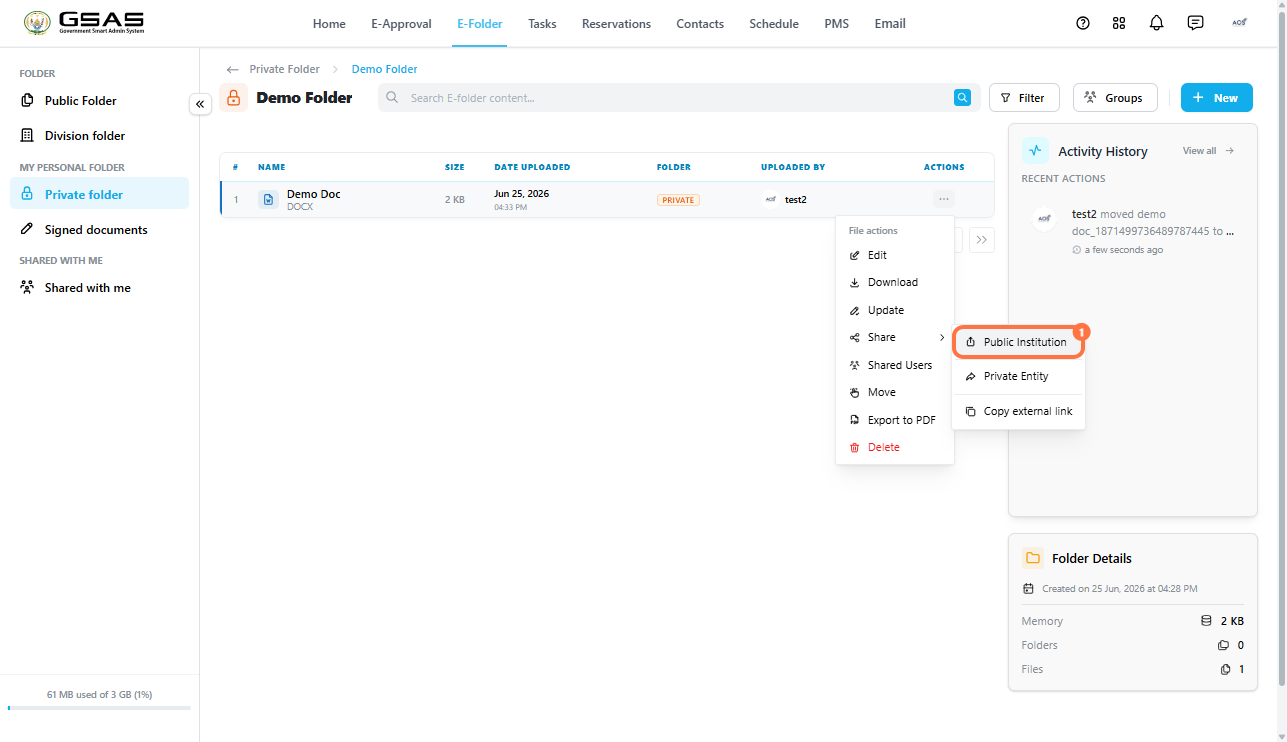](https://docs.smartadmin.rw/uploads/images/gallery/2026-07/tnKimage.png)
2. Choose the user(s)'s organization from the dropdown list on the left.
3. Use the search field to find the user by name. [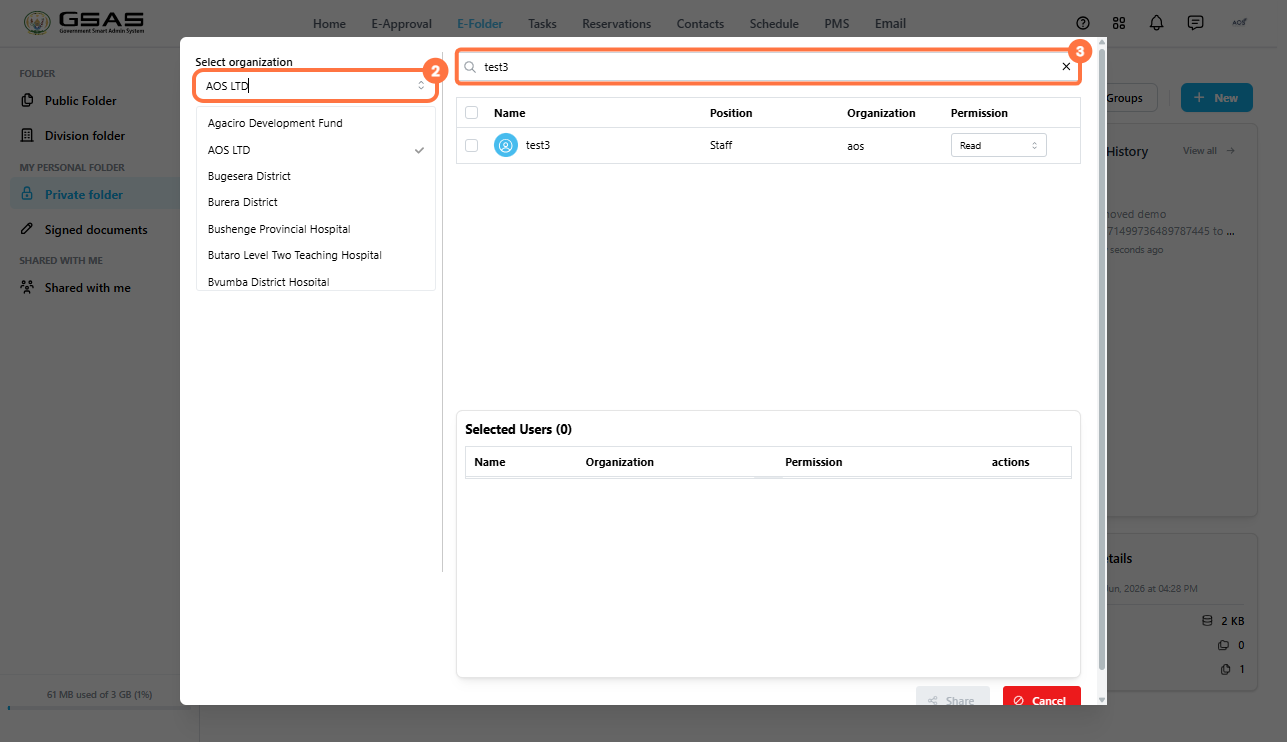](https://docs.smartadmin.rw/uploads/images/gallery/2026-07/unkimage.png)
4. Tick the checkbox next to the user to add them to the **Selected Users** list. You can add as many users as needed.
5. Choose the permission for each user — **Read** or **Write**. The default permission is Read.[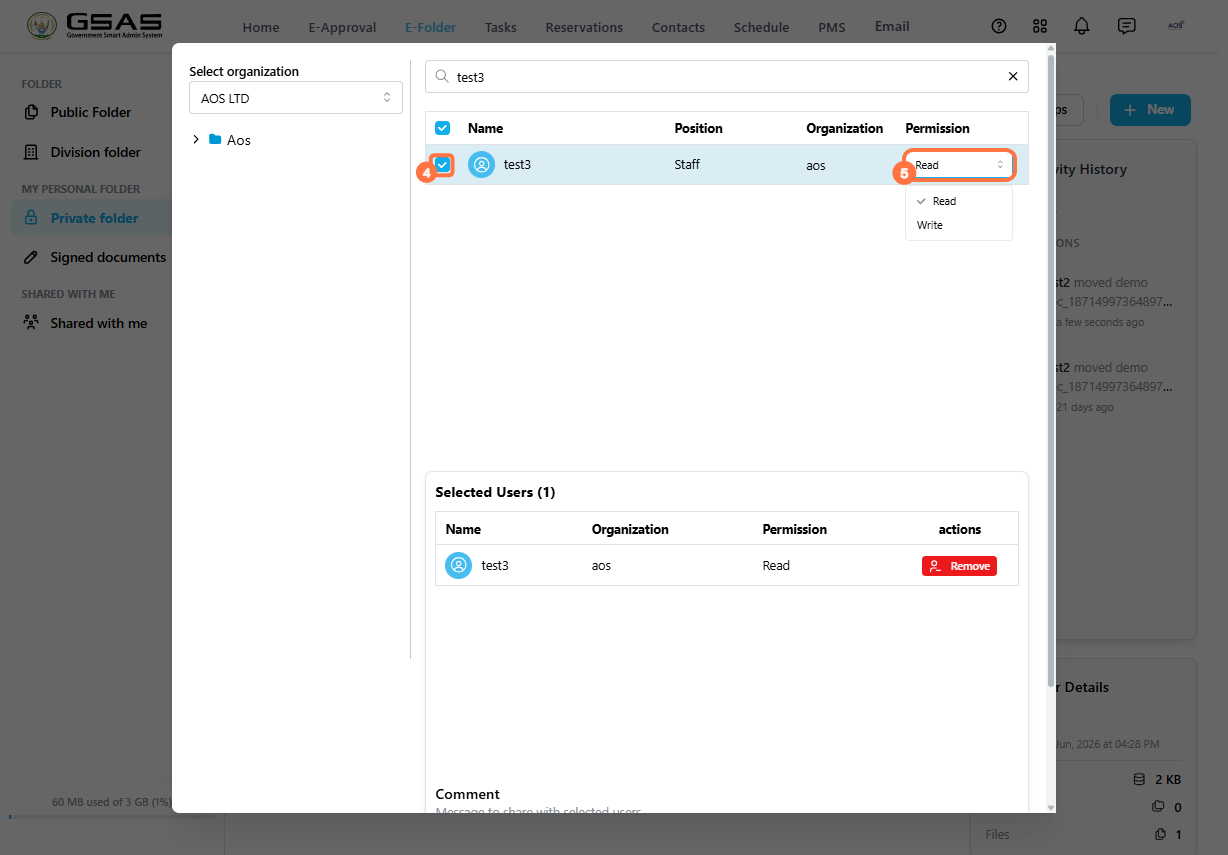](https://docs.smartadmin.rw/uploads/images/gallery/2026-07/Igtimage.png)
| Read | The user can open, view, and download the shared item. |
| Write | The user can edit editable files, export to PDF, and re-share. |
Review the users in the **Selected Users** list.
6. Enter a comment if needed.
7. Click **Share**. [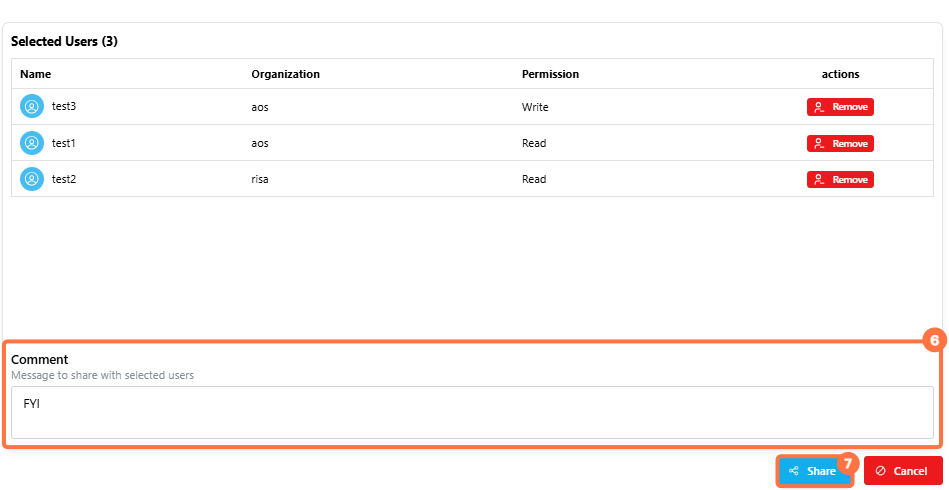](https://docs.smartadmin.rw/uploads/images/gallery/2026-07/LUXimage.png)
---
Option 2: Share with private institutions
Copy External Link *(files only)*
This generates a link that anyone can open in a browser to download the file, no system account required.
1. Click **···** on the file and select **Share → Copy External Link**. [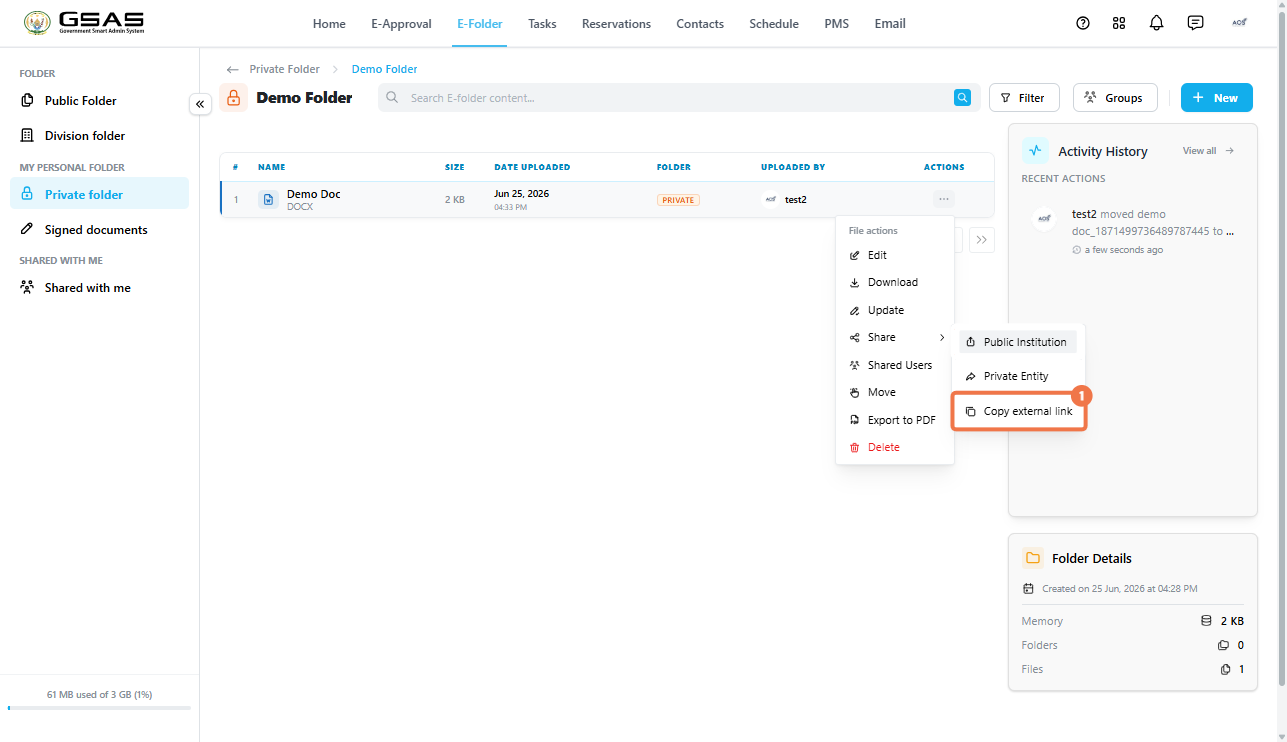](https://docs.smartadmin.rw/uploads/images/gallery/2026-07/VAyimage.png)
2. The link is copied to your clipboard. Paste it wherever you want to share it; an email, a message, or any other channel.
3. The recipient opens the link in their browser and clicks **Download** to save the file. If they are logged into smart admin, the file automatically opens in the e-folder Online Editor. [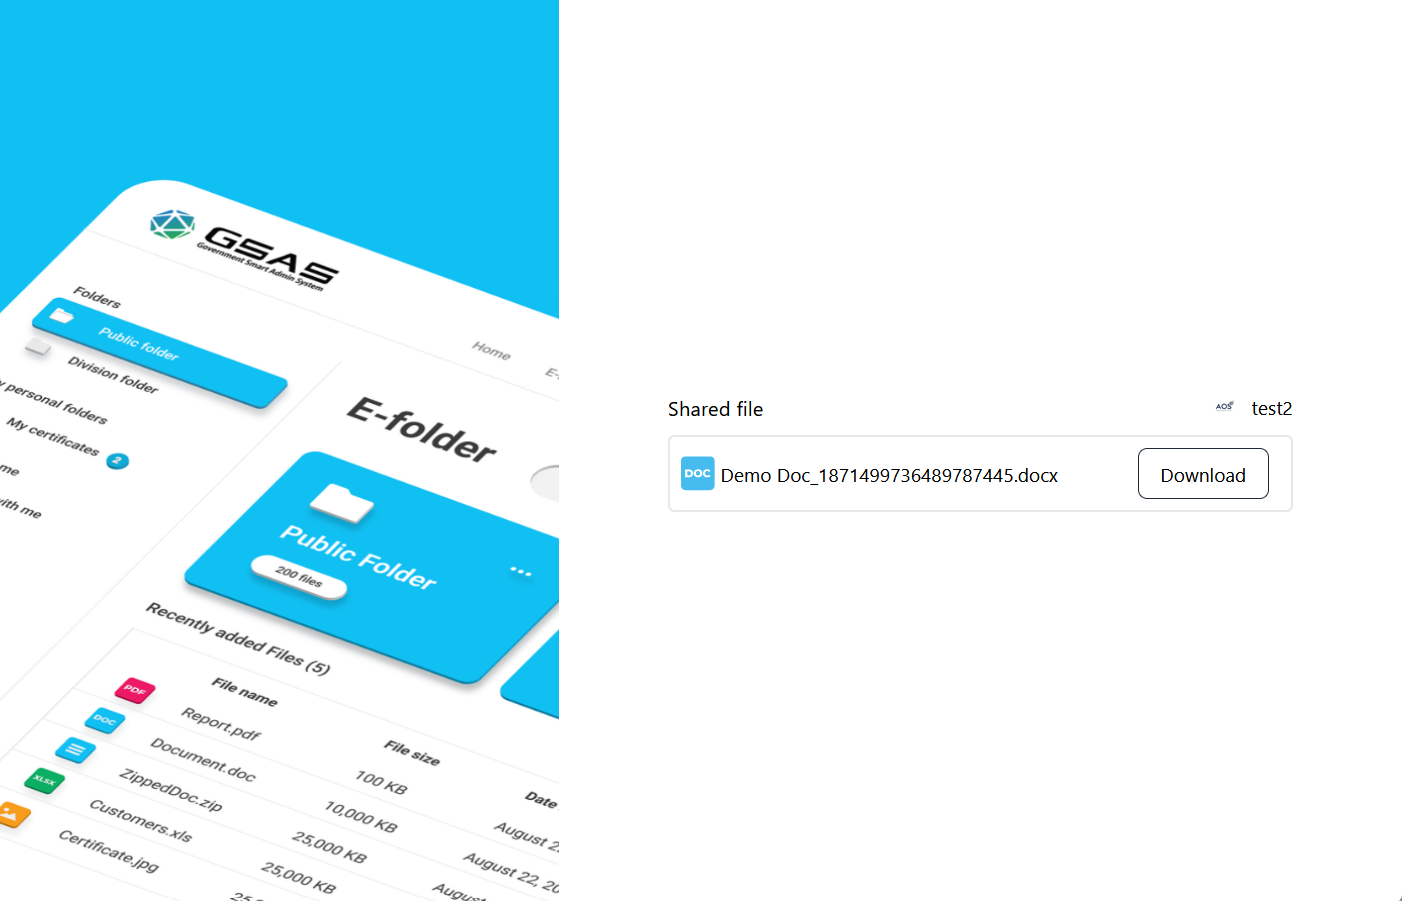](https://docs.smartadmin.rw/uploads/images/gallery/2026-07/5T5image.png)
Private Entity
Use this option to share a folder and files with someone outside the system via their email address.
1. Click **···** on the folder and select **Share → Private Entity**. [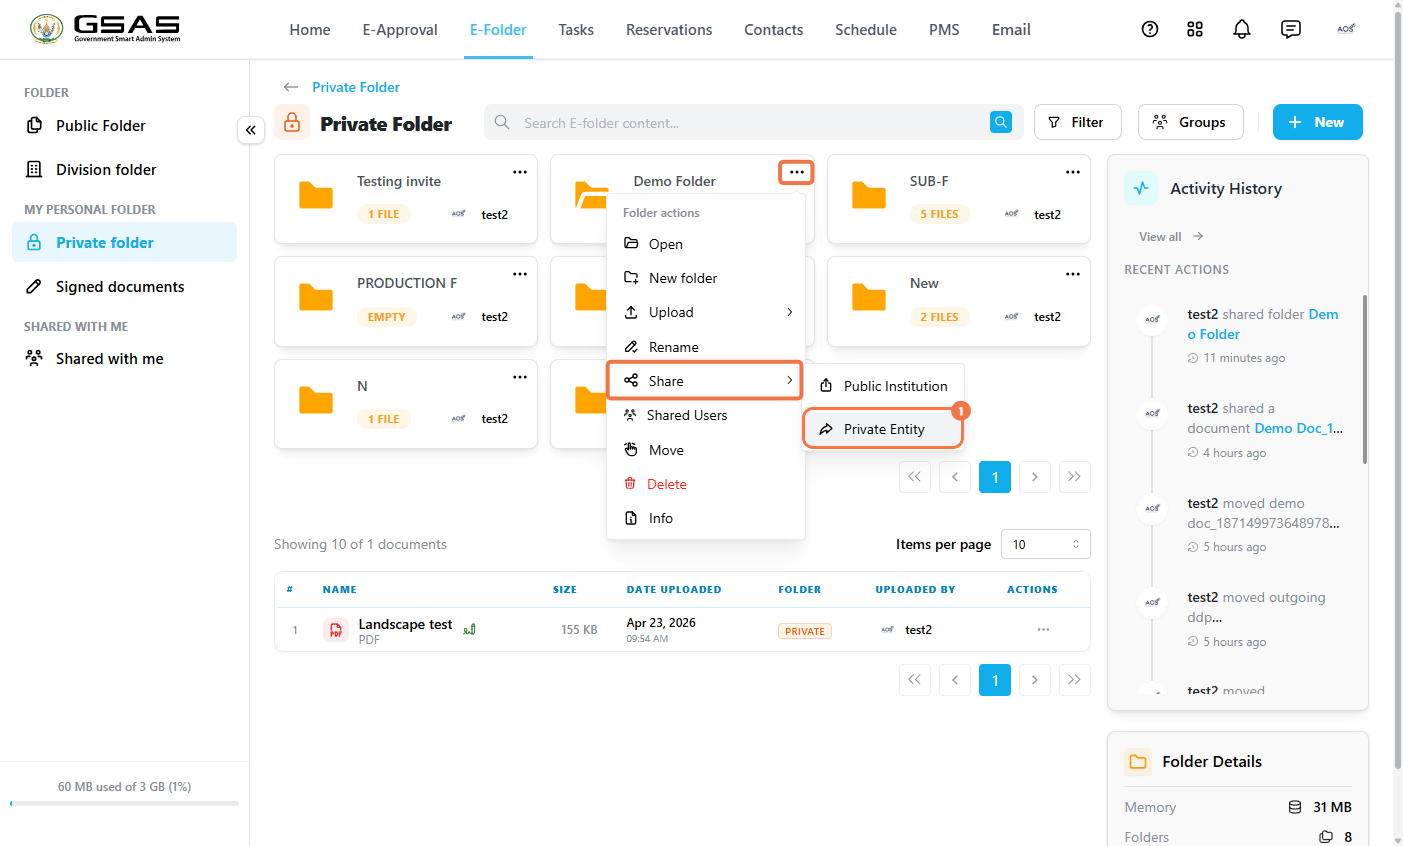](https://docs.smartadmin.rw/uploads/images/gallery/2026-07/ETBimage.png)
2. Enter the recipient's email address in the **Emails to share** field and press Enter. You can add multiple addresses.
3. Write a message in the **Comment** field.
4. Click **Share**. [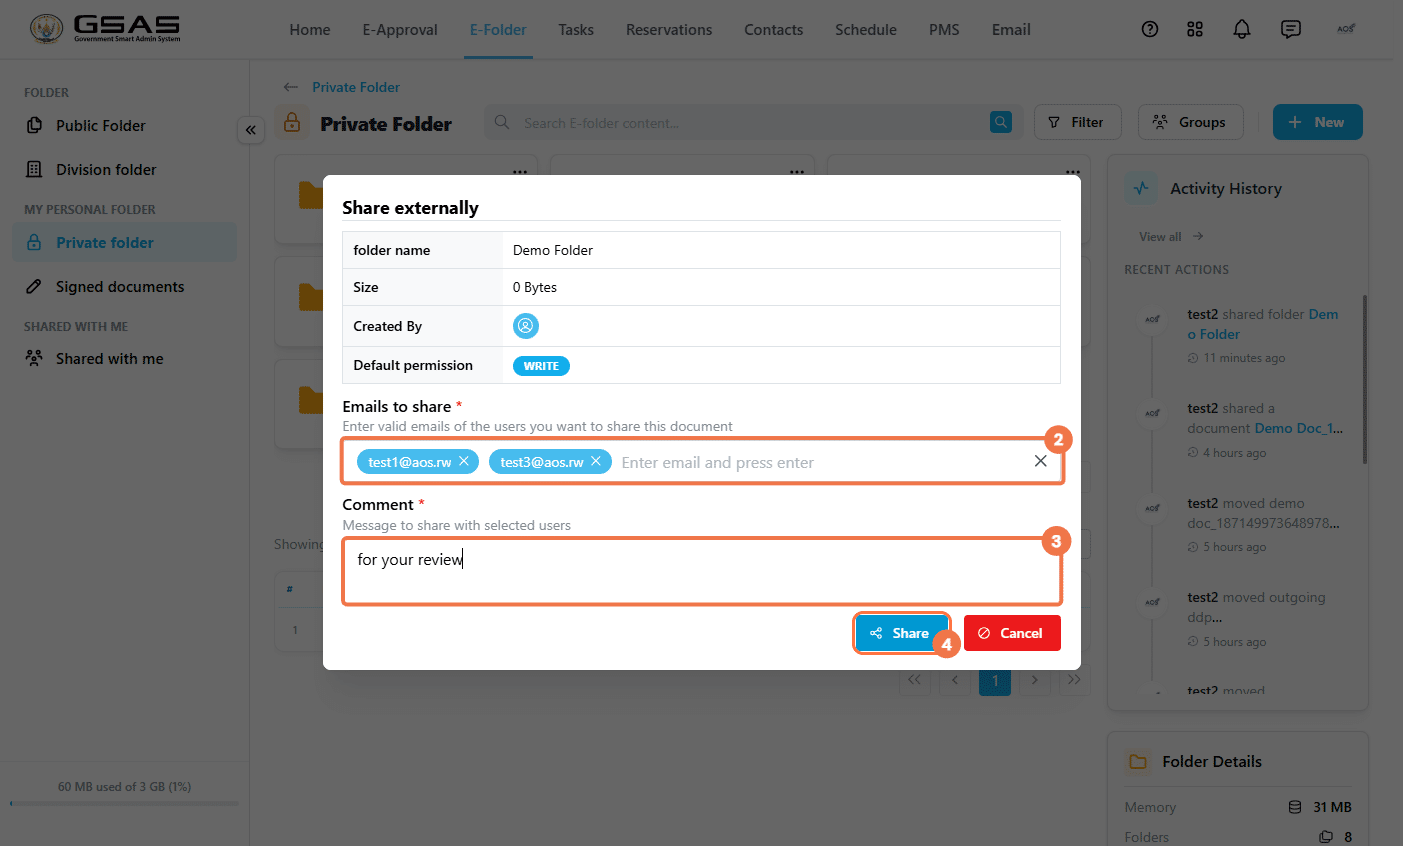](https://docs.smartadmin.rw/uploads/images/gallery/2026-07/HNXimage.png)
5. The recipient will receive an email with a link to the shared documents, as well as an OTP access code.
6. When they open the link, they will be prompted to enter the OTP to view the shared documents. [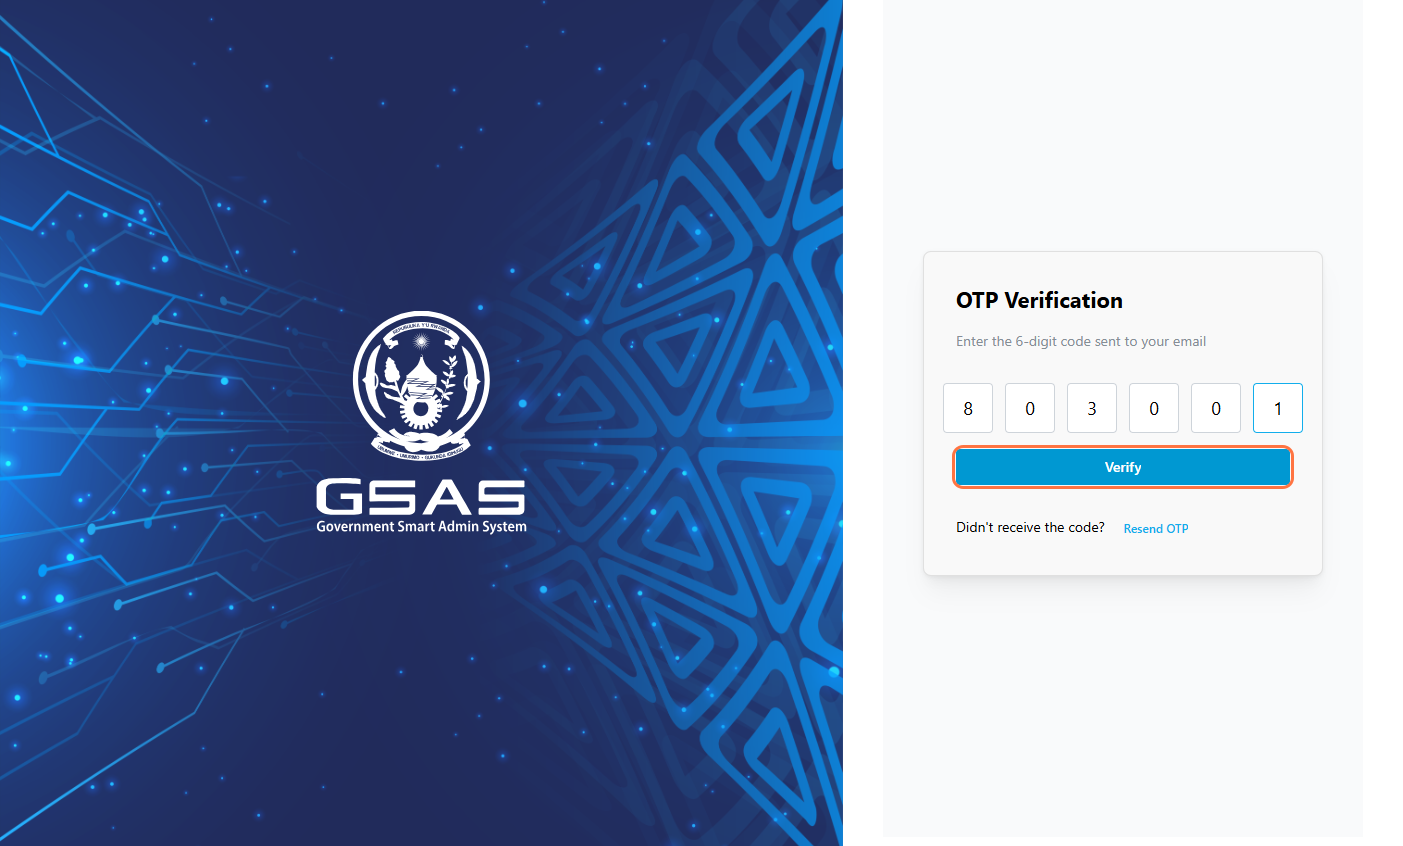](https://docs.smartadmin.rw/uploads/images/gallery/2026-07/L4Mimage.png)
7. Once the OTP is verified, they will be able to access the files [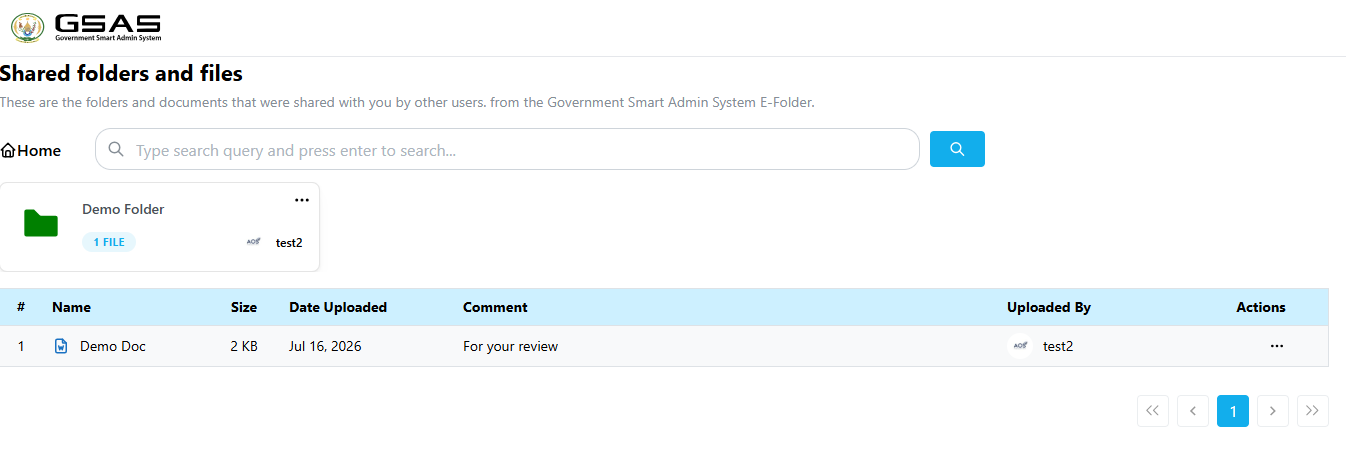](https://docs.smartadmin.rw/uploads/images/gallery/2026-07/screenshot-2026-07-16-160755.png)
---
Updating or revoking access
You can view and manage who a file or folder has been shared with at any time.
1. Click **···** on the file or folder and select **Shared Users**. [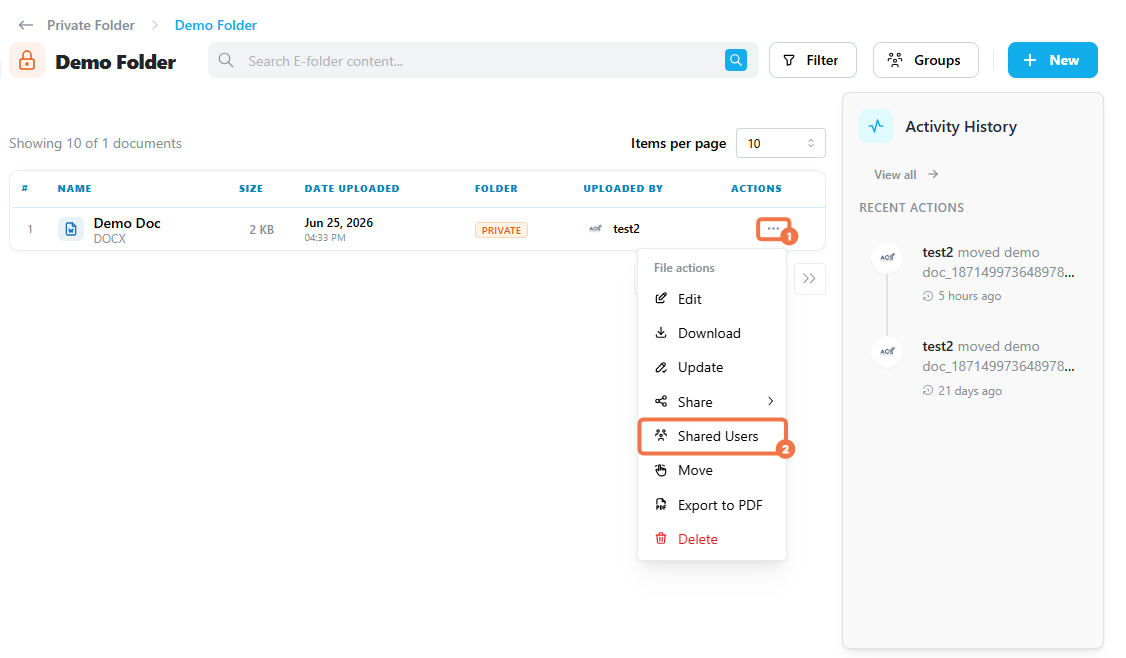](https://docs.smartadmin.rw/uploads/images/gallery/2026-07/yFwimage.png)
2. The **Update Shared Users** panel will open, listing everyone the item has been shared with, their organization, and their current permission. Use the search bar to find a specific user.
3. To change a user's permission, update it from the dropdown next to their name. To remove their access, click **Remove**. [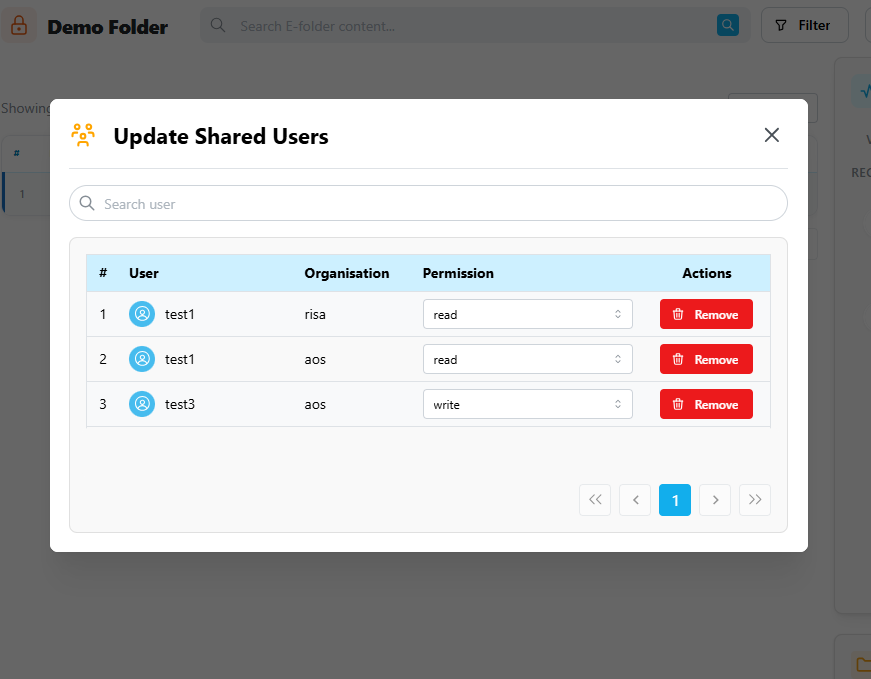](https://docs.smartadmin.rw/uploads/images/gallery/2026-07/WWmimage.png)
# Groups in e-Folder
---
Groups are collaborative workspaces where users from one or more institutions can store, organize, and share files together. Each group has its own folder space, separate from your personal folders. You can be a member of multiple groups at the same time.
---
### Accessing your groups
Click the **Groups** button at the top right of E-Folder, or on the **View All Groups** button.
[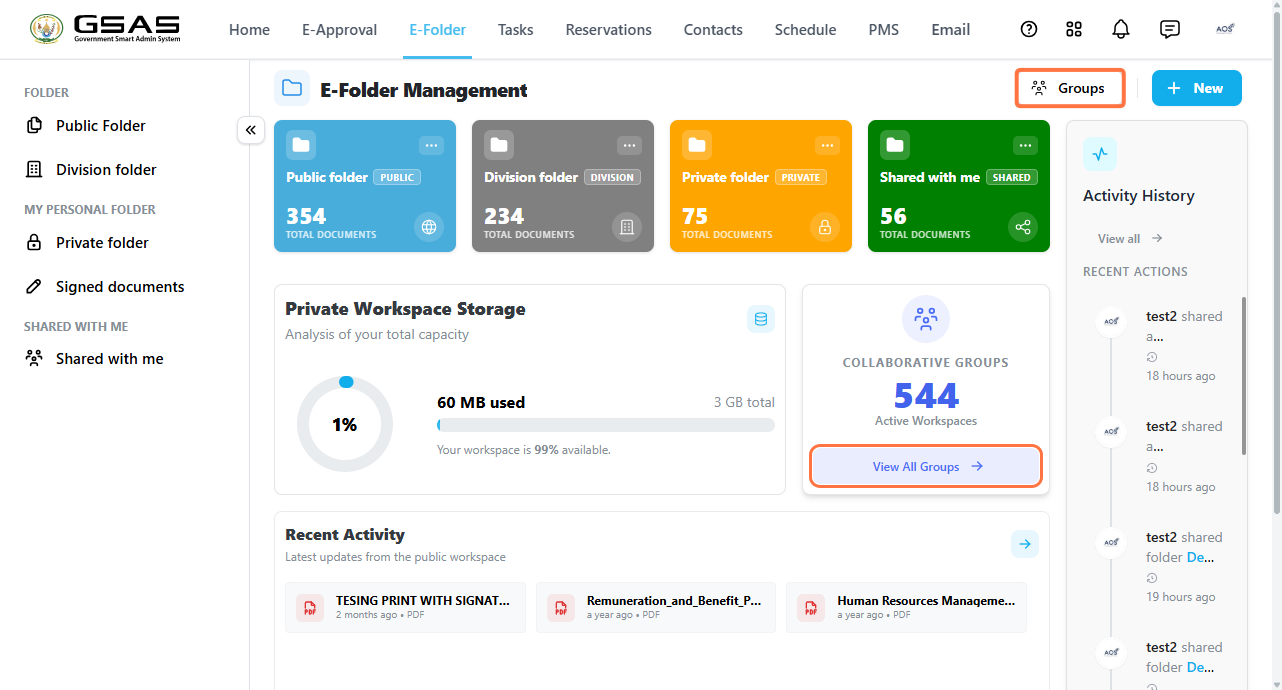](https://docs.smartadmin.rw/uploads/images/gallery/2026-07/jA4image.png)
---
The **Workspace Groups** panel will open with two tabs: **Browse Groups** shows all the groups you belong to, and **Create Group** lets you set up a new one. You can click on a group to open it or use the search bar to find a group by name.
### Creating a group
1. Click **Groups** and select the **Create Group** tab. [](https://docs.smartadmin.rw/uploads/images/gallery/2026-07/g3Yimage.png)
2. Choose the **Hierarchy Type**:
— Select **Top-level Group** to create a standalone group.
— Select **Sub-group** if this group is under an existing one. You will be asked to search for and select the parent group.
3. Enter a **Group Name**
4. Add an optional **Description**. [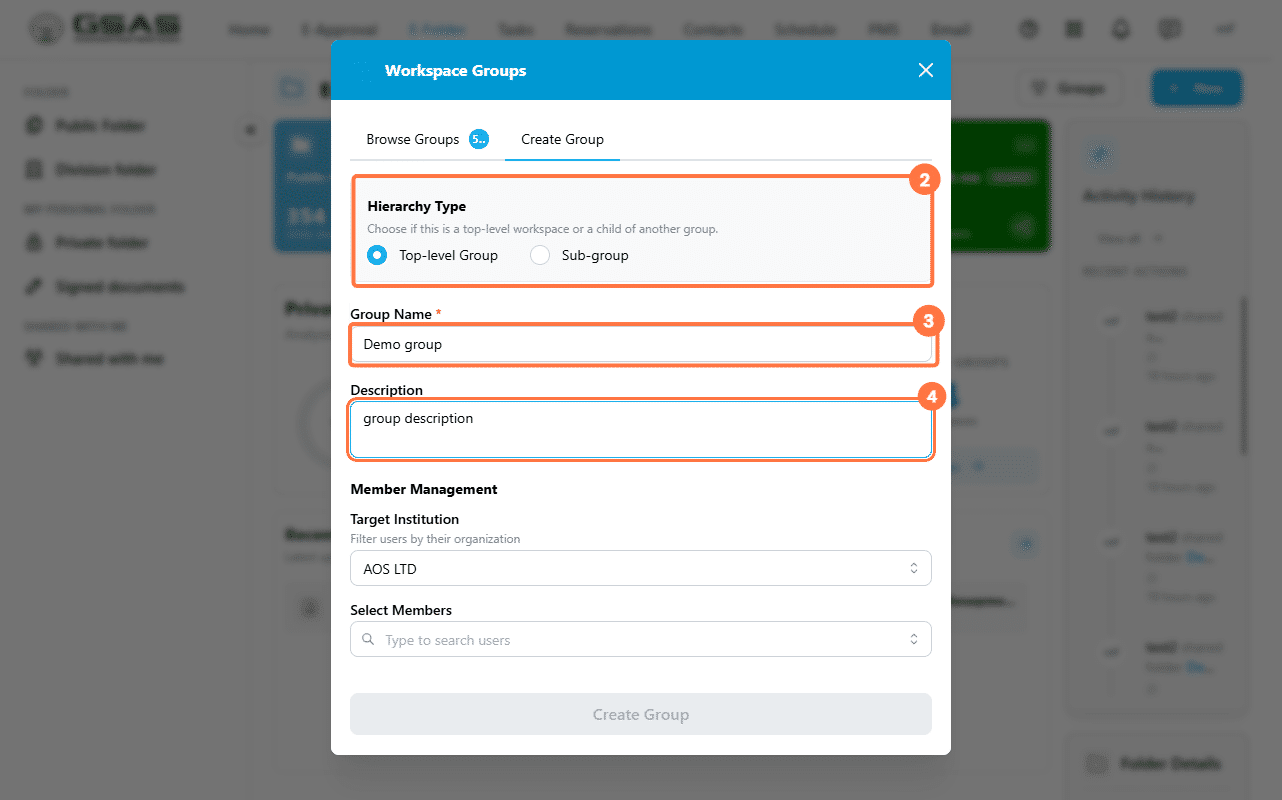](https://docs.smartadmin.rw/uploads/images/gallery/2026-07/X0Oimage.png)
5. Under **Member Management**, select the **Target Institution** to filter users by organization, [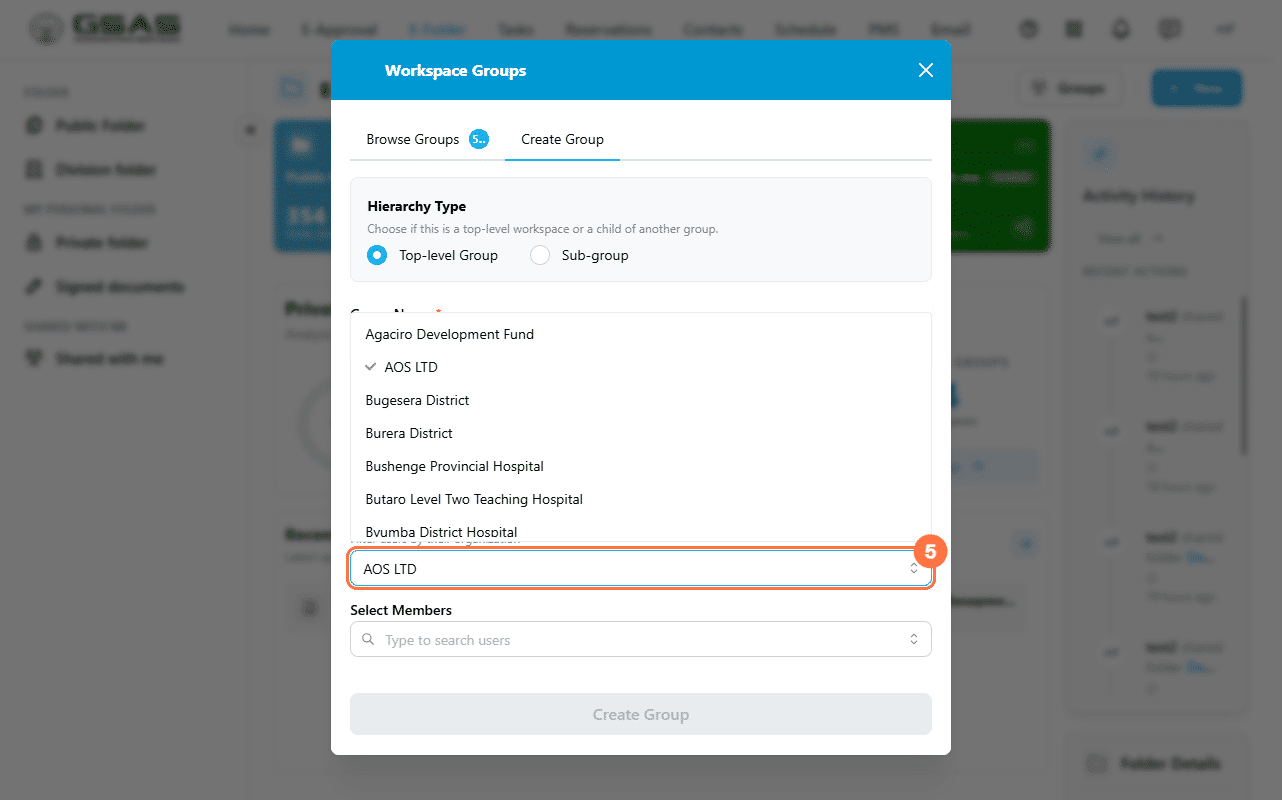](https://docs.smartadmin.rw/uploads/images/gallery/2026-07/E3Limage.png)
6. Then search for members by name and add them. [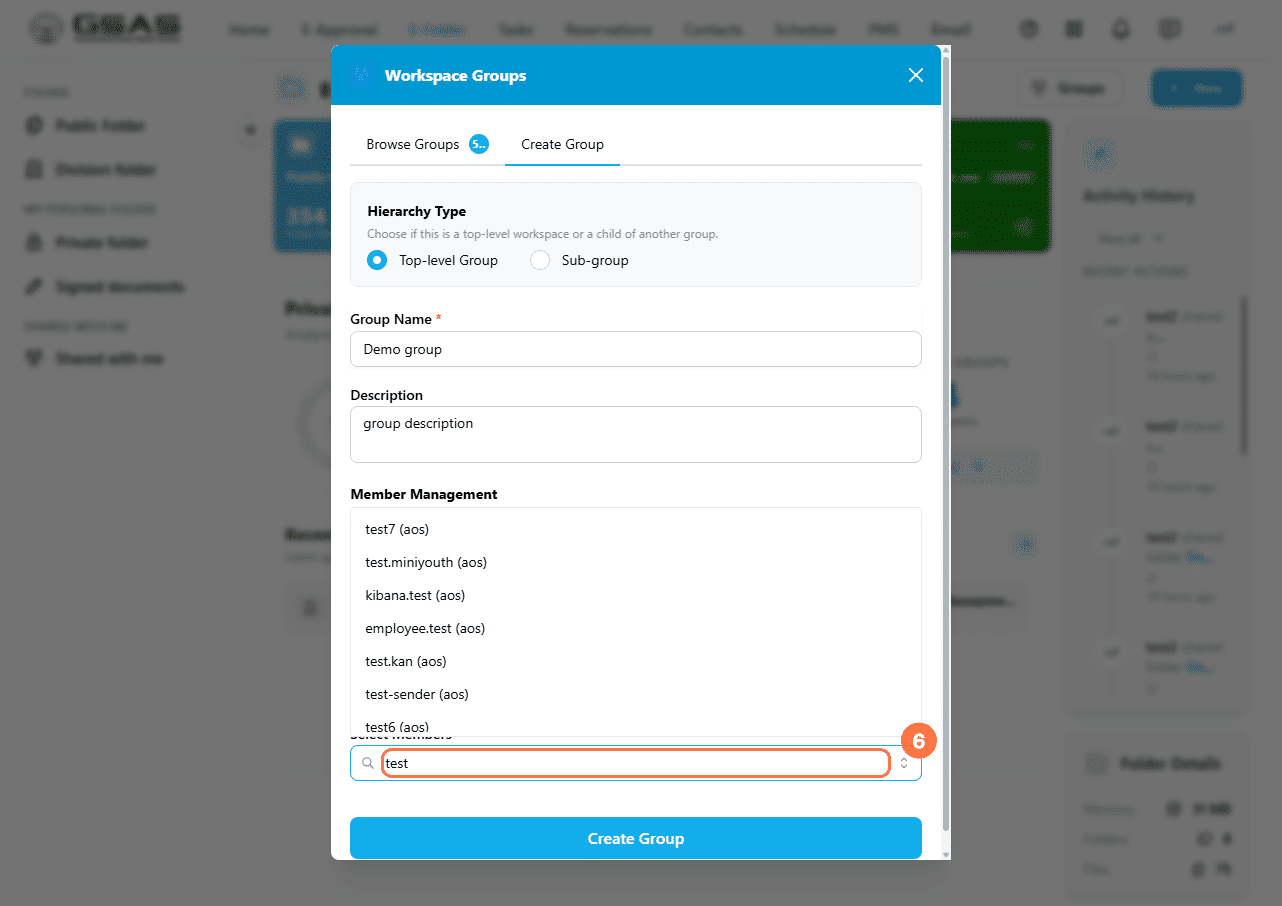](https://docs.smartadmin.rw/uploads/images/gallery/2026-07/2dRimage.png)
7. Click **Create Group**. [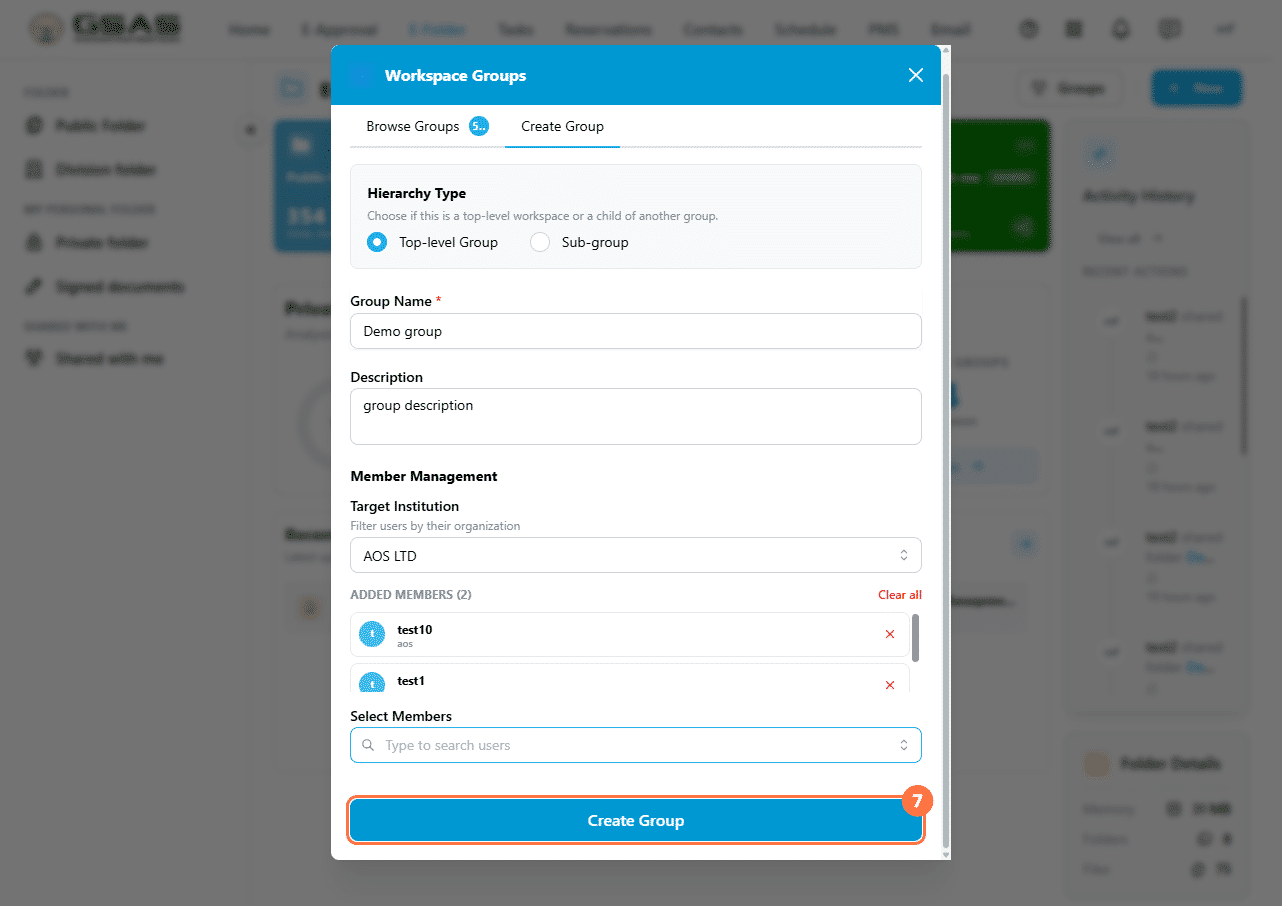](https://docs.smartadmin.rw/uploads/images/gallery/2026-07/kh7image.png)
| **Note:** Added members will see the group appear in their **Browse Groups** list. New members are assigned **Read** access by default, however, you can update this after the group is created. |
---
### Working inside a group
Once you open a group (from the browse groups tab), you will find the same tools available as in your regular folders; a search bar, Filter, and **+New** to add files and folders. The sidebar gives you access to:
#### **Folders & Files** **sharing**— the group's file space.
[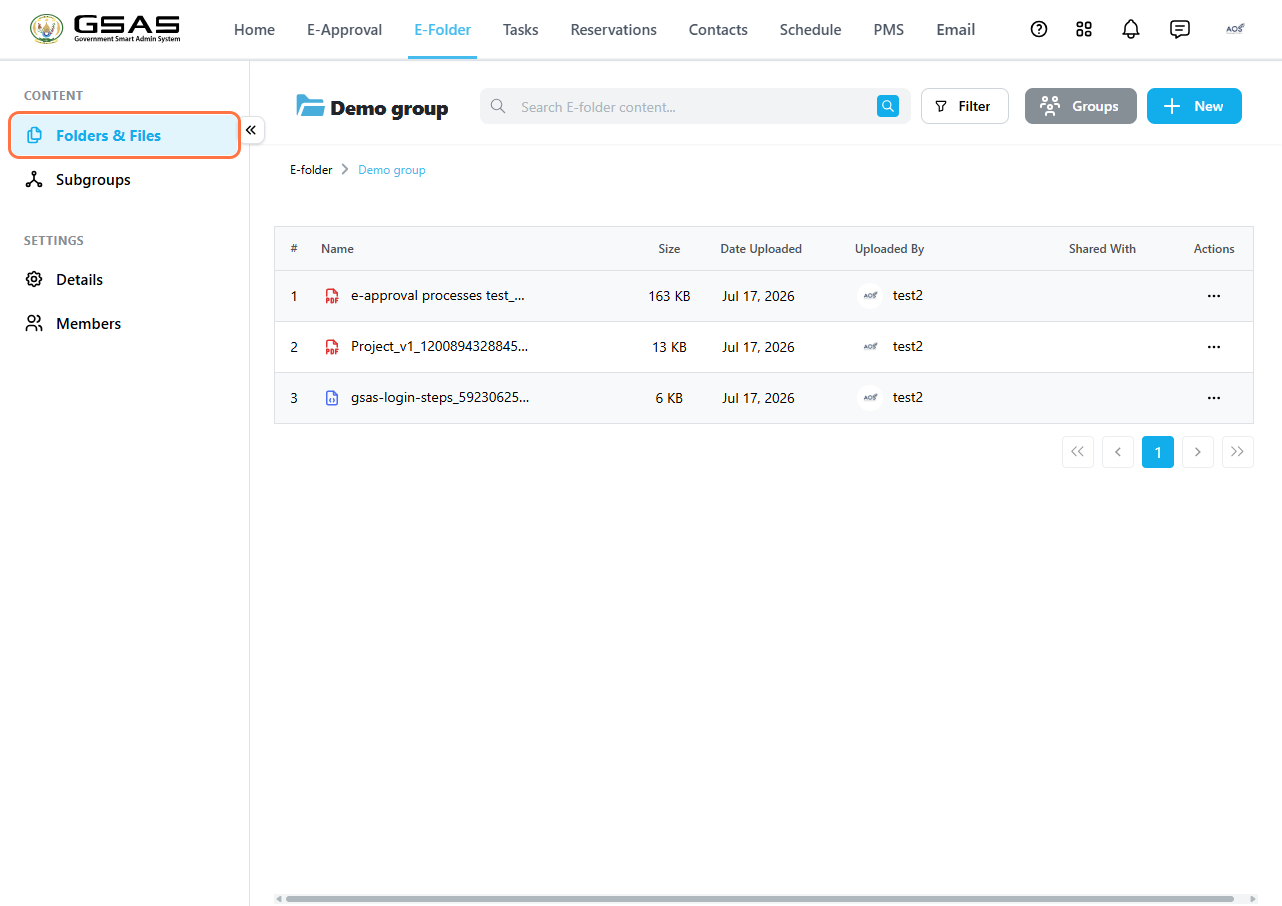](https://docs.smartadmin.rw/uploads/images/gallery/2026-07/ArBimage.png)
#### **Subgroups** — any subgroups nested under this group.
[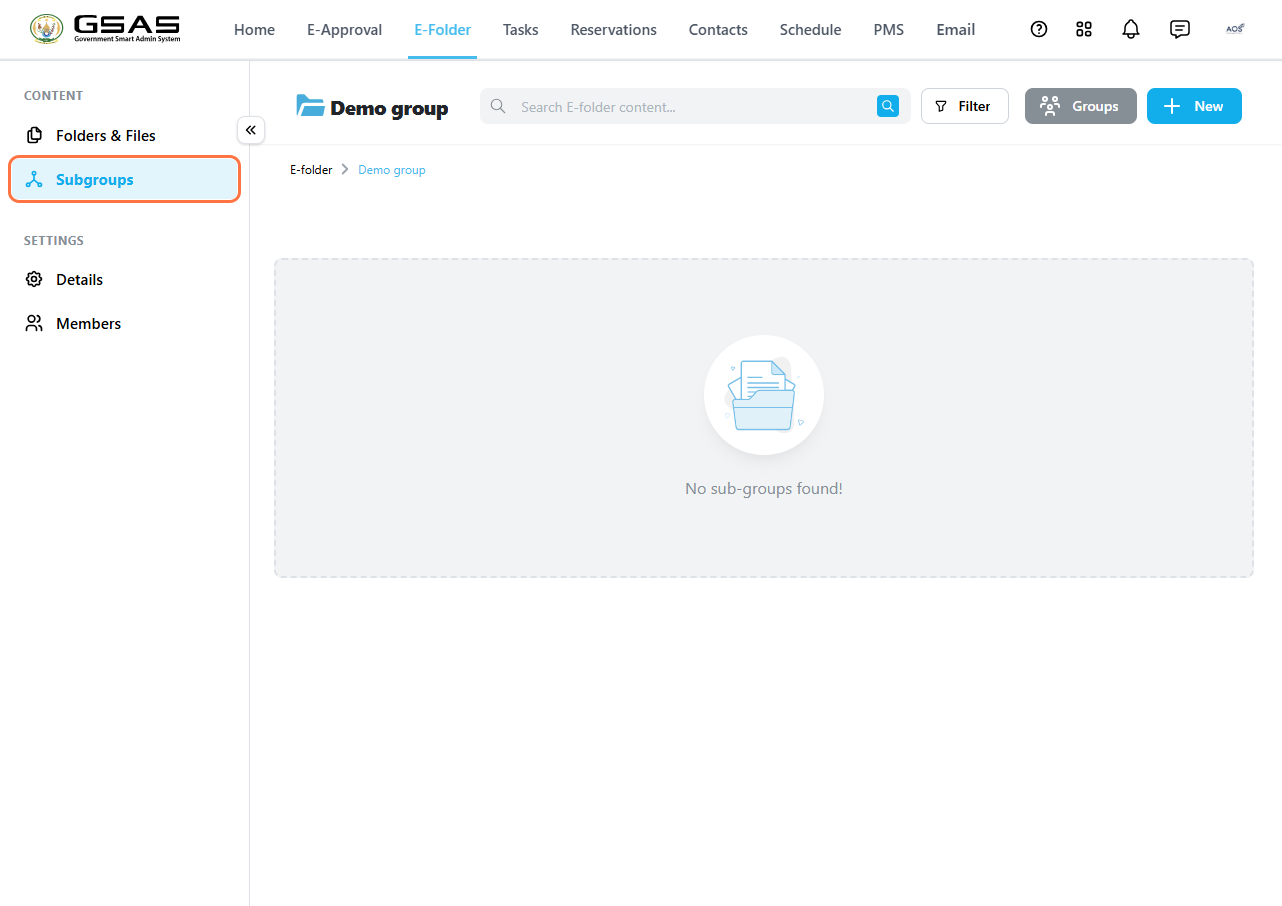](https://docs.smartadmin.rw/uploads/images/gallery/2026-07/1rUimage.png)
#### **Group details** — only the group creator can edit the group name and description, or delete the group.
[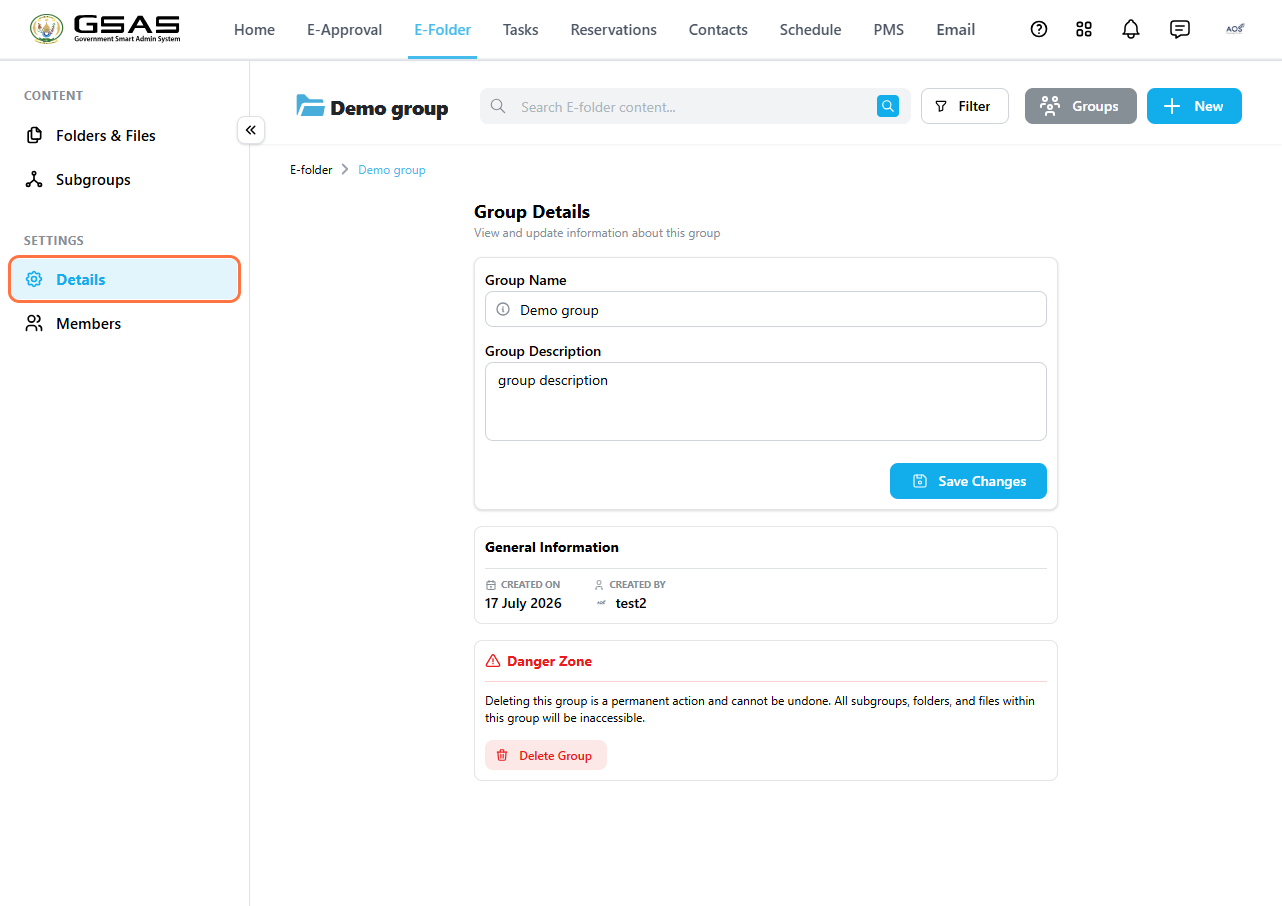](https://docs.smartadmin.rw/uploads/images/gallery/2026-07/9Fsimage.png)
**Members** — manage who is in the group and what they can do.
[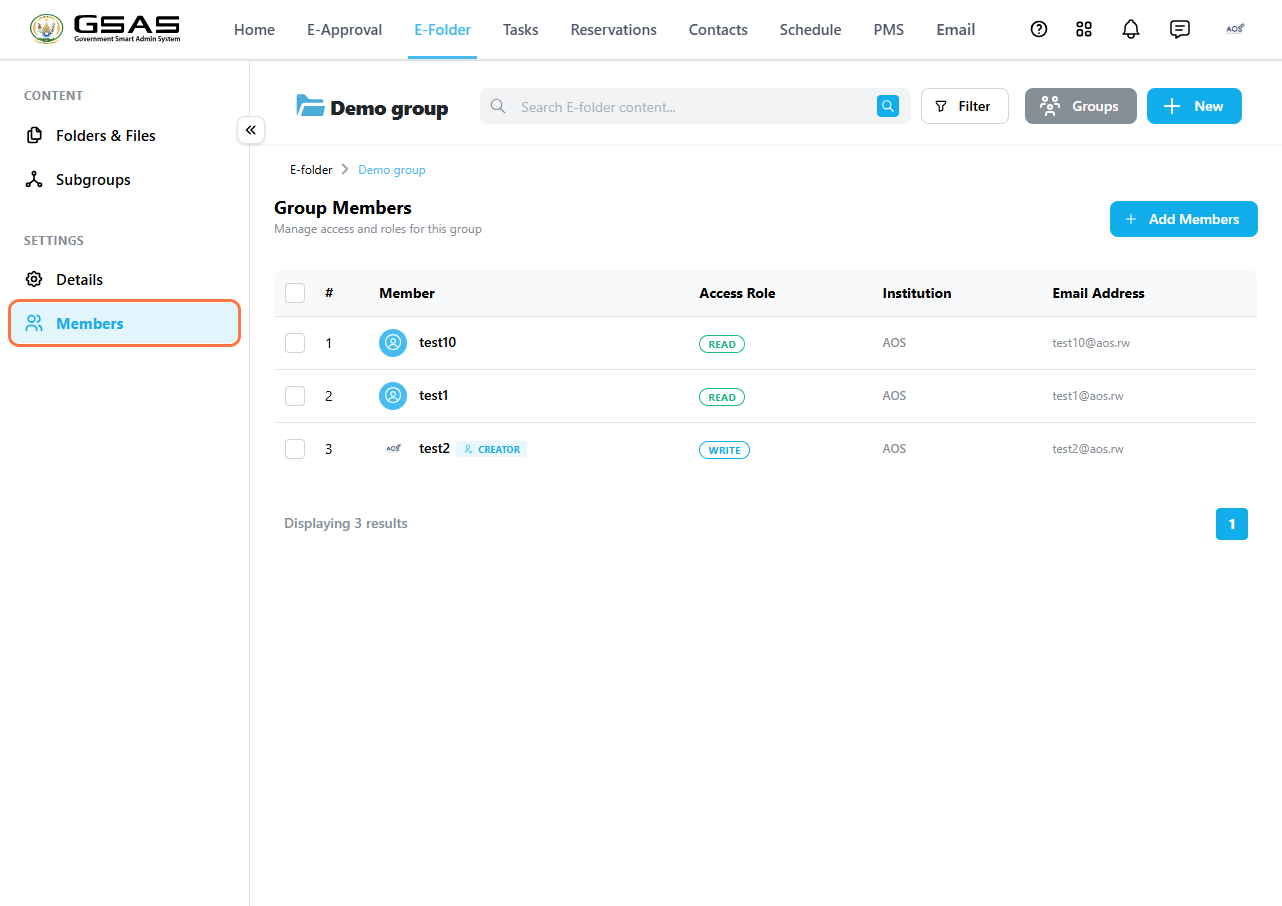](https://docs.smartadmin.rw/uploads/images/gallery/2026-07/UzRimage.png)
---
### Managing members
Click **Members** in the sidebar to see a list of all group members, their access role, institution, and email address.
1. To **add members**, click **+ Add Members** at the top right and search for users by name. [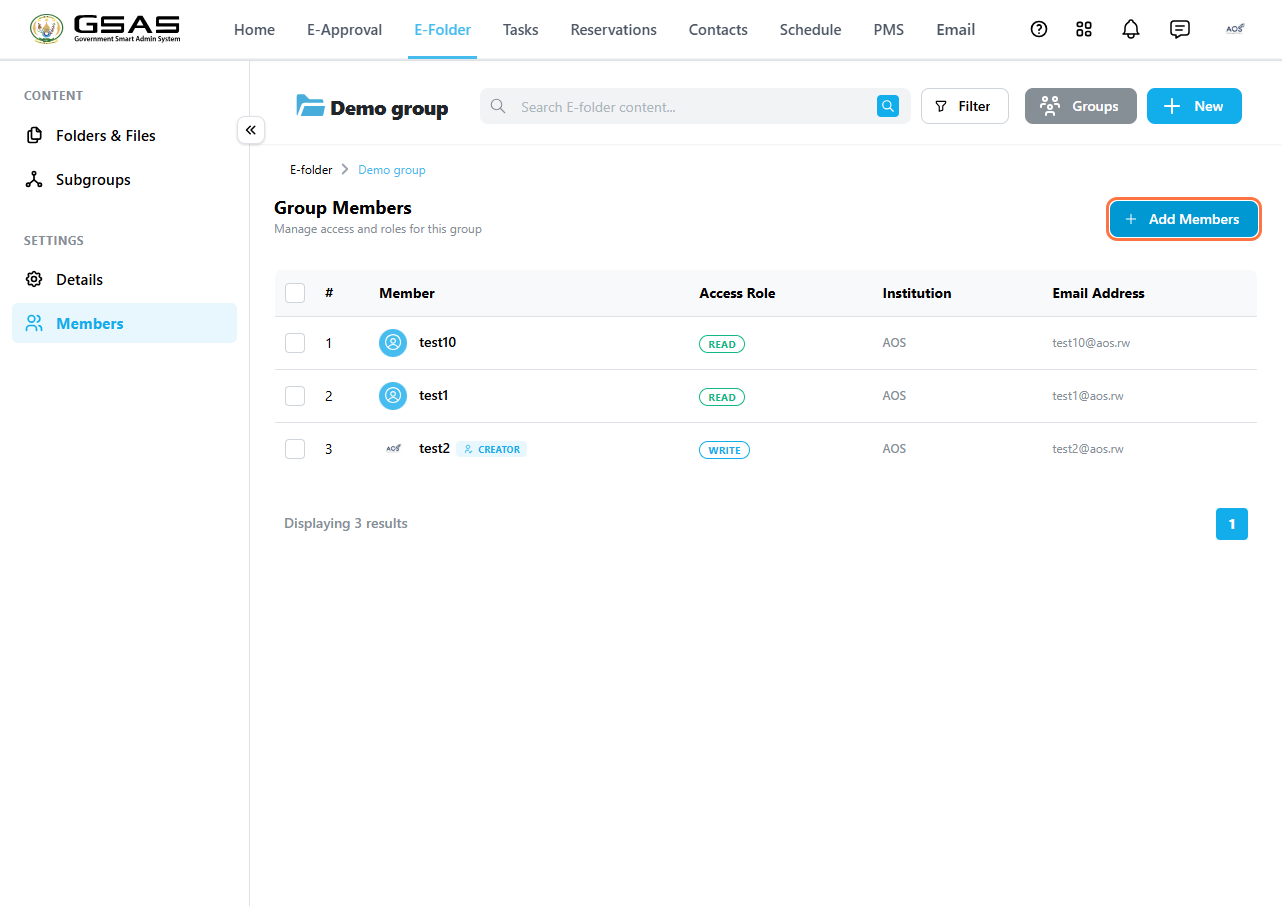](https://docs.smartadmin.rw/uploads/images/gallery/2026-07/siwimage.png)
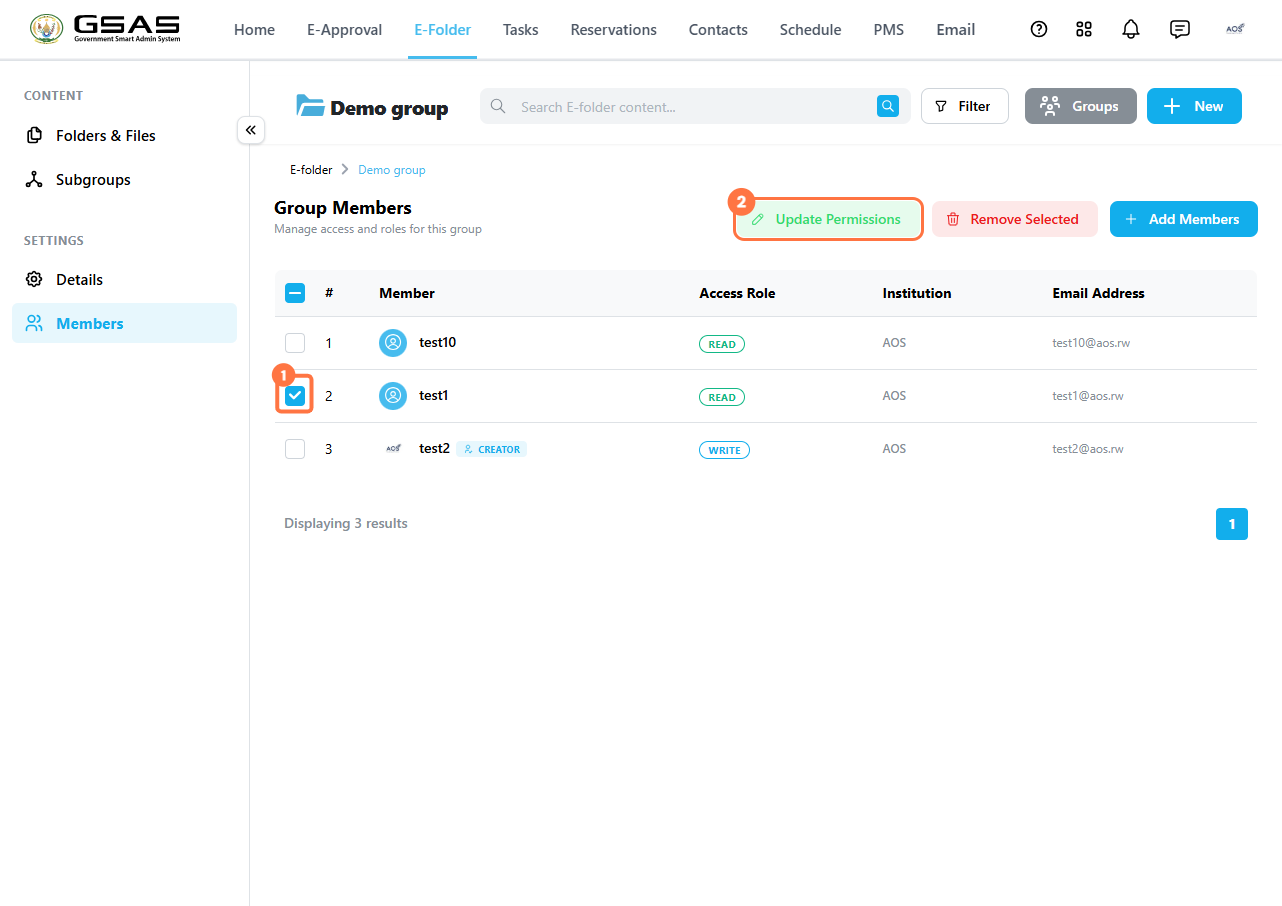
2. To update permissions, tick the checkbox next to one or more members and click **Update Permissions**. | **Note:** Members with **Read** access cannot modify files uploaded by others. To grant full access, update their permission to **Full Access**. |
[](https://docs.smartadmin.rw/uploads/images/gallery/2026-07/e9Bimage.png)
3. To remove members, tick the checkbox next to the member and click **Remove Selected**. [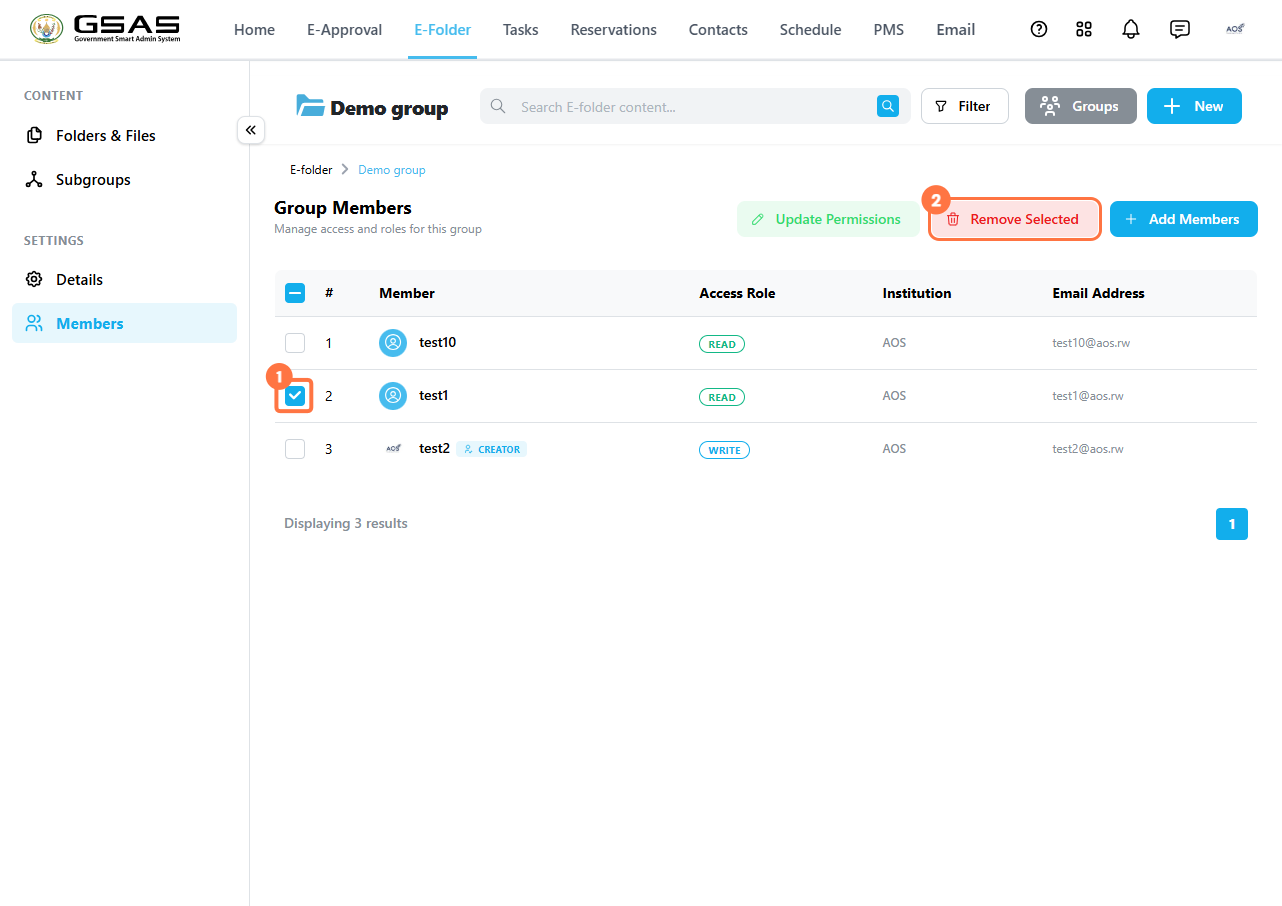](https://docs.smartadmin.rw/uploads/images/gallery/2026-07/mFyimage.png)
Removed members immediately lose access to the group and all its contents.
---
# Invite to Sign on PDF documents
---
This page explains how to submit a document from **E-Folder** for signing using **Invite to Sign**.
| **Before you begin:** The document must already be a PDF uploaded to **E-Folder**, in any folder or subfolder. Only the user who uploaded the document can invite others to sign it. |
Step 1
### Select the document
1. Go to **E-Folder** and find the document.
2. Click the **⋯** icon on the document row.
3. Click **Invite to sign**. [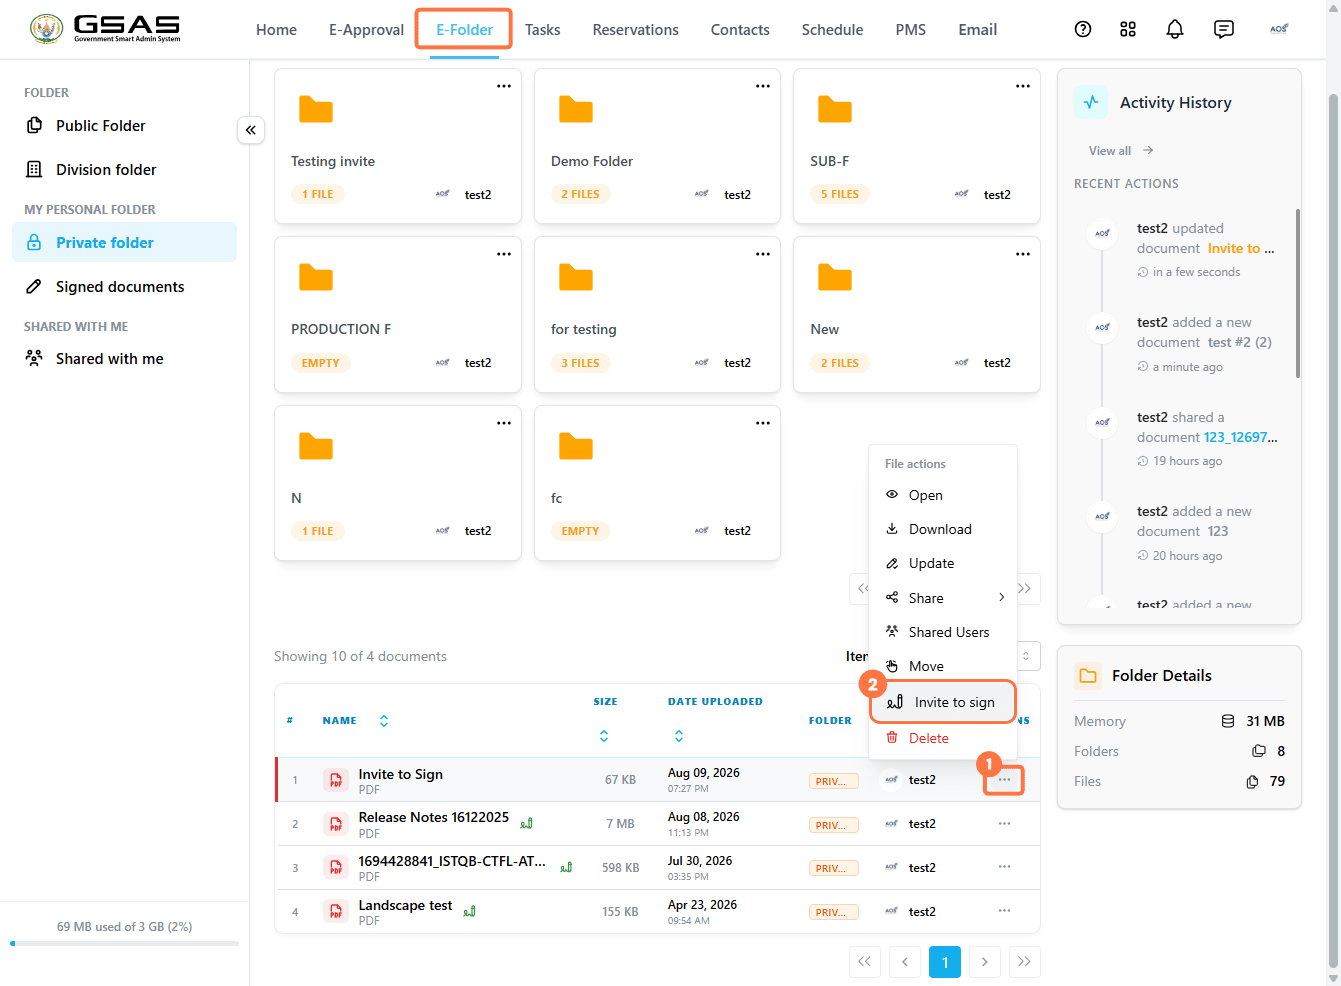](https://docs.smartadmin.rw/uploads/images/gallery/2026-08/jCYimage.png)
---
Step 2
### Place a signature field and assign it
The signature editor opens, with the **Signature Fields** panel on the left and the document on the right.
1. Drag the **Signature** field from the left panel onto the page where the signature should go. [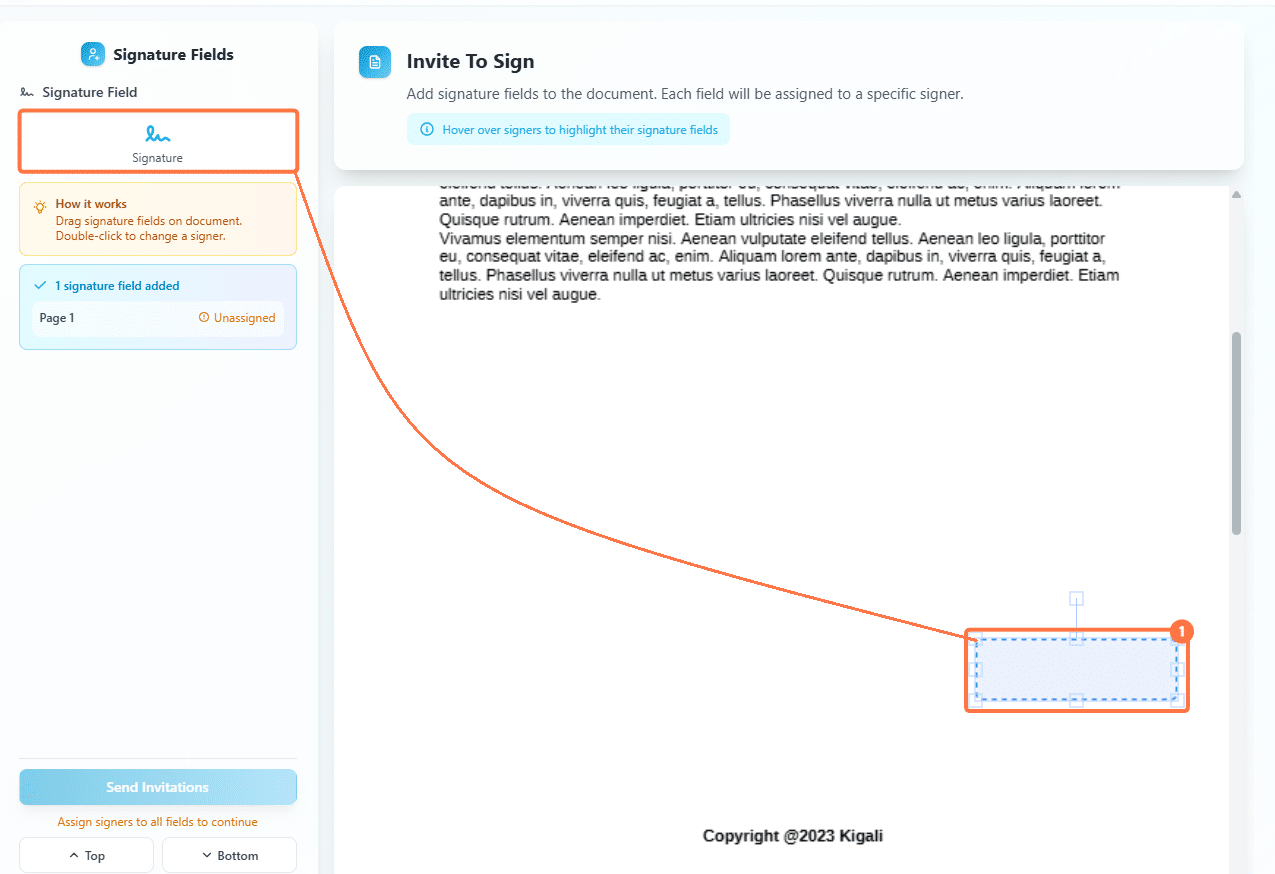](https://docs.smartadmin.rw/uploads/images/gallery/2026-08/EaCimage.png)
2. As soon as you drop the field, the **Signers** window opens automatically. Search for the user you want to assign and **Select** them. Only users in your own institution appear here. [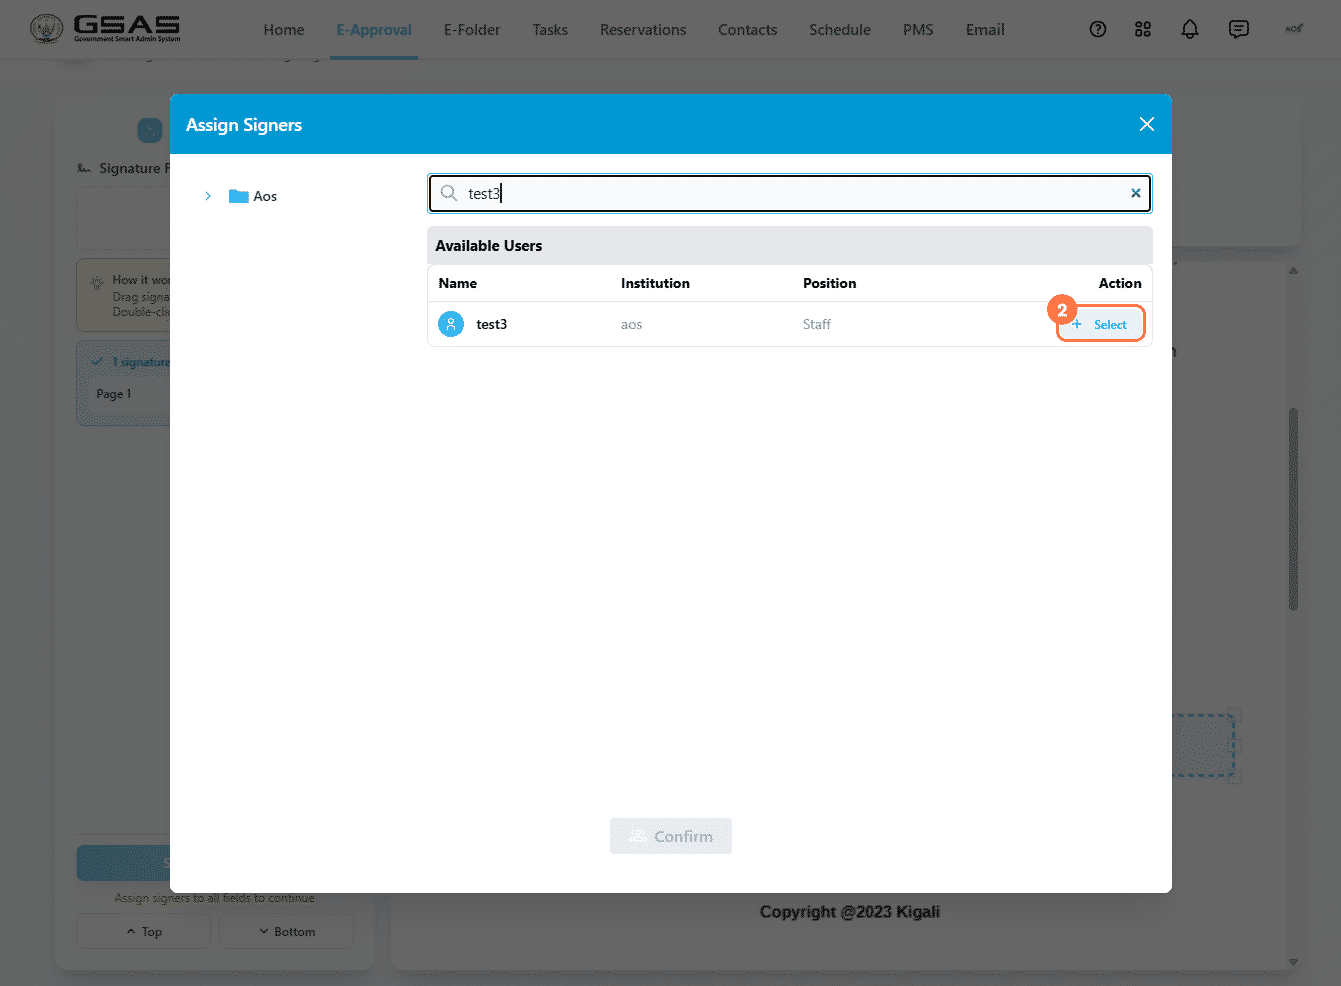](https://docs.smartadmin.rw/uploads/images/gallery/2026-08/nV4image.png)
3. Confirm they appear under **Selected Signer**, then click **Confirm**. [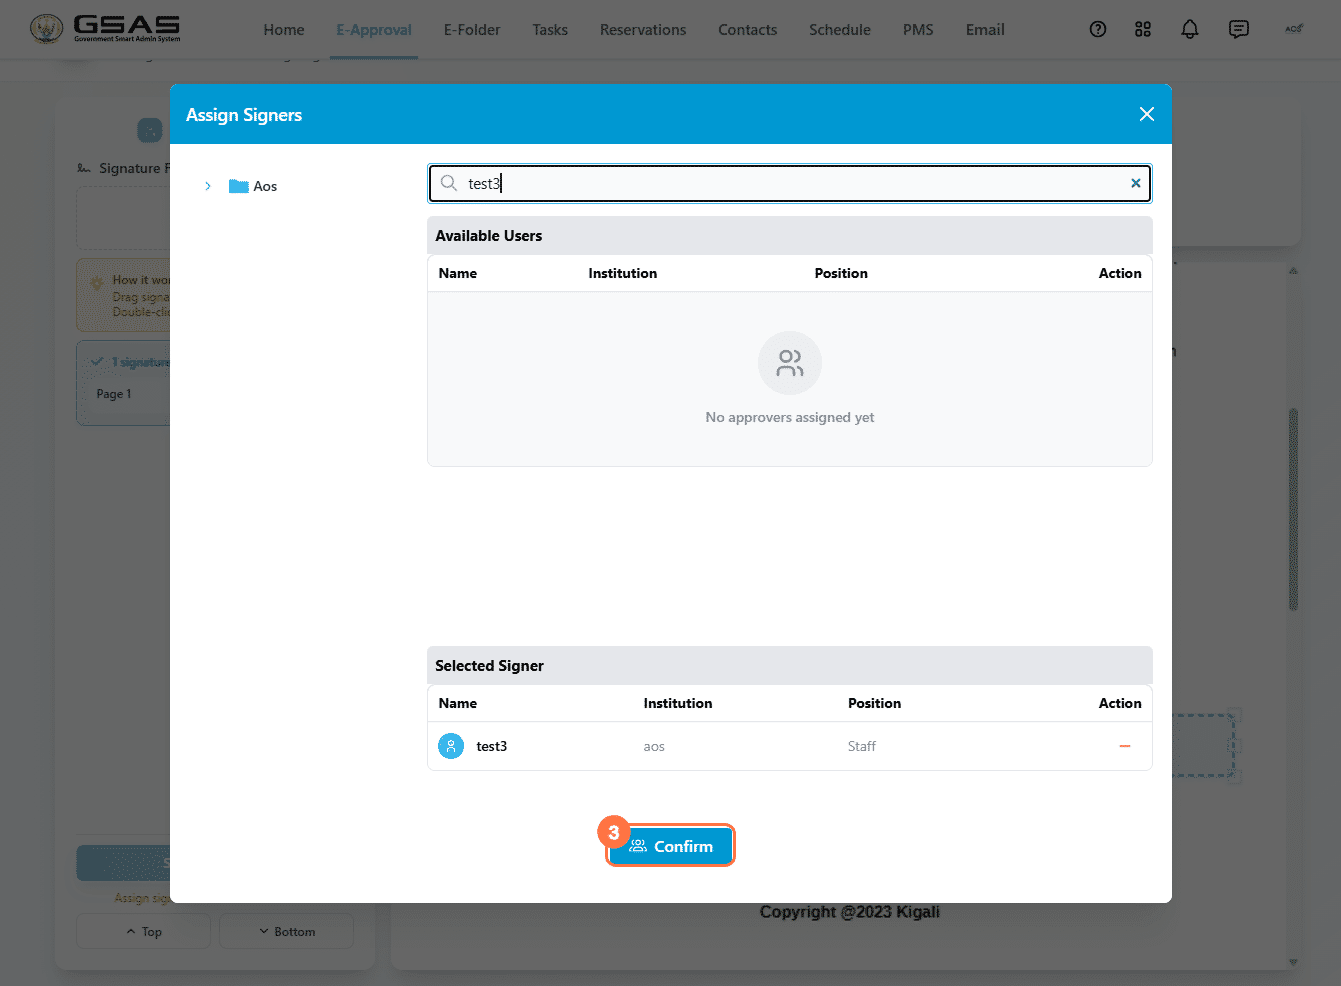](https://docs.smartadmin.rw/uploads/images/gallery/2026-08/2dGimage.png)
Repeat for every signer you need. You can place more than one signature field on the same page and if the same person needs to sign in more than one spot, just assign them to each field.
| **Signing order:** Signers sign in the order the fields were assigned, not the order they appear on the page. |
To change who a field is assigned to, double-click it and select a different user.
---
Step 3
### Send the request
Once every field has a signer assigned, click **Send Invitations**. The first signer is notified by email. As each signer completes their signature, the next signer in the order is notified automatically.
[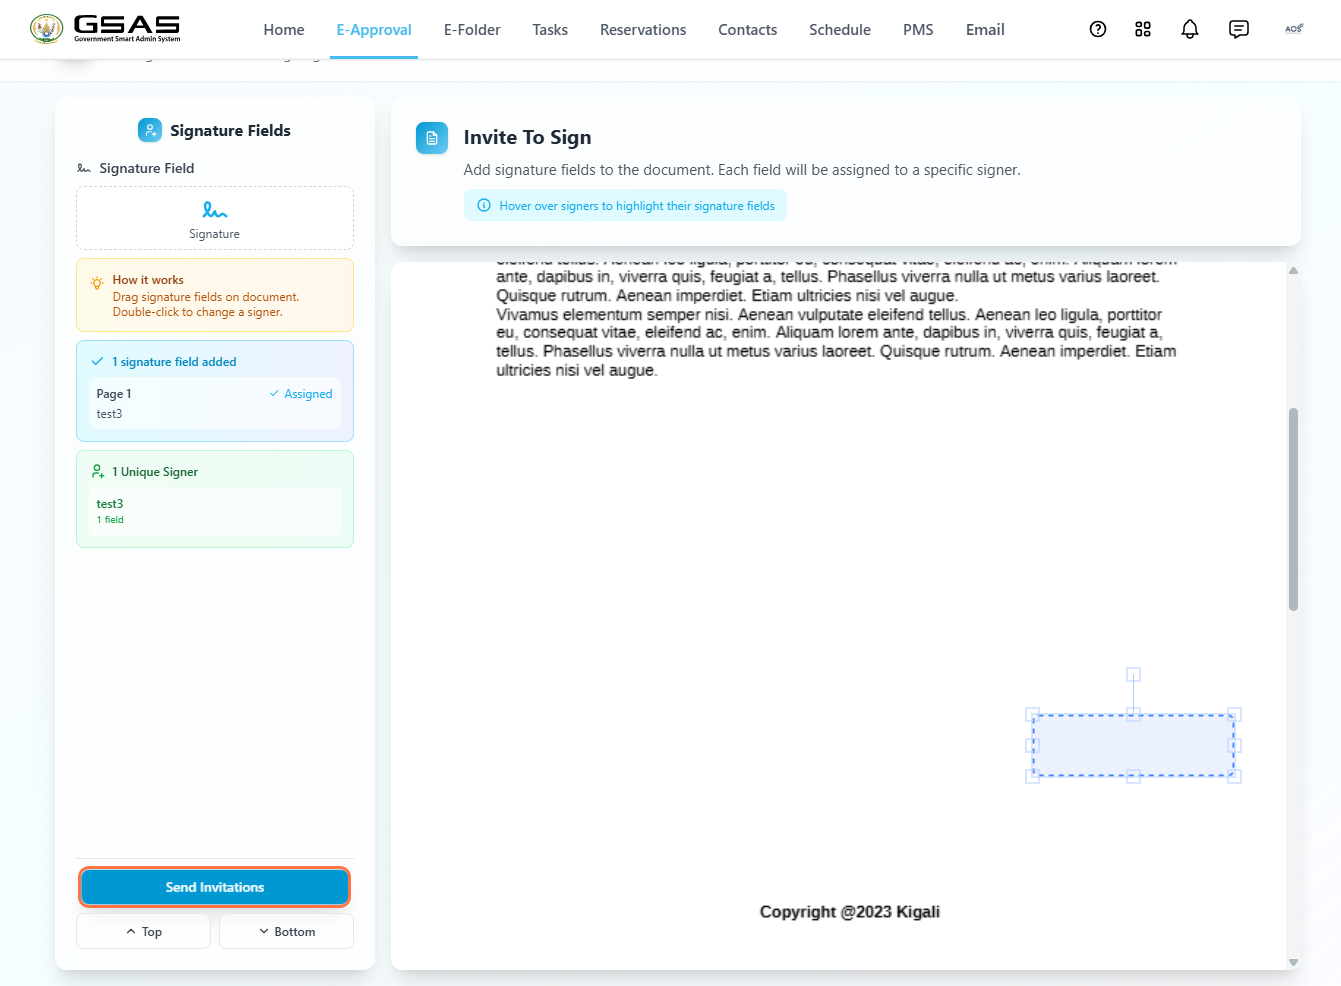](https://docs.smartadmin.rw/uploads/images/gallery/2026-08/Z2Jimage.png)
| **Note:** As soon as you send the invitations, the document appears in your **Submitted** folder in **e-Approval,** and in the **Signed documents** folder in **e-Folder.** |
---
Step 4
### Signing the document
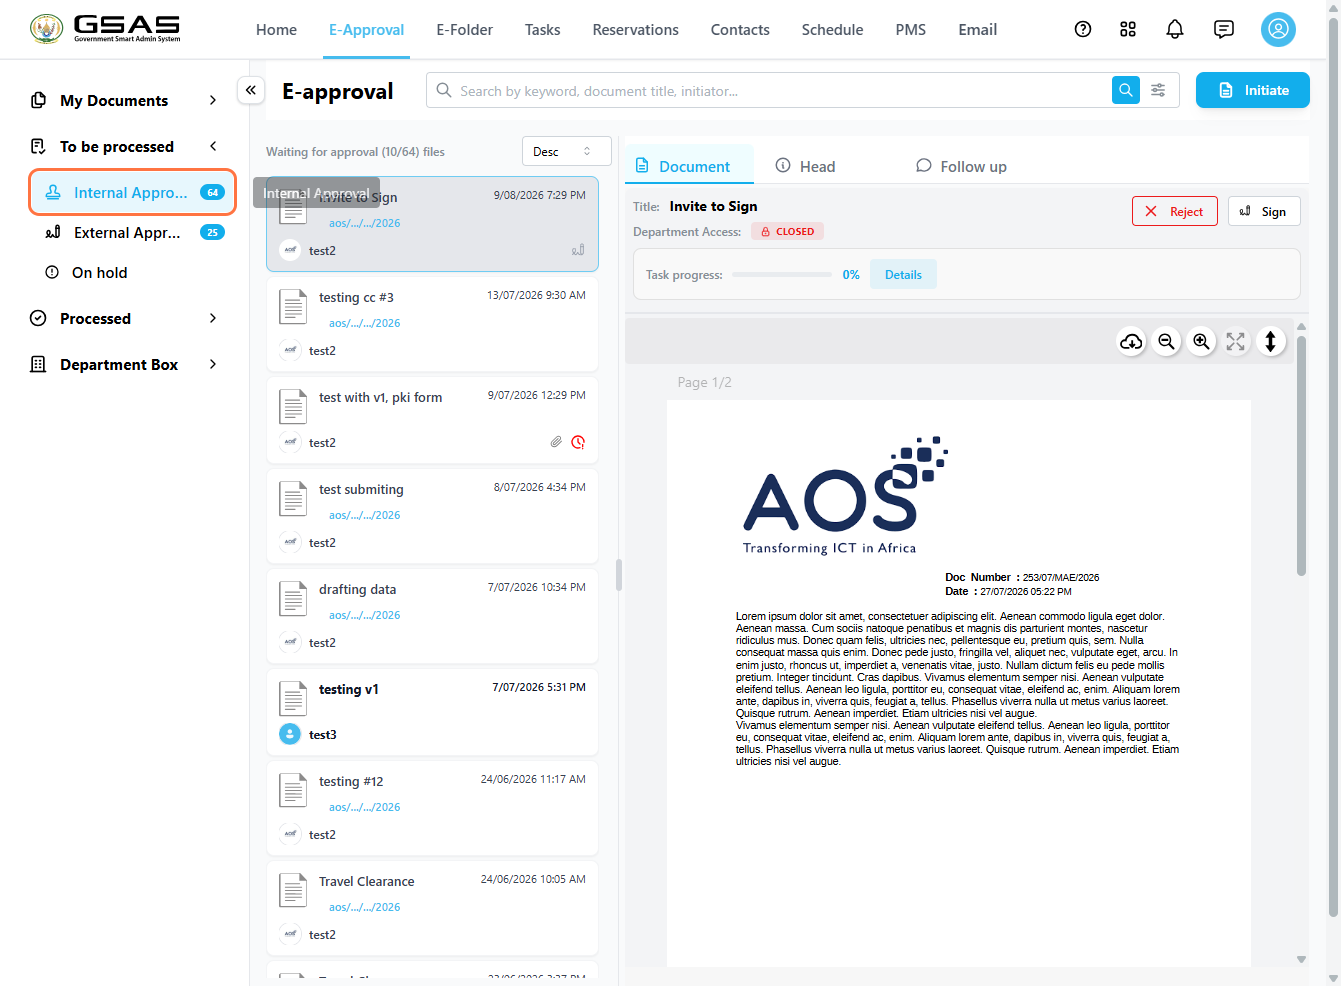
- Go to **E-Approval > Internal > To be processed**.
- Open the document.
- Click **Sign** to proceed, or **Reject** to decline.
[](https://docs.smartadmin.rw/uploads/images/gallery/2026-08/21Timage.png)
Clicking **Sign** opens the **Document Elements** panel, showing the list of signers and where each one stands (signed or pending). Drag your registered signature into the signature field placed for you.
[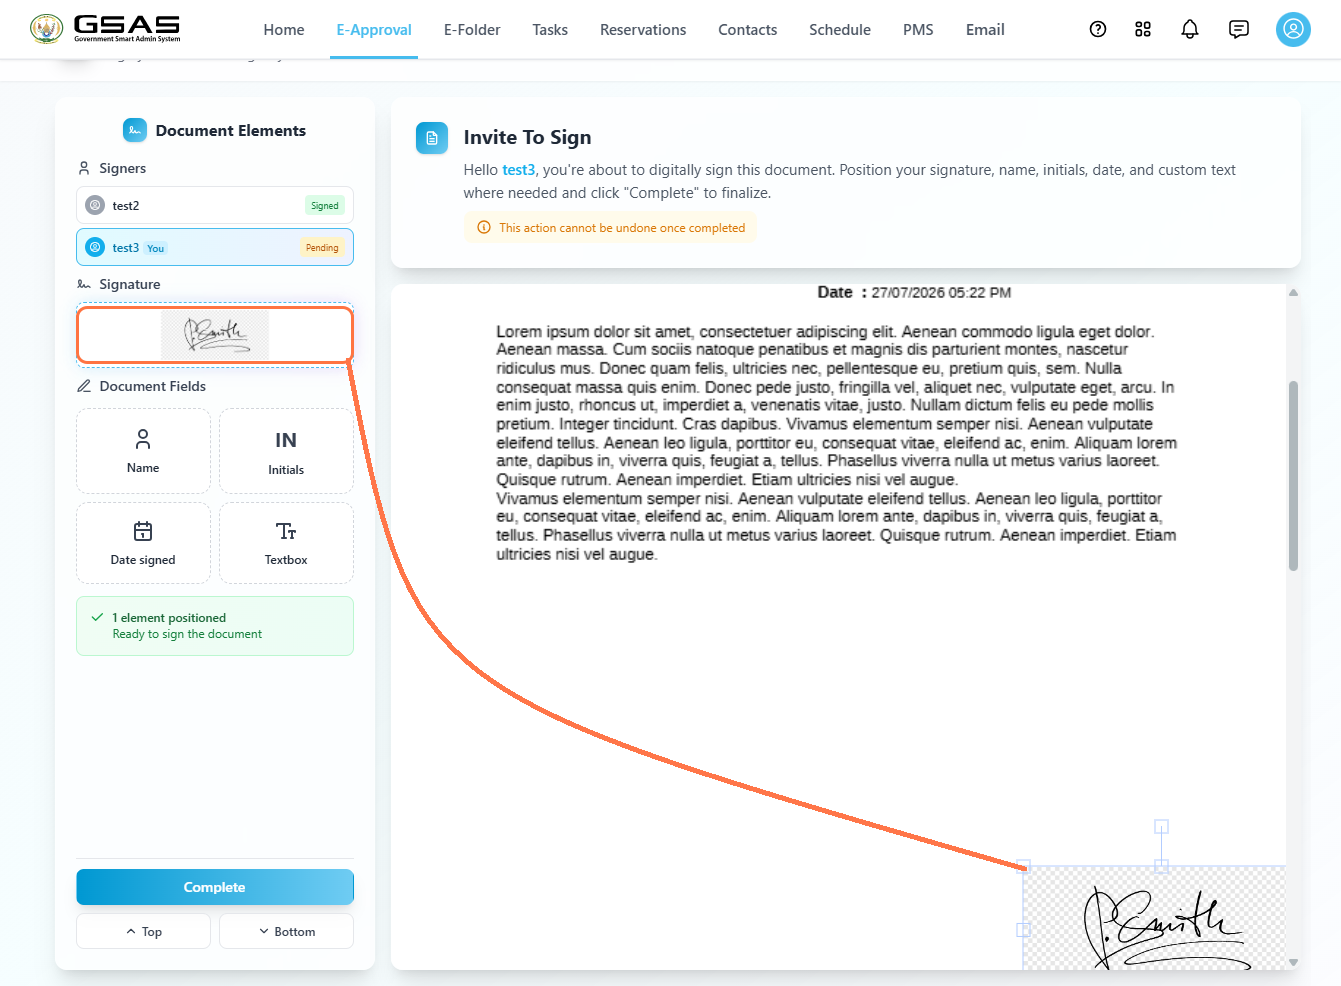](https://docs.smartadmin.rw/uploads/images/gallery/2026-08/fe63847d-3a86-4d85-9452-7fd2eb67f13e.png)
Once you're happy with the position, click **Complete**.
[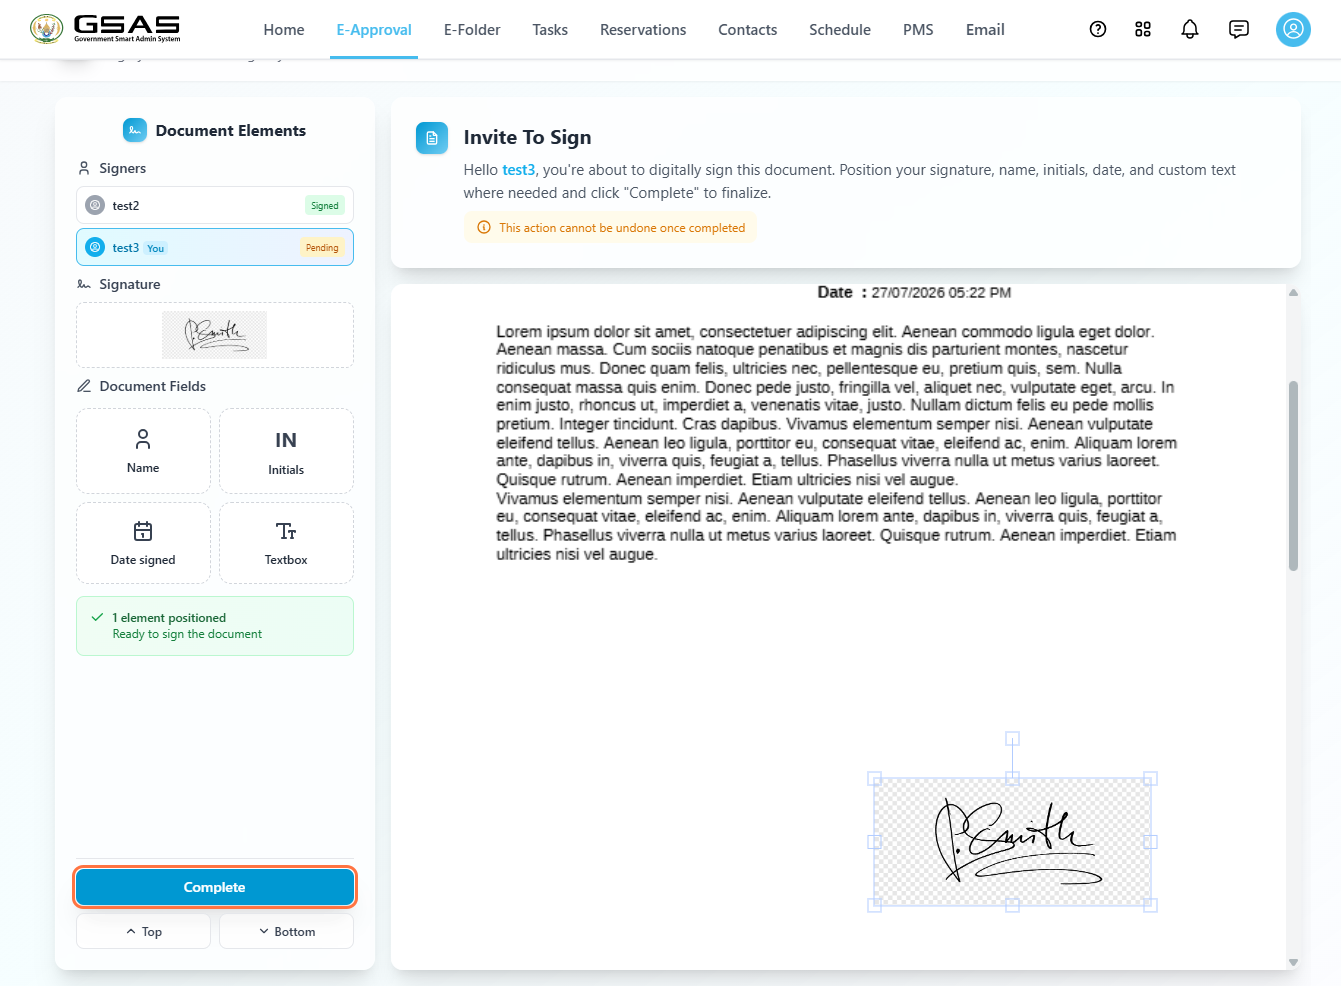](https://docs.smartadmin.rw/uploads/images/gallery/2026-08/EBsimage.png)
If you'd like, you can also drag optional **Document Fields** onto the page yourself; Name, Initials, Date signed, or a Textbox. These aren't required. Once you're done, click Complete.
| **Rejecting:** Clicking Reject sends the document back to the inviter's **Rejected** folder in E-Approval. |
---
Every user involved can track the document from **E-Approval**:
- **Inviter:** the document sits in **Submitted** from the moment invitations are sent, and moves to **Processed > Completed** once every signer has signed.
- **Signer :** the document sits in **To be processed > Internal Approval** as it awaits their approval.
- **Signer, after signing:** it moves to their **Ongoing** folder if there are signers after them, or to their **Completed** folder if they were the last signer.
The document is also saved in the inviter's **E-Folder > Signed documents**.
- Go to **E-Folder**.
- Under **My Personal Folder**, click **Signed documents**.
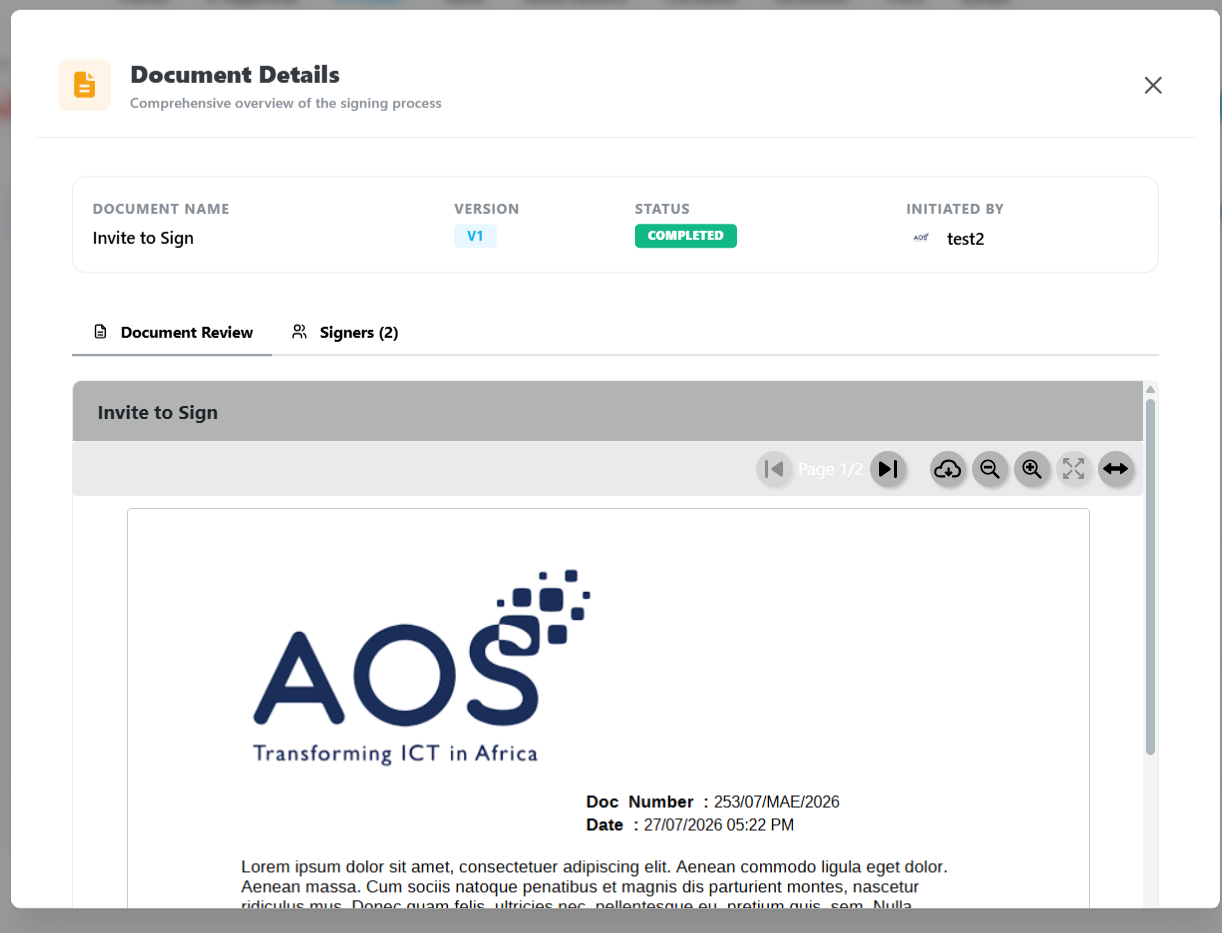
- Click **Details** next to the document to view it.
[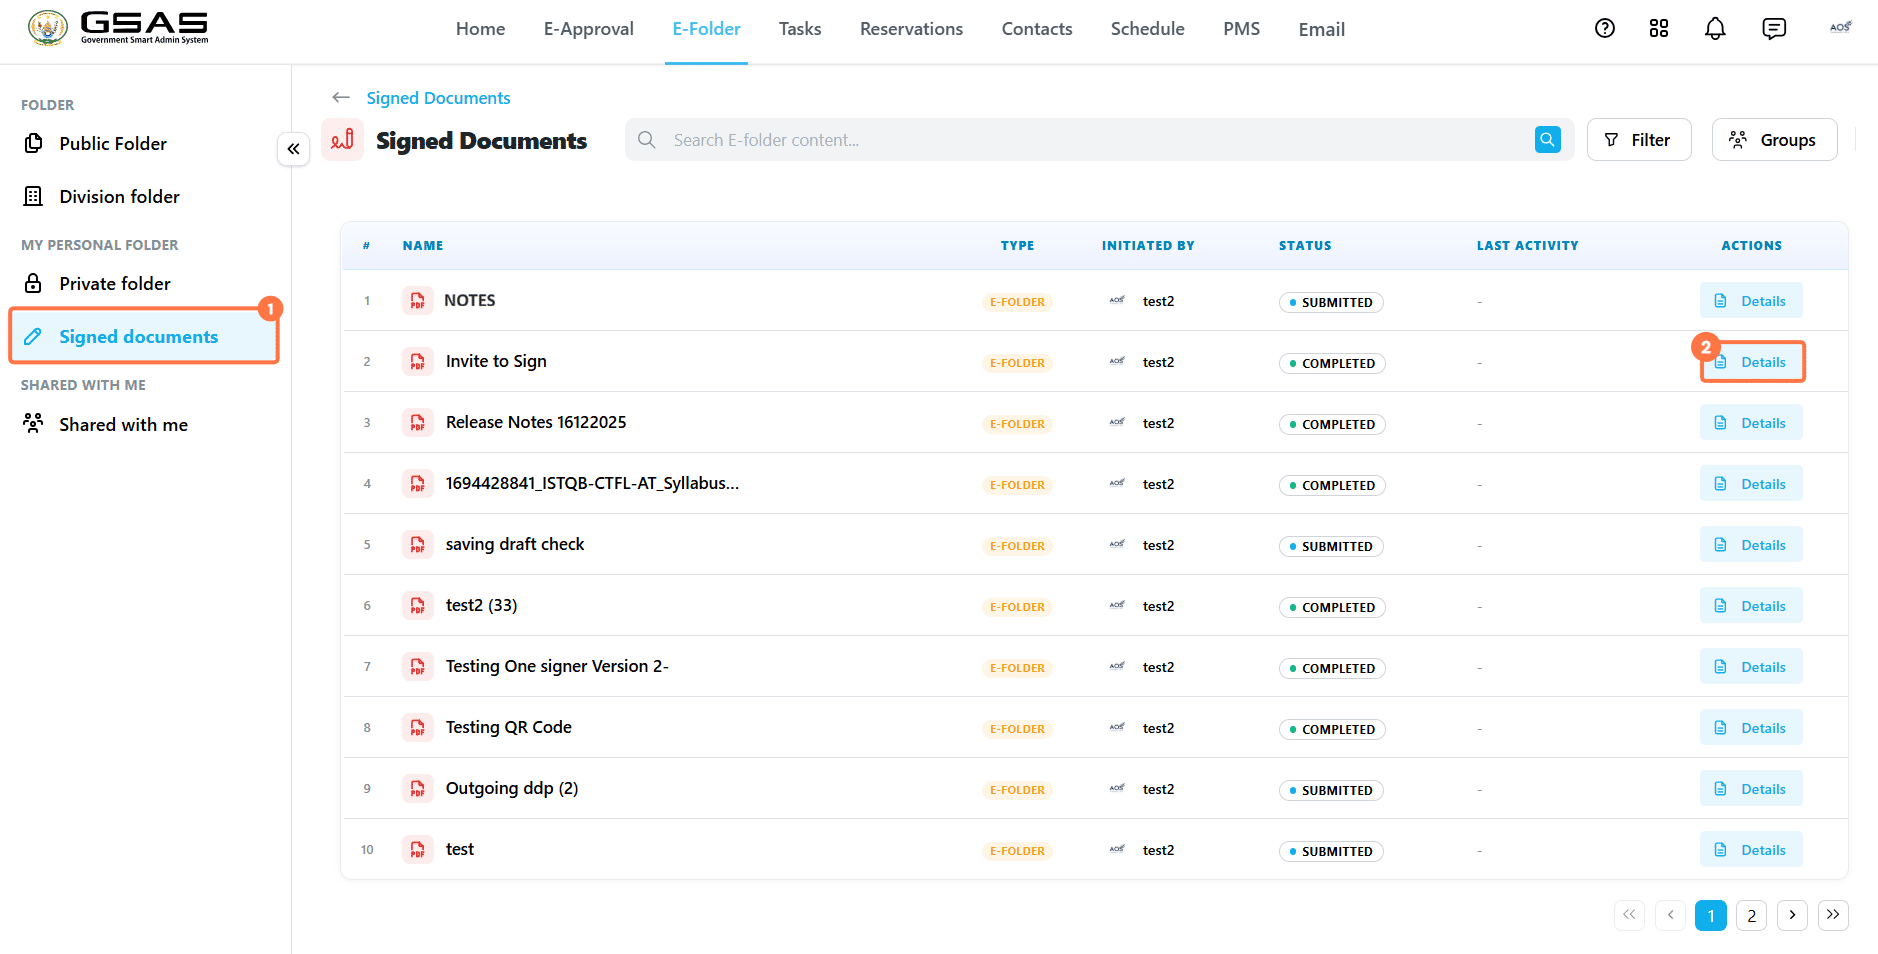](https://docs.smartadmin.rw/uploads/images/gallery/2026-08/nhEimage.png)
[](https://docs.smartadmin.rw/uploads/images/gallery/2026-08/QrDimage.png)
---
# Tasks
Create and delegate tasks and keep track of them. Learn to view, manage and respond to tasks assigned to you,
# Overview
---
The Tasks module helps you organize, assign, and track work across your institution. Every task belongs to a task project, and tasks are grouped based on whether they were assigned to you or created by you.
---
### Task Categories
| Category | Use it to |
|---|
| **Assigned To Me** | View and update tasks assigned to you by internal or external users. |
| **Initiated By Me** | Track task tasks you created or delegated to others. |
---
### How Tasks Connects to Other Modules
Tasks works with other GSAS modules:
- Projects created through **PMS** appear in Tasks with a **CREATED IN PMS** tag.
- Registered received documents from **e-Approval** can be shared as tasks.
- Task attachments can include files selected **From E-Folder**, so users do not need to re-upload documents already stored there.
| **Note:** Task projects named in the **Registered\_Received\_Year** format come from e-Approval and are covered in the [**Share as Task**](https://docs.smartadmin.rw/link/38#bkmrk-page-title) page. |
---
### Where to Go Next
- See **Tasks Dashboard** to understand the dashboard, filters, cards, charts, and task categories.
- See [**Responding to a Task**](https://docs.smartadmin.rw/link/44#bkmrk-page-title) to learn how to open a task and update progress.
- See [**Creating and Assigning Tasks**](https://docs.smartadmin.rw/link/43#bkmrk-page-title) to learn how to create projects, assign tasks, and upload tasks in bulk.
# Navigating Tasks
---
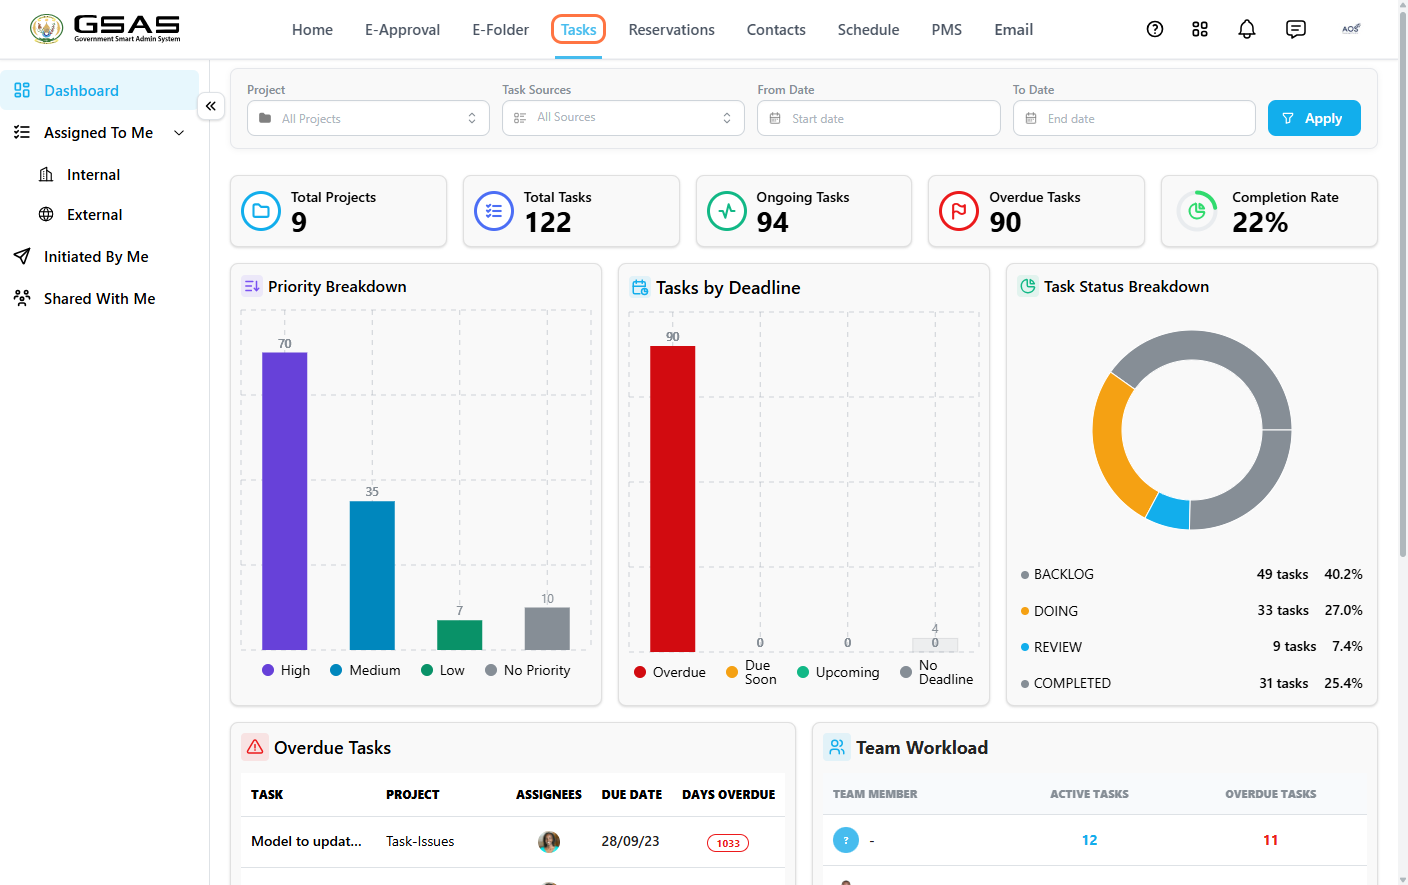
The Tasks dashboard gives you an overview of task projects, assigned work, deadlines, progress, and completion status.
Click **Tasks** in the main navigation menu.
[  ](https://docs.smartadmin.rw/uploads/images/gallery/2026-07/K7Gimage.png)
---
### Read the Dashboard
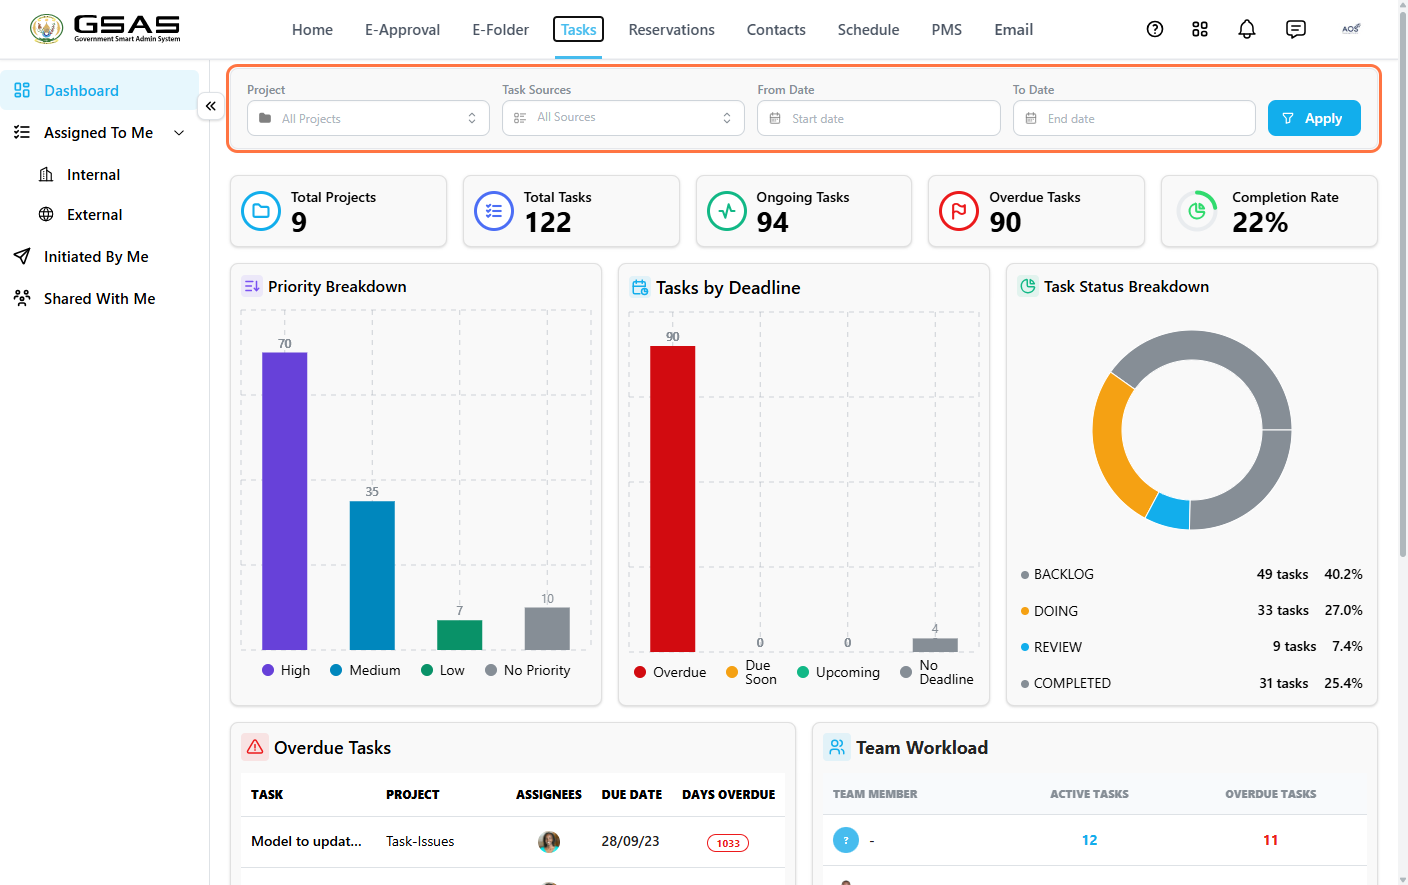
Use the filters at the top — **Project**, **Task Sources**, **From Date**, and **To Date** — to narrow the dashboard results, then click **Apply**.
[  ](https://docs.smartadmin.rw/uploads/images/gallery/2026-07/BpZimage.png)
The summary cards show the main task figures at a glance.
[ 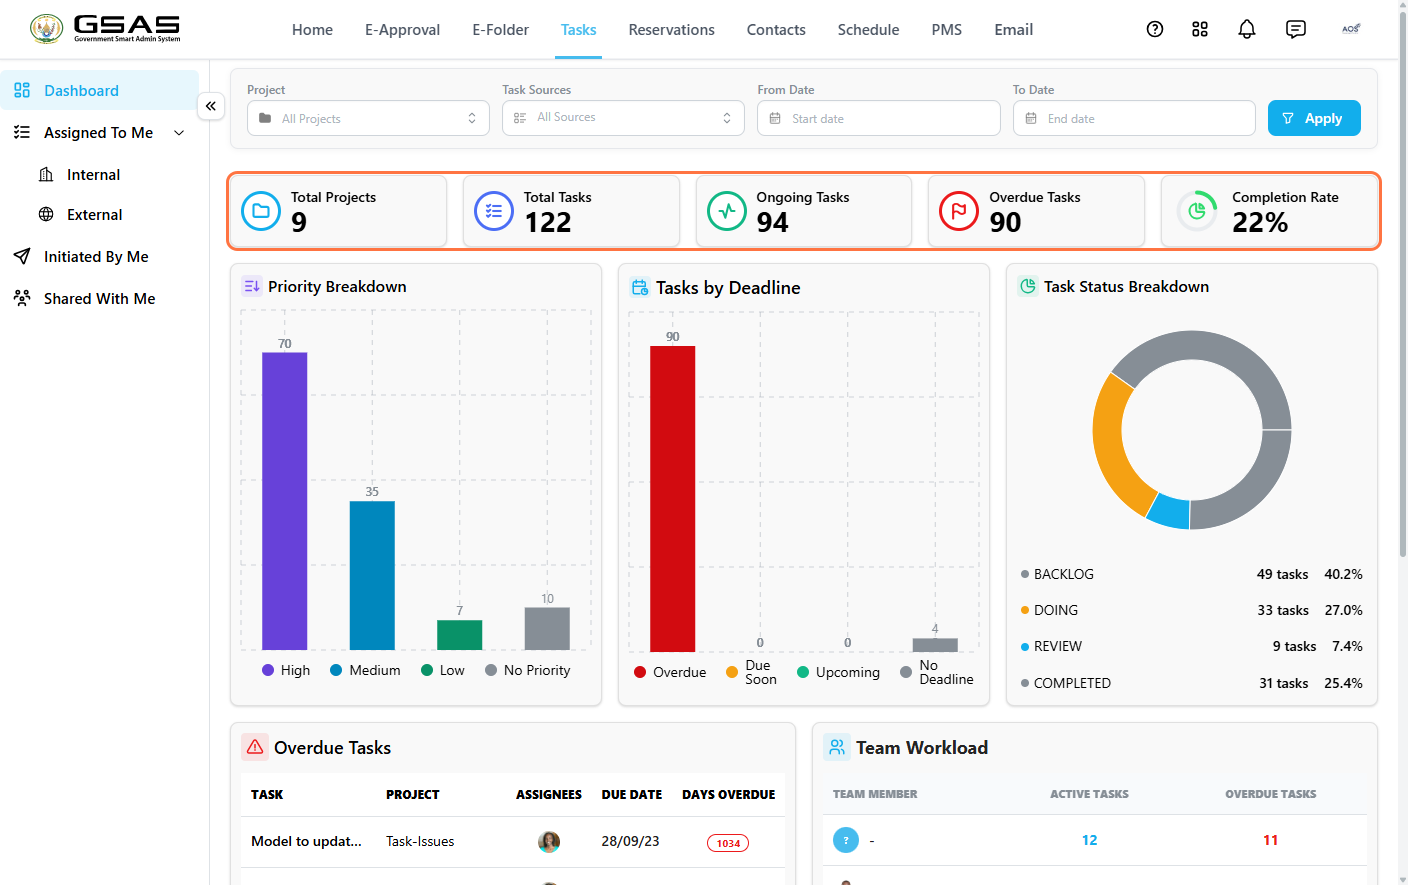 ](https://docs.smartadmin.rw/uploads/images/gallery/2026-07/yhDimage.png)
| Card | Shows |
|---|
| **Total Projects** | Number of active task projects. |
| **Total Tasks** | All tasks across those projects, including tasks assigned to you and tasks created by you. |
| **Ongoing Tasks** | Tasks currently in progress. |
| **Overdue Tasks** | Tasks past their due date. |
| **Completion Rate** | Percentage of tasks marked complete. |
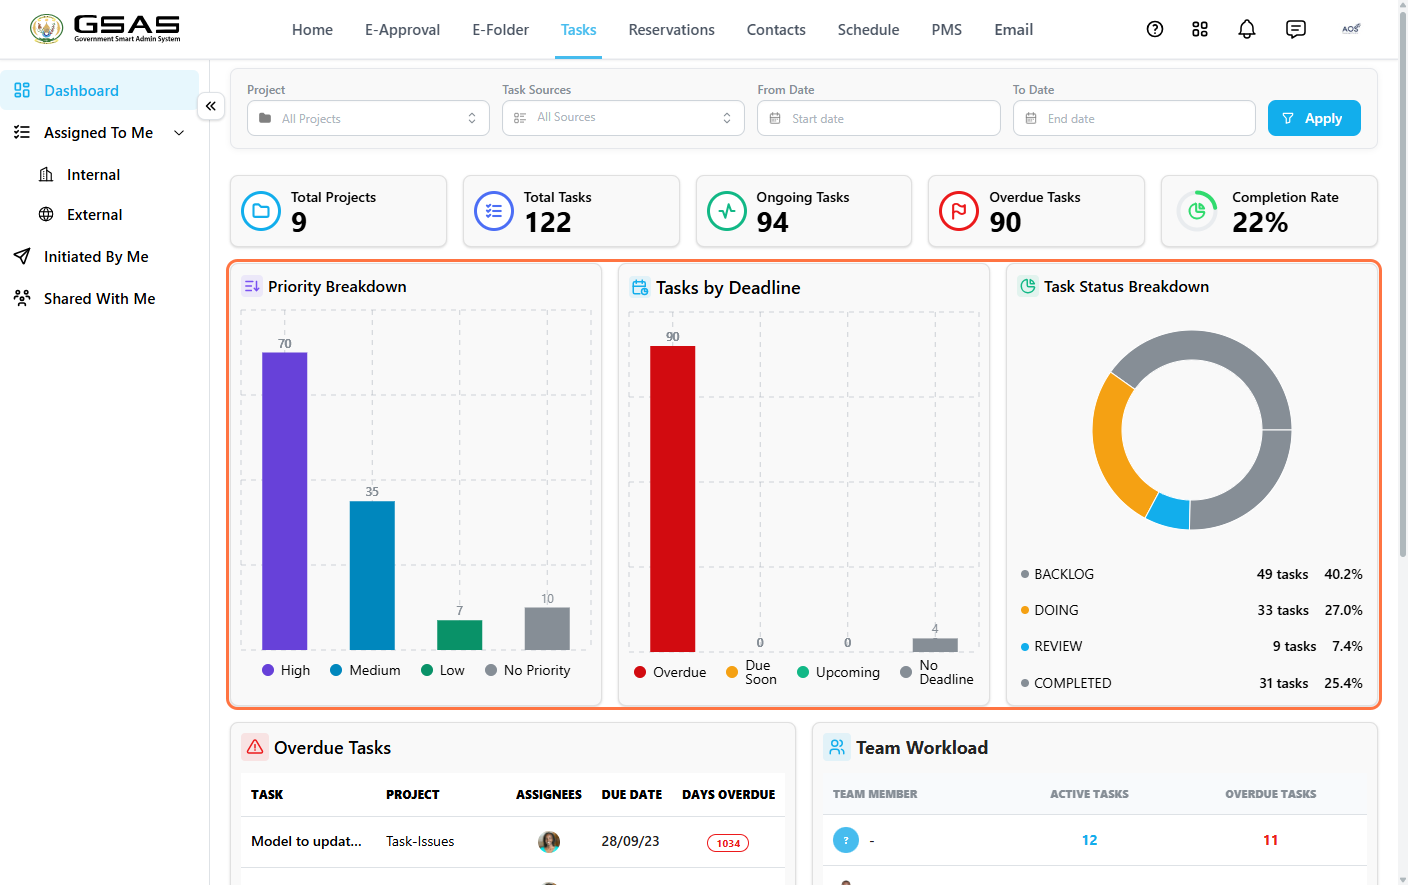
The charts show task distribution by priority, deadline, and status.
[  ](https://docs.smartadmin.rw/uploads/images/gallery/2026-07/ZQiimage.png)
| Chart | Shows |
|---|
| **Priority Breakdown** | How tasks are distributed across High, Medium, Low, and No Priority. |
| **Tasks by Deadline** | How many tasks are due, overdue, or have no deadline set. |
| **Task Status Breakdown** | How tasks are split across Backlog, Doing, Review, and Completed. |
---
### Task Categories
Tasks are grouped by origin. Tasks assigned to you appear under **Assigned To Me**, while task projects and tasks you created appear under **Initiated By Me**.
#### Assigned To Me
Use **Assigned To Me** to view tasks you are responsible for.
- Click **Assigned To Me → Internal** to view tasks assigned from within your institution.
- Click **Assigned To Me → External** to view tasks assigned by outside users.
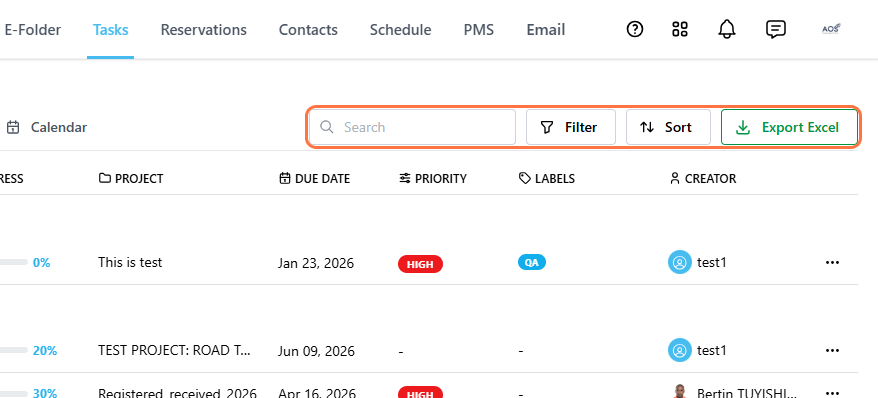
Use **Search**, **Filter**, and **Sort** to narrow the list, or click **Export Excel** to download it as a spreadsheet.
[  ](https://docs.smartadmin.rw/uploads/images/gallery/2026-07/91ded977-809f-40ff-9a1b-c1cefd2f40b4.png)
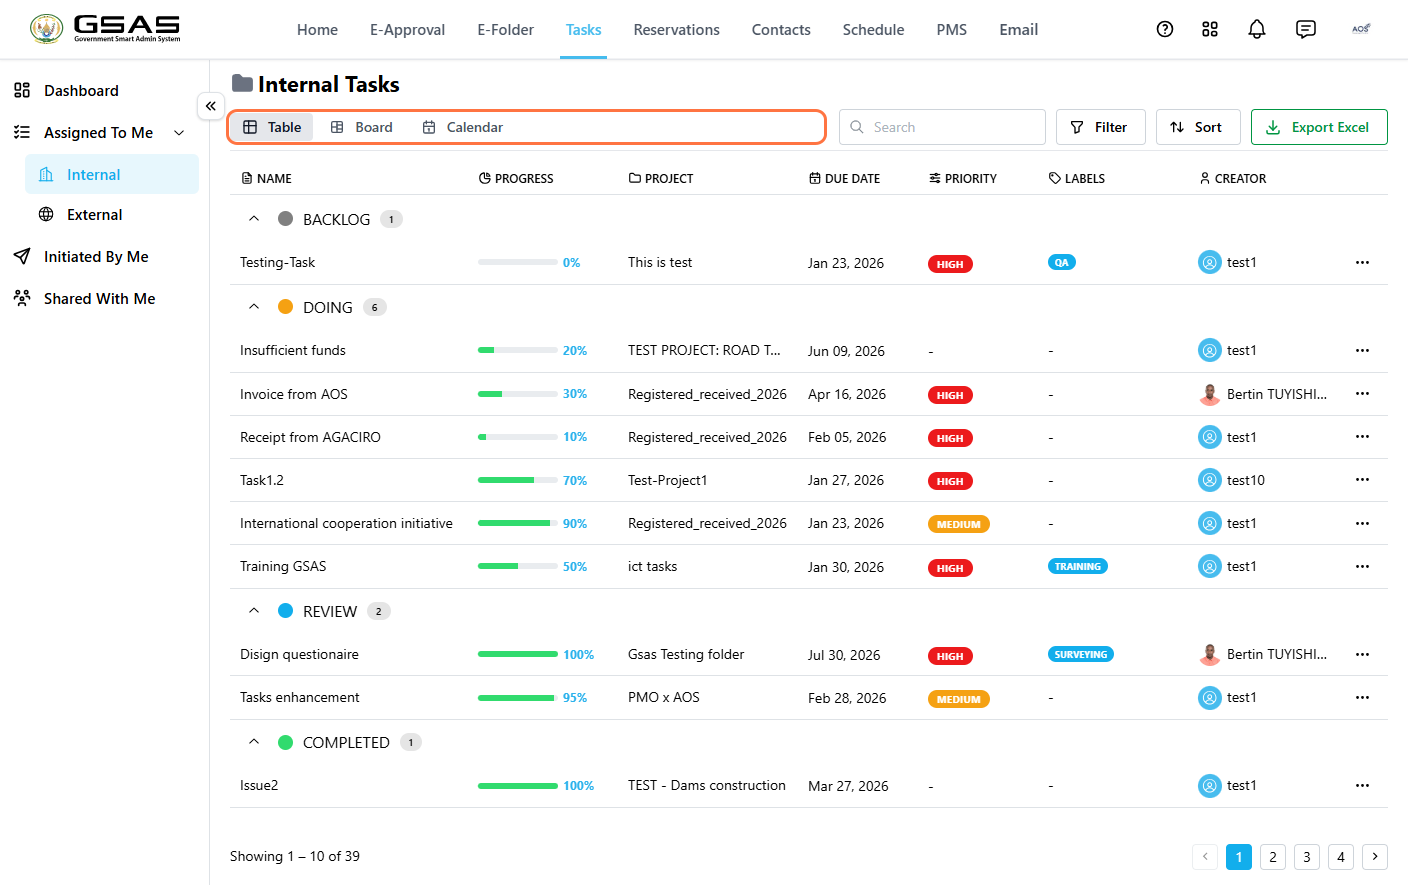
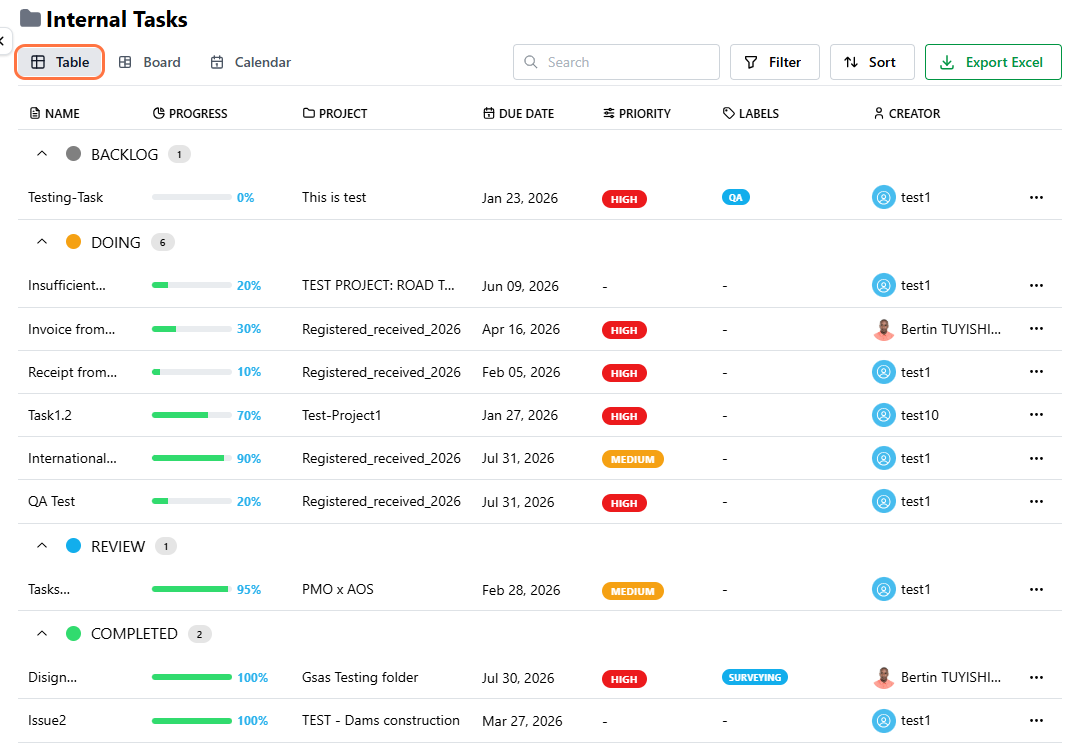
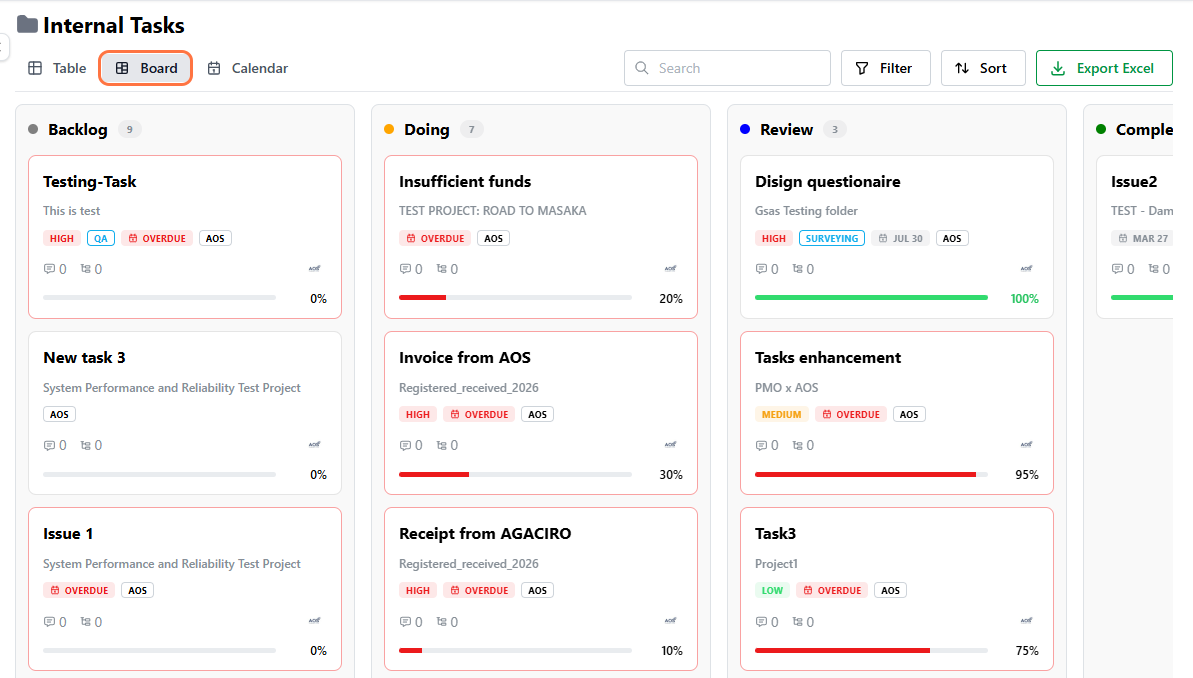
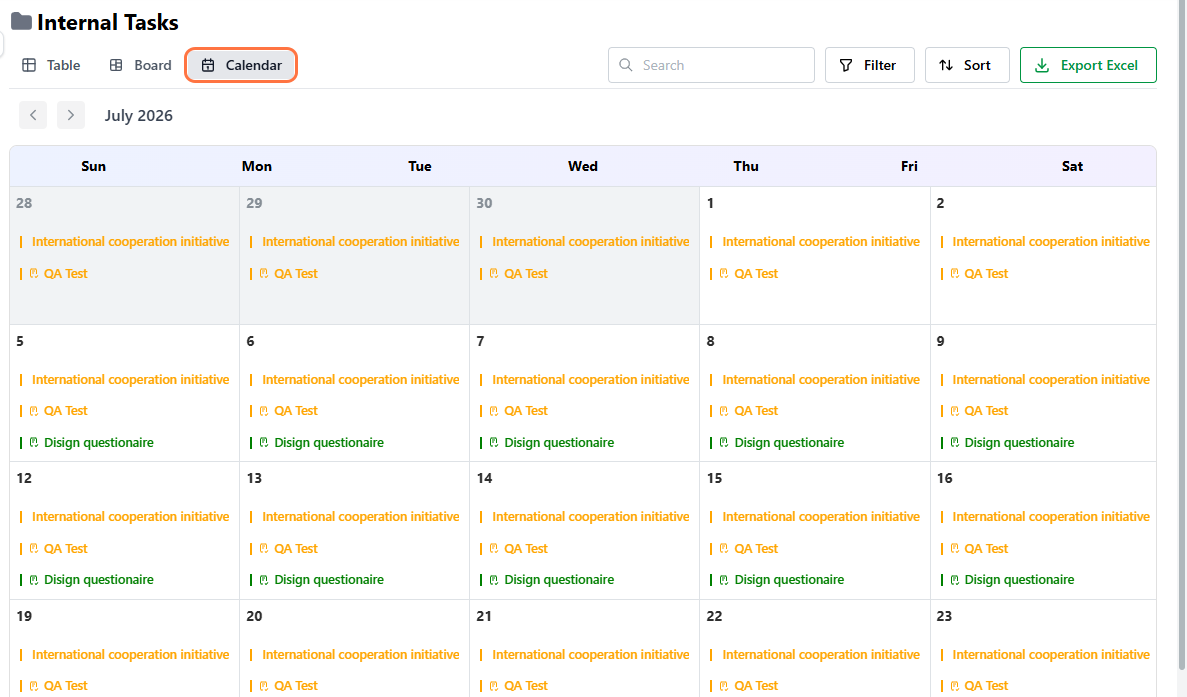
Assigned tasks can be viewed in three formats.
[  ](https://docs.smartadmin.rw/uploads/images/gallery/2026-07/Amgimage.png)
| View | Use it to |
|---|
| **Table** | View a detailed task list with sortable columns. |
| **Board** | Track task progress across Backlog, Doing, Review, and Completed. You can drag a task between columns to update its status. |
| **Calendar** | View tasks by scheduled dates, deadlines, and durations. |
[  ](https://docs.smartadmin.rw/uploads/images/gallery/2026-07/X7kd949bbc8-7f6a-4b85-b214-c2fa51121597.png)
[  ](https://docs.smartadmin.rw/uploads/images/gallery/2026-07/eab7fd1d-7b40-4ff0-9aa3-c608ba44d9e3.png)
[  ](https://docs.smartadmin.rw/uploads/images/gallery/2026-07/tE5a86379cf-ee54-429c-b2b2-8d96e667b1f5.png)
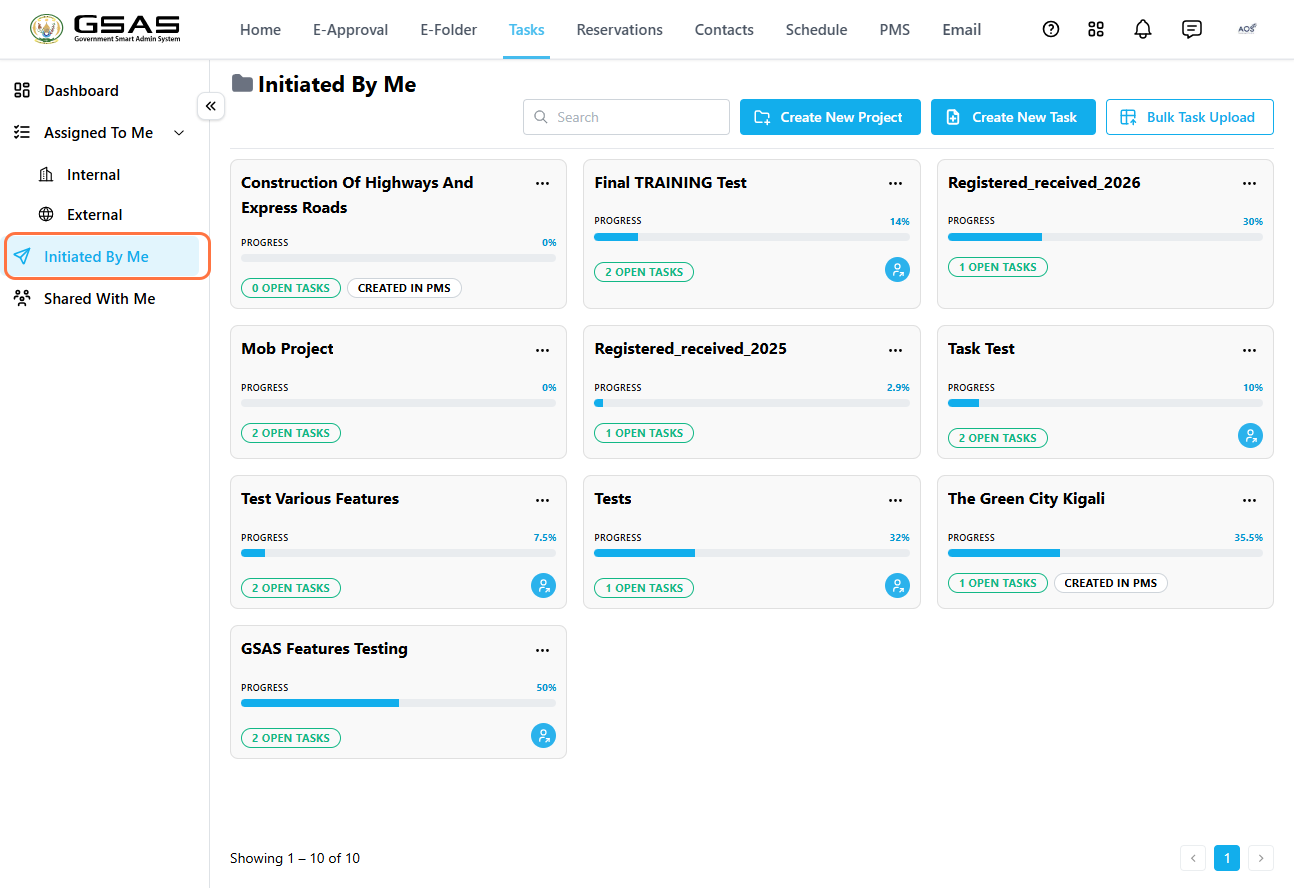
#### Initiated By Me
Use **Initiated By Me** to view task projects and tasks you created or delegated to others. Each project card shows its progress, the number of open tasks, and any relevant source tag such as **CREATED IN PMS**.
[  ](https://docs.smartadmin.rw/uploads/images/gallery/2026-07/e3qimage.png)
| **Note:** Task projects named in the **Registered\_Received\_Year** format come from e-Approval and are covered in the [**Share as Task**](https://docs.smartadmin.rw/link/38#bkmrk-page-title) page. |
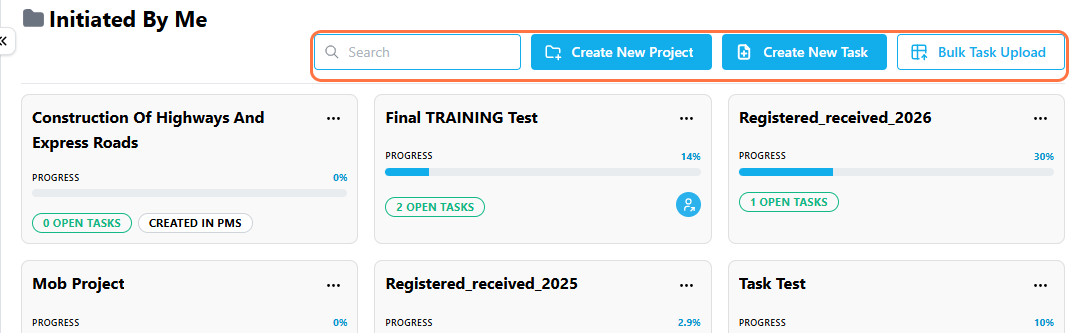
Use **Create New Project**, **Create New Task**, or **Bulk Task Upload** to add new work. Use **Search** to find a specific task project or task.
[  ](https://docs.smartadmin.rw/uploads/images/gallery/2026-07/2bc637f4-ab55-446c-8547-17162a1da619.png)
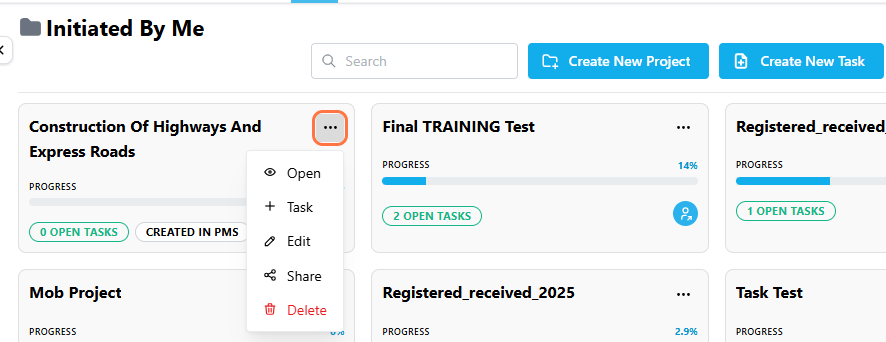
Click a task project title to open it. Click the **…** icon on a project card to access more options, including **Add Task**, **Edit**, **Share**, and **Delete**.
[  ](https://docs.smartadmin.rw/uploads/images/gallery/2026-07/ec35a757-ae98-44e5-85fa-4247dcc731cf.png)
# Creating and Assigning Tasks
Use **Initiated By Me** to create task projects, add tasks, assign users, and organize work with due dates, priorities, labels, and subtasks.
| **Before you begin:** A task must belong to a task project. If the project does not already exist, create the project first. |
### Create a Task Project
1. Go to **Tasks**.
2. Click **Initiated By Me**. [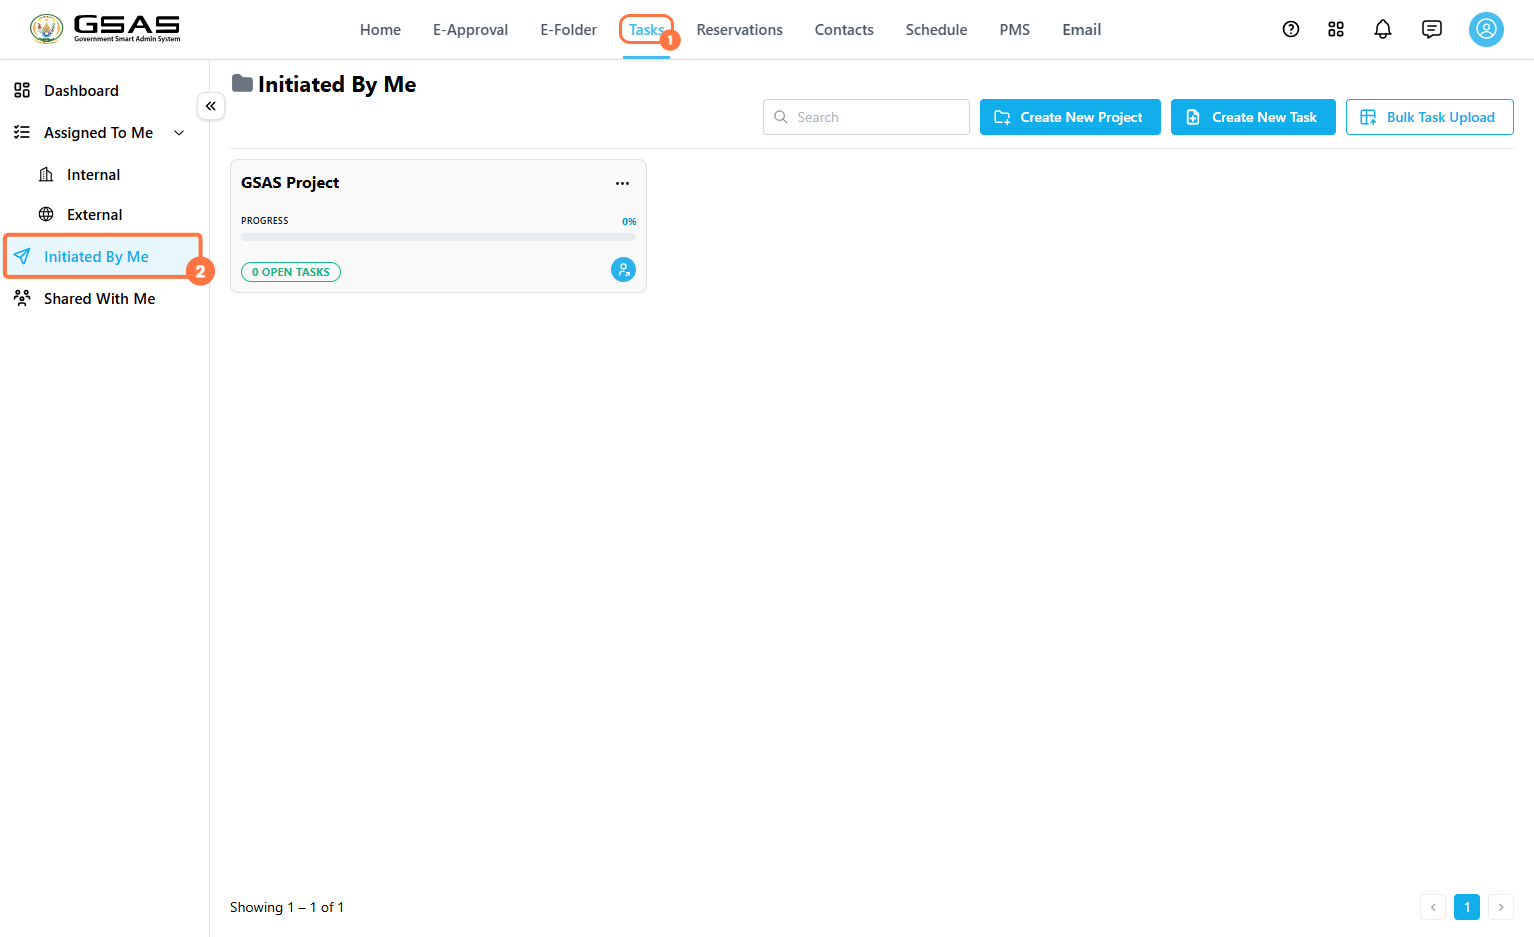](https://docs.smartadmin.rw/uploads/images/gallery/2026-08/z6vimage.png)
3. Click **Create New Project**. [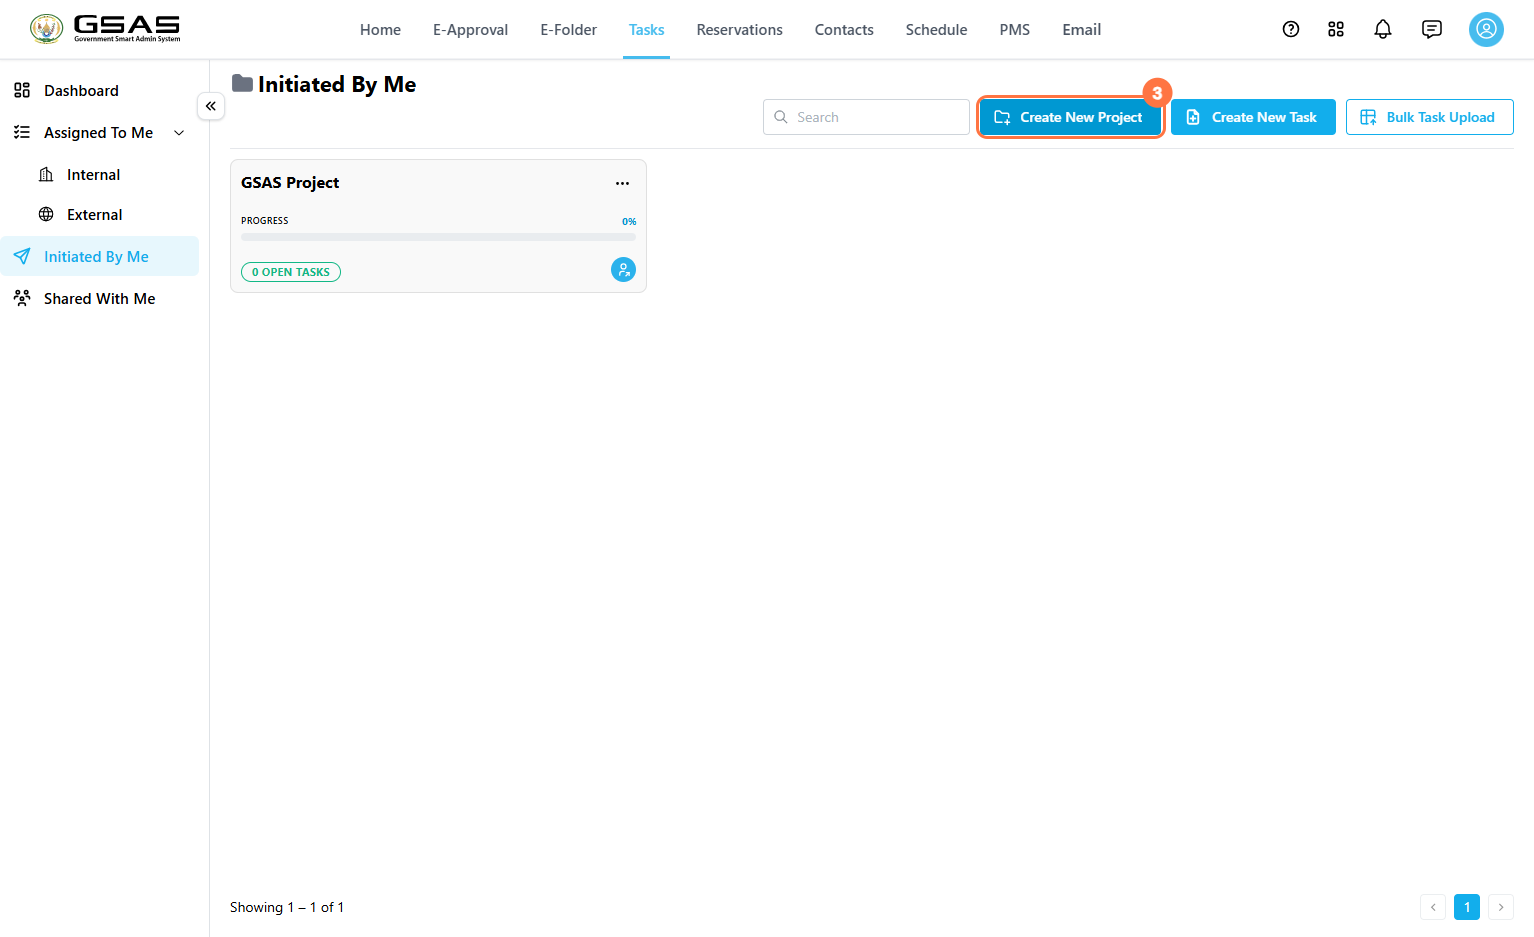](https://docs.smartadmin.rw/uploads/images/gallery/2026-08/dwdimage.png)
4. Enter the project **Name** and an optional **Description**.
5. Click **Create project**. [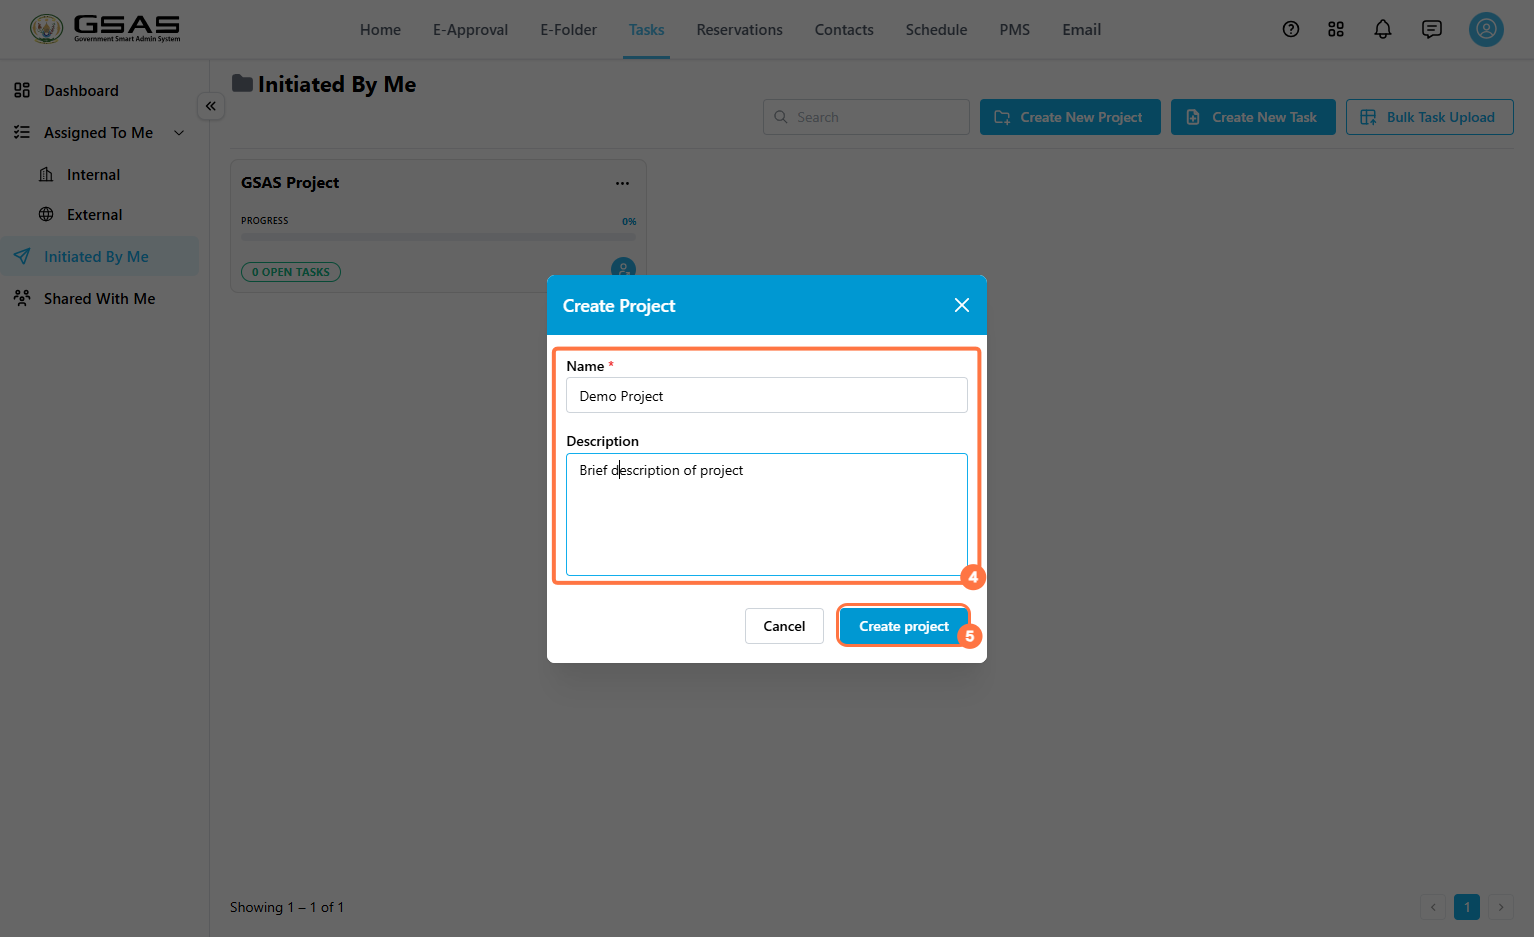](https://docs.smartadmin.rw/uploads/images/gallery/2026-08/R2timage.png)
---
### Create a Task
1. Click the project title to open its workspace. [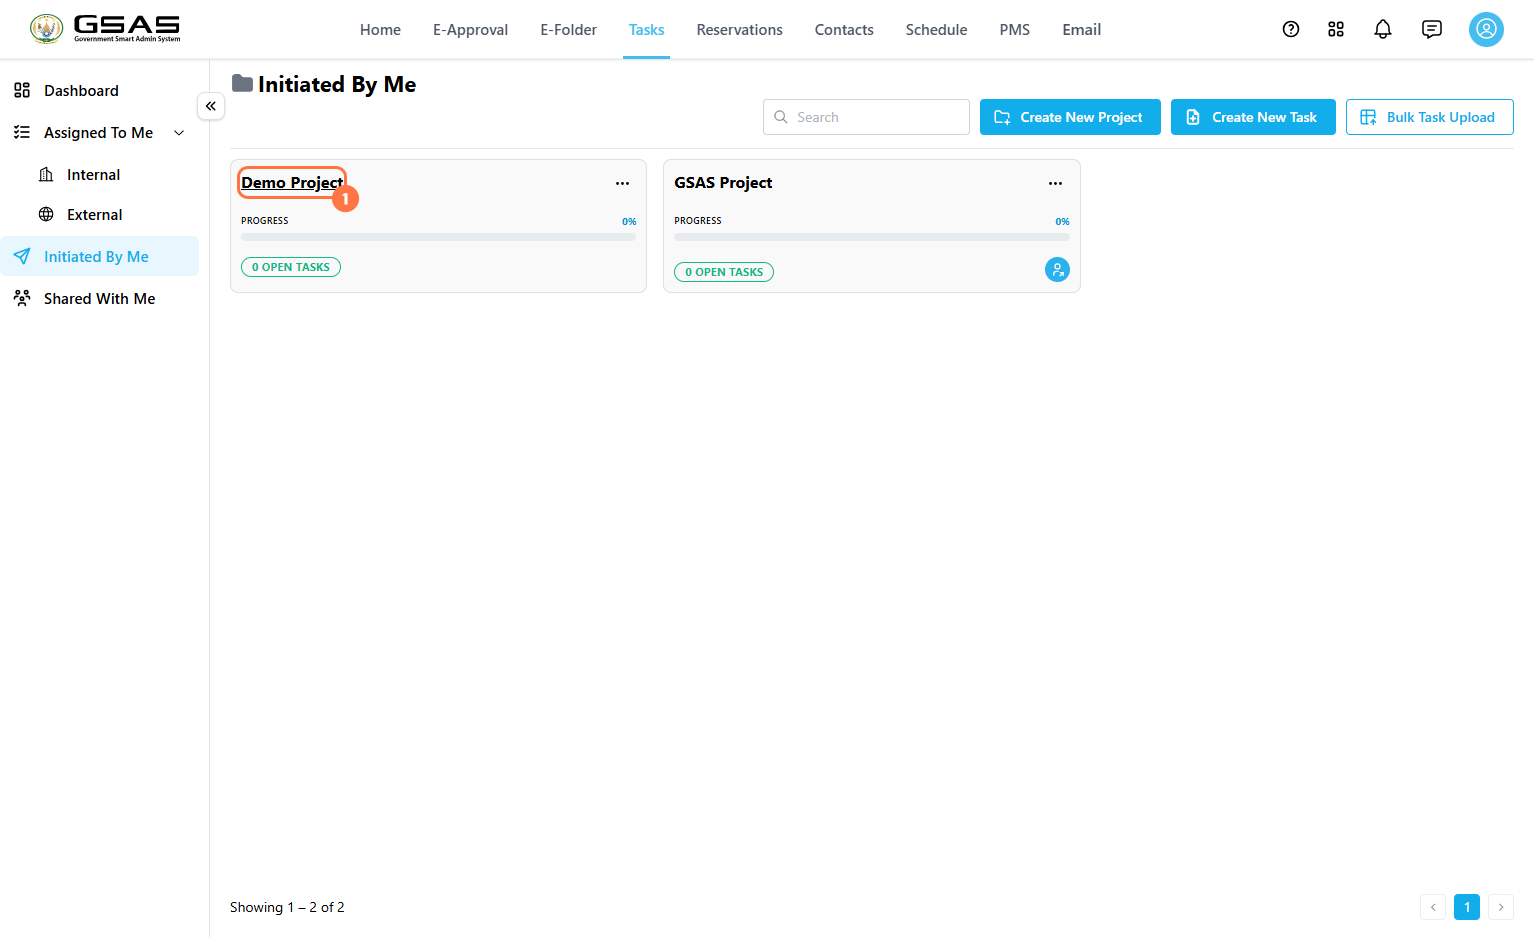](https://docs.smartadmin.rw/uploads/images/gallery/2026-08/po4image.png)
2. Click **Create New Task**. [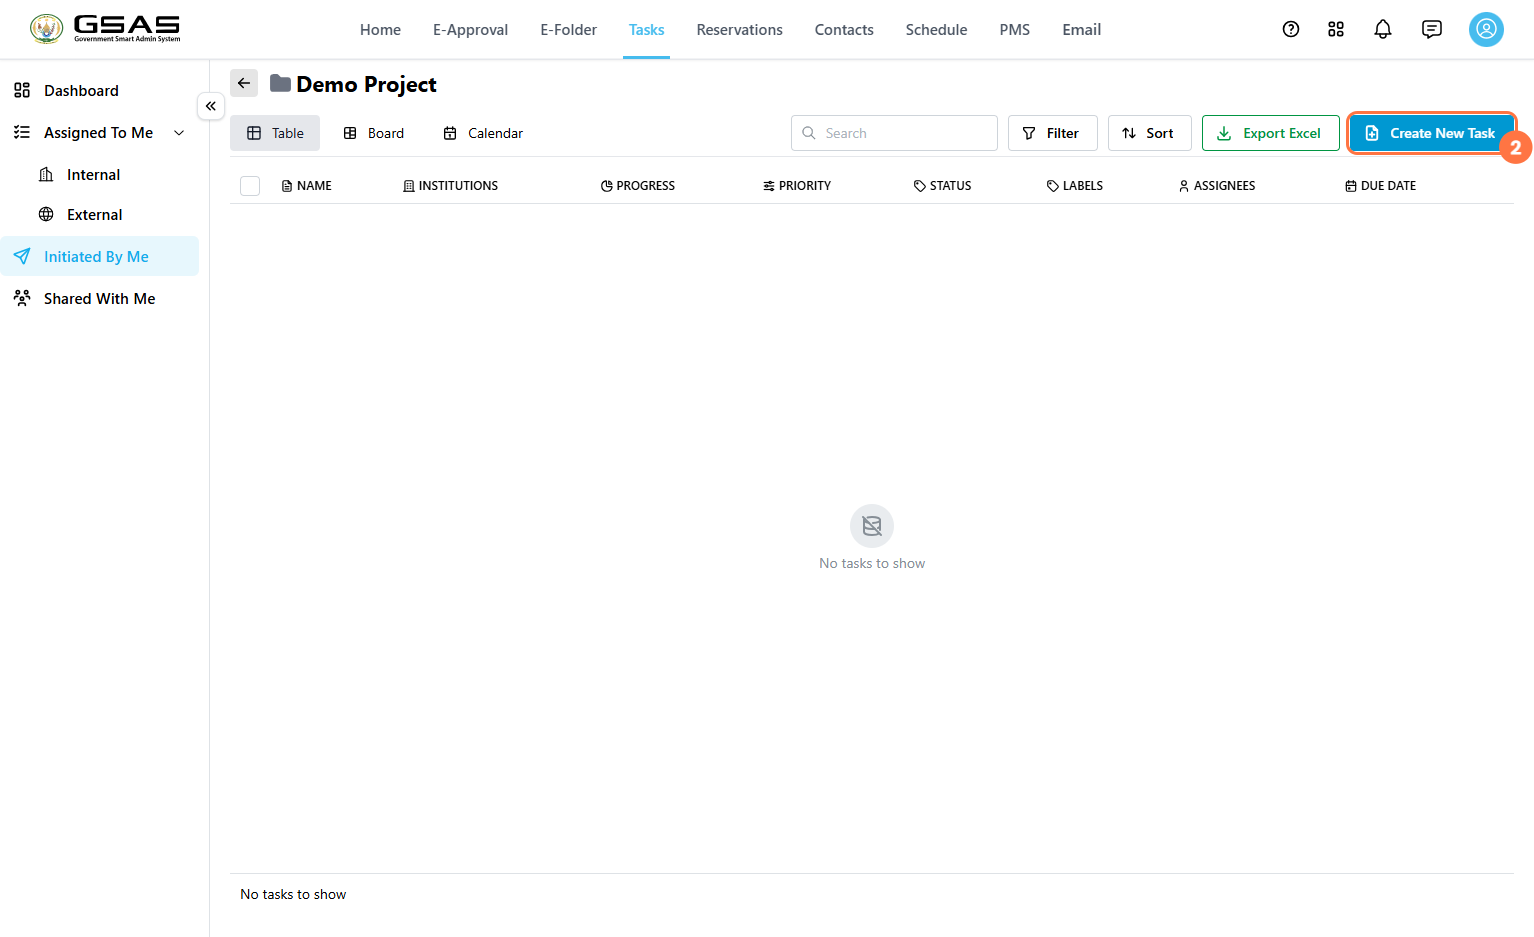](https://docs.smartadmin.rw/uploads/images/gallery/2026-08/8HCimage.png)
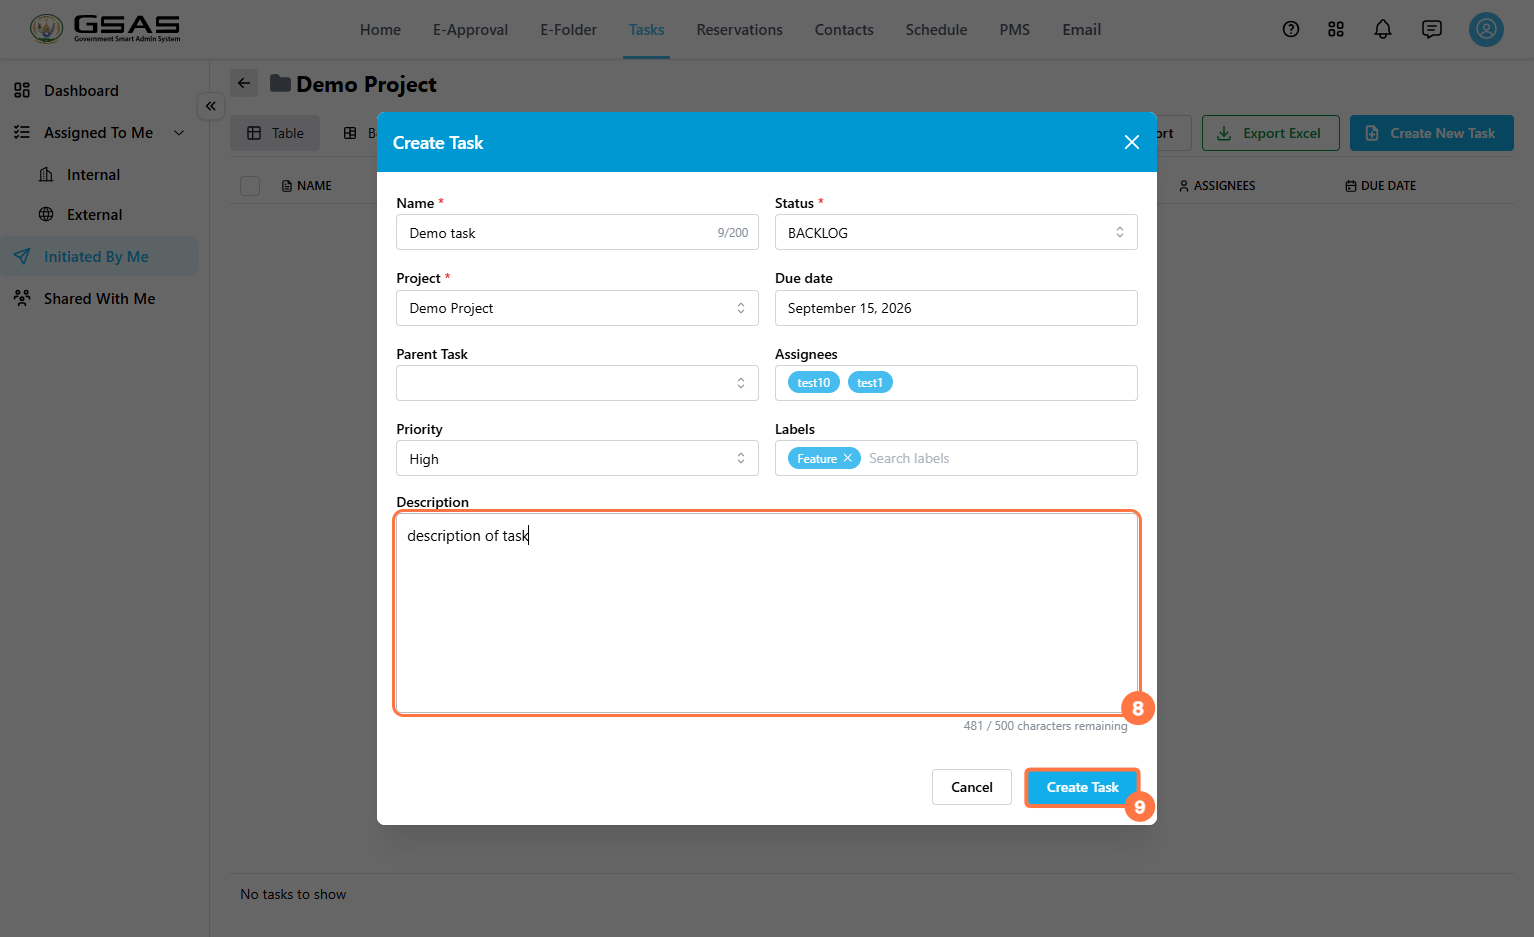
**3. Name and Status** — enter the task name, and set its **Status** (such as Backlog, Doing, Review, or Done) to reflect where it stands in the workflow.
[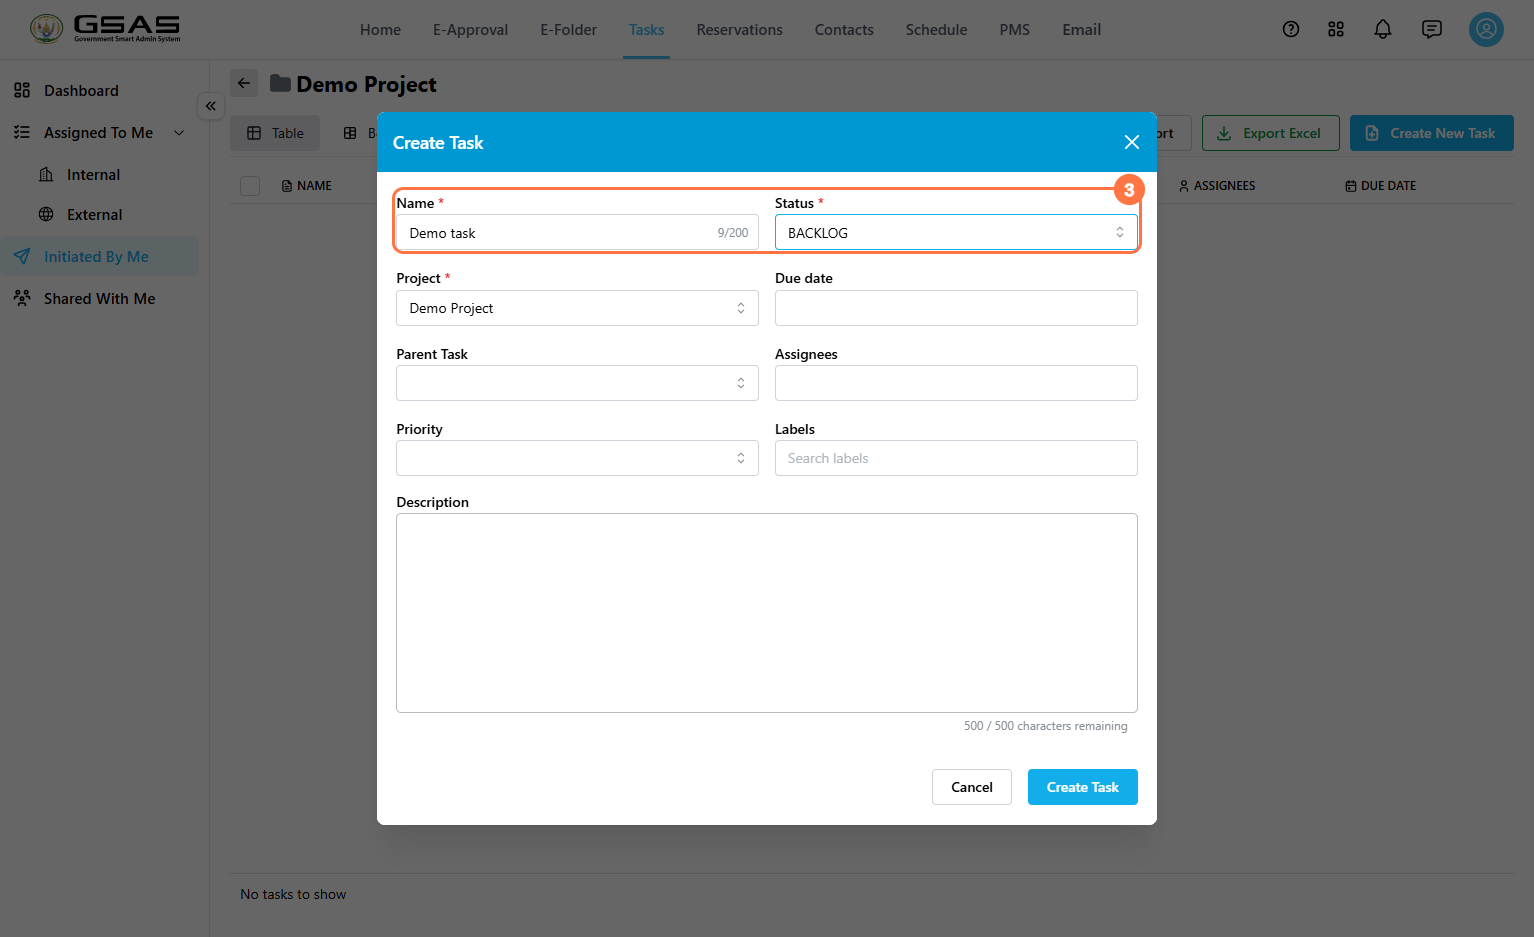](https://docs.smartadmin.rw/uploads/images/gallery/2026-08/VMtimage.png)
**4. Project and Due date** — the Project field auto-fills based on where you created the task; change it if needed. Click the Due date field to select a deadline from the calendar.
[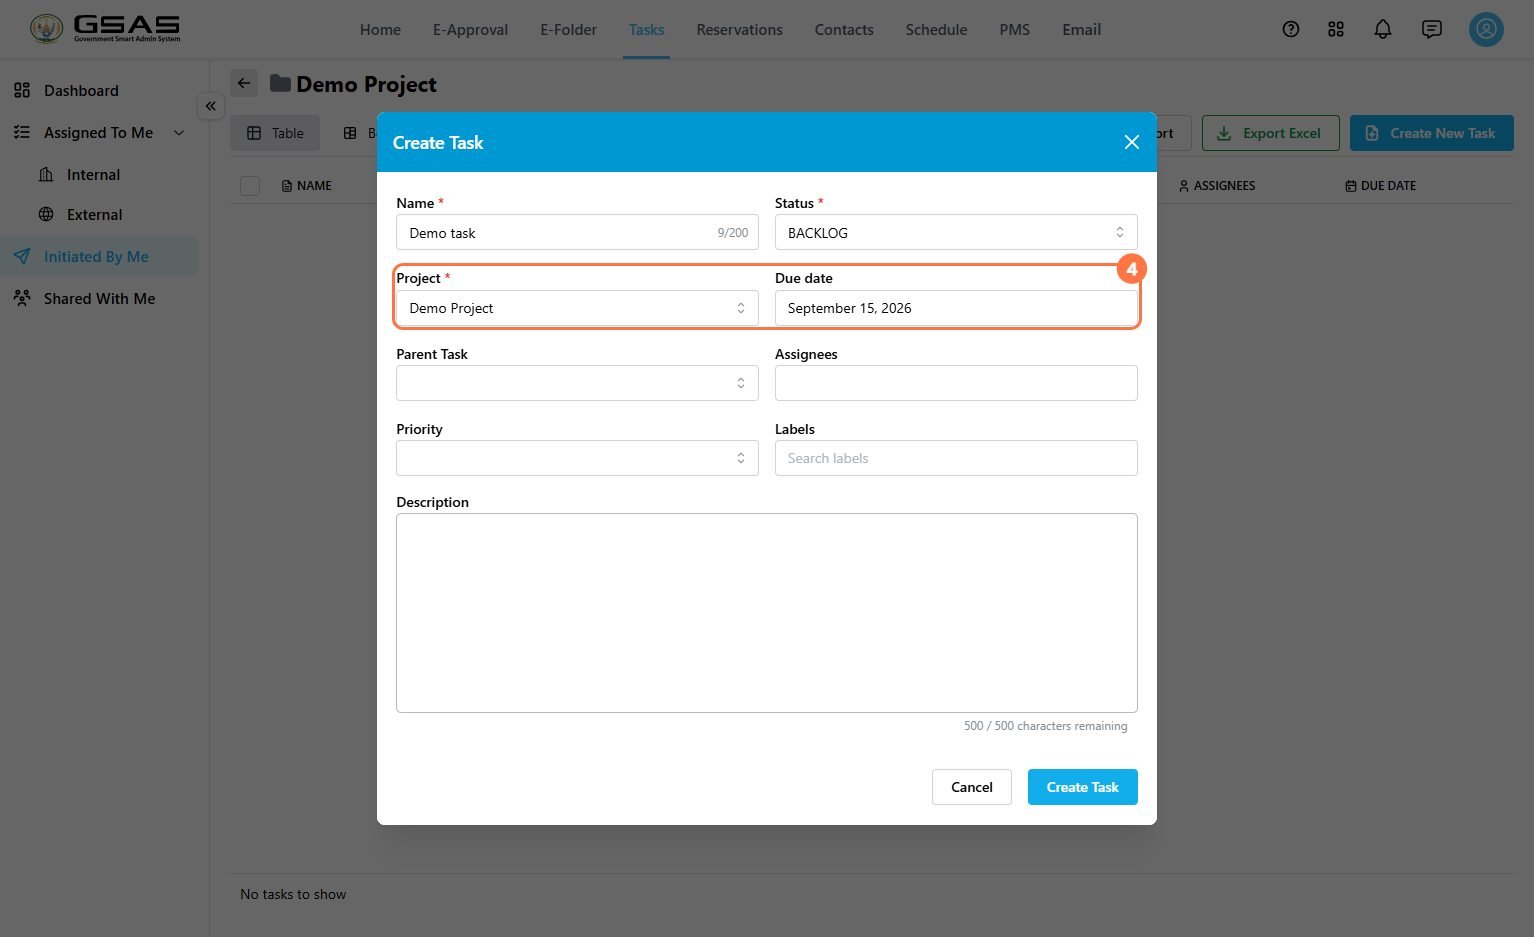](https://docs.smartadmin.rw/uploads/images/gallery/2026-08/piTimage.png)
Only fields with the red asterisk beside their name are mandatory. This means all fields after project are optional.
**Parent Task** is available in the same form, but only needs to be set when the task you're creating is a subtask of an existing one. Leave this field blank otherwise.
**5. Assignees** — click the Assignees field to open the Add Assignees window.
[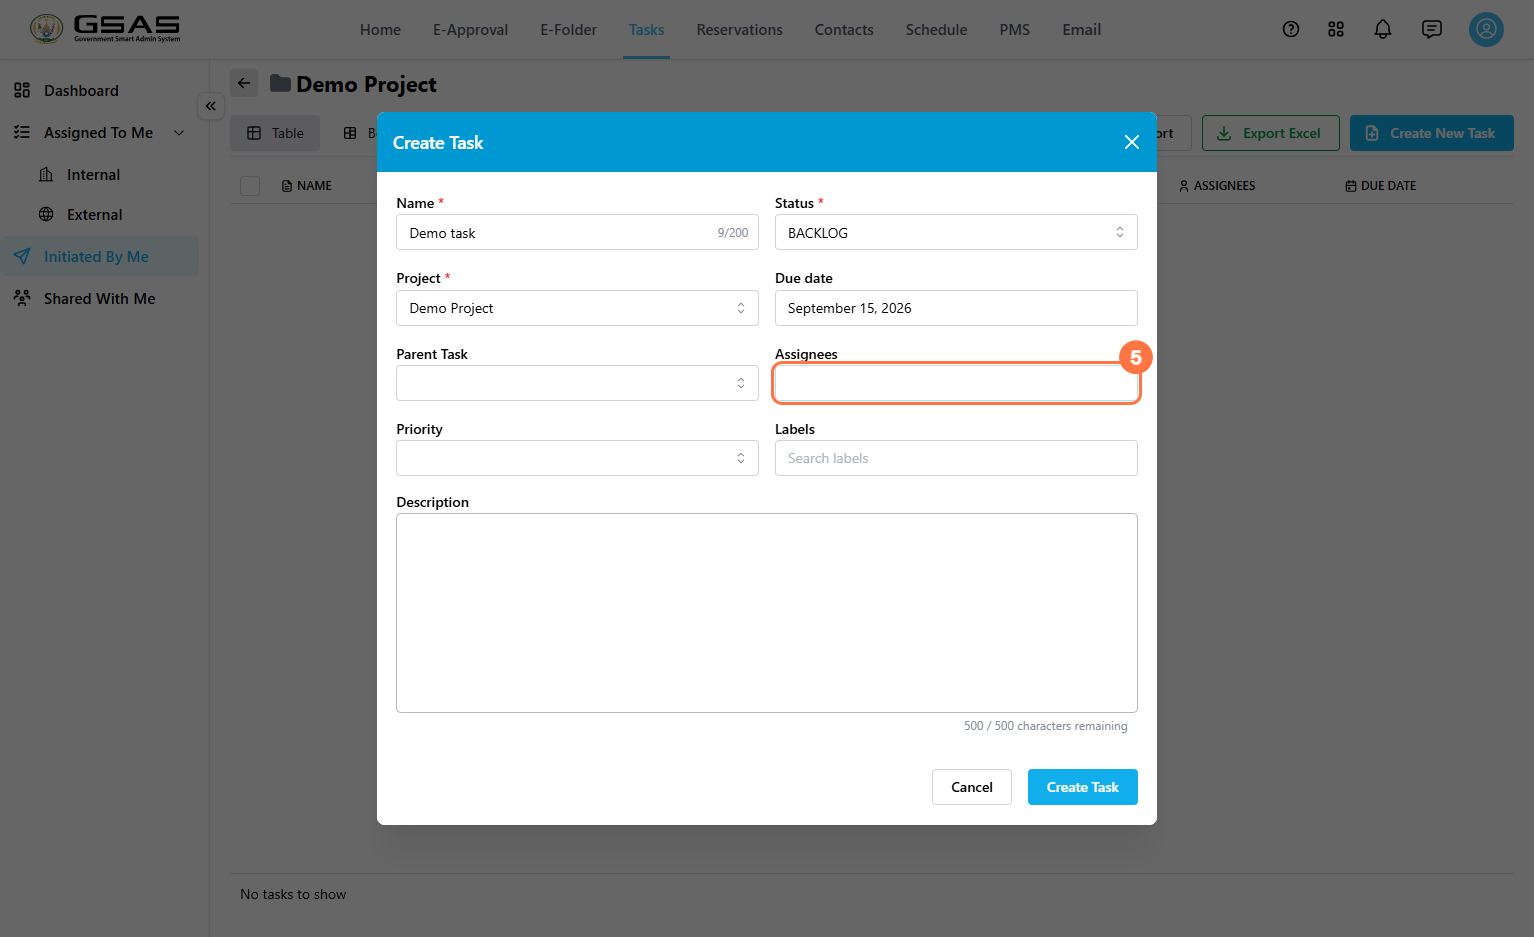](https://docs.smartadmin.rw/uploads/images/gallery/2026-08/2qIimage.png)
- **5.1** Select the organization.
- **5.2** Search for the user.
- **5.3** Click **Add** next to their name. [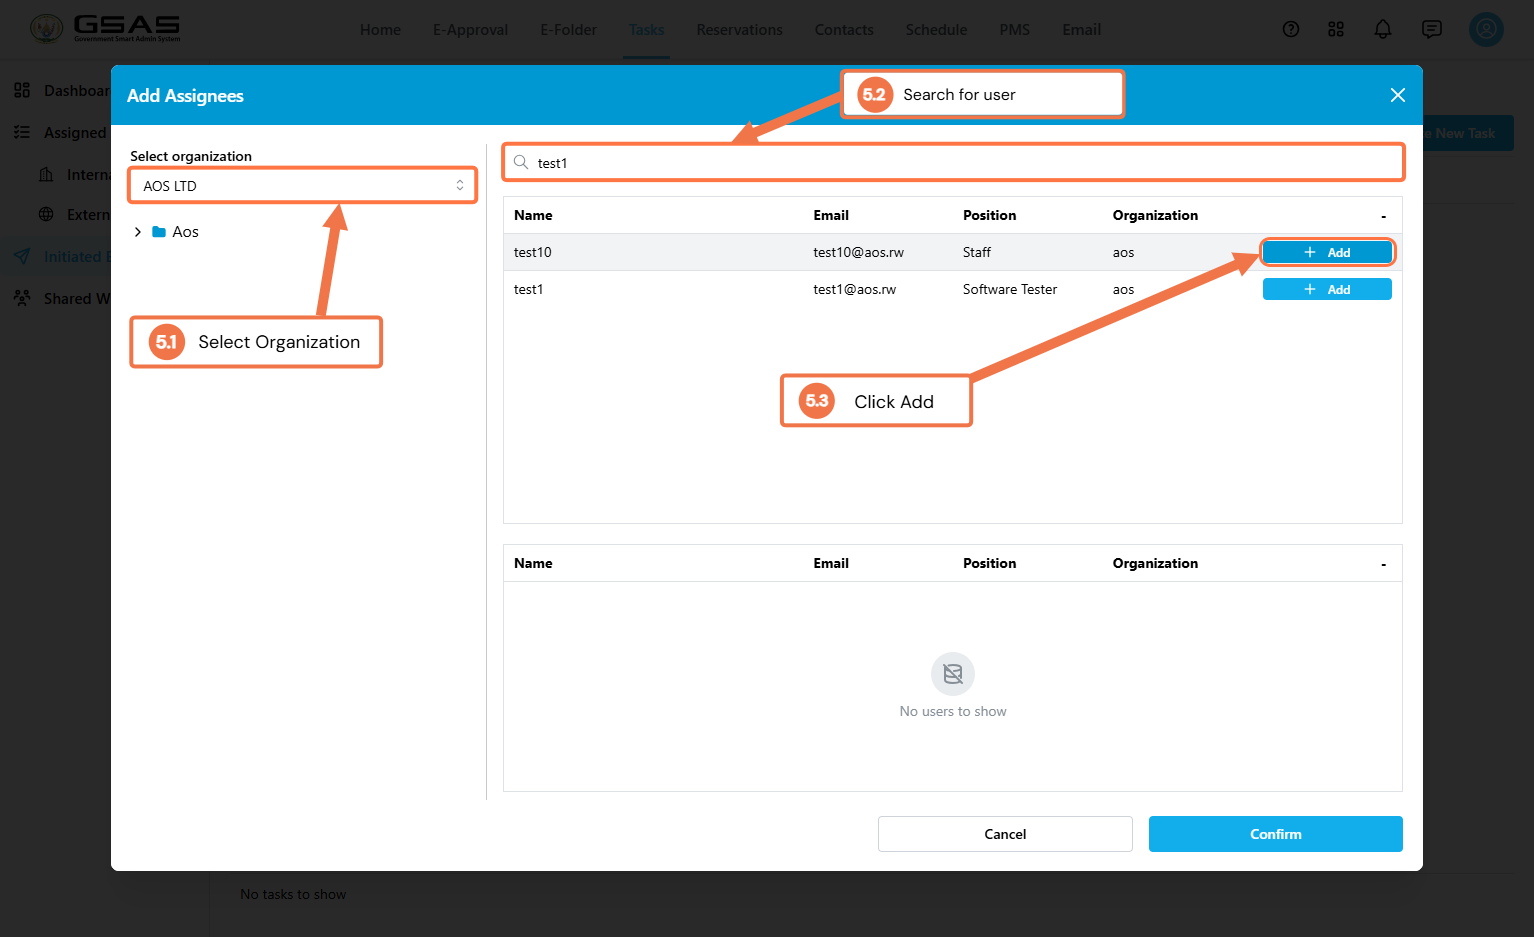](https://docs.smartadmin.rw/uploads/images/gallery/2026-08/NgXimage.png)
Review the selected users, then click **Confirm**.
[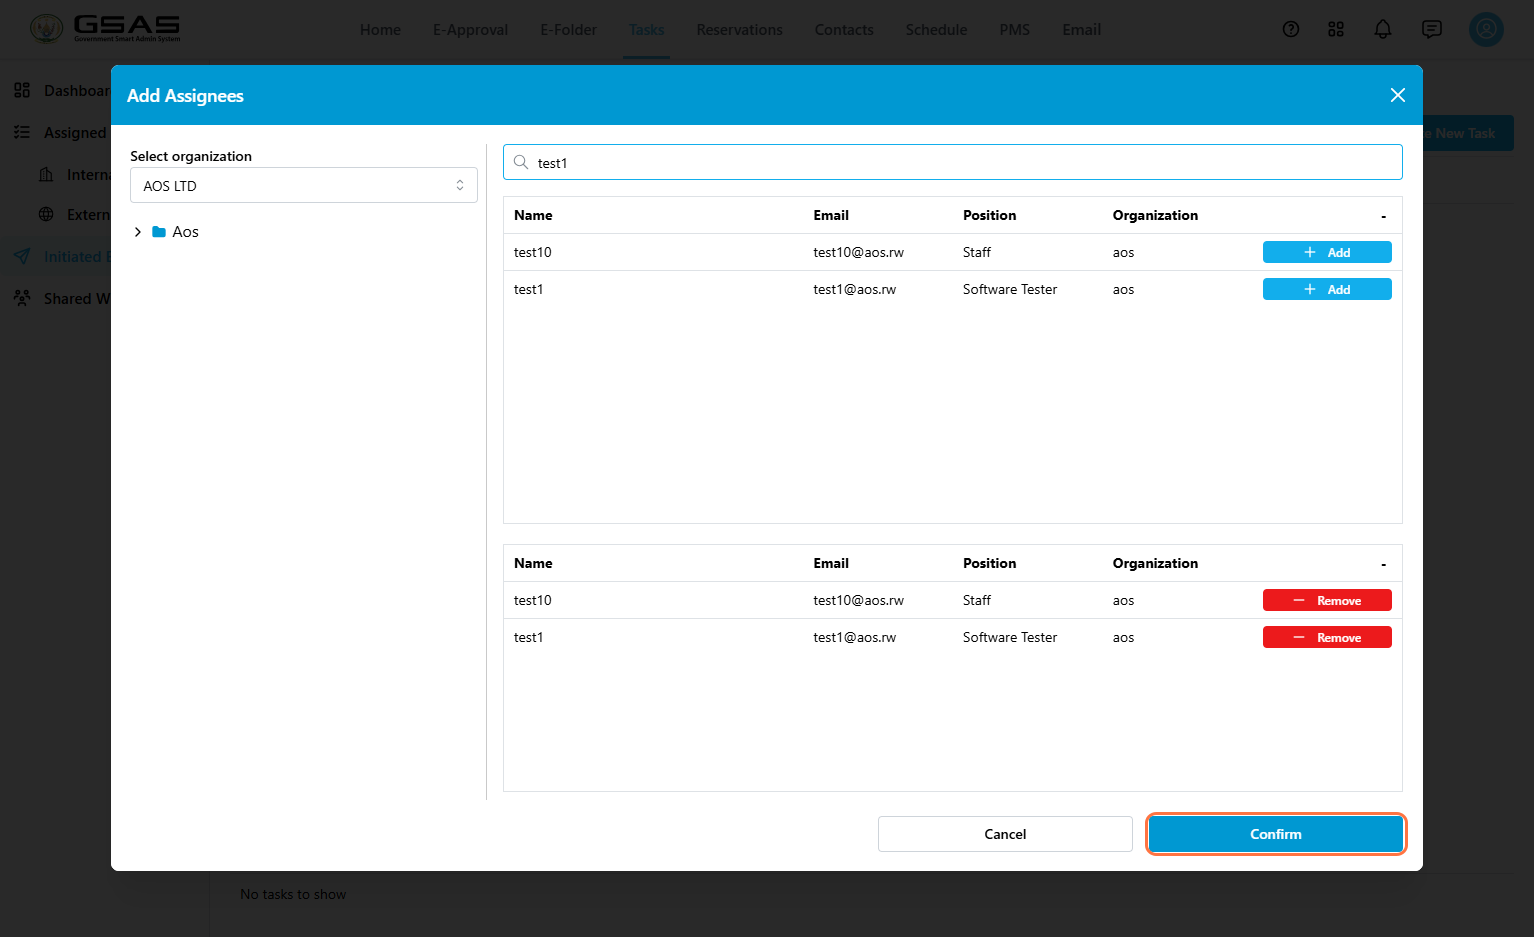](https://docs.smartadmin.rw/uploads/images/gallery/2026-08/gT7image.png)
**6. Priority** sets how urgent the task is: High, Medium, or Low. It feeds into the Priority Breakdown chart on the dashboard.
**7. Labels** help you group related tasks and find them later through filtering. Select an existing label or click **Create new label** to add one.
[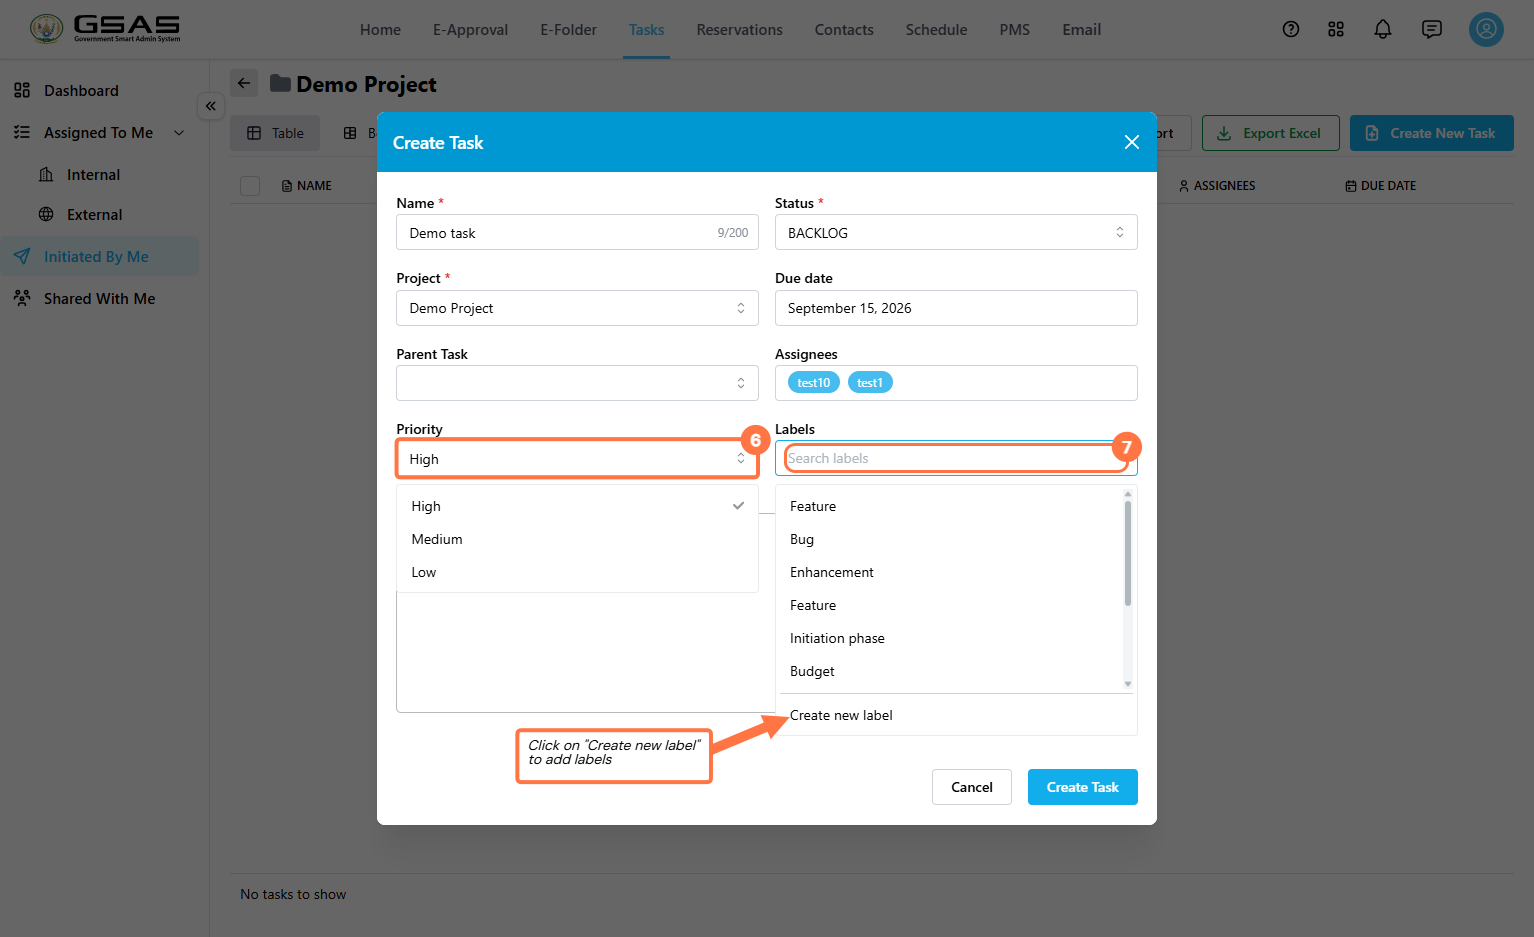](https://docs.smartadmin.rw/uploads/images/gallery/2026-08/Bbhimage.png)
**8. Description** — enter an optional description explaining what needs to be done.
Once finished, click **Create Task** (9).
[](https://docs.smartadmin.rw/uploads/images/gallery/2026-08/2Xgimage.png)
---
### Open, Edit, or Delete a Task
- Click the **…** icon on the task row to view additional options, such as editing or deleting the task, only visible to the task creator. [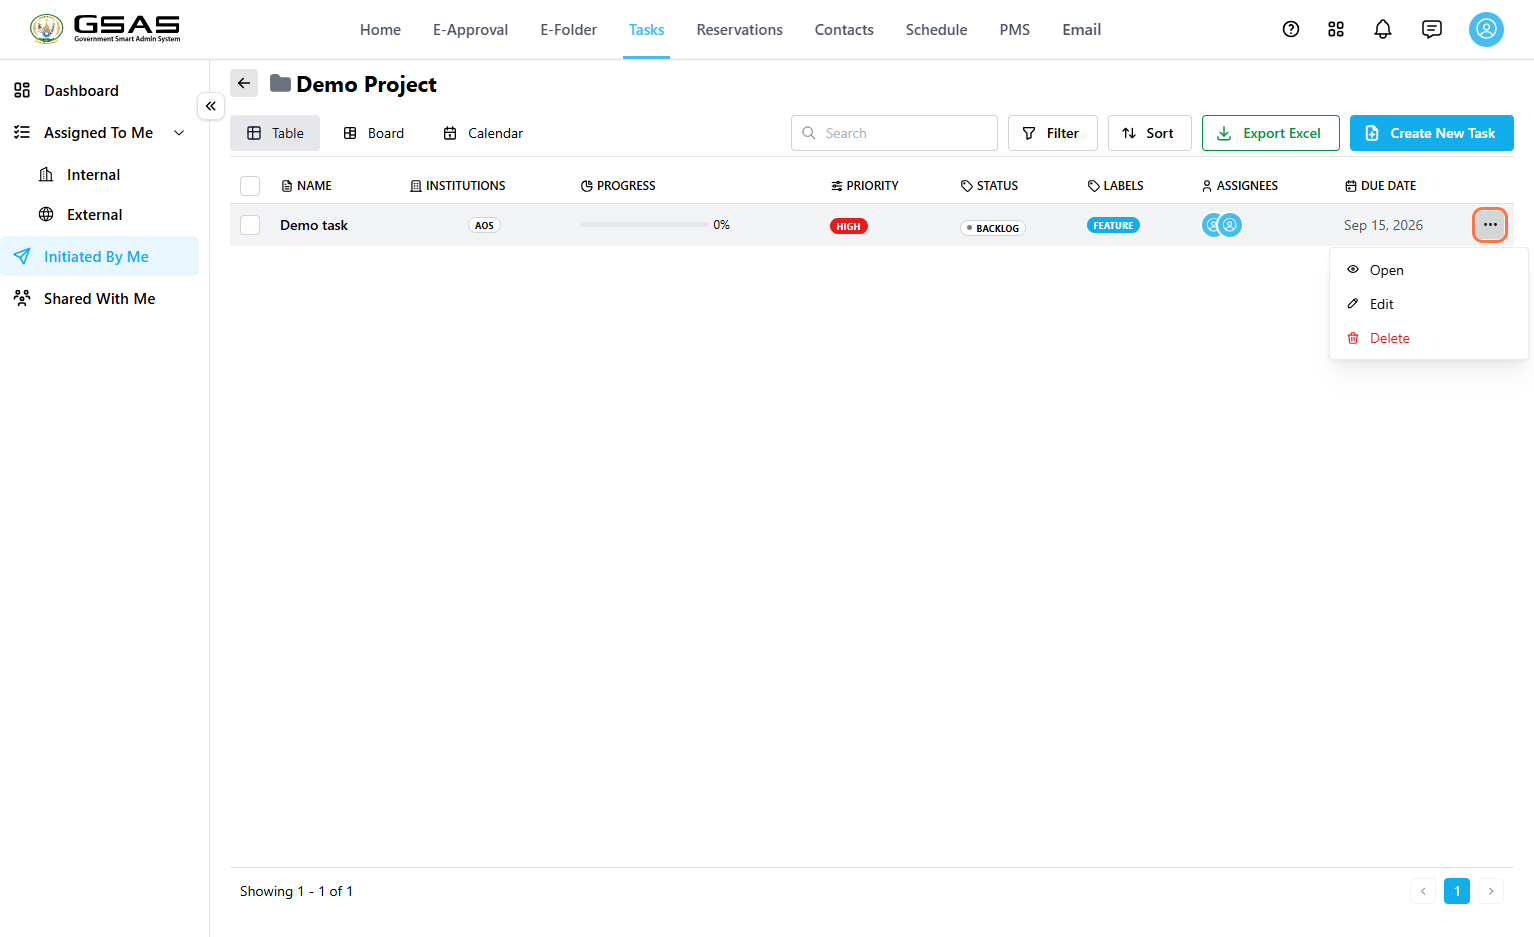](https://docs.smartadmin.rw/uploads/images/gallery/2026-08/eJrimage.png)
---
### Importing Tasks in Bulk
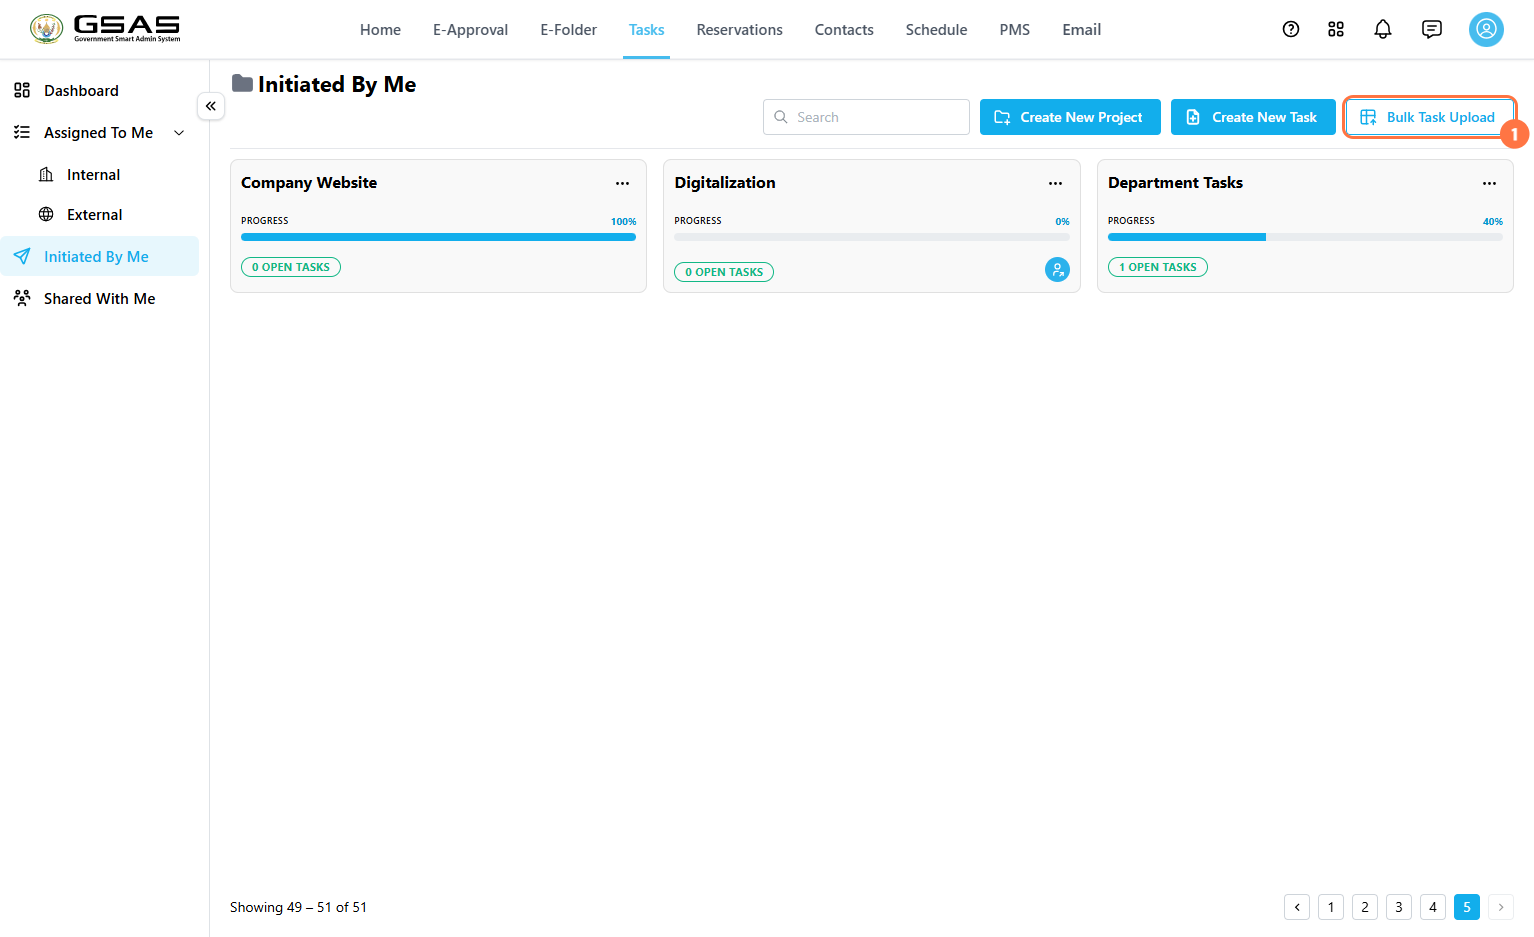
Use **Bulk Task Upload** to create multiple tasks at once from an Excel file. This is useful when you already have a list of existing tasks and want to add them to GSAS without entering each one manually.
##### 1. Open Bulk Task Upload
- Go to **Tasks >** **Initiated By Me** > **Bulk Task Upload**.
[](https://docs.smartadmin.rw/uploads/images/gallery/2026-08/FYqimage.png)
2\. Import Excel File
- In the **Import Tasks in Bulk** window, click **Click to browse.**[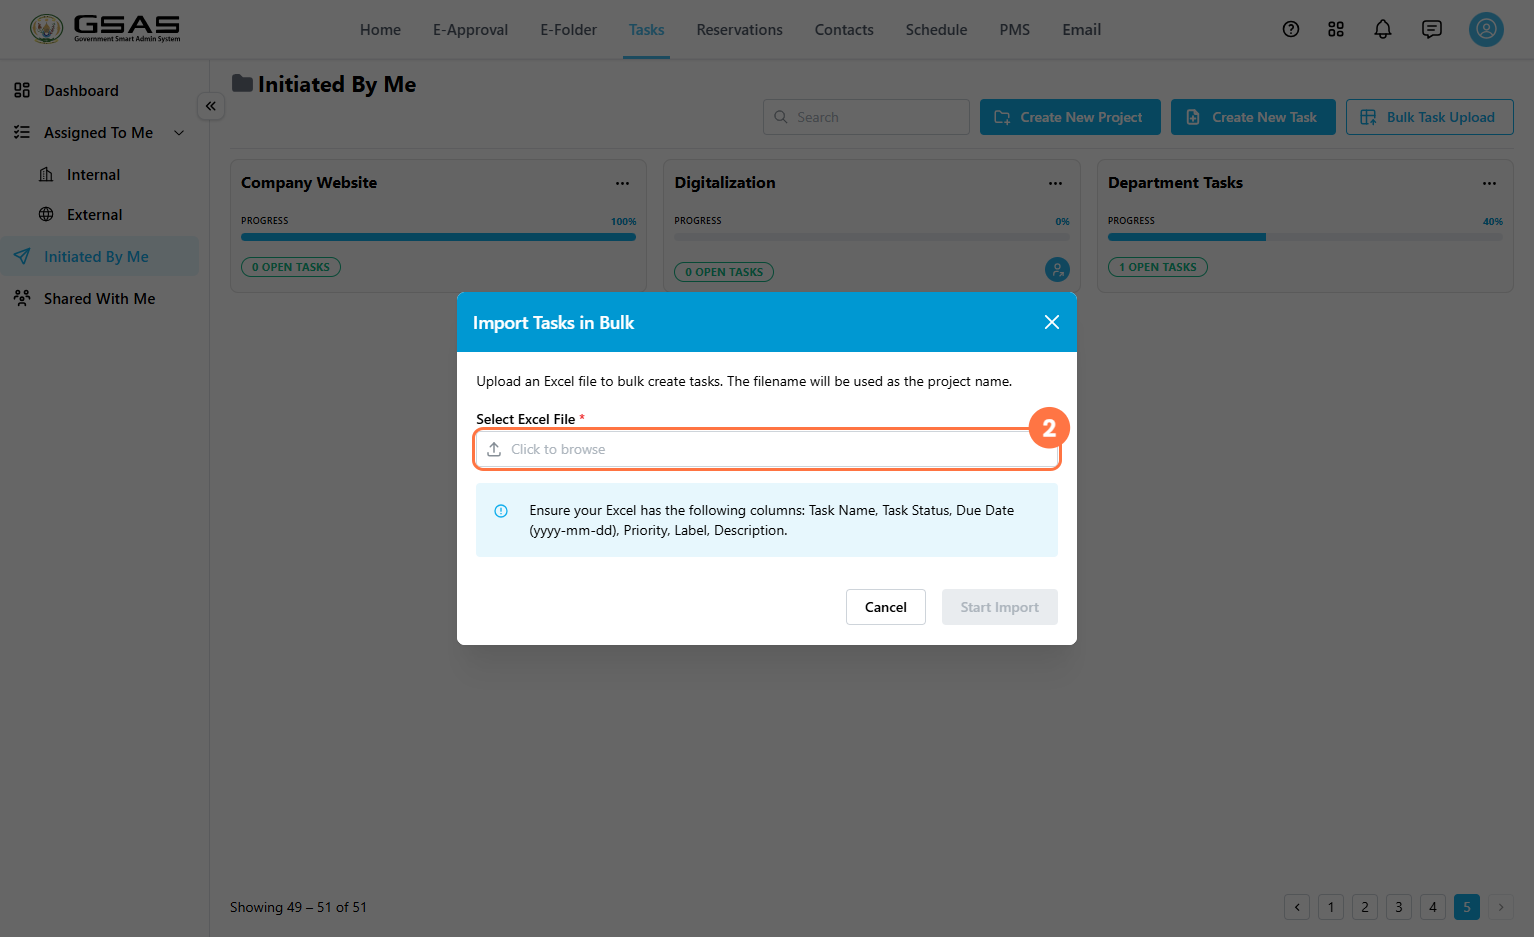](https://docs.smartadmin.rw/uploads/images/gallery/2026-08/u63image.png)
- Select the Excel file that contains the tasks you want to import and click **Start Import.** Ensure the file includes the required columns: Task Name, Task Status, Due Date (yyyy-mm-dd), Priority, Label, and Description. [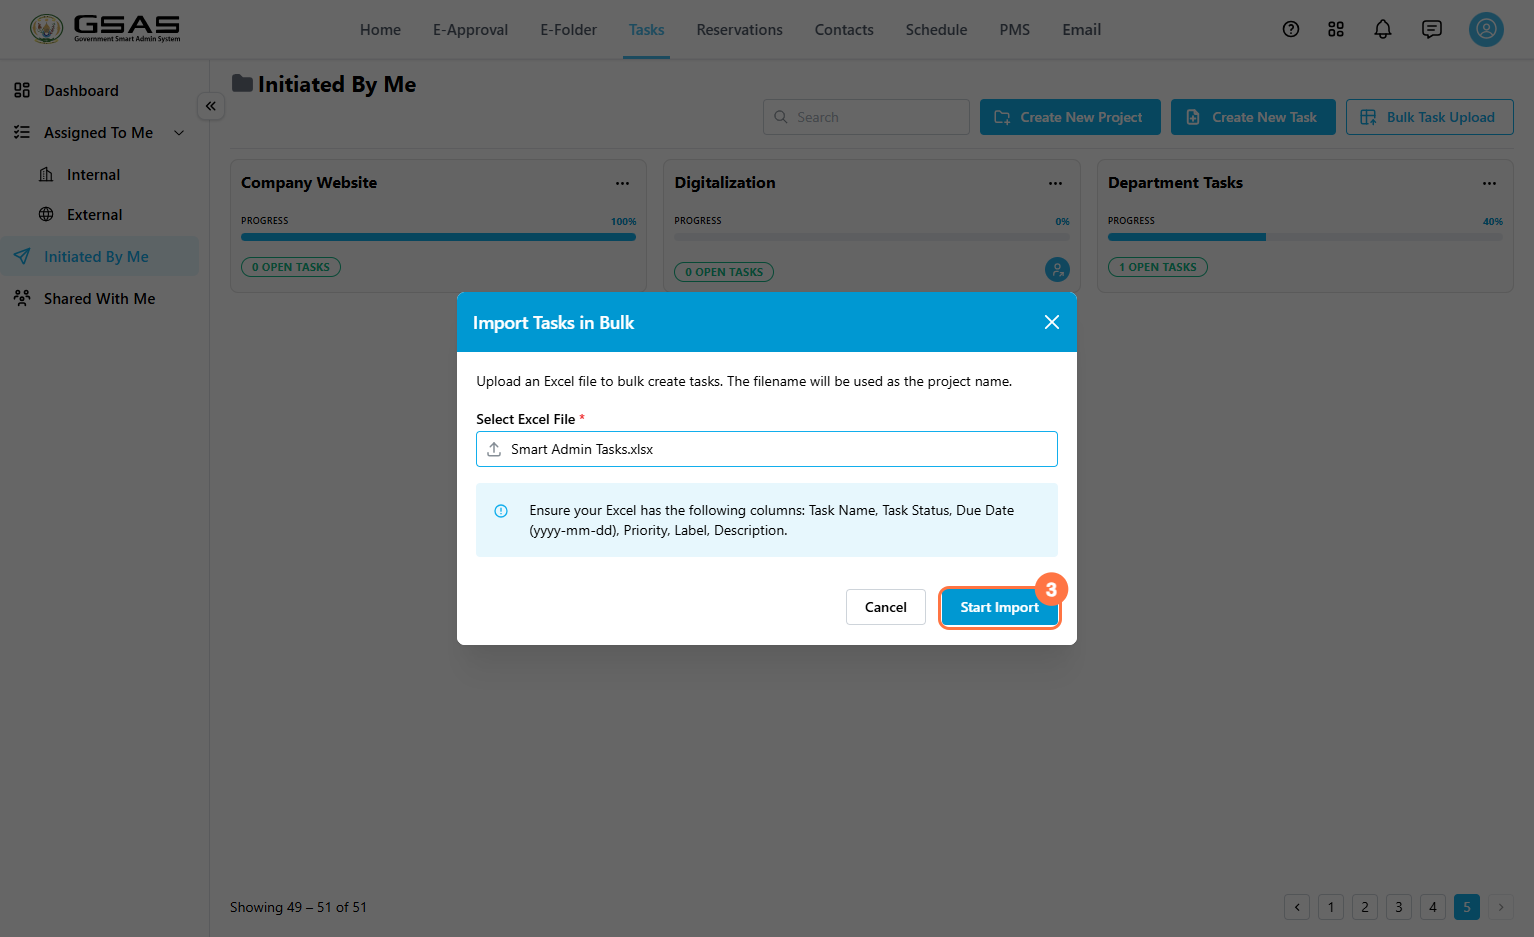](https://docs.smartadmin.rw/uploads/images/gallery/2026-08/abQimage.png)
- Confirm that the tasks were imported successfully. The import summary displays the number of processed rows and successfully created tasks. If any tasks could not be imported, the **Failure Report** lists the affected row and the reason for the failure. Review the details, then click Done to complete the process or close the pop up and retry. [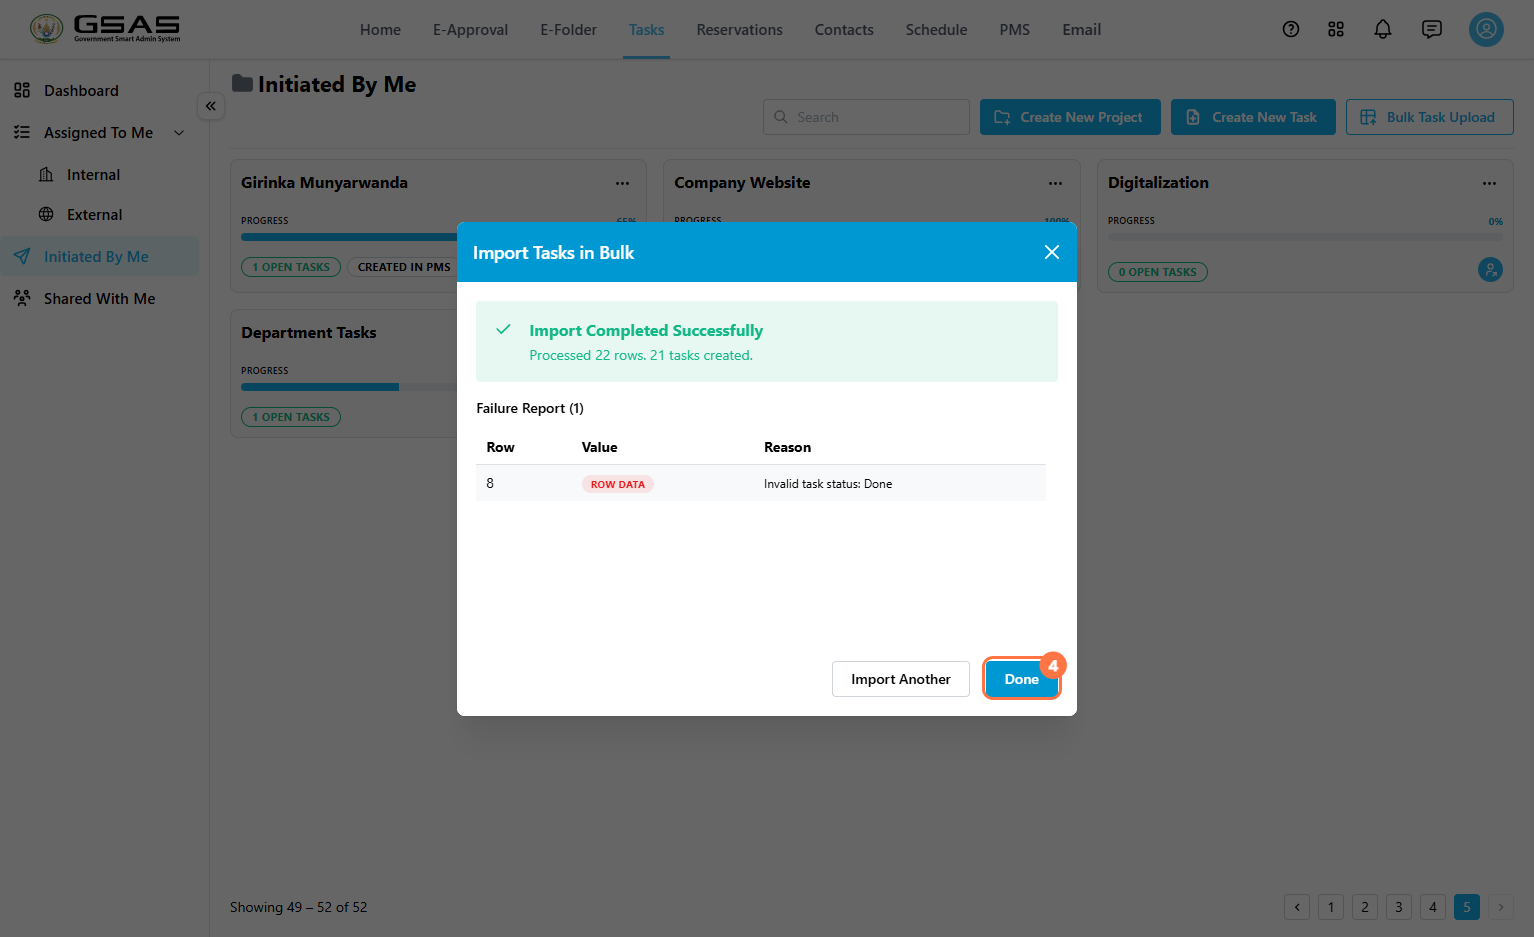](https://docs.smartadmin.rw/uploads/images/gallery/2026-08/VF7image.png)
4. Review the imported tasks
After the import is complete, GSAS creates a project using the Excel filename and lists the imported tasks inside it. Open the project to view the tasks.
[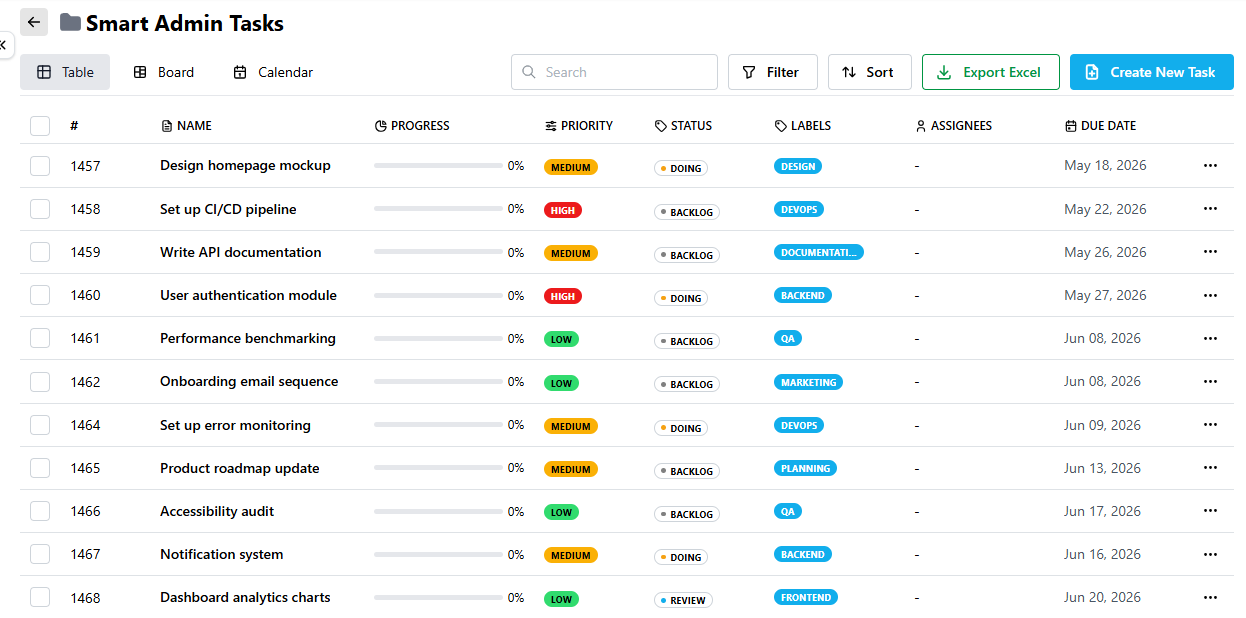](https://docs.smartadmin.rw/uploads/images/gallery/2026-08/5FWimage.png)
5. Manage imported tasks
- Select one or more tasks using the checkboxes
- Click **Assign Selected** to assign multiple tasks to users at a time or **Delete Selected** to remove multiple tasks.
[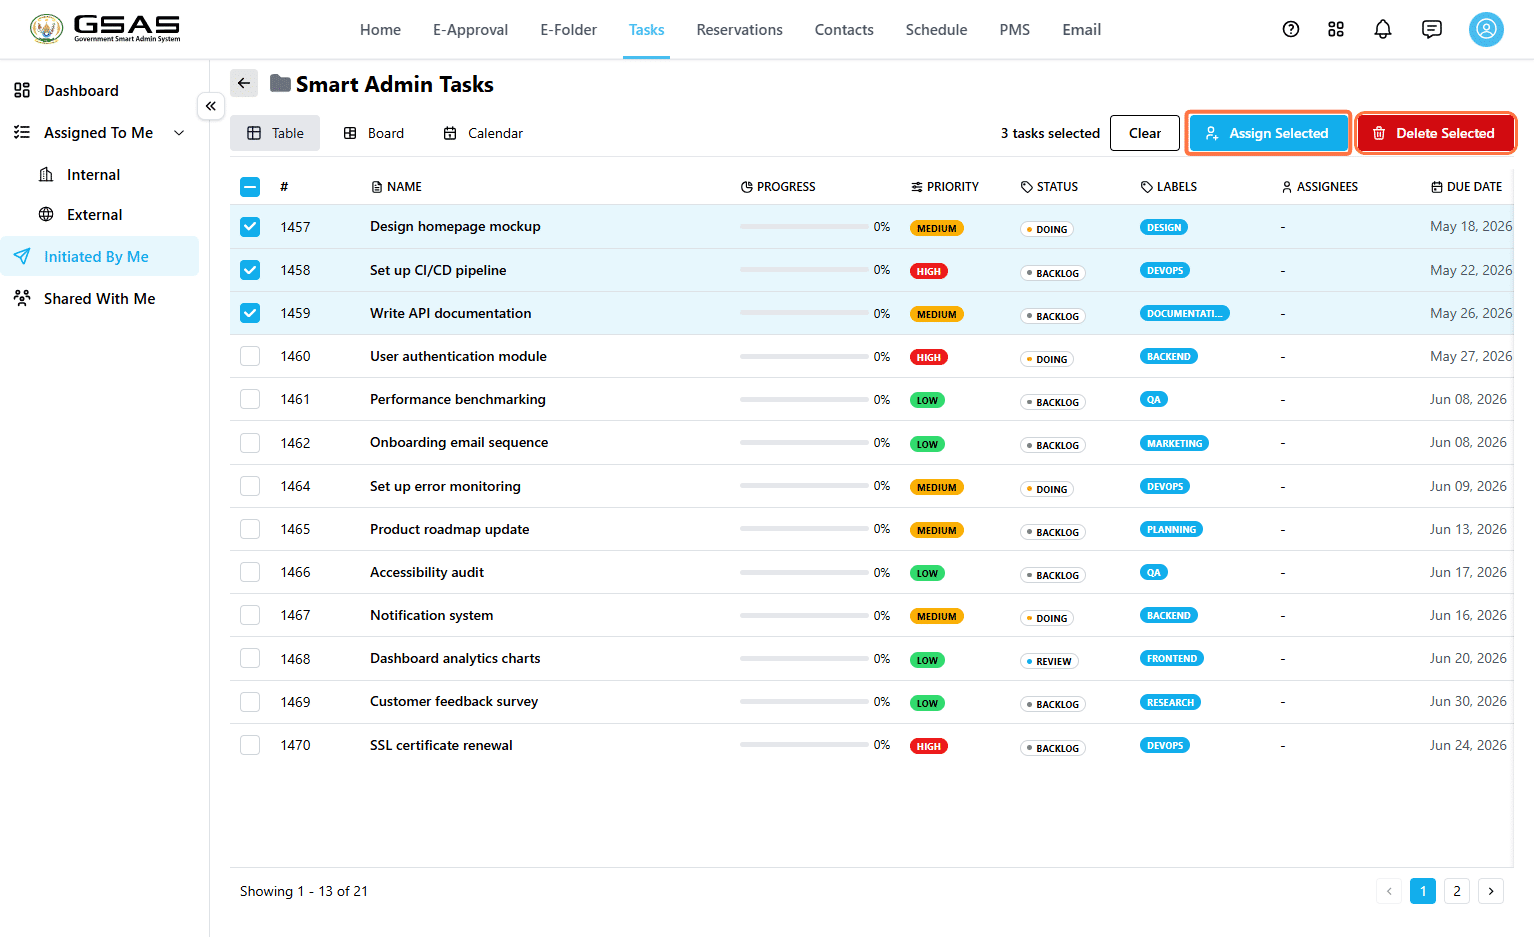](https://docs.smartadmin.rw/uploads/images/gallery/2026-08/BiFimage.png)
---
### How Task Fields Affect Dashboard Stats
| Field or Action | Where it appears |
|---|
| **Project** | Contributes to **Total Projects** and groups related tasks together. |
| **Task** | Contributes to **Total Tasks**. |
| **Status** | Affects **Ongoing Tasks**, **Completion Rate**, and the **Task Status Breakdown** chart. |
| **Due Date** | Affects **Overdue Tasks** and the **Tasks by Deadline** chart. |
| **Priority** | Affects the **Priority Breakdown** chart. |
| **Tip:** To keep dashboard statistics useful, set the task status, due date and priority when creating the task. |
---
### Related Pages
- See [**Navigating Tasks**](https://docs.smartadmin.rw/link/46#bkmrk-page-title) to understand dashboard cards, charts, filters, and task categories.
- See [**Responding to and Tracking Tasks**](https://docs.smartadmin.rw/link/44#bkmrk-page-title) to learn how you can keep track of the tasks you assign and how assigned users update task progress.
# Responding to and Tracking Tasks
Learn to review a task, update its progress, add supporting files, communicate through comments, and track its history. Anyone with access to a task — whether they were assigned to it or created it — can open it and use the actions on this page, unless noted otherwise below.
### Task Actions at a Glance
| Action | Use it to |
|---|
| **Update Progress** | Record progress percentage, status, updates, next steps, blockers, and escalation needs. |
| **View Progress Update History** | Review previous progress updates and attached evidence. Editing an entry is limited to the assignee who logged it. |
| **View Activity** | See a running log of everything that has happened on the task. |
| **Comments** | Discuss the task and keep follow-up communication in one place. |
| **Add subtask** | Break a larger task into smaller related tasks. |
| **Attach files** | Add supporting documents from your computer or E-Folder. |
| **Mark as Complete** | Close the task when the work is finished. |
---
### Open a Task
Where you find the task depends on whether it was assigned to you or created by you.
#### If the task was assigned to you
1. Go to **Tasks → Assigned To Me**.
2. Choose **Internal** (assigned by someone within your institution) or **External** (assigned by someone outside it).
3. Find the task in the list.
4. Click the task name to open it, or click the **…** icon and select **Open**. [](https://docs.smartadmin.rw/uploads/images/gallery/2026-08/4JRimage.png)
#### If you created and delegated the task
1. Go to **Tasks → Initiated By Me**.
2. Open the project the task belongs to.
3. Find the task in the project's task list.
4. Click the task name to open it, or click the **…** icon and select **Open**. [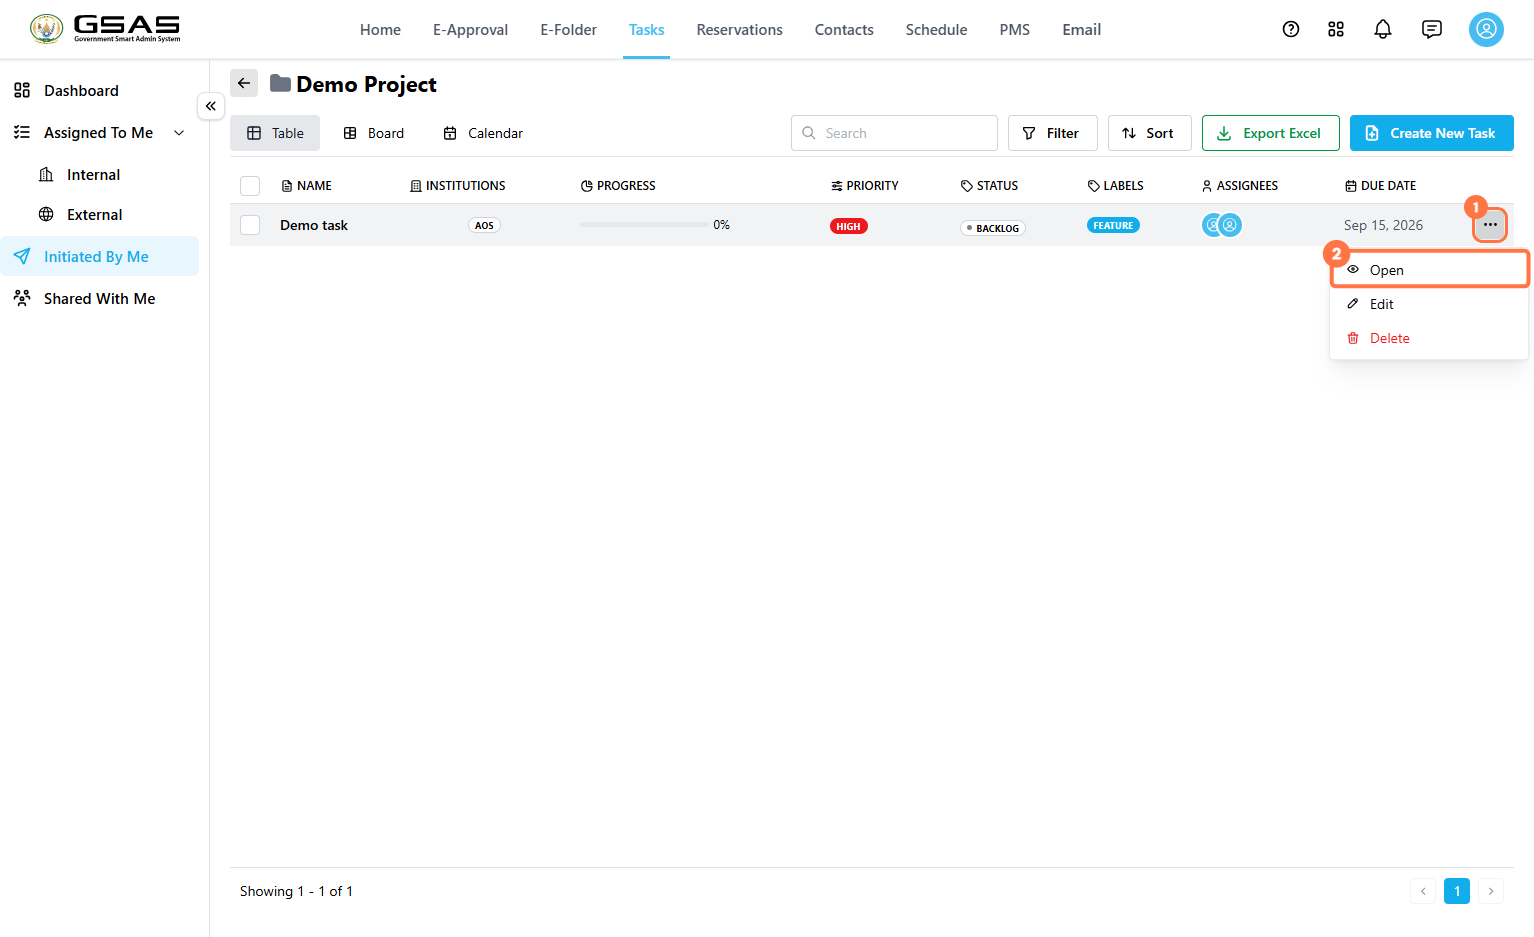](https://docs.smartadmin.rw/uploads/images/gallery/2026-08/OYMimage.png)
The task details page shows the task description, due date, status, priority, labels, assigned users, progress, subtasks, attachments, activity, and comments.
[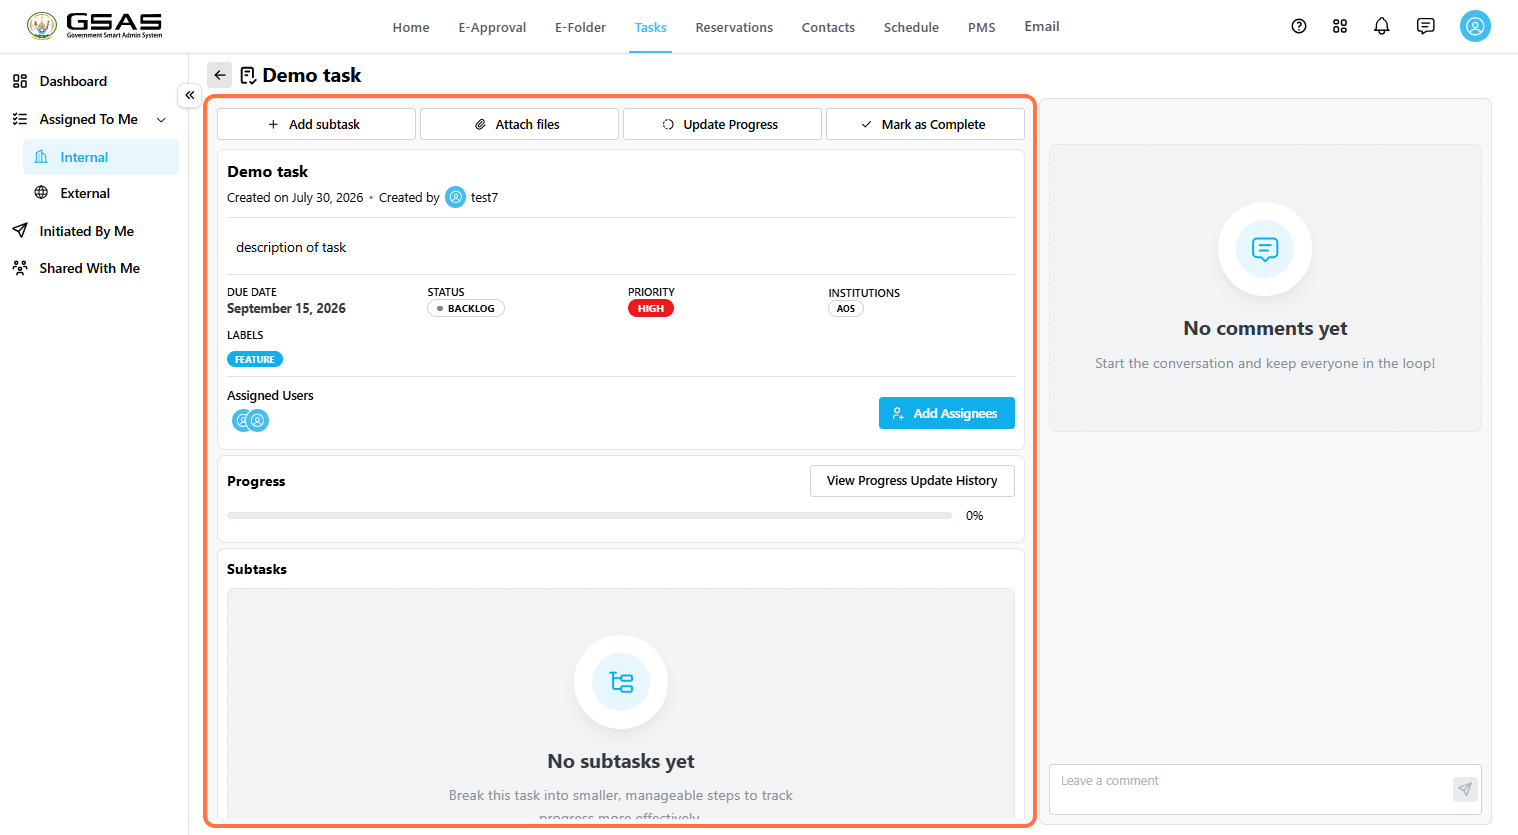](https://docs.smartadmin.rw/uploads/images/gallery/2026-08/gLUimage.png)
---
### To update task progress
1. Click **Update Progress**. [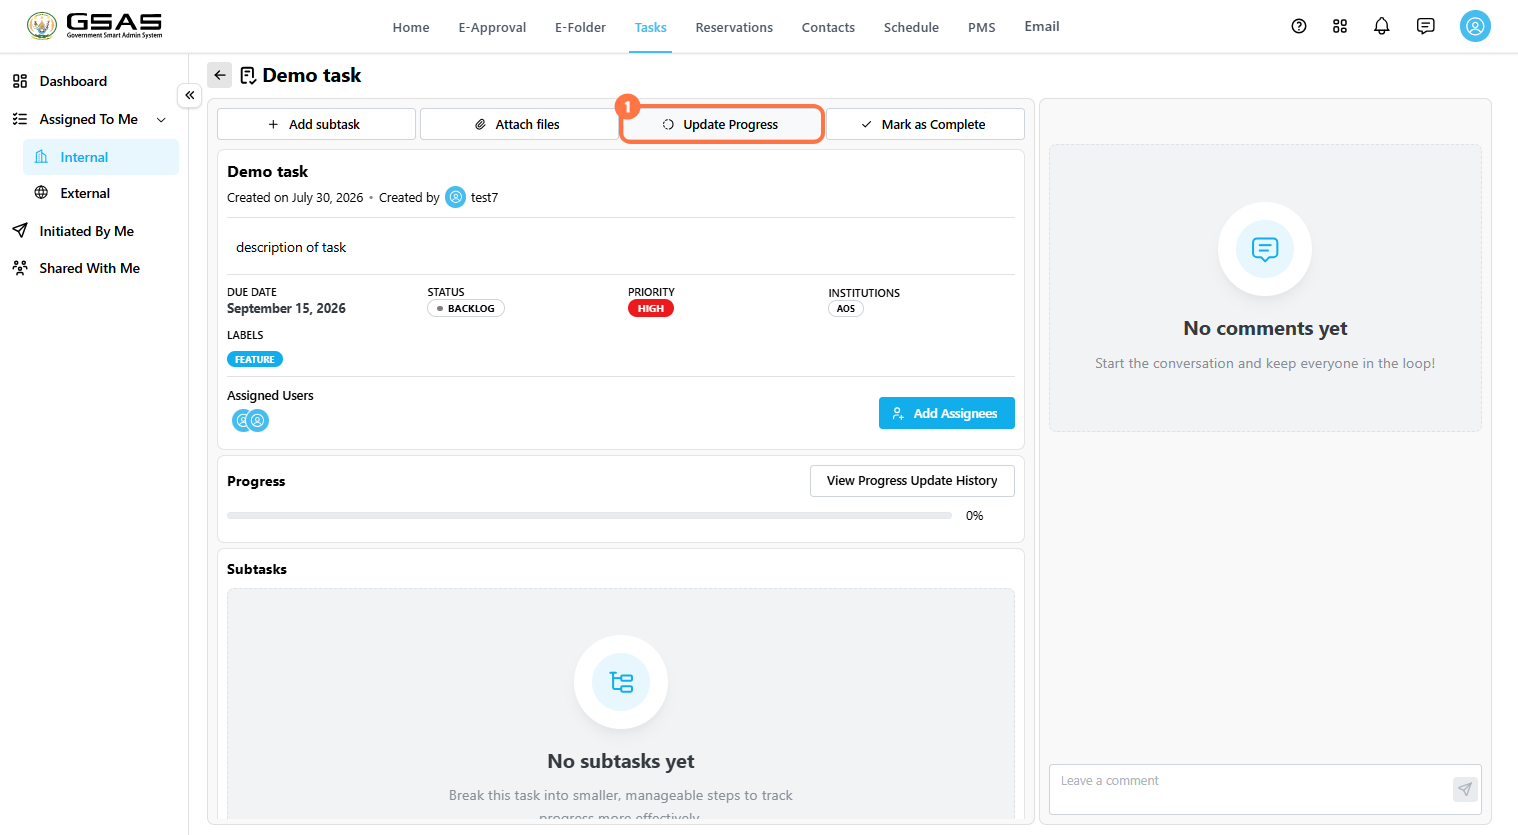](https://docs.smartadmin.rw/uploads/images/gallery/2026-08/zcgimage.png)
2. Enter the current **Progress (%)**. [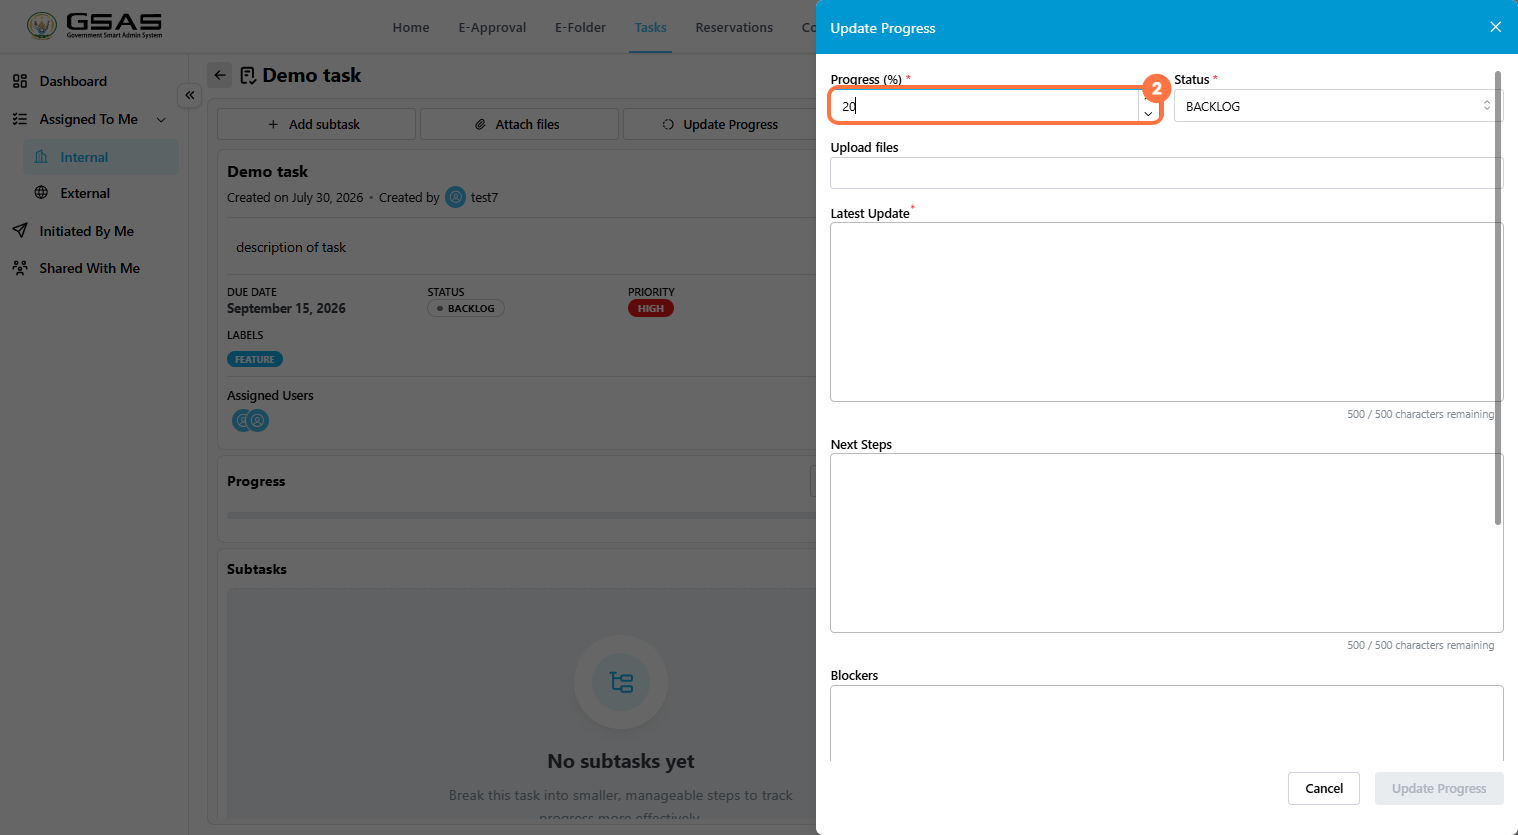](https://docs.smartadmin.rw/uploads/images/gallery/2026-08/6xUimage.png)
3. Select the current **Status**, such as **Backlog**, **Doing**, **Review**, or **Completed**. [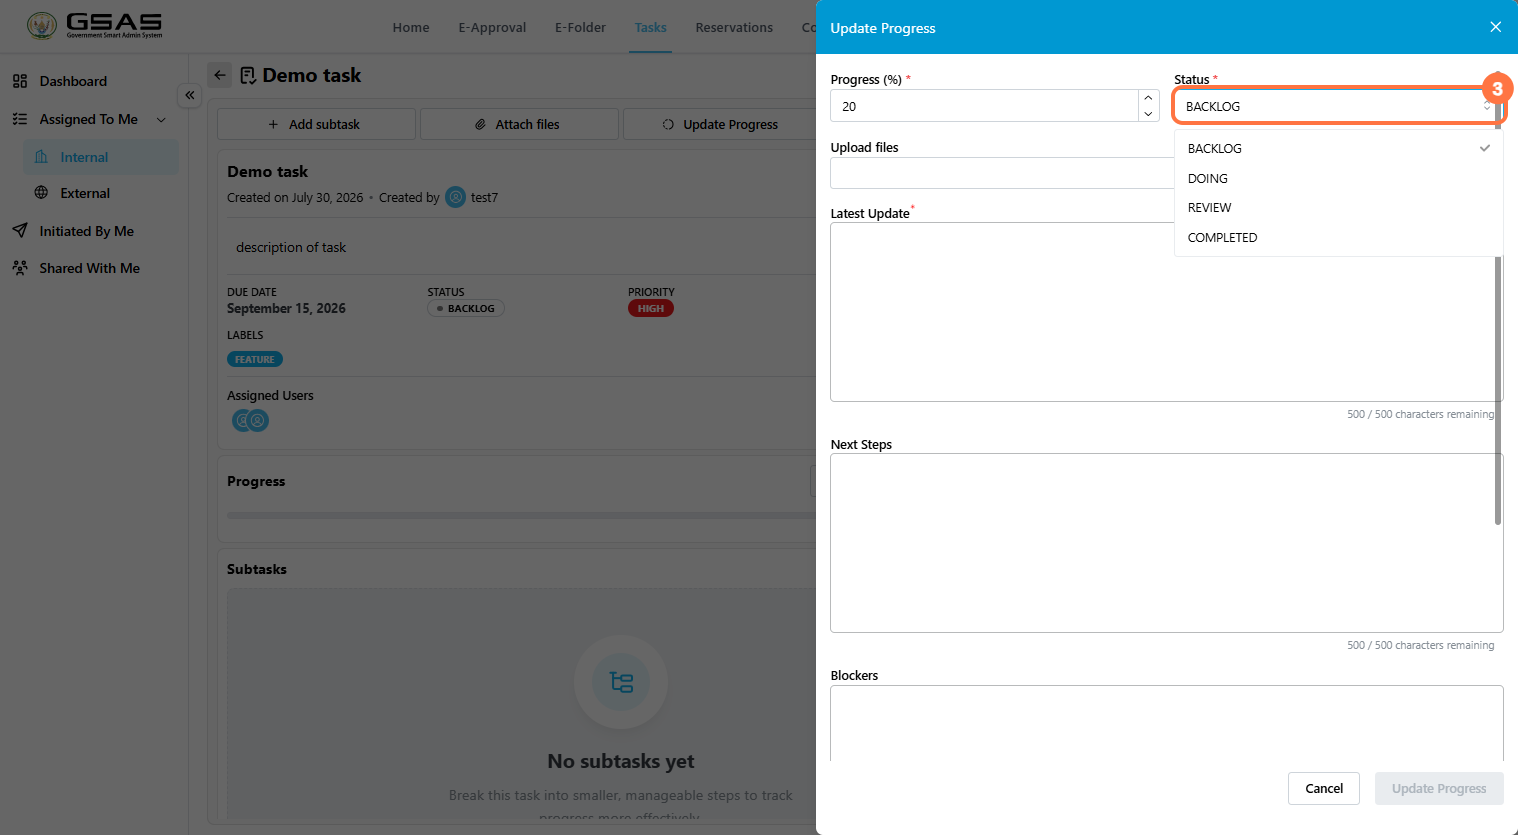](https://docs.smartadmin.rw/uploads/images/gallery/2026-08/cu0image.png)
4. Upload supporting files, if needed. This step is optional. [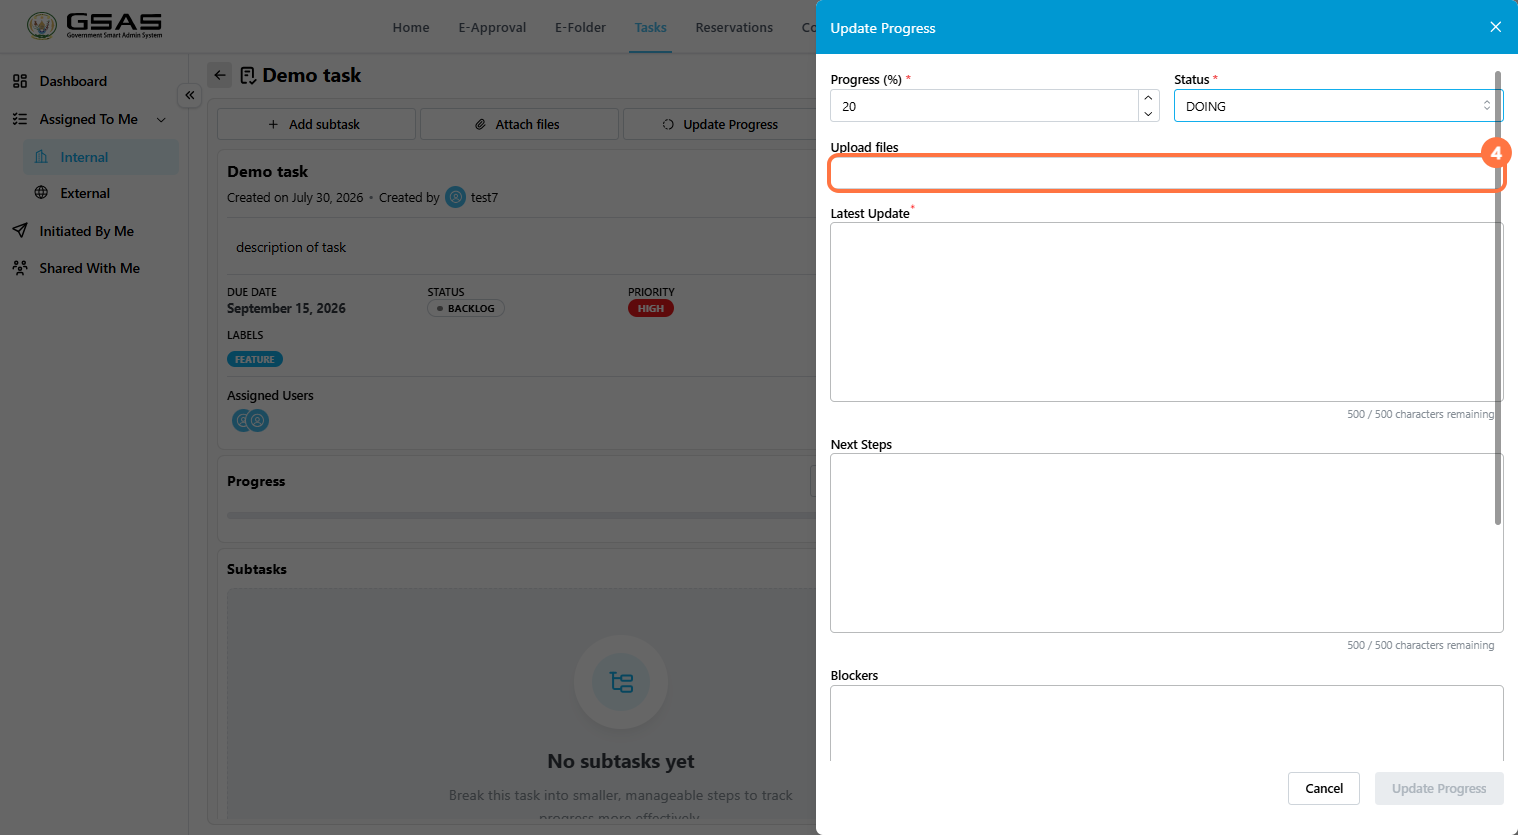](https://docs.smartadmin.rw/uploads/images/gallery/2026-08/SBximage.png)
5. Enter the **Latest Update**. [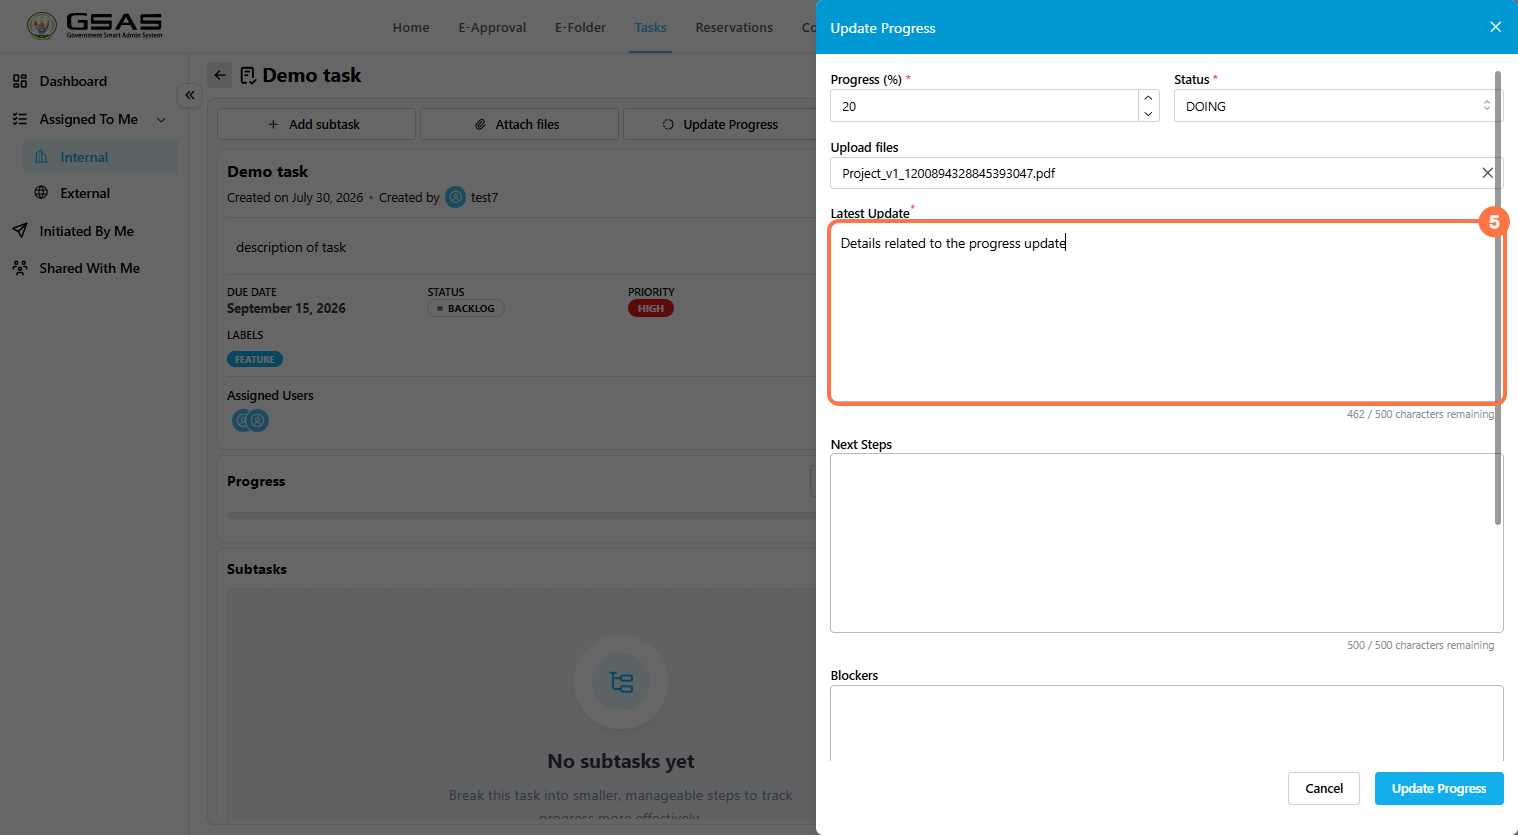](https://docs.smartadmin.rw/uploads/images/gallery/2026-08/i4qimage.png)
6. Add **Next Steps**, **Blockers**, or **Escalation Needed** where relevant. [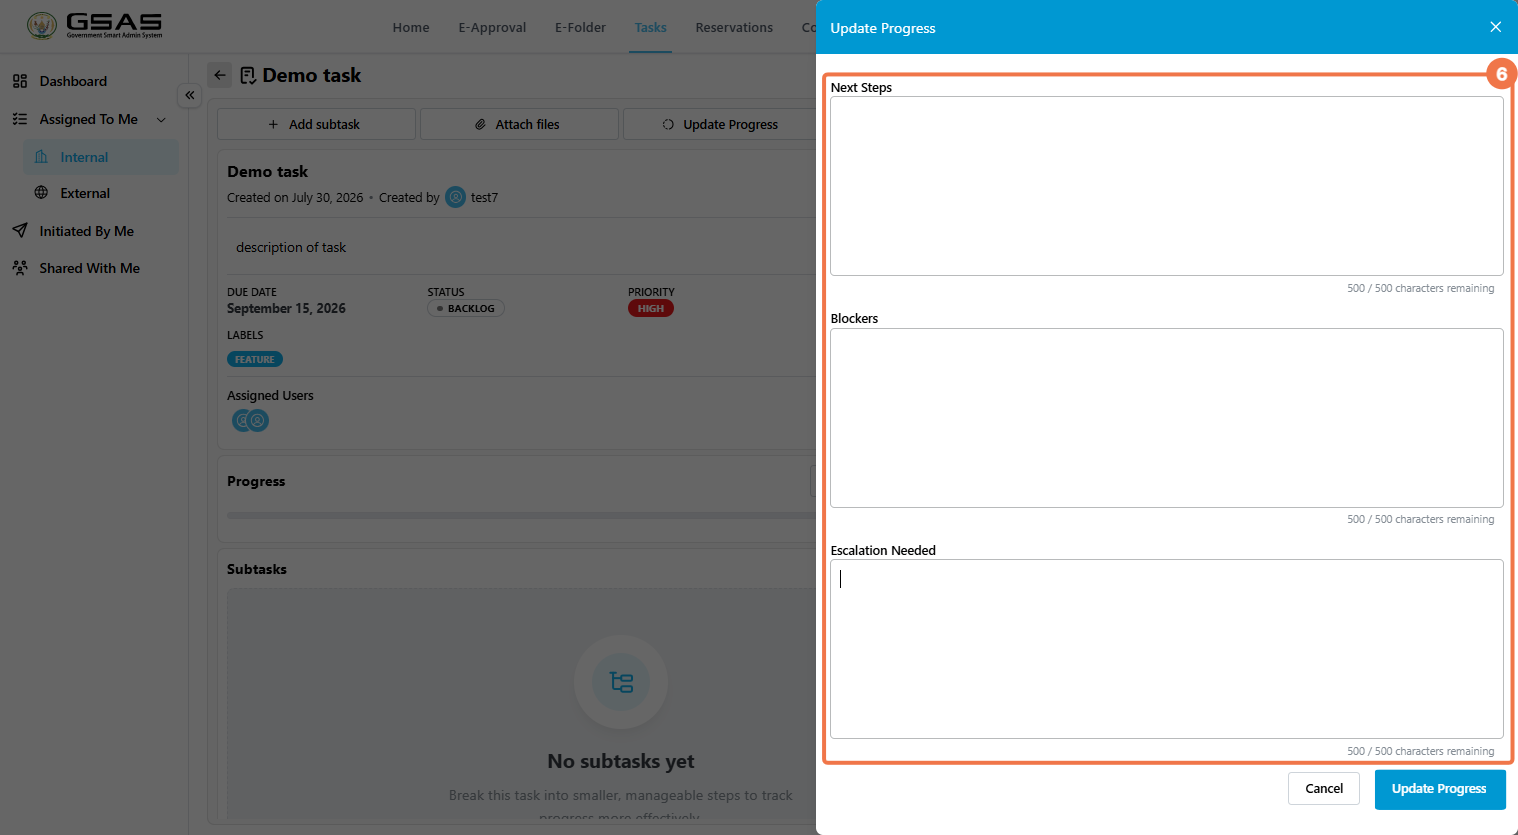](https://docs.smartadmin.rw/uploads/images/gallery/2026-08/3syimage.png)
7. Click **Update Progress**. [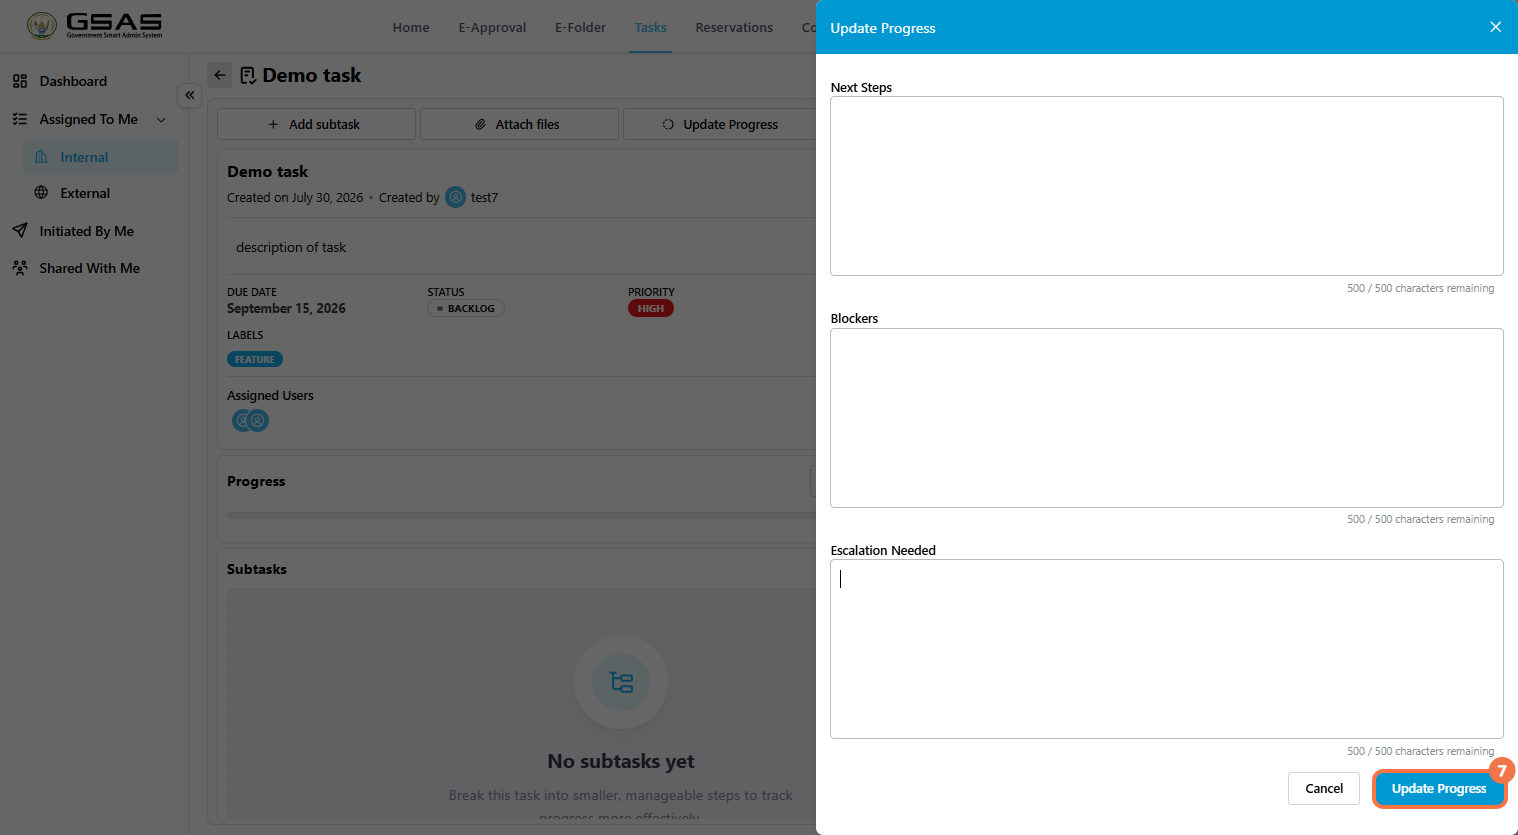](https://docs.smartadmin.rw/uploads/images/gallery/2026-08/Kwbimage.png)
| **Tip:** Progress percentage, status, due date, and priority affect the dashboard cards and charts. Keep them updated so dashboard statistics remain accurate. |
---
### Use Subtasks for Smaller Work Items
Subtasks help break a larger task into smaller pieces. They appear inside the parent task and can be opened like regular tasks.
[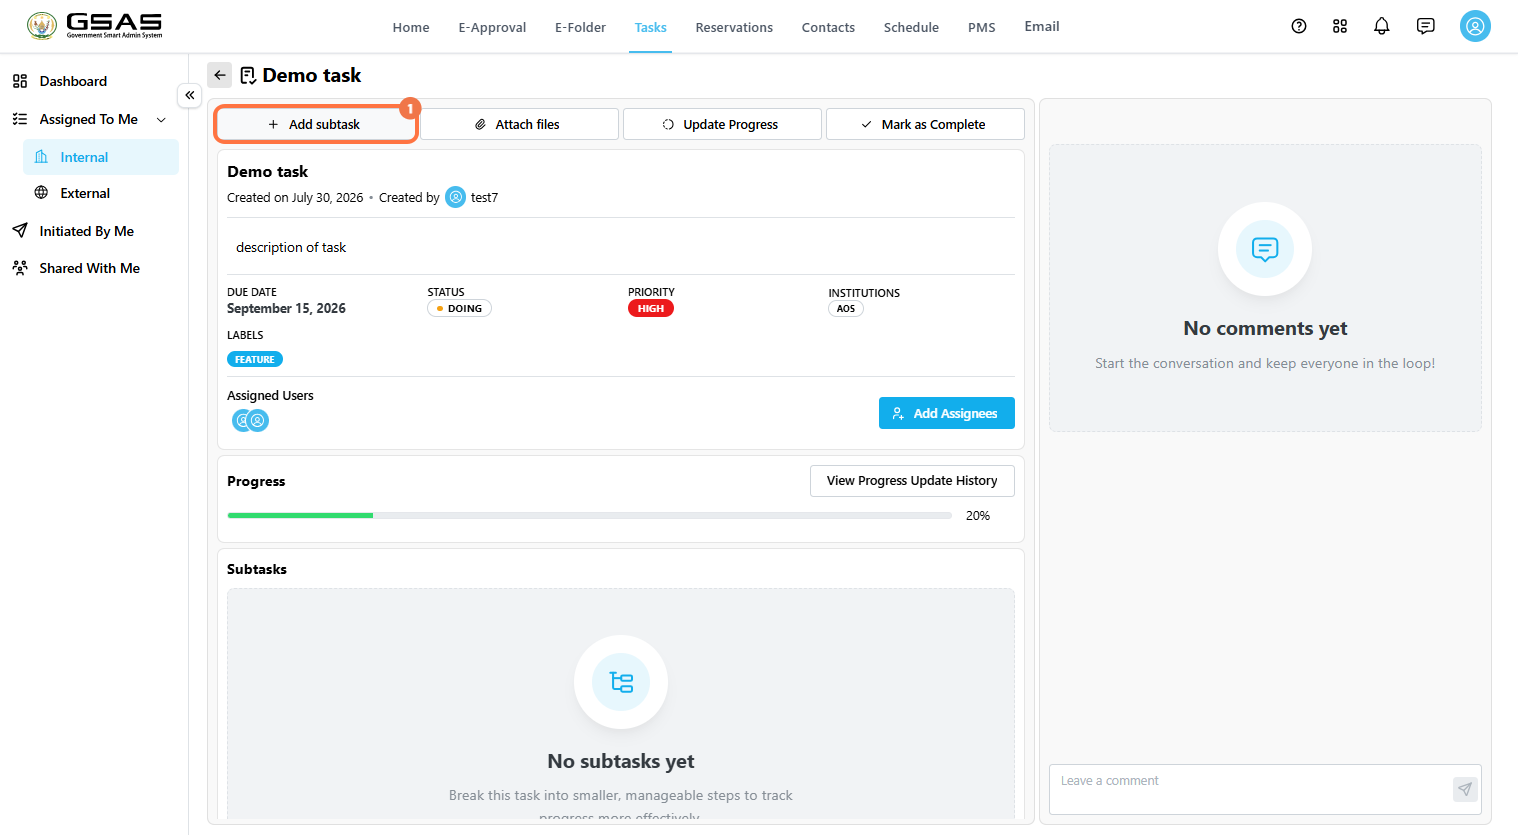](https://docs.smartadmin.rw/uploads/images/gallery/2026-08/Qwvimage.png)
[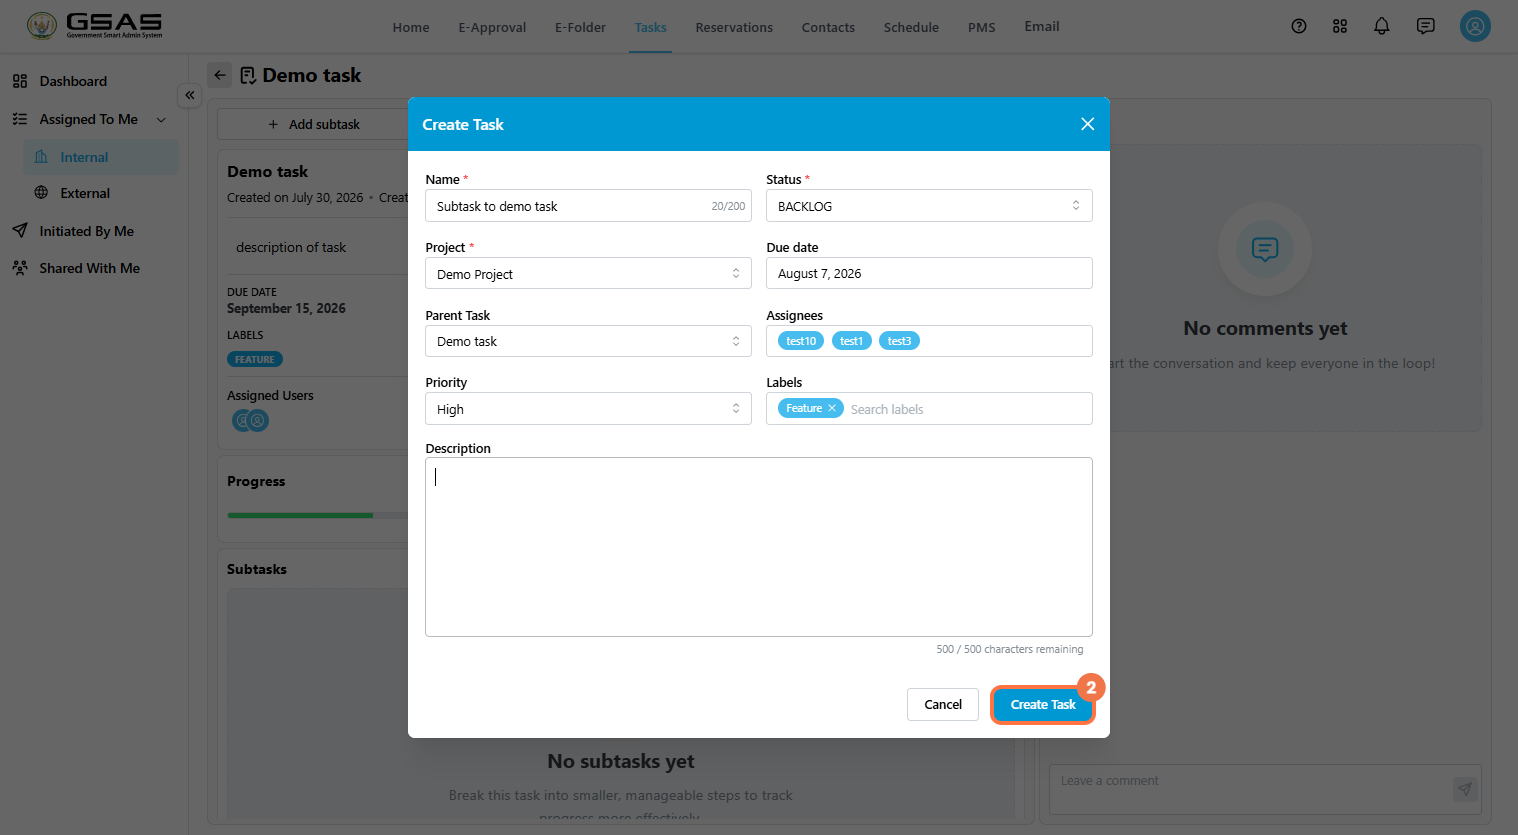](https://docs.smartadmin.rw/uploads/images/gallery/2026-08/N2iimage.png)
[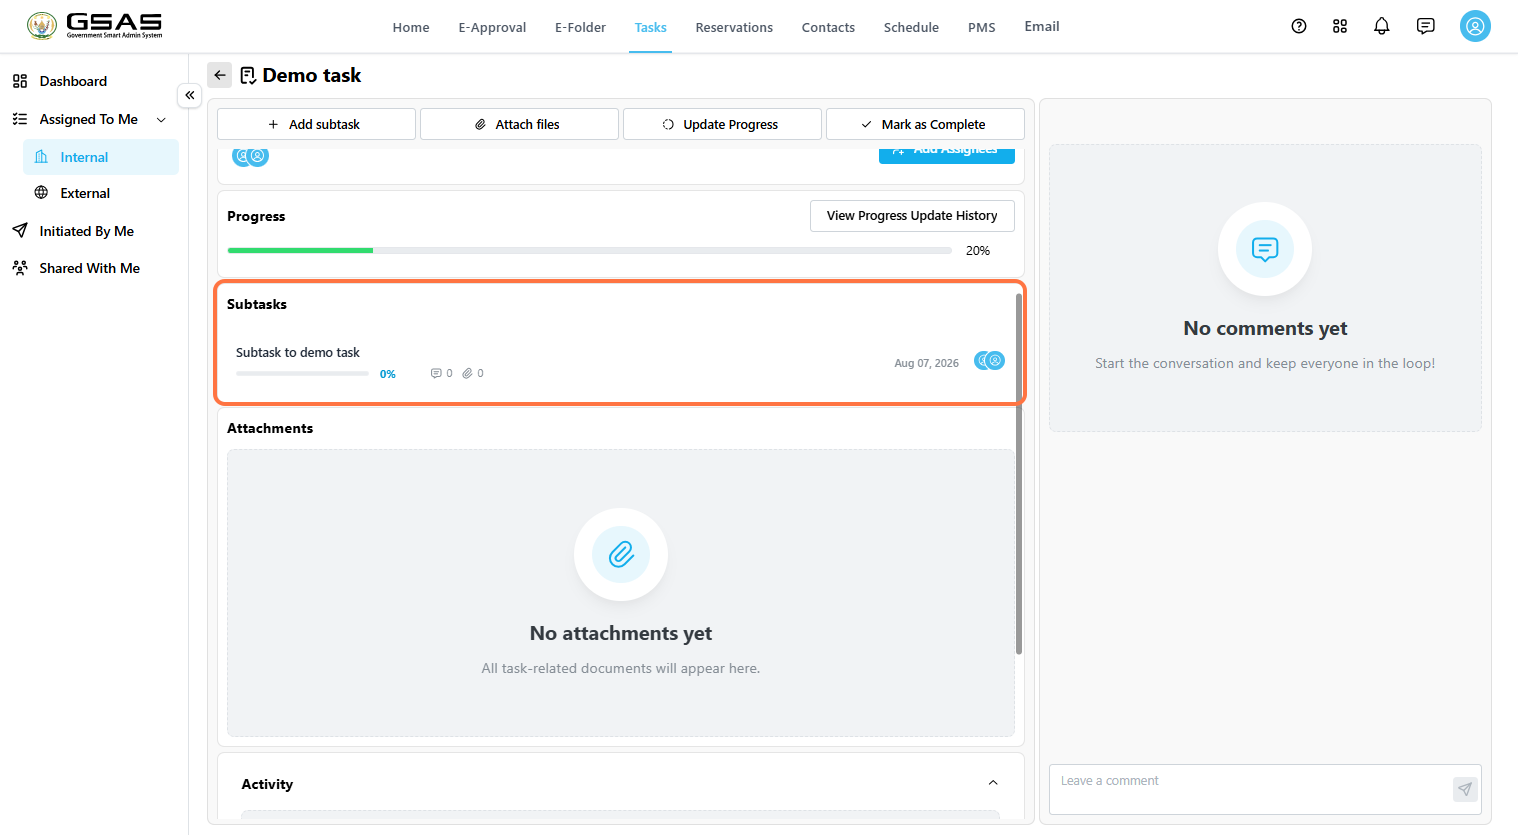](https://docs.smartadmin.rw/uploads/images/gallery/2026-08/zM0image.png)
---
### Attach Supporting Files
Files related to the task can be attached from your computer or selected from **E-Folder**. Attached files appear in the **Attachments** section of the task.
[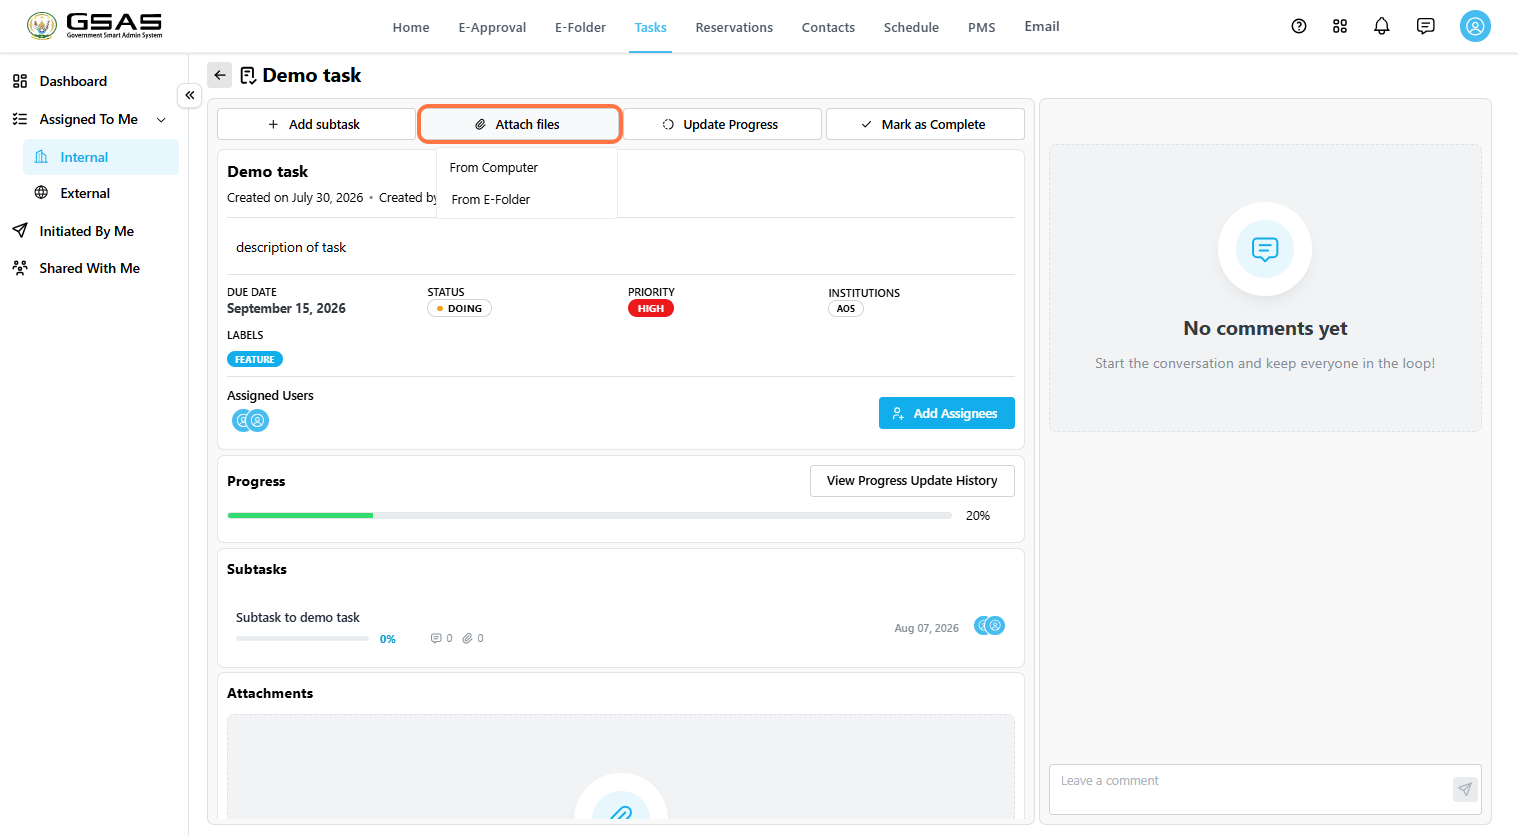](https://docs.smartadmin.rw/uploads/images/gallery/2026-08/yW8image.png)
---
[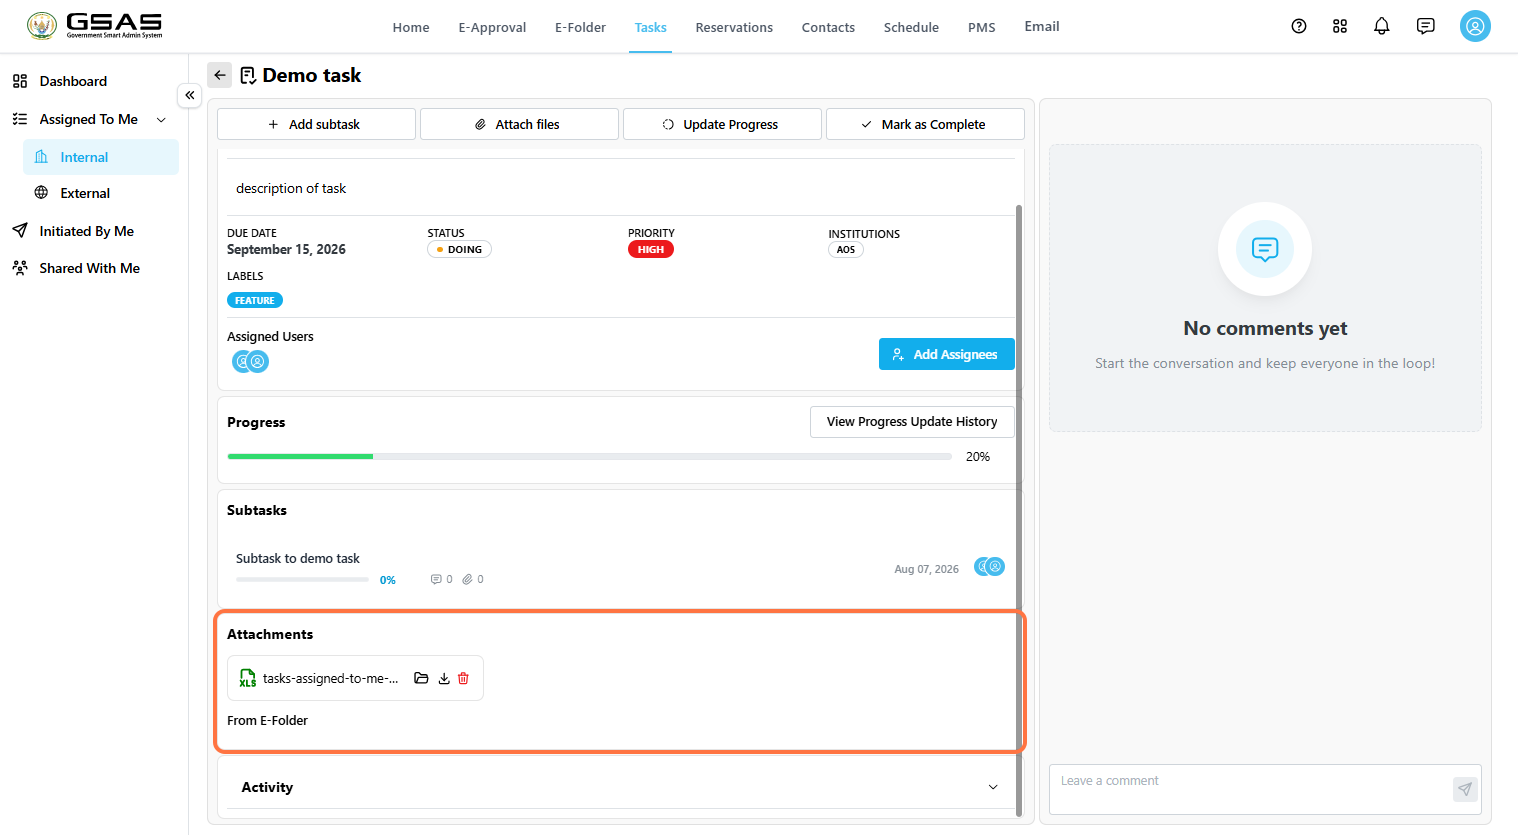](https://docs.smartadmin.rw/uploads/images/gallery/2026-08/H4Wimage.png)
---
### Add a Comment
Use the comments panel to ask questions, share quick updates, or follow up with other users on the task.
Type your message in the comment box and click on the send icon.
[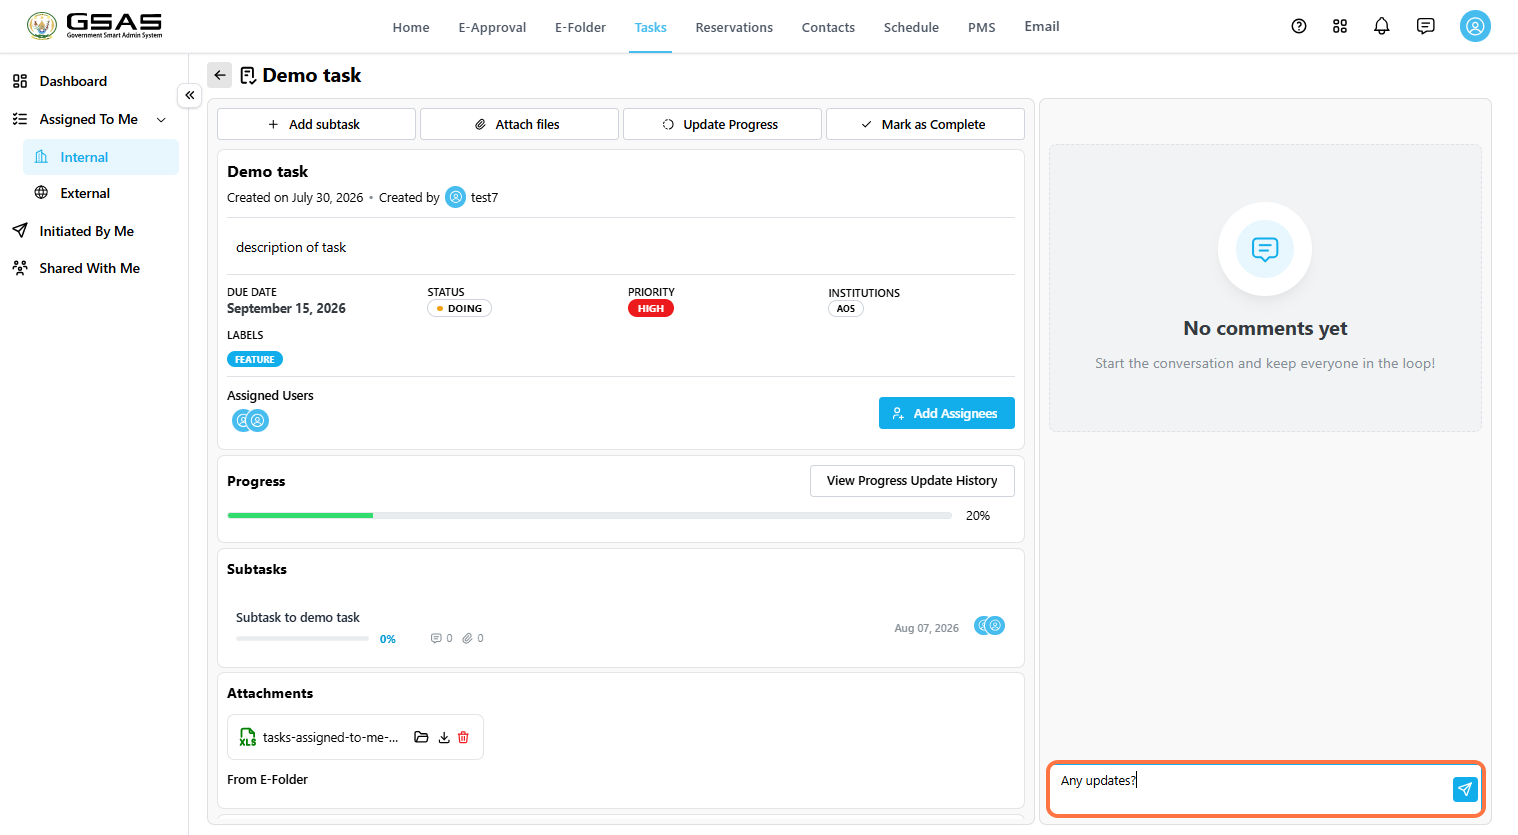](https://docs.smartadmin.rw/uploads/images/gallery/2026-08/YINimage.png)
The comment can be deleted by clicking on the trash icon visible in the upper right side of the comment.
[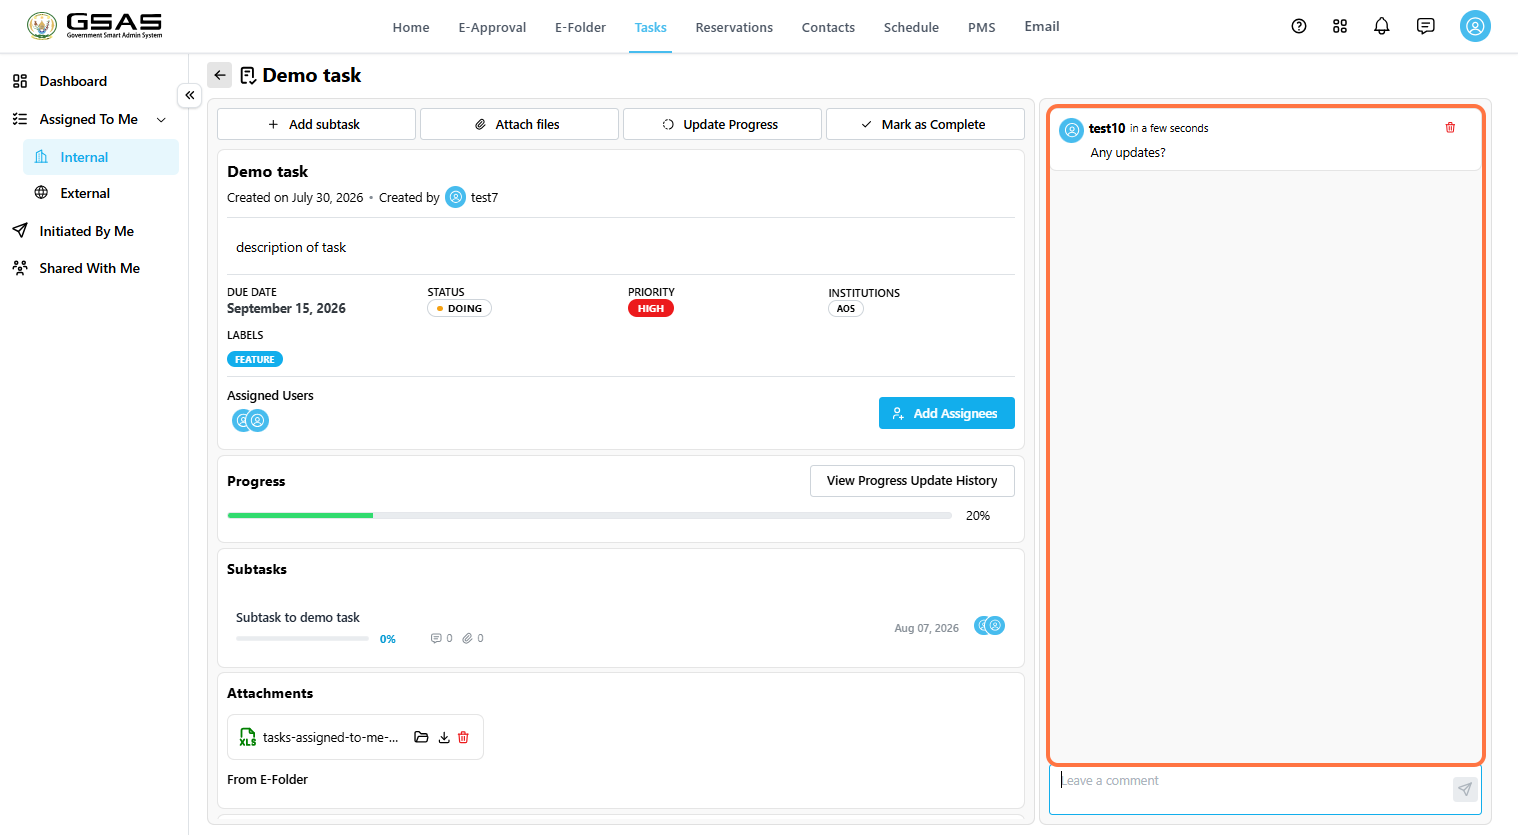](https://docs.smartadmin.rw/uploads/images/gallery/2026-08/xGlimage.png)
---
### View Progress Update History
This is most often checked by whoever assigned the task, as a way to follow how work is progressing over time, though anyone with access to the task can view it.
1. Open the task.
2. Click **View Progress Update History**. [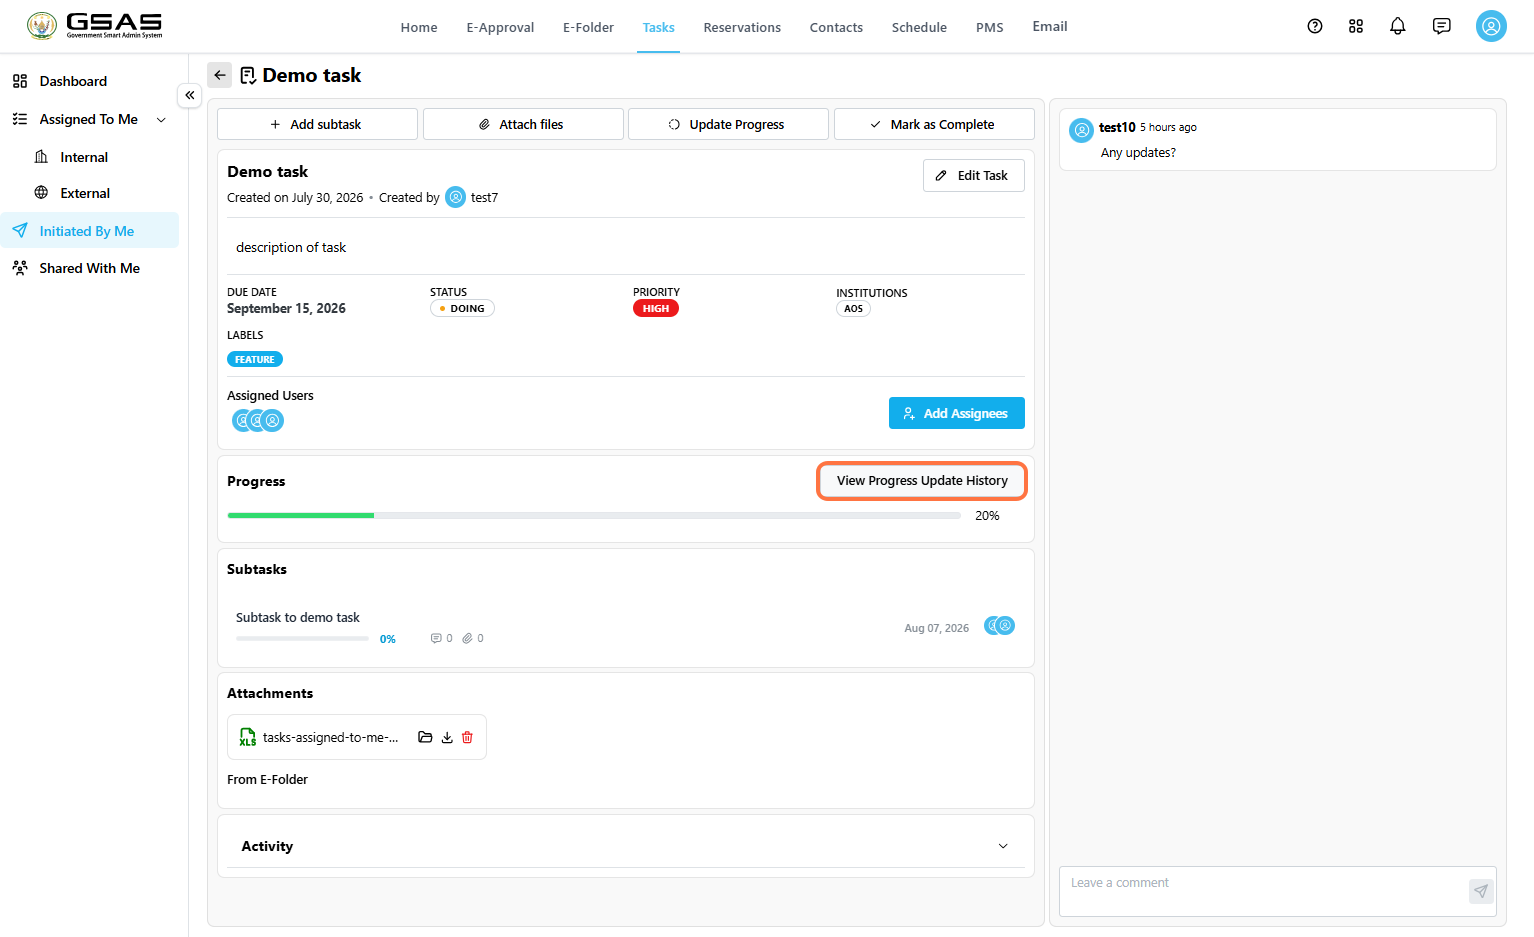](https://docs.smartadmin.rw/uploads/images/gallery/2026-08/BJmimage.png)
3. Review the update percentage, update date, the user who made the update, attachments related to the update, latest update notes and everything else added by the user.
[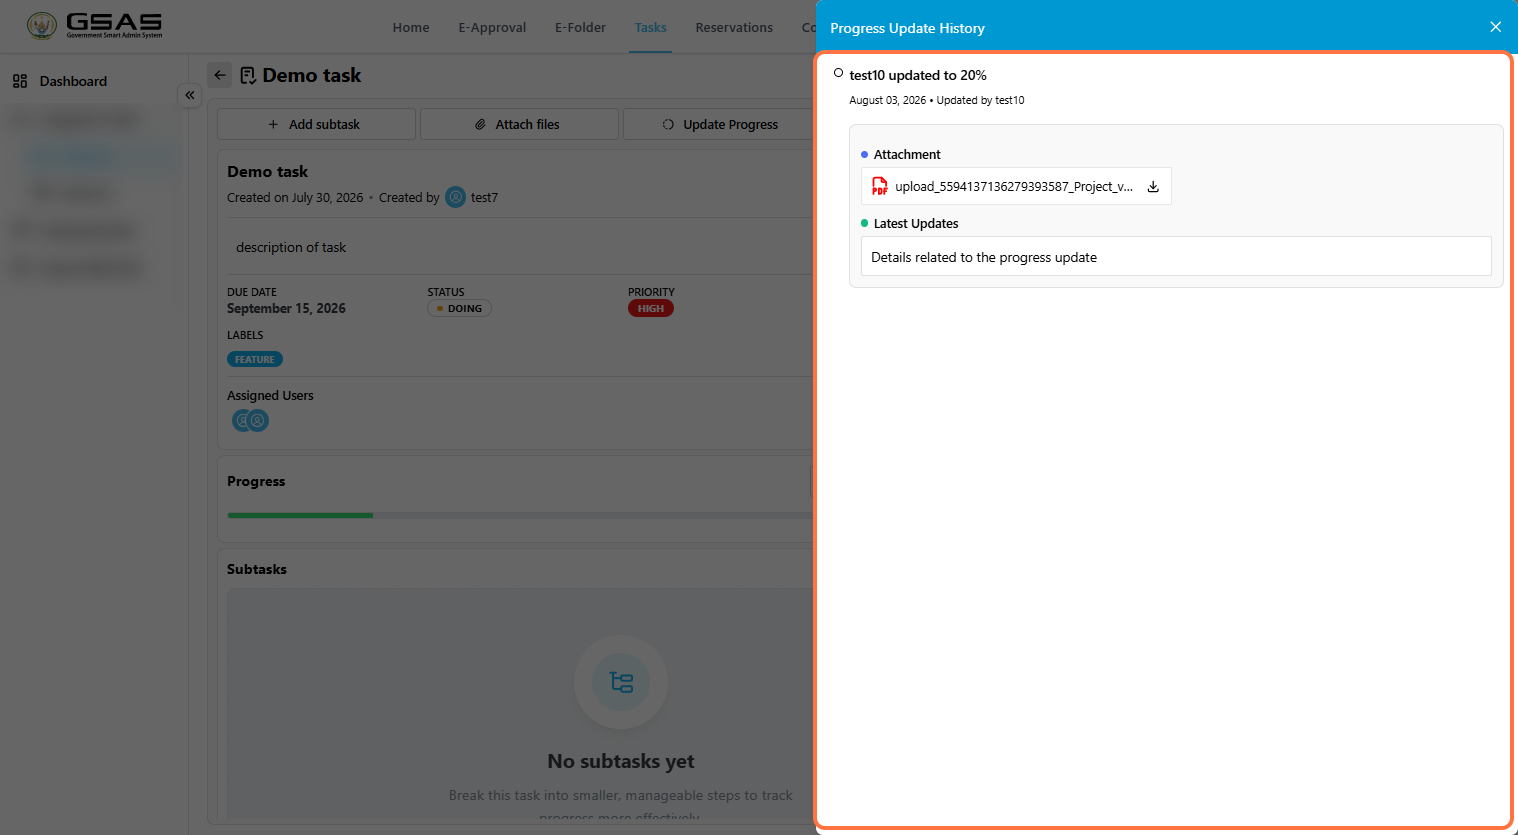](https://docs.smartadmin.rw/uploads/images/gallery/2026-08/qtSimage.png)
### Editing Progress Update History
Only the assignee who logged a progress update can edit it. [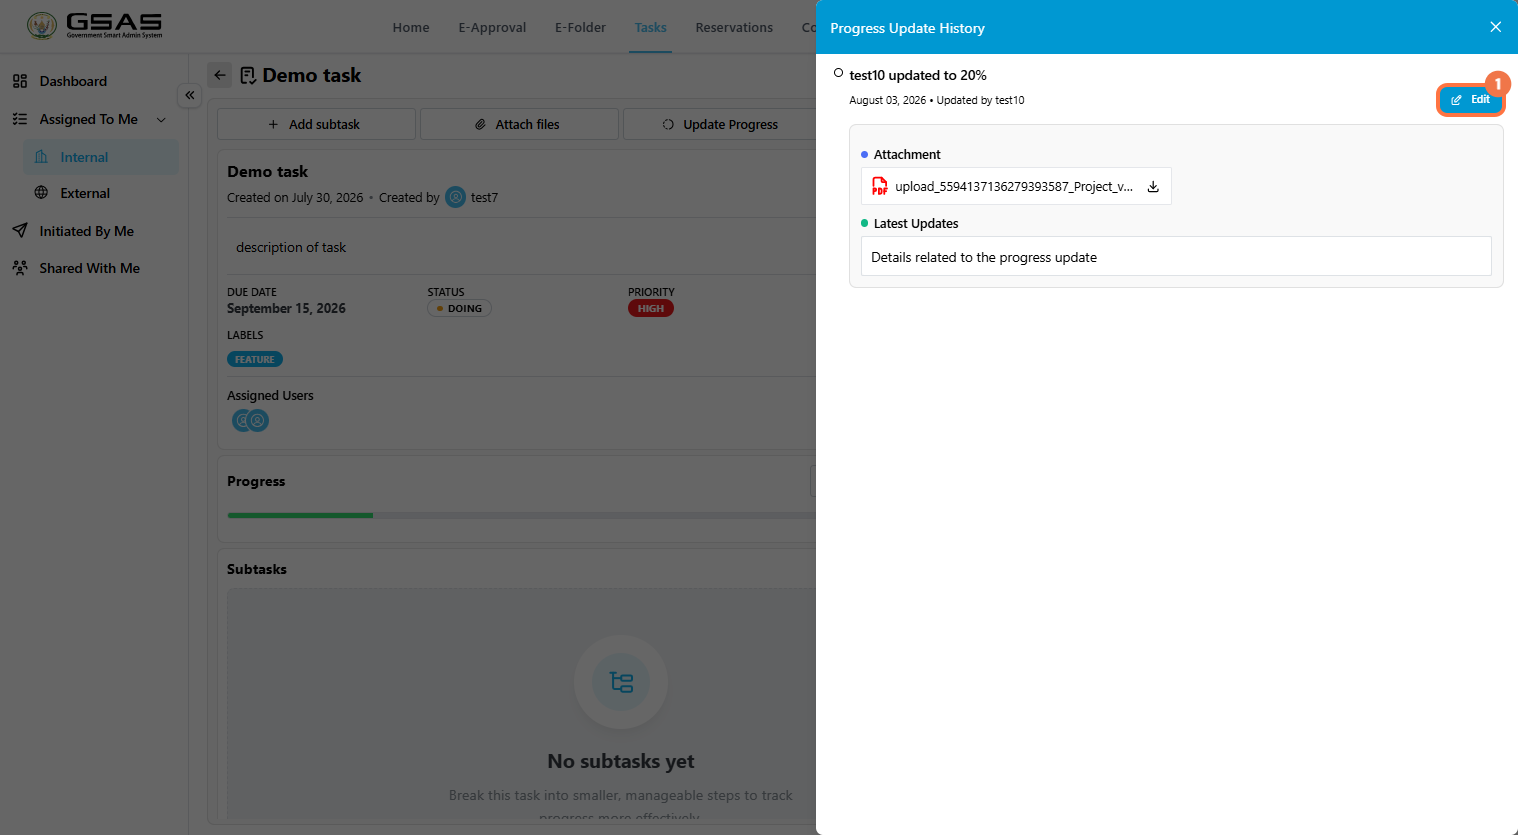](https://docs.smartadmin.rw/uploads/images/gallery/2026-08/Iy3image.png)
[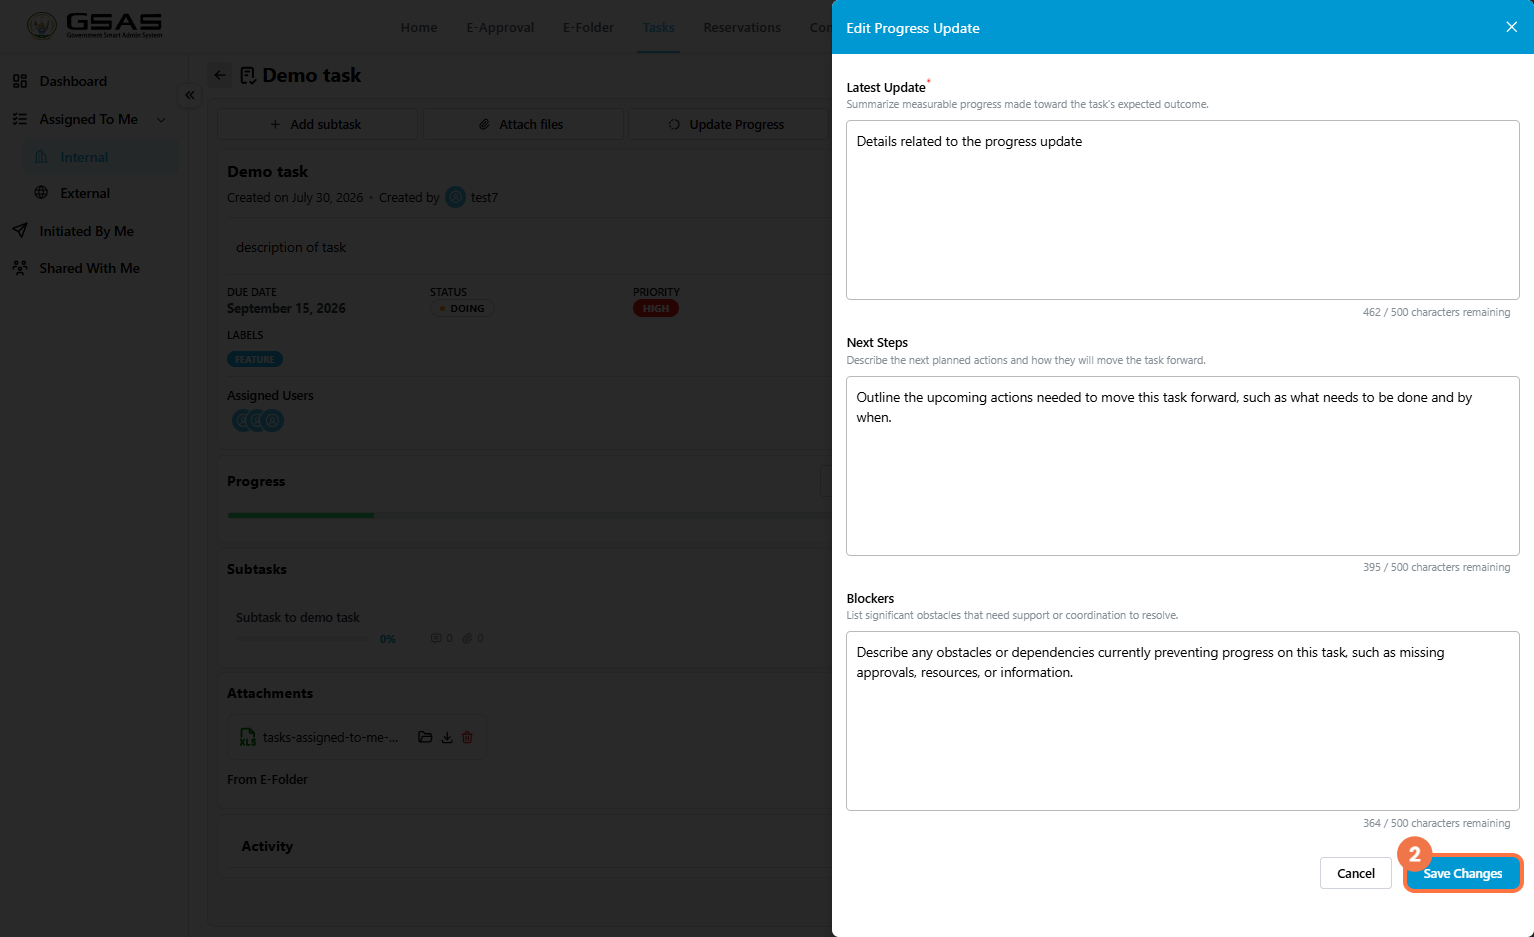](https://docs.smartadmin.rw/uploads/images/gallery/2026-08/XGRimage.png)
---
### View Activity
The **Activity** log is a running record of everything that has happened on the task; creation, assignment changes, progress updates, and more separate from the detailed progress percentage history above. Like progress history, it's most often reviewed by whoever assigned the task, though it's visible to anyone with access.
[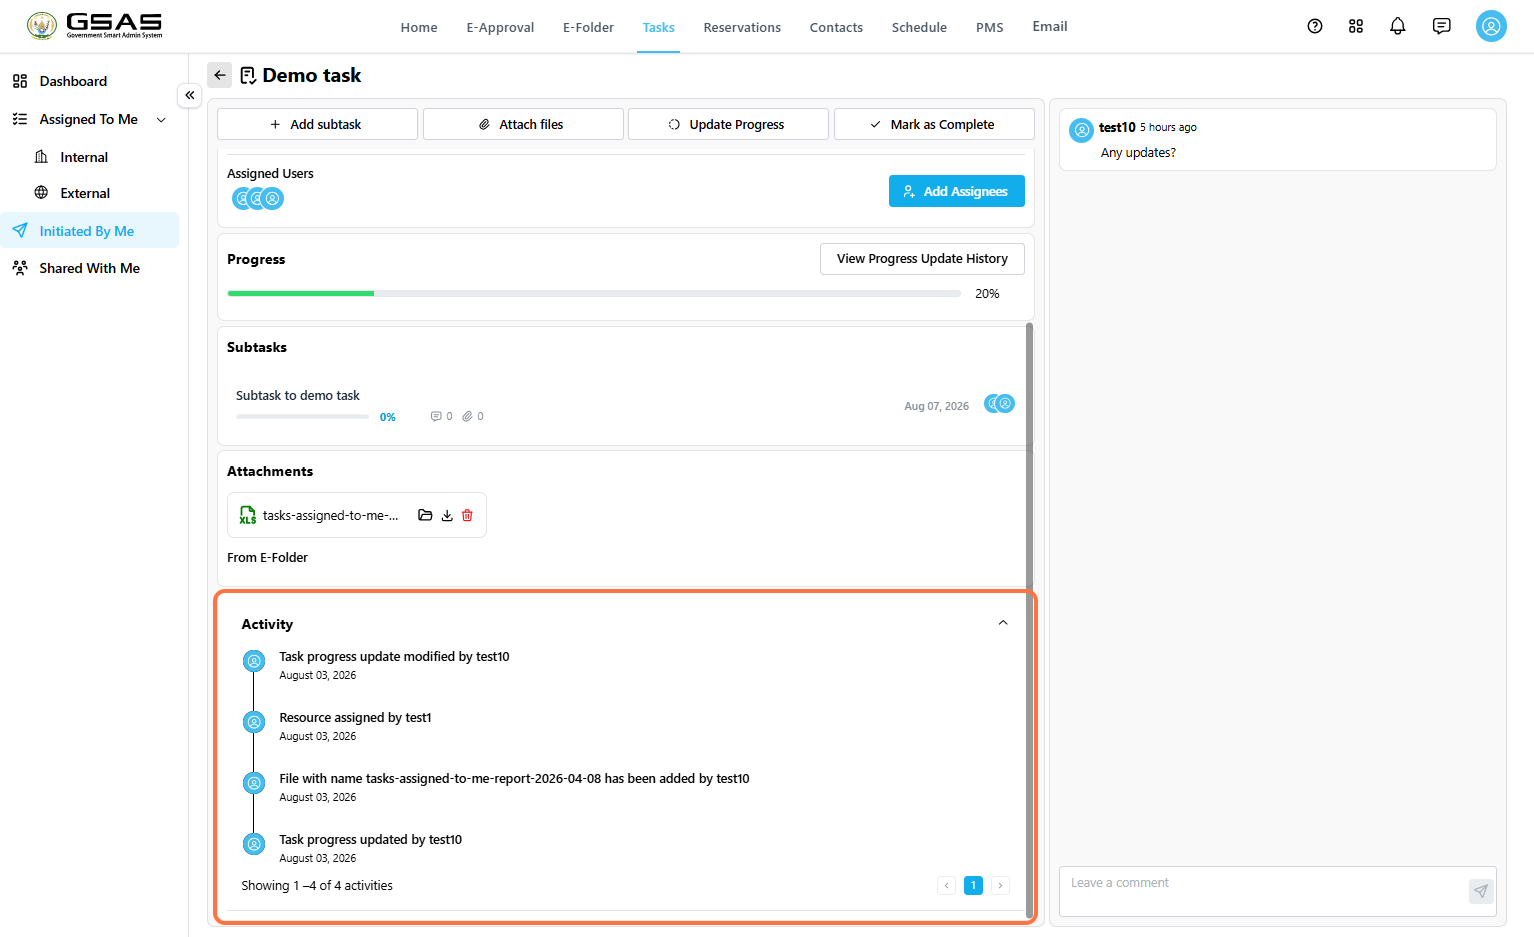](https://docs.smartadmin.rw/uploads/images/gallery/2026-08/fusimage.png)
---
### Mark the Task as Complete
When the work is finished, click **Mark as Complete**. This updates the task status, sets the progress percentage to 100% and contributes to the task completion rate chart shown on the dashboard.
[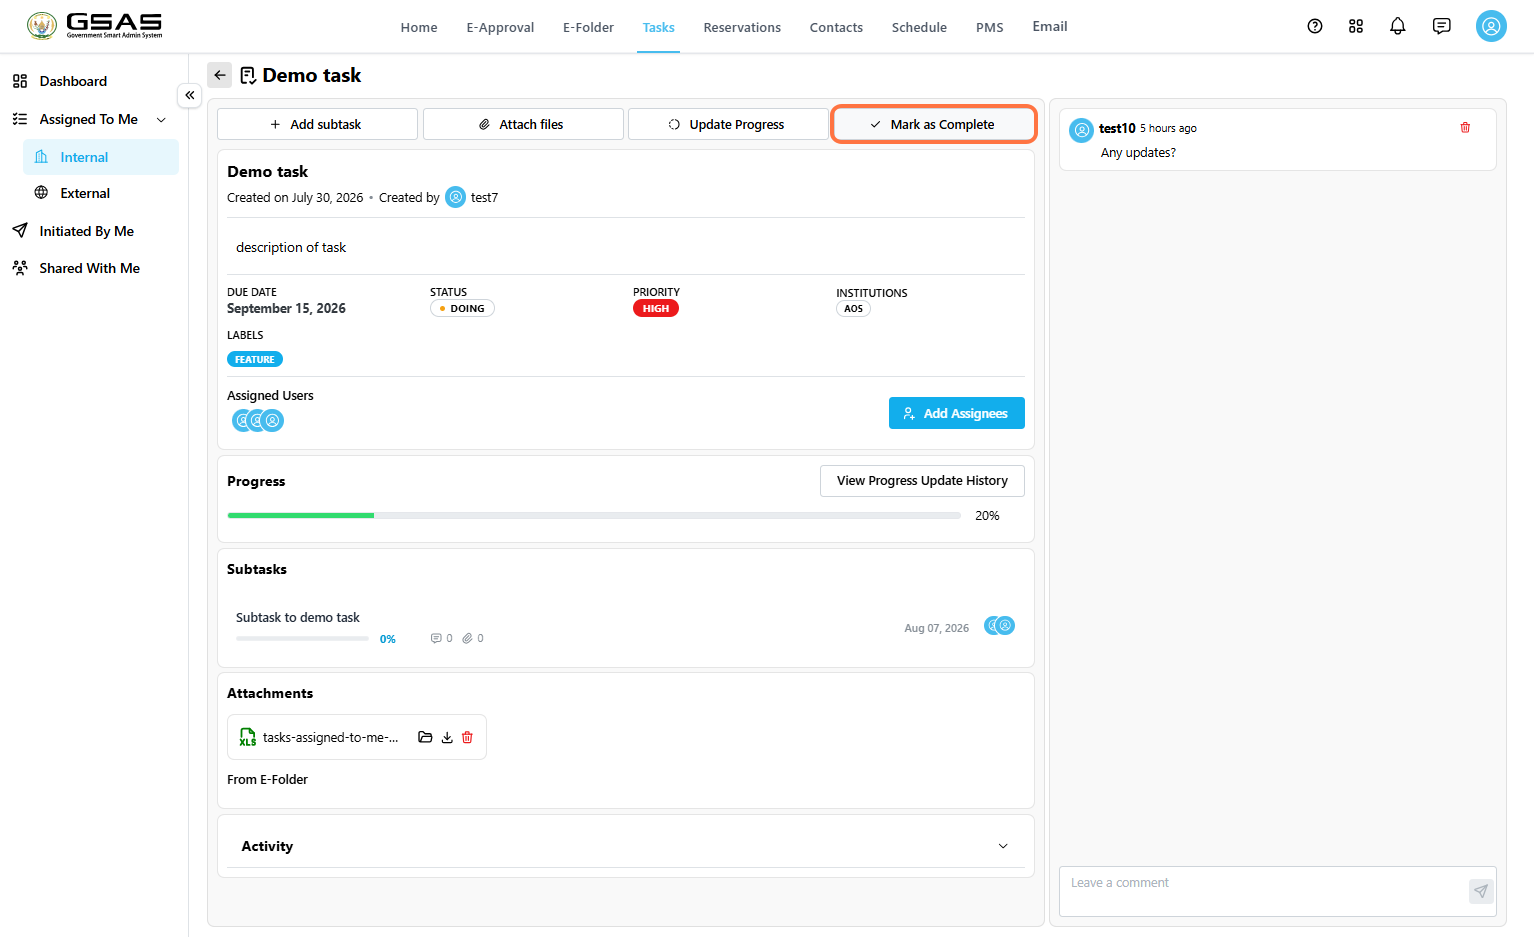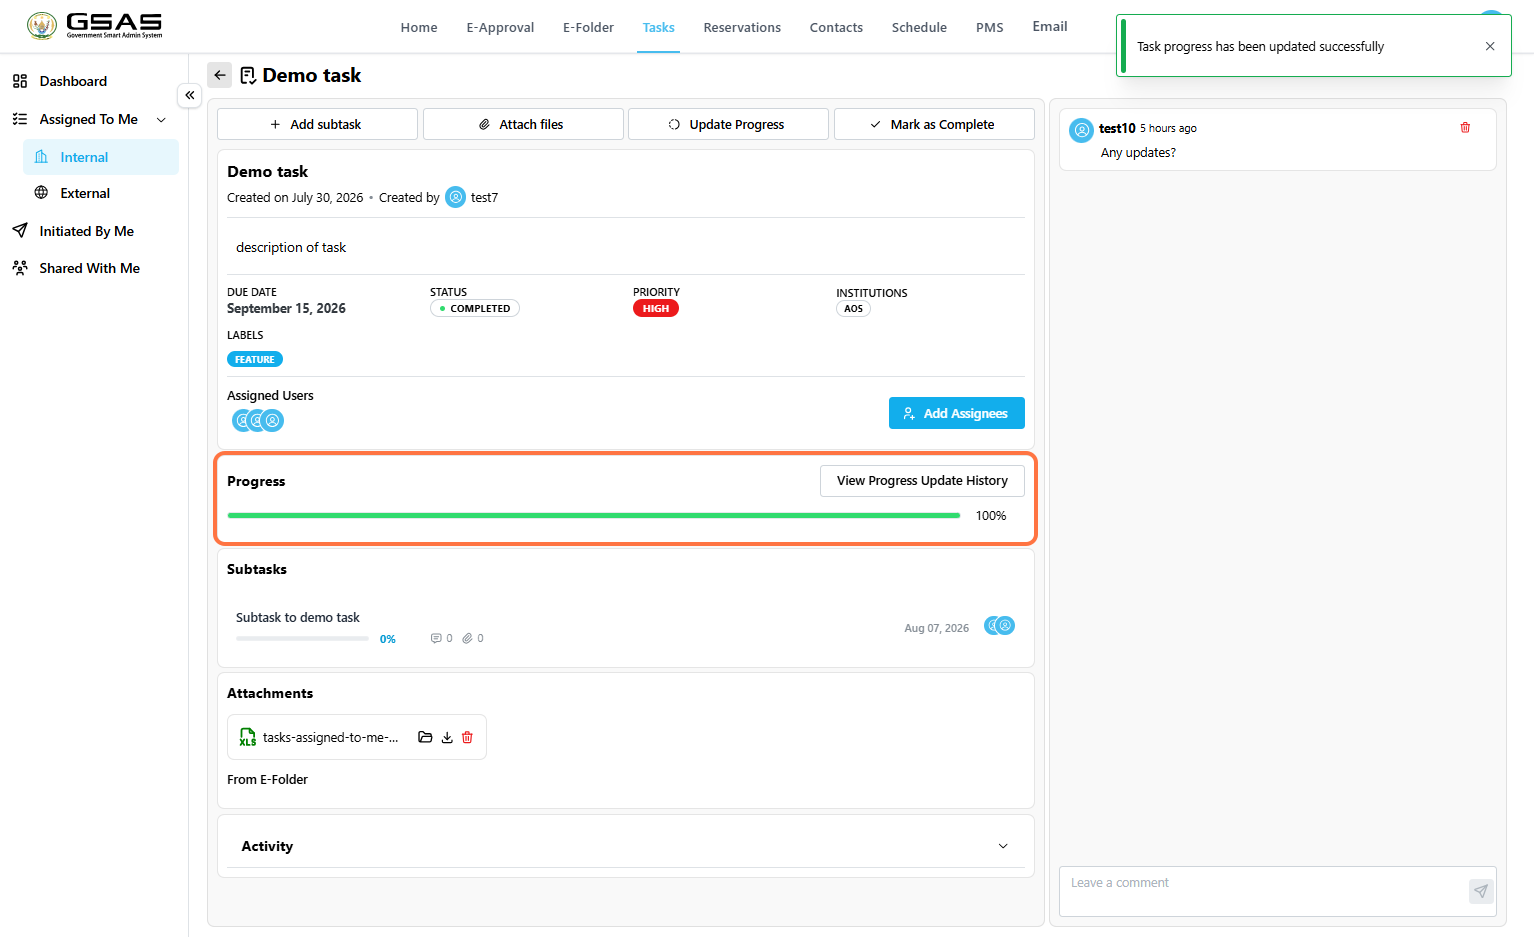](https://docs.smartadmin.rw/uploads/images/gallery/2026-08/jUaimage.png)
# Sharing Tasks
---
Use **Share** to give another user access to a task project. The user the task has been shared with can access it from **Shared with Me** within the Tasks module.
| **Before you begin:** You must have permission to manage or share the task project. |
### Open the Share Window
1. Go to **Tasks**.
2. Click **Initiated By Me**.
3. Find the project you want to share.
4. Open the project options menu and select **Share**. [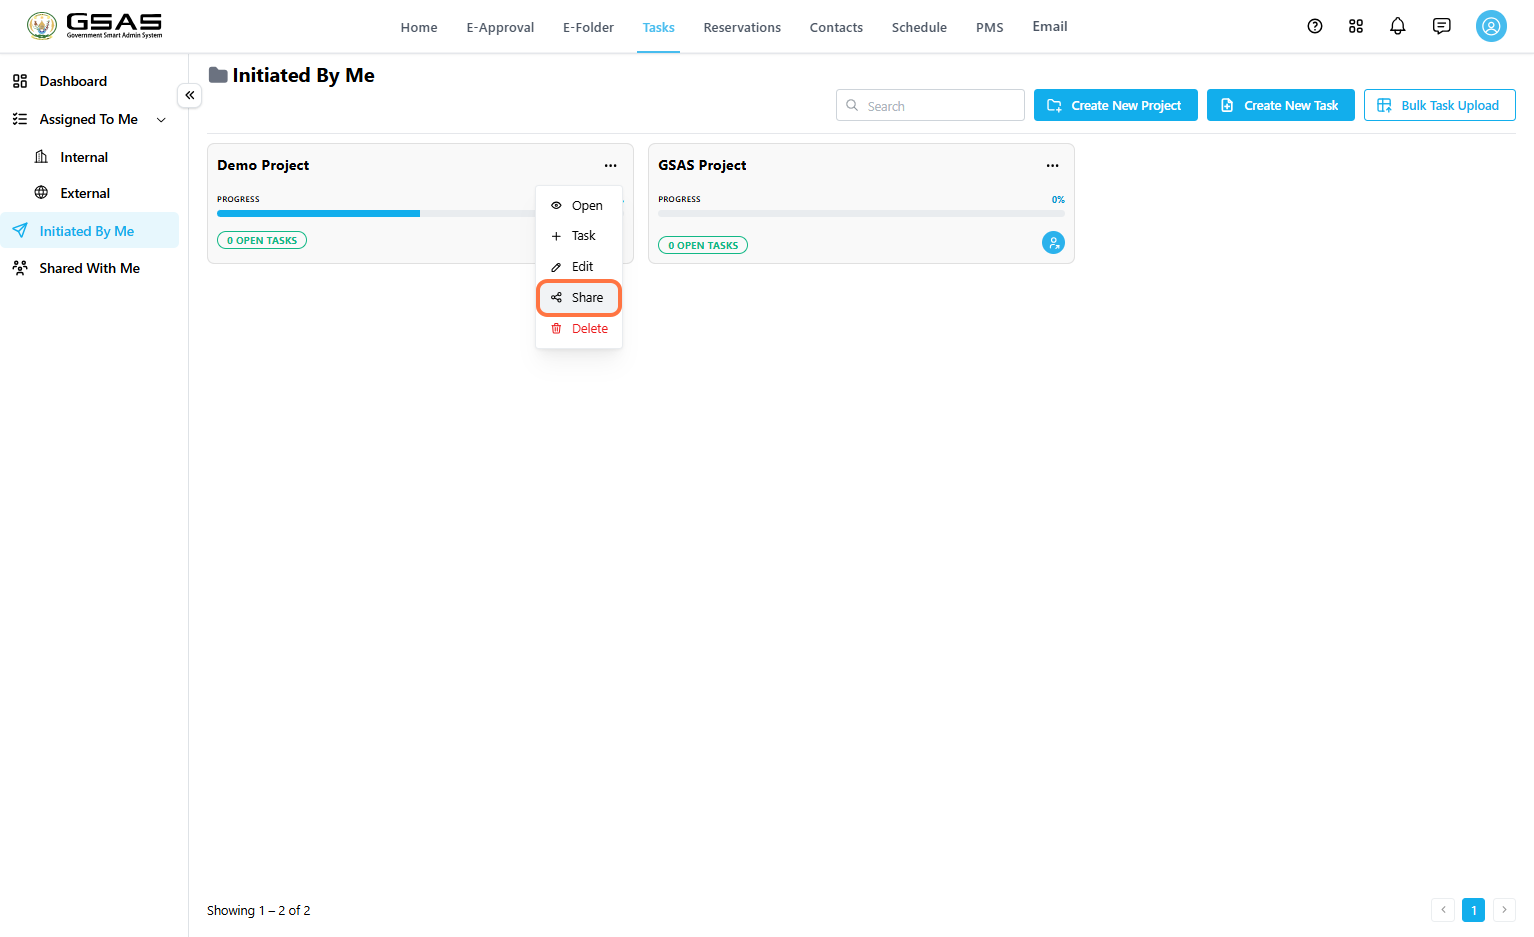](https://docs.smartadmin.rw/uploads/images/gallery/2026-08/zlyimage.png)
---
### Search for the User
1. **Search** users to share with by user name. [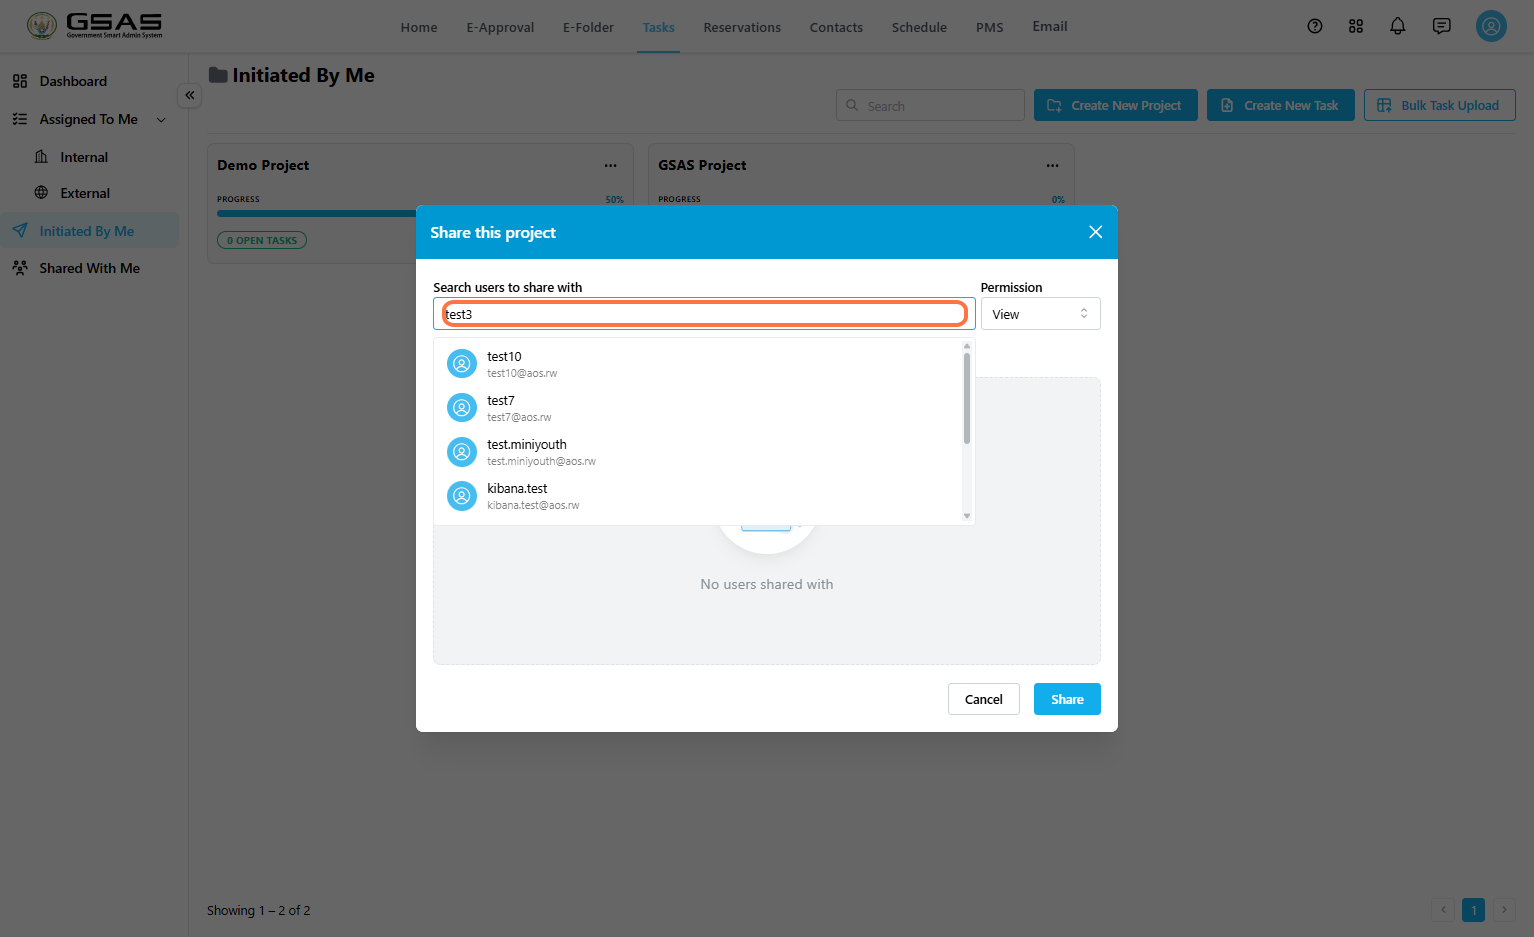](https://docs.smartadmin.rw/uploads/images/gallery/2026-08/mvkimage.png)
2. Select the matching user from the search result. [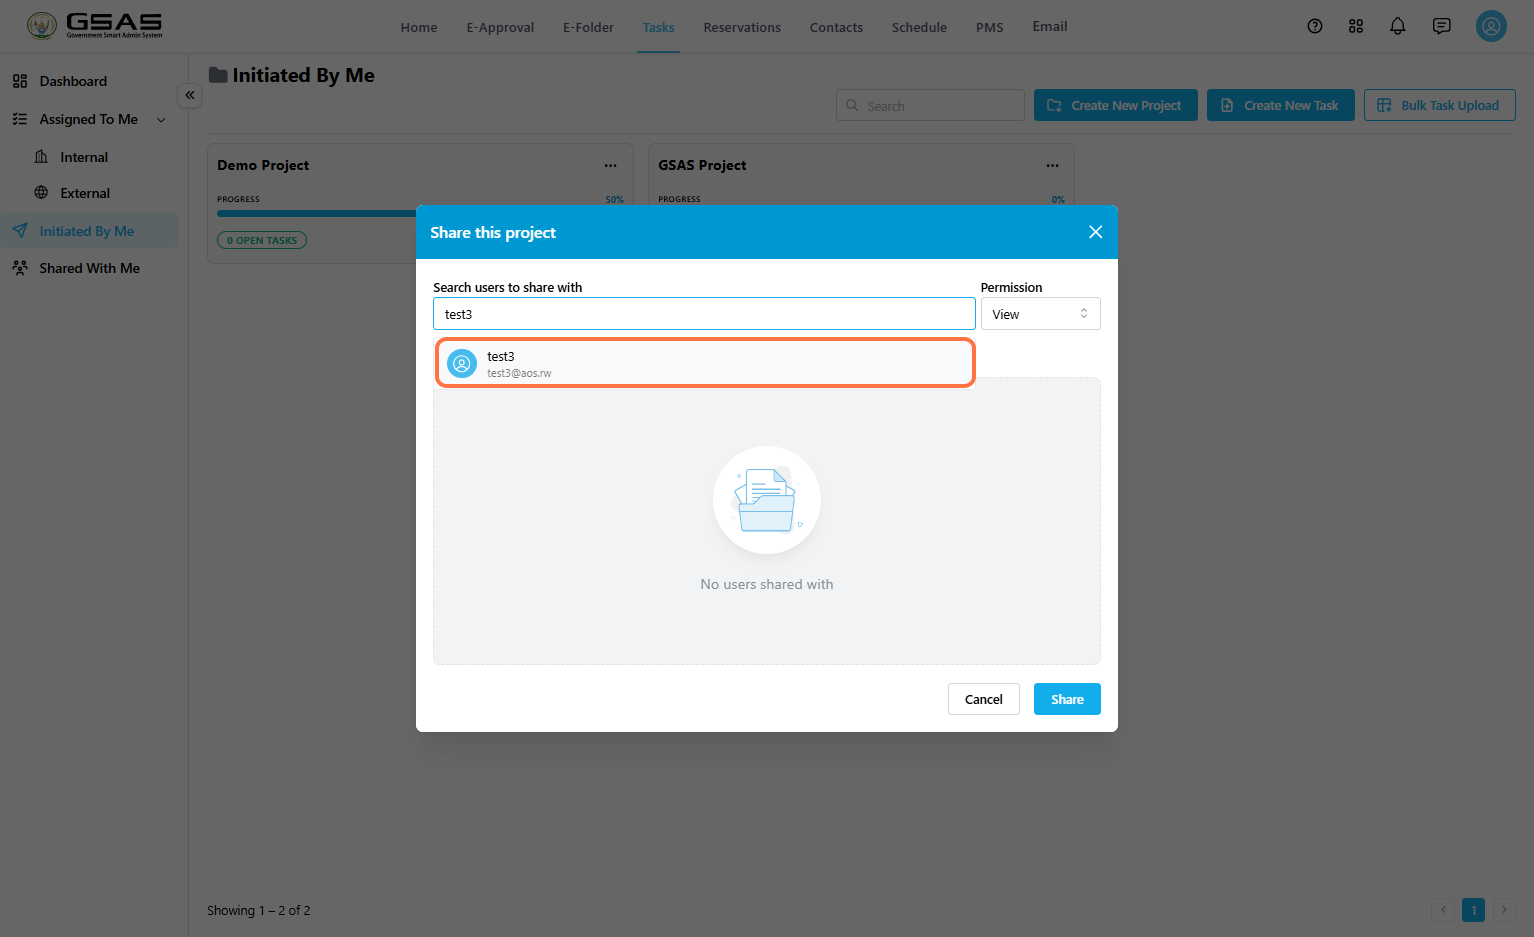](https://docs.smartadmin.rw/uploads/images/gallery/2026-08/ZlKimage.png)
---
### Choose Permission
Use the **Permission** dropdown to choose what the shared user can do in the project.
- **View:** Allows the user to view the shared project.
- **Edit:** Allows the user to make changes to the tasks within the project, create new tasks within the project, and re-share the shared project. [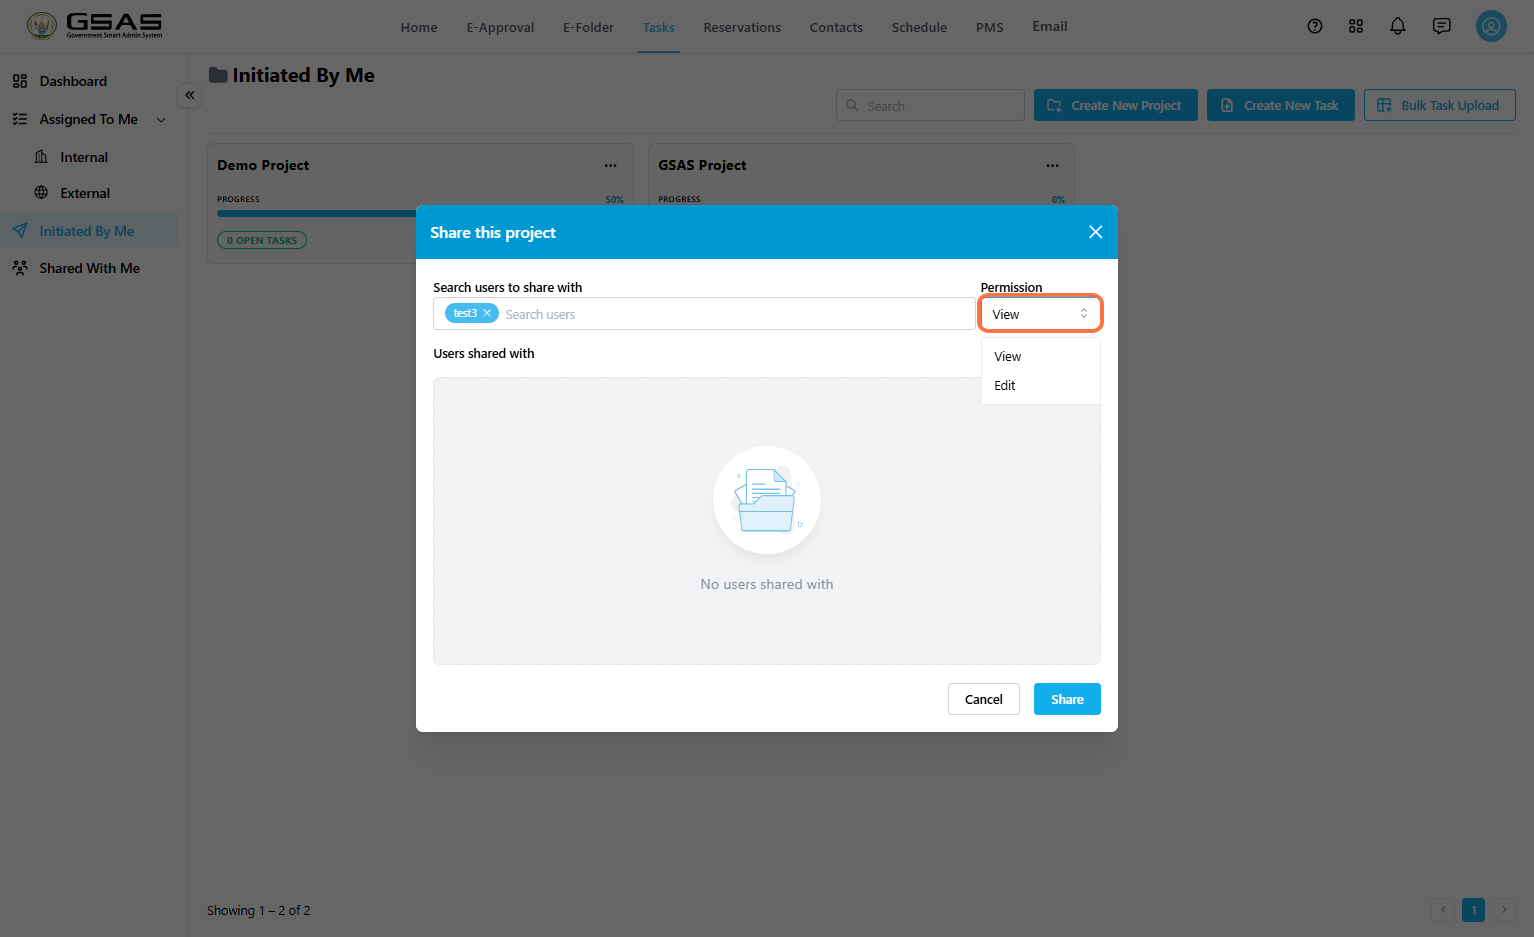](https://docs.smartadmin.rw/uploads/images/gallery/2026-08/7zJimage.png)
---
### Share the Project
1. Confirm that the correct user is selected.
2. Confirm the selected permission.
3. Click **Share**. [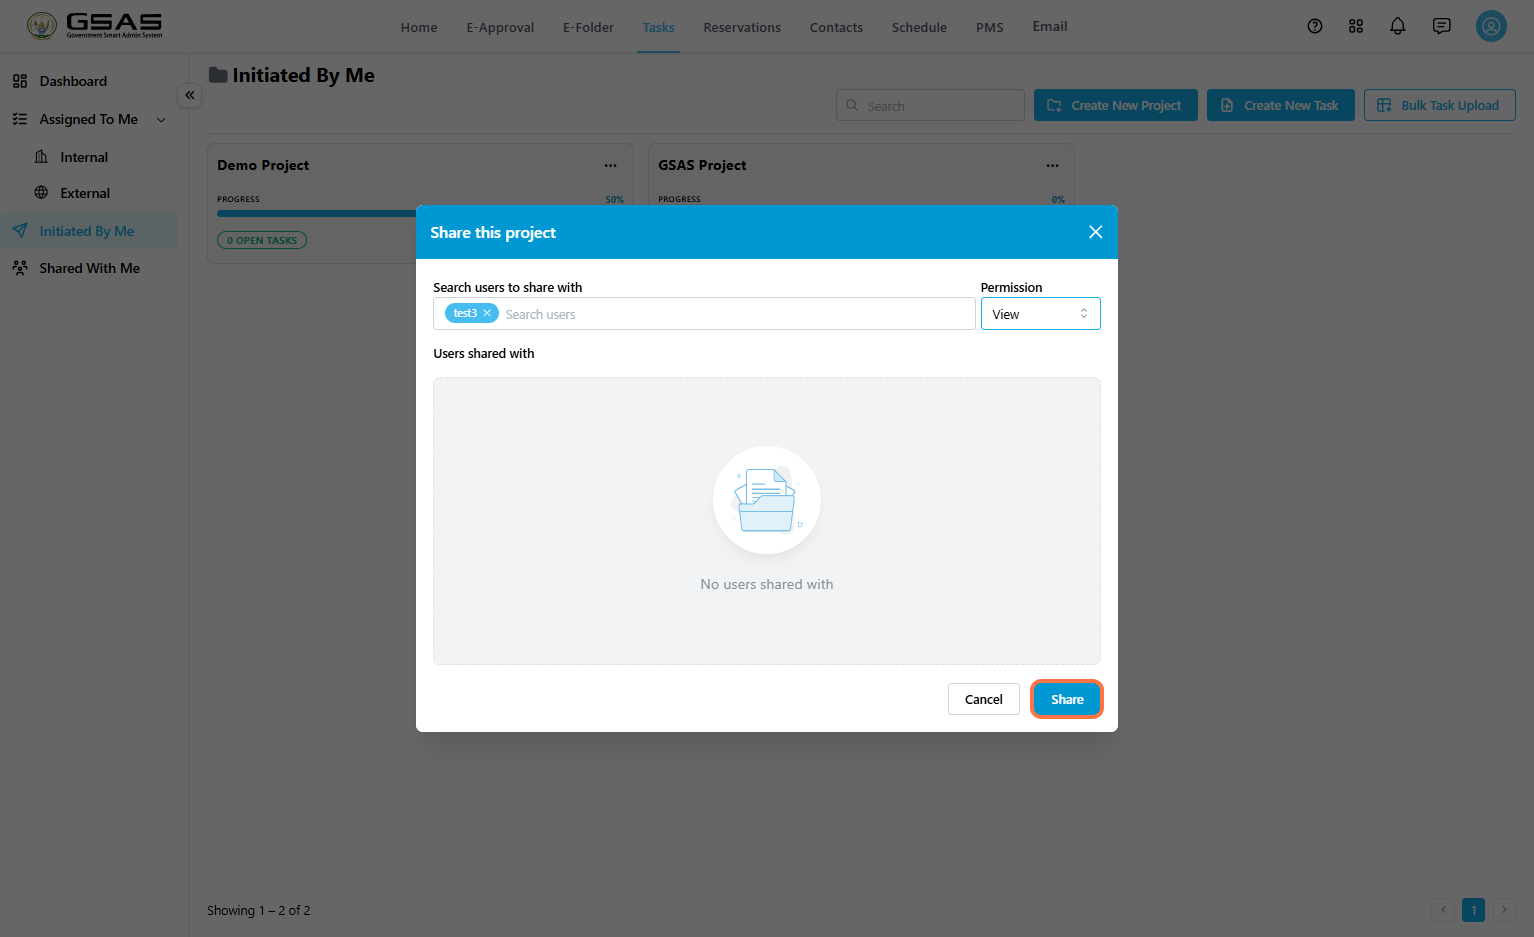](https://docs.smartadmin.rw/uploads/images/gallery/2026-08/pQQimage.png)
---
### Confirm the Success Message
After sharing, the system displays a success message confirming that the project has been shared.
[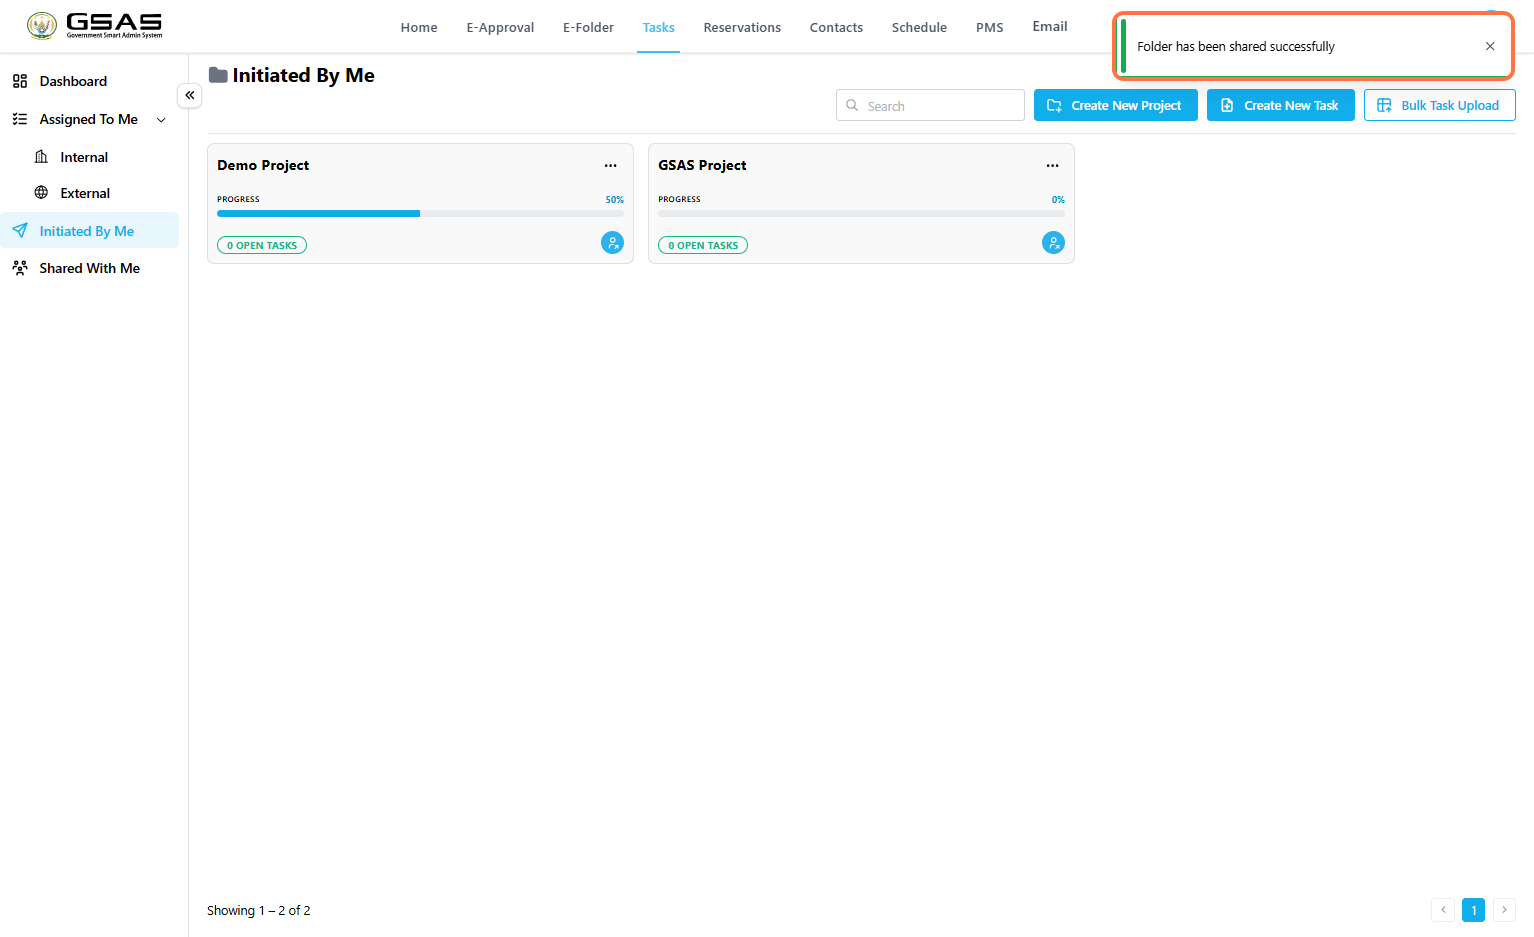](https://docs.smartadmin.rw/uploads/images/gallery/2026-08/1Mqimage.png)
---
### Expected Result
| The selected user receives access to the shared task project in their **Shared With Me** folder. Their level of access depends on the permission selected during sharing. |
### Notes
- Sharing a project gives another user access to the project; it does not automatically assign tasks to that user.
- Use **View** when the user only needs visibility.
- Use **Edit** only when the user should be allowed to update the shared project.
# Reservations
Book meeting rooms, boardrooms, and other shared facilities across your institution, then keep an eye on your bookings from request to confirmation. Facility managers will also find what they need to review and approve incoming requests.
# Navigating Reservations
---
The Reservations module lets you book shared facilities, such as meeting rooms, boardrooms, and equipment, and keep track of your requests in one place.
### Sidebar Sections
The sidebar on the left gives you access to the main areas of the module. **Dashboard**, **Facilities**, and **My Reservations** are available to everyone. **Submissions** and **My Facilities** only appear if you manage one or more facilities, since they're used to review bookings and edit facility settings.
- **Dashboard** — an overview of facility availability and reservation activity.
- **Facilities** — browse the facilities available to book.
- **My Reservations** — view and track the bookings you've made.
- **Submissions** — review reservation requests made against facilities you manage.Facility Manager only
- **My Facilities** — edit or manage the facilities under your responsibility.Facility Manager only
---
### Reading the Dashboard
The Dashboard gives you a quick snapshot of facility availability and your own reservation activity. Use the **Filter by date range** field at the top to narrow the charts below to a specific period.
Two summary cards sit at the top of the page. **Available Facilities** shows how many facilities are currently bookable, and **My Reservations** shows how many bookings you personally have on record.
[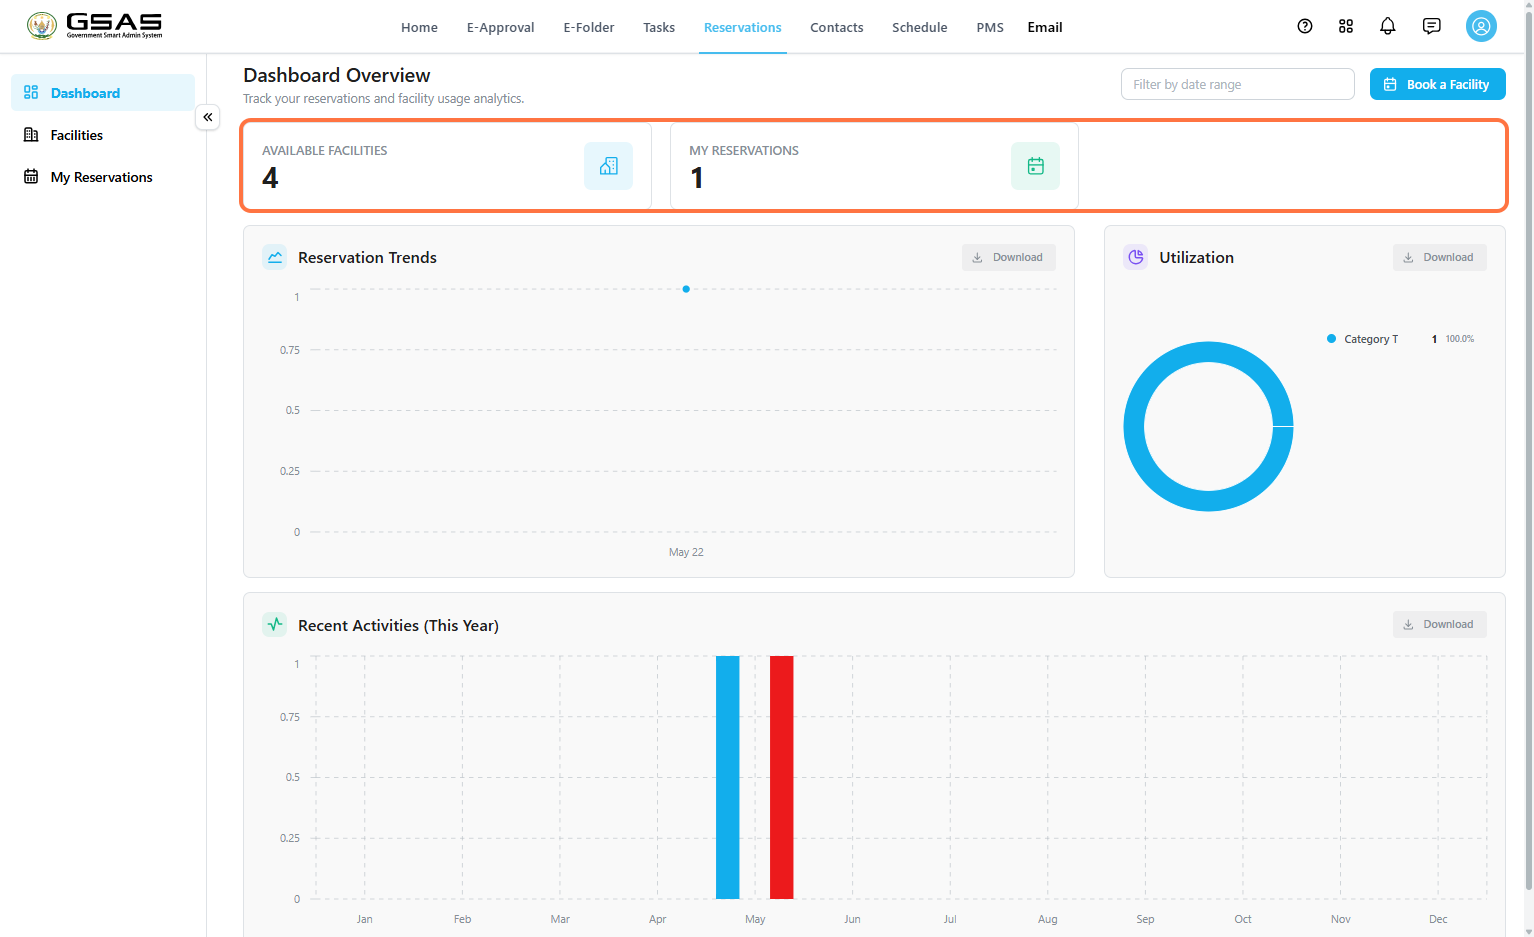](https://docs.smartadmin.rw/uploads/images/gallery/2026-08/3IAimage.png)
Below the summary cards, three charts break down activity in more detail.
[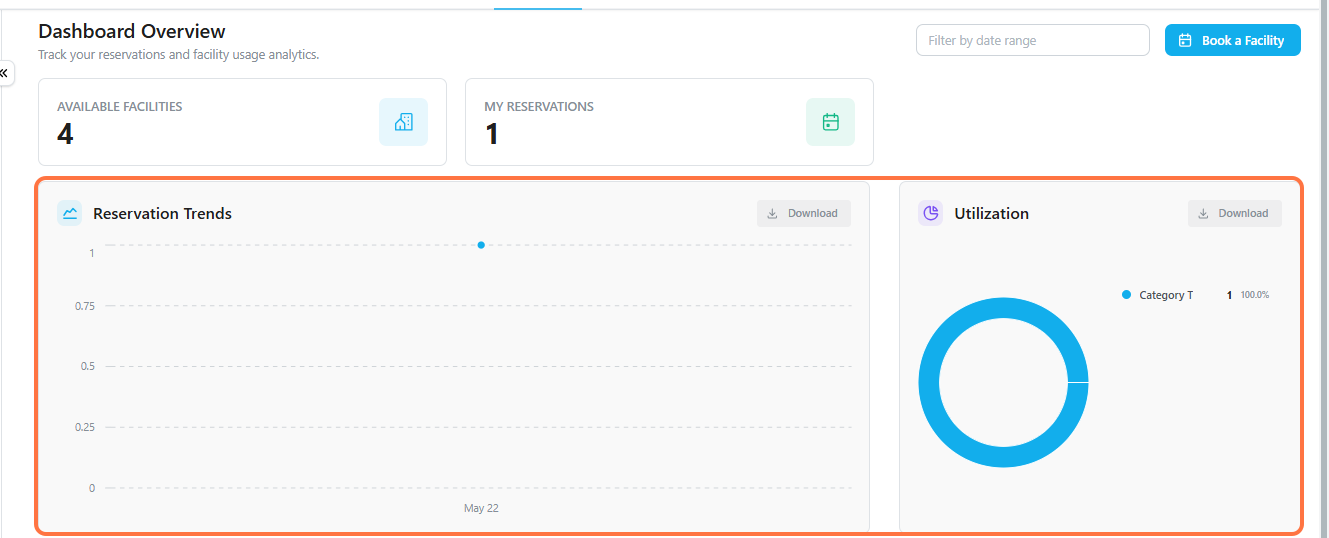](https://docs.smartadmin.rw/uploads/images/gallery/2026-08/21d9c932-8740-41ed-97e6-f400830d284f.png)
[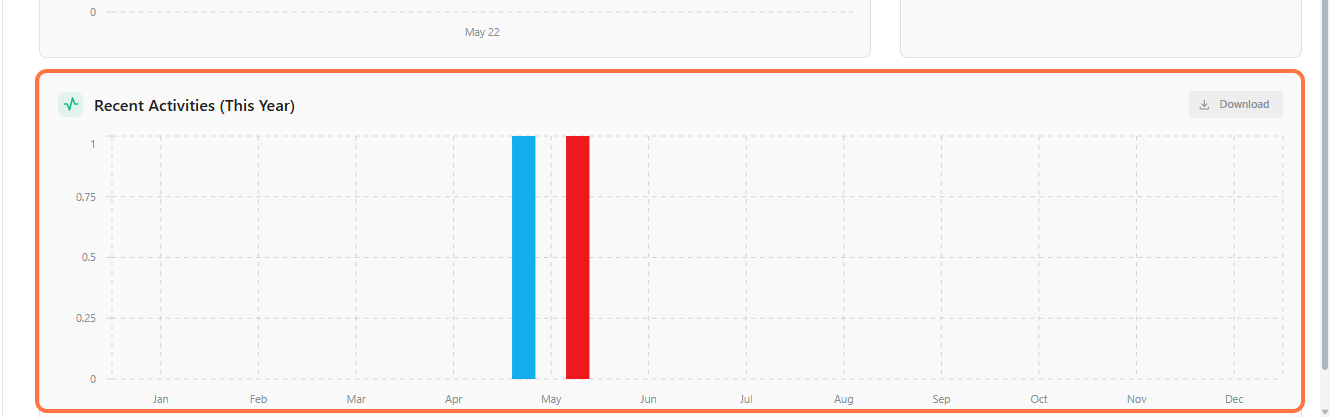](https://docs.smartadmin.rw/uploads/images/gallery/2026-08/67f3c55c-52aa-404f-b128-69e9734dd823.png)
| Chart | Shows |
|---|
| **Reservation Trends** | How many reservations have been made over time. |
| **Utilization** | Which facility categories are booked most often. |
| **Recent Activities** | A monthly breakdown of reservation activity for the current year. |
Each chart has a **Download** option if you need to export the data. To start a new booking from anywhere on the dashboard, click **Book a Facility** in the top right.
---
If you manage a facility, see [**Managing Facilities and Reservations**](https://docs.smartadmin.rw/link/51#bkmrk-page-title) to learn how to review incoming reservation requests and edit facility details.
# Reserving a Facility
This page walks you through finding a facility and reserving it.
### Browse Facilities
Go to **Reservations → Facilities** to see everything available to book.
[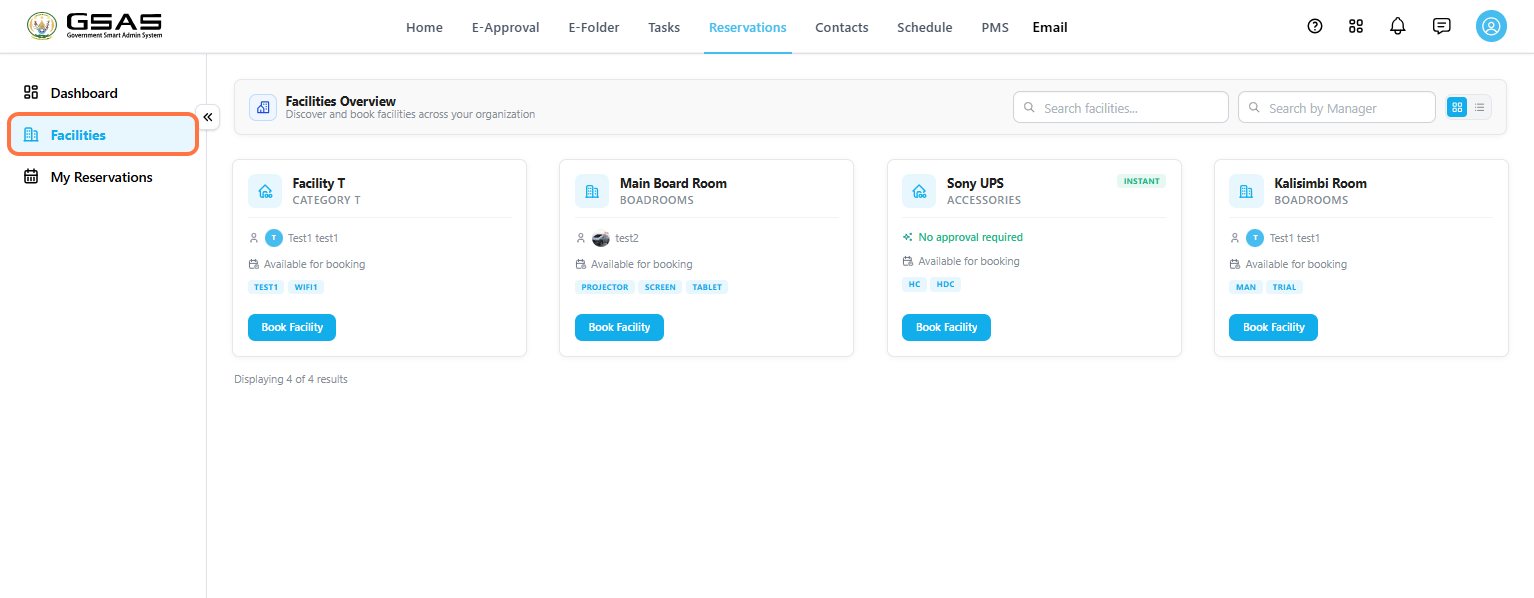](https://docs.smartadmin.rw/uploads/images/gallery/2026-08/c6fba6a5-9ce7-40d2-87ef-156bff42730a.png)
You can use **Search facilities(1)** to look up a facility by name, or **Search by Manager(2)** if you know who oversees it. Use the toggle next to the search bars to switch between a grid view and a list view.[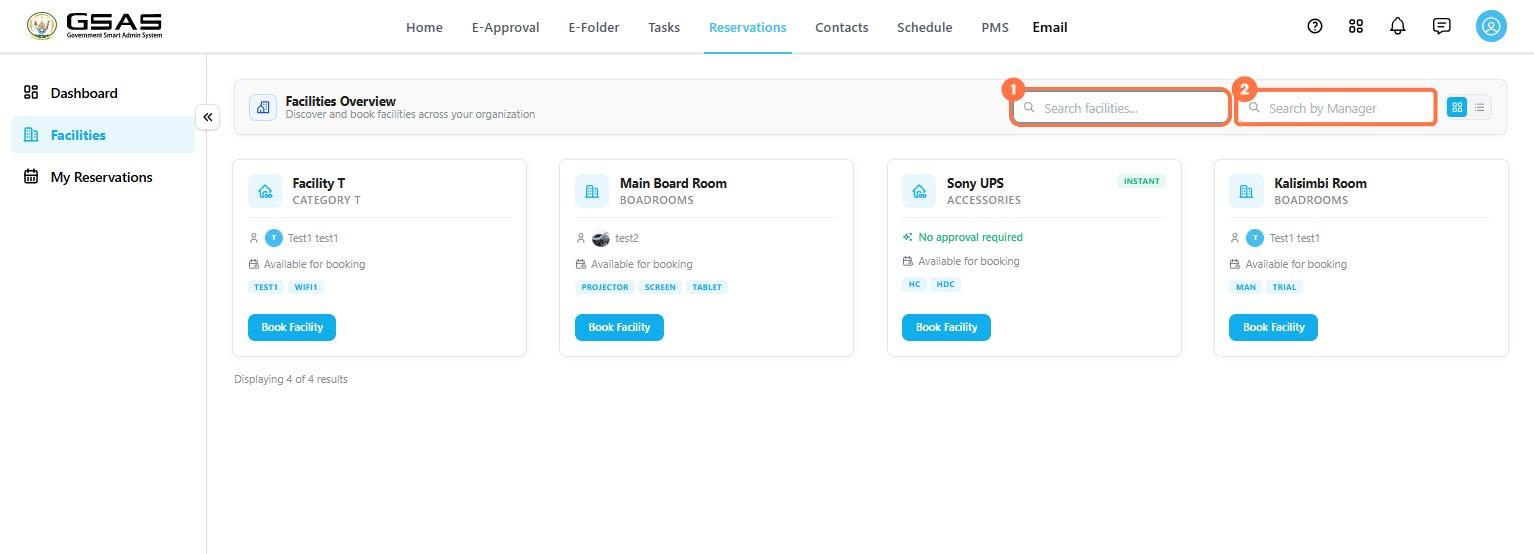](https://docs.smartadmin.rw/uploads/images/gallery/2026-08/1786025775842.jpeg)
### Reading a Facility Card
Each facility card shows its category, the person managing it, its availability, and any relevant tags such as available equipment. Some cards also show **No approval required**, meaning the booking is confirmed the moment you submit it.
[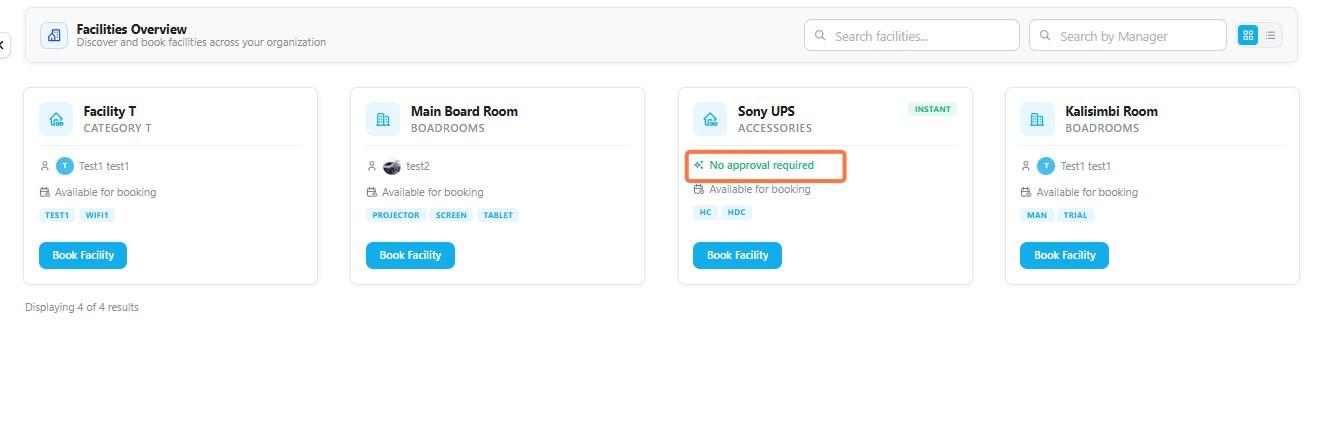](https://docs.smartadmin.rw/uploads/images/gallery/2026-08/1786026058738.jpeg)
Facilities without this label need approval from the facility manager before the booking is finalized.
---
### Reserve a Facility
You can start a reservation directly from a facility card, or from the calendar if you're already viewing a facility's availability.
Step 1
Open the Booking Form
Click **Book Facility** on the facility you want to reserve.
[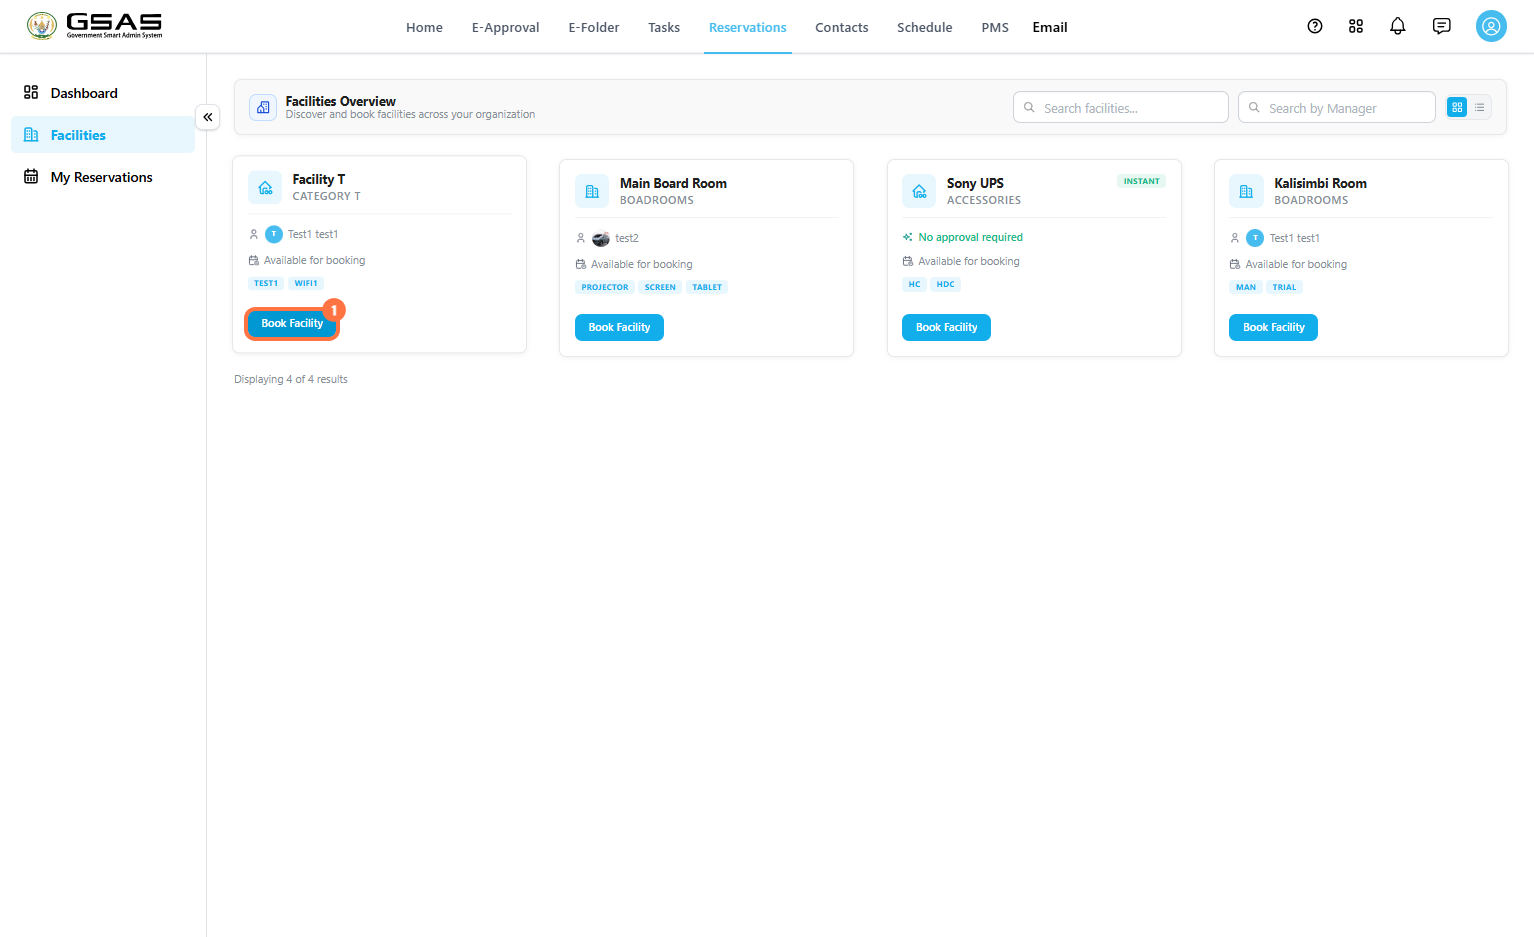](https://docs.smartadmin.rw/uploads/images/gallery/2026-08/0RSimage.png)
You will then see a calendar view showing you the facility's availability, click **Reserve Facility** in the top right.
[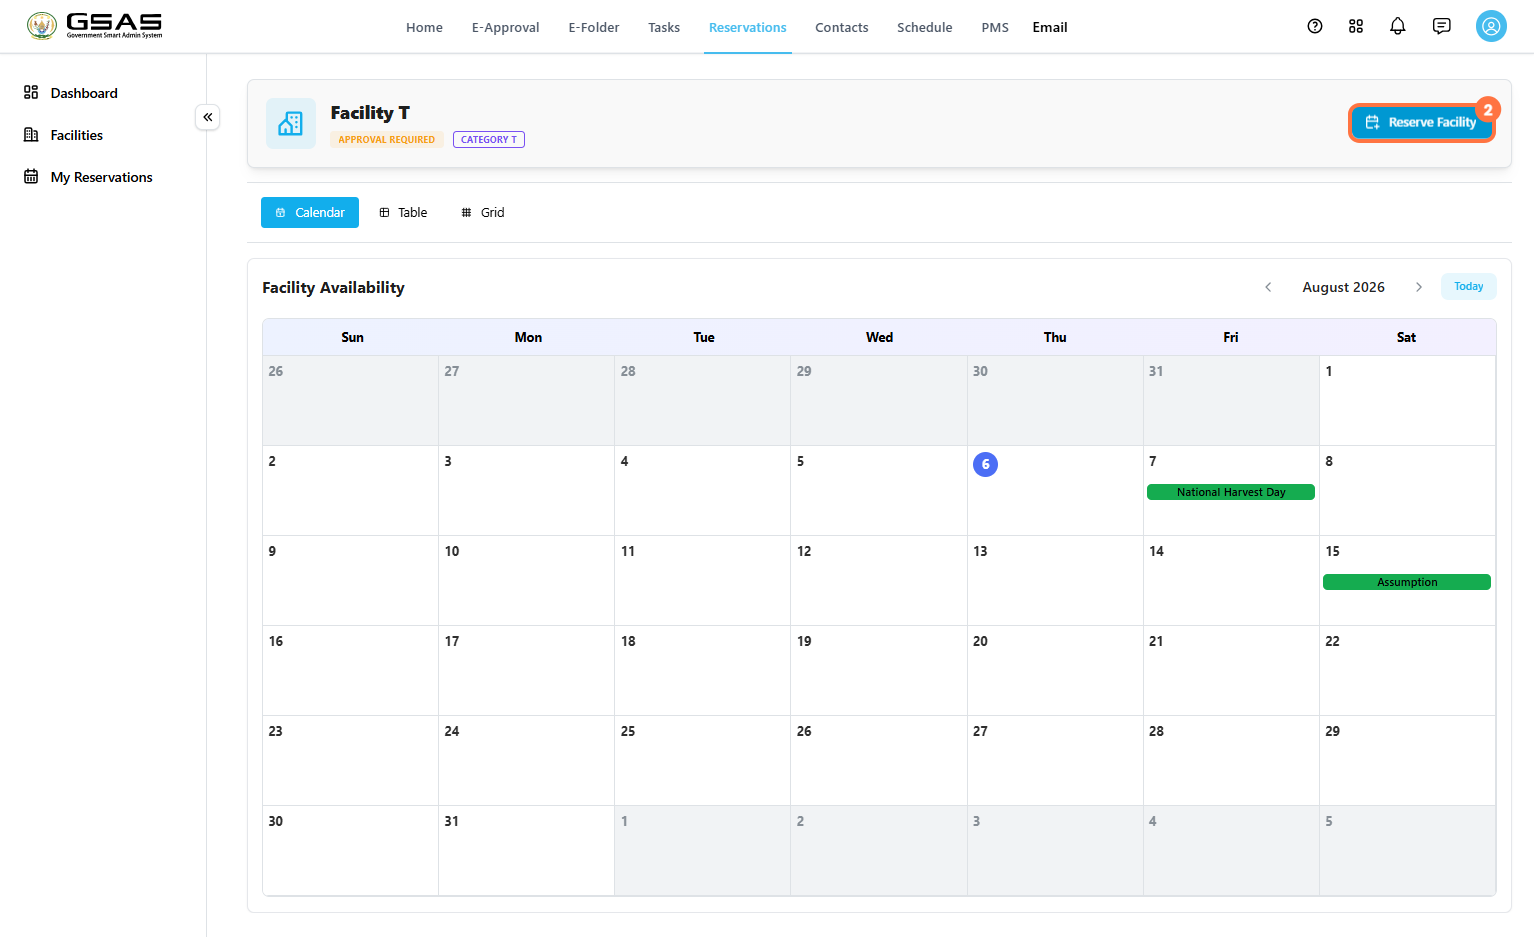](https://docs.smartadmin.rw/uploads/images/gallery/2026-08/dySimage.png)
Step 2
Set the Date and Time
Enter the **From** and **To** dates, along with a **Start time** and **End time**. If the booking covers the entire day, tick **All Day** instead of setting specific times.
[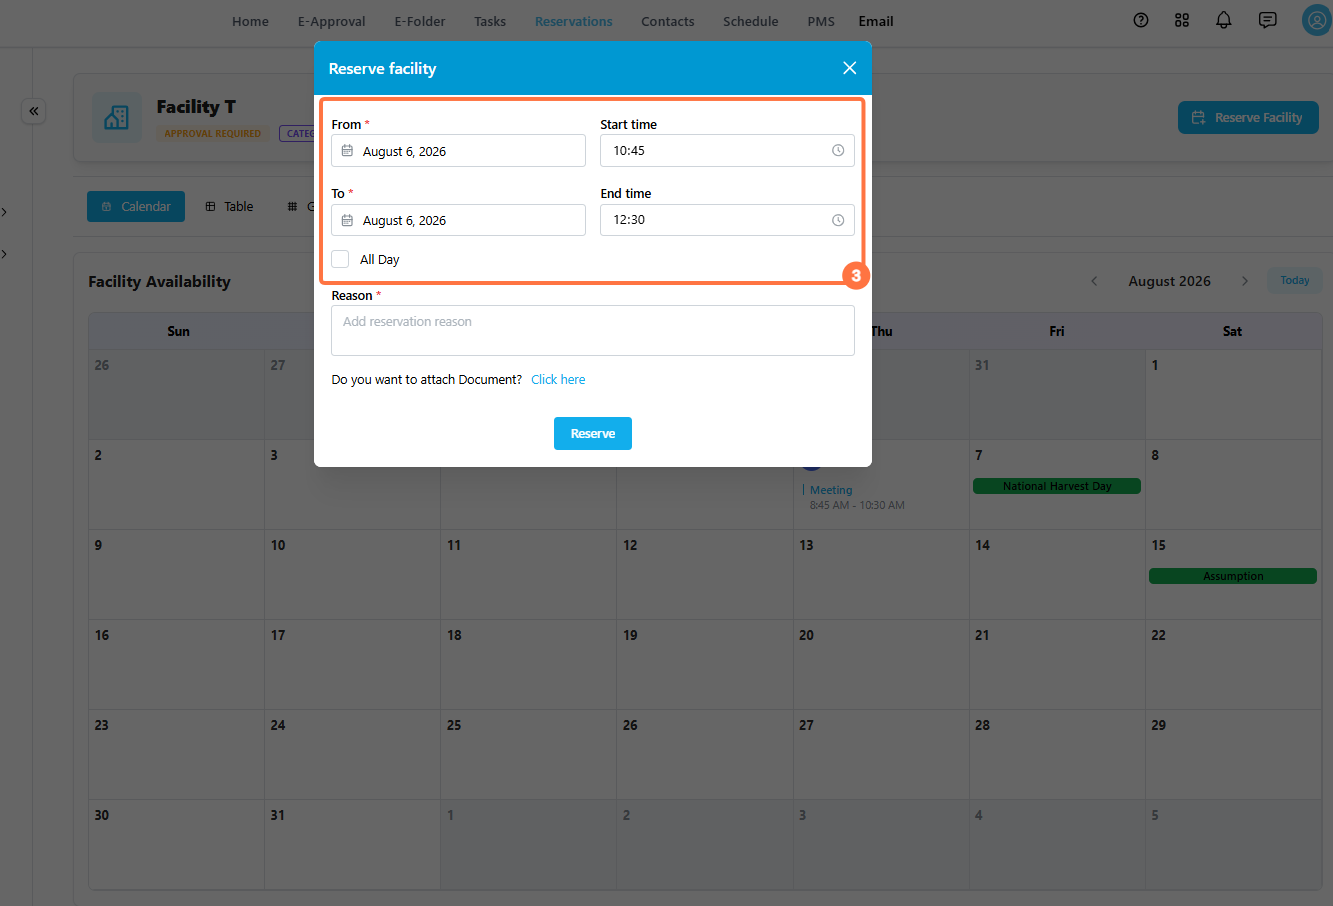](https://docs.smartadmin.rw/uploads/images/gallery/2026-08/pEMimage.png)
Step 3
Add a Reason
Enter a short reason for the booking. This helps the facility manager understand the purpose of your reservation when reviewing it, and appears on your reservation record for future reference.
[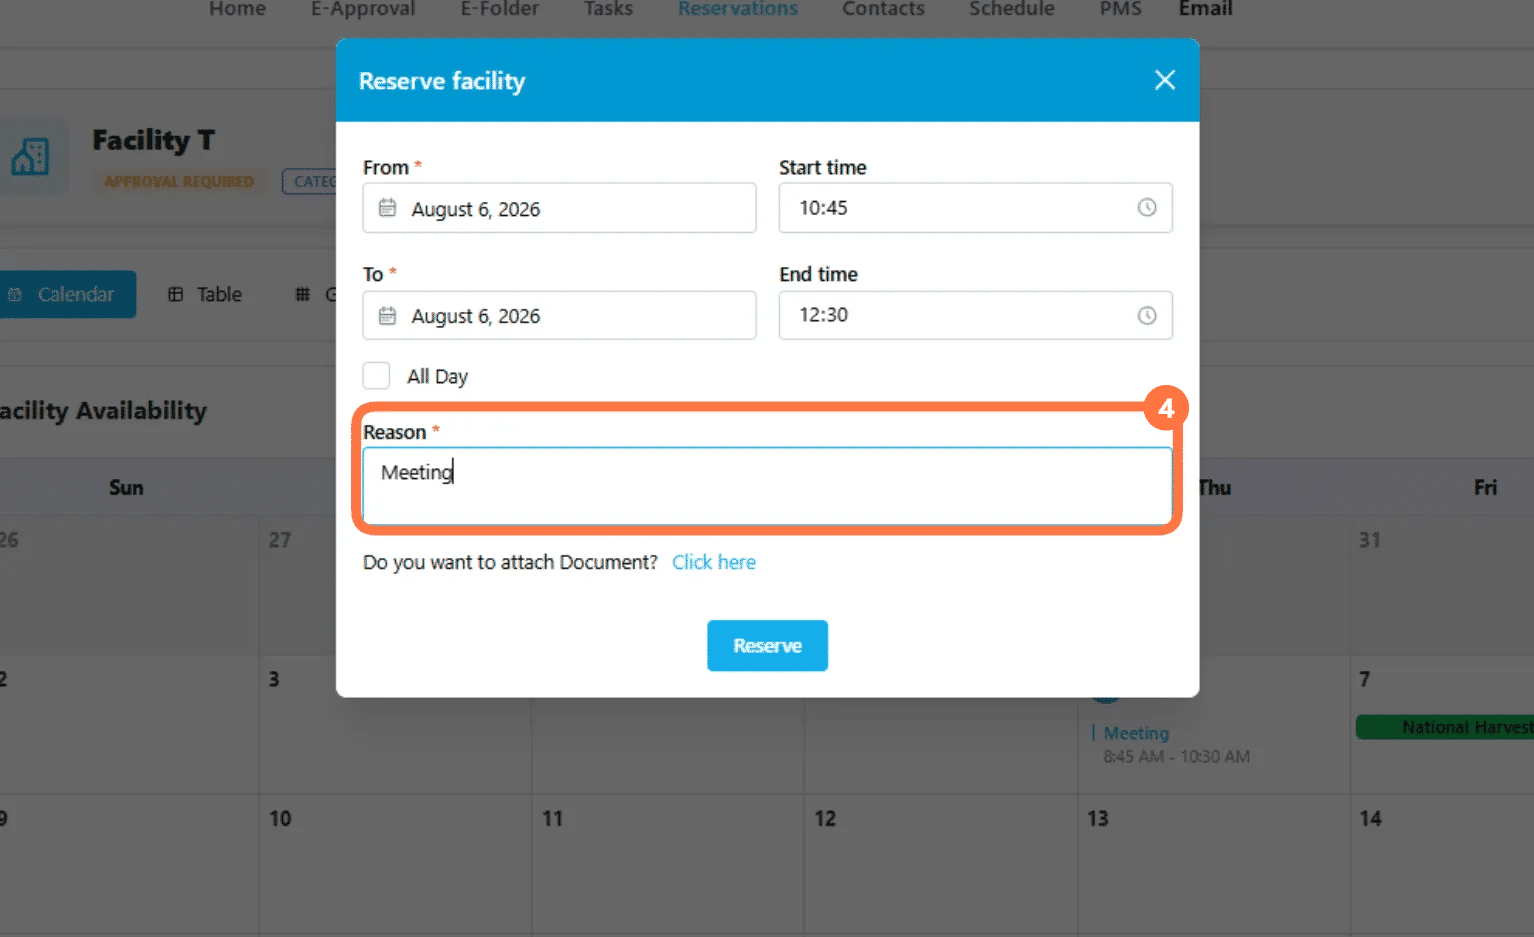](https://docs.smartadmin.rw/uploads/images/gallery/2026-08/FSQimage.png)
If you need to include a supporting document, click **Click here** next to **Do you want to attach Document?** and select the file from your computer. This is optional and can be left blank for straightforward bookings.
Step 4
Submit the Reservation
Click **Reserve** to submit the booking.
[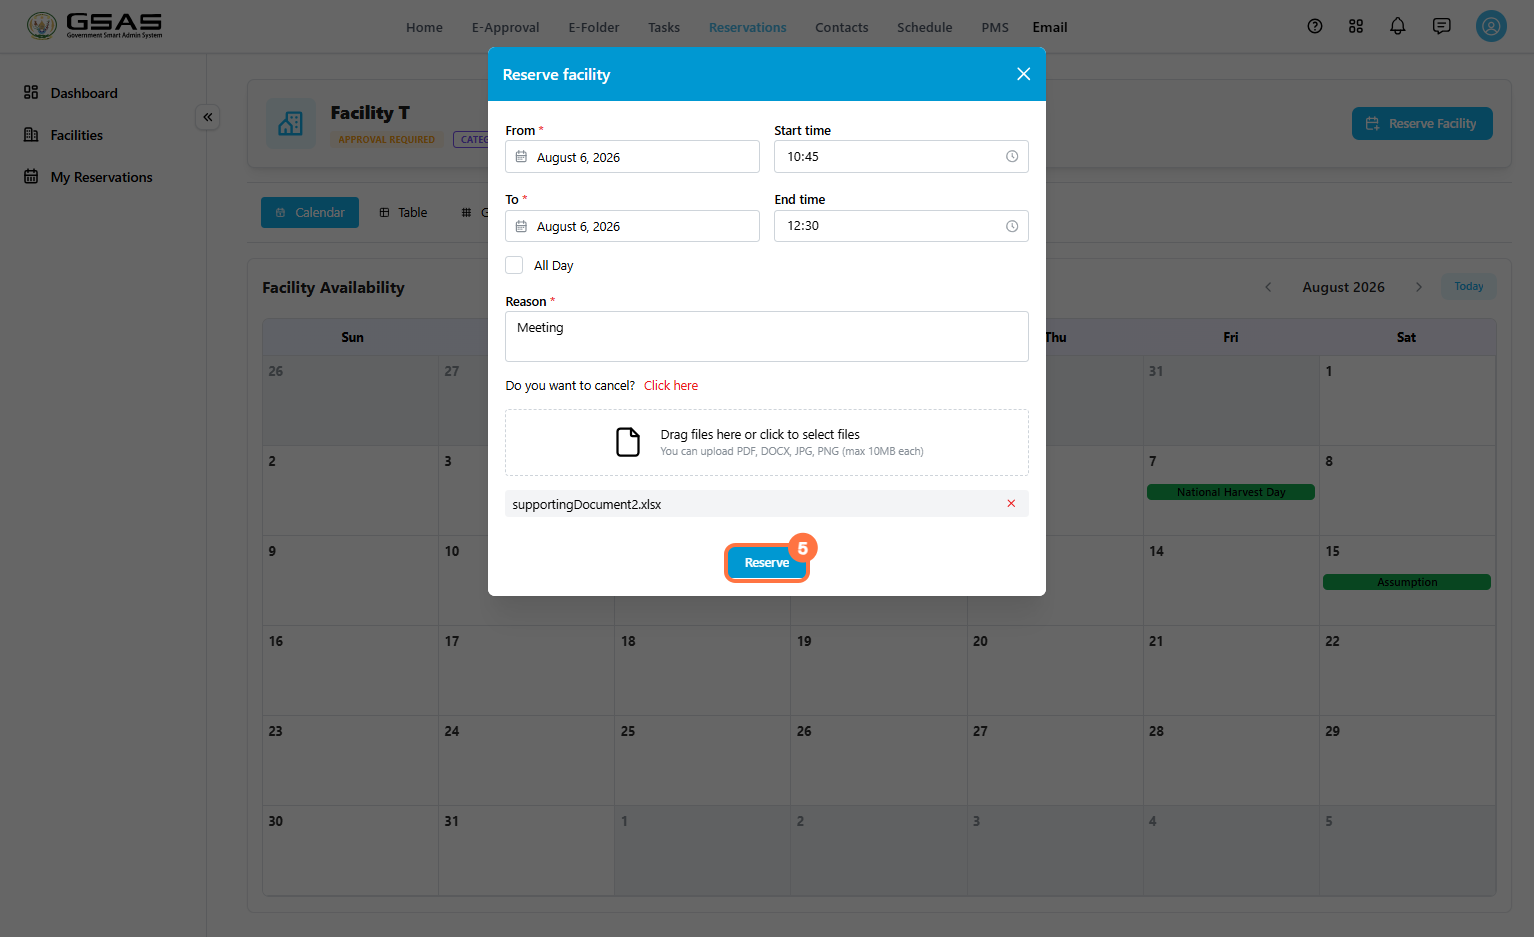](https://docs.smartadmin.rw/uploads/images/gallery/2026-08/WBHimage.png)
A confirmation message appears once your reservation is submitted.
If the time slot you selected overlaps with an existing booking on the same facility, you will see an error message "**Booking already overlaps with existing booking start and end date**" and the reservation won't go through. Choose a different time or date and try again.
---
*See **[Tracking Your Reservations](https://docs.smartadmin.rw/link/50#bkmrk-page-title)** page to learn how to check the status of your booking request.*
# Tracking Your Reservations
---
Once you've submitted a reservation, **My Reservations** is where you go to review it's status.
### Open My Reservations
Go to **Reservations → My Reservations**. By default, your bookings appear in **Grid** view, but you can switch to whichever layout suits what you're trying to see.
| View | Best For |
|---|
| **Grid** | Browsing your reservations as individual cards, each showing status at a glance. |
| **Table** | Scanning a dense list of reservations side by side. |
| **Calendar** | Seeing your bookings laid out by date. |
[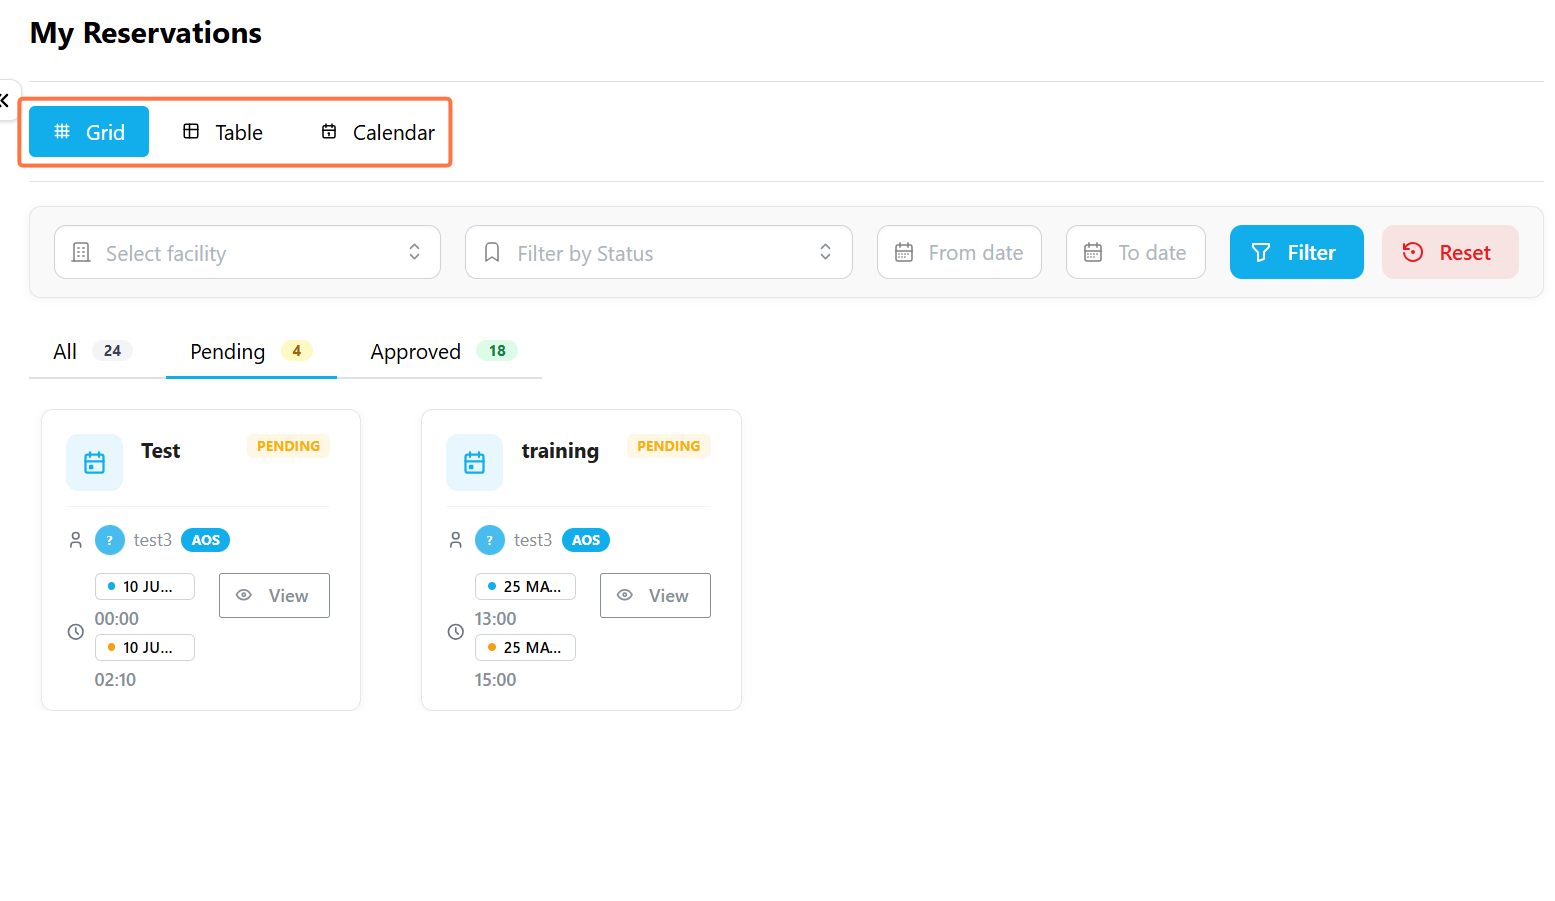](https://docs.smartadmin.rw/uploads/images/gallery/2026-08/2YQimage.png)
---
### View Reservation Status
Every reservation that requires approval moves through one of three stages:
| Status | What it means |
|---|
| **Pending** | Awaiting review from the facility manager. The facility is not yet confirmed. |
| **Approved** | The facility manager reviewed and confirmed the booking for your requested time. |
| **Rejected** | The booking did not go through. |
[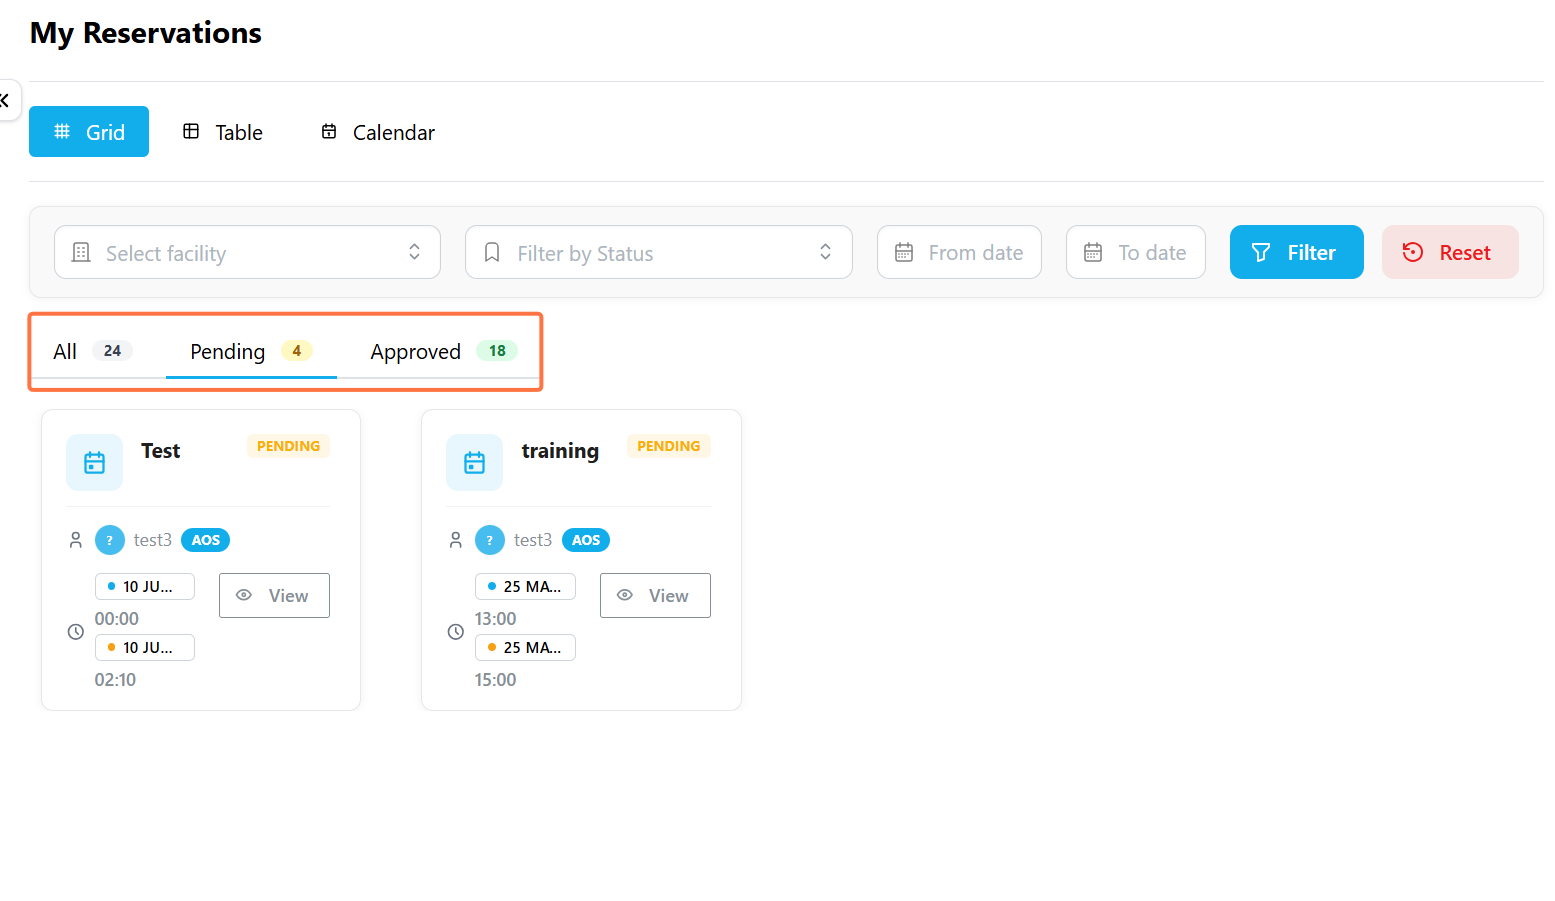](https://docs.smartadmin.rw/uploads/images/gallery/2026-08/IH8image.png)
---
### Filter your Reservations
Use the filters above your reservation list to find a specific reservation:
- **Select facility** narrows the list to a single facility,
- **Filter by Status** shows only Pending, Approved, or Rejected reservations.
- You can also set a **From date** and **To date** to limit results to a specific period.
- Click **Filter** to apply your selection, or **Reset** to start over.
[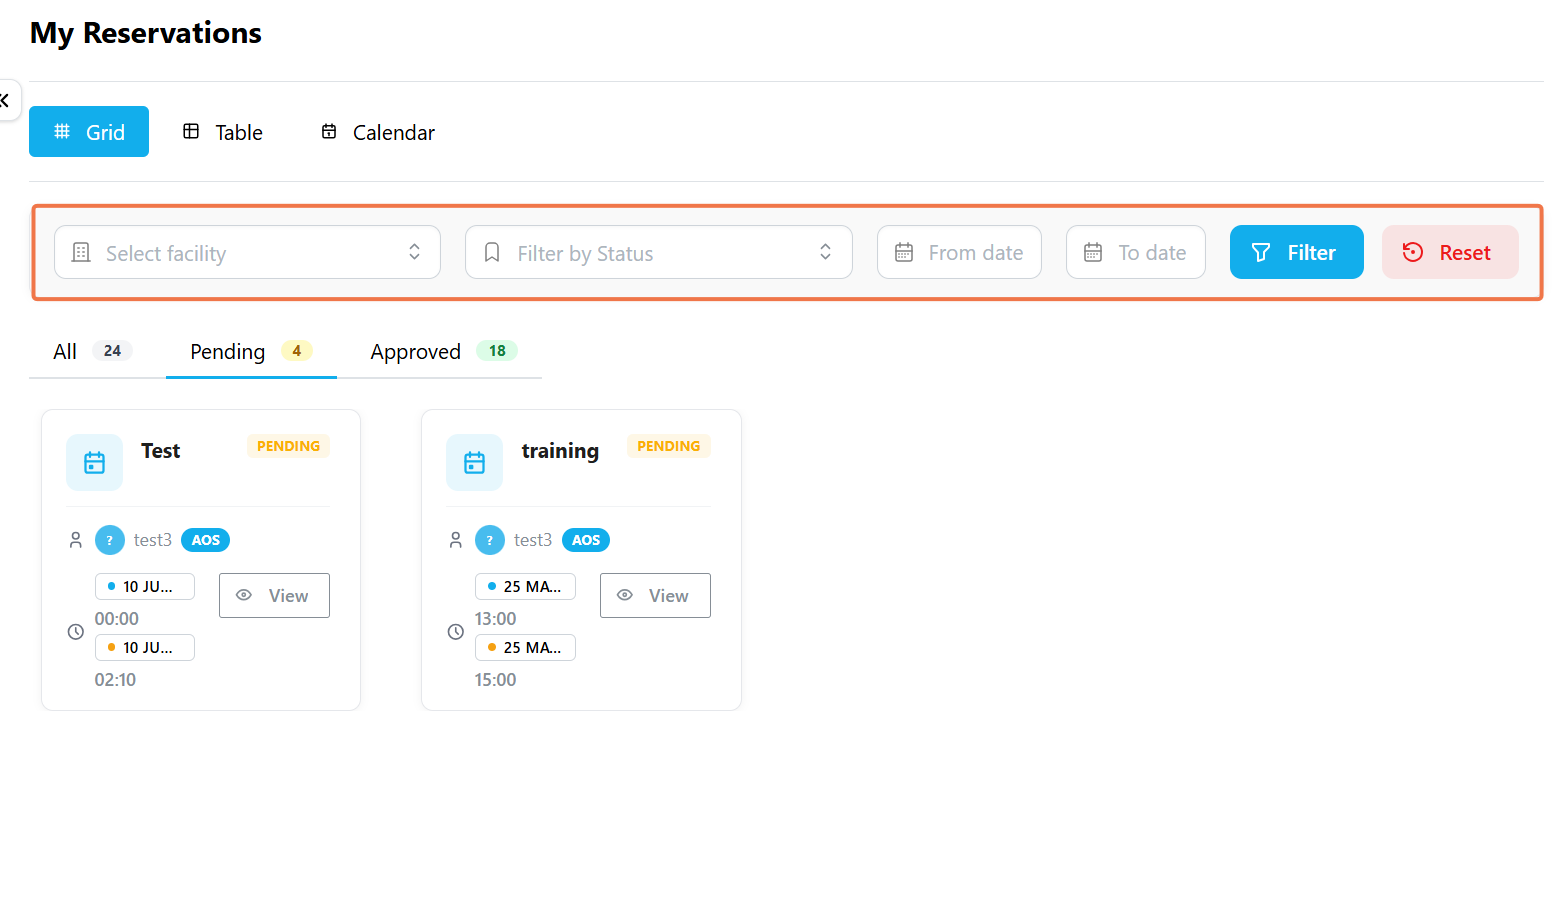](https://docs.smartadmin.rw/uploads/images/gallery/2026-08/FZVimage.png)
---
### Viewing a Reservation's Details
Click **View** on a reservation card to see it's full details.
[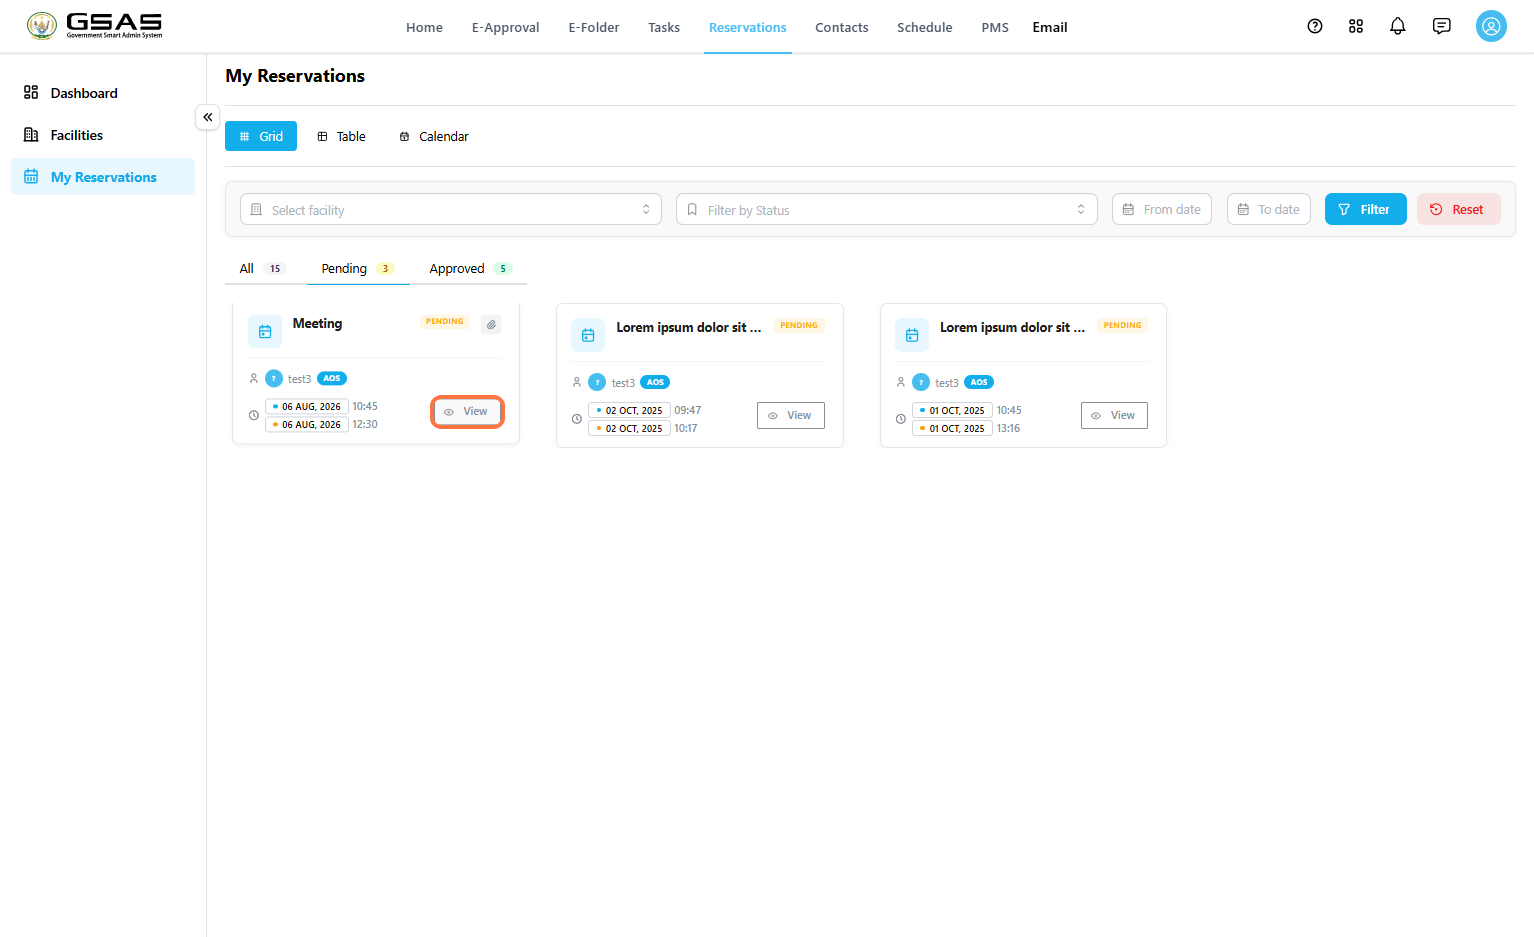](https://docs.smartadmin.rw/uploads/images/gallery/2026-08/3Zbimage.png)
- The **Reservation Details** open showing the facility name and current status, along with its amenities and manager under **Facility Information**.
- The **Reservation Schedule** section shows the exact date range and time slot you booked.
- Below that, you'll find the reason you gave when booking, and any supporting document you attached.
[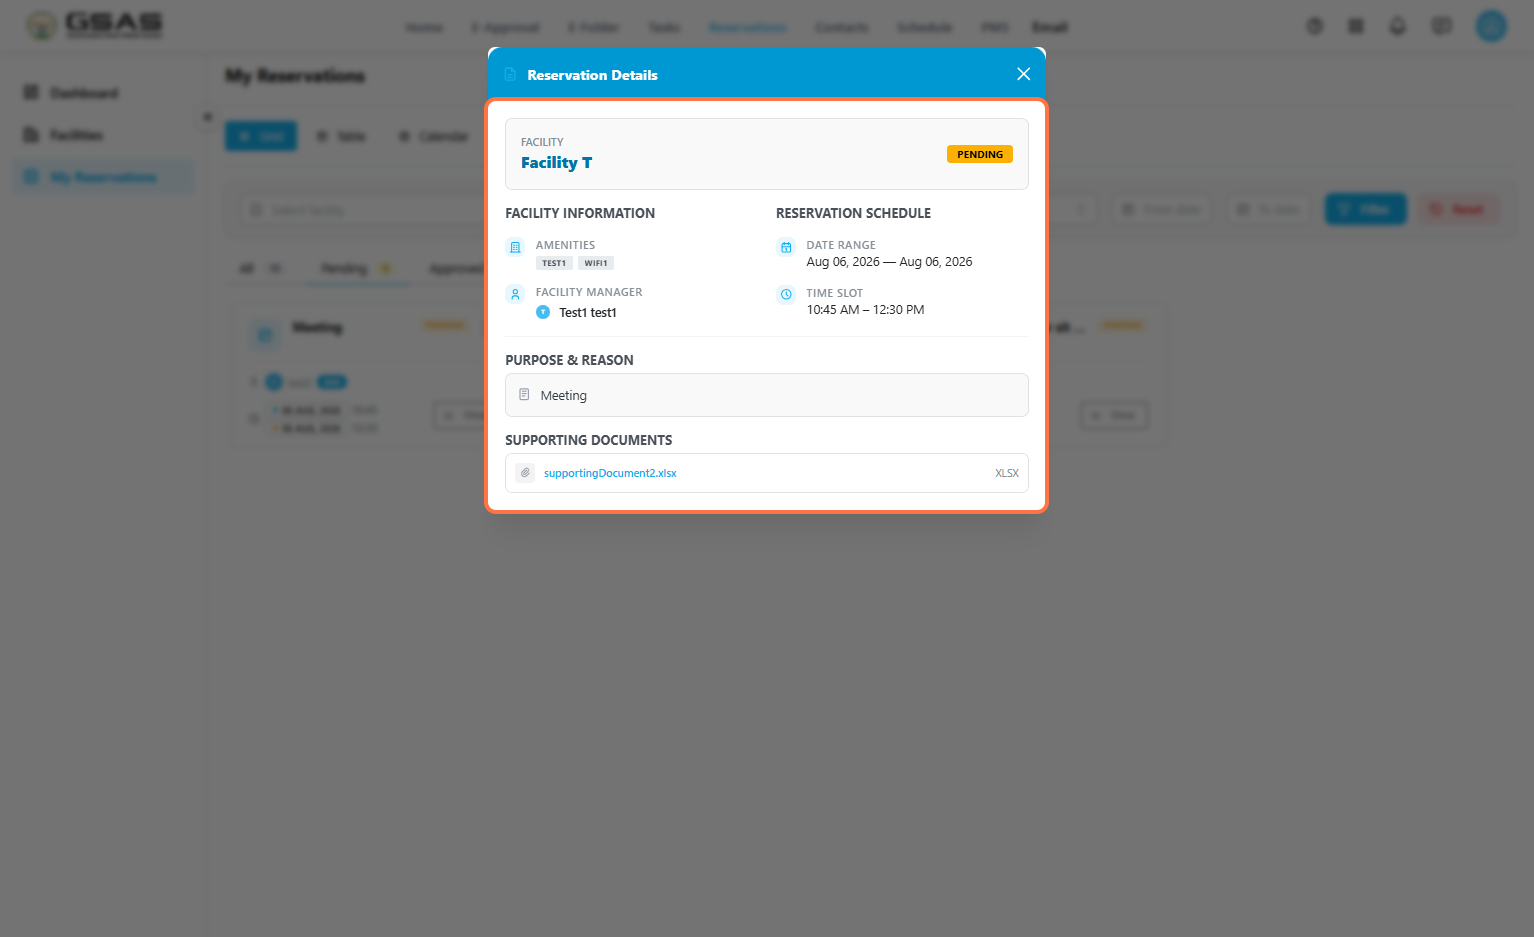](https://docs.smartadmin.rw/uploads/images/gallery/2026-08/RfUimage.png)
---
If your reservation is approved and scheduled for today, you'll also see it under **Today's Bookings** on the GSAS home page.
# Managing Reservations and Facilities
---
If you manage one or more facilities, this page covers how to review incoming reservation requests and how to update a facility's settings. You can only see these options if you've been assigned as a facility manager.
### Approving or Rejecting a Reservation
Go to **Reservations → Submissions → Pending** to see reservation requests waiting on your review. You can also check **Approved**, **Rejected**, or **All submissions** for a full history.
[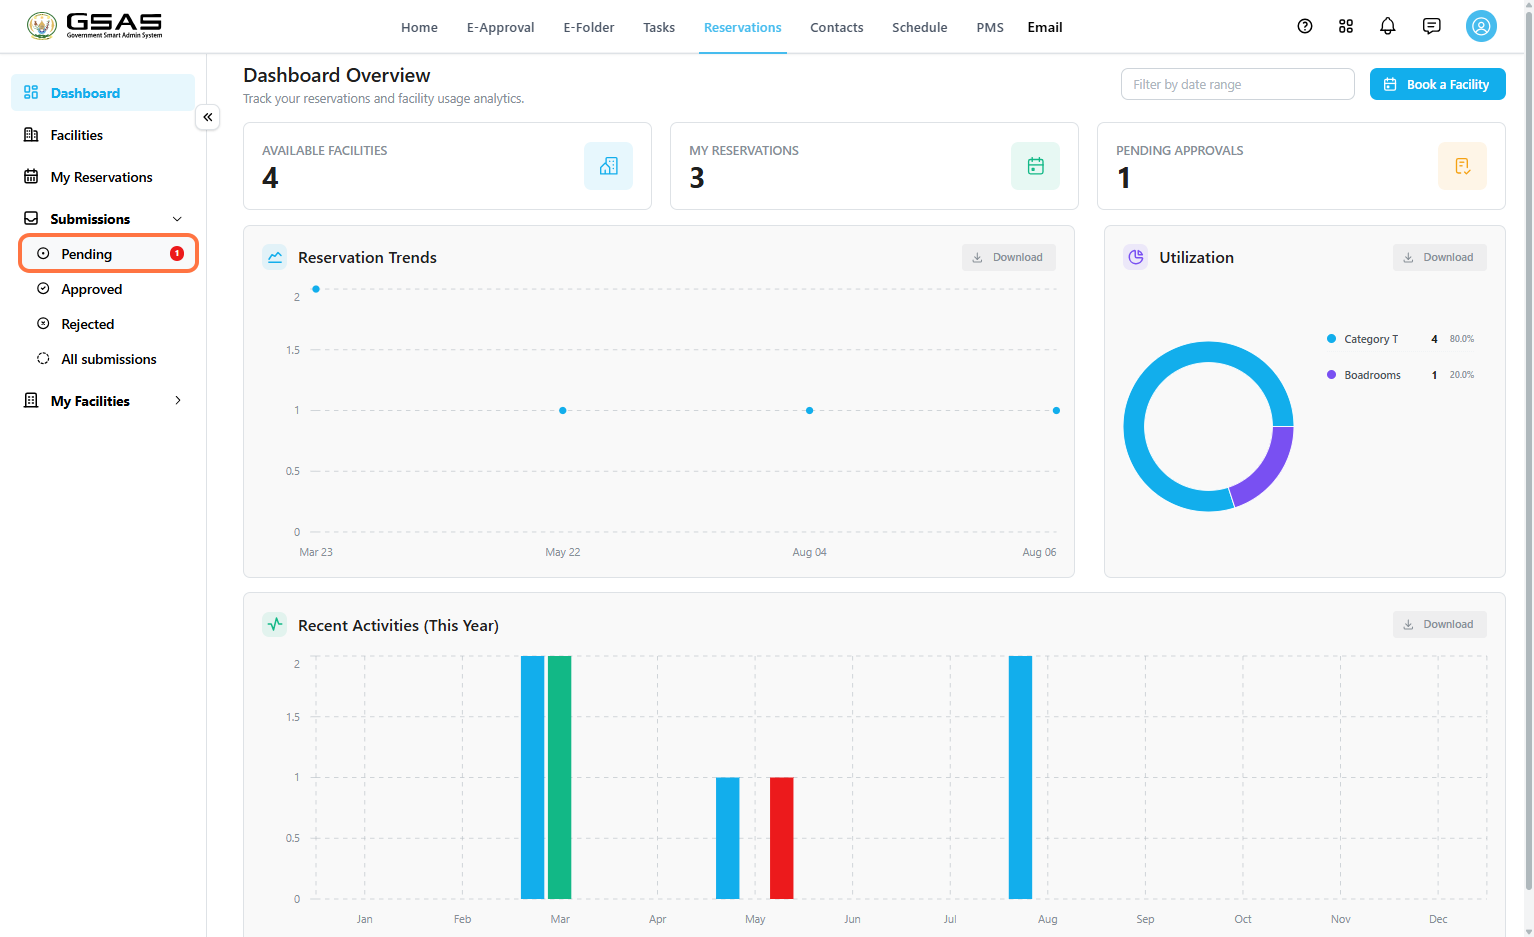](https://docs.smartadmin.rw/uploads/images/gallery/2026-08/h2Cimage.png)
Step 1
Review the Request
Each row shows who reserved the facility and the current status. Click the **…** icon under **Actions**, then select **View Details** to see the full reservation, including the requested schedule, reason, and any supporting document.
[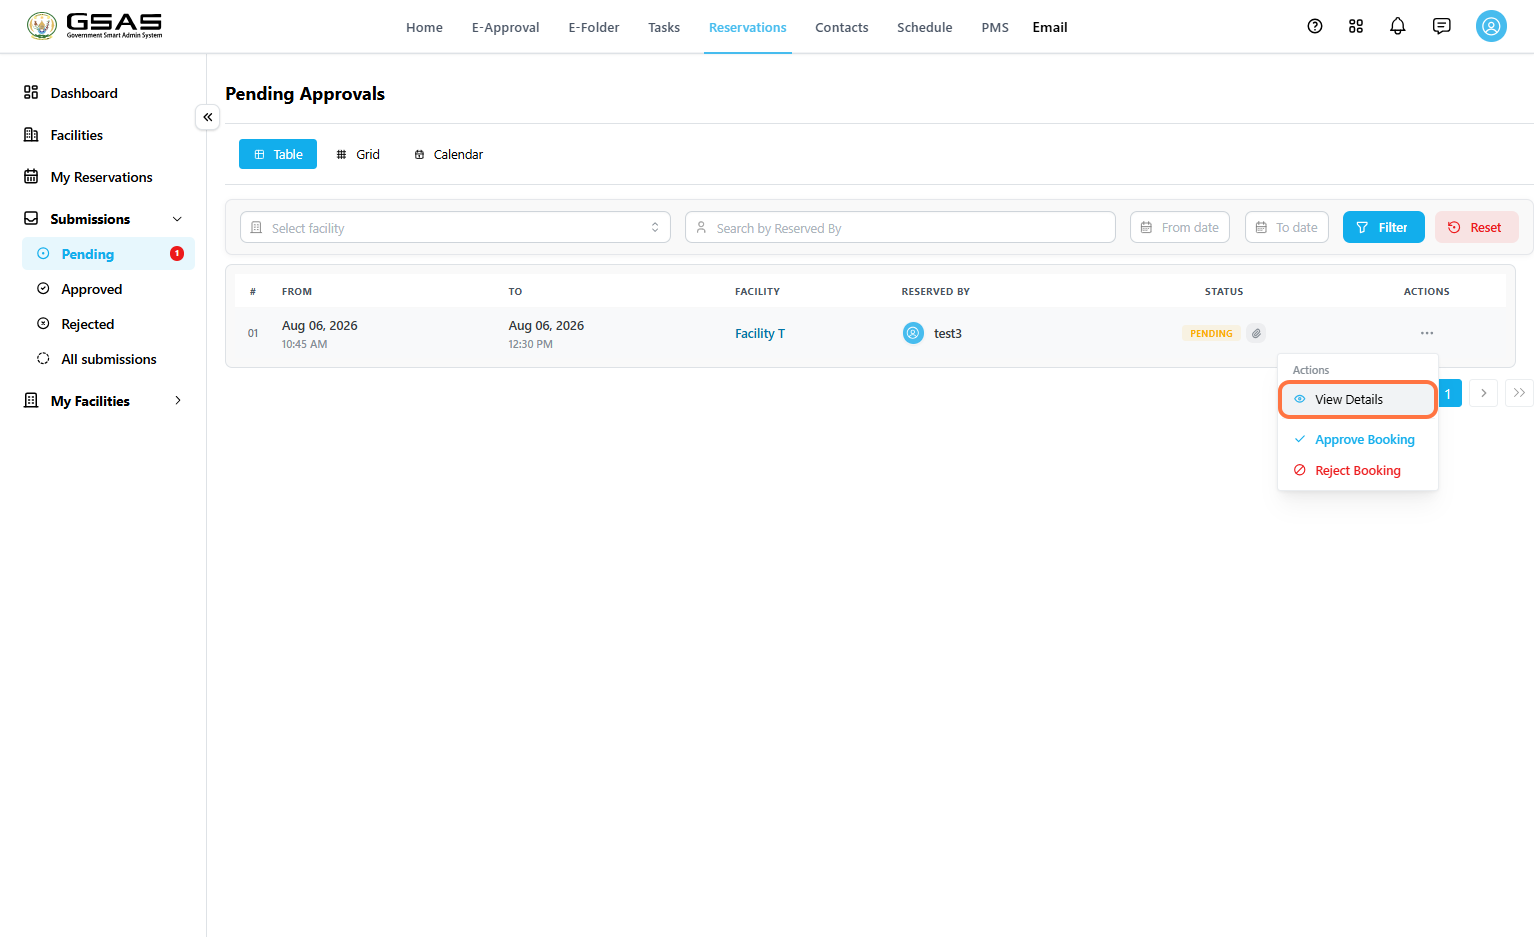](https://docs.smartadmin.rw/uploads/images/gallery/2026-08/iwNimage.png)
[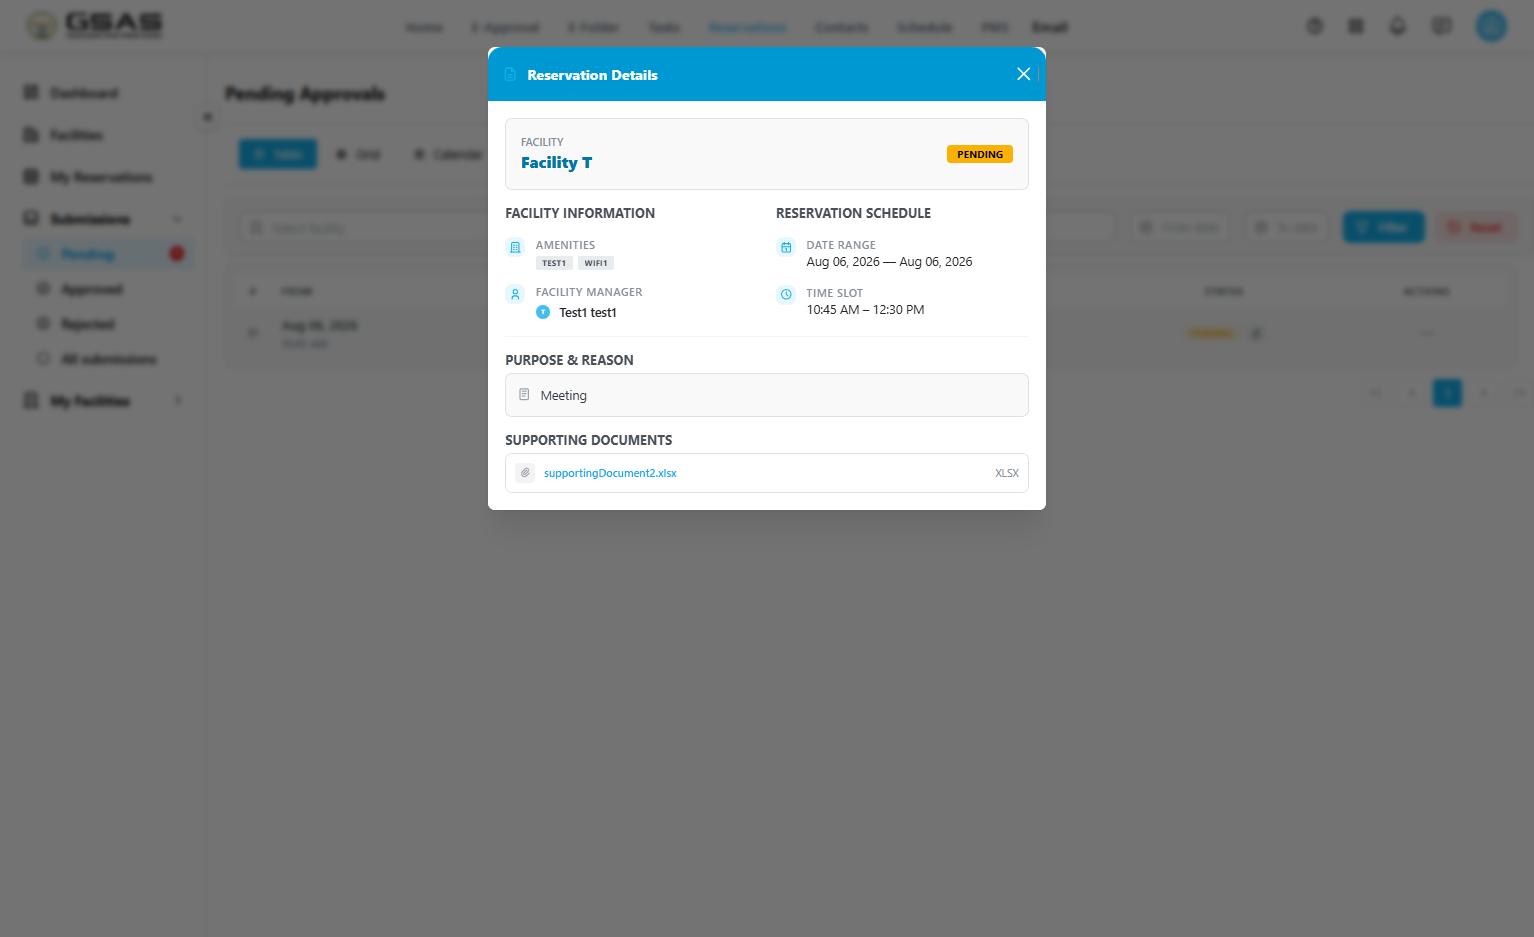](https://docs.smartadmin.rw/uploads/images/gallery/2026-08/oLaimage.png)
Step 2
Approve or Reject
From the same **Actions** menu, select **Approve Booking** or **Reject Booking**.
[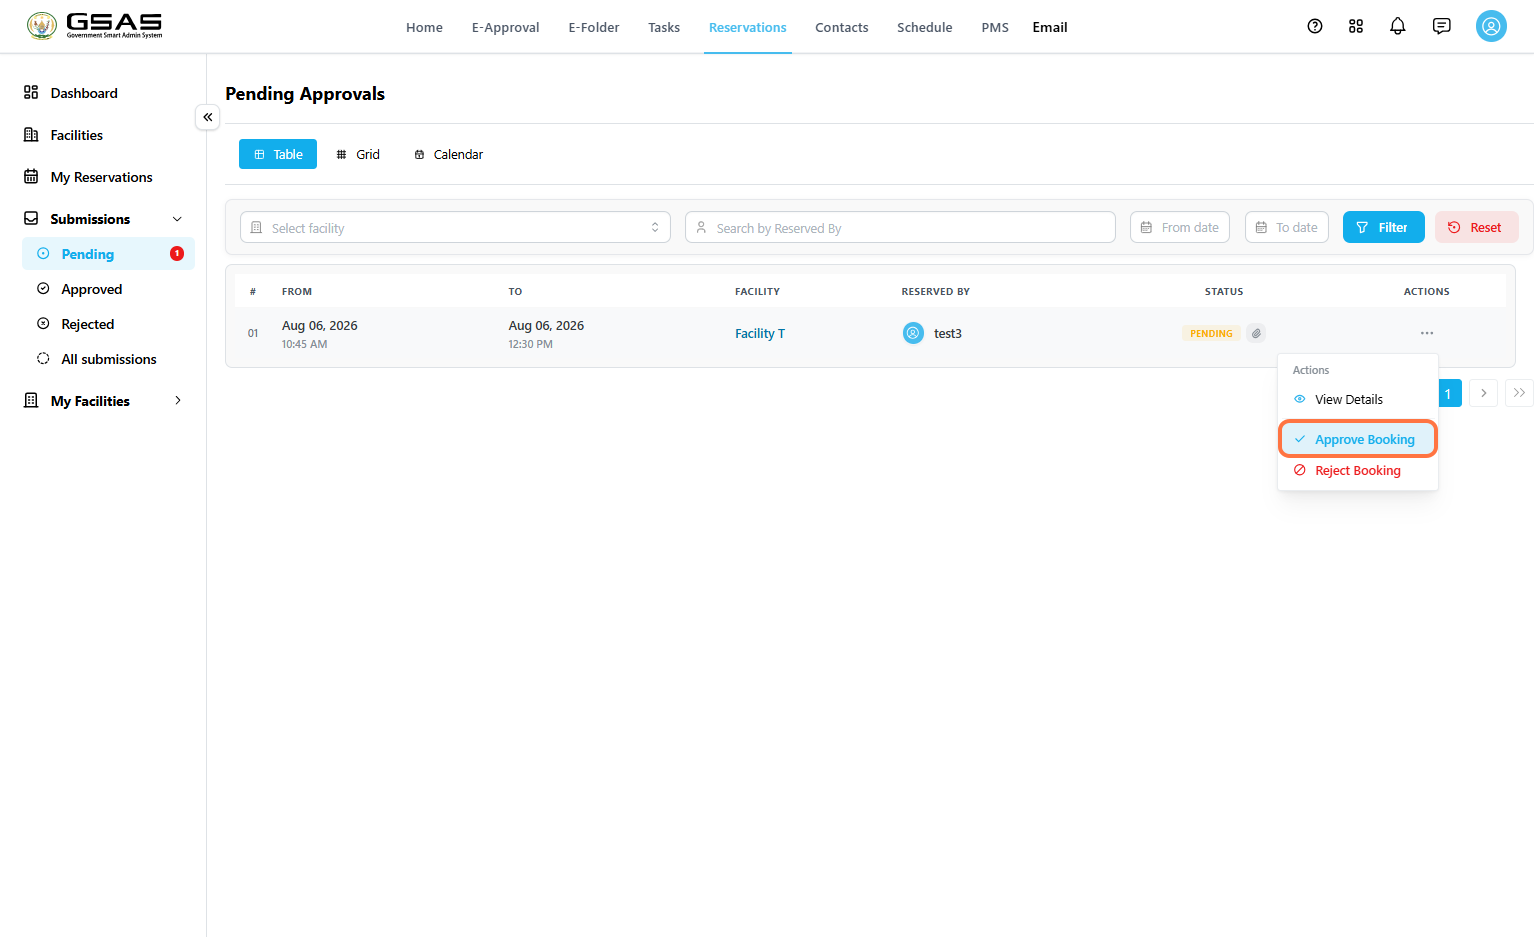](https://docs.smartadmin.rw/uploads/images/gallery/2026-08/eWbimage.png)
A confirmation window appears before the action is finalized. Click **Yes, Proceed** to confirm, or **No, Cancel** to back out.
[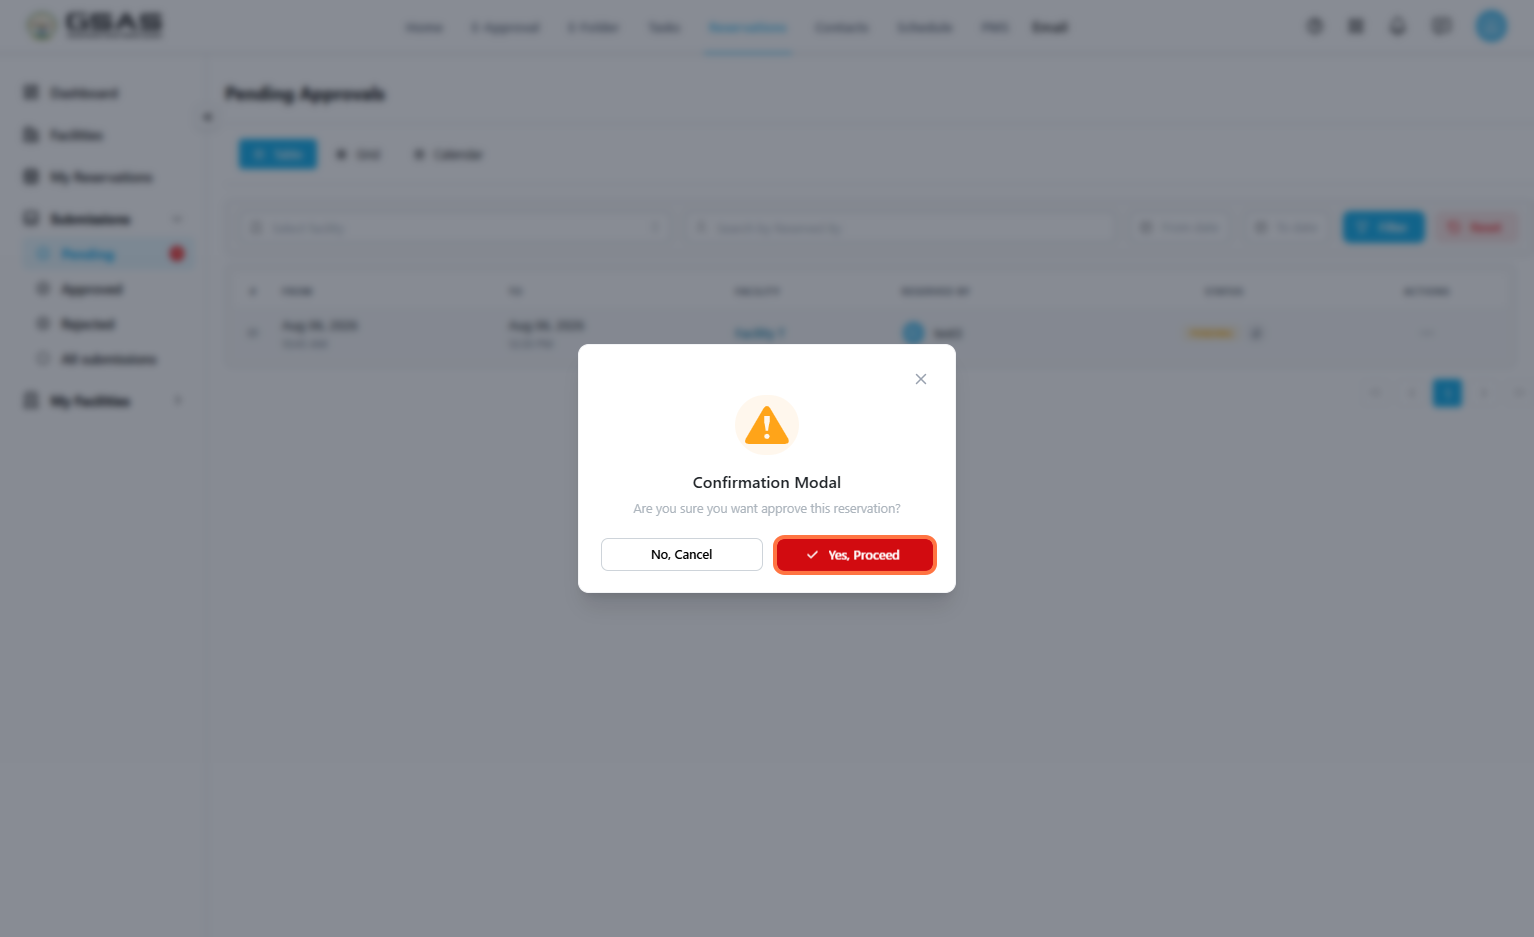](https://docs.smartadmin.rw/uploads/images/gallery/2026-08/3NJimage.png)
| **Note:** Approving a reservation automatically cancels any other pending reservation that overlaps with the same facility and time slot. Double-check the schedule before approving if multiple requests are waiting on the same booking window. |
[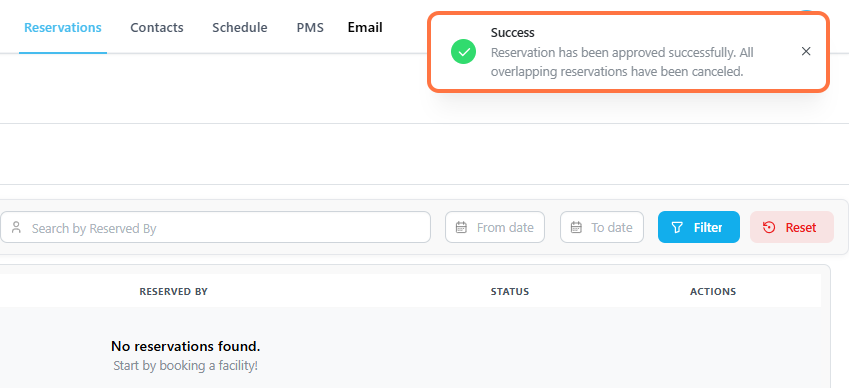](https://docs.smartadmin.rw/uploads/images/gallery/2026-08/d7820626-d6f8-4596-a843-df7f56c22a76.png)
---
### Managing a Facility
Go to **Reservations → My Facilities** to see the facilities you're responsible for.
[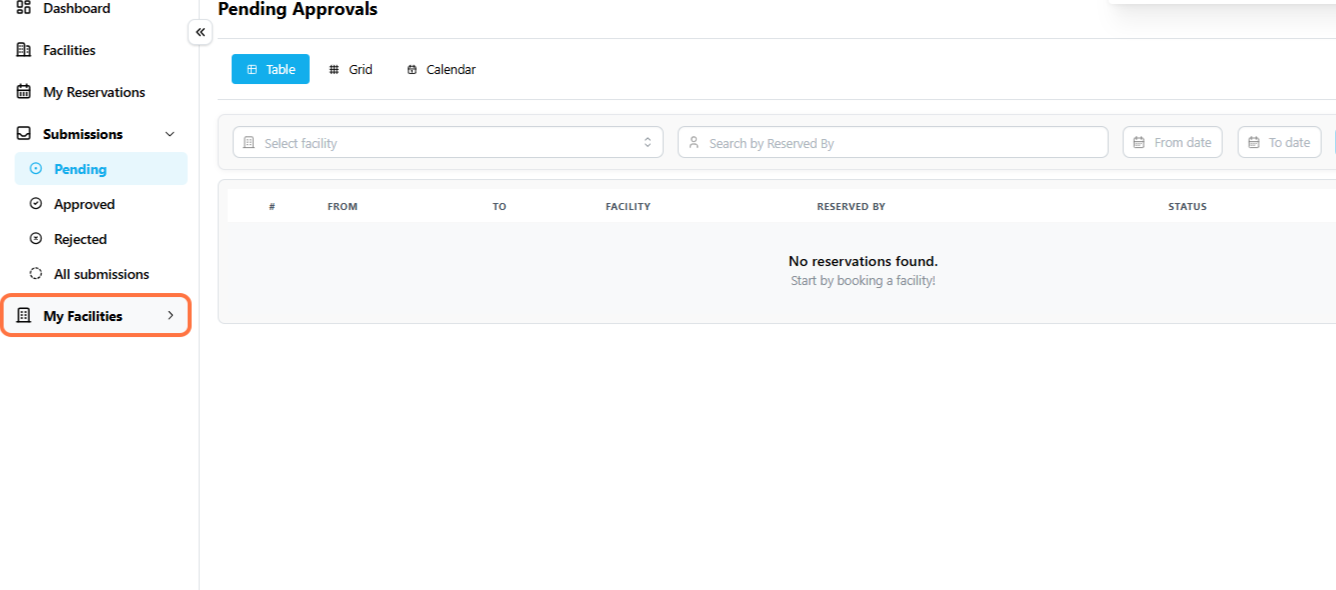](https://docs.smartadmin.rw/uploads/images/gallery/2026-08/df4237c7-ca9d-48c8-bb25-ea2a2ca9c141.png)
Step 1
Open Facility Actions
Click the **…** icon next to a facility, then select **Edit Facility** to change its settings, (or **Delete Facility** to remove it entirely.)
[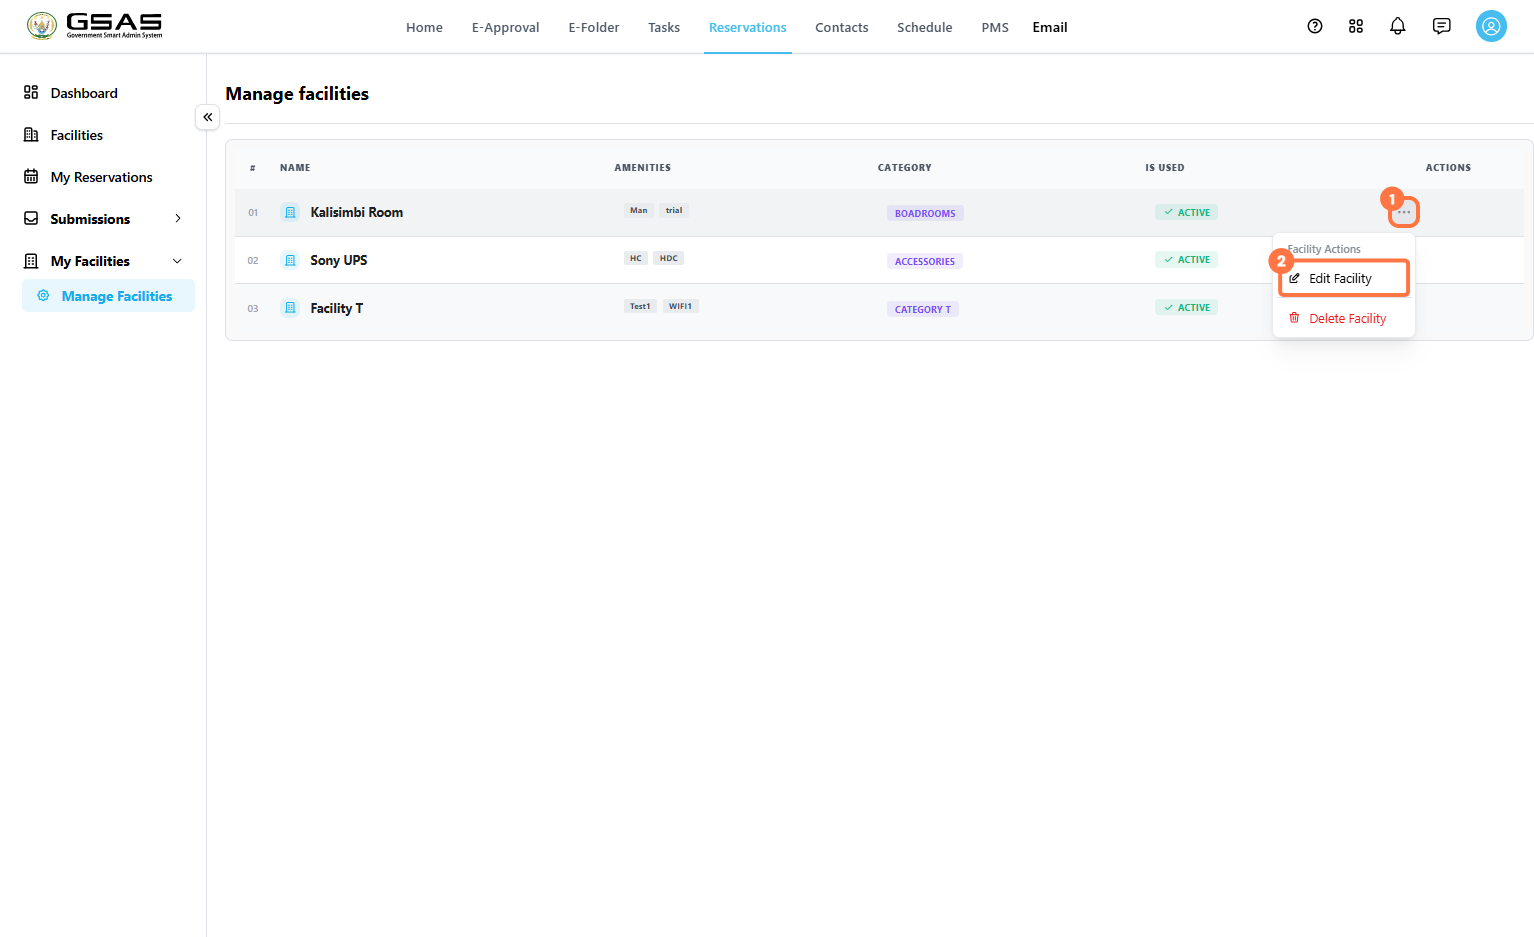](https://docs.smartadmin.rw/uploads/images/gallery/2026-08/j54image.png)
Step 2
Update Basic Information
- If necessary, edit the facility's **Category** and **Facility name**, along with a **Color** used to identify it on the calendar.
- Add or remove **Amenities** to help people know what to expect when booking it.
- **Does this facility have a manager?** controls what manager is responsible for the facility.
- **Notify specific users when used?** lets you send a notification to selected users every time the facility is booked.
Under **Facility Status**, set **Under Maintenance?** to **Yes** if the facility is temporarily out of use, and set **Is Facility Active?** to **Inactive** if it should no longer appear as bookable at all.
[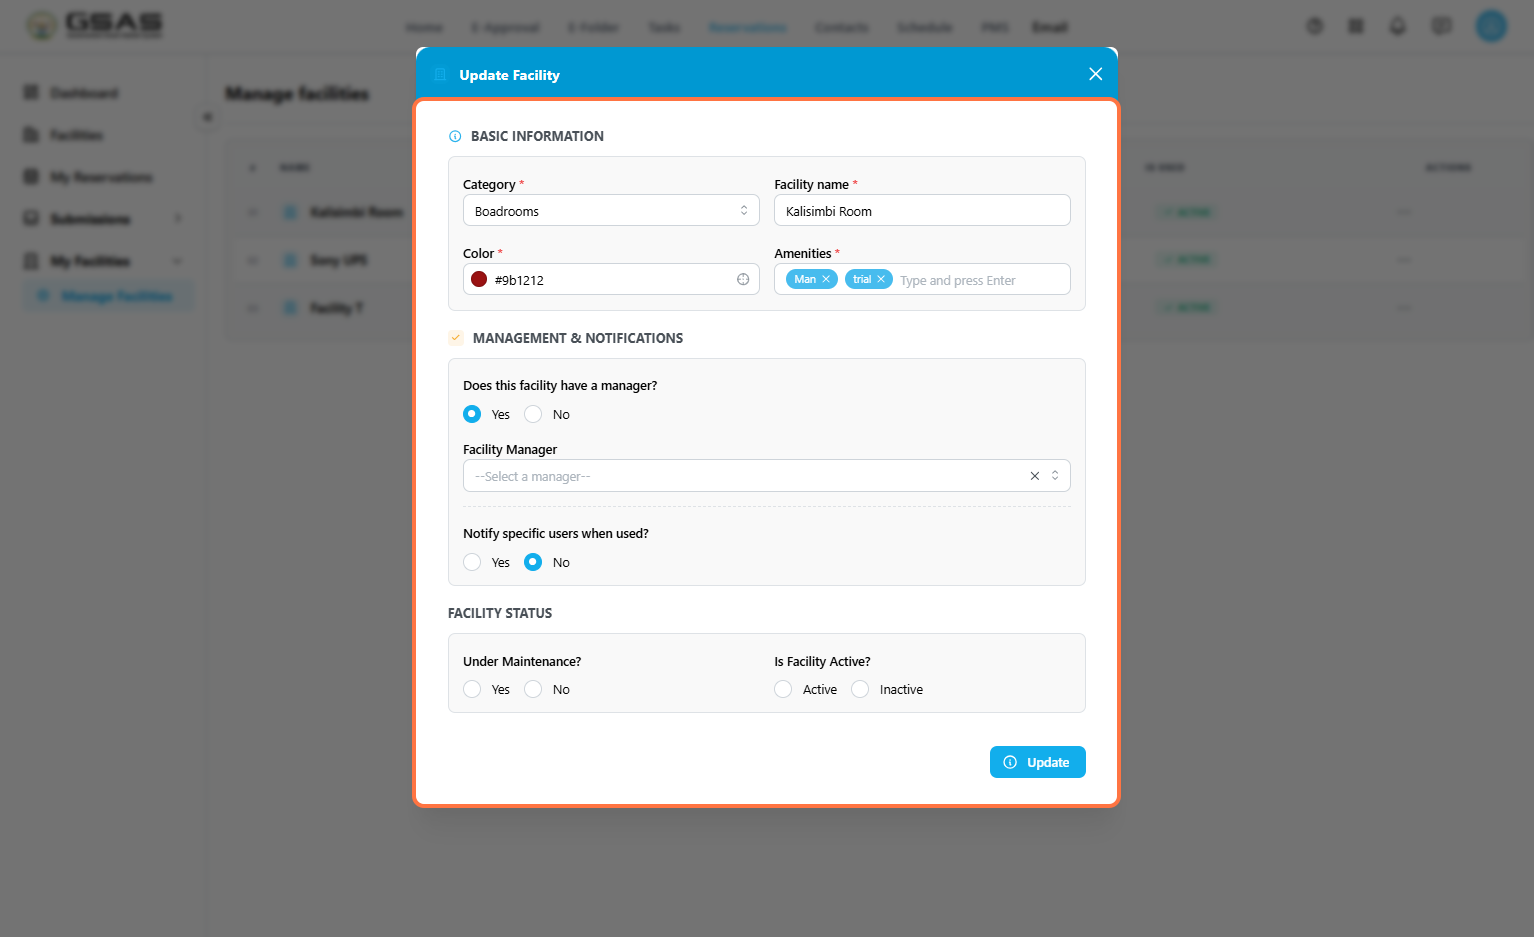](https://docs.smartadmin.rw/uploads/images/gallery/2026-08/kTtimage.png)
Click **Update** to save changes.
# Schedule
Plan your upcoming events and keep track of what's on your calendar.
# .
| [](https://docs.smartadmin.rw/uploads/images/gallery/2026-08/recreated-icon.png)
Coming soon
Check back soon for the finished version.
|
# Contacts
View contacts across all institutions using Smart Admin
# Overview
The Contacts page lets you look up the contact details of any user that uses the system.
---
### Viewing contacts
Click **Contacts** in the top navigation. By default, the list shows the users in your own institution. Use the search bar to find a specific contact.
[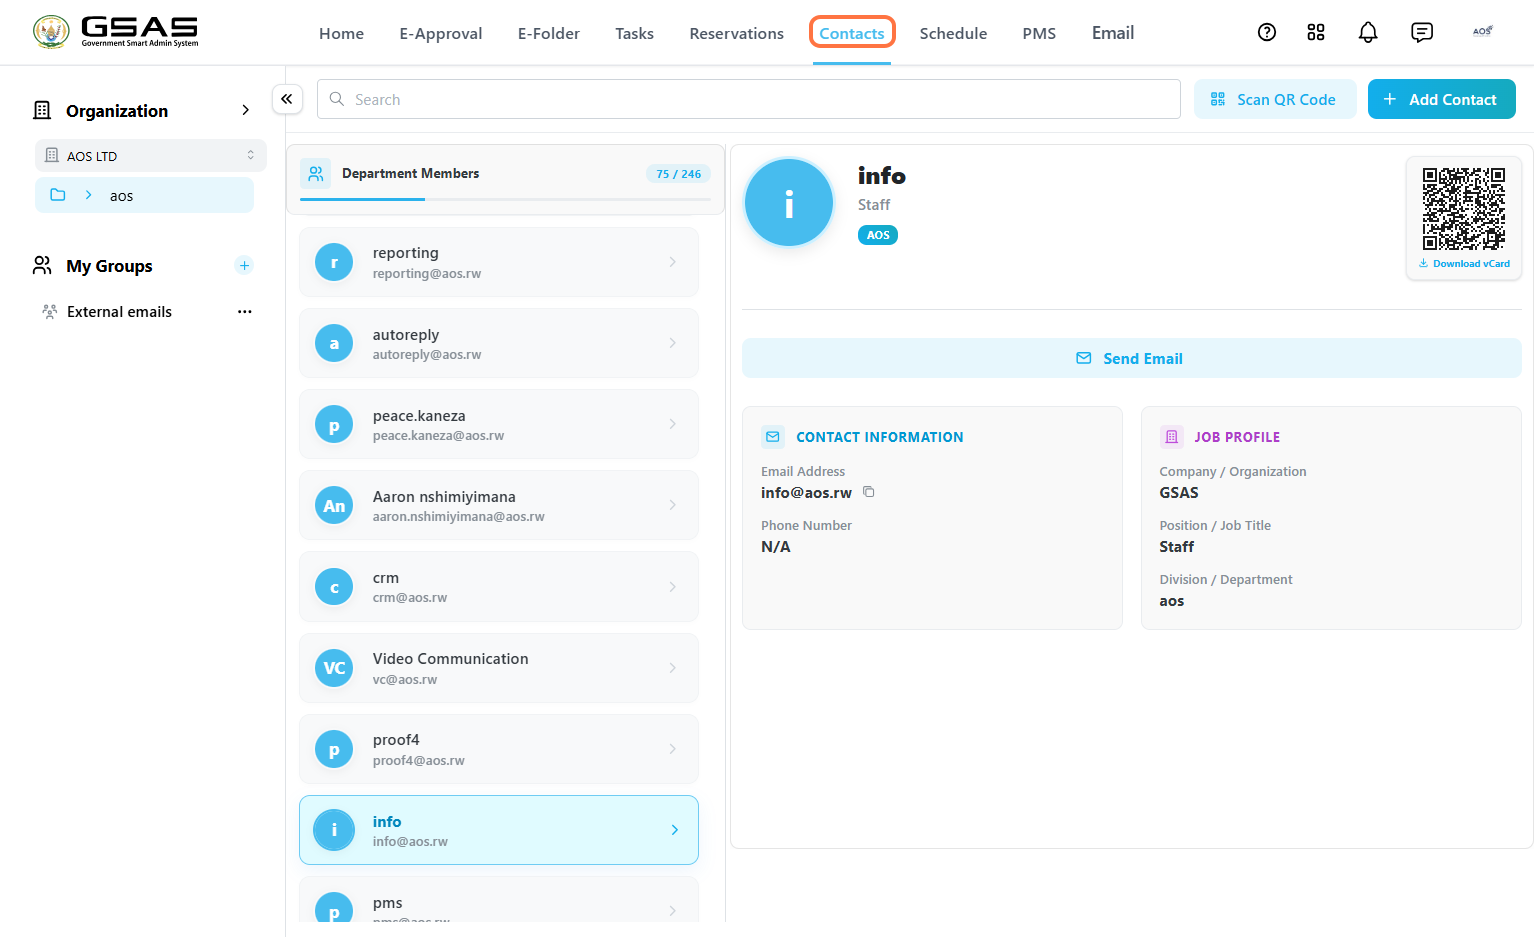](https://docs.smartadmin.rw/uploads/images/gallery/2026-08/q7rimage.png)
To view contacts from a different institution, select it from the institution dropdown.
[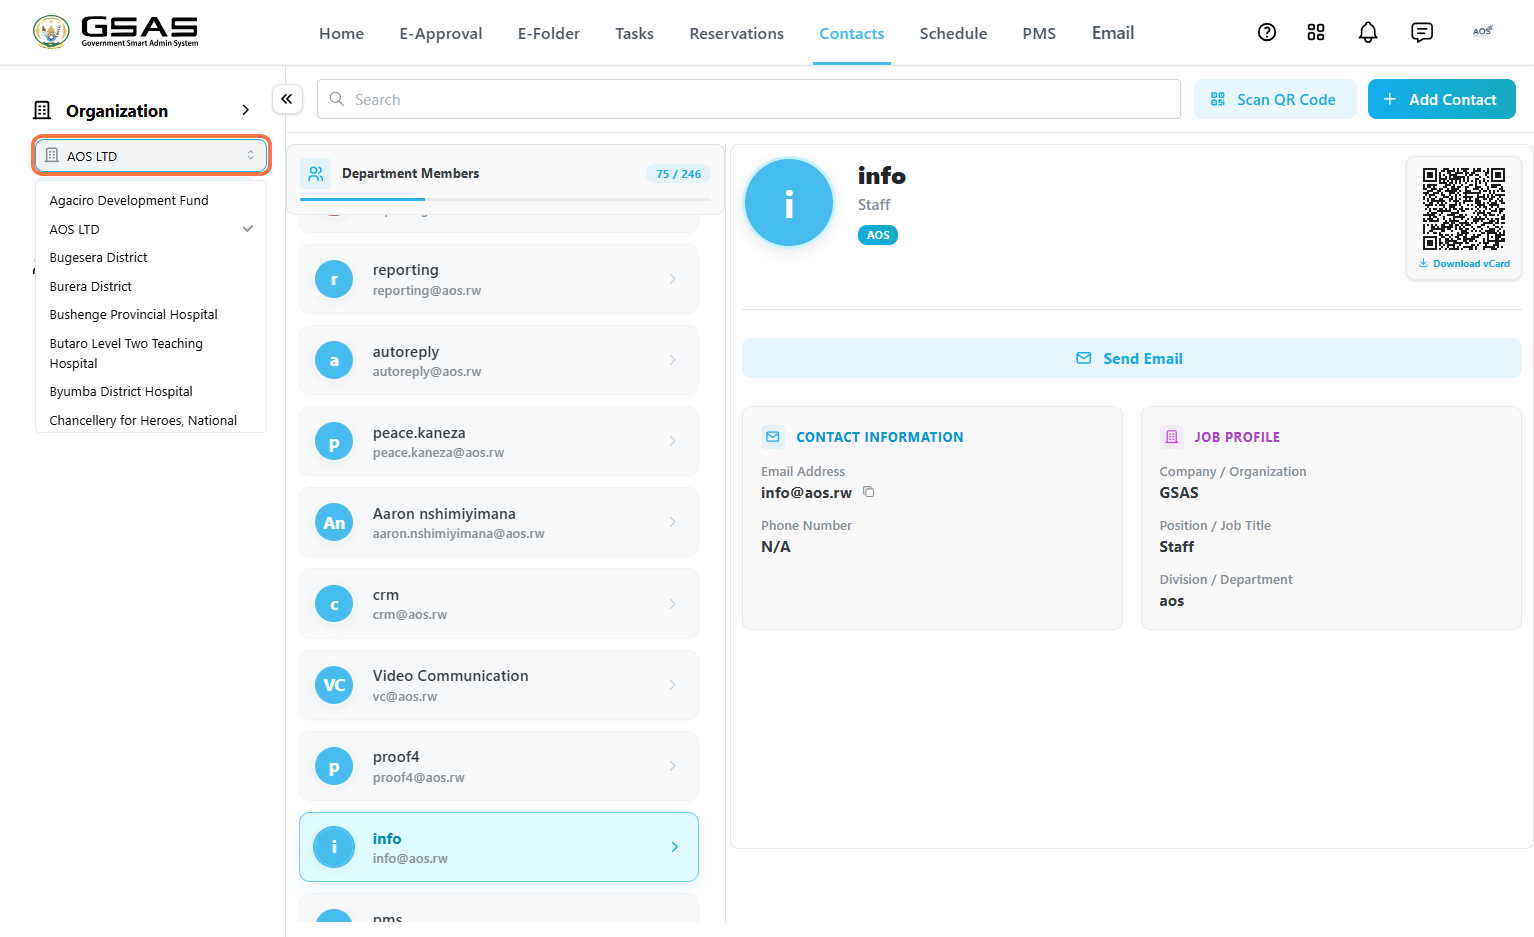](https://docs.smartadmin.rw/uploads/images/gallery/2026-08/7uLimage.png)
###
**Filter contacts by department** to locate a specific user faster. Click the institution name below the dropdown to view its departments, then select one.
[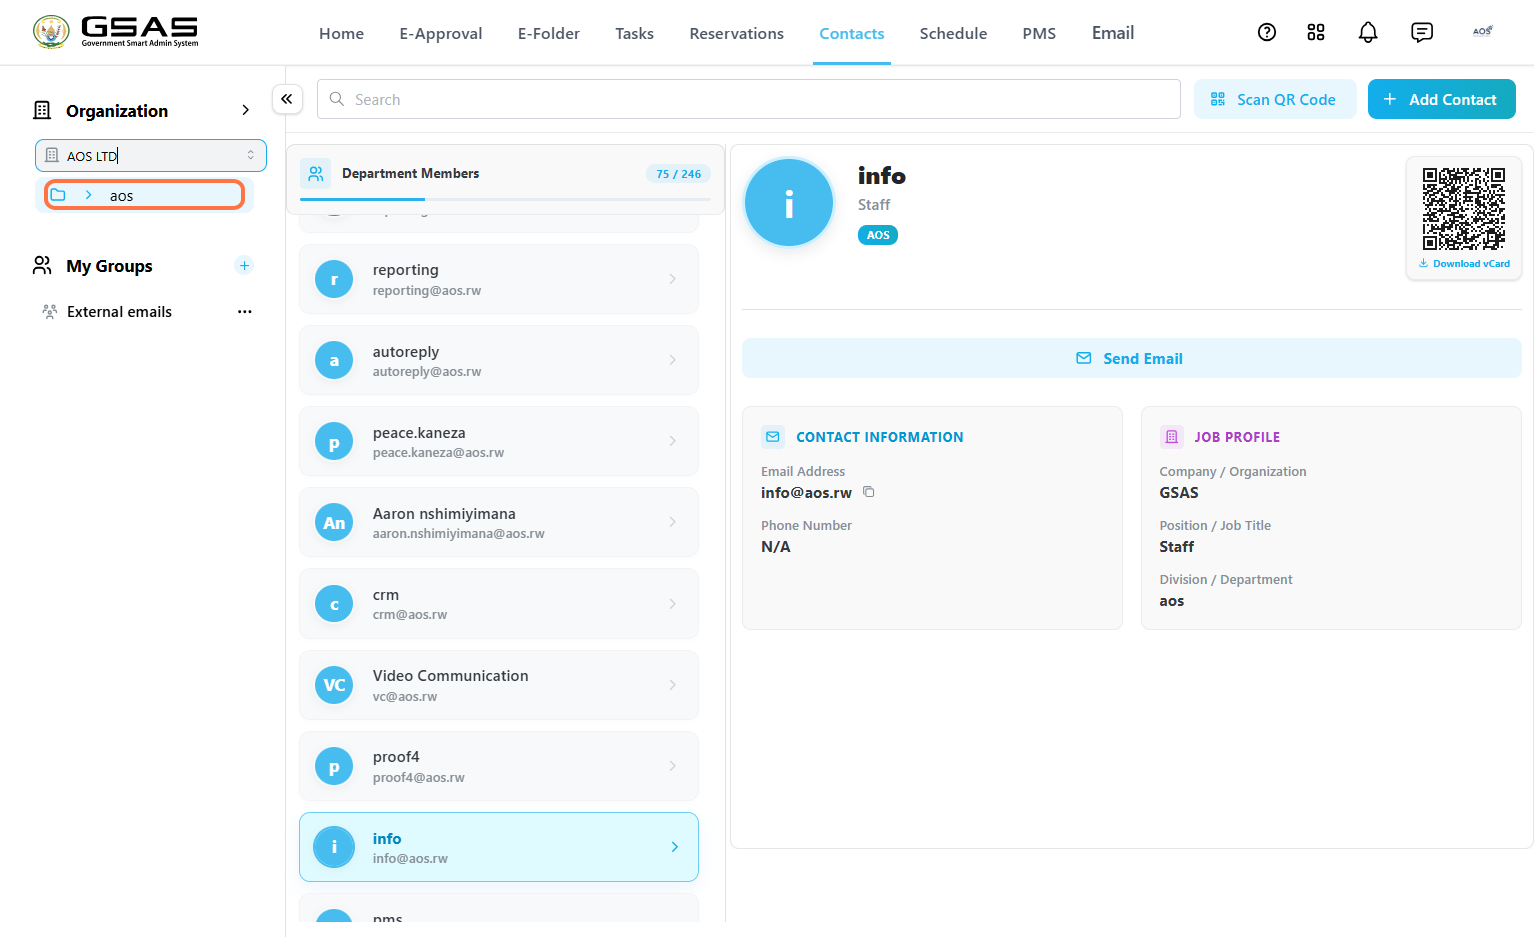](https://docs.smartadmin.rw/uploads/images/gallery/2026-08/p02image.png)
Select a contact to open their profile on the right, showing their name, title, and institution, along with:
- **Contact Information** — email address and phone number (only appears if the user has added it in their profile settings).
- **Job Profile** — company/organization, position/job title, and division/department.
- A **QR Code** you can scan or download as a vCard, and a **Send Email** shortcut.
# PMS
Project Management System (PMS) is an integral feature within the Government Smart Administration System (GSAS), functioning as a standalone system dedicated to efficiently managing projects within government operations.
PMS streamlines project planning, execution, and monitoring, enhancing productivity and transparency.
[](https://docs.smartadmin.rw/books/gsas-user-guide/draft/29)
# PMS Dashboard
---
Using the PMS Total Dashboard
Follow this guide to access and use the Project Management System (PMS) dashboard in GSAS. The dashboard helps you review project status, budgets, sectors, tasks, priority projects, development partner funding, approvals, programs, activity logs, timesheets, and employment reports.
| **How it works:** Open PMS from the GSAS menu, review the dashboard tabs, use filters to narrow project information, export reports when needed, and use the left-side menu to manage project-related work. |
---
Guideline 1
Open PMS
From the GSAS top menu, click **PMS**. Confirm that the **Dashboard** page opens and that you can see the dashboard tabs and project summary cards.
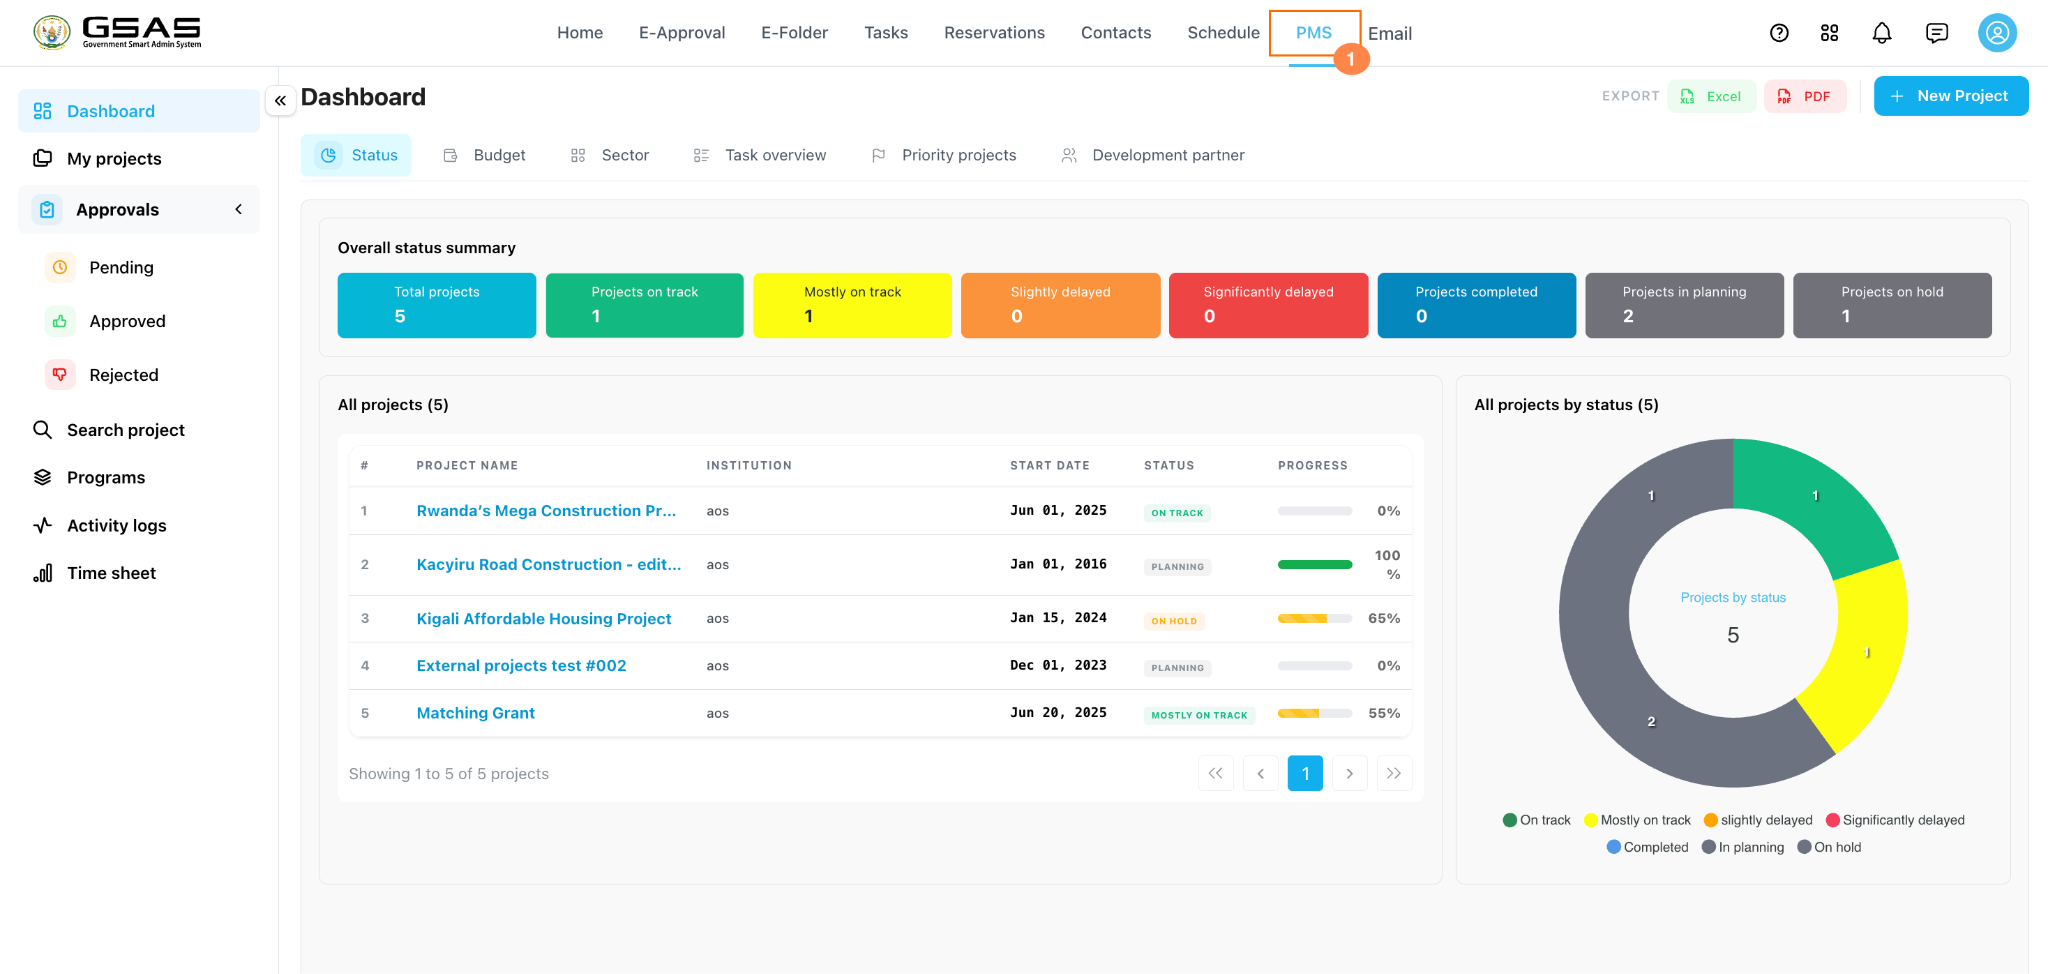
---
Guideline 2
Review the status summary
On the **Status** tab, review the colored cards in the **Overall status summary**.
These cards show the number of projects by status, including total projects, on track, mostly on track, delayed, completed, planning, and on hold.
Use the project table and chart below the cards to compare the status count with the project list and progress percentages.
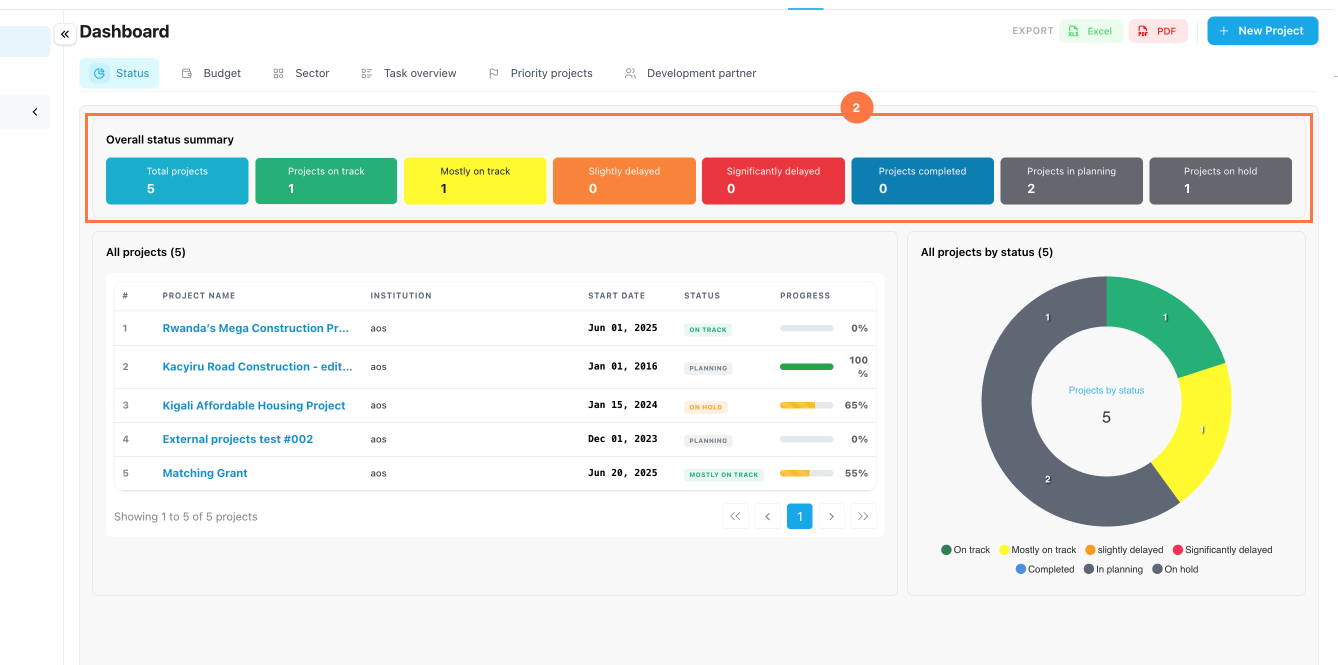
| **Tip:** The dashboard only shows project information available to your user role and permissions. If a project is missing, confirm that you have been added as a creator, stakeholder, collaborator, developer, manager, or other authorized role. |
---
Guideline 3
Export dashboard data
Use the **Export** buttons in the top right corner of the dashboard to download project information.
Click **Excel** when you need a spreadsheet for analysis, or click **PDF** when you need a fixed report for sharing or filing.
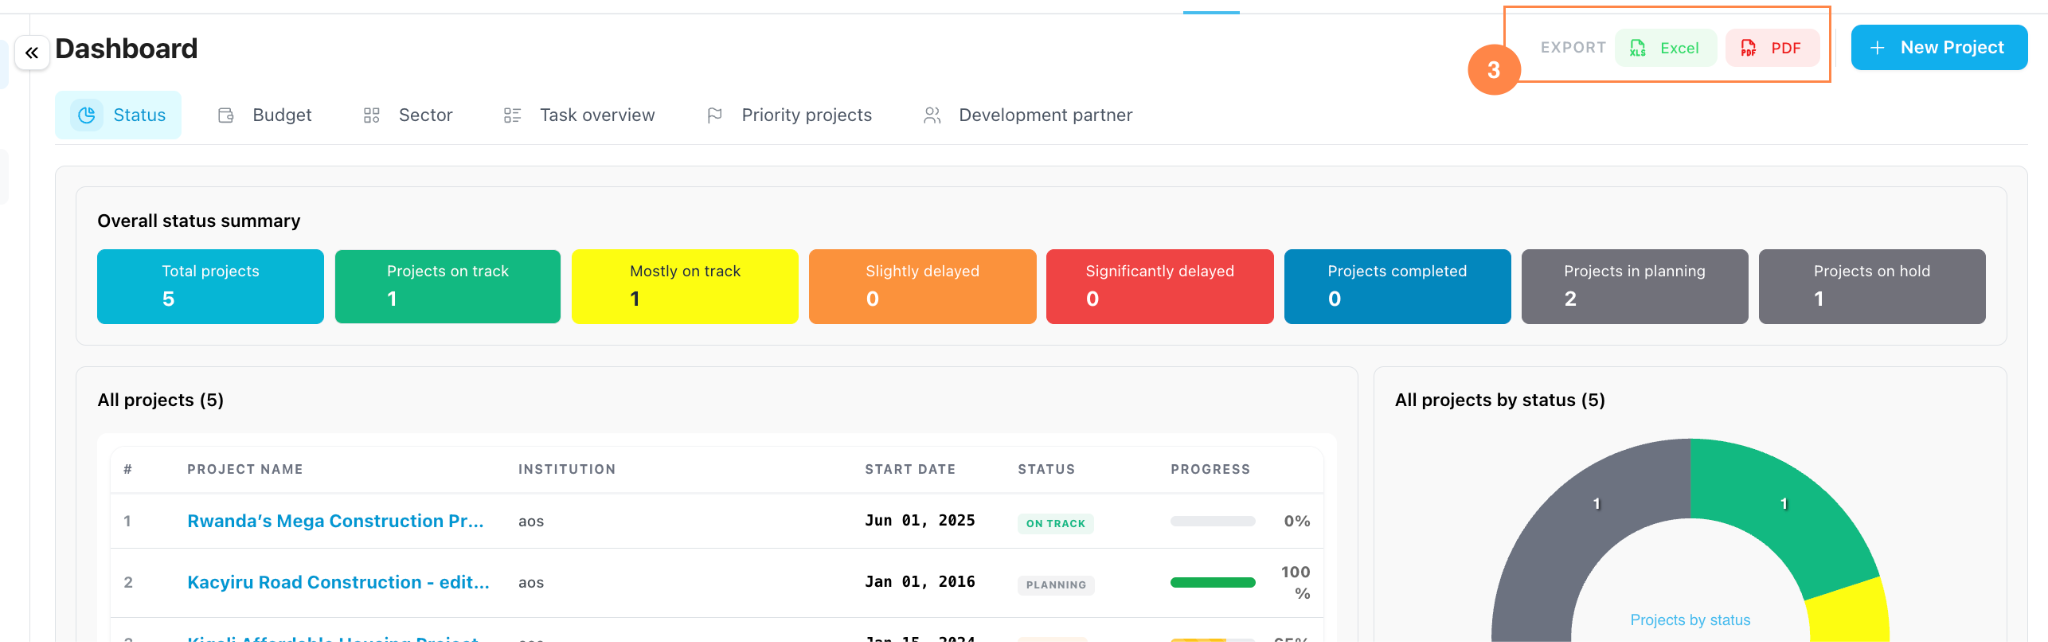
---
Guideline 4
Use the Status tab
Click **Status** to return to the main project status view.
Use this tab for a quick progress check across multiple projects.
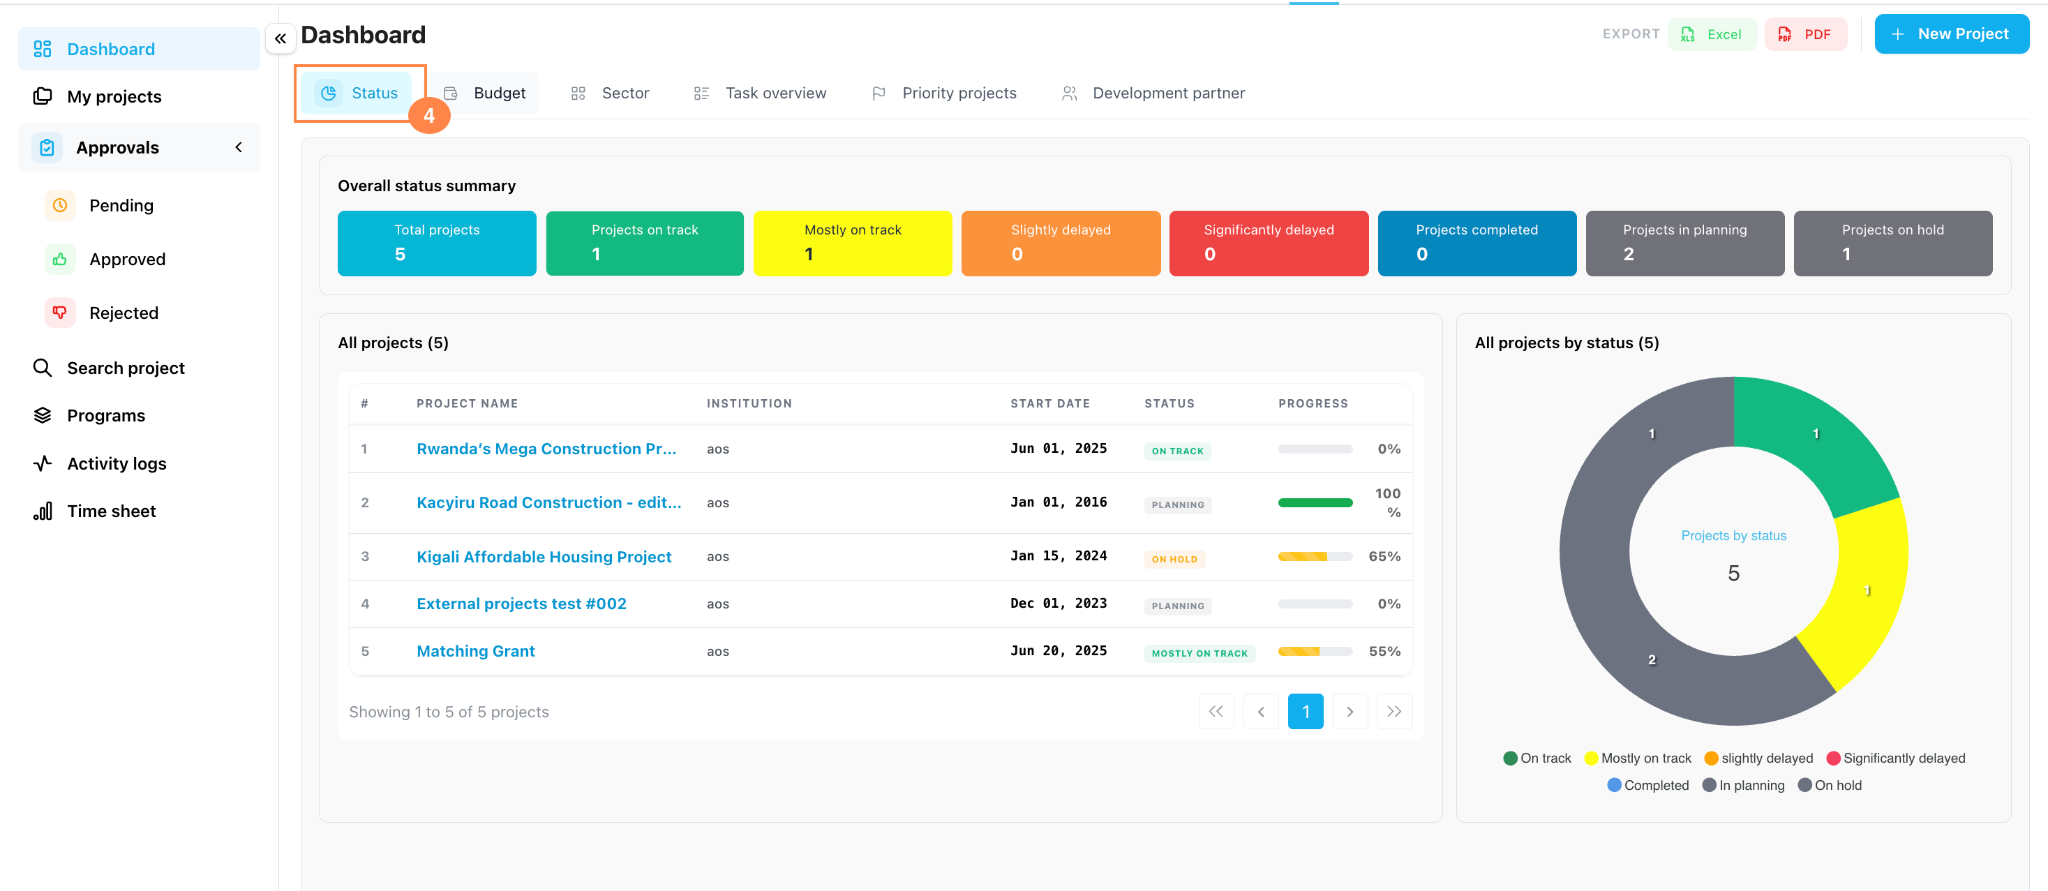
---
Guideline 5
Review project budgets
Click **Budget** to review financial performance.
Use the summary cards to compare the total, paid, and unpaid project budgets. Review the project table to see budget details by project.
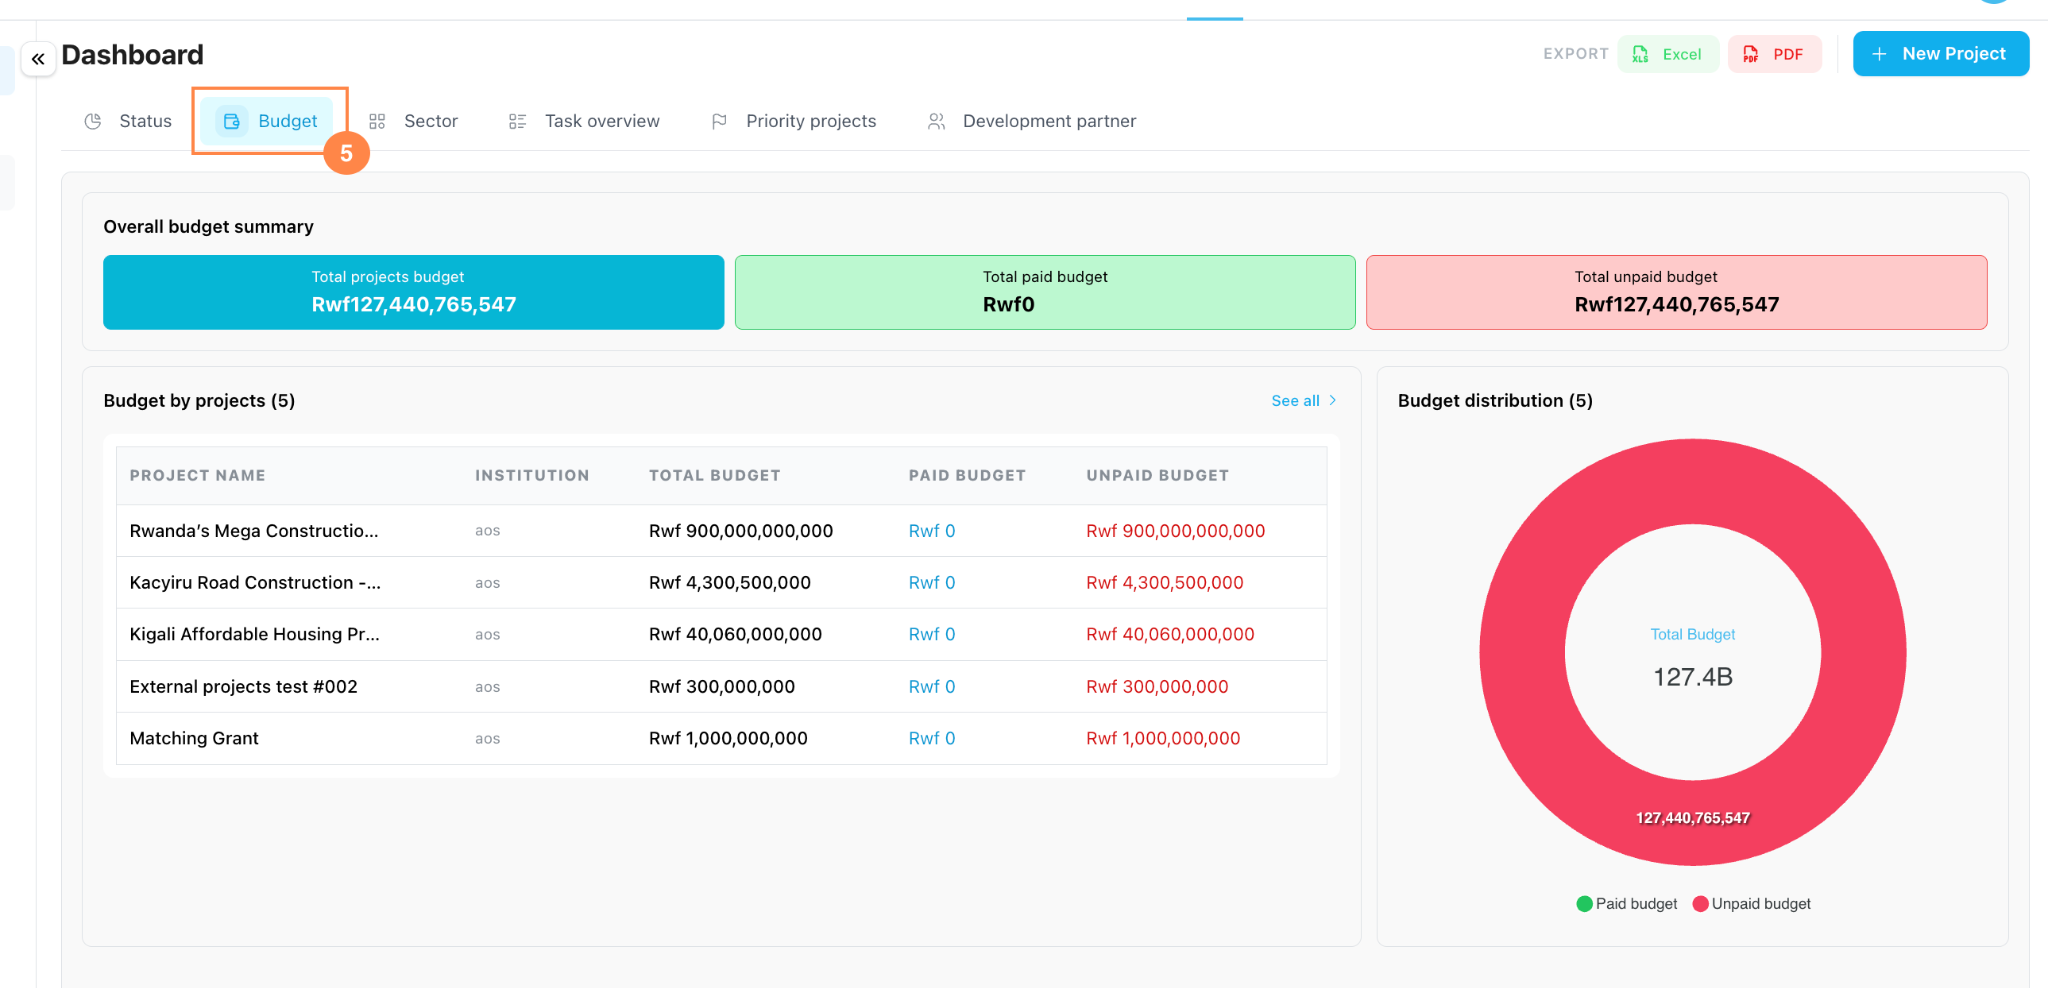
| Total project budget | : The full approved or recorded budget across the projects is displayed. |
| Total paid budget | : The amount already paid or marked as used. |
| Total unpaid budget | : The remaining amount that has not yet been paid. |
---
Guideline 6
Filter projects by sector
Click **Sector**, then use the **Project by sector** dropdown to filter projects by sector.
Select **all** to return to the full list.
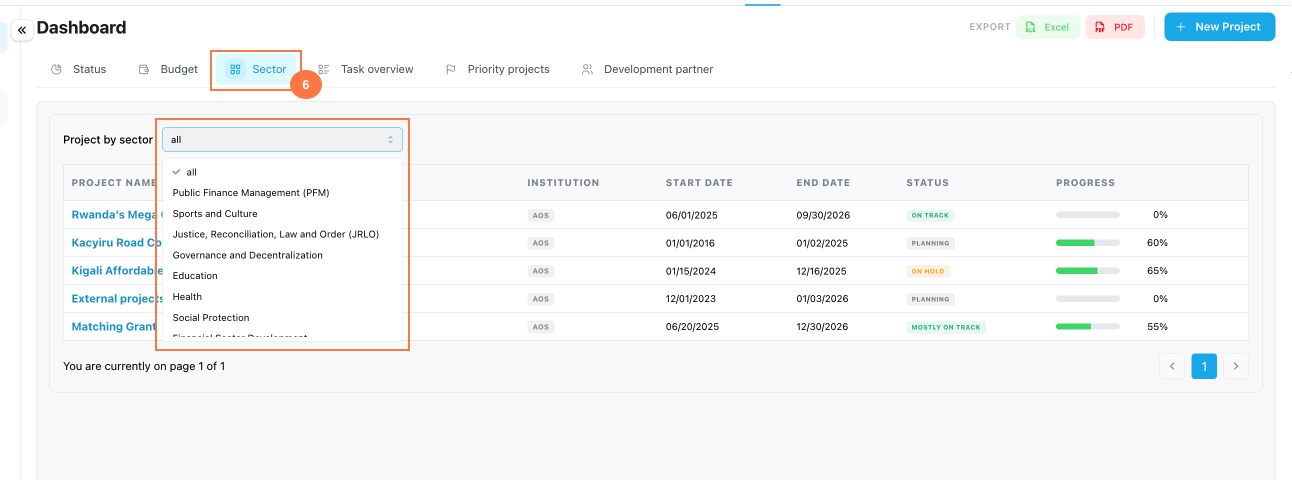
---
Guideline 7
Review tasks and deliverables
Click **Task overview** to review the task and deliverable status for each project.
Use this view to identify work that is pending, in progress, delayed, or completed.
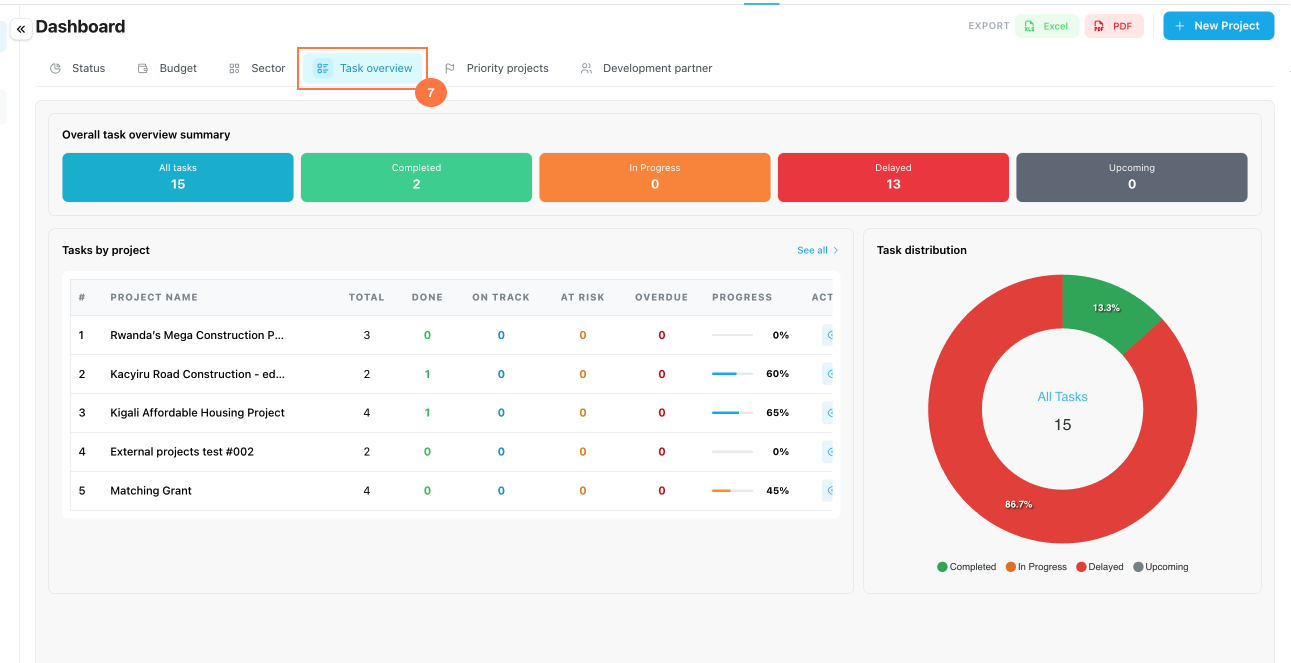
---
Guideline 8
Open Priority projects
Click **Priority projects** to focus on projects that require closer attention. Use this area to organize projects by priority type, such as budget, risk, impact, or dependency.
---
Guideline 9
Review the priority matrix
In the **Priority projects** area, open the **Filter View** dropdown. Select the matrix view you want to review, such as **Budget**, **Risk**, **Impact**, or **Dependency**.
| Budget | : Use this view to focus on budget-related priority items. |
| Risk | : Use this view to identify projects that may need risk follow-up. |
| Impact | : Use this view to track projects with important expected outcomes. |
| Dependency | : Use this view to monitor projects that depend on other activities, teams, or programs. |
---
Guideline 10
Create a new priority list
Click **New Priority** to create a custom priority list.
Enter a clear priority name, then click **Save**.
---
Guideline 11
Assign standalone projects to a priority
After creating or selecting a priority list, click **Assign Projects (11.1)**.
In the assignment window, keep the **Projects** tab selected **(11.2)**, then tick the checkbox beside each project you want to add.
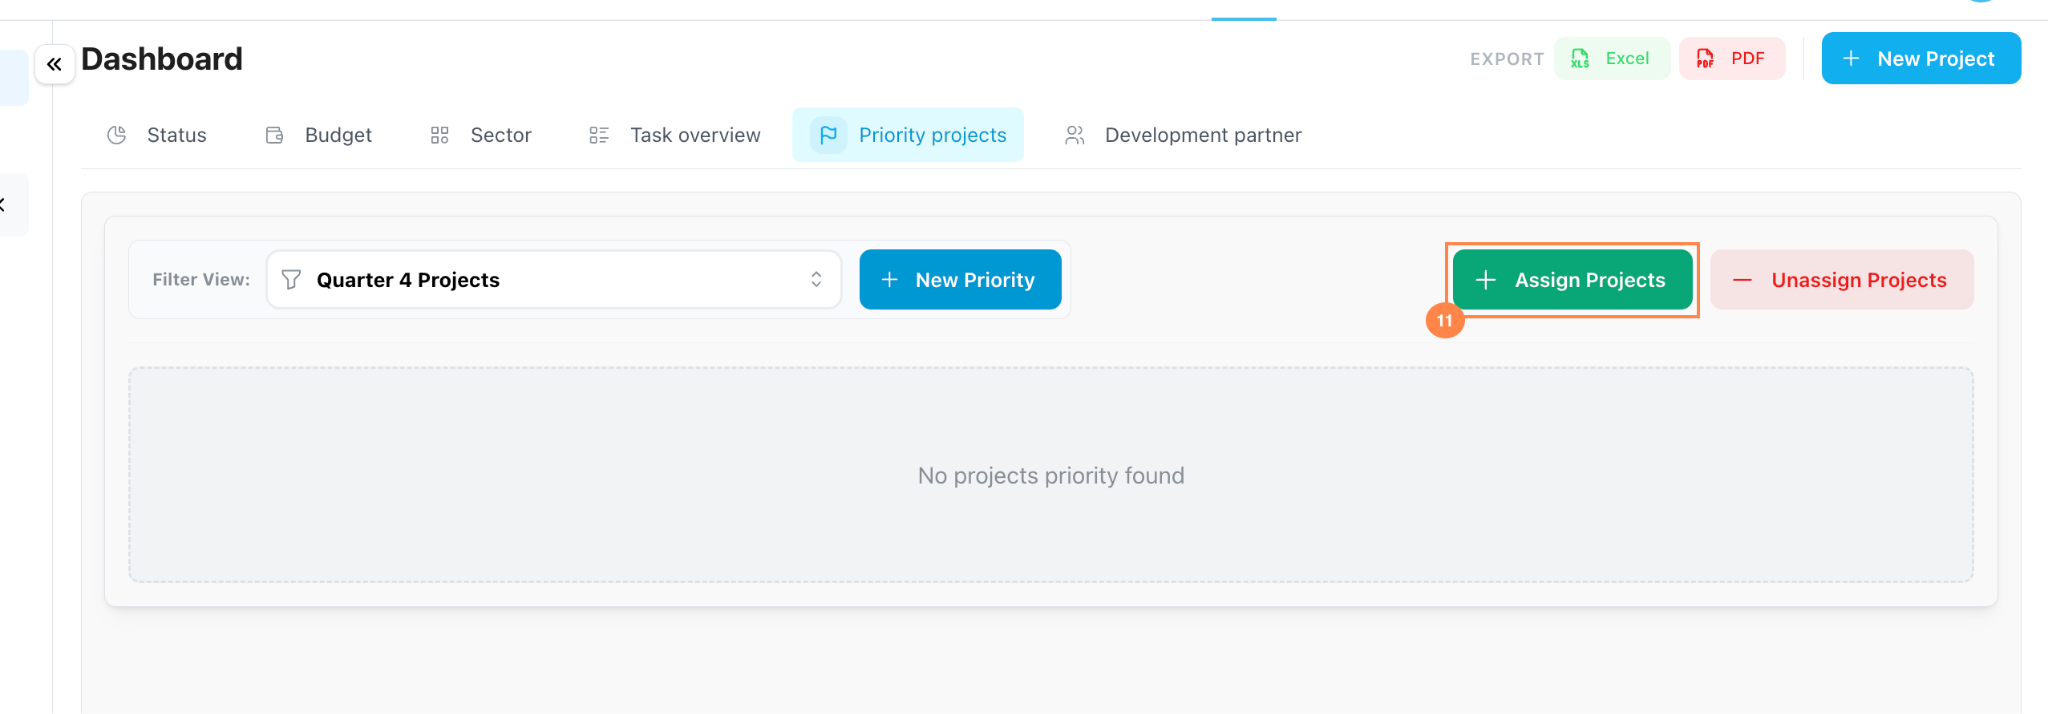
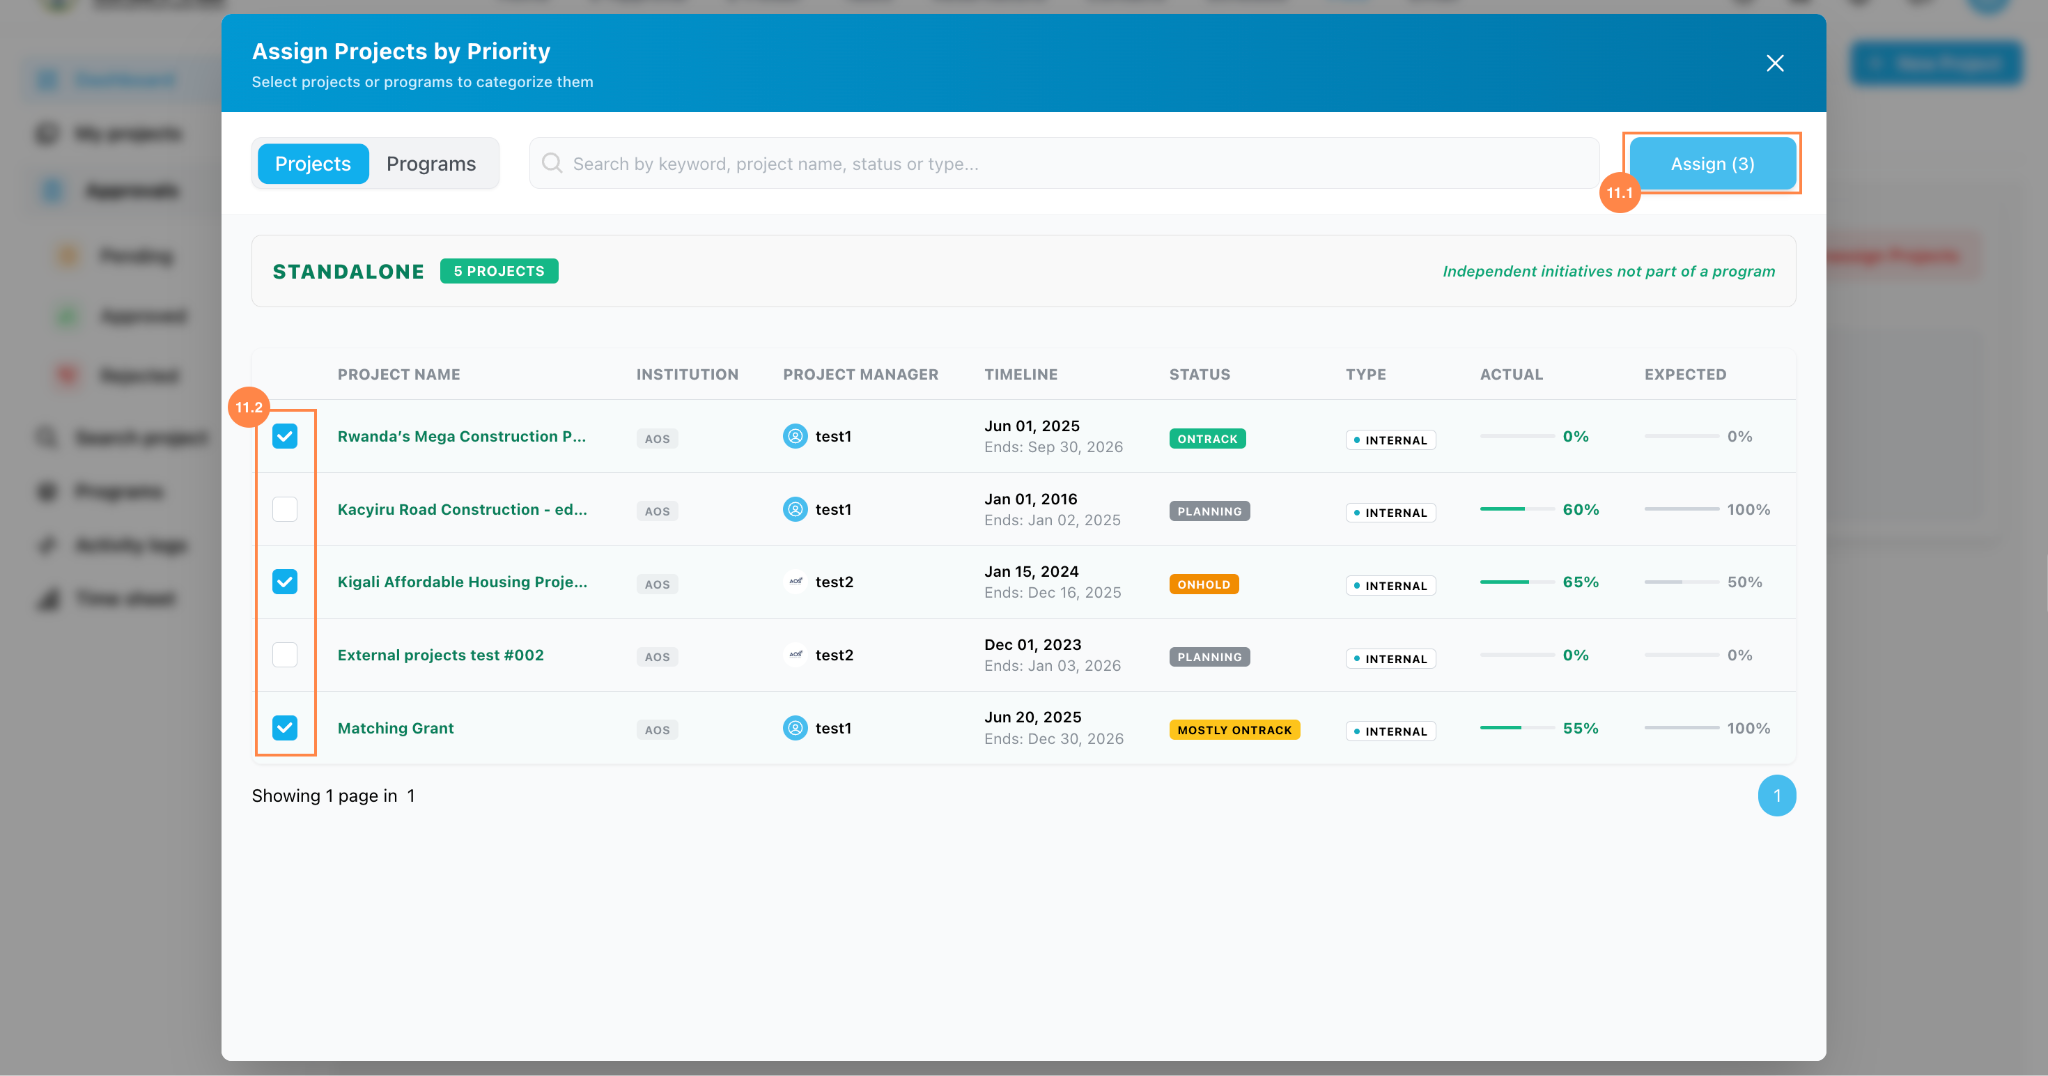
Click **Assign** to save the selected projects to the priority list.
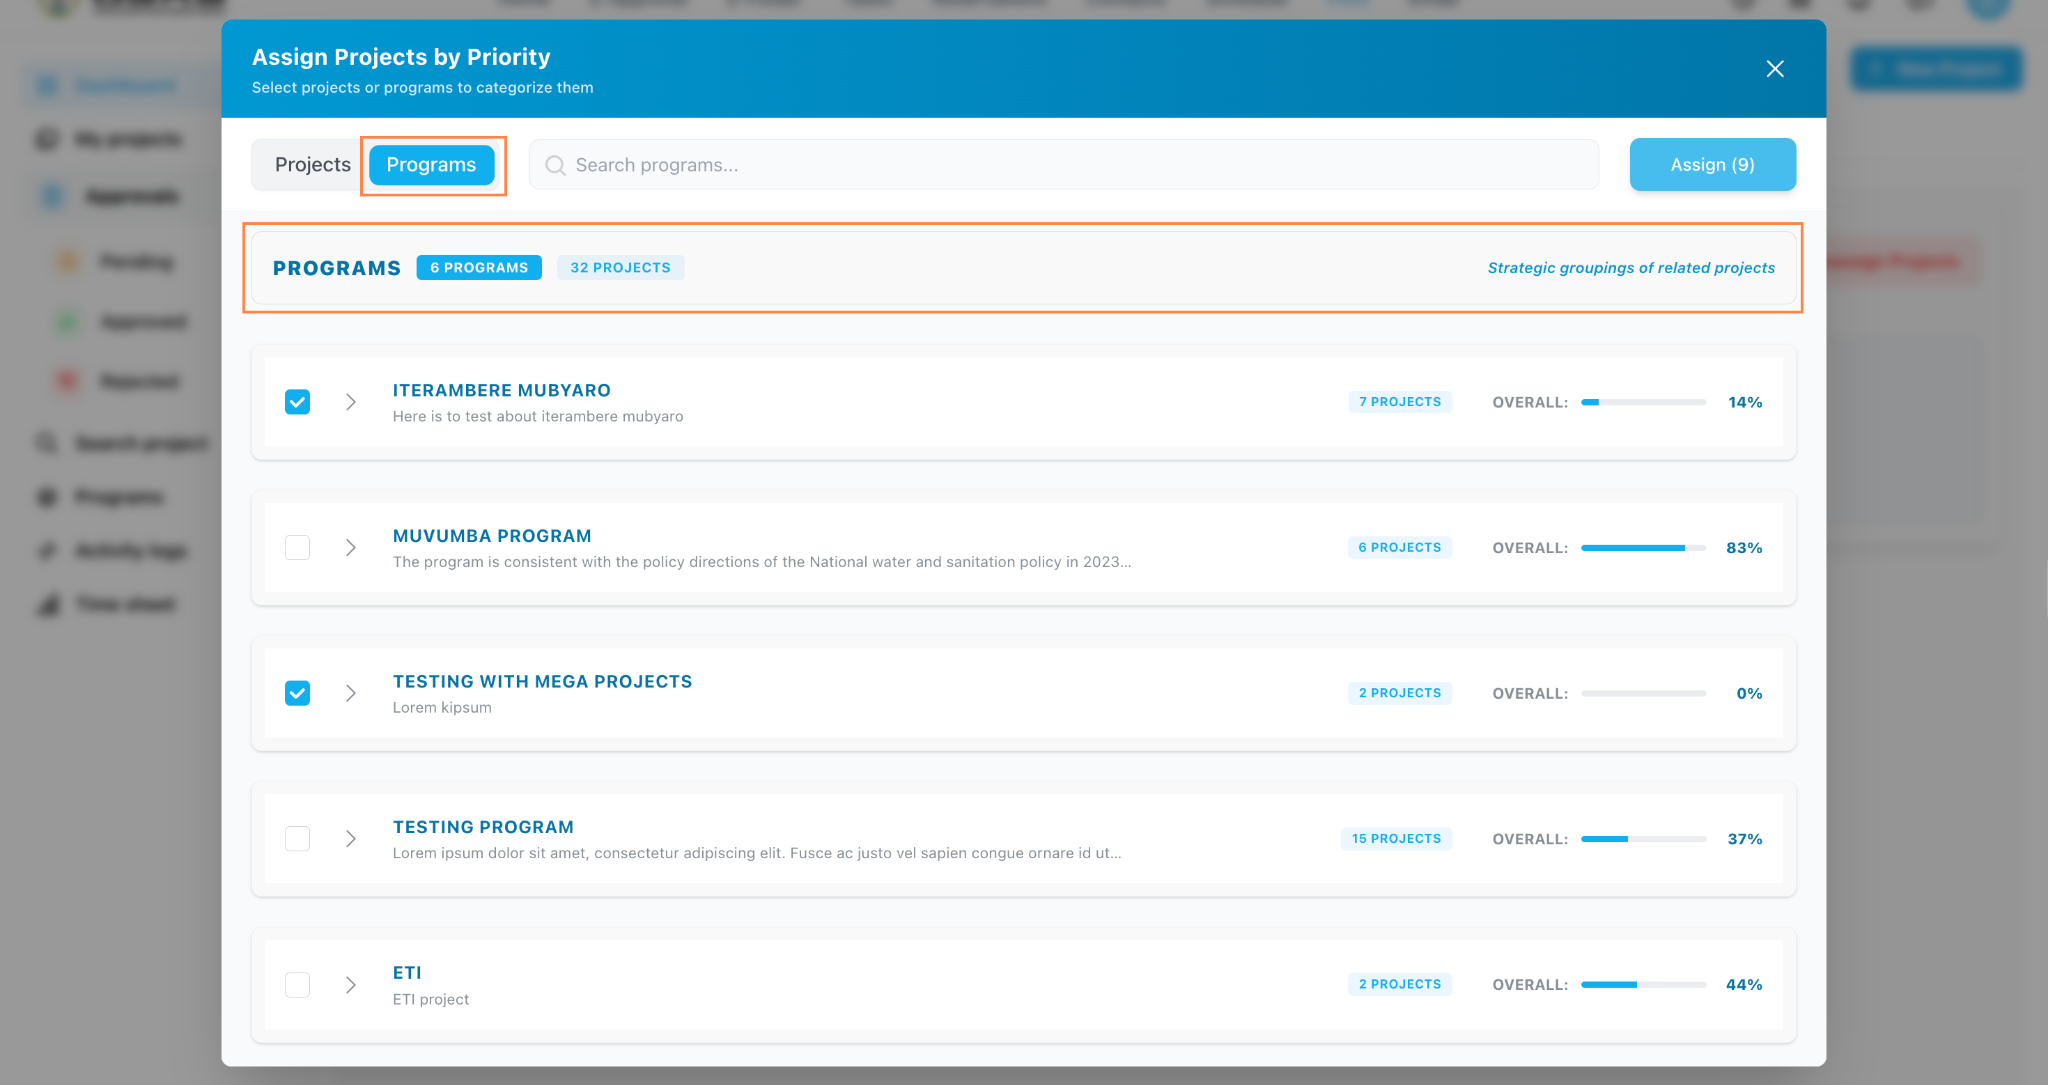
Use this to assign a whole program instead.
If you want the priority list to track an entire program, open the **Programs** tab in the same assignment window, select the program, then click **Assign**.

| **Search tip:** Start with the simplest information you have, such as the project name or status. Add more filters only when the results are too broad. |
---
Guideline 16
Review programs
Click **Programs** in the left-side menu to view programs and the projects grouped under them.
Use this page when projects share the same objective, sector, or category and need to be followed together.
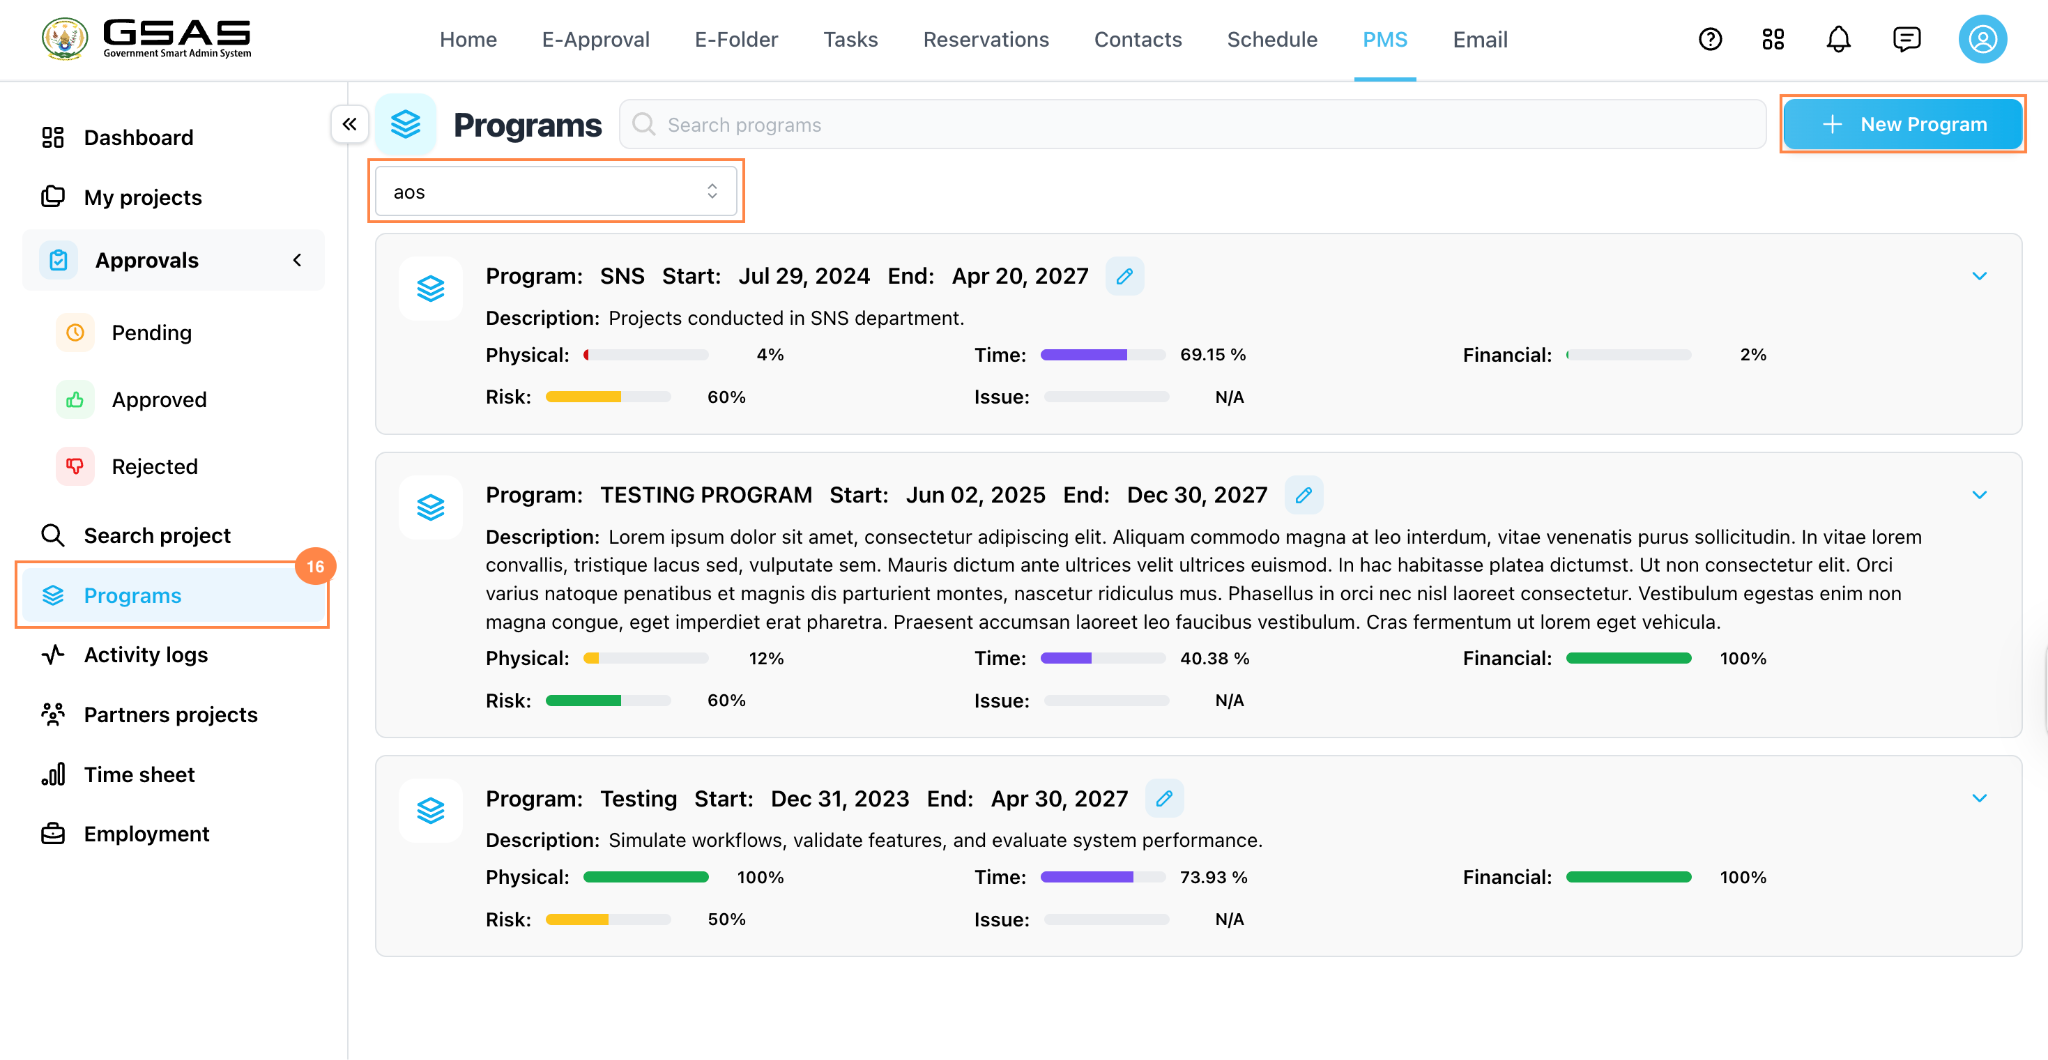
To create a new program, click **New Program**, enter the program name and description, then click **Save**.
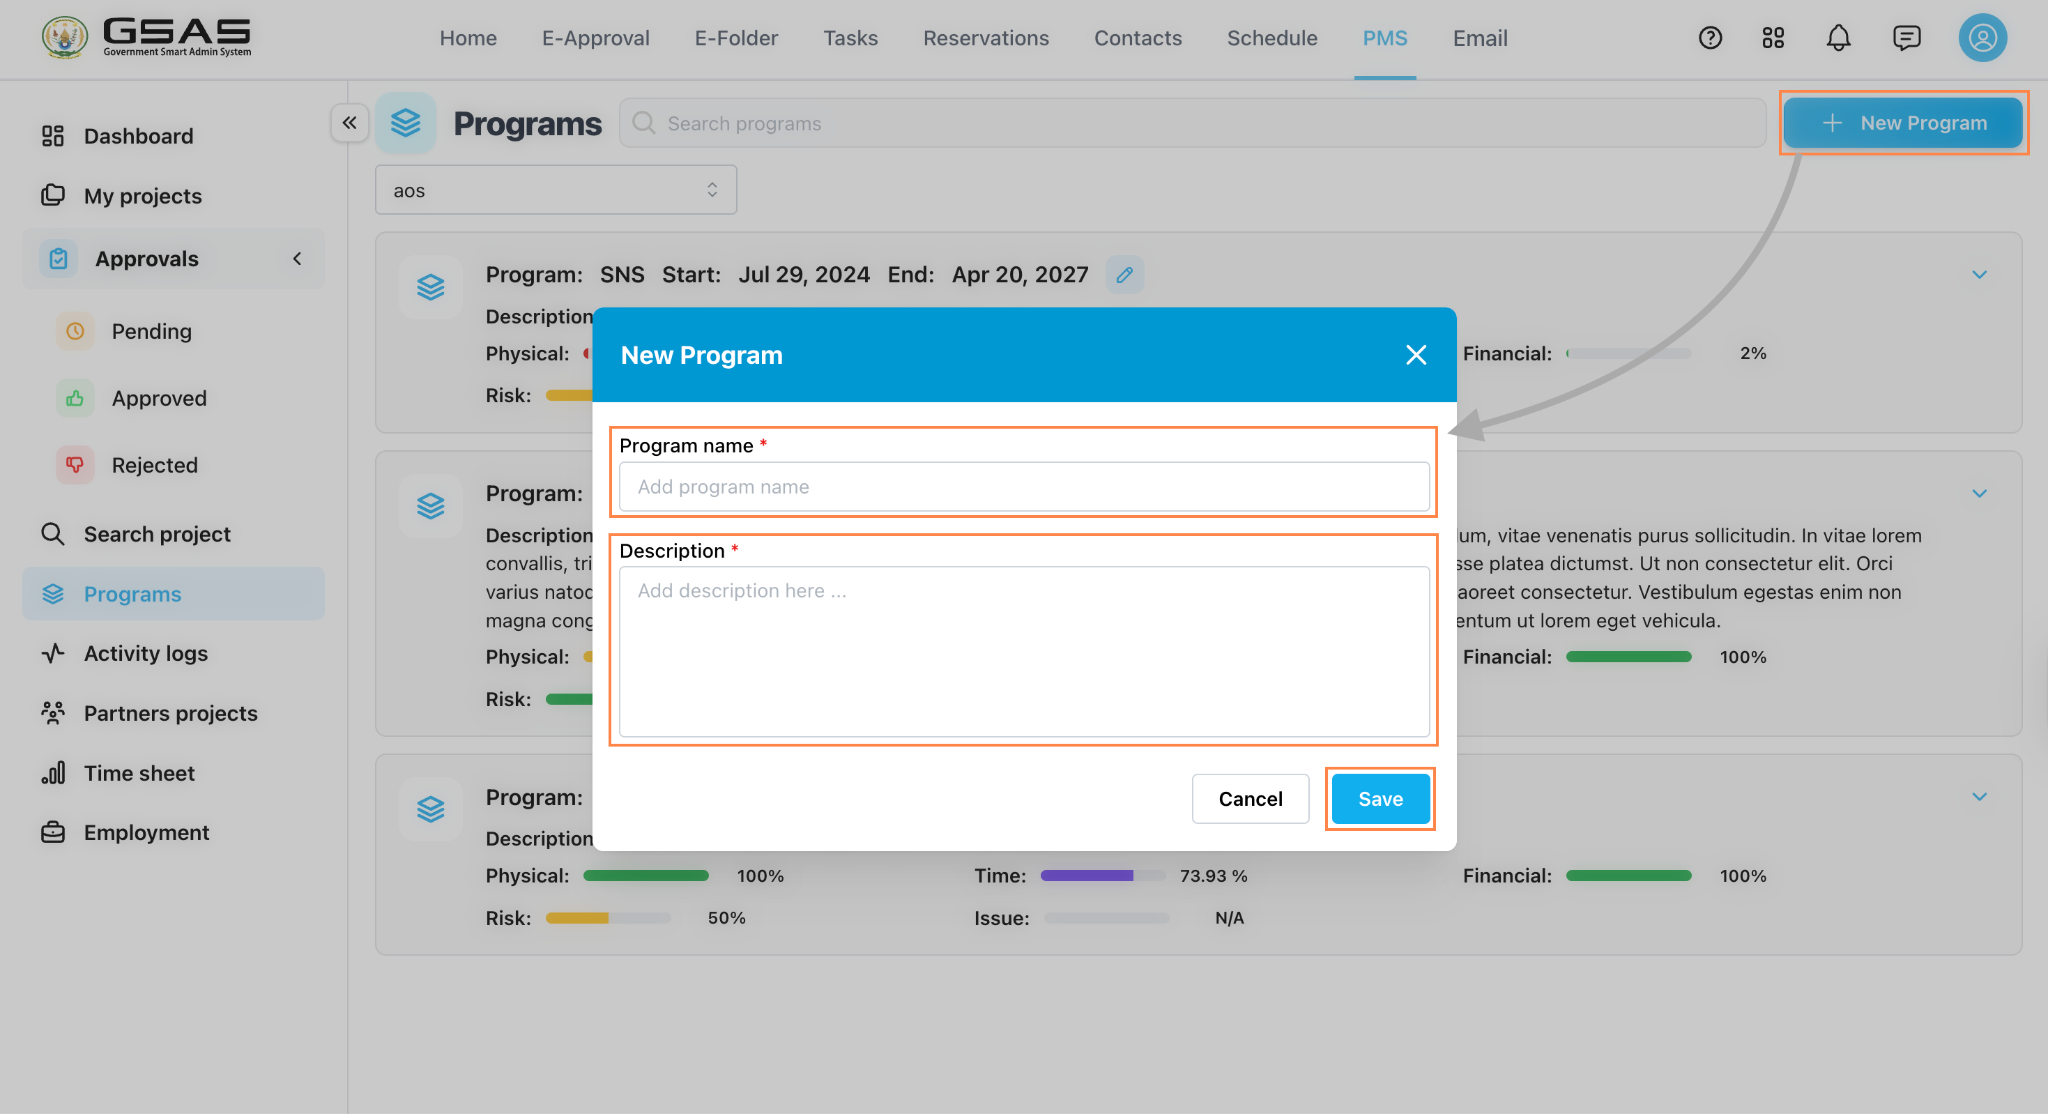
---
Guideline 17
Track project activity
Click **Activity logs** to review project actions and changes.
Use the available institution and date filters to narrow the activity history when auditing updates.
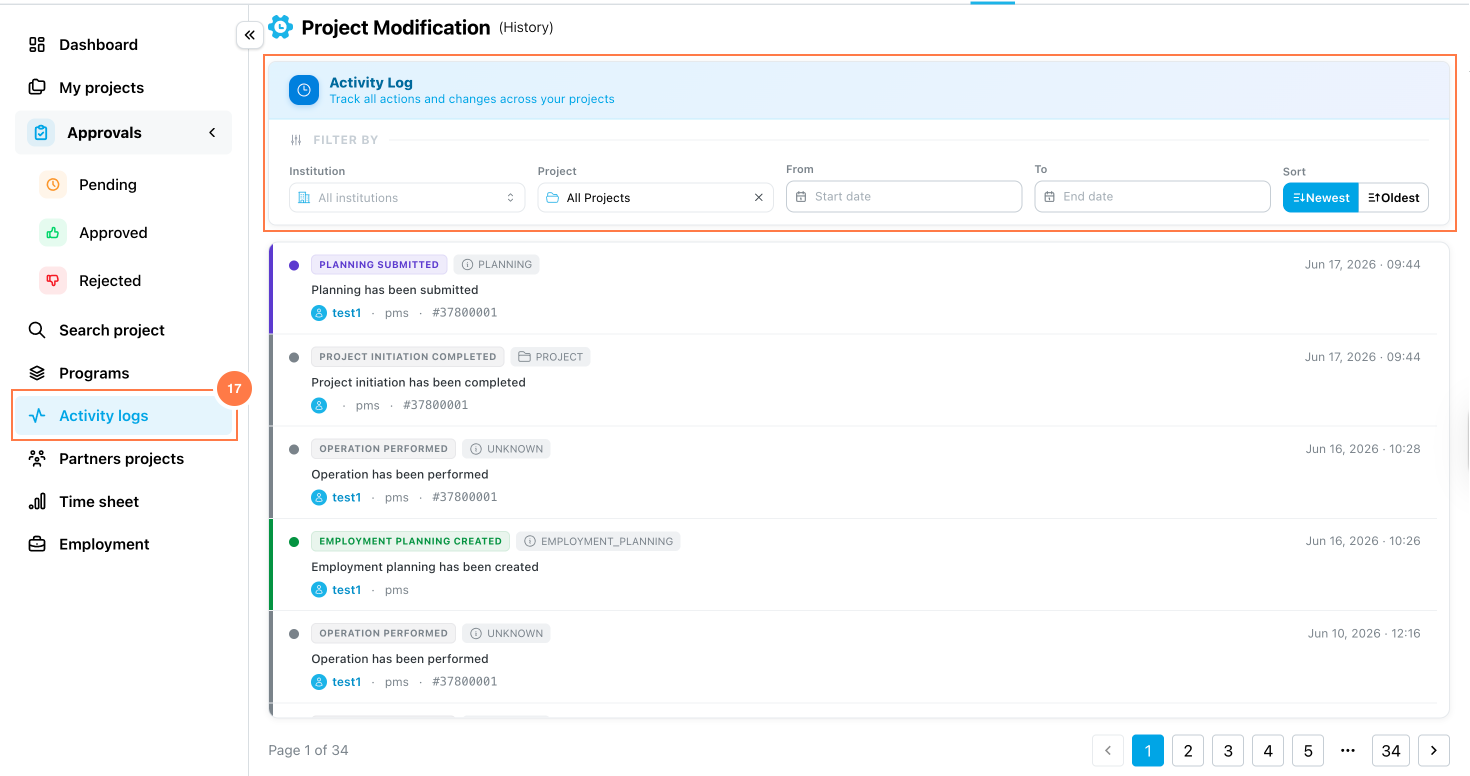
---
Guideline 18
Record work time
Click the **Time** **Sheet** to record project hours. Enter the date, worked hours, supporting document if required, and notes describing the work completed.
Search by Week, User, or project to select which one you want to report to **(a)**.
Export **(b)** a report as **PDF** or **Excel** when needed.
Save the entry so it can be reported to the project manager.
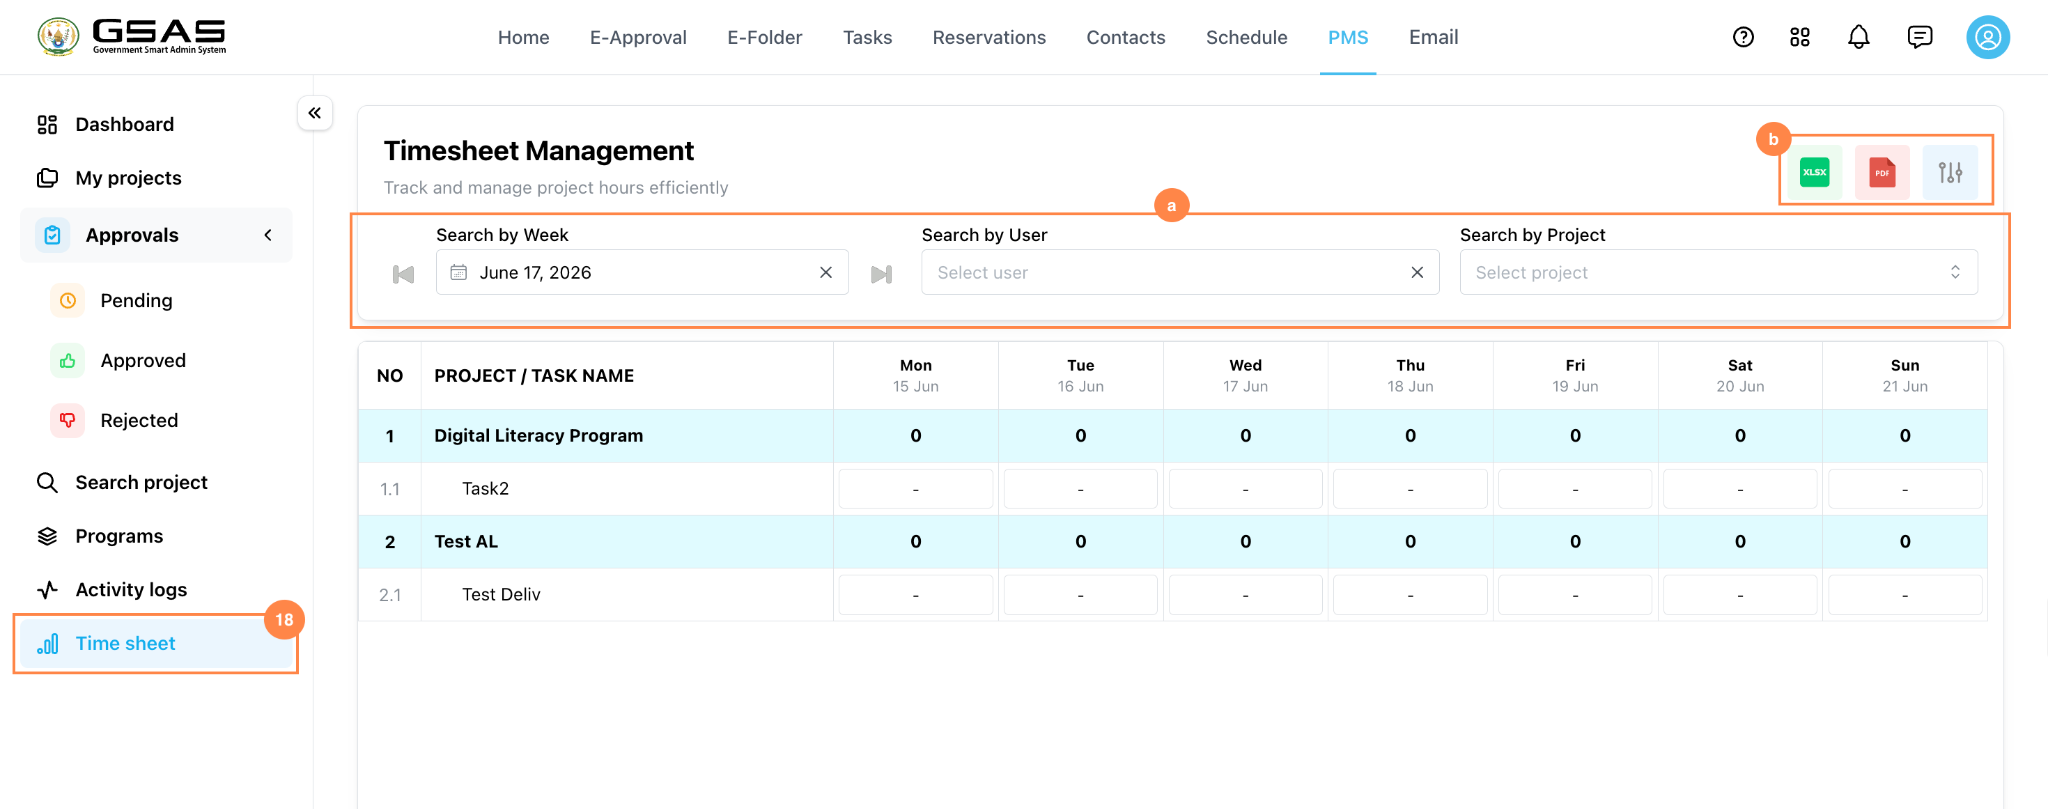
| **Reminder:** Record time consistently so project work records remain accurate and easy for managers to review. |
---
Guideline 19
Review employment reports
Click **Employment** to access employment monitoring information linked to your projects.
Review the dashboard by **Job Reported (a)** or **Workplace Learning (c)**, then **export (b)** a report as **PDF** or **Excel** when needed.
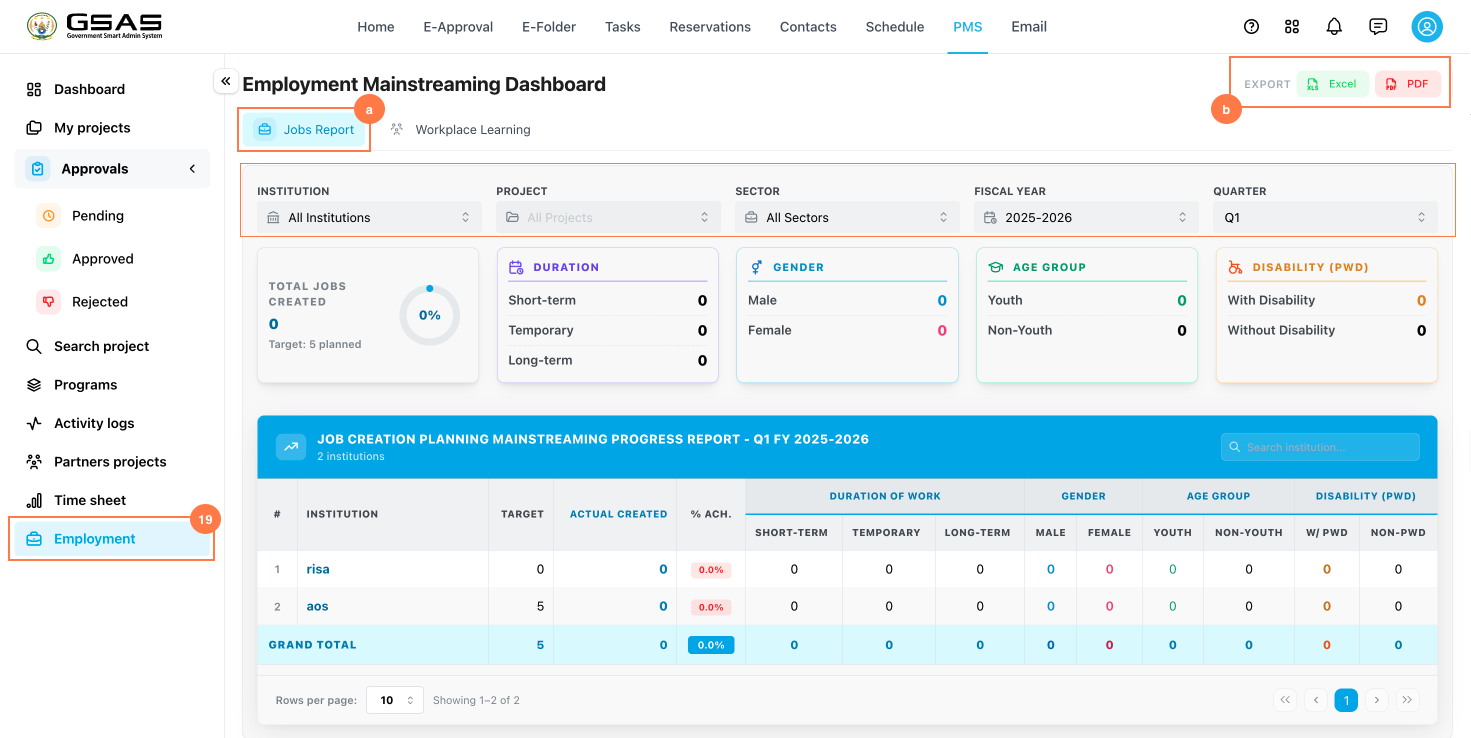
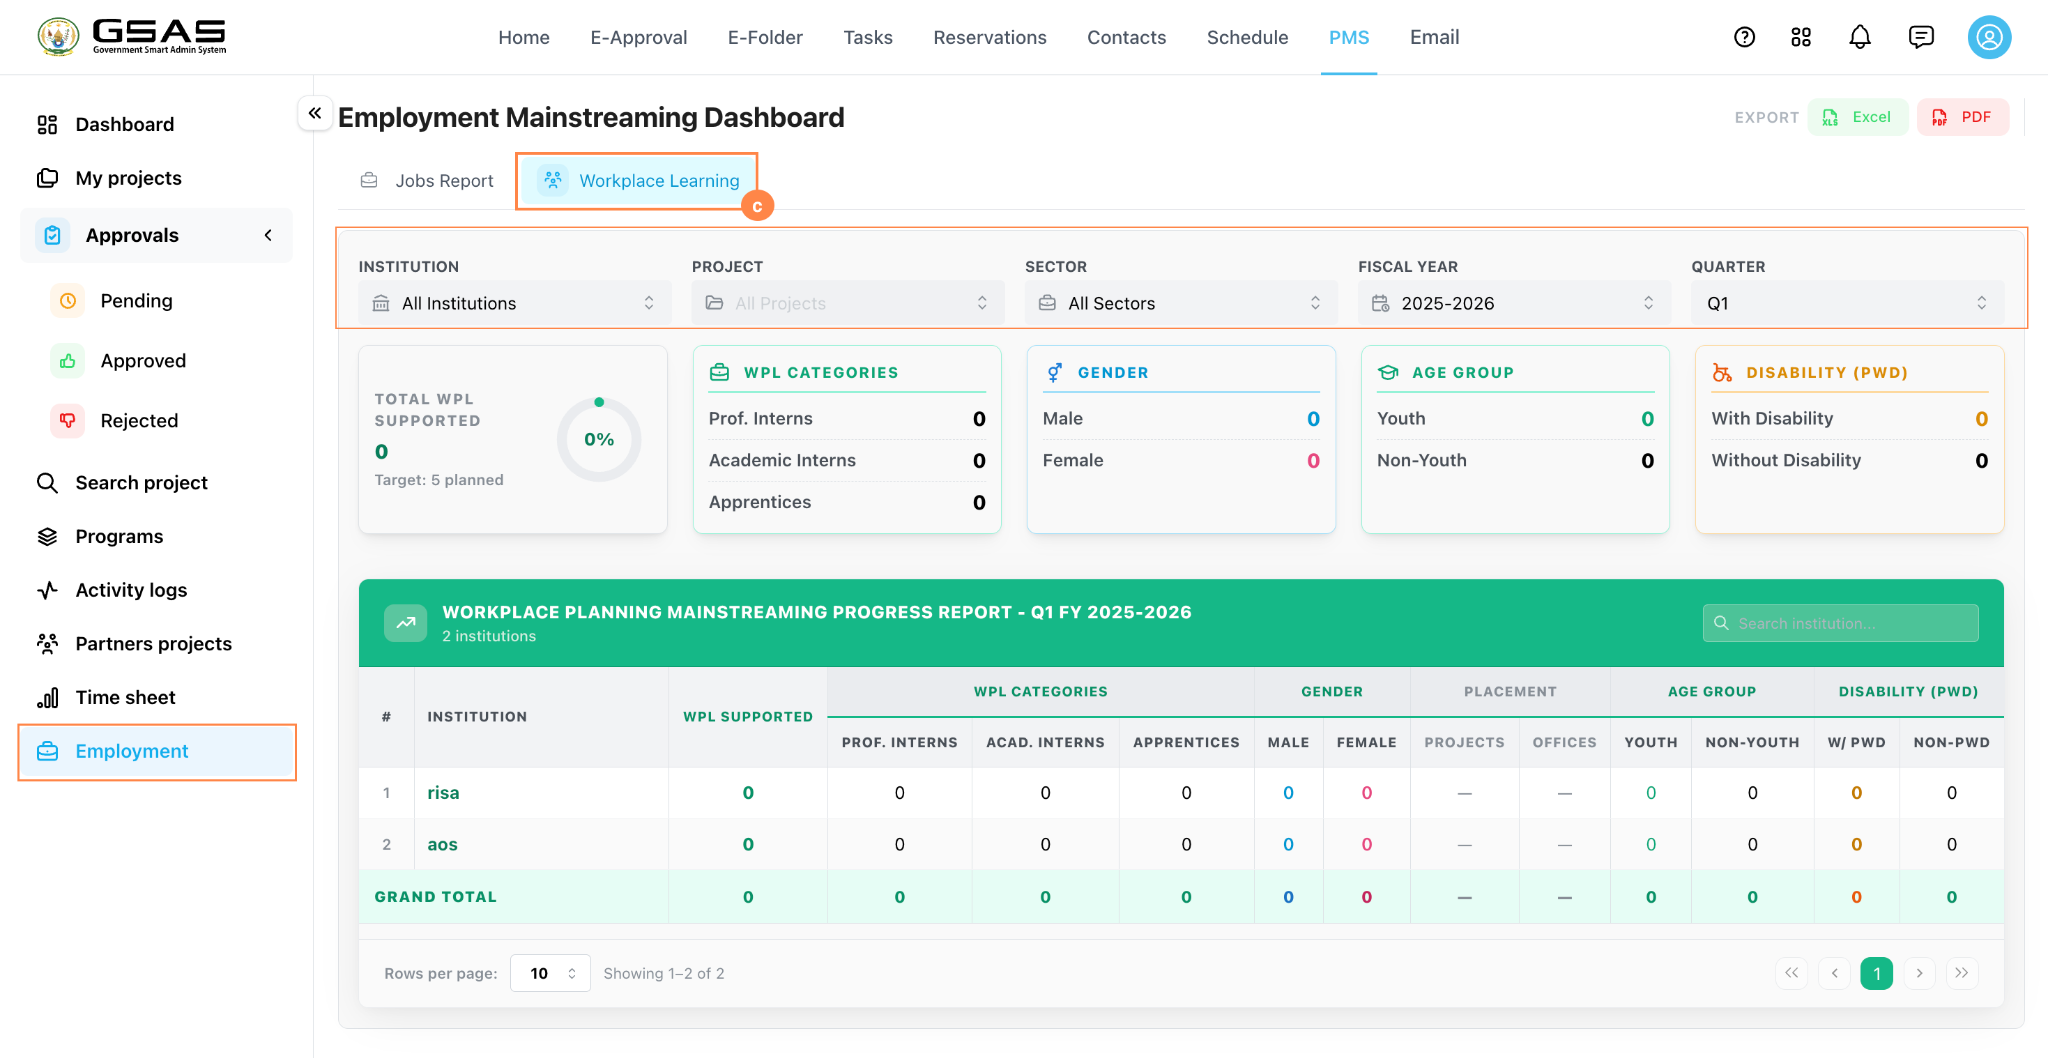
---
***Use the PMS dashboard regularly to keep project information, approvals, reports, and activity records up to date.***
# -
| [](https://docs.smartadmin.rw/uploads/images/gallery/2026-08/recreated-icon.png)
Work in progress
Check back soon for the finished version.
|