# Tasks

<span>Create and delegate tasks and keep track of them. Learn to view, manage and respond to tasks assigned to you, </span>

# Overview

---

The Tasks module helps you organize, assign, and track work across your institution. Every task belongs to a task project, and tasks are grouped based on whether they were assigned to you or created by you.

---

### Task Categories

<table id="bkmrk-category-use-it-to-a" style="width: 100%; border-collapse: collapse; margin-bottom: 24px;"><thead><tr><th style="font-size: 13px; color: #185fa5; text-align: left; padding: 8px 14px; border-bottom: 1px solid #e8e8e8;">Category</th><th style="font-size: 13px; color: #185fa5; text-align: left; padding: 8px 14px; border-bottom: 1px solid #e8e8e8;">Use it to</th></tr></thead><tbody><tr><td style="font-size: 13px; color: #555; padding: 8px 14px; border-bottom: 1px solid #e8e8e8;">**Assigned To Me**</td><td style="font-size: 13px; color: #555; padding: 8px 14px; border-bottom: 1px solid #e8e8e8;">View and update tasks assigned to you by internal or external users.</td></tr><tr><td style="font-size: 13px; color: #555; padding: 8px 14px;">**Initiated By Me**</td><td style="font-size: 13px; color: #555; padding: 8px 14px;">Track task tasks you created or delegated to others.</td></tr></tbody></table>

---

### How Tasks Connects to Other Modules

Tasks works with other GSAS modules:

- Projects created through **PMS** appear in Tasks with a **CREATED IN PMS** tag.
- Registered received documents from **e-Approval** can be shared as tasks.
- Task attachments can include files selected **From E-Folder**, so users do not need to re-upload documents already stored there.

<table id="bkmrk-note%3A-task-projects-" style="width: 100%; background-color: #eef4fb; border-left: 3px solid #185fa5; border-radius: 4px; border-collapse: collapse; margin: 20px 0 24px;"><tbody><tr><td style="padding: 10px 14px; font-size: 12px; color: #555; line-height: 1.65;">**Note:** Task projects named in the **Registered\_Received\_Year** format come from e-Approval and are covered in the [**Share as Task**](https://docs.smartadmin.rw/link/38#bkmrk-page-title) page.</td></tr></tbody></table>

---

### Where to Go Next

- See **Tasks Dashboard** to understand the dashboard, filters, cards, charts, and task categories.
- See [**Responding to a Task**](https://docs.smartadmin.rw/link/44#bkmrk-page-title) to learn how to open a task and update progress.
- See [**Creating and Assigning Tasks**](https://docs.smartadmin.rw/link/43#bkmrk-page-title) to learn how to create projects, assign tasks, and upload tasks in bulk.

# Navigating Tasks

---

The Tasks dashboard gives you an overview of task projects, assigned work, deadlines, progress, and completion status.

Click **Tasks** in the main navigation menu.

[ ![Tasks option in the main navigation menu](https://docs.smartadmin.rw/uploads/images/gallery/2026-07/scaled-1680-/K7Gimage.png) ](https://docs.smartadmin.rw/uploads/images/gallery/2026-07/K7Gimage.png)

---

### Read the Dashboard

Use the filters at the top — **Project**, **Task Sources**, **From Date**, and **To Date** — to narrow the dashboard results, then click **Apply**.

[ ![Tasks dashboard filters](https://docs.smartadmin.rw/uploads/images/gallery/2026-07/scaled-1680-/BpZimage.png) ](https://docs.smartadmin.rw/uploads/images/gallery/2026-07/BpZimage.png)

The summary cards show the main task figures at a glance.

[ ![Tasks dashboard summary cards](https://docs.smartadmin.rw/uploads/images/gallery/2026-07/scaled-1680-/yhDimage.png) ](https://docs.smartadmin.rw/uploads/images/gallery/2026-07/yhDimage.png)

<table id="bkmrk-card-shows-total-pro" style="width: 100%; border-collapse: collapse; margin-bottom: 24px;"><thead><tr><th style="font-size: 13px; color: #185fa5; text-align: left; padding: 8px 14px; border-bottom: 1px solid #e8e8e8;">Card</th><th style="font-size: 13px; color: #185fa5; text-align: left; padding: 8px 14px; border-bottom: 1px solid #e8e8e8;">Shows</th></tr></thead><tbody><tr><td style="font-size: 13px; color: #555; padding: 8px 14px; border-bottom: 1px solid #e8e8e8;">**Total Projects**</td><td style="font-size: 13px; color: #555; padding: 8px 14px; border-bottom: 1px solid #e8e8e8;">Number of active task projects.</td></tr><tr><td style="font-size: 13px; color: #555; padding: 8px 14px; border-bottom: 1px solid #e8e8e8;">**Total Tasks**</td><td style="font-size: 13px; color: #555; padding: 8px 14px; border-bottom: 1px solid #e8e8e8;">All tasks across those projects, including tasks assigned to you and tasks created by you.</td></tr><tr><td style="font-size: 13px; color: #555; padding: 8px 14px; border-bottom: 1px solid #e8e8e8;">**Ongoing Tasks**</td><td style="font-size: 13px; color: #555; padding: 8px 14px; border-bottom: 1px solid #e8e8e8;">Tasks currently in progress.</td></tr><tr><td style="font-size: 13px; color: #555; padding: 8px 14px; border-bottom: 1px solid #e8e8e8;">**Overdue Tasks**</td><td style="font-size: 13px; color: #555; padding: 8px 14px; border-bottom: 1px solid #e8e8e8;">Tasks past their due date.</td></tr><tr><td style="font-size: 13px; color: #555; padding: 8px 14px;">**Completion Rate**</td><td style="font-size: 13px; color: #555; padding: 8px 14px;">Percentage of tasks marked complete.</td></tr></tbody></table>

The charts show task distribution by priority, deadline, and status.

[ ![Tasks dashboard charts](https://docs.smartadmin.rw/uploads/images/gallery/2026-07/scaled-1680-/ZQiimage.png) ](https://docs.smartadmin.rw/uploads/images/gallery/2026-07/ZQiimage.png)

<table id="bkmrk-chart-shows-priority" style="width: 100%; border-collapse: collapse; margin-bottom: 24px;"><thead><tr><th style="font-size: 13px; color: #185fa5; text-align: left; padding: 8px 14px; border-bottom: 1px solid #e8e8e8;">Chart</th><th style="font-size: 13px; color: #185fa5; text-align: left; padding: 8px 14px; border-bottom: 1px solid #e8e8e8;">Shows</th></tr></thead><tbody><tr><td style="font-size: 13px; color: #555; padding: 8px 14px; border-bottom: 1px solid #e8e8e8;">**Priority Breakdown**</td><td style="font-size: 13px; color: #555; padding: 8px 14px; border-bottom: 1px solid #e8e8e8;">How tasks are distributed across High, Medium, Low, and No Priority.</td></tr><tr><td style="font-size: 13px; color: #555; padding: 8px 14px; border-bottom: 1px solid #e8e8e8;">**Tasks by Deadline**</td><td style="font-size: 13px; color: #555; padding: 8px 14px; border-bottom: 1px solid #e8e8e8;">How many tasks are due, overdue, or have no deadline set.</td></tr><tr><td style="font-size: 13px; color: #555; padding: 8px 14px;">**Task Status Breakdown**</td><td style="font-size: 13px; color: #555; padding: 8px 14px;">How tasks are split across Backlog, Doing, Review, and Completed.</td></tr></tbody></table>

---

### Task Categories

Tasks are grouped by origin. Tasks assigned to you appear under **Assigned To Me**, while task projects and tasks you created appear under **Initiated By Me**.

#### Assigned To Me

Use **Assigned To Me** to view tasks you are responsible for.

- Click **Assigned To Me → Internal** to view tasks assigned from within your institution.
- Click **Assigned To Me → External** to view tasks assigned by outside users.

Use **Search**, **Filter**, and **Sort** to narrow the list, or click **Export Excel** to download it as a spreadsheet.

[ ![Assigned To Me search filter sort and export options](https://docs.smartadmin.rw/uploads/images/gallery/2026-07/scaled-1680-/91ded977-809f-40ff-9a1b-c1cefd2f40b4.png) ](https://docs.smartadmin.rw/uploads/images/gallery/2026-07/91ded977-809f-40ff-9a1b-c1cefd2f40b4.png)

Assigned tasks can be viewed in three formats.

[ ![Assigned To Me view options](https://docs.smartadmin.rw/uploads/images/gallery/2026-07/scaled-1680-/Amgimage.png) ](https://docs.smartadmin.rw/uploads/images/gallery/2026-07/Amgimage.png)

<table id="bkmrk-view-use-it-to-table" style="width: 100%; border-collapse: collapse; margin-bottom: 24px;"><thead><tr><th style="font-size: 13px; color: #185fa5; text-align: left; padding: 8px 14px; border-bottom: 1px solid #e8e8e8;">View</th><th style="font-size: 13px; color: #185fa5; text-align: left; padding: 8px 14px; border-bottom: 1px solid #e8e8e8;">Use it to</th></tr></thead><tbody><tr><td style="font-size: 13px; color: #555; padding: 8px 14px; border-bottom: 1px solid #e8e8e8;">**Table**</td><td style="font-size: 13px; color: #555; padding: 8px 14px; border-bottom: 1px solid #e8e8e8;">View a detailed task list with sortable columns.</td></tr><tr><td style="font-size: 13px; color: #555; padding: 8px 14px; border-bottom: 1px solid #e8e8e8;">**Board**</td><td style="font-size: 13px; color: #555; padding: 8px 14px; border-bottom: 1px solid #e8e8e8;">Track task progress across Backlog, Doing, Review, and Completed. You can drag a task between columns to update its status.</td></tr><tr><td style="font-size: 13px; color: #555; padding: 8px 14px;">**Calendar**</td><td style="font-size: 13px; color: #555; padding: 8px 14px;">View tasks by scheduled dates, deadlines, and durations.</td></tr></tbody></table>

[ ![Assigned To Me table view](https://docs.smartadmin.rw/uploads/images/gallery/2026-07/scaled-1680-/X7kd949bbc8-7f6a-4b85-b214-c2fa51121597.png) ](https://docs.smartadmin.rw/uploads/images/gallery/2026-07/X7kd949bbc8-7f6a-4b85-b214-c2fa51121597.png)

[ ![Assigned To Me board view](https://docs.smartadmin.rw/uploads/images/gallery/2026-07/scaled-1680-/eab7fd1d-7b40-4ff0-9aa3-c608ba44d9e3.png) ](https://docs.smartadmin.rw/uploads/images/gallery/2026-07/eab7fd1d-7b40-4ff0-9aa3-c608ba44d9e3.png)

[ ![Assigned To Me calendar view](https://docs.smartadmin.rw/uploads/images/gallery/2026-07/scaled-1680-/tE5a86379cf-ee54-429c-b2b2-8d96e667b1f5.png) ](https://docs.smartadmin.rw/uploads/images/gallery/2026-07/tE5a86379cf-ee54-429c-b2b2-8d96e667b1f5.png)

<table id="bkmrk-related%3A-for-details" style="width: 100%; background-color: #eef4fb; border-left: 3px solid #185fa5; border-radius: 4px; border-collapse: collapse; margin: 20px 0 24px;"><tbody><tr><td style="padding: 10px 14px; font-size: 12px; color: #555; line-height: 1.65;">**Related:** For details on opening a task and updating its progress, see [**Responding to a Task**](https://docs.smartadmin.rw/link/44#bkmrk-page-title).</td></tr></tbody></table>

#### Initiated By Me

Use **Initiated By Me** to view task projects and tasks you created or delegated to others. Each project card shows its progress, the number of open tasks, and any relevant source tag such as **CREATED IN PMS**.

[ ![Initiated By Me project cards](https://docs.smartadmin.rw/uploads/images/gallery/2026-07/scaled-1680-/e3qimage.png) ](https://docs.smartadmin.rw/uploads/images/gallery/2026-07/e3qimage.png)

<table id="bkmrk-note%3A-task-projects-" style="width: 100%; background-color: #eef4fb; border-left: 3px solid #185fa5; border-radius: 4px; border-collapse: collapse; margin: 20px 0 24px;"><tbody><tr><td style="padding: 10px 14px; font-size: 12px; color: #555; line-height: 1.65;">**Note:** Task projects named in the **Registered\_Received\_Year** format come from e-Approval and are covered in the [**Share as Task**](https://docs.smartadmin.rw/link/38#bkmrk-page-title) page.</td></tr></tbody></table>

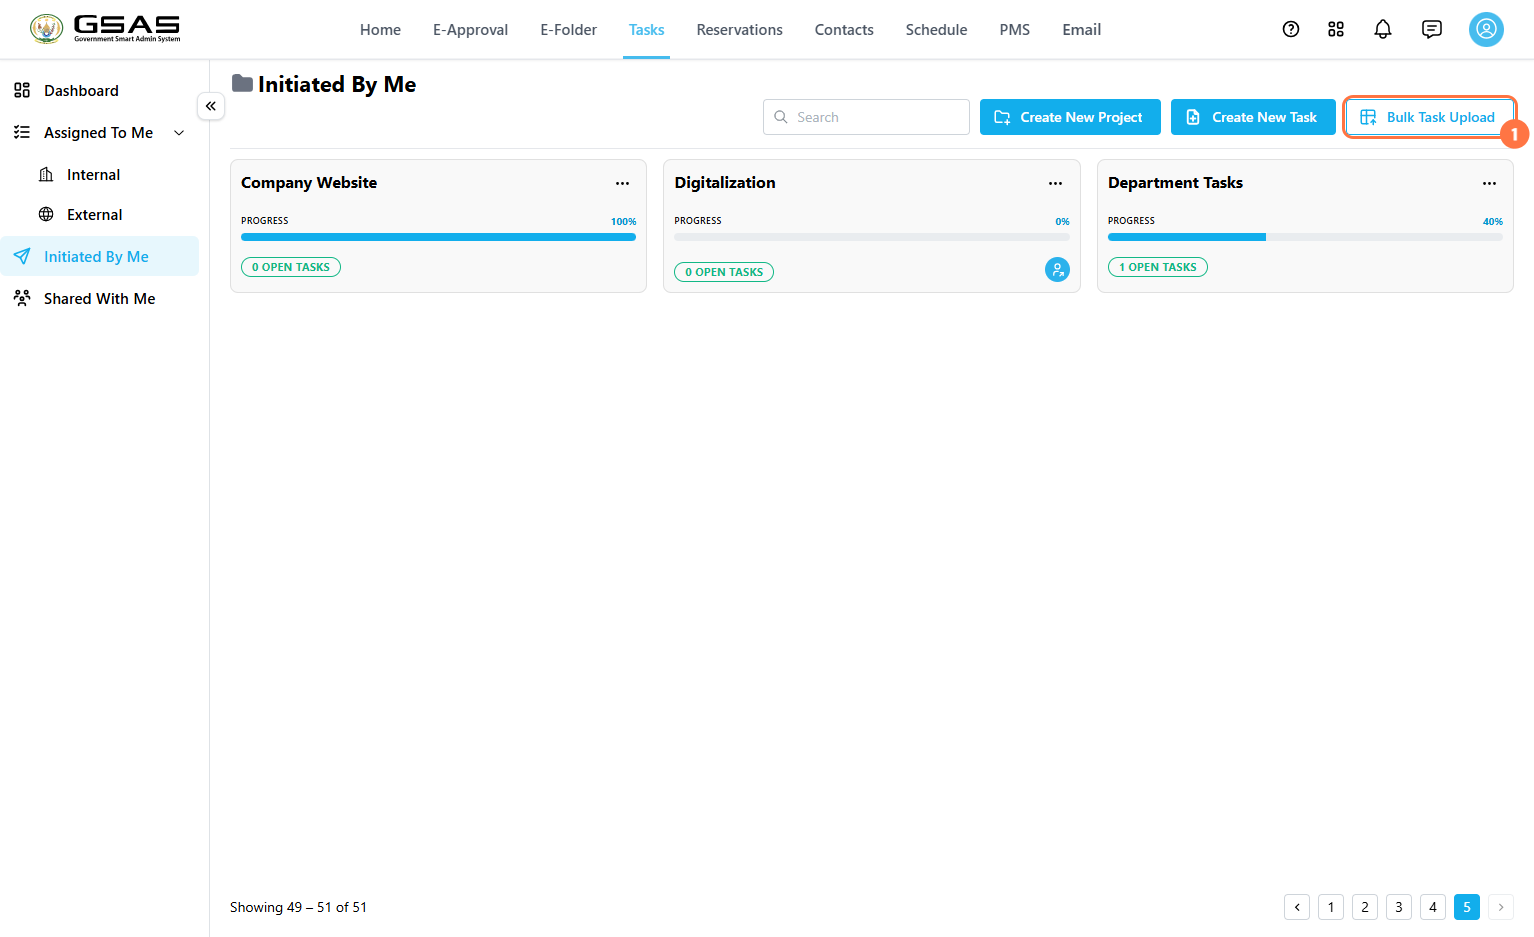
Use **Create New Project**, **Create New Task**, or **Bulk Task Upload** to add new work. Use **Search** to find a specific task project or task.

[ ![Create project create task bulk upload and search options](https://docs.smartadmin.rw/uploads/images/gallery/2026-07/scaled-1680-/2bc637f4-ab55-446c-8547-17162a1da619.png) ](https://docs.smartadmin.rw/uploads/images/gallery/2026-07/2bc637f4-ab55-446c-8547-17162a1da619.png)

Click a task project title to open it. Click the **…** icon on a project card to access more options, including **Add Task**, **Edit**, **Share**, and **Delete**.

[ ![Initiated By Me project card options menu](https://docs.smartadmin.rw/uploads/images/gallery/2026-07/scaled-1680-/ec35a757-ae98-44e5-85fa-4247dcc731cf.png) ](https://docs.smartadmin.rw/uploads/images/gallery/2026-07/ec35a757-ae98-44e5-85fa-4247dcc731cf.png)

<table id="bkmrk-related%3A-for-details-1" style="width: 100%; background-color: #eef4fb; border-left: 3px solid #185fa5; border-radius: 4px; border-collapse: collapse; margin: 20px 0 24px;"><tbody><tr><td style="padding: 10px 14px; font-size: 12px; color: #555; line-height: 1.65;">**Related:** For details on creating a task project, creating a task, assigning a task, or uploading tasks in bulk, see [**Creating and Assigning Tasks**](https://docs.smartadmin.rw/link/43#bkmrk-page-title).</td></tr></tbody></table>

# Creating and Assigning Tasks

Use **Initiated By Me** to create task projects, add tasks, assign users, and organize work with due dates, priorities, labels, and subtasks.

<table id="bkmrk-before-you-begin%3A-a-" style="width: 100%; background-color: #eef4fb; border-left: 3px solid #185fa5; border-radius: 4px; border-collapse: collapse; margin: 0 0 24px;"><tbody><tr><td style="padding: 10px 14px; font-size: 12px; color: #555; line-height: 1.65;">**Before you begin:** A task must belong to a task project. If the project does not already exist, create the project first.</td></tr></tbody></table>

### Create a Task Project

1. Go to **Tasks**.
2. Click **Initiated By Me**. [![image.png](https://docs.smartadmin.rw/uploads/images/gallery/2026-08/scaled-1680-/z6vimage.png)](https://docs.smartadmin.rw/uploads/images/gallery/2026-08/z6vimage.png)
3. Click **Create New Project**. [![image.png](https://docs.smartadmin.rw/uploads/images/gallery/2026-08/scaled-1680-/dwdimage.png)](https://docs.smartadmin.rw/uploads/images/gallery/2026-08/dwdimage.png)
4. Enter the project **Name** and an optional **Description**.
5. Click **Create project**. [![image.png](https://docs.smartadmin.rw/uploads/images/gallery/2026-08/scaled-1680-/R2timage.png)](https://docs.smartadmin.rw/uploads/images/gallery/2026-08/R2timage.png)

---

### Create a Task

1. Click the project title to open its workspace. [![image.png](https://docs.smartadmin.rw/uploads/images/gallery/2026-08/scaled-1680-/po4image.png)](https://docs.smartadmin.rw/uploads/images/gallery/2026-08/po4image.png)
2. Click **Create New Task**. [![image.png](https://docs.smartadmin.rw/uploads/images/gallery/2026-08/scaled-1680-/8HCimage.png)](https://docs.smartadmin.rw/uploads/images/gallery/2026-08/8HCimage.png)

**3. Name and Status** — enter the task name, and set its **Status** (such as Backlog, Doing, Review, or Done) to reflect where it stands in the workflow.

[![image.png](https://docs.smartadmin.rw/uploads/images/gallery/2026-08/scaled-1680-/VMtimage.png)](https://docs.smartadmin.rw/uploads/images/gallery/2026-08/VMtimage.png)

**4. Project and Due date** — the Project field auto-fills based on where you created the task; change it if needed. Click the Due date field to select a deadline from the calendar.

[![image.png](https://docs.smartadmin.rw/uploads/images/gallery/2026-08/scaled-1680-/piTimage.png)](https://docs.smartadmin.rw/uploads/images/gallery/2026-08/piTimage.png)

<p class="callout info">Only fields with the red asterisk beside their name are mandatory. This means all fields after project are optional.</p>

**Parent Task** is available in the same form, but only needs to be set when the task you're creating is a subtask of an existing one. Leave this field blank otherwise.

**5. Assignees** — click the Assignees field to open the Add Assignees window.

[![image.png](https://docs.smartadmin.rw/uploads/images/gallery/2026-08/scaled-1680-/2qIimage.png)](https://docs.smartadmin.rw/uploads/images/gallery/2026-08/2qIimage.png)
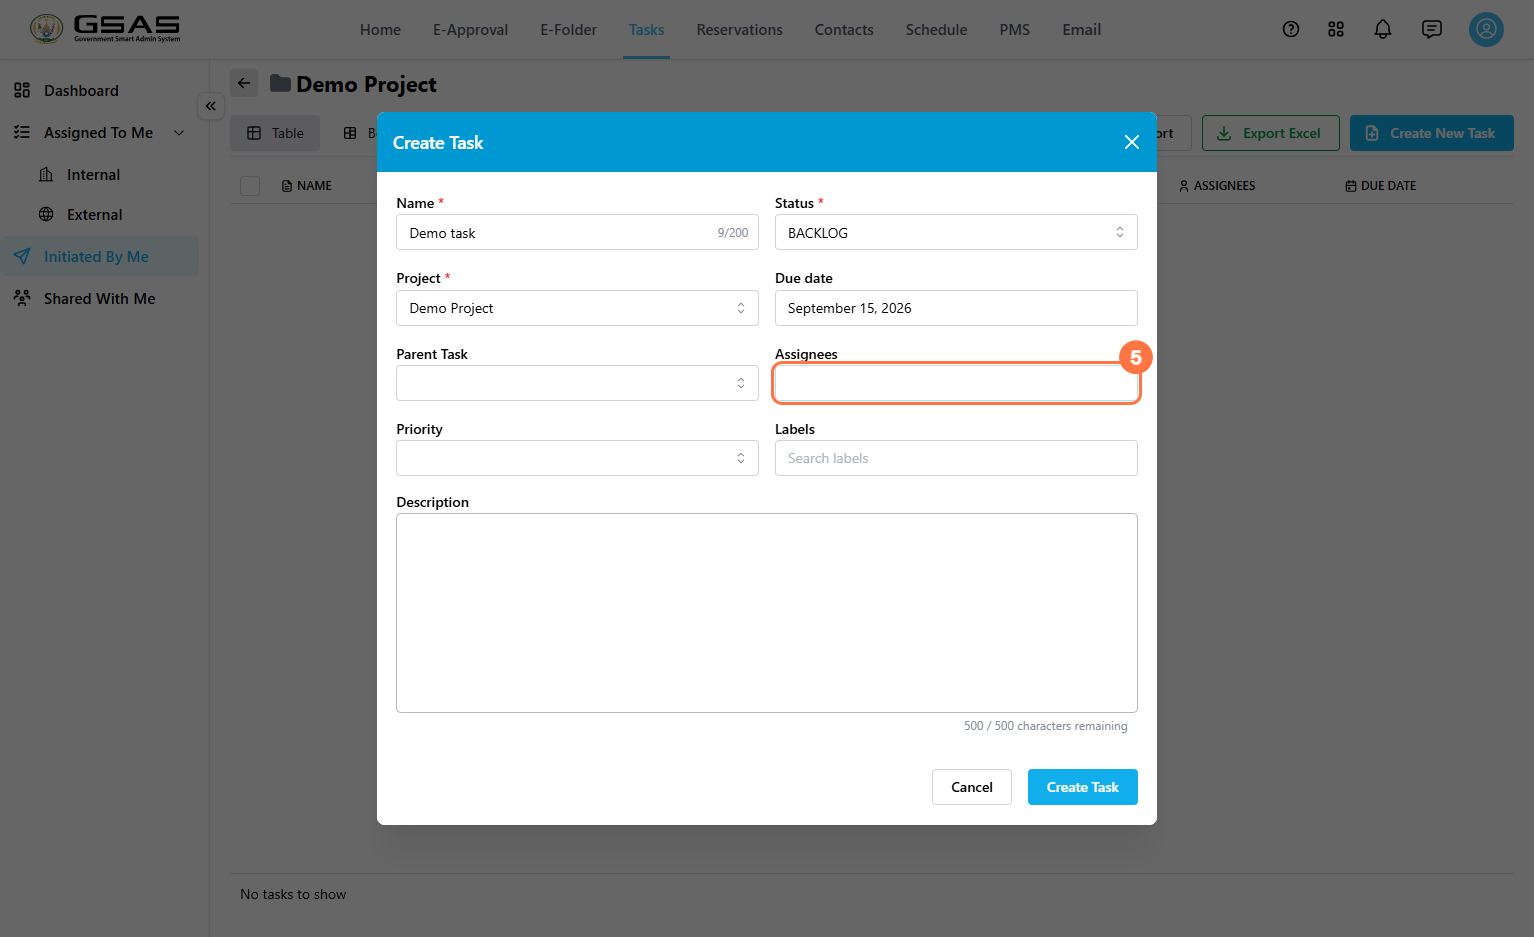
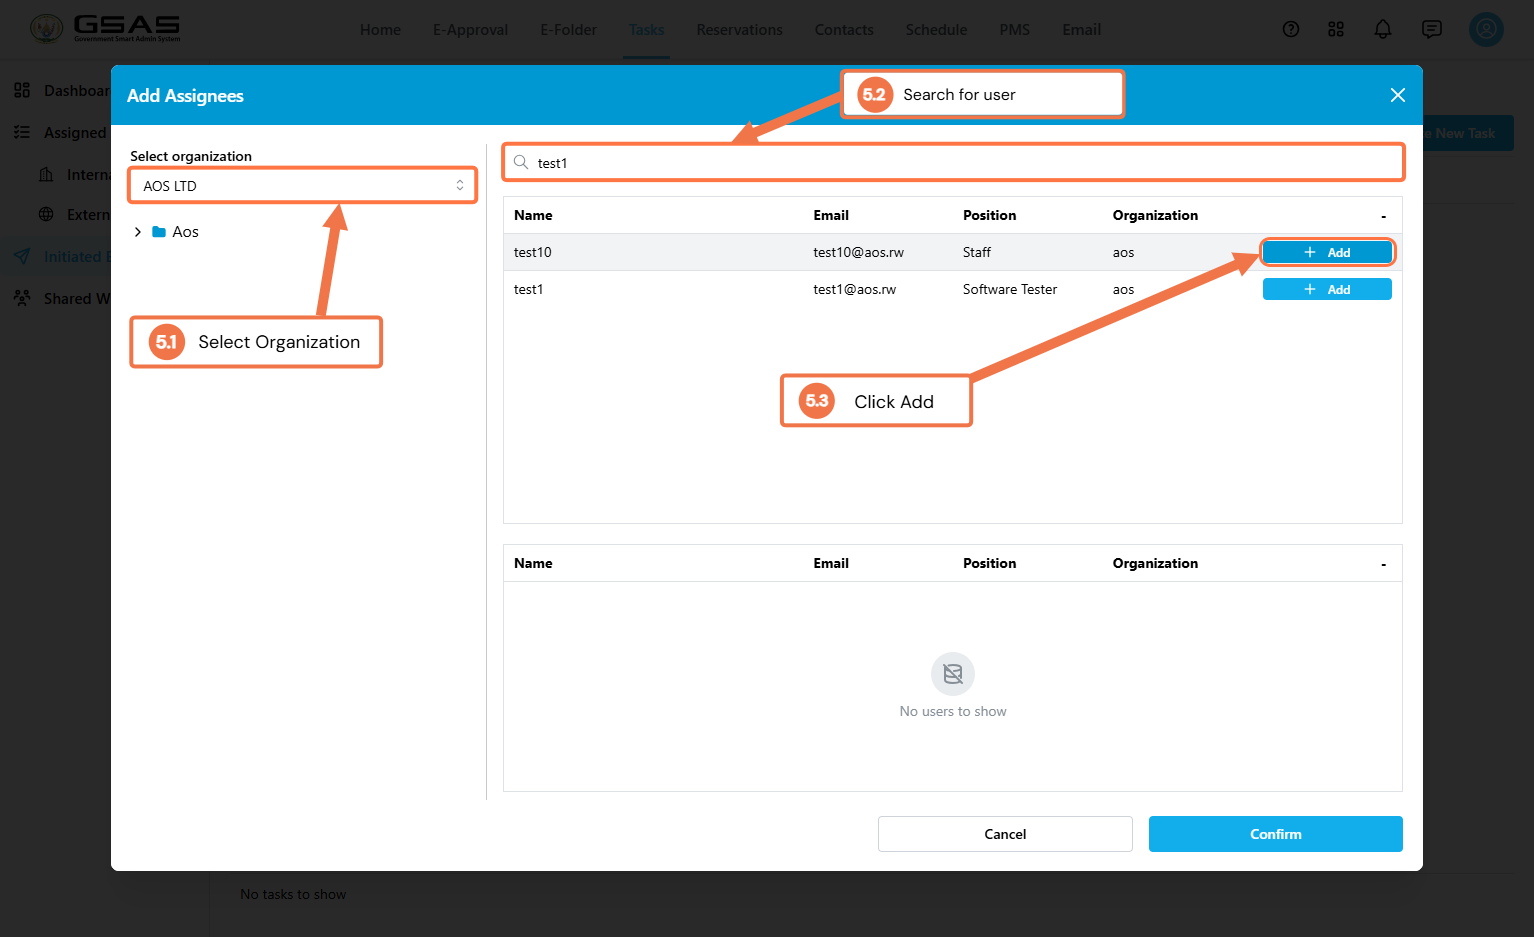
- **5.1** Select the organization.
- **5.2** Search for the user.
- **5.3** Click **Add** next to their name. [![image.png](https://docs.smartadmin.rw/uploads/images/gallery/2026-08/scaled-1680-/NgXimage.png)](https://docs.smartadmin.rw/uploads/images/gallery/2026-08/NgXimage.png)
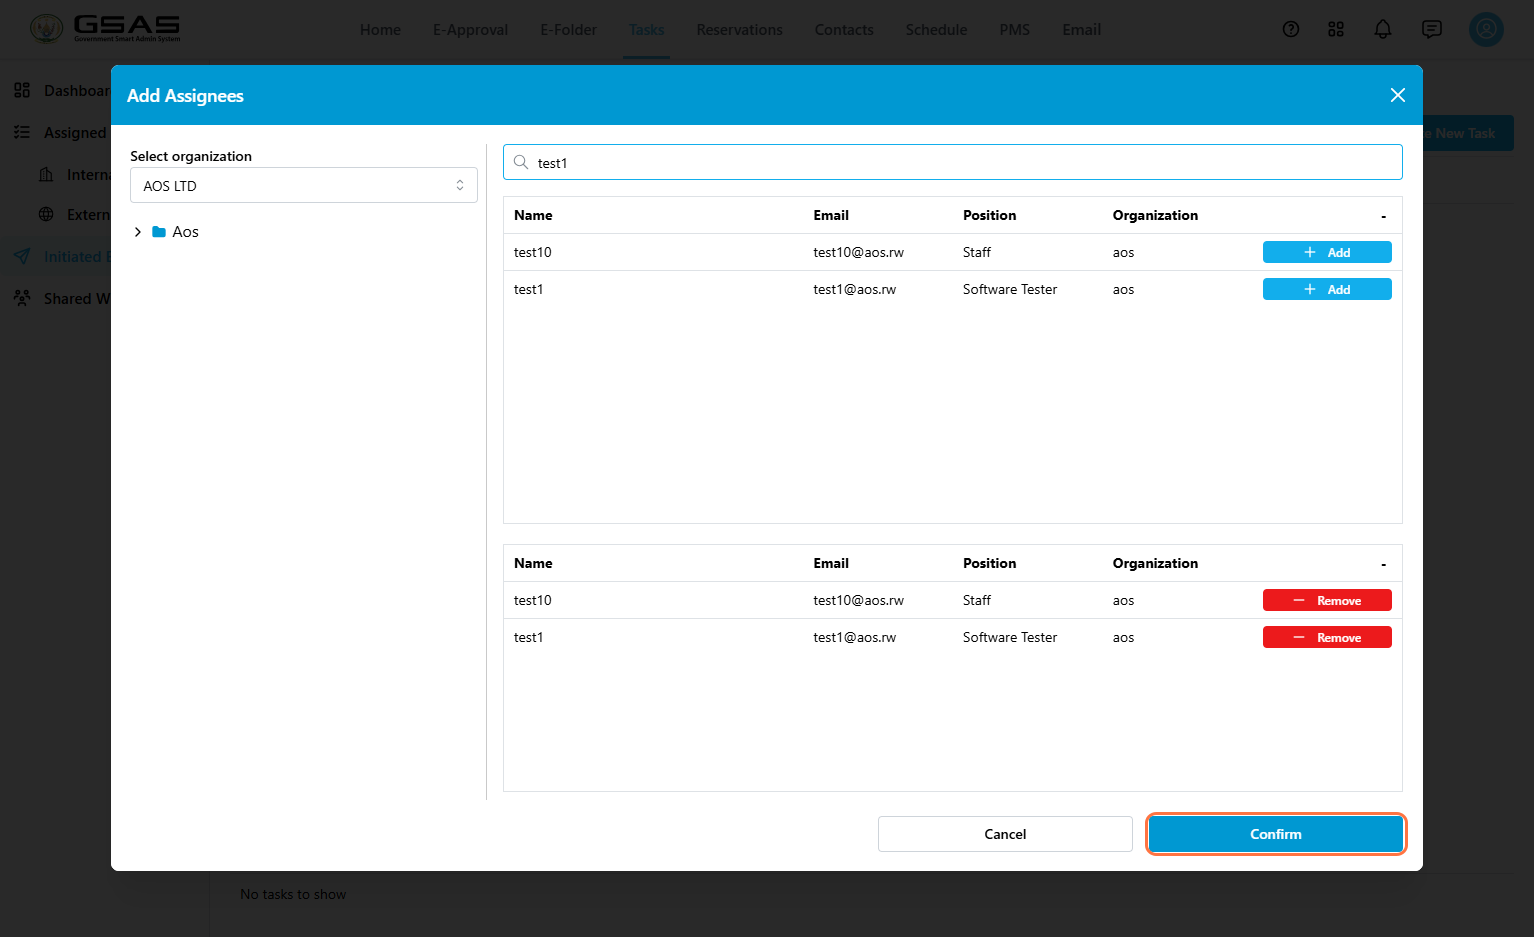
Review the selected users, then click **Confirm**.

[![image.png](https://docs.smartadmin.rw/uploads/images/gallery/2026-08/scaled-1680-/gT7image.png)](https://docs.smartadmin.rw/uploads/images/gallery/2026-08/gT7image.png)
**6. Priority** sets how urgent the task is: High, Medium, or Low. It feeds into the Priority Breakdown chart on the dashboard.

**7. Labels** help you group related tasks and find them later through filtering. Select an existing label or click **Create new label** to add one.

[![image.png](https://docs.smartadmin.rw/uploads/images/gallery/2026-08/scaled-1680-/Bbhimage.png)](https://docs.smartadmin.rw/uploads/images/gallery/2026-08/Bbhimage.png)
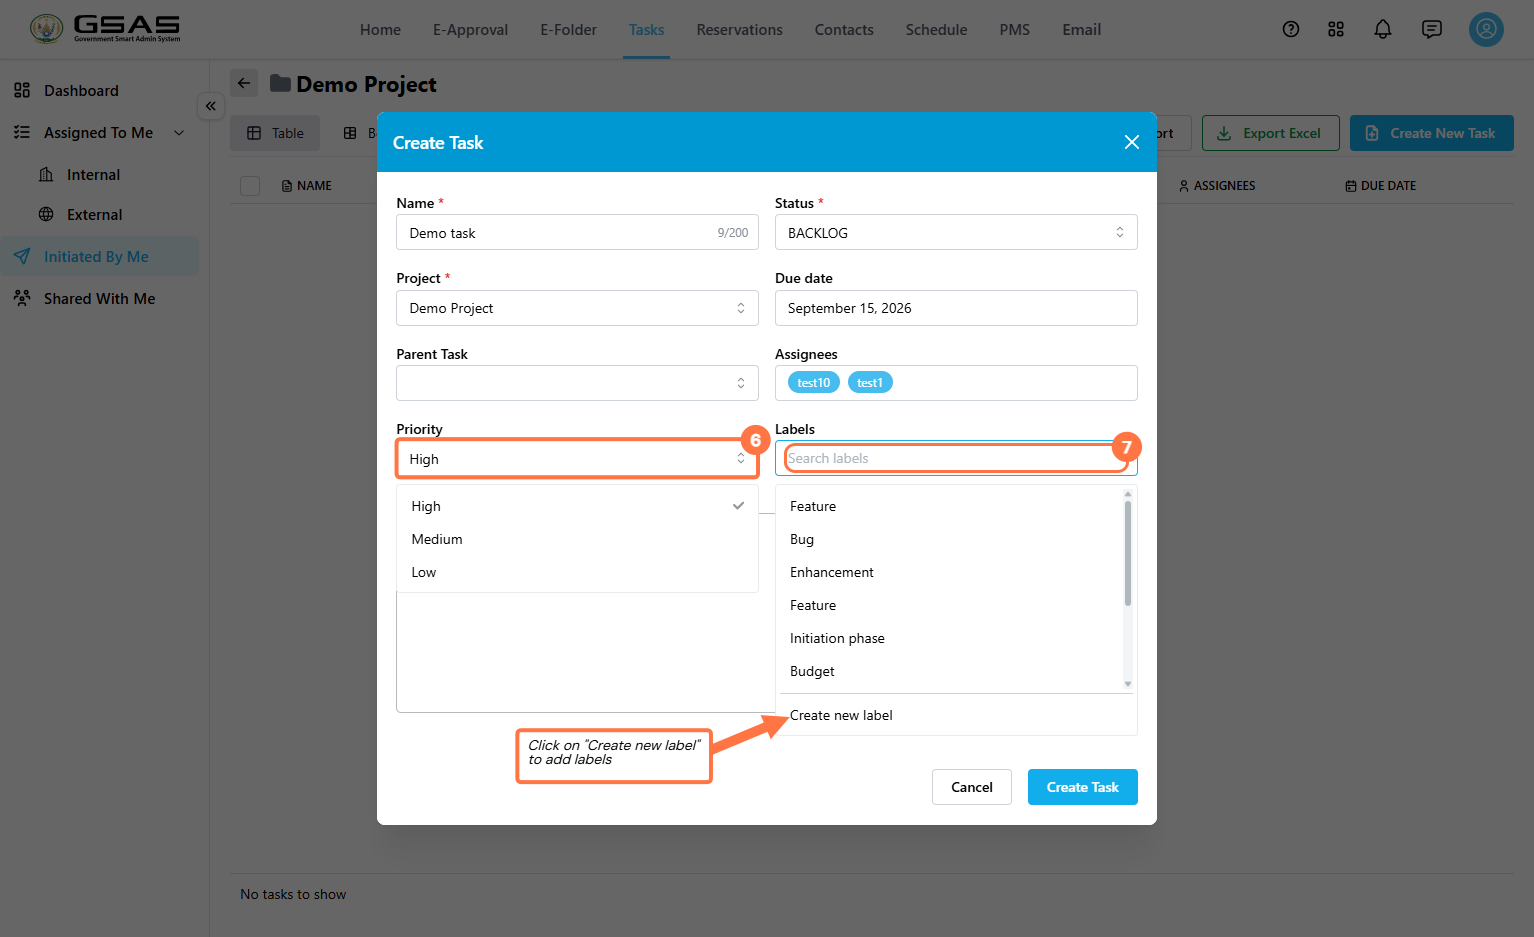
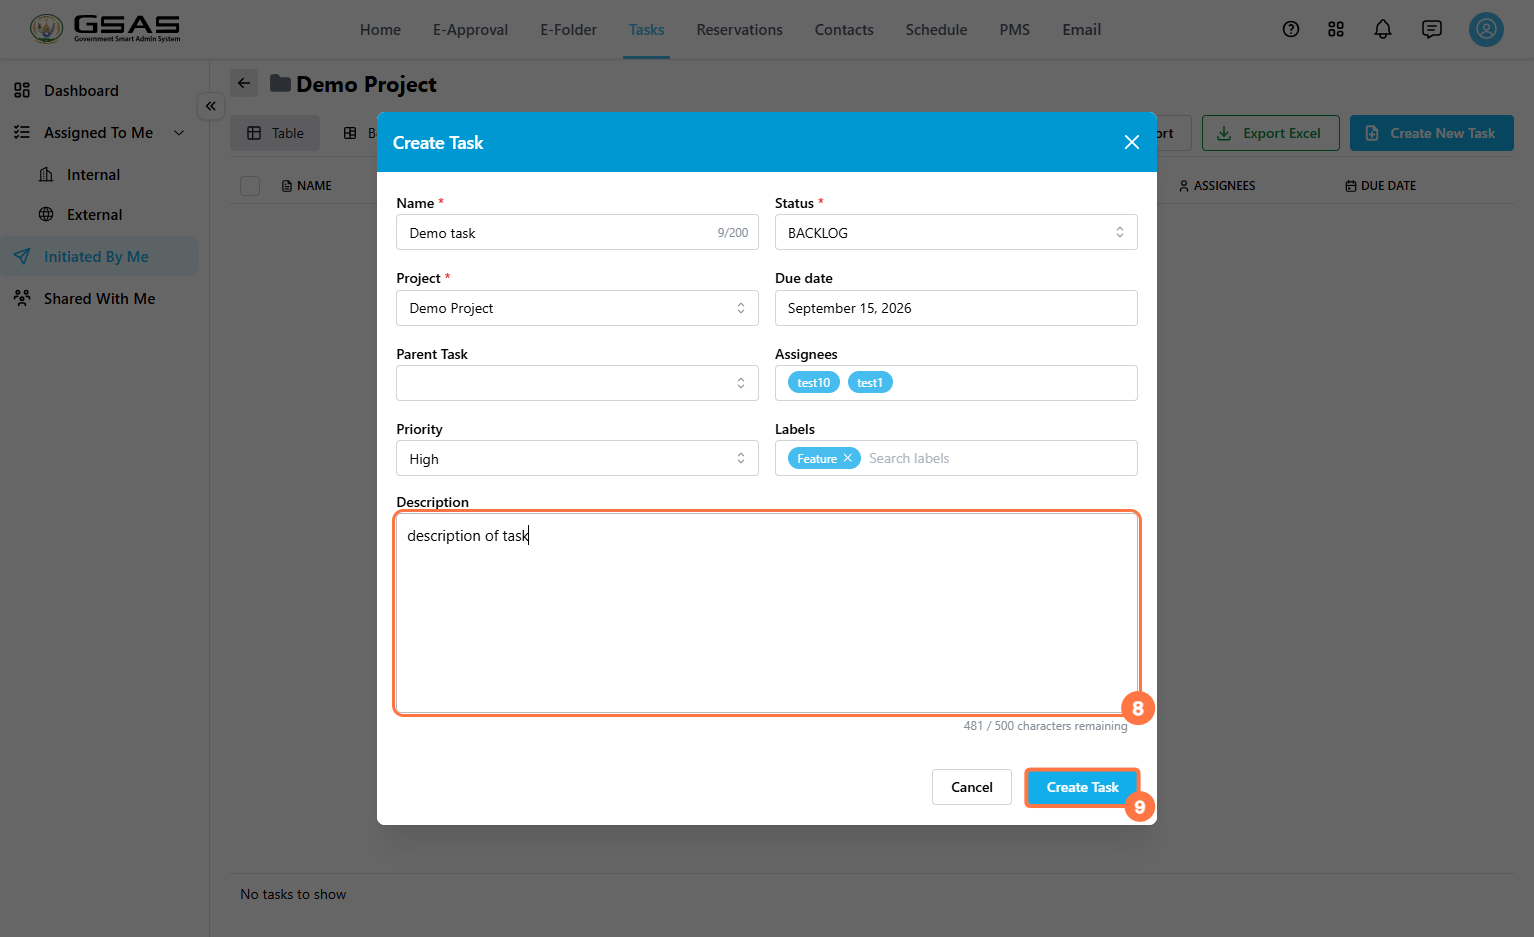
**8. Description** — enter an optional description explaining what needs to be done.

Once finished, click **Create Task** (9).

[![image.png](https://docs.smartadmin.rw/uploads/images/gallery/2026-08/scaled-1680-/2Xgimage.png)](https://docs.smartadmin.rw/uploads/images/gallery/2026-08/2Xgimage.png)
---

### Open, Edit, or Delete a Task

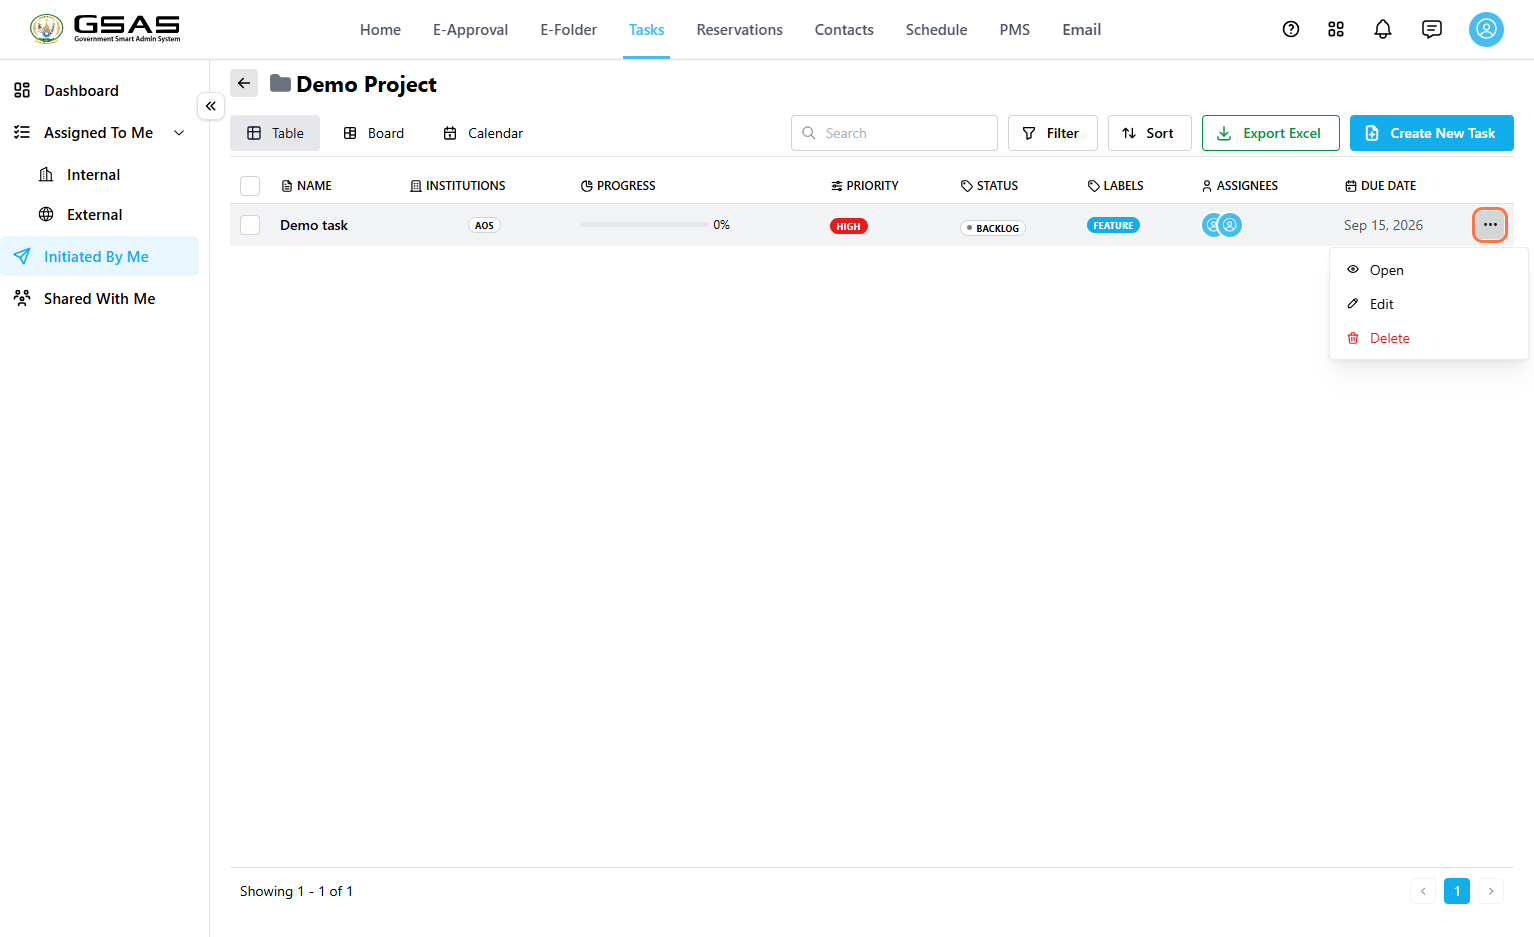
- Click the **…** icon on the task row to view additional options, such as editing or deleting the task, only visible to the task creator. [![image.png](https://docs.smartadmin.rw/uploads/images/gallery/2026-08/scaled-1680-/eJrimage.png)](https://docs.smartadmin.rw/uploads/images/gallery/2026-08/eJrimage.png)
---

### Importing Tasks in Bulk

Use **Bulk Task Upload** to create multiple tasks at once from an Excel file. This is useful when you already have a list of existing tasks and want to add them to GSAS without entering each one manually.

##### 1. Open Bulk Task Upload

- Go to **Tasks &gt;** **Initiated By Me** &gt; **Bulk Task Upload**.

[![image.png](https://docs.smartadmin.rw/uploads/images/gallery/2026-08/scaled-1680-/FYqimage.png)](https://docs.smartadmin.rw/uploads/images/gallery/2026-08/FYqimage.png)

2\. Import Excel File

- In the **Import Tasks in Bulk** window, click **Click to browse.**[![image.png](https://docs.smartadmin.rw/uploads/images/gallery/2026-08/scaled-1680-/u63image.png)](https://docs.smartadmin.rw/uploads/images/gallery/2026-08/u63image.png)
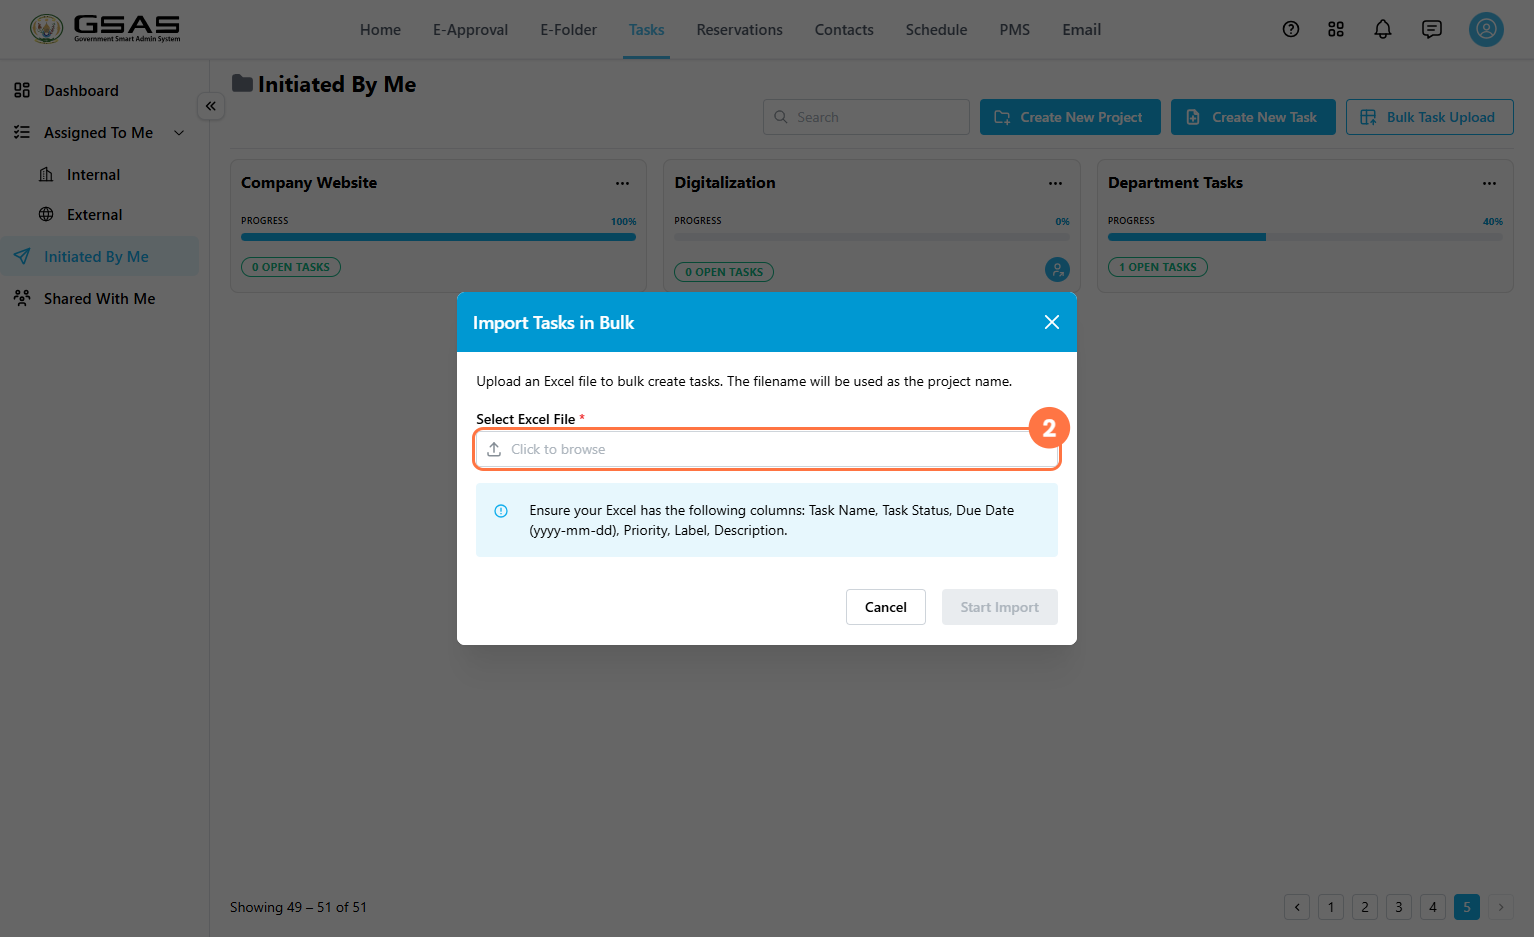
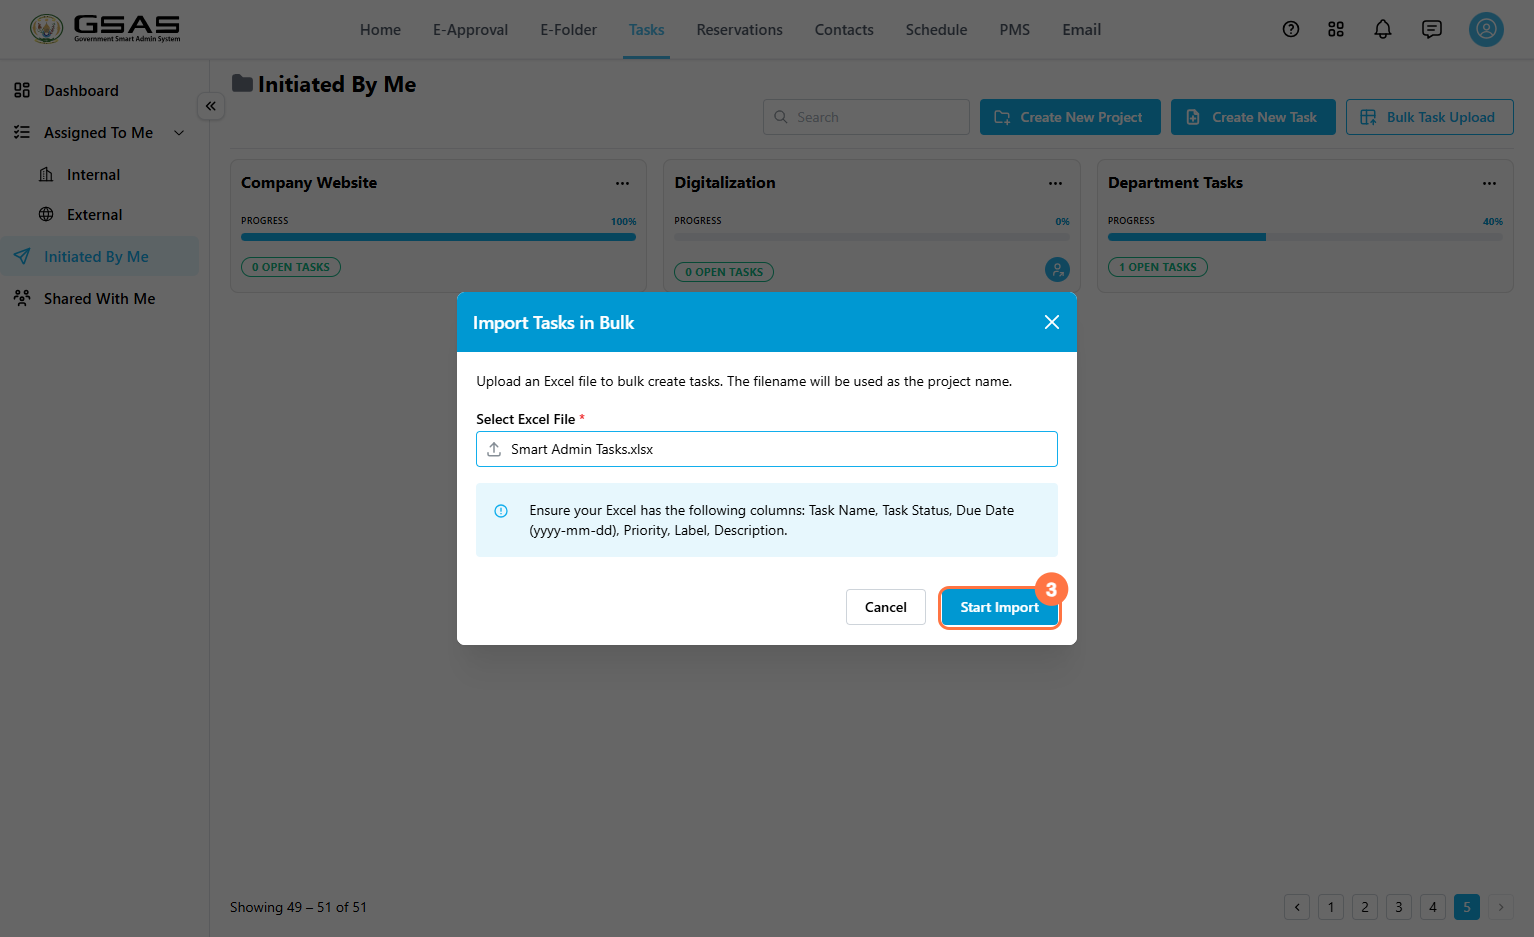
- Select the Excel file that contains the tasks you want to import and click **Start Import.** Ensure the file includes the required columns: Task Name, Task Status, Due Date (yyyy-mm-dd), Priority, Label, and Description. [![image.png](https://docs.smartadmin.rw/uploads/images/gallery/2026-08/scaled-1680-/abQimage.png)](https://docs.smartadmin.rw/uploads/images/gallery/2026-08/abQimage.png)
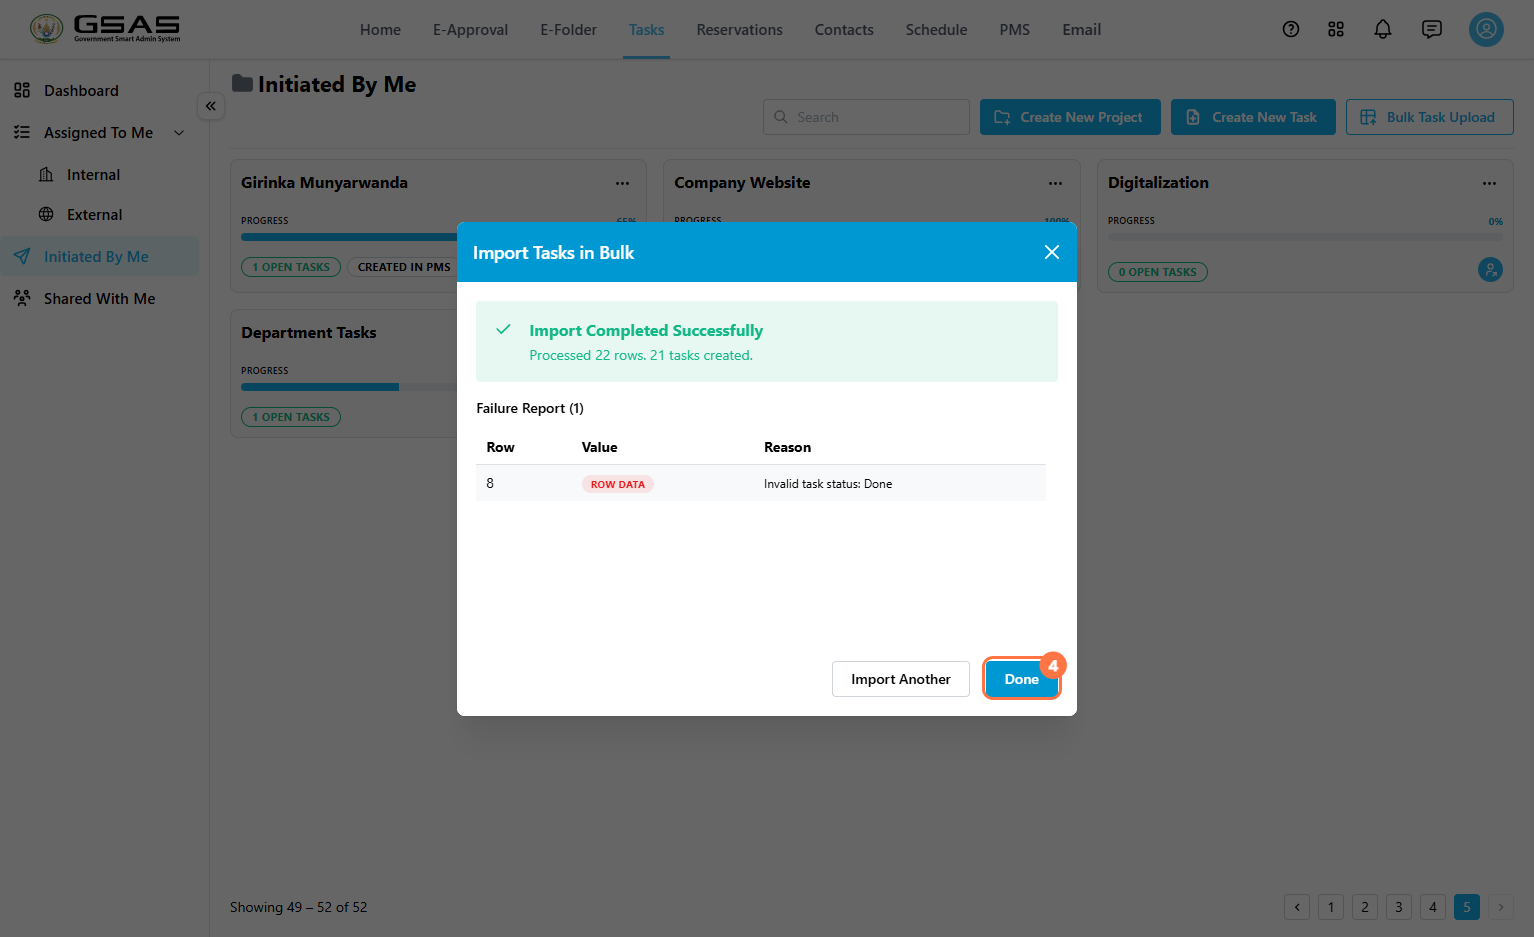
- Confirm that the tasks were imported successfully. The import summary displays the number of processed rows and successfully created tasks. If any tasks could not be imported, the **Failure Report** lists the affected row and the reason for the failure. Review the details, then click Done to complete the process or close the pop up and retry. [![image.png](https://docs.smartadmin.rw/uploads/images/gallery/2026-08/scaled-1680-/VF7image.png)](https://docs.smartadmin.rw/uploads/images/gallery/2026-08/VF7image.png)
<span style="color: rgb(0, 0, 0);">4. Review the imported tasks</span>

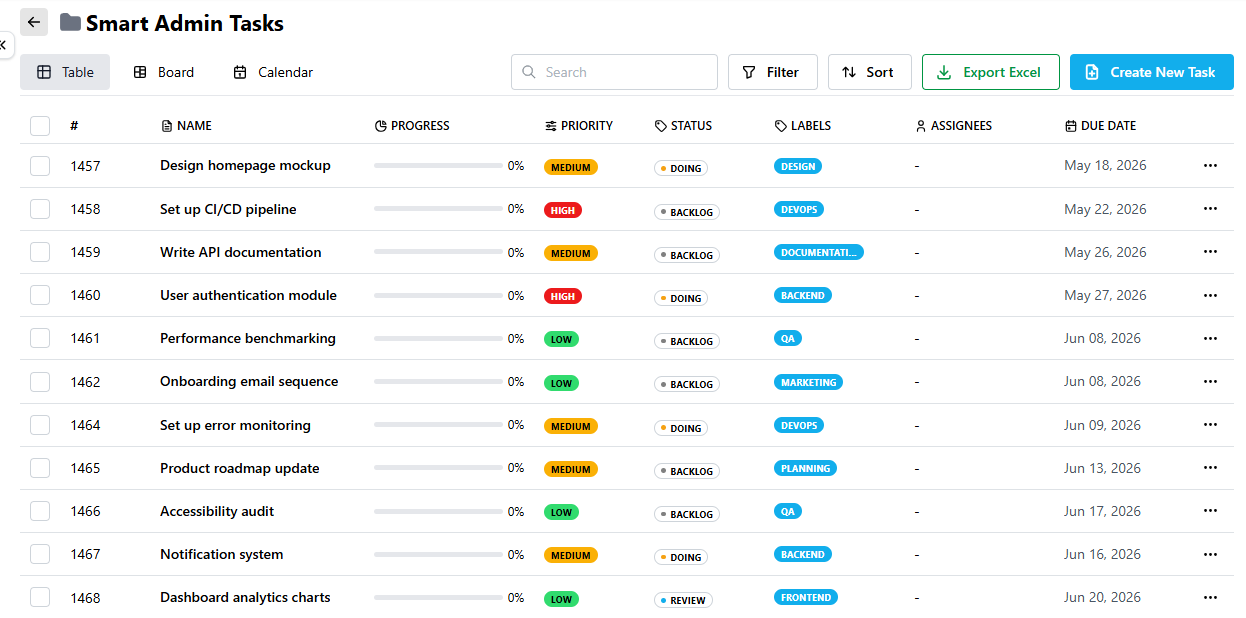
After the import is complete, GSAS creates a project using the Excel filename and lists the imported tasks inside it. Open the project to view the tasks.

[![image.png](https://docs.smartadmin.rw/uploads/images/gallery/2026-08/scaled-1680-/5FWimage.png)](https://docs.smartadmin.rw/uploads/images/gallery/2026-08/5FWimage.png)
<span style="color: rgb(0, 0, 0);">5. Manage imported tasks</span>

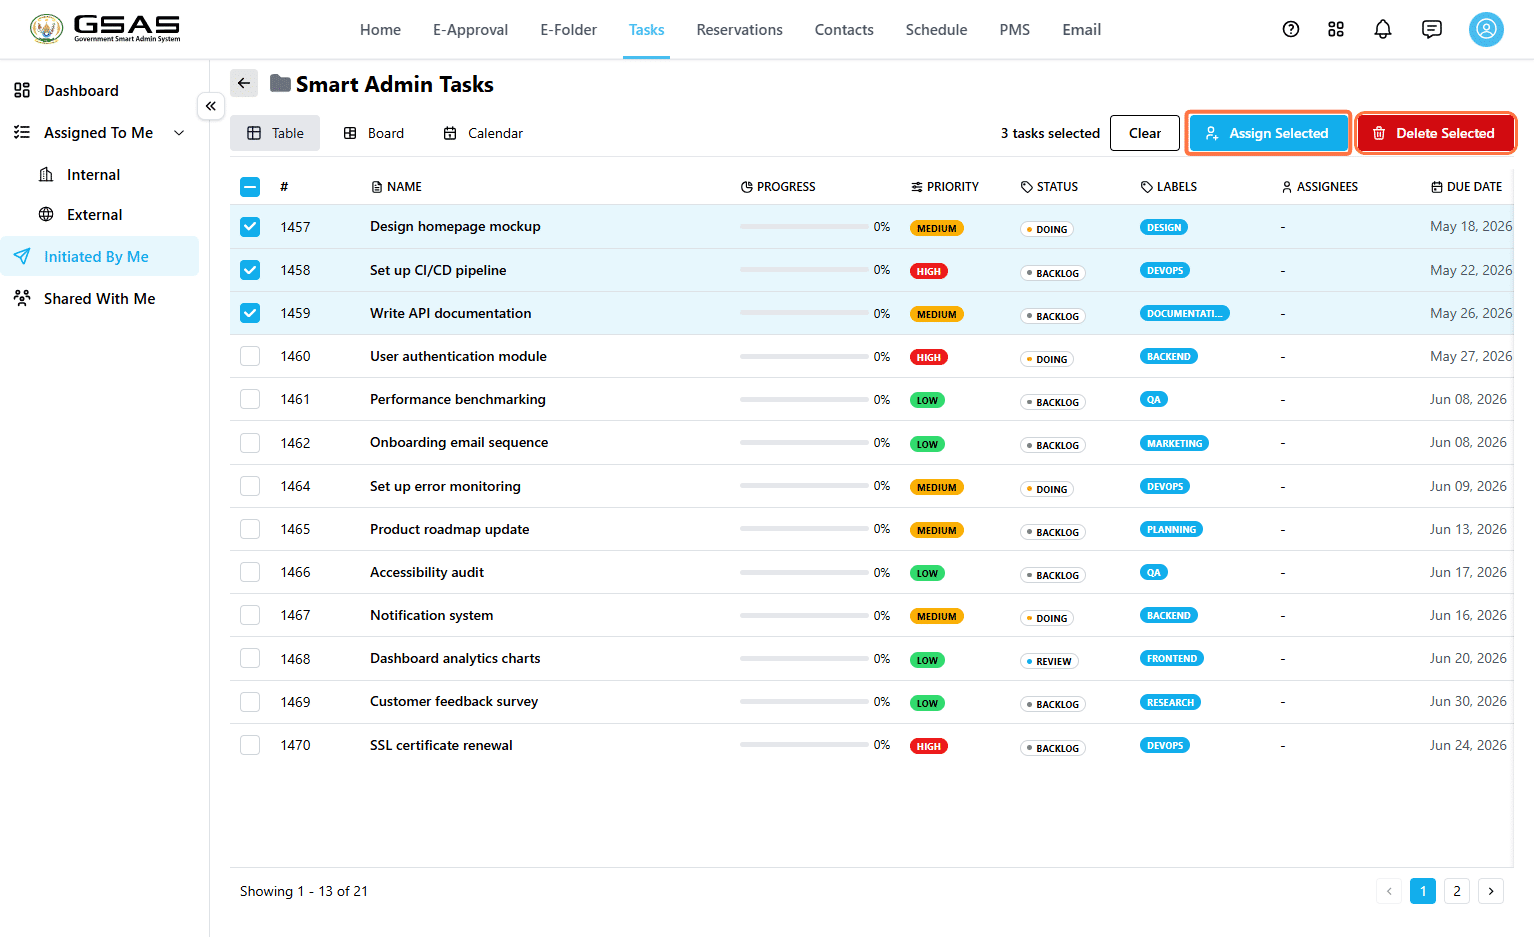
- Select one or more tasks using the checkboxes
- Click **Assign Selected** to assign multiple tasks to users at a time or **Delete Selected** to remove multiple tasks.

[![image.png](https://docs.smartadmin.rw/uploads/images/gallery/2026-08/scaled-1680-/BiFimage.png)](https://docs.smartadmin.rw/uploads/images/gallery/2026-08/BiFimage.png)
---

### How Task Fields Affect Dashboard Stats

<table id="bkmrk-field-or-action-wher" style="width: 100%; border-collapse: collapse; margin-bottom: 24px;"><thead><tr><th style="font-size: 13px; color: #185fa5; text-align: left; padding: 8px 14px; border-bottom: 1px solid #e8e8e8;">Field or Action</th><th style="font-size: 13px; color: #185fa5; text-align: left; padding: 8px 14px; border-bottom: 1px solid #e8e8e8;">Where it appears</th></tr></thead><tbody><tr><td style="font-size: 13px; color: #555; padding: 8px 14px; border-bottom: 1px solid #e8e8e8;">**Project**</td><td style="font-size: 13px; color: #555; padding: 8px 14px; border-bottom: 1px solid #e8e8e8;">Contributes to **Total Projects** and groups related tasks together.</td></tr><tr><td style="font-size: 13px; color: #555; padding: 8px 14px; border-bottom: 1px solid #e8e8e8;">**Task**</td><td style="font-size: 13px; color: #555; padding: 8px 14px; border-bottom: 1px solid #e8e8e8;">Contributes to **Total Tasks**.</td></tr><tr><td style="font-size: 13px; color: #555; padding: 8px 14px; border-bottom: 1px solid #e8e8e8;">**Status**</td><td style="font-size: 13px; color: #555; padding: 8px 14px; border-bottom: 1px solid #e8e8e8;">Affects **Ongoing Tasks**, **Completion Rate**, and the **Task Status Breakdown** chart.</td></tr><tr><td style="font-size: 13px; color: #555; padding: 8px 14px; border-bottom: 1px solid #e8e8e8;">**Due Date**</td><td style="font-size: 13px; color: #555; padding: 8px 14px; border-bottom: 1px solid #e8e8e8;">Affects **Overdue Tasks** and the **Tasks by Deadline** chart.</td></tr><tr><td style="font-size: 13px; color: #555; padding: 8px 14px; border-bottom: 1px solid #e8e8e8;">**Priority**</td><td style="font-size: 13px; color: #555; padding: 8px 14px; border-bottom: 1px solid #e8e8e8;">Affects the **Priority Breakdown** chart.</td></tr></tbody></table>

<table id="bkmrk-tip%3A-to-keep-dashboa" style="width: 100%; background-color: #eef4fb; border-left: 3px solid #185fa5; border-radius: 4px; border-collapse: collapse; margin: 20px 0 24px;"><tbody><tr><td style="padding: 10px 14px; font-size: 12px; color: #555; line-height: 1.65;">**Tip:** To keep dashboard statistics useful, set the task status, due date and priority when creating the task.</td></tr></tbody></table>

---

### Related Pages

- See [**Navigating Tasks**](https://docs.smartadmin.rw/link/46#bkmrk-page-title) to understand dashboard cards, charts, filters, and task categories.
- See [**Responding to and Tracking Tasks**](https://docs.smartadmin.rw/link/44#bkmrk-page-title) to learn how you can keep track of the tasks you assign and how assigned users update task progress.

# Responding to and Tracking Tasks

Learn to review a task, update its progress, add supporting files, communicate through comments, and track its history. Anyone with access to a task — whether they were assigned to it or created it — can open it and use the actions on this page, unless noted otherwise below.

### Task Actions at a Glance

<table id="bkmrk-action-use-it-to-upd" style="width: 100%; border-collapse: collapse; margin-bottom: 24px;"><thead><tr><th style="font-size: 13px; color: #185fa5; text-align: left; padding: 8px 14px; border-bottom: 1px solid #e8e8e8;">Action</th><th style="font-size: 13px; color: #185fa5; text-align: left; padding: 8px 14px; border-bottom: 1px solid #e8e8e8;">Use it to</th></tr></thead><tbody><tr><td style="font-size: 13px; color: #555; padding: 8px 14px; border-bottom: 1px solid #e8e8e8;">**Update Progress**</td><td style="font-size: 13px; color: #555; padding: 8px 14px; border-bottom: 1px solid #e8e8e8;">Record progress percentage, status, updates, next steps, blockers, and escalation needs.</td></tr><tr><td style="font-size: 13px; color: #555; padding: 8px 14px; border-bottom: 1px solid #e8e8e8;">**View Progress Update History**</td><td style="font-size: 13px; color: #555; padding: 8px 14px; border-bottom: 1px solid #e8e8e8;">Review previous progress updates and attached evidence. Editing an entry is limited to the assignee who logged it.</td></tr><tr><td style="font-size: 13px; color: #555; padding: 8px 14px; border-bottom: 1px solid #e8e8e8;">**View Activity**</td><td style="font-size: 13px; color: #555; padding: 8px 14px; border-bottom: 1px solid #e8e8e8;">See a running log of everything that has happened on the task.</td></tr><tr><td style="font-size: 13px; color: #555; padding: 8px 14px; border-bottom: 1px solid #e8e8e8;">**Comments**</td><td style="font-size: 13px; color: #555; padding: 8px 14px; border-bottom: 1px solid #e8e8e8;">Discuss the task and keep follow-up communication in one place.</td></tr><tr><td style="font-size: 13px; color: #555; padding: 8px 14px; border-bottom: 1px solid #e8e8e8;">**Add subtask**</td><td style="font-size: 13px; color: #555; padding: 8px 14px; border-bottom: 1px solid #e8e8e8;">Break a larger task into smaller related tasks.</td></tr><tr><td style="font-size: 13px; color: #555; padding: 8px 14px; border-bottom: 1px solid #e8e8e8;">**Attach files**</td><td style="font-size: 13px; color: #555; padding: 8px 14px; border-bottom: 1px solid #e8e8e8;">Add supporting documents from your computer or E-Folder.</td></tr><tr><td style="font-size: 13px; color: #555; padding: 8px 14px;">**Mark as Complete**</td><td style="font-size: 13px; color: #555; padding: 8px 14px;">Close the task when the work is finished.</td></tr></tbody></table>

---

### Open a Task

Where you find the task depends on whether it was assigned to you or created by you.

#### If the task was assigned to you

1. Go to **Tasks → Assigned To Me**.
2. Choose **Internal** (assigned by someone within your institution) or **External** (assigned by someone outside it).
3. Find the task in the list.
4. Click the task name to open it, or click the **…** icon and select **Open**. [![image.png](https://docs.smartadmin.rw/uploads/images/gallery/2026-08/scaled-1680-/4JRimage.png)](https://docs.smartadmin.rw/uploads/images/gallery/2026-08/4JRimage.png)

#### If you created and delegated the task

1. Go to **Tasks → Initiated By Me**.
2. Open the project the task belongs to.
3. Find the task in the project's task list.
4. Click the task name to open it, or click the **…** icon and select **Open**. [![image.png](https://docs.smartadmin.rw/uploads/images/gallery/2026-08/scaled-1680-/OYMimage.png)](https://docs.smartadmin.rw/uploads/images/gallery/2026-08/OYMimage.png)

The task details page shows the task description, due date, status, priority, labels, assigned users, progress, subtasks, attachments, activity, and comments.

[![image.png](https://docs.smartadmin.rw/uploads/images/gallery/2026-08/scaled-1680-/gLUimage.png)](https://docs.smartadmin.rw/uploads/images/gallery/2026-08/gLUimage.png)

---

### To update task progress

1. Click **Update Progress**. [![image.png](https://docs.smartadmin.rw/uploads/images/gallery/2026-08/scaled-1680-/zcgimage.png)](https://docs.smartadmin.rw/uploads/images/gallery/2026-08/zcgimage.png)
2. Enter the current **Progress (%)**. [![image.png](https://docs.smartadmin.rw/uploads/images/gallery/2026-08/scaled-1680-/6xUimage.png)](https://docs.smartadmin.rw/uploads/images/gallery/2026-08/6xUimage.png)
3. Select the current **Status**, such as **Backlog**, **Doing**, **Review**, or **Completed**. [![image.png](https://docs.smartadmin.rw/uploads/images/gallery/2026-08/scaled-1680-/cu0image.png)](https://docs.smartadmin.rw/uploads/images/gallery/2026-08/cu0image.png)
4. Upload supporting files, if needed. This step is optional. [![image.png](https://docs.smartadmin.rw/uploads/images/gallery/2026-08/scaled-1680-/SBximage.png)](https://docs.smartadmin.rw/uploads/images/gallery/2026-08/SBximage.png)
5. Enter the **Latest Update**. [![image.png](https://docs.smartadmin.rw/uploads/images/gallery/2026-08/scaled-1680-/i4qimage.png)](https://docs.smartadmin.rw/uploads/images/gallery/2026-08/i4qimage.png)
6. Add **Next Steps**, **Blockers**, or **Escalation Needed** where relevant. [![image.png](https://docs.smartadmin.rw/uploads/images/gallery/2026-08/scaled-1680-/3syimage.png)](https://docs.smartadmin.rw/uploads/images/gallery/2026-08/3syimage.png)
7. Click **Update Progress**. [![image.png](https://docs.smartadmin.rw/uploads/images/gallery/2026-08/scaled-1680-/Kwbimage.png)](https://docs.smartadmin.rw/uploads/images/gallery/2026-08/Kwbimage.png)

<table id="bkmrk-%E2%9A%A0%EF%B8%8F-important%3A-if-a-f" style="width: 87.5%; background-color: rgb(255, 248, 230); border-left: 3px solid rgb(230, 168, 23); border-radius: 4px; border-collapse: collapse; margin-bottom: 24px; height: 86px;"><tbody><tr><td style="padding: 10px 14px; font-size: 12px; color: rgb(85, 85, 85); line-height: 1.65; width: 100%;">**Tip:** Progress percentage, status, due date, and priority affect the dashboard cards and charts. Keep them updated so dashboard statistics remain accurate.</td></tr></tbody></table>

---

### Use Subtasks for Smaller Work Items

Subtasks help break a larger task into smaller pieces. They appear inside the parent task and can be opened like regular tasks.

[![image.png](https://docs.smartadmin.rw/uploads/images/gallery/2026-08/scaled-1680-/Qwvimage.png)](https://docs.smartadmin.rw/uploads/images/gallery/2026-08/Qwvimage.png)

[![image.png](https://docs.smartadmin.rw/uploads/images/gallery/2026-08/scaled-1680-/N2iimage.png)](https://docs.smartadmin.rw/uploads/images/gallery/2026-08/N2iimage.png)

[![image.png](https://docs.smartadmin.rw/uploads/images/gallery/2026-08/scaled-1680-/zM0image.png)](https://docs.smartadmin.rw/uploads/images/gallery/2026-08/zM0image.png)

---

### Attach Supporting Files

Files related to the task can be attached from your computer or selected from **E-Folder**. Attached files appear in the **Attachments** section of the task.

[![image.png](https://docs.smartadmin.rw/uploads/images/gallery/2026-08/scaled-1680-/yW8image.png)](https://docs.smartadmin.rw/uploads/images/gallery/2026-08/yW8image.png)

---

[![image.png](https://docs.smartadmin.rw/uploads/images/gallery/2026-08/scaled-1680-/H4Wimage.png)](https://docs.smartadmin.rw/uploads/images/gallery/2026-08/H4Wimage.png)

---

### Add a Comment

Use the comments panel to ask questions, share quick updates, or follow up with other users on the task.

Type your message in the comment box and click on the send icon.

[![image.png](https://docs.smartadmin.rw/uploads/images/gallery/2026-08/scaled-1680-/YINimage.png)](https://docs.smartadmin.rw/uploads/images/gallery/2026-08/YINimage.png)

The comment can be deleted by clicking on the trash icon visible in the upper right side of the comment.

[![image.png](https://docs.smartadmin.rw/uploads/images/gallery/2026-08/scaled-1680-/xGlimage.png)](https://docs.smartadmin.rw/uploads/images/gallery/2026-08/xGlimage.png)

---

### View Progress Update History

This is most often checked by whoever assigned the task, as a way to follow how work is progressing over time, though anyone with access to the task can view it.

1. Open the task.
2. Click **View Progress Update History**. [![image.png](https://docs.smartadmin.rw/uploads/images/gallery/2026-08/scaled-1680-/BJmimage.png)](https://docs.smartadmin.rw/uploads/images/gallery/2026-08/BJmimage.png)
3. Review the update percentage, update date, the user who made the update, attachments related to the update, latest update notes and everything else added by the user.

[![image.png](https://docs.smartadmin.rw/uploads/images/gallery/2026-08/scaled-1680-/qtSimage.png)](https://docs.smartadmin.rw/uploads/images/gallery/2026-08/qtSimage.png)

### Editing Progress Update History

Only the assignee who logged a progress update can edit it. [![image.png](https://docs.smartadmin.rw/uploads/images/gallery/2026-08/scaled-1680-/Iy3image.png)](https://docs.smartadmin.rw/uploads/images/gallery/2026-08/Iy3image.png)

[![image.png](https://docs.smartadmin.rw/uploads/images/gallery/2026-08/scaled-1680-/XGRimage.png)](https://docs.smartadmin.rw/uploads/images/gallery/2026-08/XGRimage.png)

---

### View Activity

The **Activity** log is a running record of everything that has happened on the task; creation, assignment changes, progress updates, and more separate from the detailed progress percentage history above. Like progress history, it's most often reviewed by whoever assigned the task, though it's visible to anyone with access.

[![image.png](https://docs.smartadmin.rw/uploads/images/gallery/2026-08/scaled-1680-/fusimage.png)](https://docs.smartadmin.rw/uploads/images/gallery/2026-08/fusimage.png)

---

### Mark the Task as Complete

When the work is finished, click **Mark as Complete**. This updates the task status, sets the progress percentage to 100% and contributes to the task completion rate chart shown on the dashboard.

[![image.png](https://docs.smartadmin.rw/uploads/images/gallery/2026-08/scaled-1680-/jUaimage.png)![](https://assets.guidejar.com/uploads/fd139b58-0ce2-43d5-8255-8b56ef27195d/79ER9rgO4VUeZLEBmES9p6CuRKf2/e8116612-8f84-4fae-aca2-31768082827c/1785770562027.jpeg)](https://docs.smartadmin.rw/uploads/images/gallery/2026-08/jUaimage.png)

# Sharing Tasks

---

Use **Share** to give another user access to a task project. The user the task has been shared with can access it from **Shared with Me** within the Tasks module.

<table id="bkmrk-before-you-begin%3A-yo" style="width: 100%; background-color: #eef4fb; border-left: 3px solid #185fa5; border-radius: 4px; border-collapse: collapse; margin: 0 0 24px;"><tbody><tr><td style="padding: 10px 14px; font-size: 12px; color: #555; line-height: 1.65;">**Before you begin:** You must have permission to manage or share the task project.</td></tr></tbody></table>

### Open the Share Window

1. Go to **Tasks**.
2. Click **Initiated By Me**.
3. Find the project you want to share.
4. Open the project options menu and select **Share**. [![image.png](https://docs.smartadmin.rw/uploads/images/gallery/2026-08/scaled-1680-/zlyimage.png)](https://docs.smartadmin.rw/uploads/images/gallery/2026-08/zlyimage.png)

---

### Search for the User

1. **Search** users to share with by user name. [![image.png](https://docs.smartadmin.rw/uploads/images/gallery/2026-08/scaled-1680-/mvkimage.png)](https://docs.smartadmin.rw/uploads/images/gallery/2026-08/mvkimage.png)
2. Select the matching user from the search result. [![image.png](https://docs.smartadmin.rw/uploads/images/gallery/2026-08/scaled-1680-/ZlKimage.png)](https://docs.smartadmin.rw/uploads/images/gallery/2026-08/ZlKimage.png)

---

### Choose Permission

Use the **Permission** dropdown to choose what the shared user can do in the project.

- **View:** Allows the user to view the shared project.
- **Edit:** Allows the user to make changes to the tasks within the project, create new tasks within the project, and re-share the shared project. [![image.png](https://docs.smartadmin.rw/uploads/images/gallery/2026-08/scaled-1680-/7zJimage.png)](https://docs.smartadmin.rw/uploads/images/gallery/2026-08/7zJimage.png)

---

### Share the Project

1. Confirm that the correct user is selected.
2. Confirm the selected permission.
3. Click **Share**. [![image.png](https://docs.smartadmin.rw/uploads/images/gallery/2026-08/scaled-1680-/pQQimage.png)](https://docs.smartadmin.rw/uploads/images/gallery/2026-08/pQQimage.png)

---

### Confirm the Success Message

After sharing, the system displays a success message confirming that the project has been shared.

[![image.png](https://docs.smartadmin.rw/uploads/images/gallery/2026-08/scaled-1680-/1Mqimage.png)](https://docs.smartadmin.rw/uploads/images/gallery/2026-08/1Mqimage.png)

---

### Expected Result

<table id="bkmrk-the-selected-user-re" style="width: 100%; background-color: #eef4fb; border-left: 3px solid #185fa5; border-radius: 4px; border-collapse: collapse; margin: 0 0 24px;"><tbody><tr><td style="padding: 10px 14px; font-size: 12px; color: #555; line-height: 1.65;">The selected user receives access to the shared task project in their **Shared With Me** folder. Their level of access depends on the permission selected during sharing.</td></tr></tbody></table>

### Notes

- Sharing a project gives another user access to the project; it does not automatically assign tasks to that user.
- Use **View** when the user only needs visibility.
- Use **Edit** only when the user should be allowed to update the shared project.