e-Folder
Store and organize your files, share them securely with colleagues or other users, and manage access privileges for files shared by you.
- Overview
- Working with Files and Folders
- Sharing Files and Folders
- Groups in e-Folder
- Invite to Sign on PDF documents
Overview
E-Folder is a secure digital file storage for work documents integrated directly into the system. Upload, create, organize, and share documents all in one place, accessible from anywhere. Because it lives within the system, your work files are always where you need them, securely stored and easy to access.
Getting to E-Folder
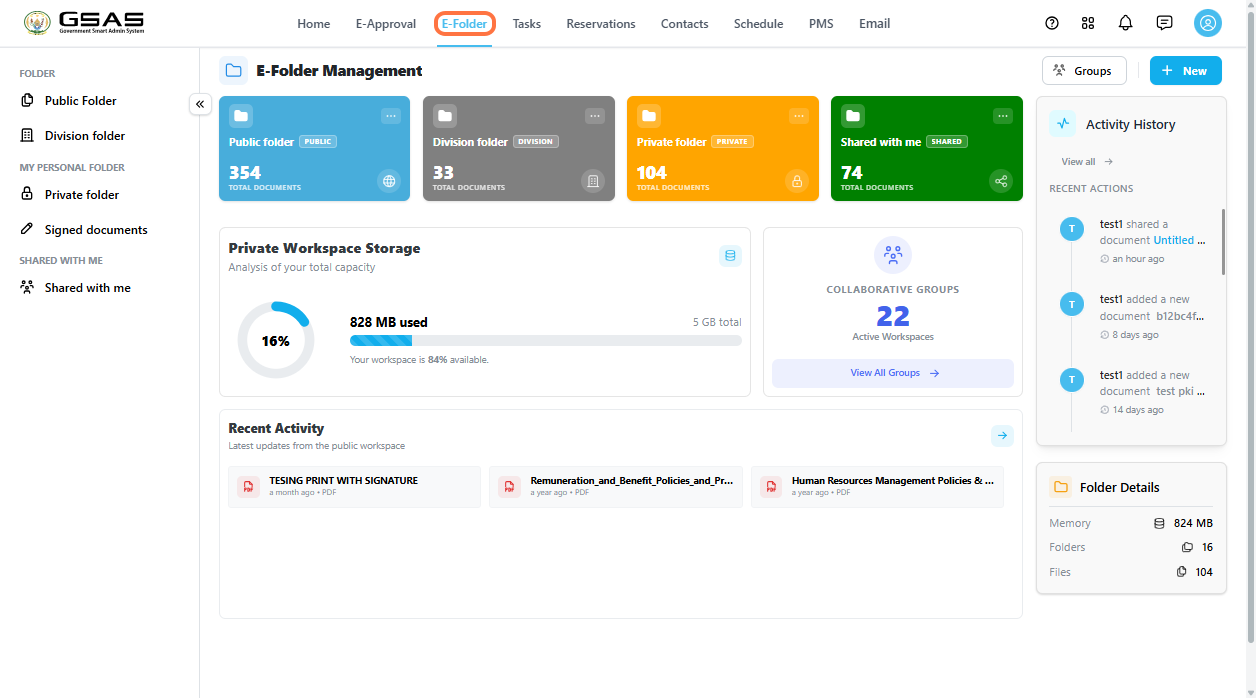
Click the E-Folder tab in the top navigation bar. This opens the E-Folder home screen, which shows your four main folders, your storage usage, recent activity, and a summary of your collaborative groups.
Your four main folders
Your files are organized across four main folders, each with a different audience and purpose.
| Public Folder | Contents are visible to all staff in your institution. Use it for documents that everyone should be able to access. |
| Division Folder | Contents shared with your department or division only. |
| Private Folder | Only you can see the content of this folder. Your personal storage for work files and folders. |
| Shared with Me | Contains files and folders that other users have shared directly with you. What you can do on the share documents depends on the permission the owner granted. See the note below. |
| Note: In the Shared with Me folder, what you can do with a file depends on the permission the owner gave you. With Read permission you can view and download the file. With Write permission you can also edit, export, and re-share it. |
Storage
The E-Folder home screen shows how much of your private storage you have used. Each user starts with a 1 GB storage allowance. If you need more space, your institution's administrator (IT) can increase this limit.
Activity History
On the right side of the home screen, the Activity History panel shows a log of recent actions taken across your folders — such as documents added or updated. Click View all to see the full history.
Collaborative Groups
Working with Files and Folders
This page walks you through the everyday tasks you will use in E-Folder. Most actions work the same way across the Public, Division, and Private folders, any differences are noted where they apply.
Opening a folder
- From E-Folder, double-click the folder card you want to open.
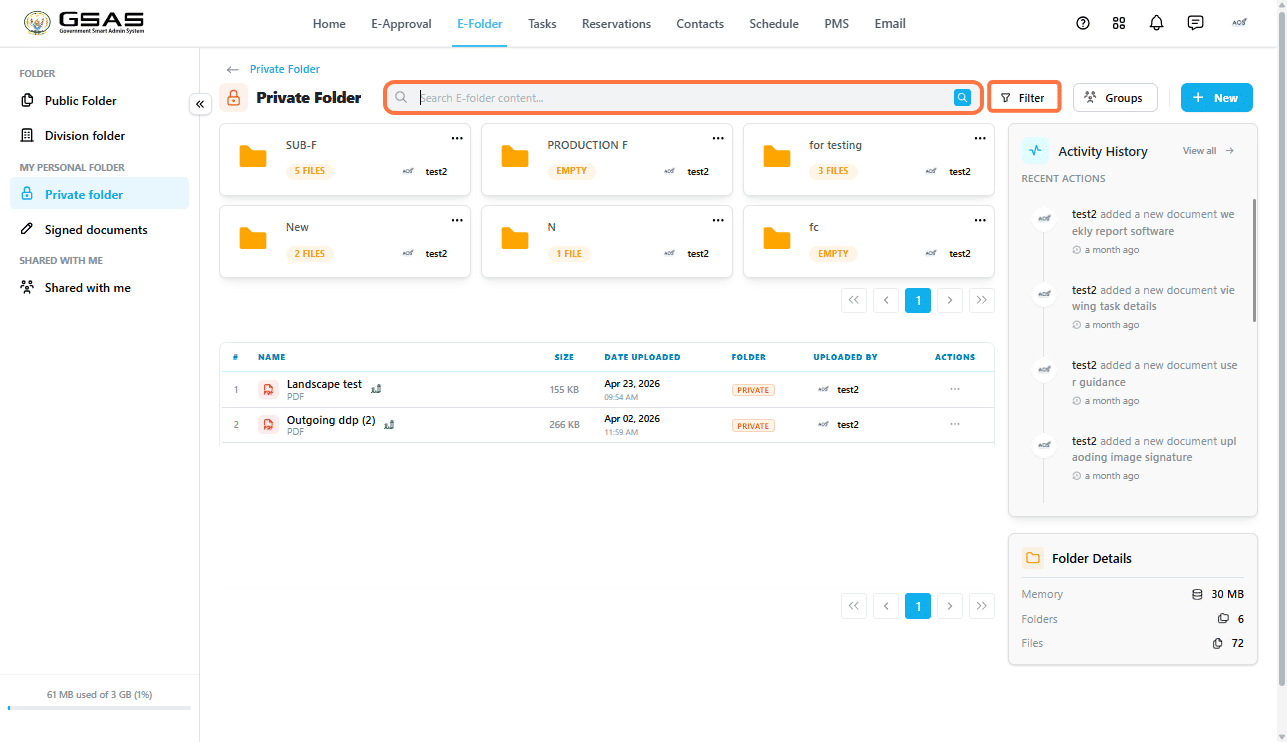
- Once inside, you will see the files and subfolders it contains. Use the search bar to find something by name, or click Filter to narrow the list.
Creating a new folder
- Click + New at the top right and select New Folder.
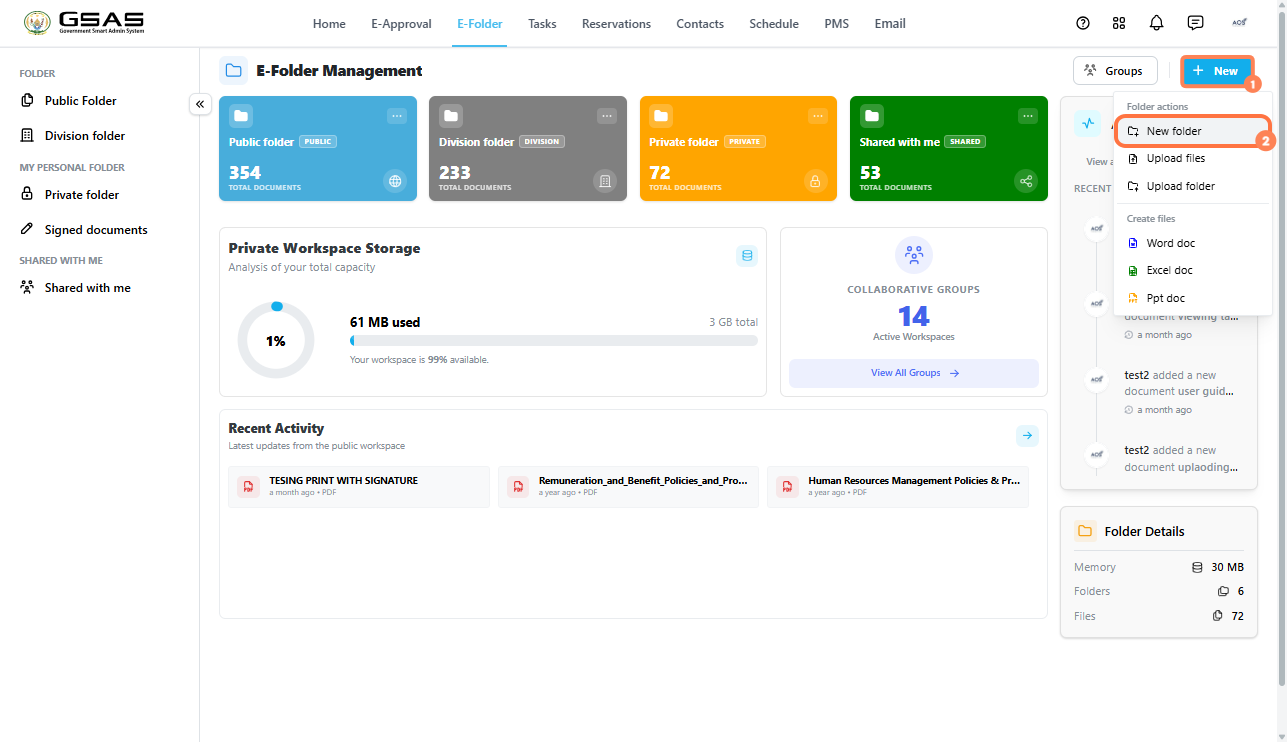
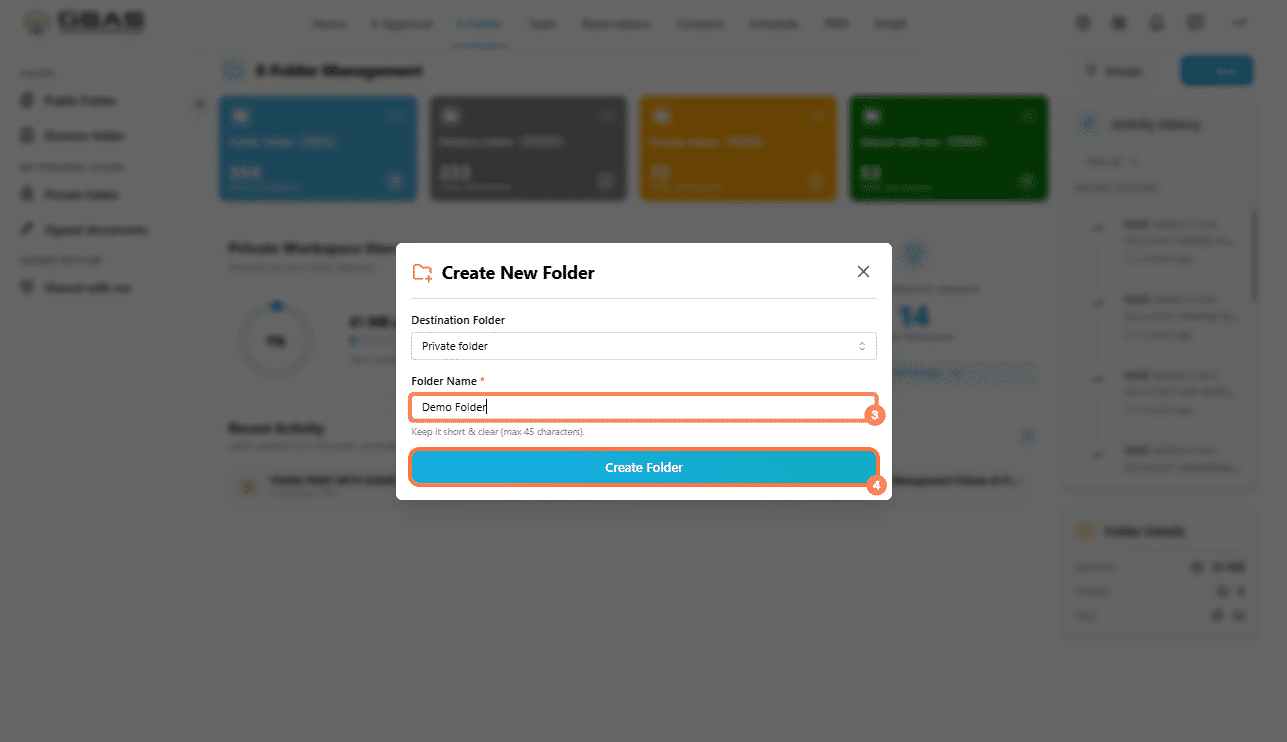
If you clicked + New from the home screen, you will be asked to choose which folder to create it in. If you are already inside a folder, it will be created there.
- Enter a name for the folder and confirm.
Uploading files or a folder
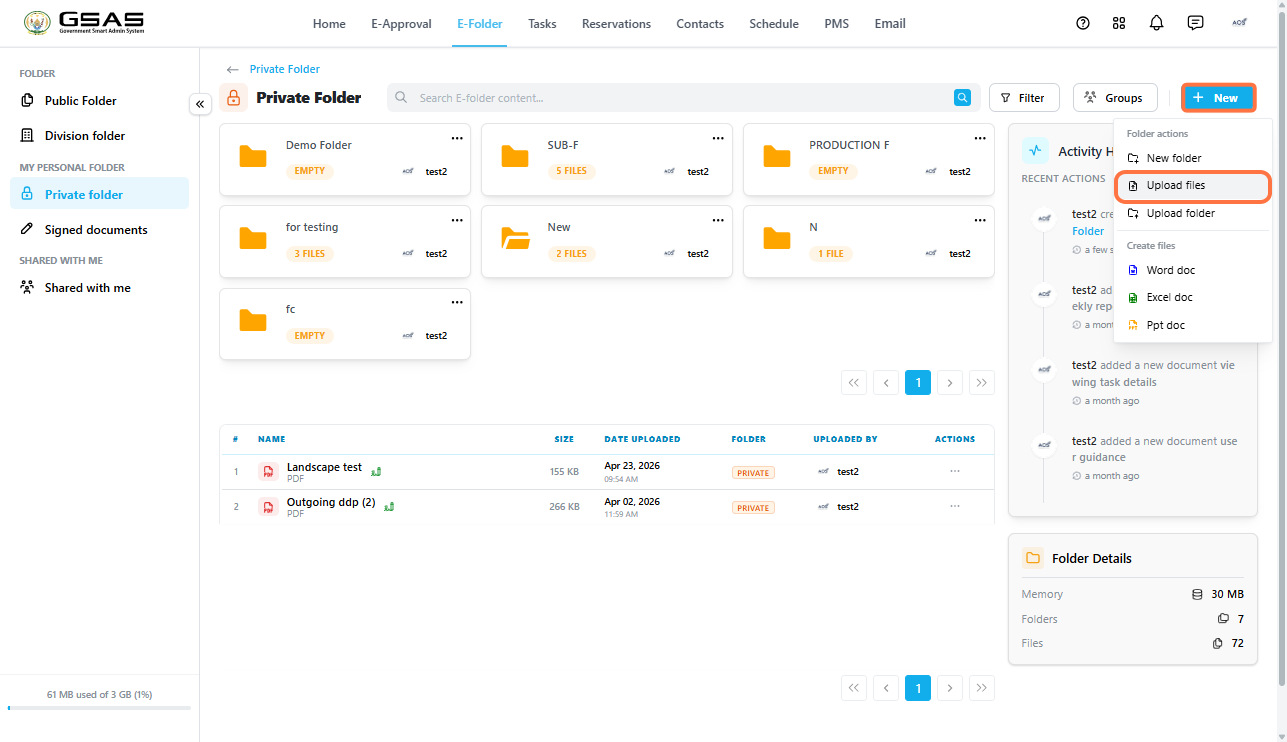
- Click + New at the top right and select Upload Files or Upload Folder.

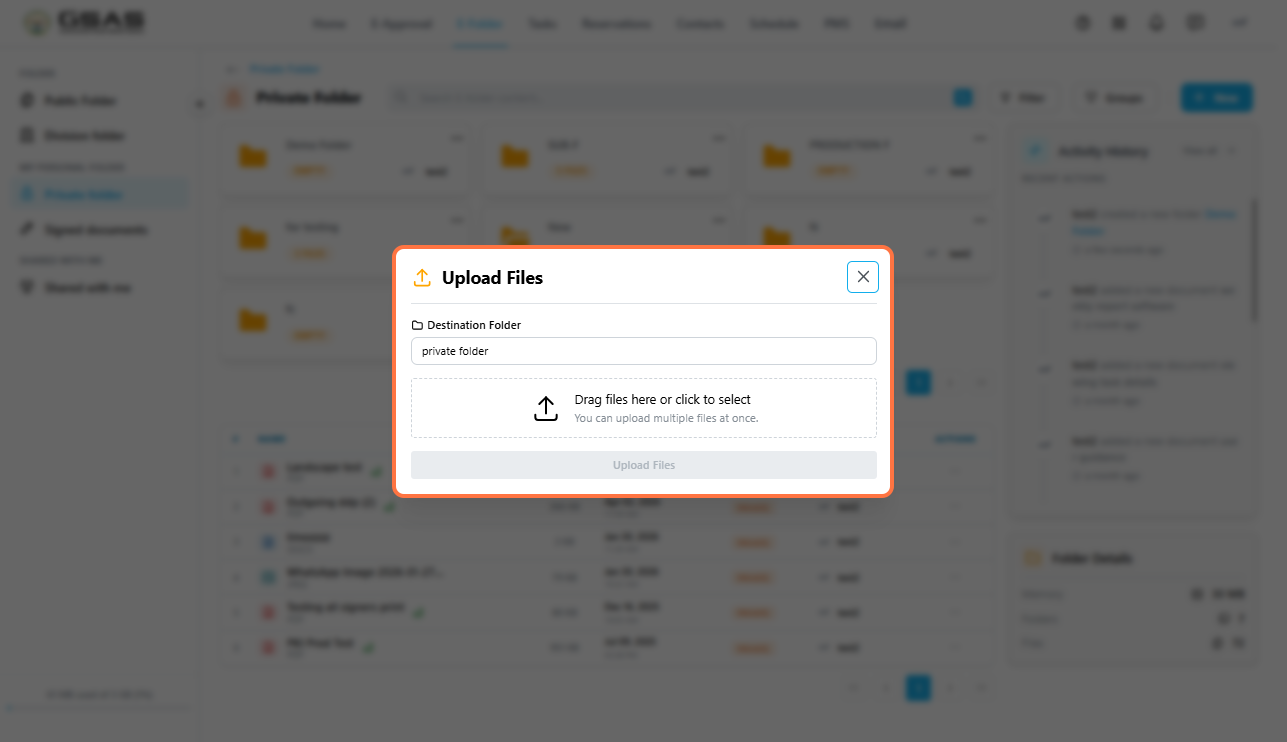
- If prompted, choose the destination folder.
- Browse your device, select the files or folder you want to upload, and confirm.

Creating a document
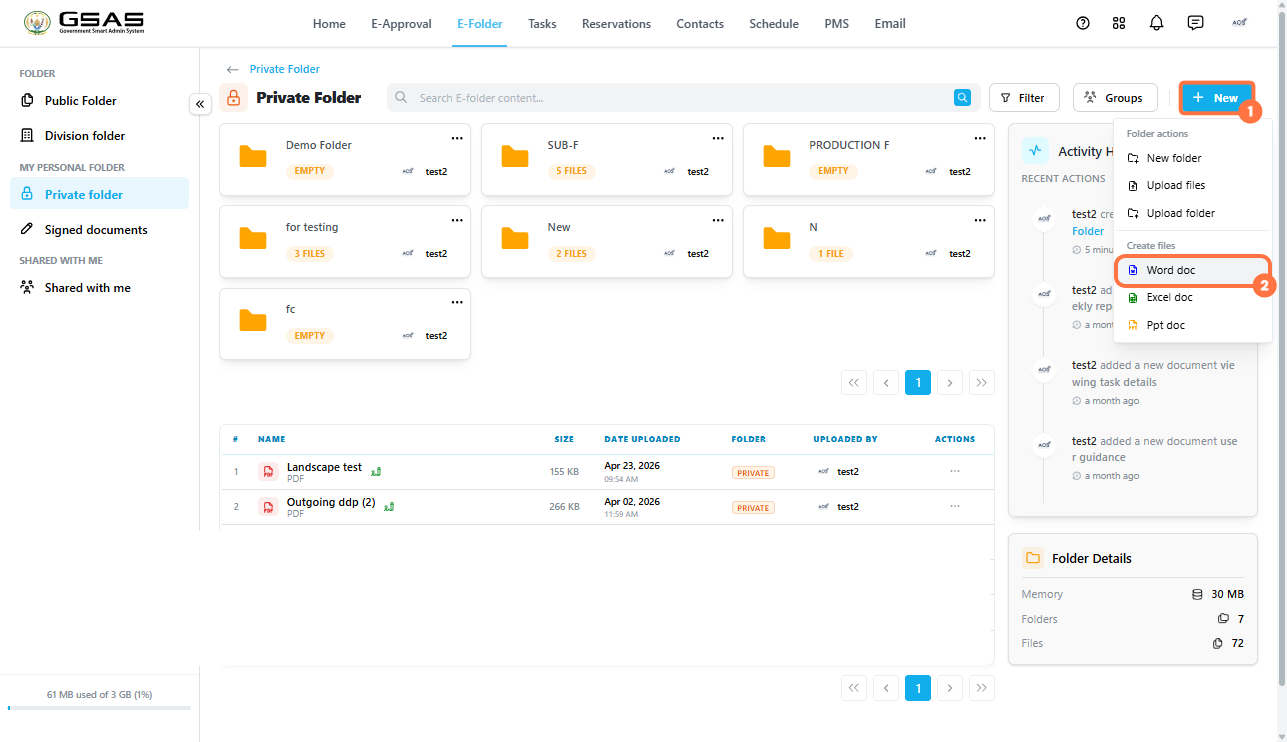
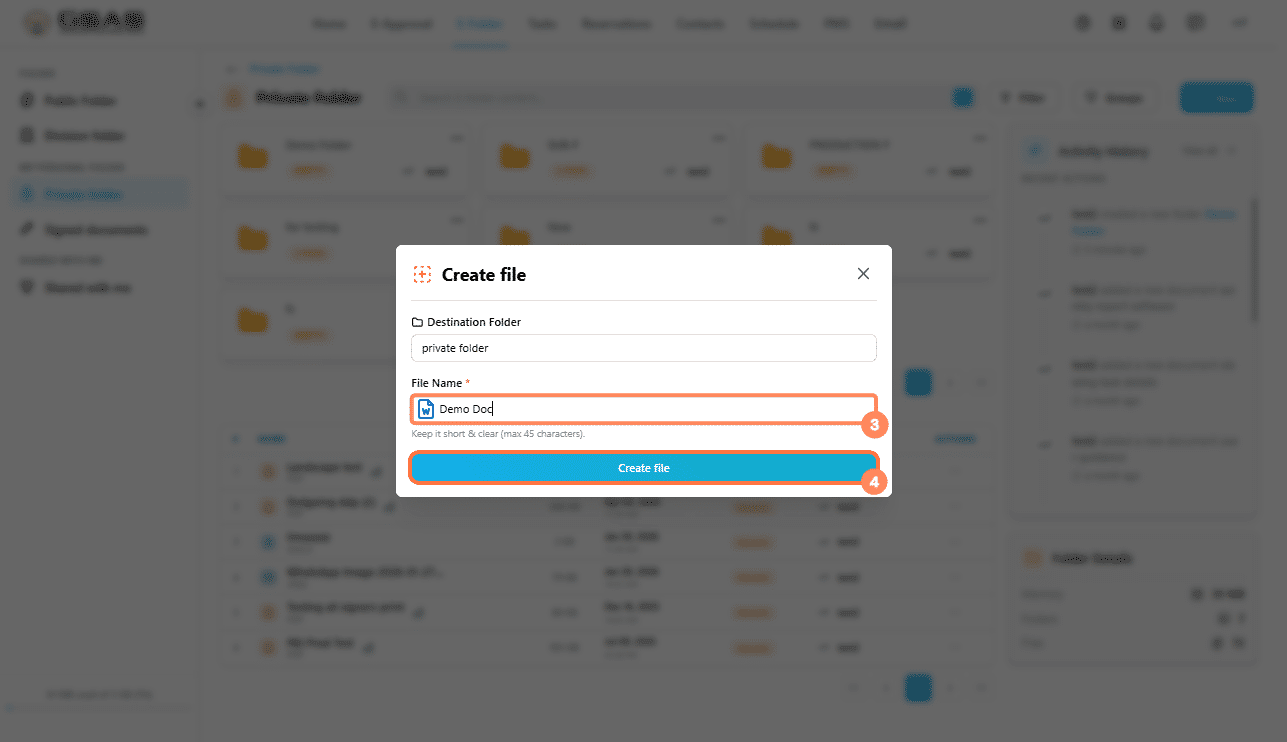
You can create a Word, Excel, or PowerPoint document directly in E-Folder without uploading anything from your device.
- Open the folder where you want the document to be.
- Click + New and select Word doc, Excel doc, or Ppt doc.


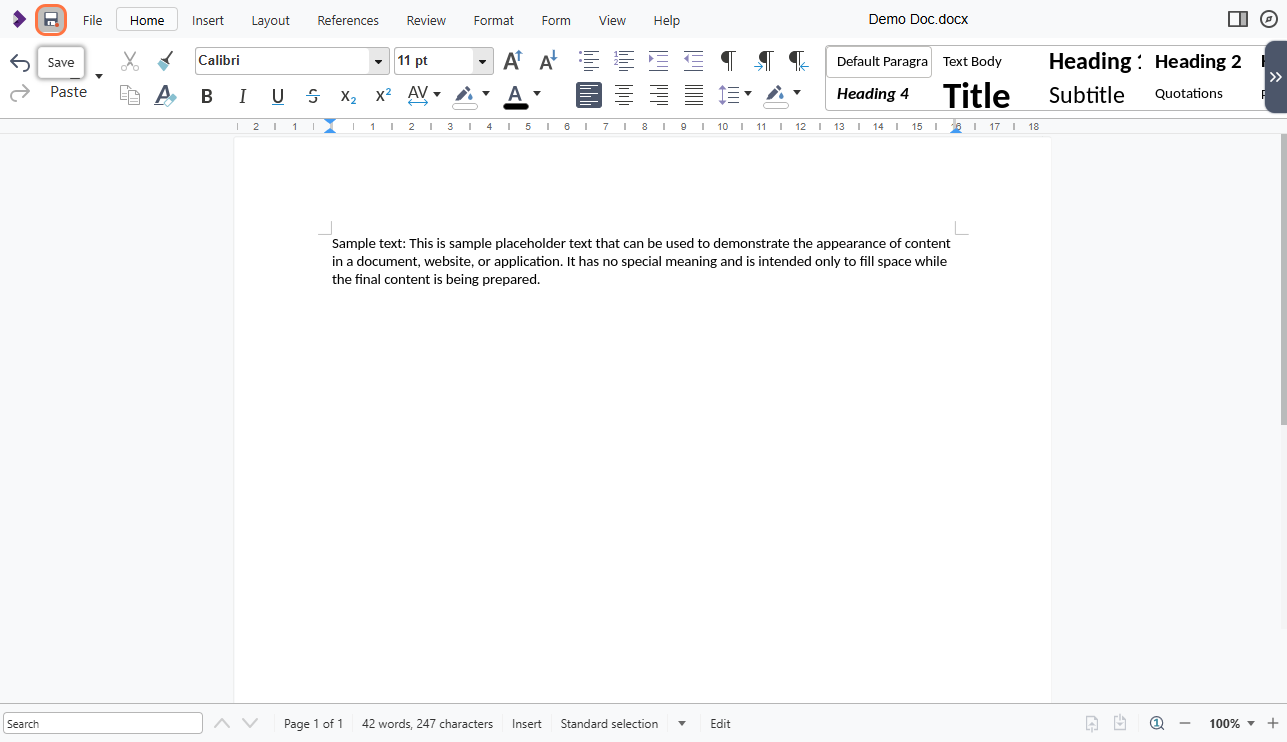
- The document will open in the system ready for you to edit.

| Tip: You can also click on the three dots icon (···) on any main folder from the home screen or on subfolders and choose any of these options: Upload Files, Upload Folder, New Folder. |
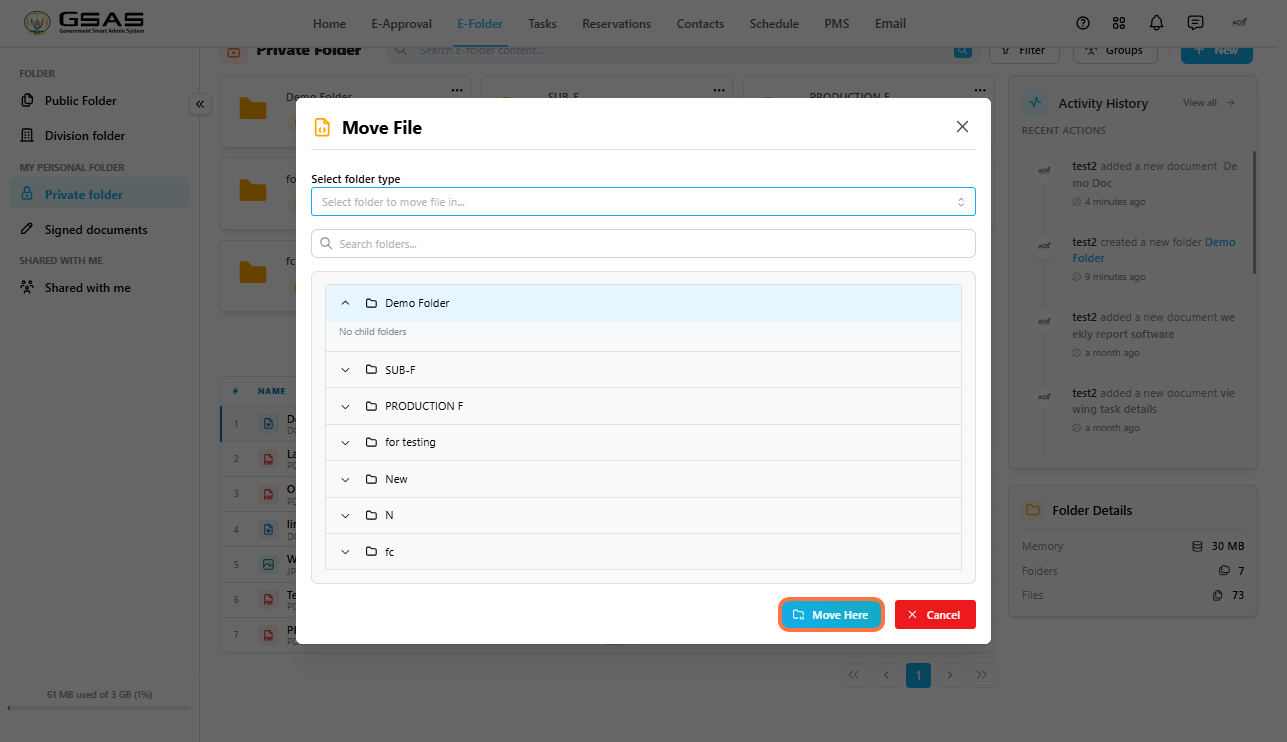
Moving a file
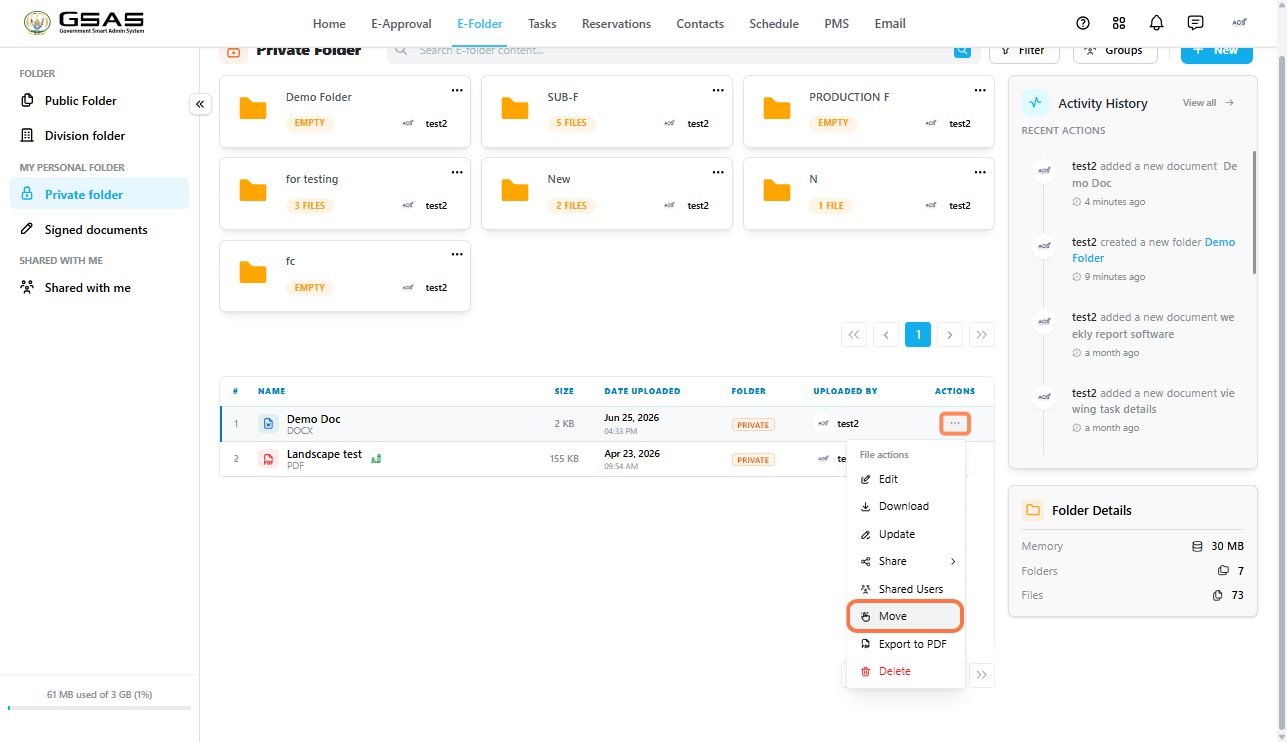
- Click this icon ··· on the file and select Move.

- A panel will open showing your folder structure , choose folder type (Public, Division, Private) then select the destination folder.
- Confirm the move. The file will be removed from its current location and placed in the new one.

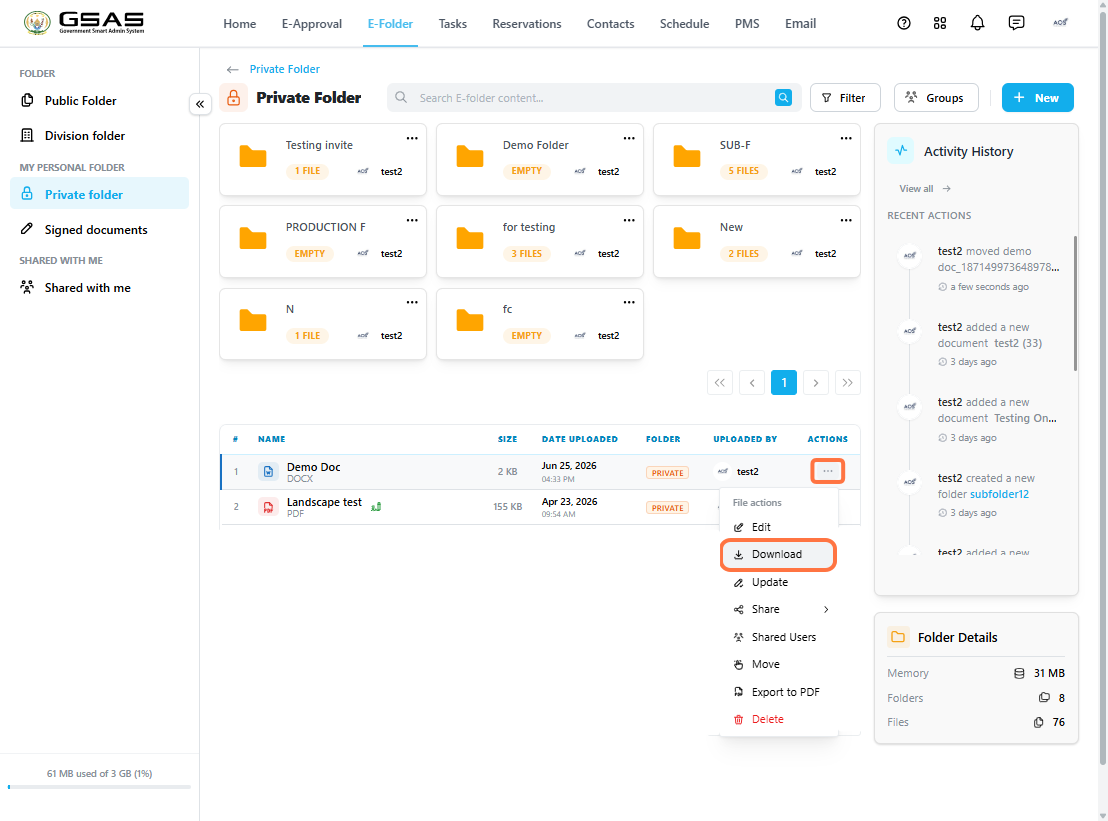
Downloading a file
- Click on this icon ··· on the file and select Download.
- The file will be saved to your device.

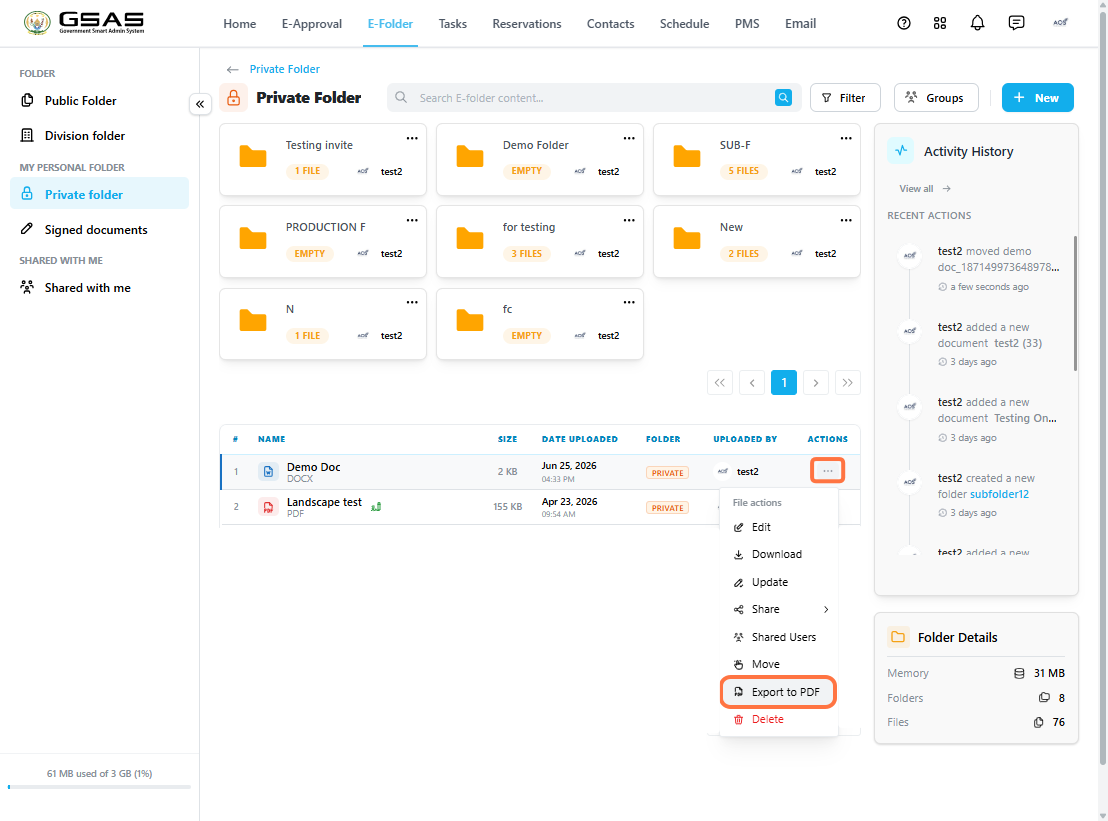
Exporting a file to PDF
- Click on this icon ··· on the file and select Export to PDF.
- A PDF version of the file will be saved in that same folder.

Sharing a file
- Click on this icon ··· on the file and select Share.
- Choose how you want to share it from the options that appear.

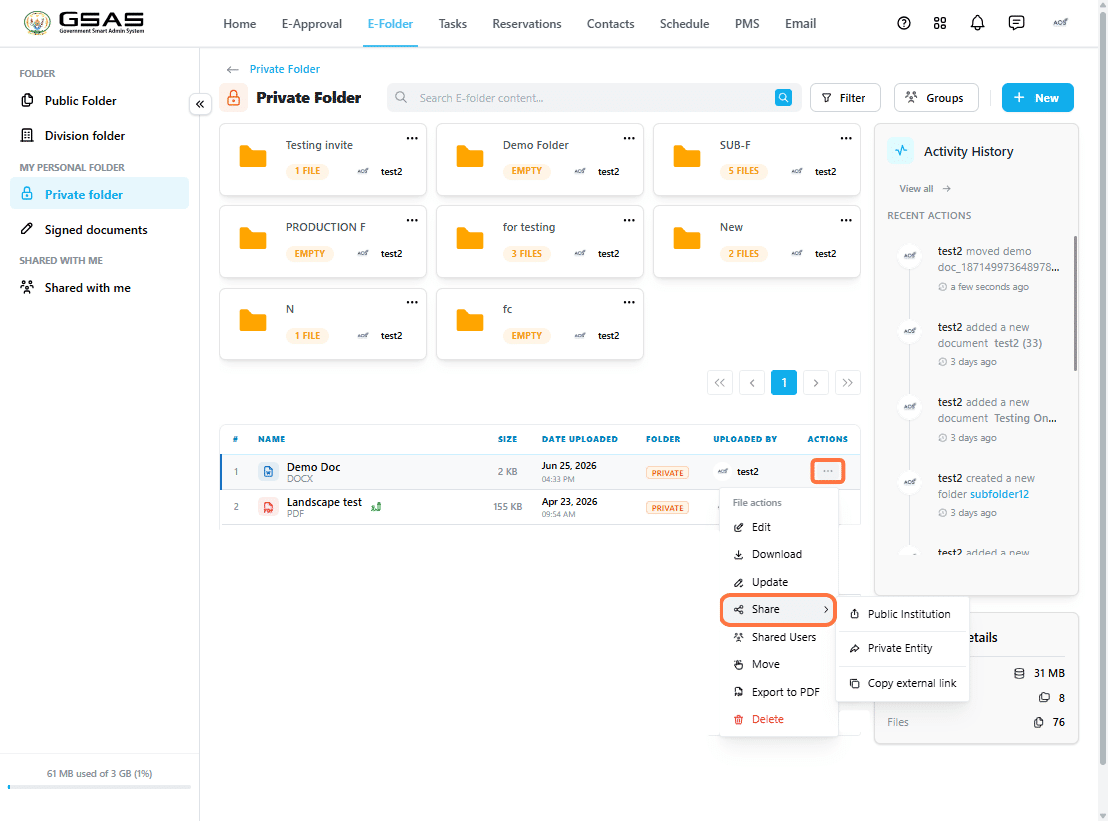
For full details on sharing options and permissions, see the Sharing Files and Folders page.
Deleting a file
- Click on the three dots icon ( ··· ) on the file and select Delete. You can only delete files you own, i.e. files and folders you have created or uploaded.
- A confirmation prompt will appear click Delete to proceed.

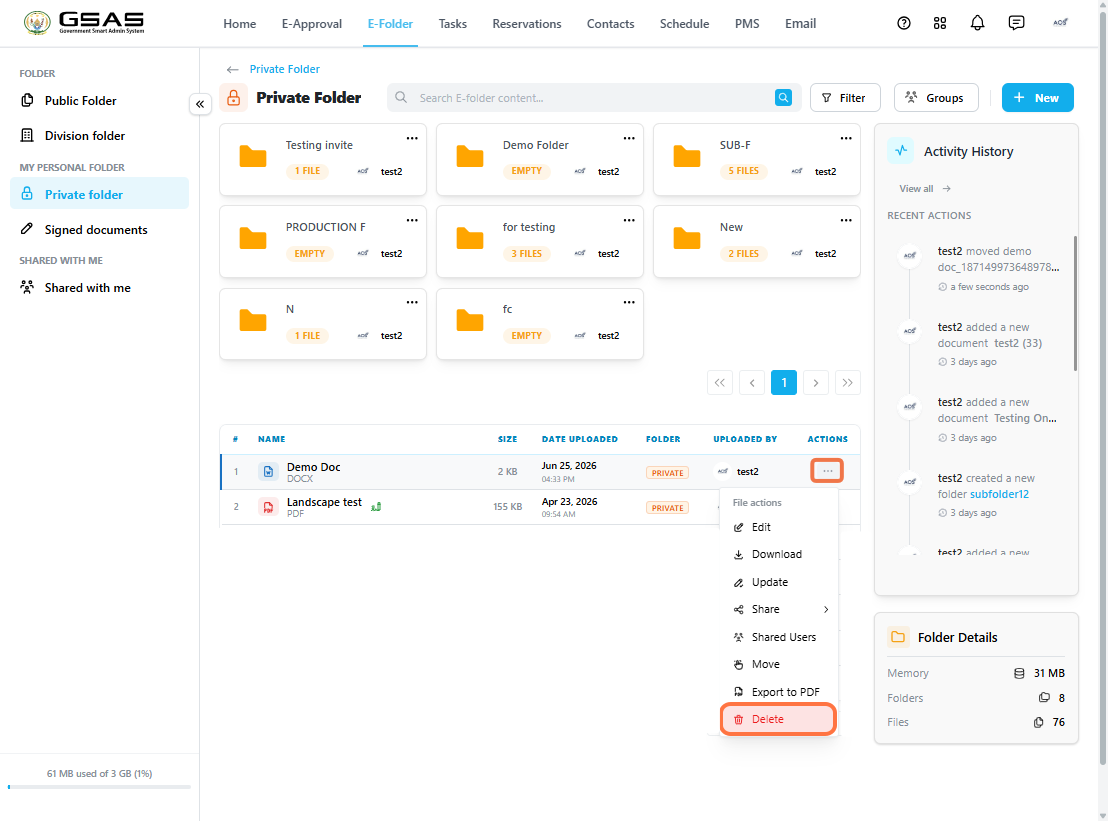
| Warning: Deletion is permanent. There is no recycle bin in E-Folder, so once a file is deleted it cannot be recovered. Make sure you no longer need it before proceeding. |
- You can not upload or create files within the Shared with Me folder. Only files and folders shared with you appear in this folder.
- Editing shared word, excel, or ppt files depends on the permissions granted by the file owner;
| Read permission — you can only open the file. Write permission — you can edit, export to PDF, and share the file. |
Sharing Files and Folders
Use sharing when internal or external system users, and non-system users need access to a file or folder from E-Folder. You can share both files and folders, and the access you give depends on the permission you select.
Step 1
Open the sharing options
- Open the folder that contains the file or folder you want to share.
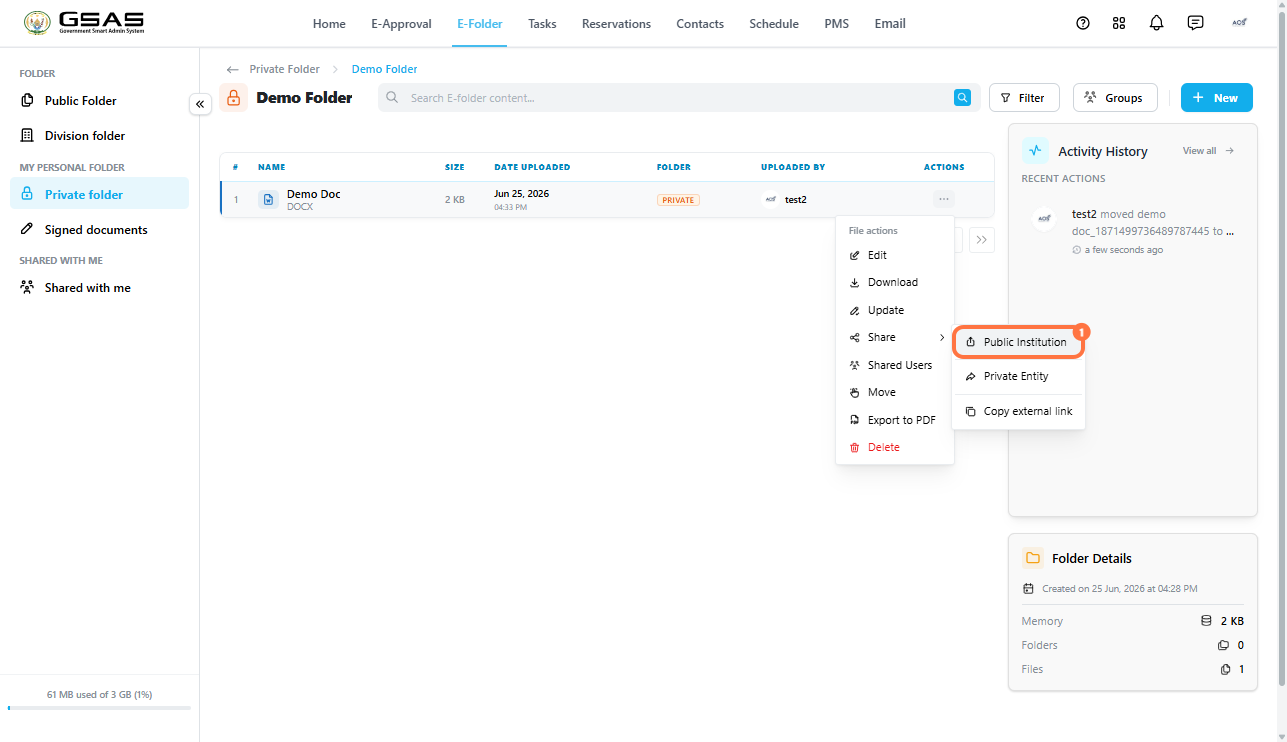
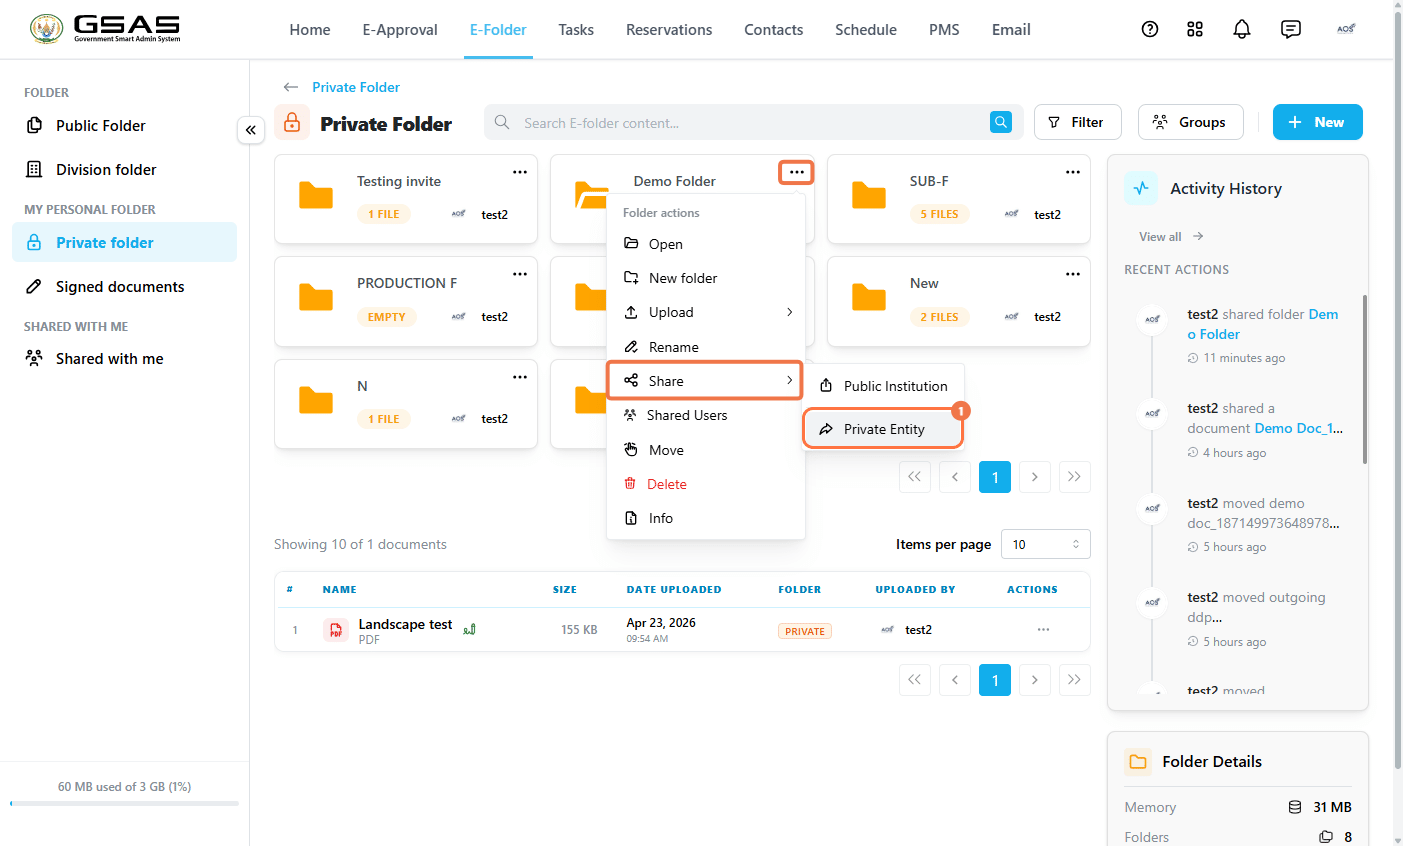
- Click ··· on the item and point to Share, then choose the sharing option you want to use.
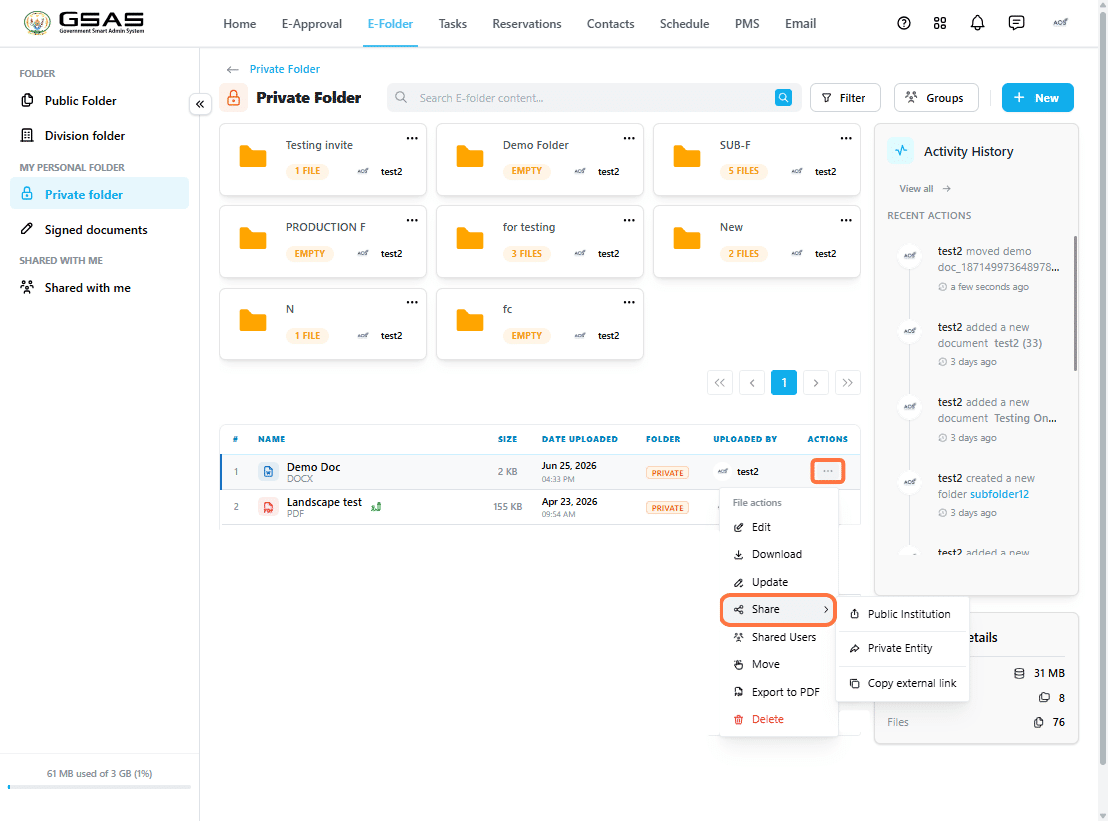
| Public Institution | Share with users from any institution that use the system. |
| Private Entity | Share folders and files externally by email. |
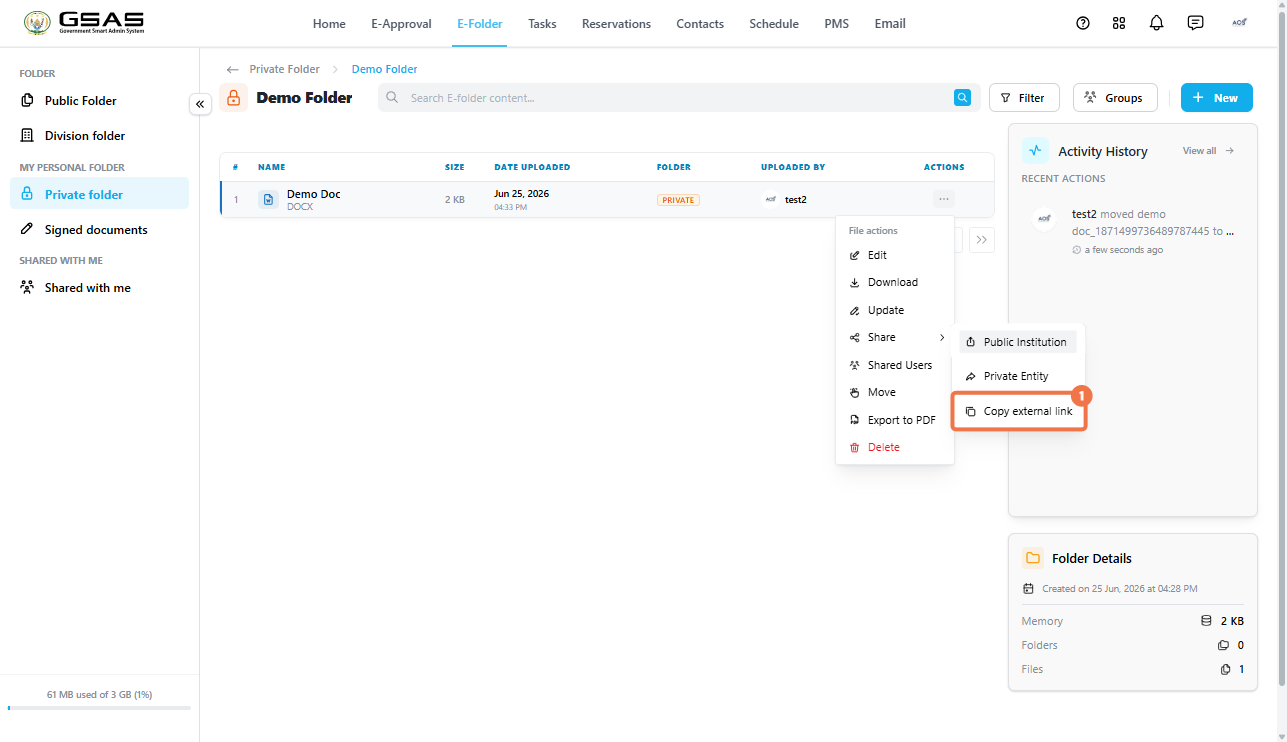
| Copy External Link | Copy a link that anyone can open in a browser to download the file. Available for files only. |
Step 2
Use this option to share with one or more users who have accounts in the system.
- Select Public Institution.

- Choose the user(s)'s organization from the dropdown list on the left.
- Use the search field to find the user by name.

- Tick the checkbox next to the user to add them to the Selected Users list. You can add as many users as needed.
- Choose the permission for each user — Read or Write. The default permission is Read.

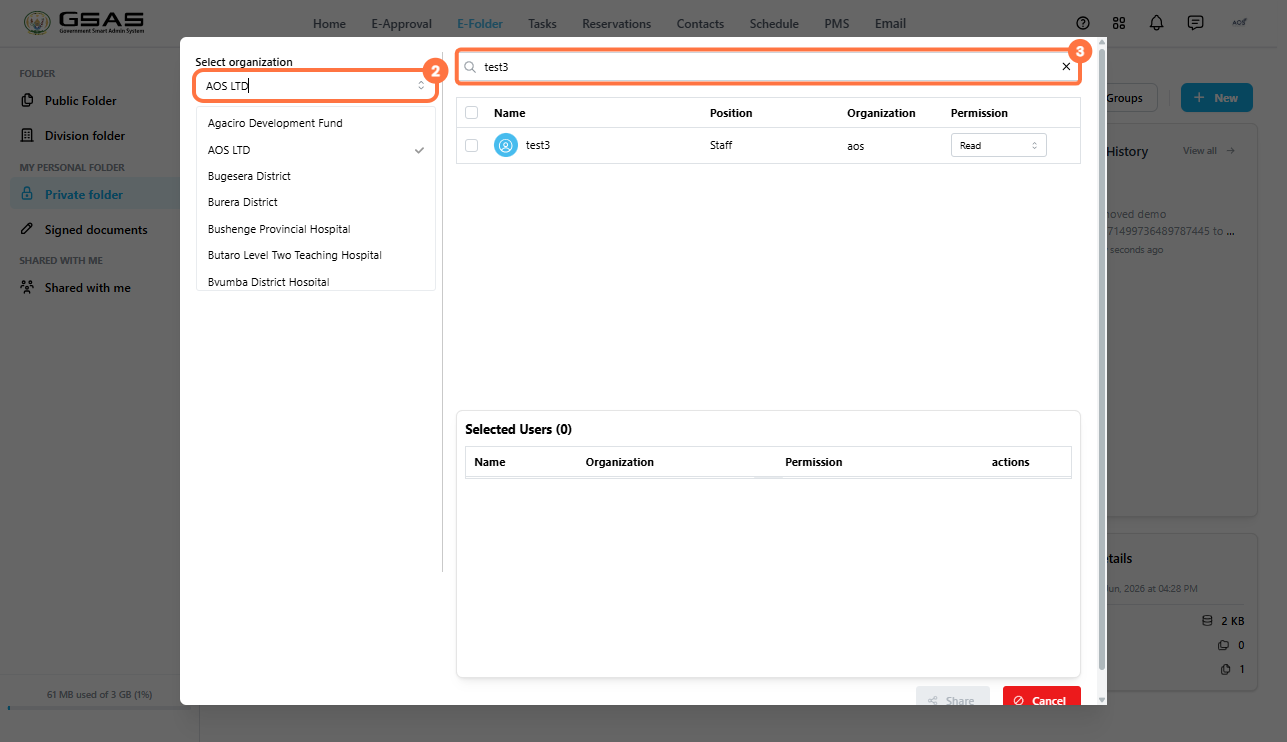
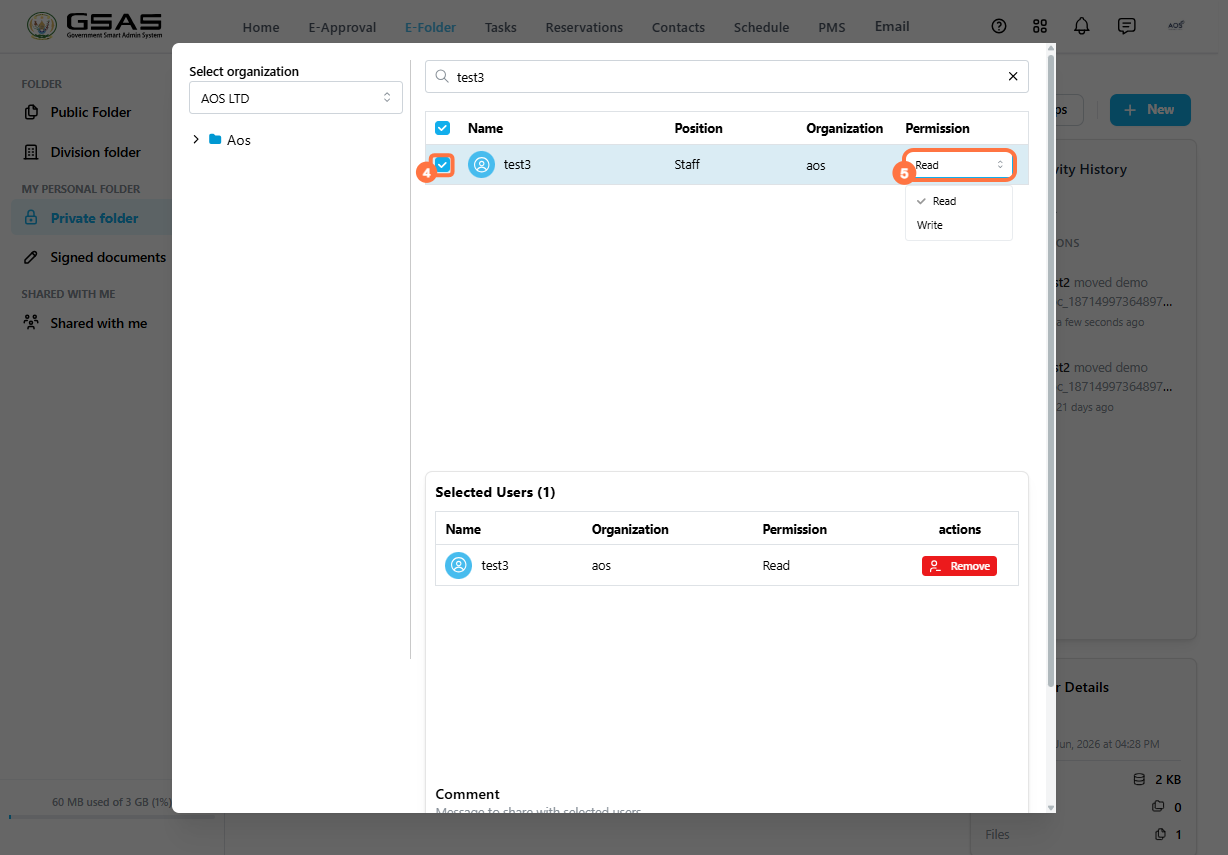
| Read | The user can open, view, and download the shared item. |
| Write | The user can edit editable files, export to PDF, and re-share. |
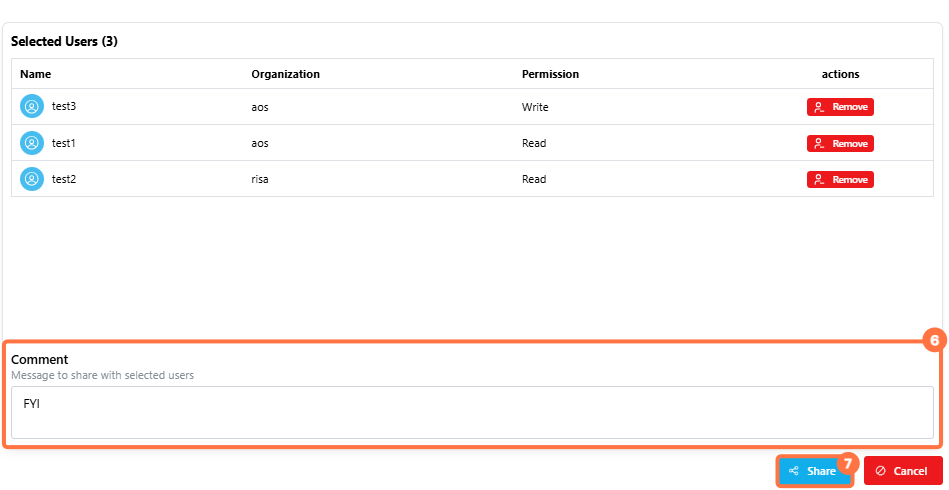
Review the users in the Selected Users list.
- Enter a comment if needed.
- Click Share.

Copy External Link (files only)
This generates a link that anyone can open in a browser to download the file, no system account required.
- Click ··· on the file and select Share → Copy External Link.

- The link is copied to your clipboard. Paste it wherever you want to share it; an email, a message, or any other channel.
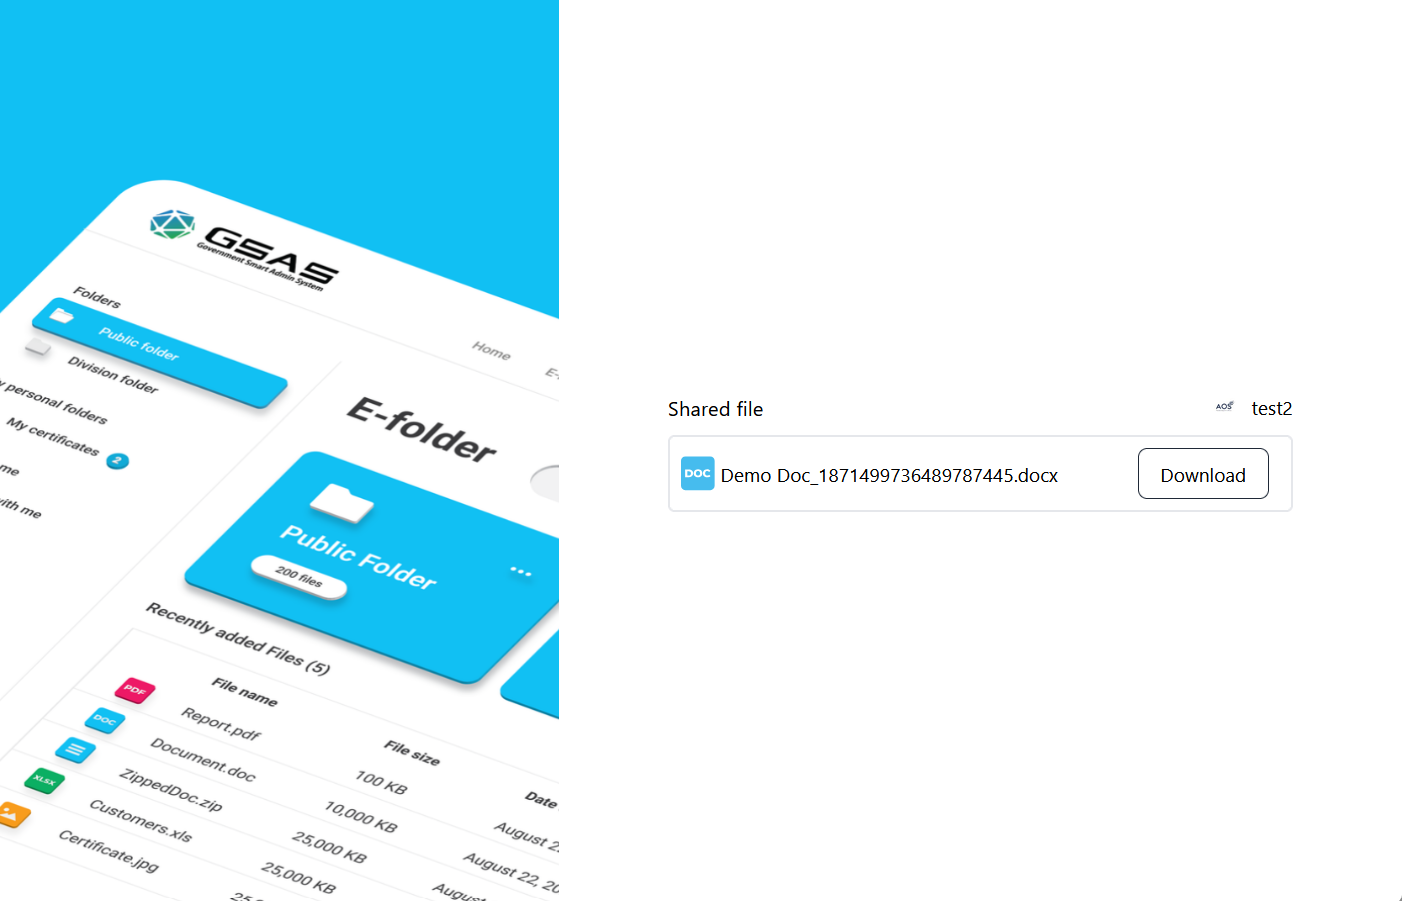
- The recipient opens the link in their browser and clicks Download to save the file. If they are logged into smart admin, the file automatically opens in the e-folder Online Editor.

Private Entity
Use this option to share a folder and files with someone outside the system via their email address.
- Click ··· on the folder and select Share → Private Entity.

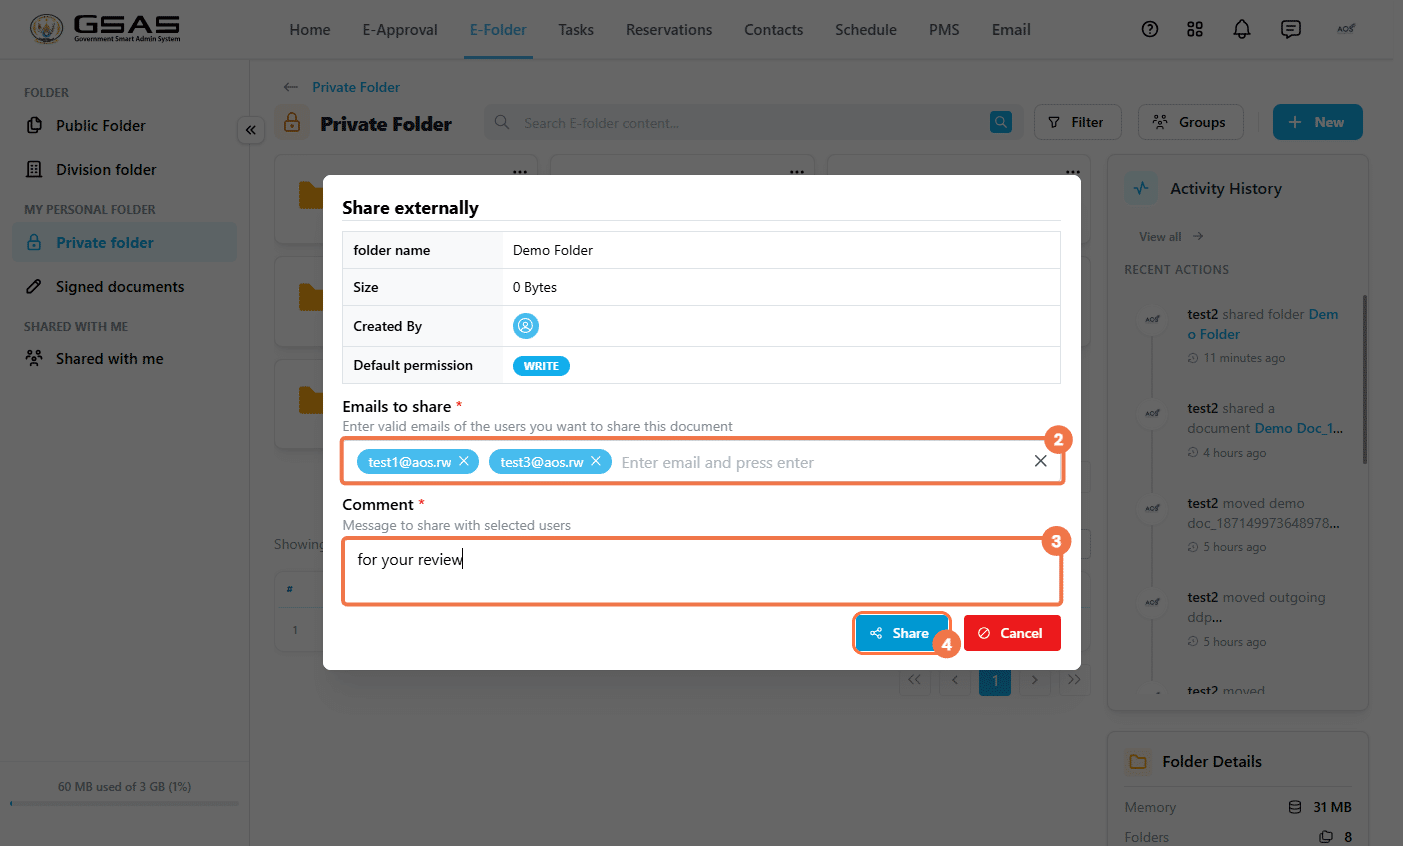
- Enter the recipient's email address in the Emails to share field and press Enter. You can add multiple addresses.
- Write a message in the Comment field.
- Click Share.

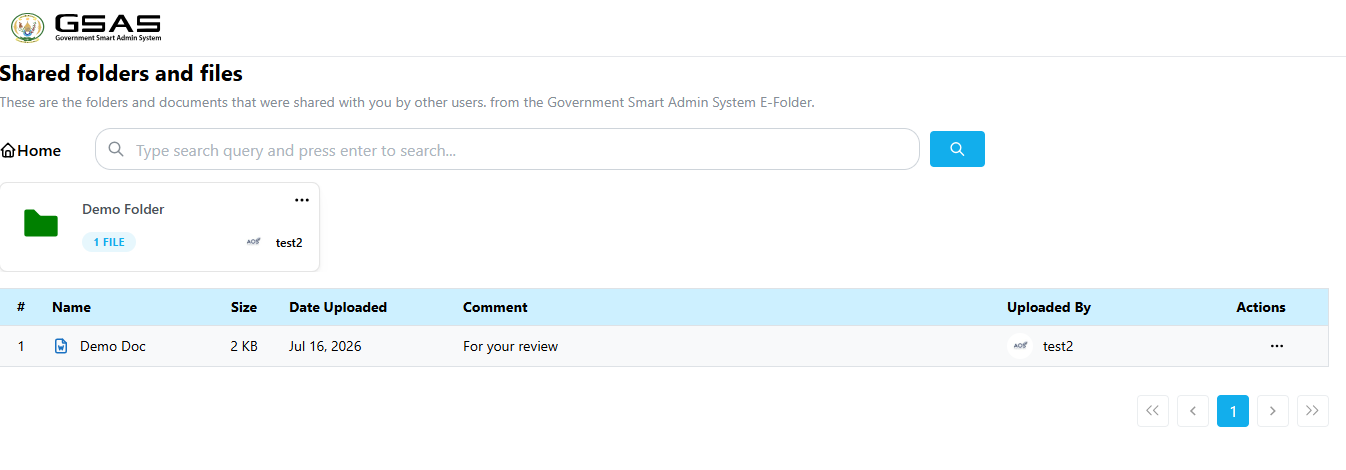
- The recipient will receive an email with a link to the shared documents, as well as an OTP access code.
- When they open the link, they will be prompted to enter the OTP to view the shared documents.

- Once the OTP is verified, they will be able to access the files


Updating or revoking access
You can view and manage who a file or folder has been shared with at any time.
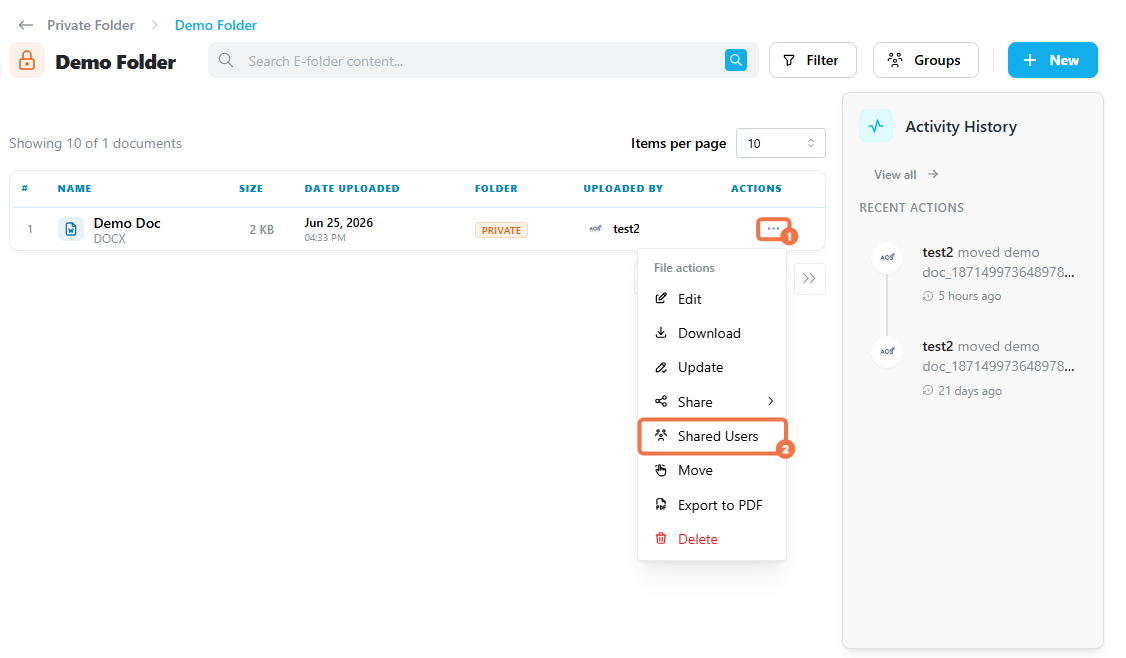
- Click ··· on the file or folder and select Shared Users.

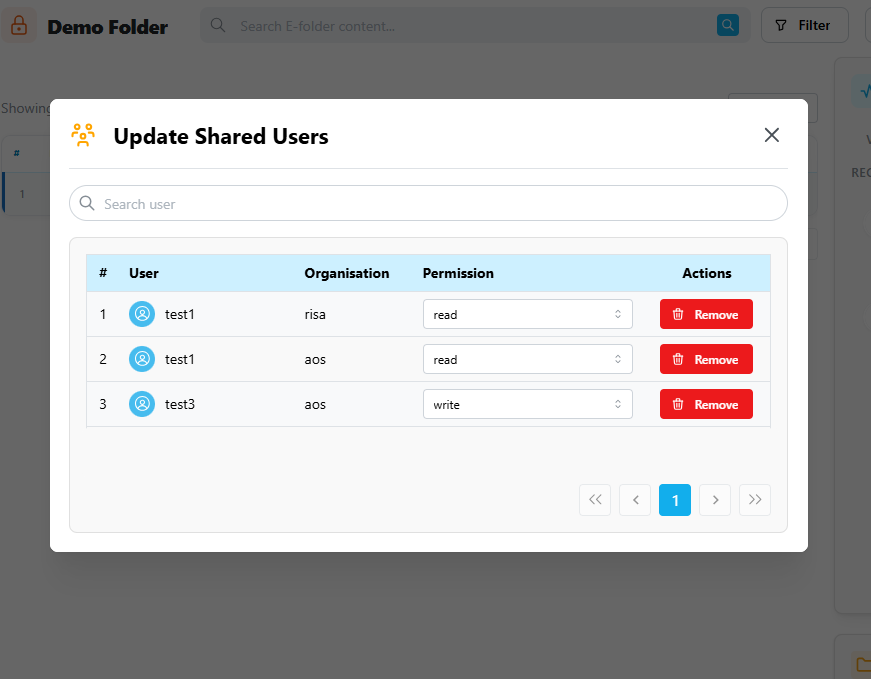
- The Update Shared Users panel will open, listing everyone the item has been shared with, their organization, and their current permission. Use the search bar to find a specific user.
- To change a user's permission, update it from the dropdown next to their name. To remove their access, click Remove.

Groups in e-Folder
Groups are collaborative workspaces where users from one or more institutions can store, organize, and share files together. Each group has its own folder space, separate from your personal folders. You can be a member of multiple groups at the same time.
Accessing your groups
Click the Groups button at the top right of E-Folder, or on the View All Groups button.

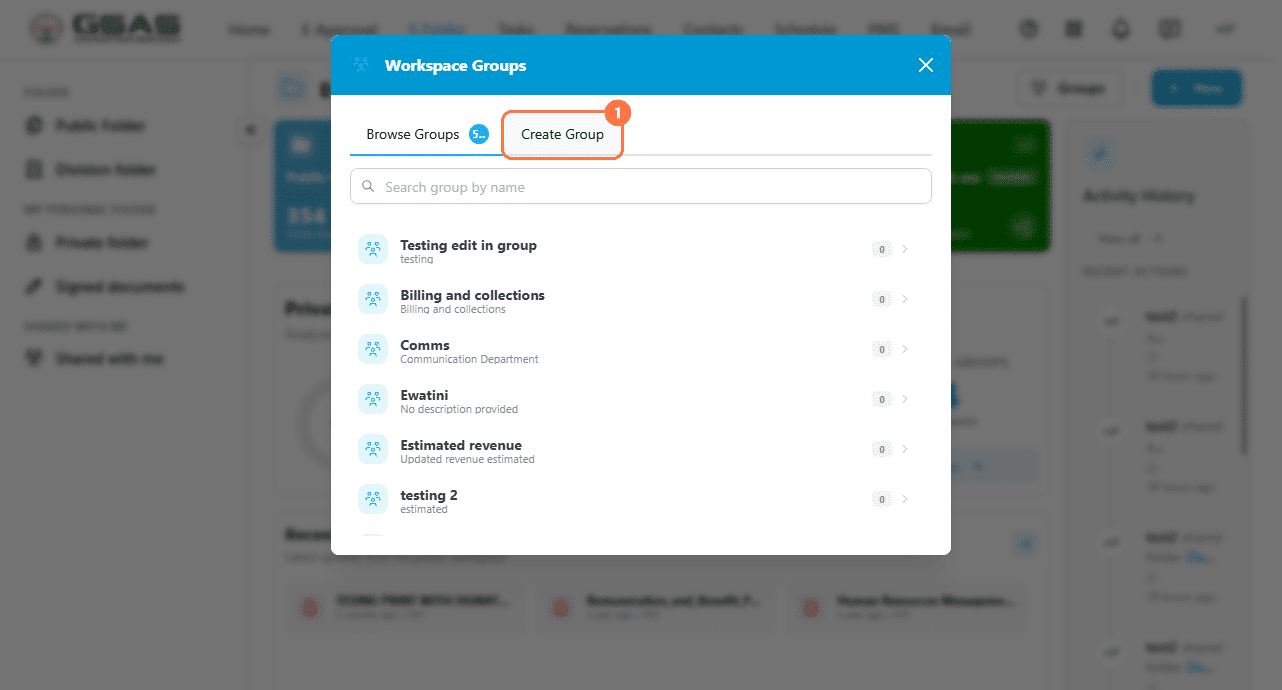
The Workspace Groups panel will open with two tabs: Browse Groups shows all the groups you belong to, and Create Group lets you set up a new one. You can click on a group to open it or use the search bar to find a group by name.
Creating a group
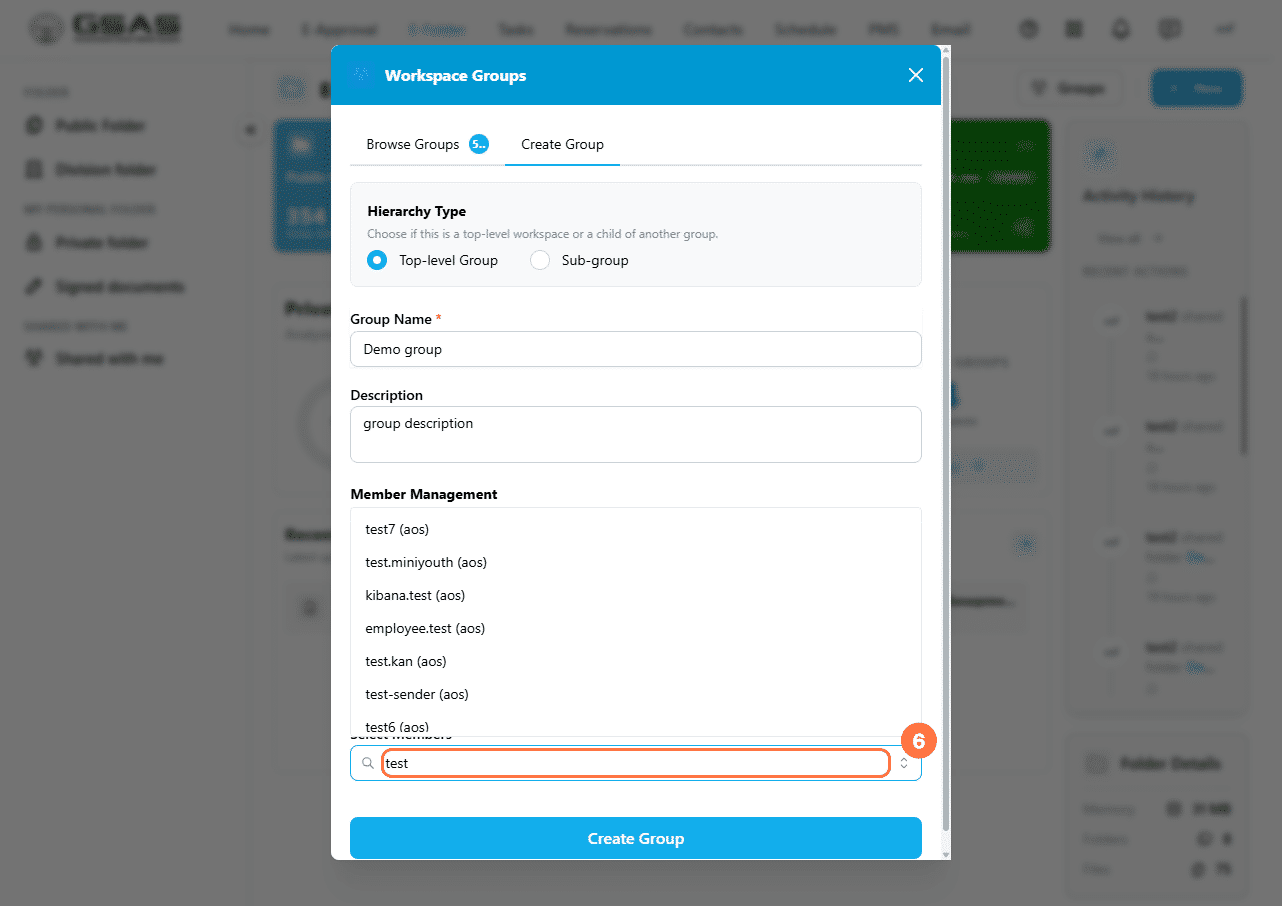
- Click Groups and select the Create Group tab.

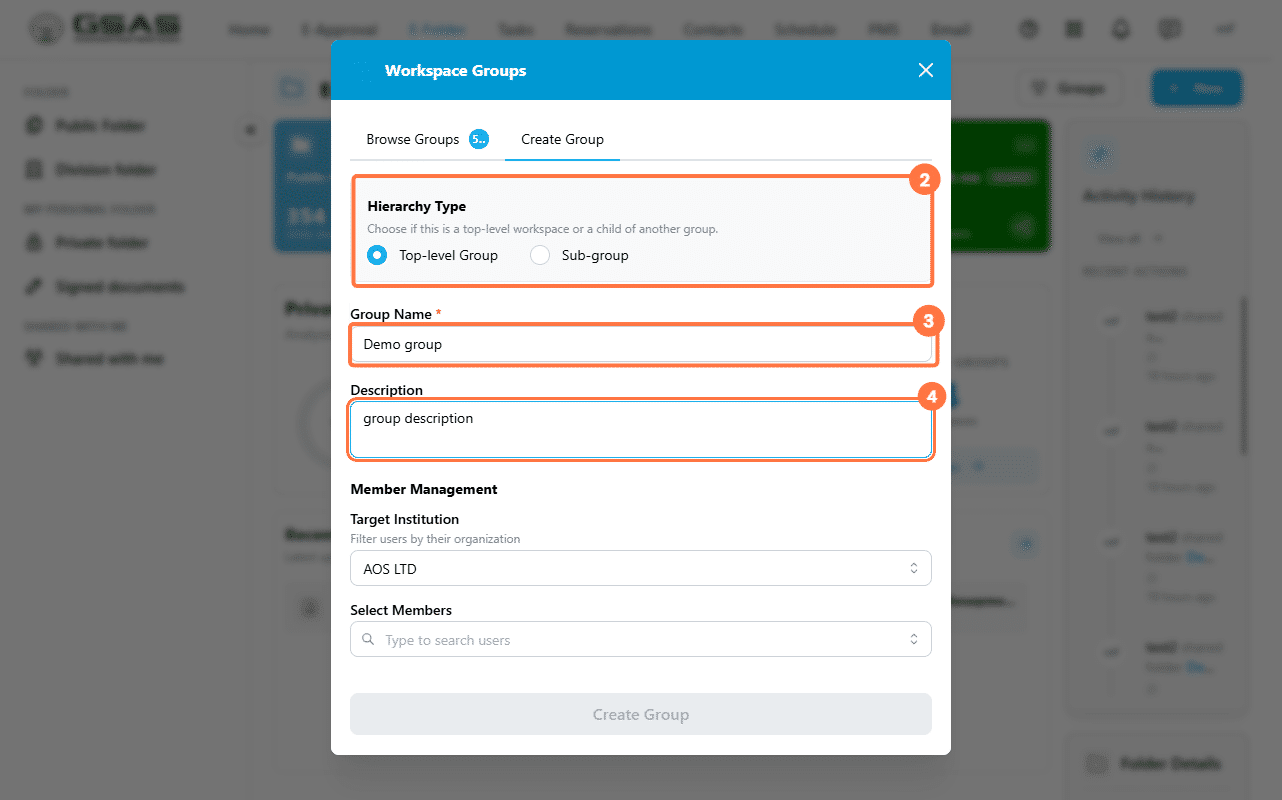
- Choose the Hierarchy Type:
— Select Top-level Group to create a standalone group.
— Select Sub-group if this group is under an existing one. You will be asked to search for and select the parent group. - Enter a Group Name
- Add an optional Description.

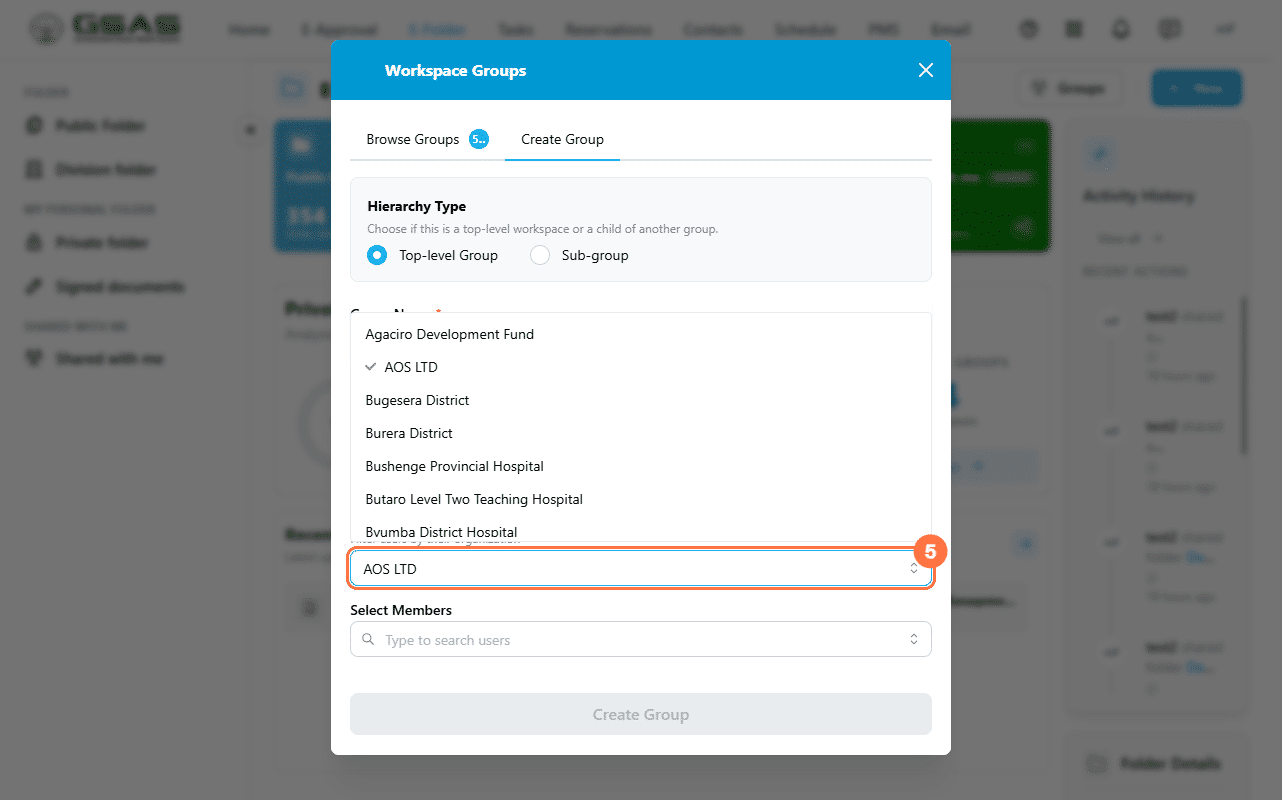
- Under Member Management, select the Target Institution to filter users by organization,

- Then search for members by name and add them.

- Click Create Group.

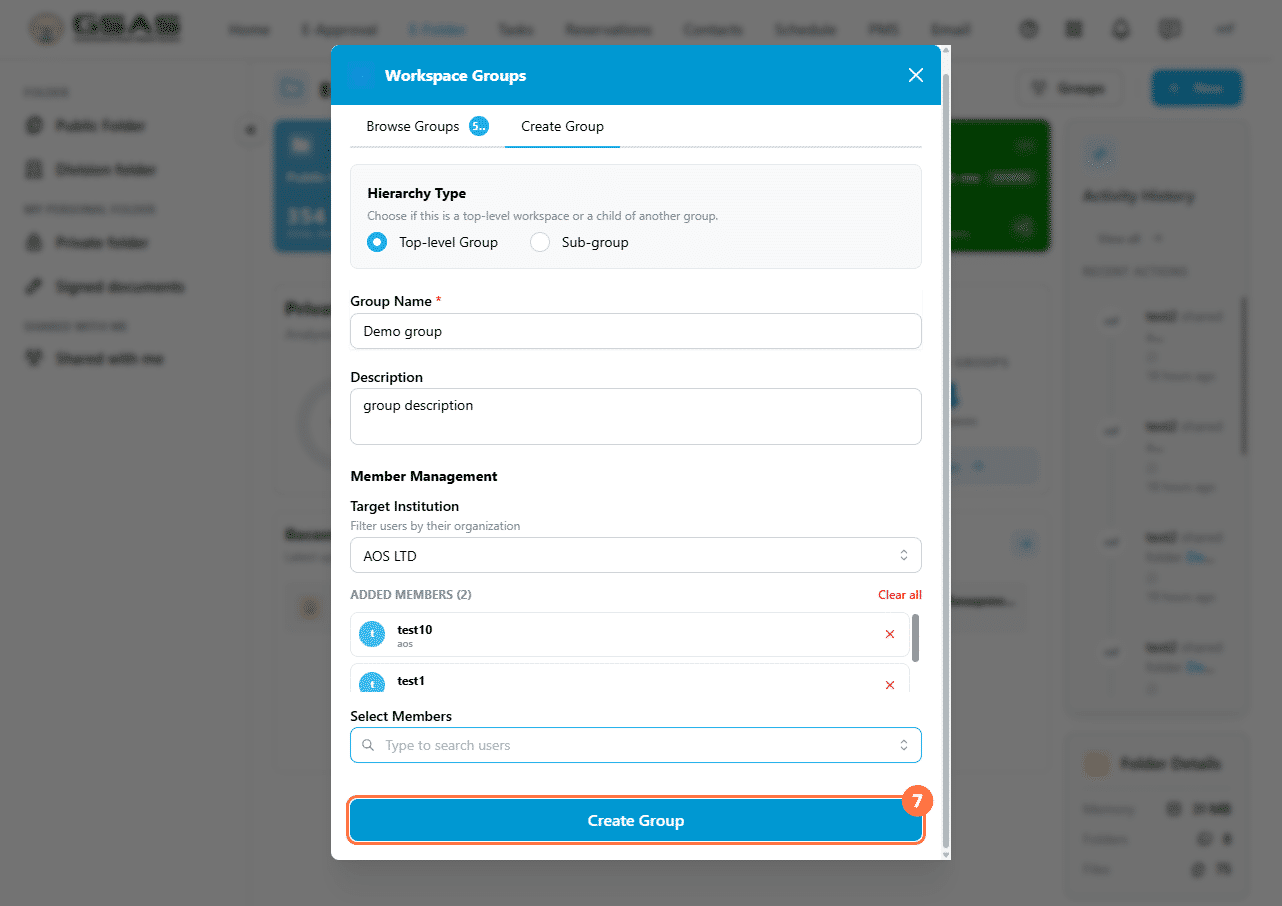
| Note: Added members will see the group appear in their Browse Groups list. New members are assigned Read access by default, however, you can update this after the group is created. |
Working inside a group
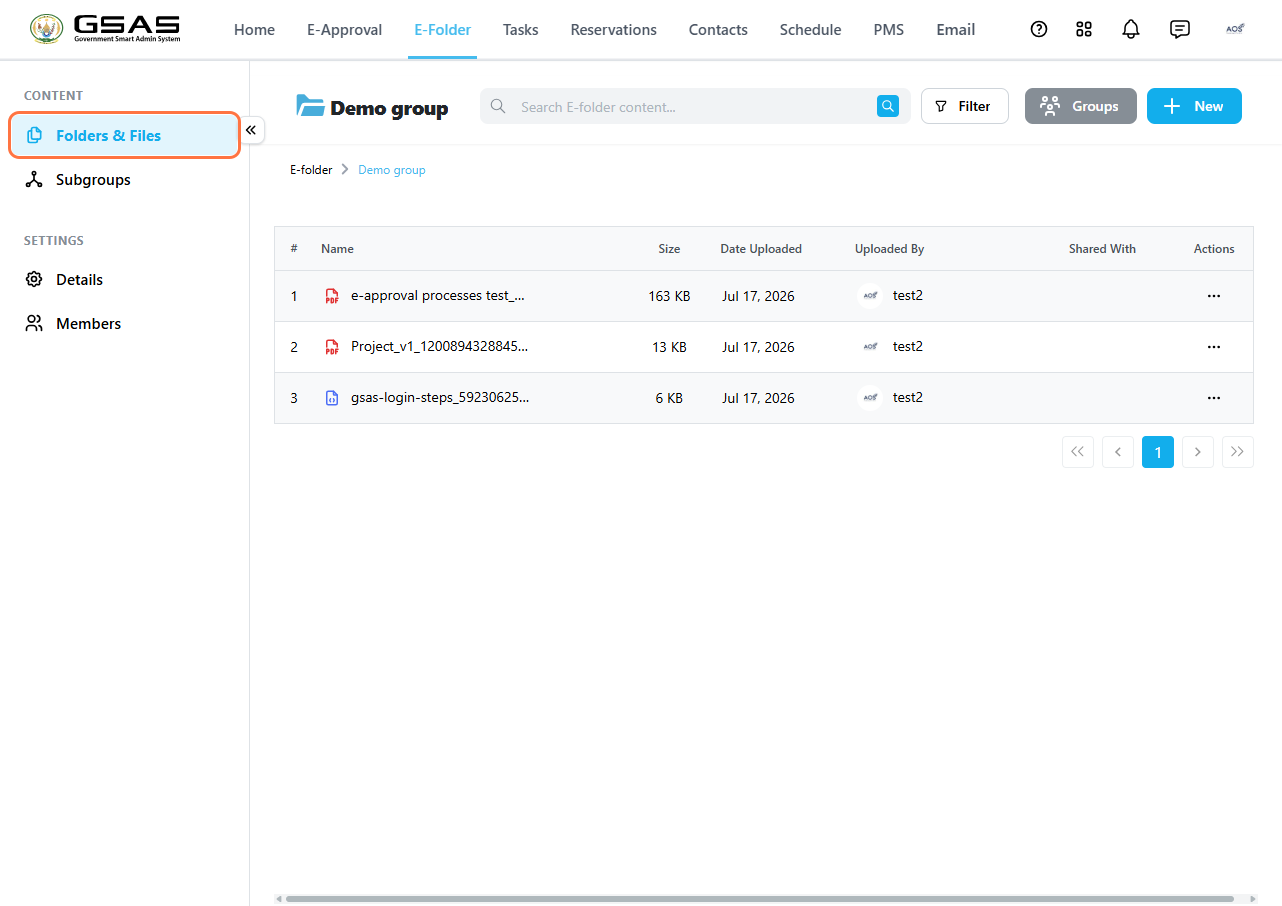
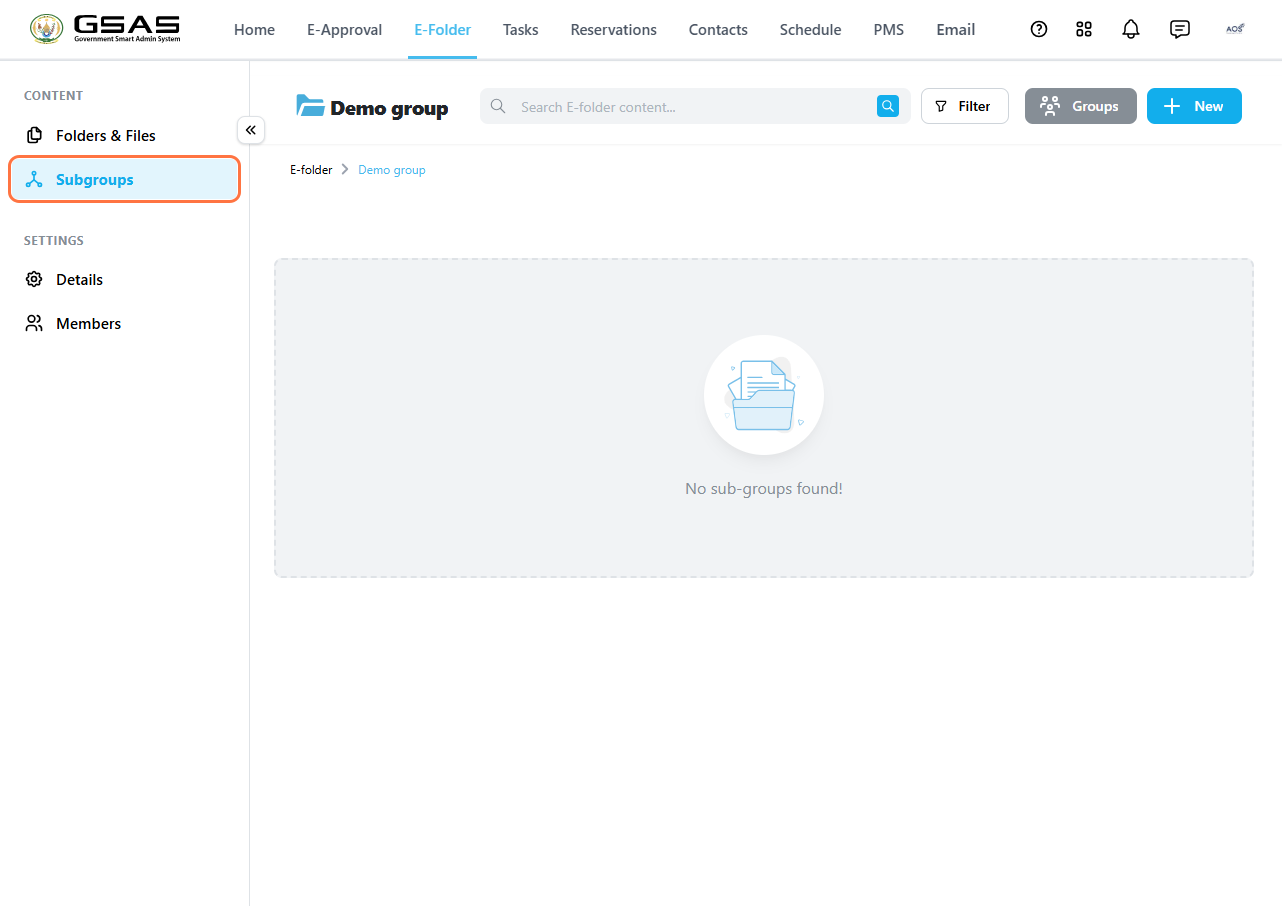
Once you open a group (from the browse groups tab), you will find the same tools available as in your regular folders; a search bar, Filter, and +New to add files and folders. The sidebar gives you access to:
Folders & Files sharing— the group's file space.
Subgroups — any subgroups nested under this group.
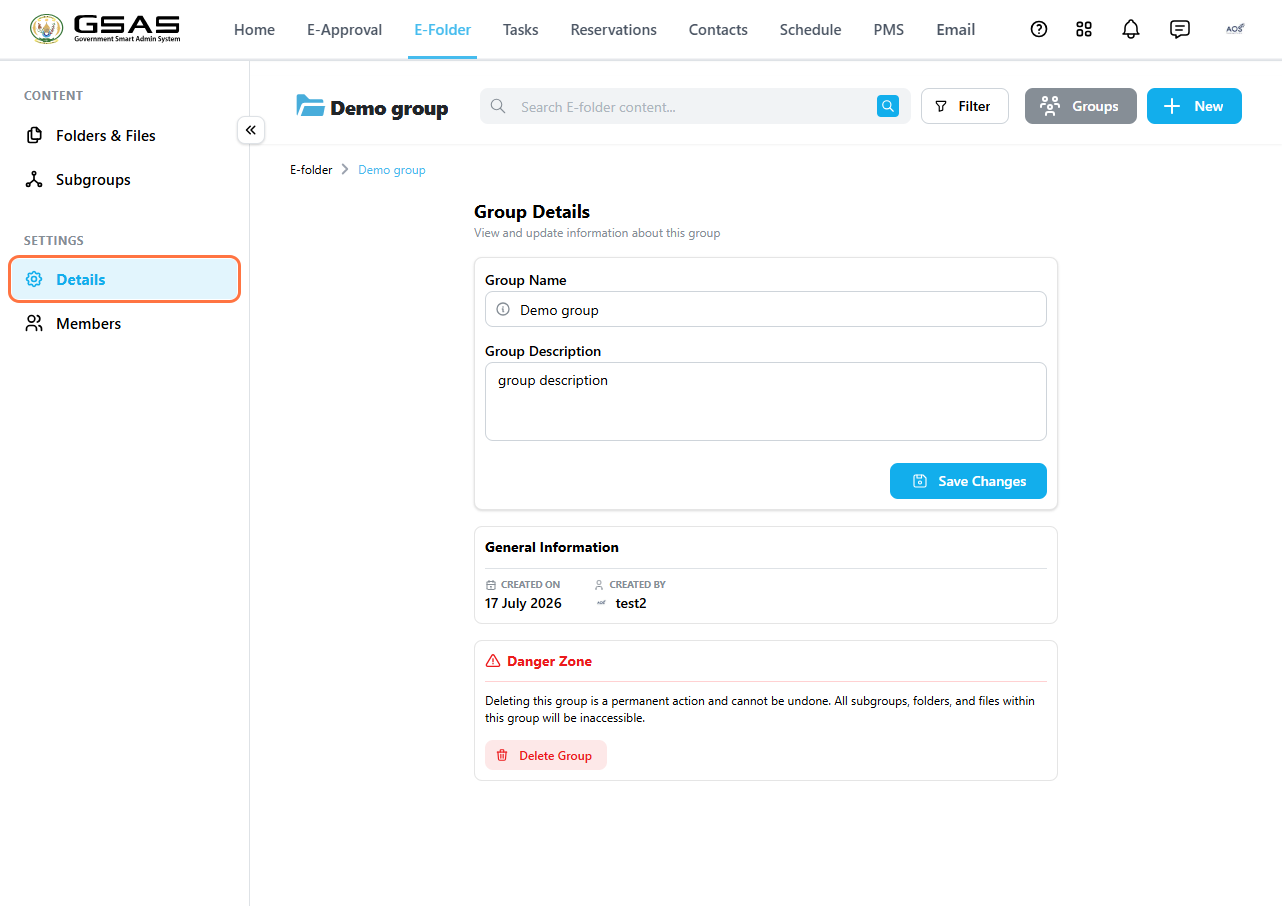
Group details — only the group creator can edit the group name and description, or delete the group.
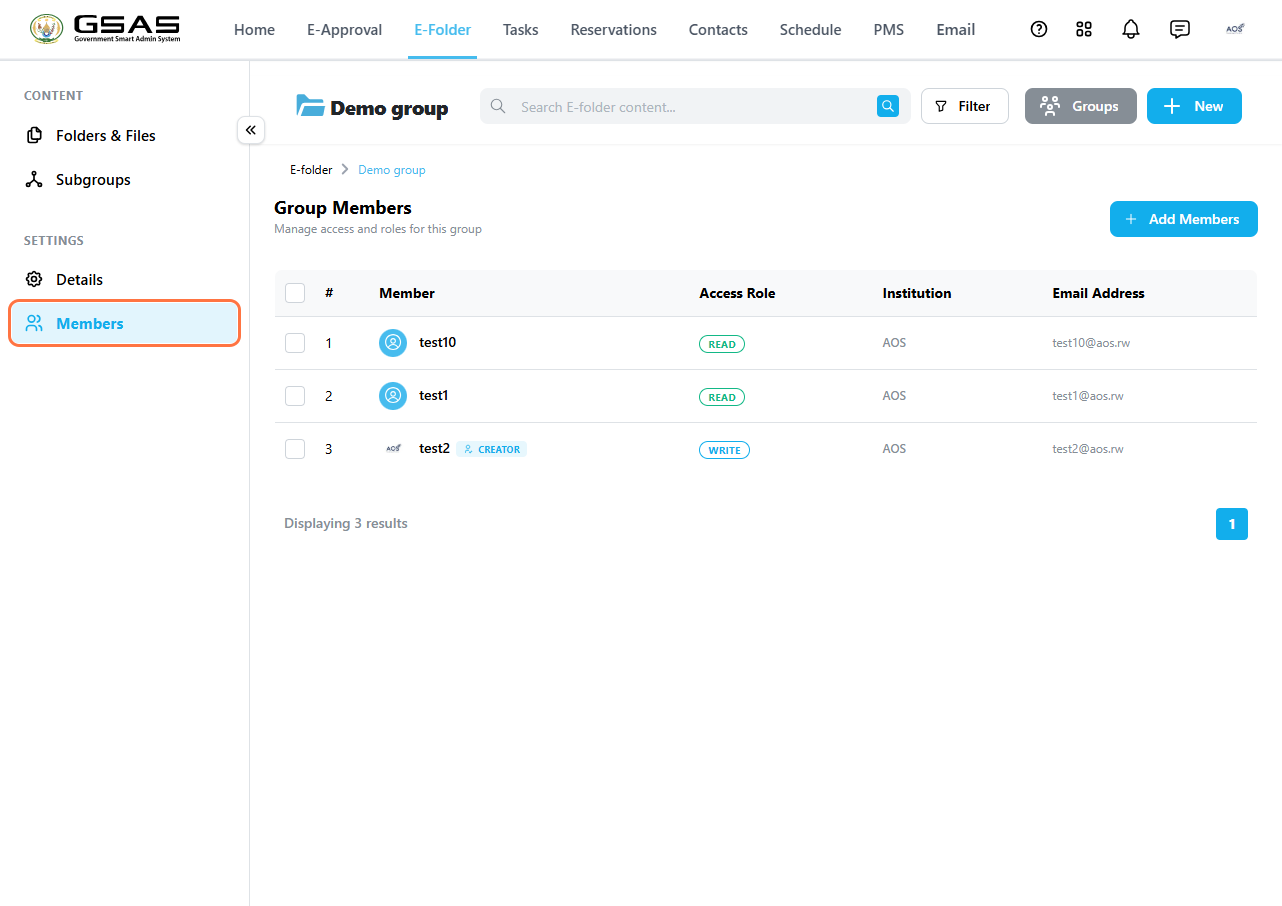
Members — manage who is in the group and what they can do.
Managing members
Click Members in the sidebar to see a list of all group members, their access role, institution, and email address.
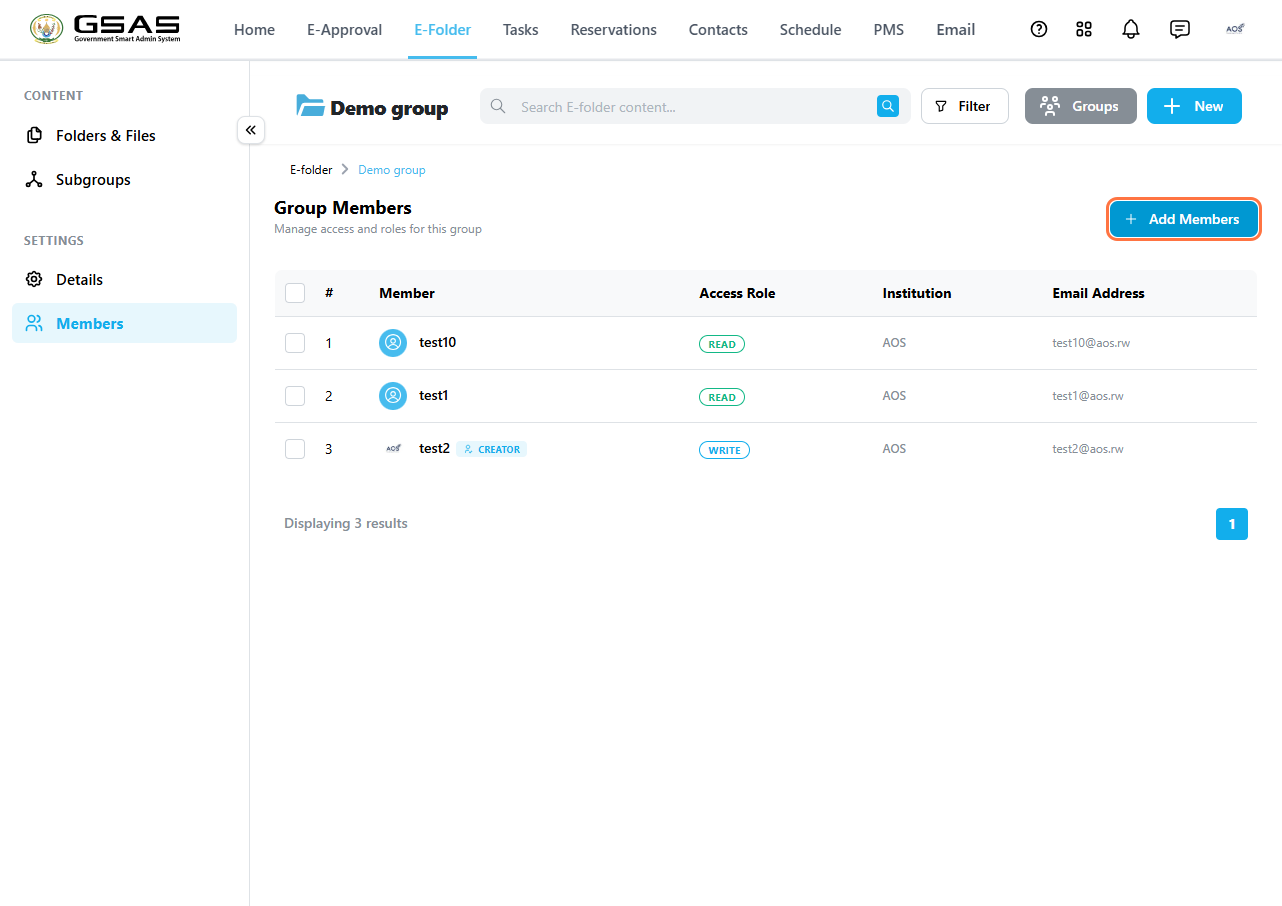
- To add members, click + Add Members at the top right and search for users by name.

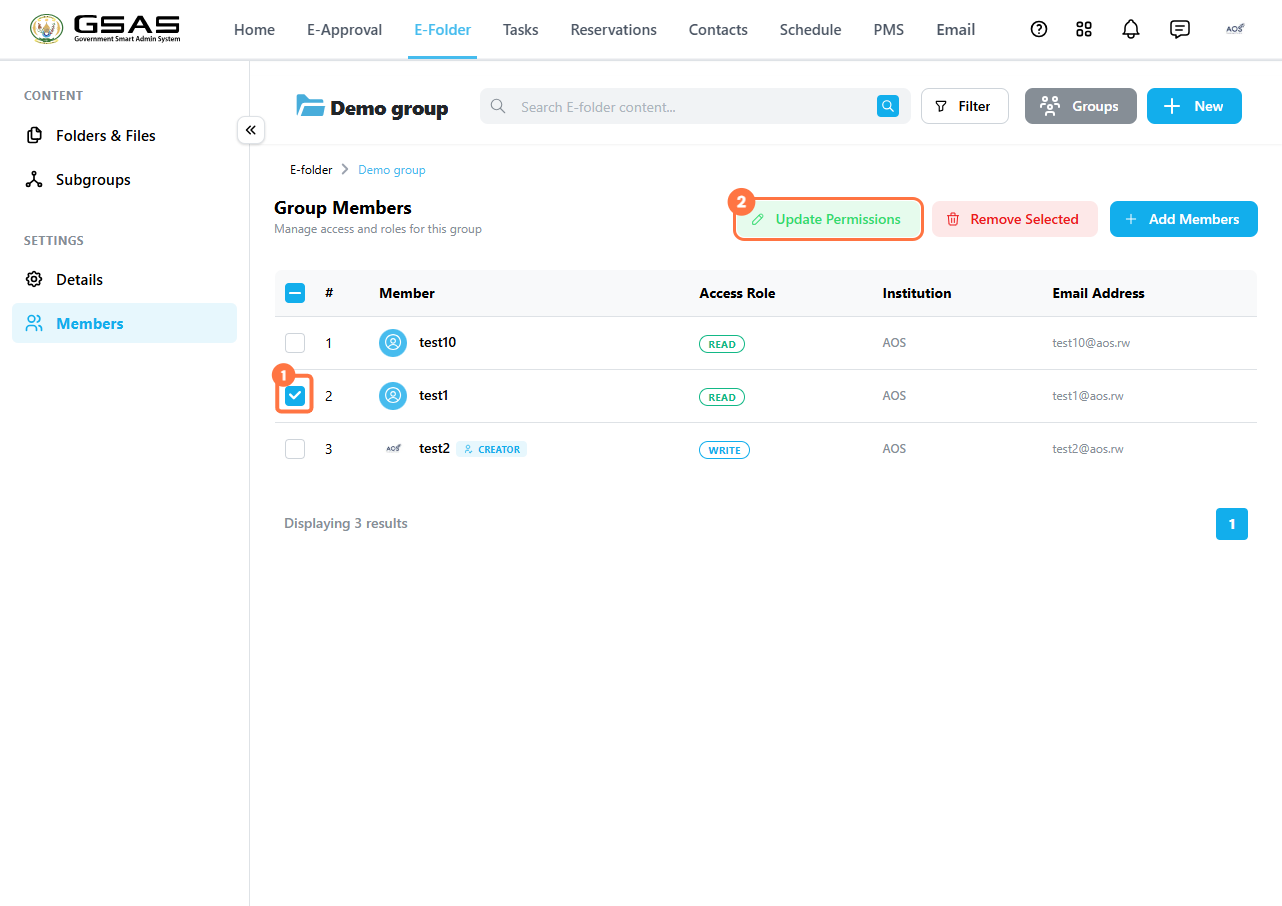
- To update permissions, tick the checkbox next to one or more members and click Update Permissions.
Note: Members with Read access cannot modify files uploaded by others. To grant full access, update their permission to Full Access. 
- To remove members, tick the checkbox next to the member and click Remove Selected.

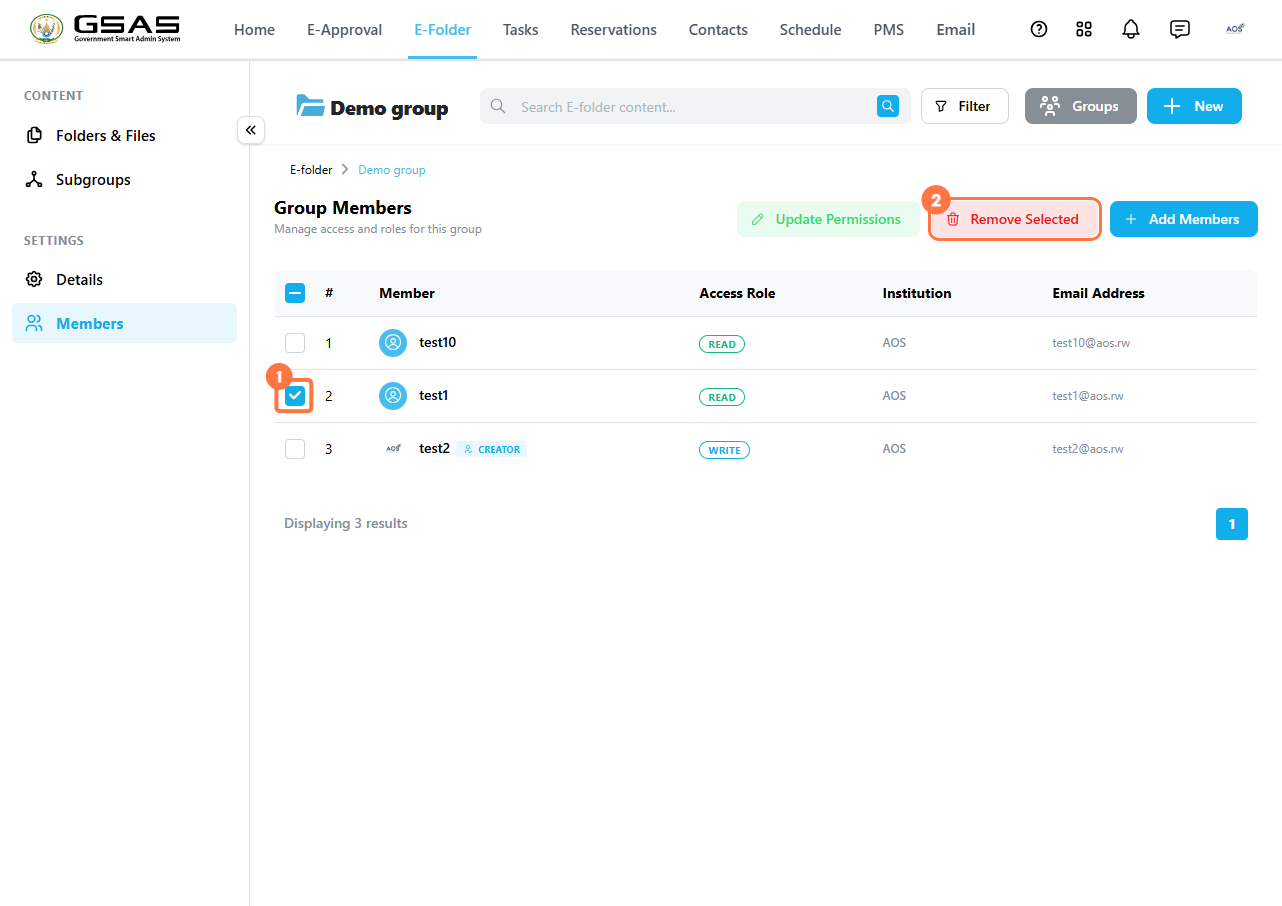
Removed members immediately lose access to the group and all its contents.
Invite to Sign on PDF documents
This page explains how to submit a document from E-Folder for signing using Invite to Sign.
| Before you begin: The document must already be a PDF uploaded to E-Folder, in any folder or subfolder. Only the user who uploaded the document can invite others to sign it. |
Step 1
Select the document
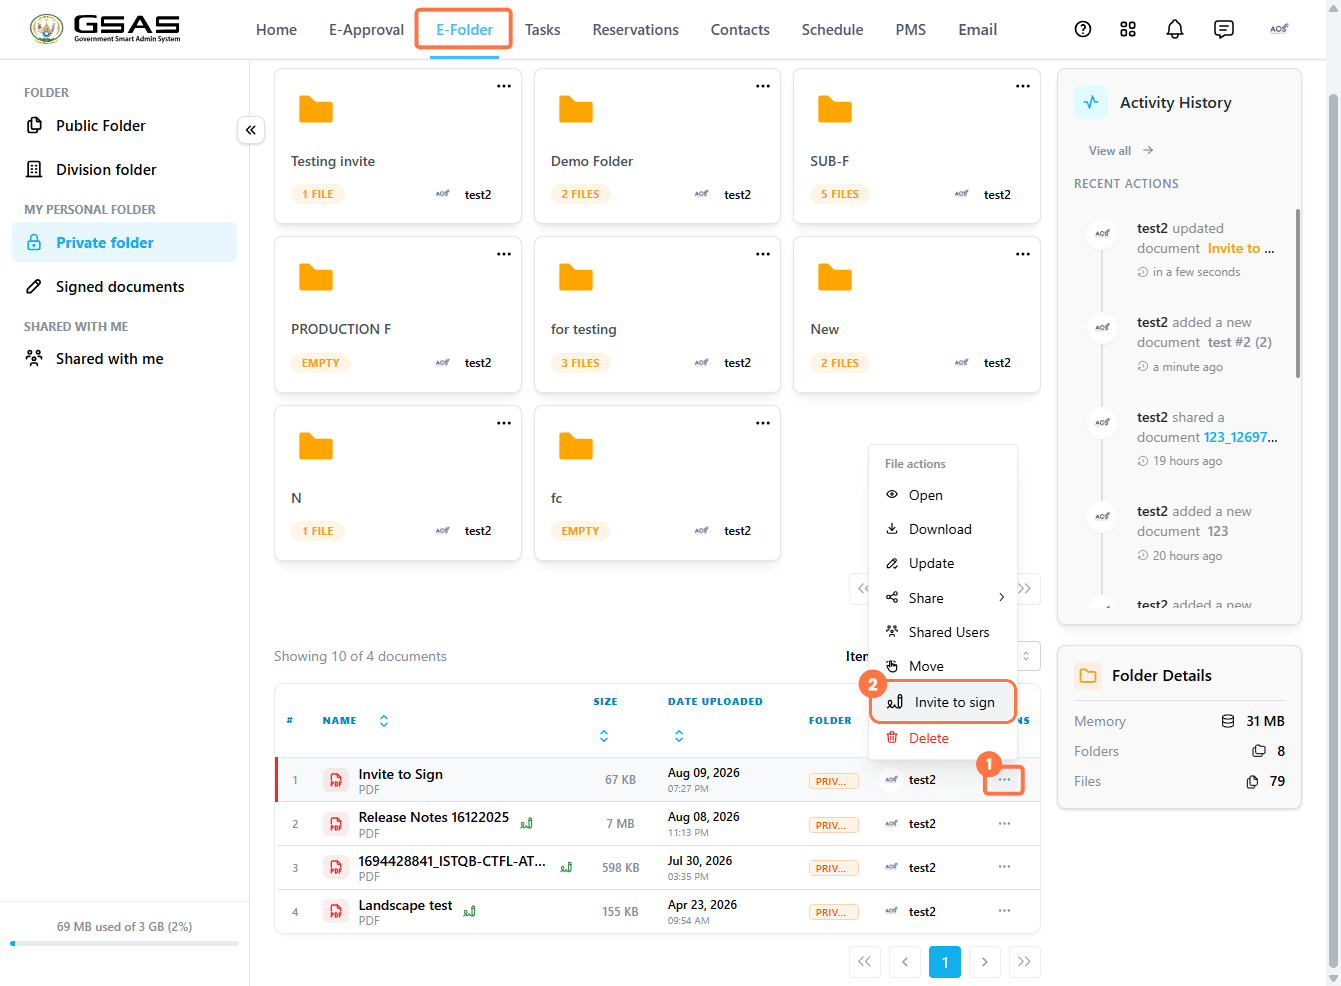
- Go to E-Folder and find the document.
- Click the ⋯ icon on the document row.
- Click Invite to sign.

Step 2
Place a signature field and assign it
The signature editor opens, with the Signature Fields panel on the left and the document on the right.
- Drag the Signature field from the left panel onto the page where the signature should go.

- As soon as you drop the field, the Signers window opens automatically. Search for the user you want to assign and Select them. Only users in your own institution appear here.

- Confirm they appear under Selected Signer, then click Confirm.

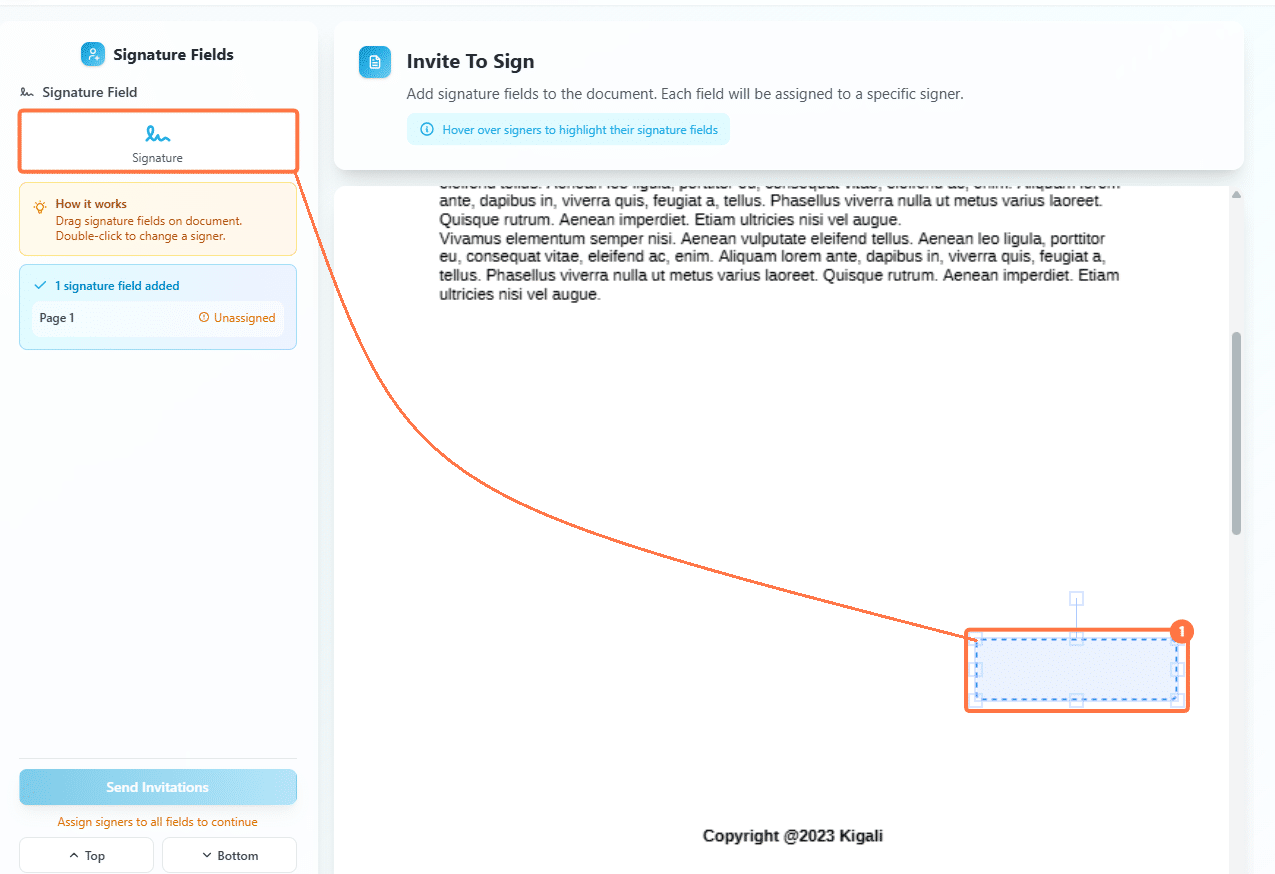
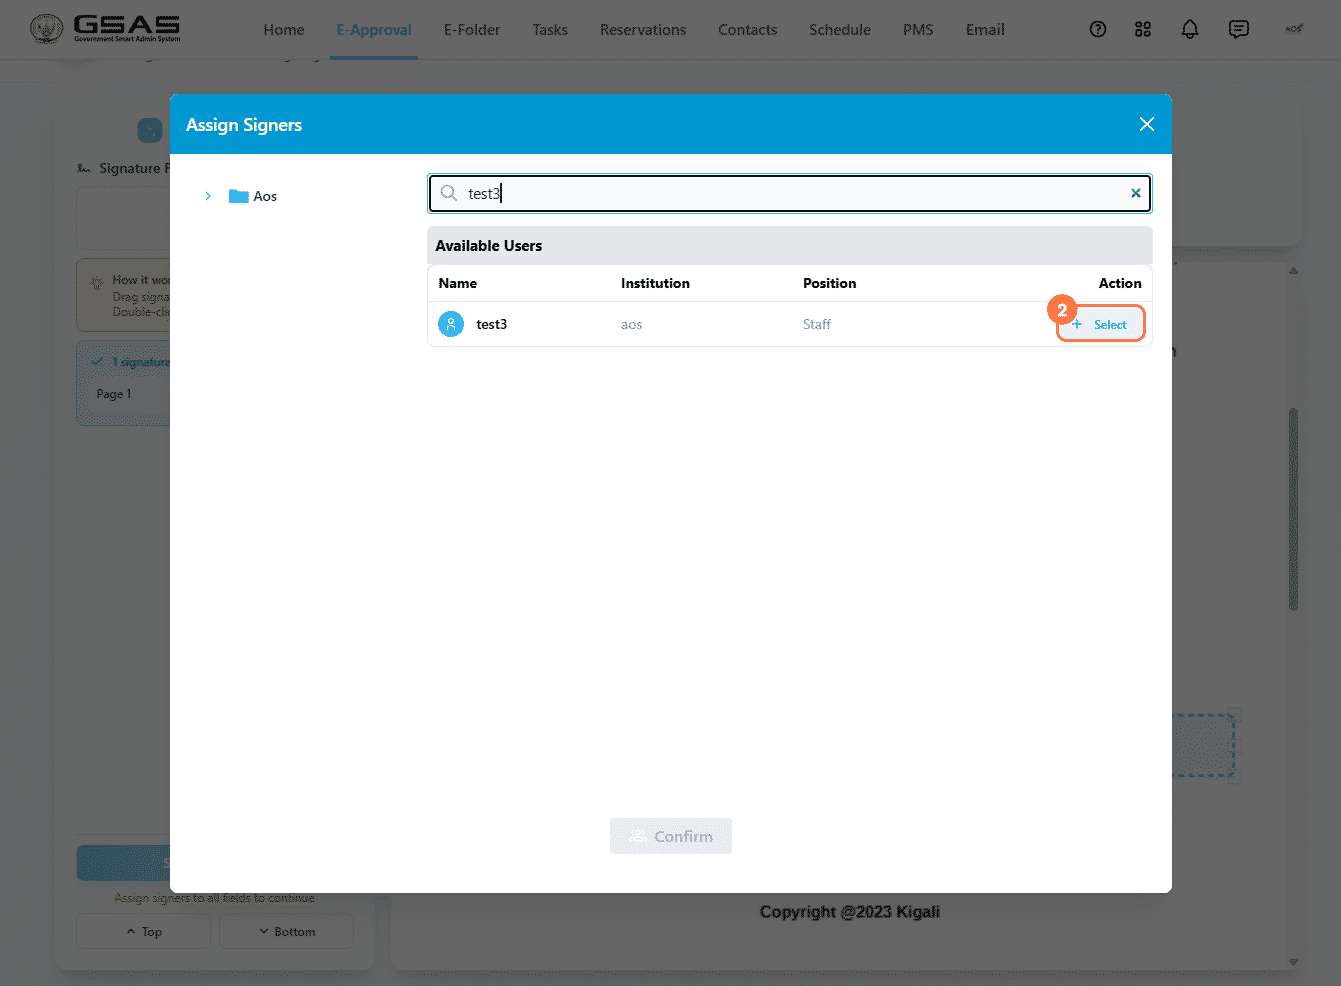
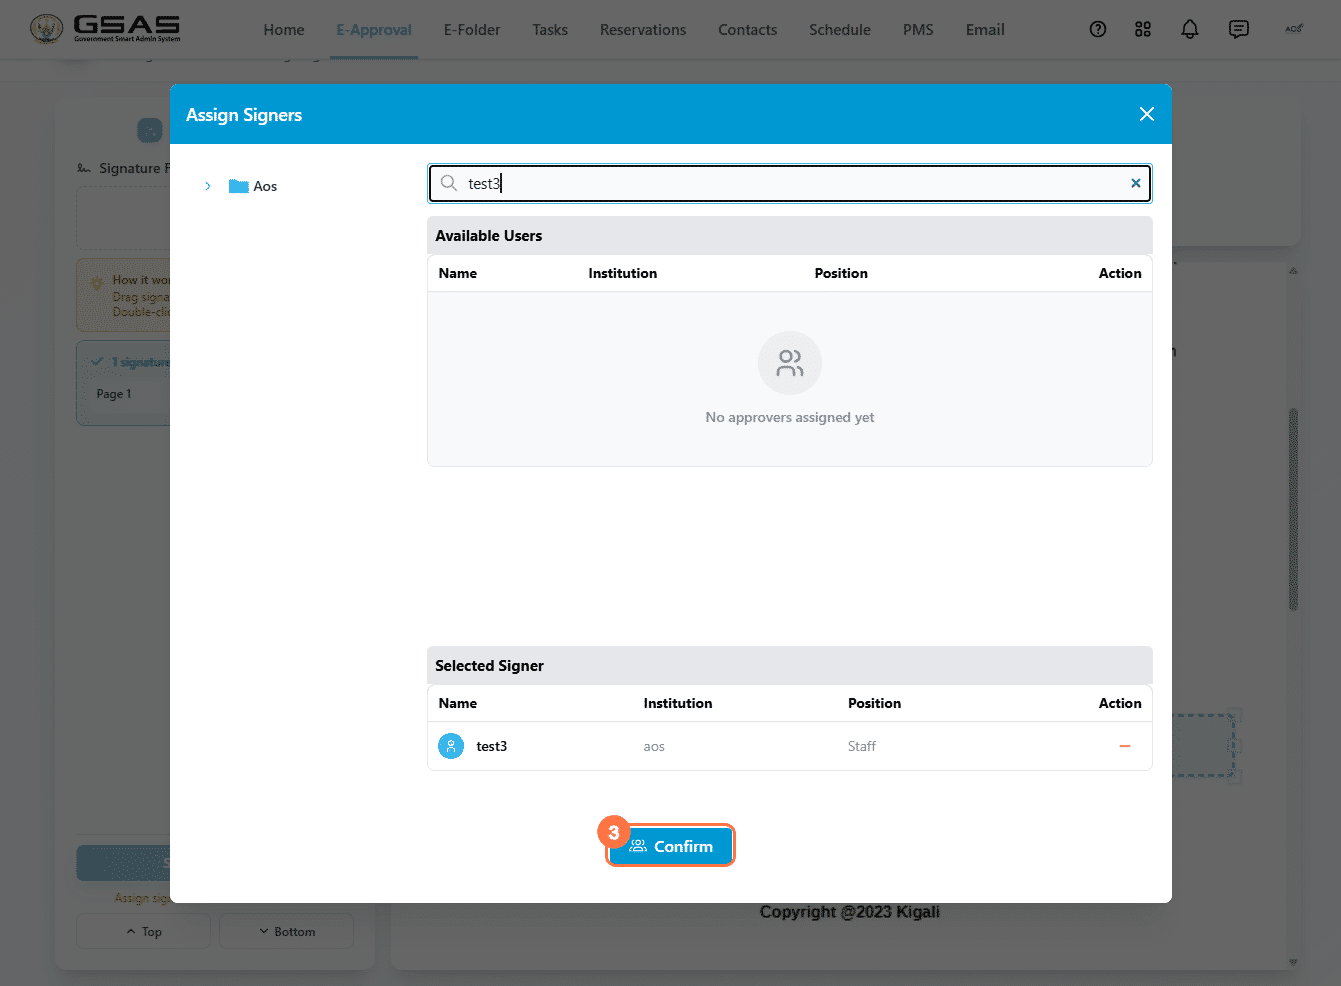
Repeat for every signer you need. You can place more than one signature field on the same page and if the same person needs to sign in more than one spot, just assign them to each field.
| Signing order: Signers sign in the order the fields were assigned, not the order they appear on the page. |
To change who a field is assigned to, double-click it and select a different user.
Step 3
Send the request
Once every field has a signer assigned, click Send Invitations. The first signer is notified by email. As each signer completes their signature, the next signer in the order is notified automatically.
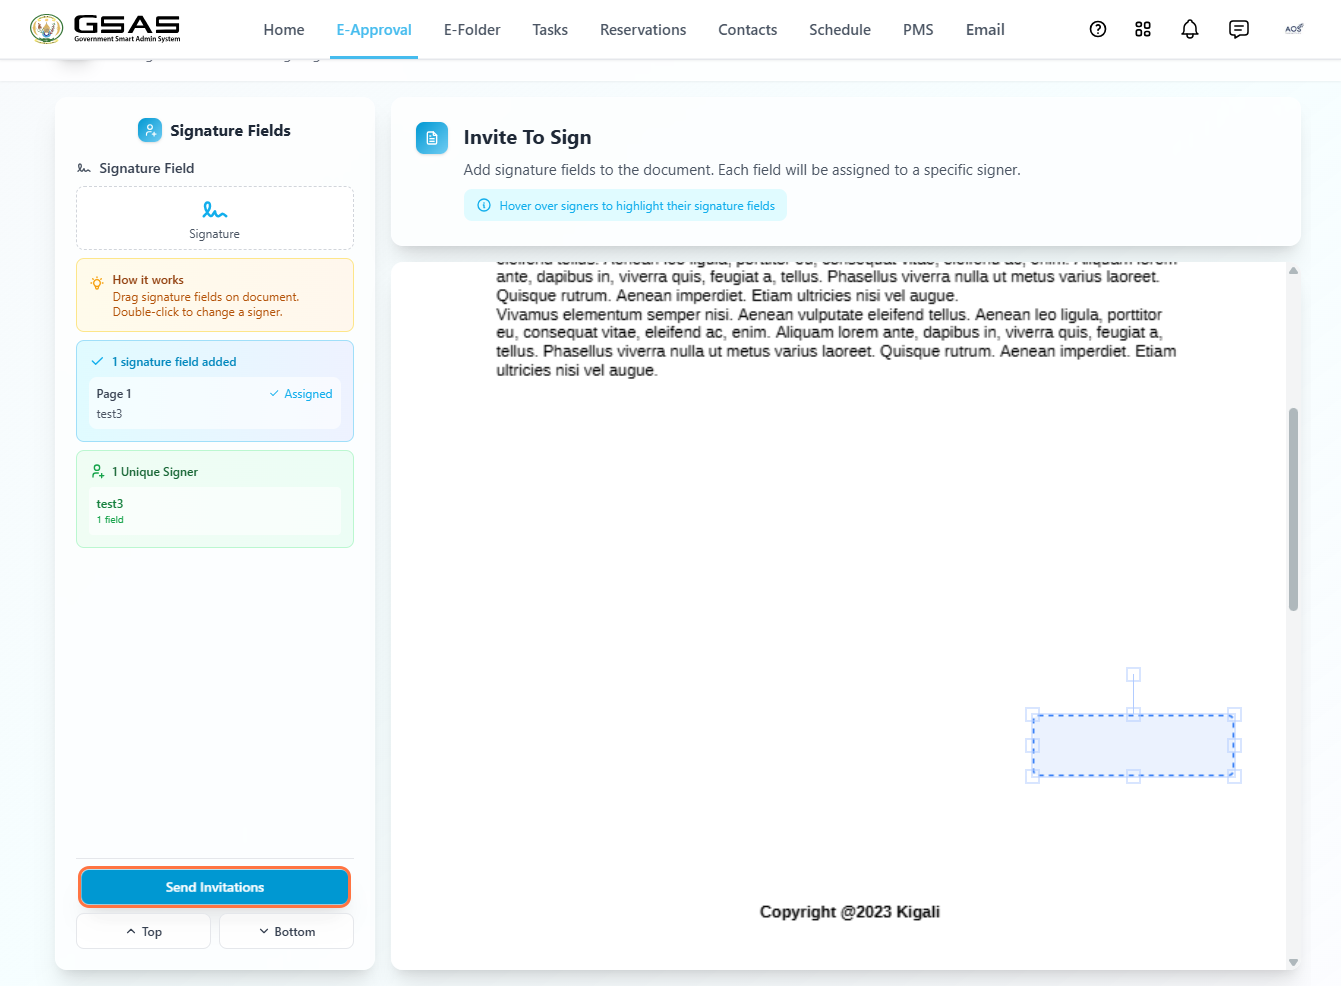
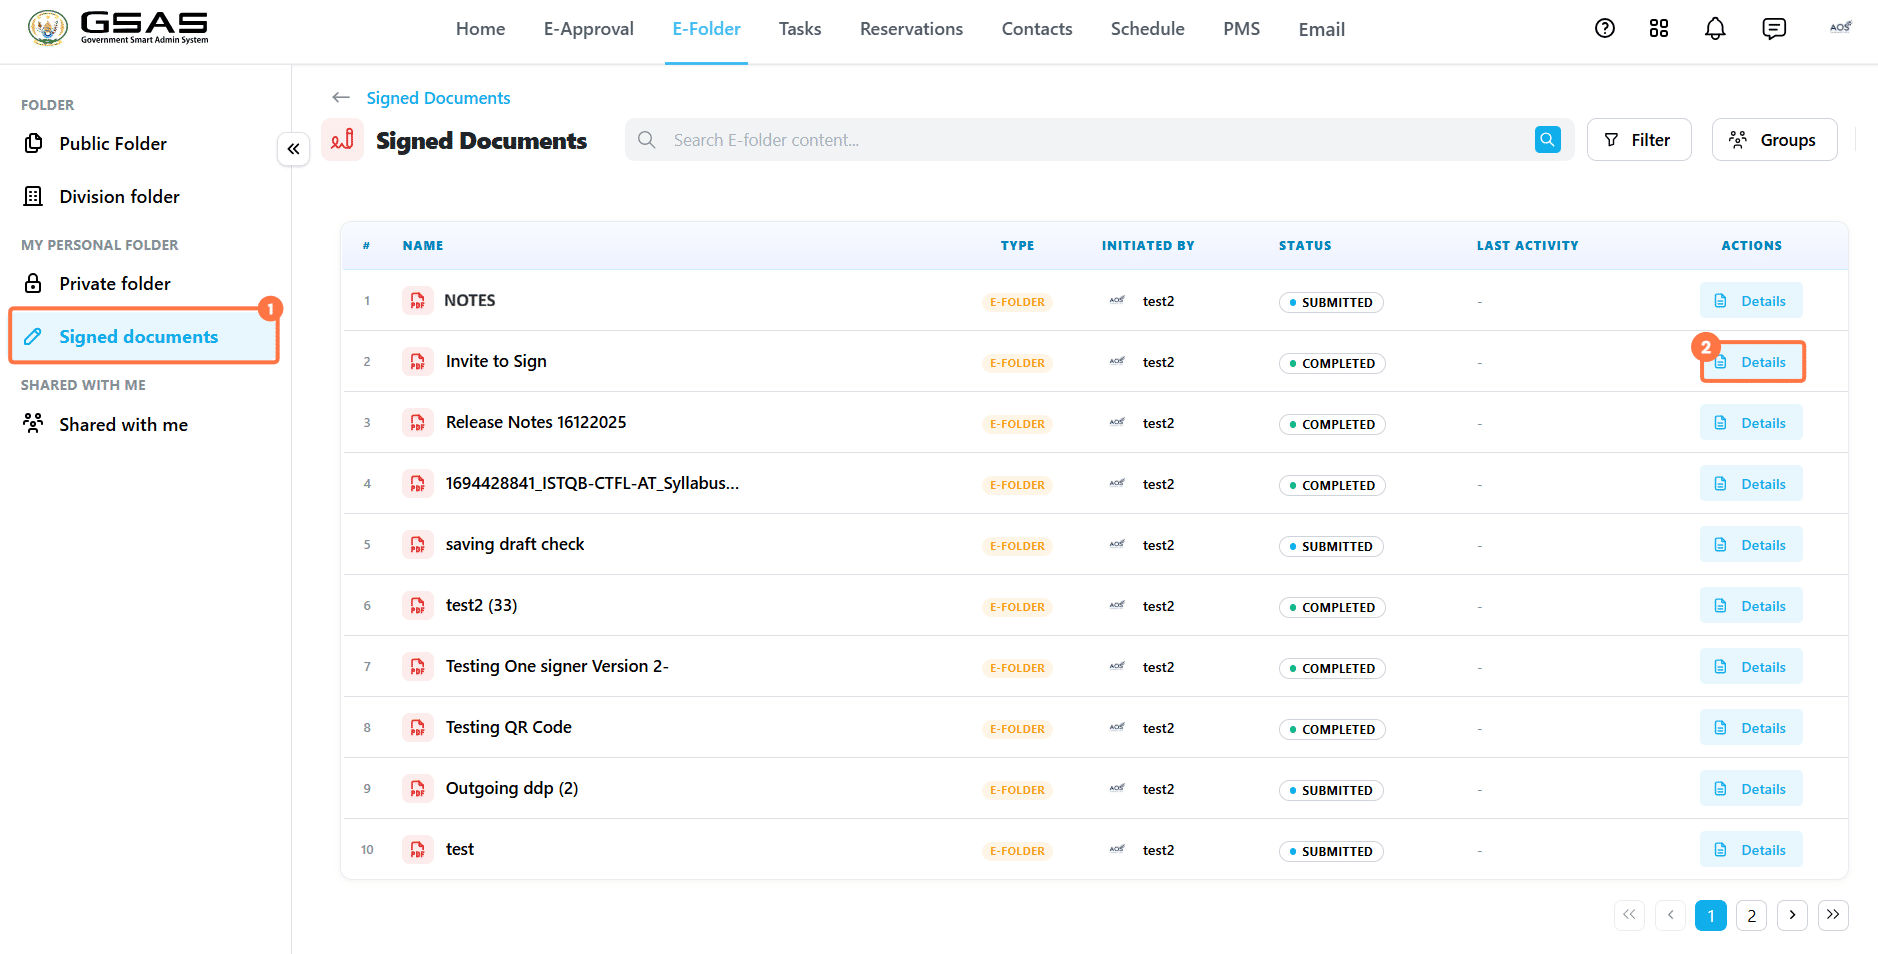
| Note: As soon as you send the invitations, the document appears in your Submitted folder in e-Approval, and in the Signed documents folder in e-Folder. |
Step 4
Signing the document
- Go to E-Approval > Internal > To be processed.
- Open the document.
- Click Sign to proceed, or Reject to decline.
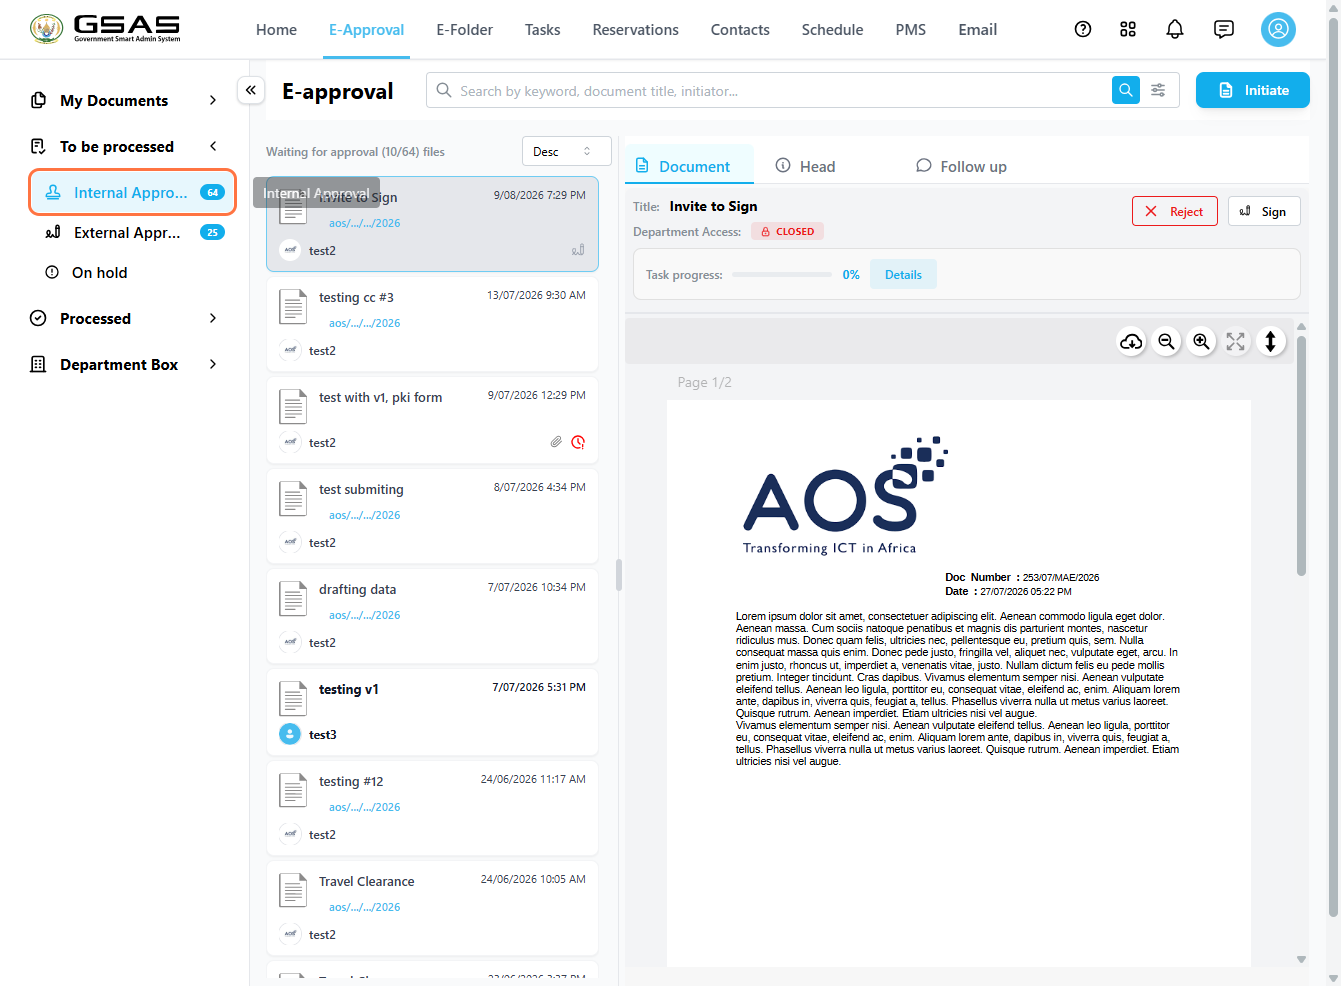
Clicking Sign opens the Document Elements panel, showing the list of signers and where each one stands (signed or pending). Drag your registered signature into the signature field placed for you.
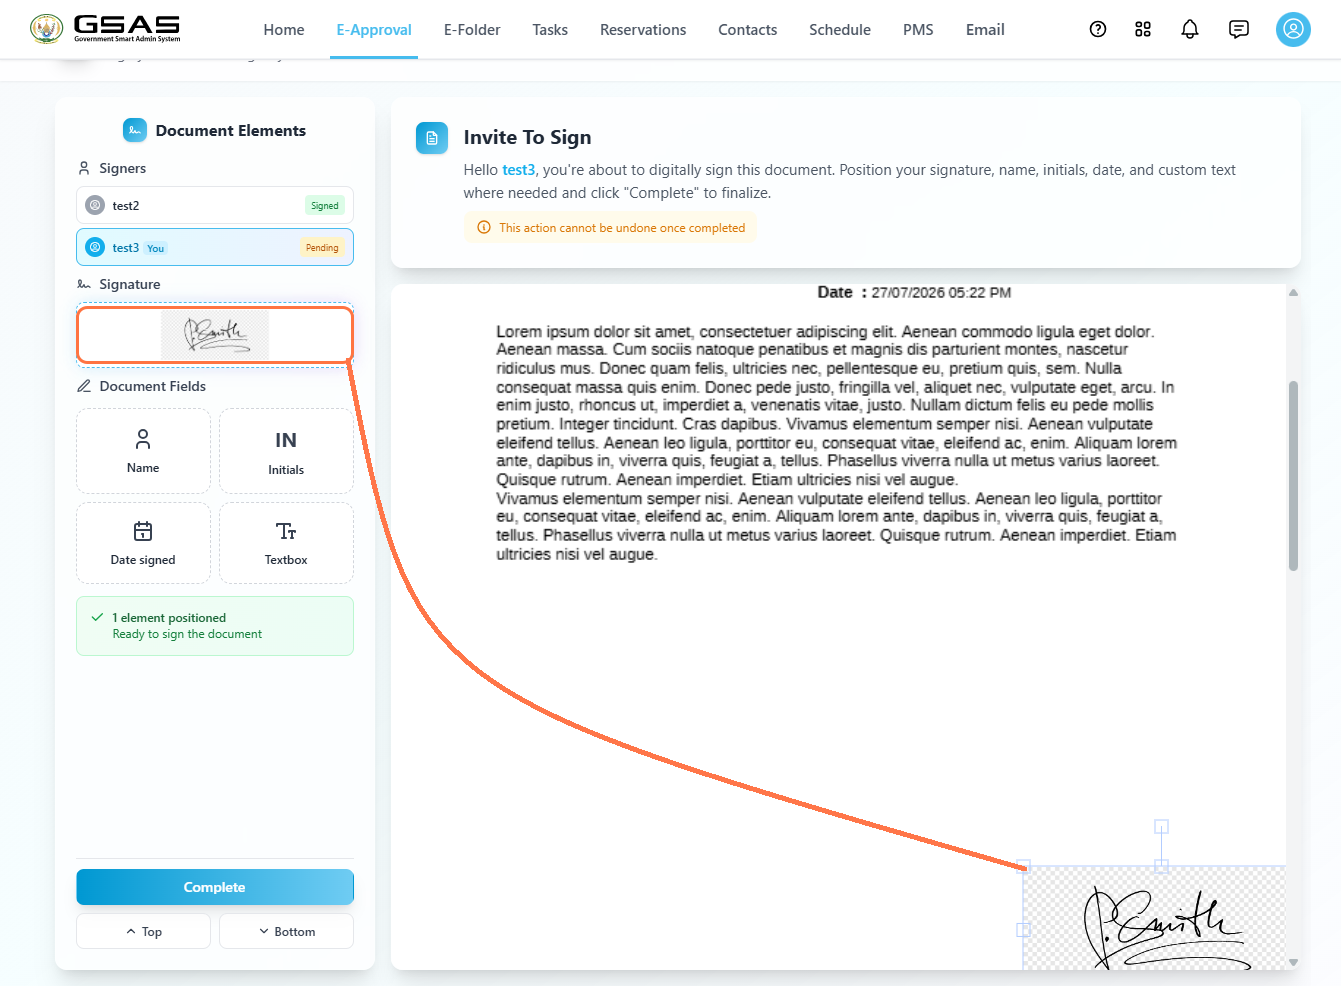
Once you're happy with the position, click Complete.
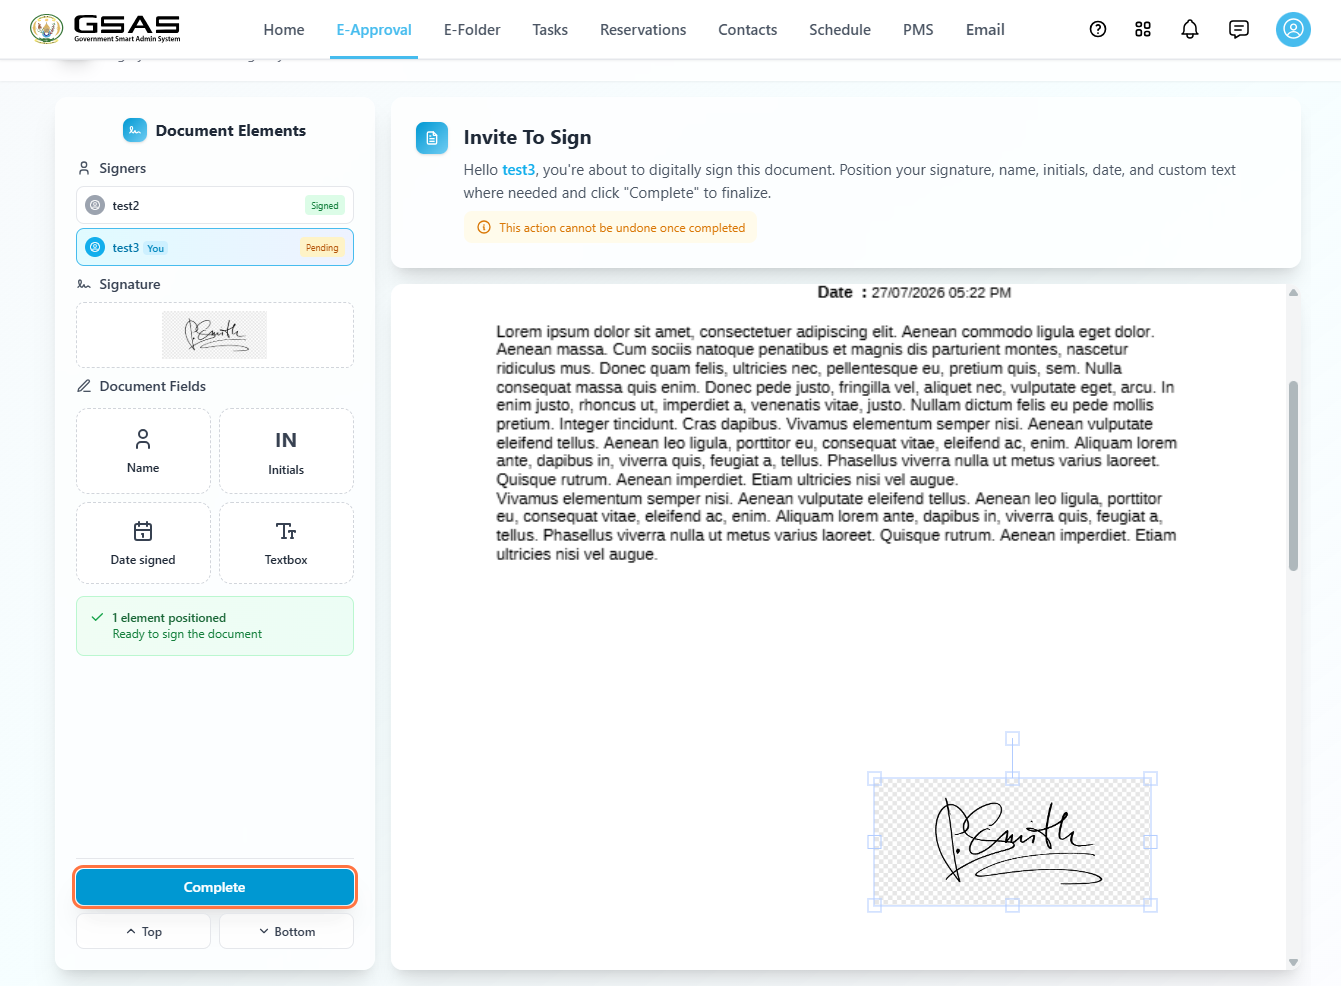
If you'd like, you can also drag optional Document Fields onto the page yourself; Name, Initials, Date signed, or a Textbox. These aren't required. Once you're done, click Complete.
| Rejecting: Clicking Reject sends the document back to the inviter's Rejected folder in E-Approval. |
Every user involved can track the document from E-Approval:
- Inviter: the document sits in Submitted from the moment invitations are sent, and moves to Processed > Completed once every signer has signed.
- Signer : the document sits in To be processed > Internal Approval as it awaits their approval.
- Signer, after signing: it moves to their Ongoing folder if there are signers after them, or to their Completed folder if they were the last signer.
The document is also saved in the inviter's E-Folder > Signed documents.
- Go to E-Folder.
- Under My Personal Folder, click Signed documents.
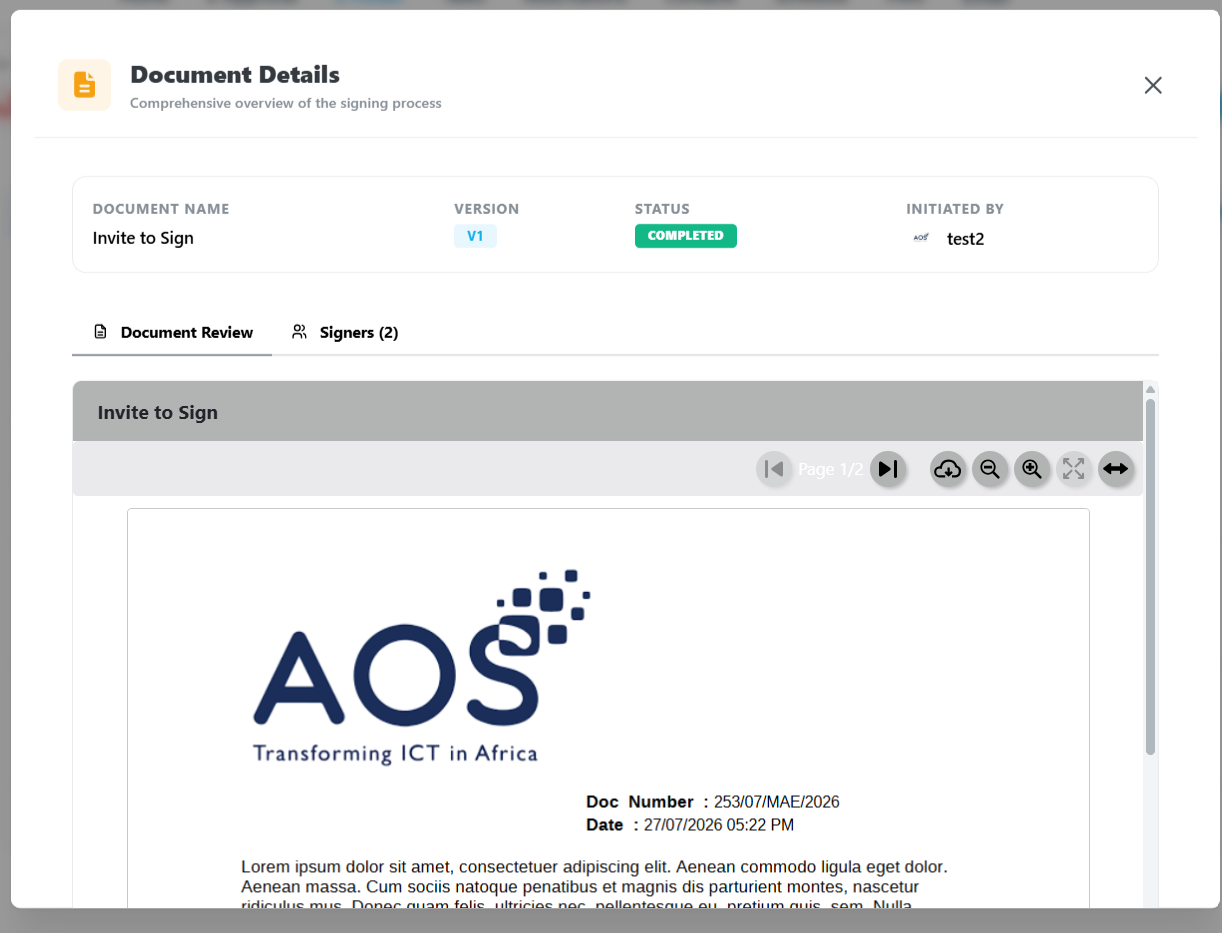
- Click Details next to the document to view it.