e-Approval
Submit documents for approval, track where they stand in the process, and sign off on the ones that land in your queue. This chapter covers the full approval workflow, from initiating a request to closing it out.
- Navigating e-Approval
- Internal Approval Requests
- Outgoing Approval Requests
- Dynamic forms -Travel Clearance
- Managing approval requests
- Registering documents
- Invite to sign on Received PDF documents
- Share document as Task
- Sender and Receiver Manager Controls
Navigating e-Approval
The E-Approval module allows you to create and submit approval requests digitally within GSAS. Instead of handling physical documents around the office, everything is done within the system, from drafting and submitting a request to getting it approved and finalized.
Folder Reference
What each folder in the e-Approval module contains and what you can expect to find there.
My Documents
Documents you have created yourself.
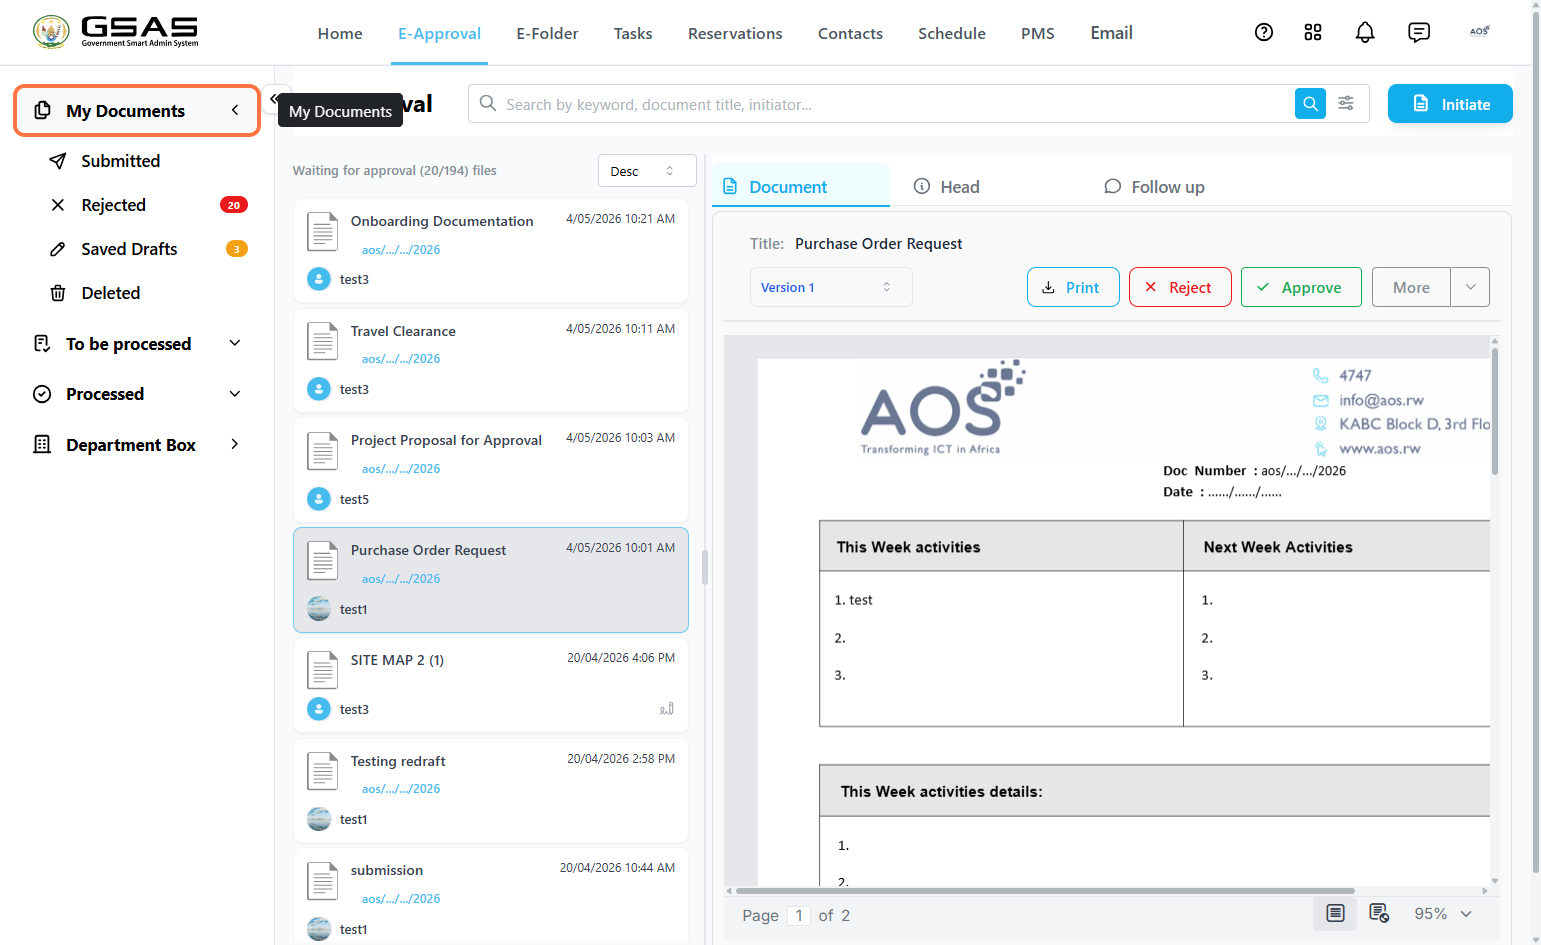
| Submitted | Documents you have submitted for approval. |
| Rejected | Documents that have been rejected by an approver. Once you edit and resubmit a rejected document, it is removed from this folder and updated to a new version. |
| Saved Drafts | Documents you have saved but not yet submitted. Also where reverted submissions are returned to for further editing. |
| Deleted | Drafts you have deleted. |
To Be Processed
Documents assigned to you that require your action.
| Internal Approval | Internal requests waiting for your approval. You will be notified when a document reaches your turn in the approval line. |
| External Approval | Requests received from external institutions waiting for your approval. External approvals are only visible to you once the Receiver Manager of your institution forwards it to you. |
| On Hold | Documents you have placed on hold while you decide whether to approve or reject them. You can return to them at any time to take action. |
| Outgoing Sender Manager only | Approved documents ready to be dispatched to external institutions. Only visible to users with the Sender Manager role. |
Processed
Documents you have already taken action on and are no longer waiting for your review.
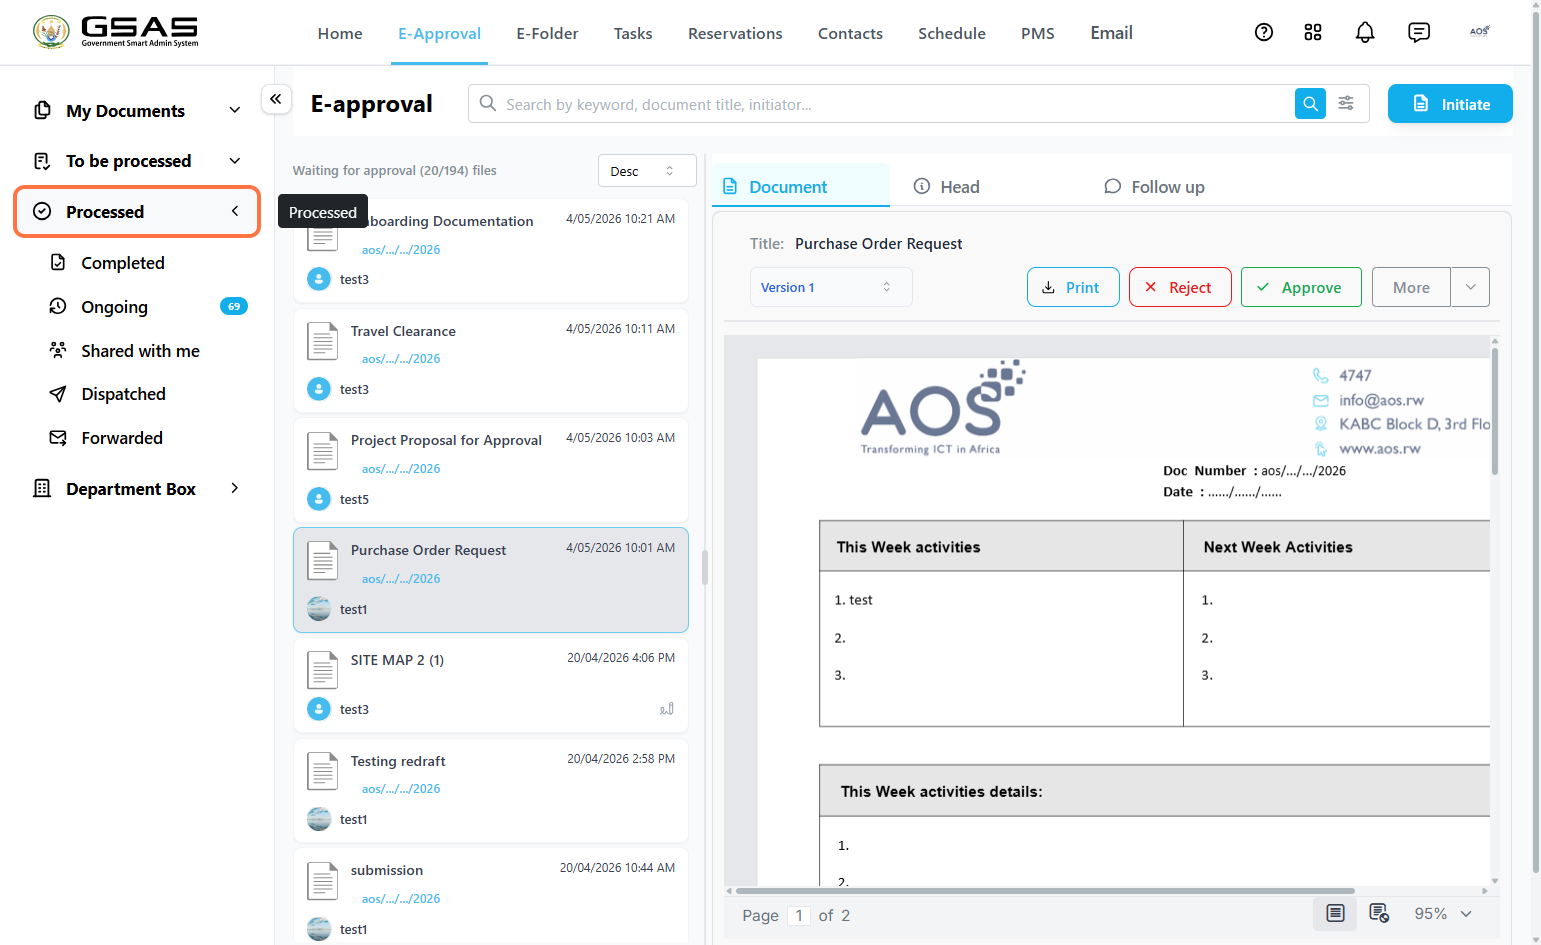
| Completed | Documents that have been approved by all approvers in the line and are fully completed. |
| Ongoing | Documents you have already approved but are still moving through the remaining approvers in the line. |
| Shared with Me | Completed documents that other users have shared with you. |
| Dispatched Sender Manager only | Documents that have been sent out to external institutions from the Outgoing folder. Only visible to users with the Sender Manager role. |
| Forwarded | External documents you have received and forwarded on to other internal users. |
Department Box
Official documents exchanged between your institution and external institutions, including physical documents registered for record-keeping. Visible to all users in your department.
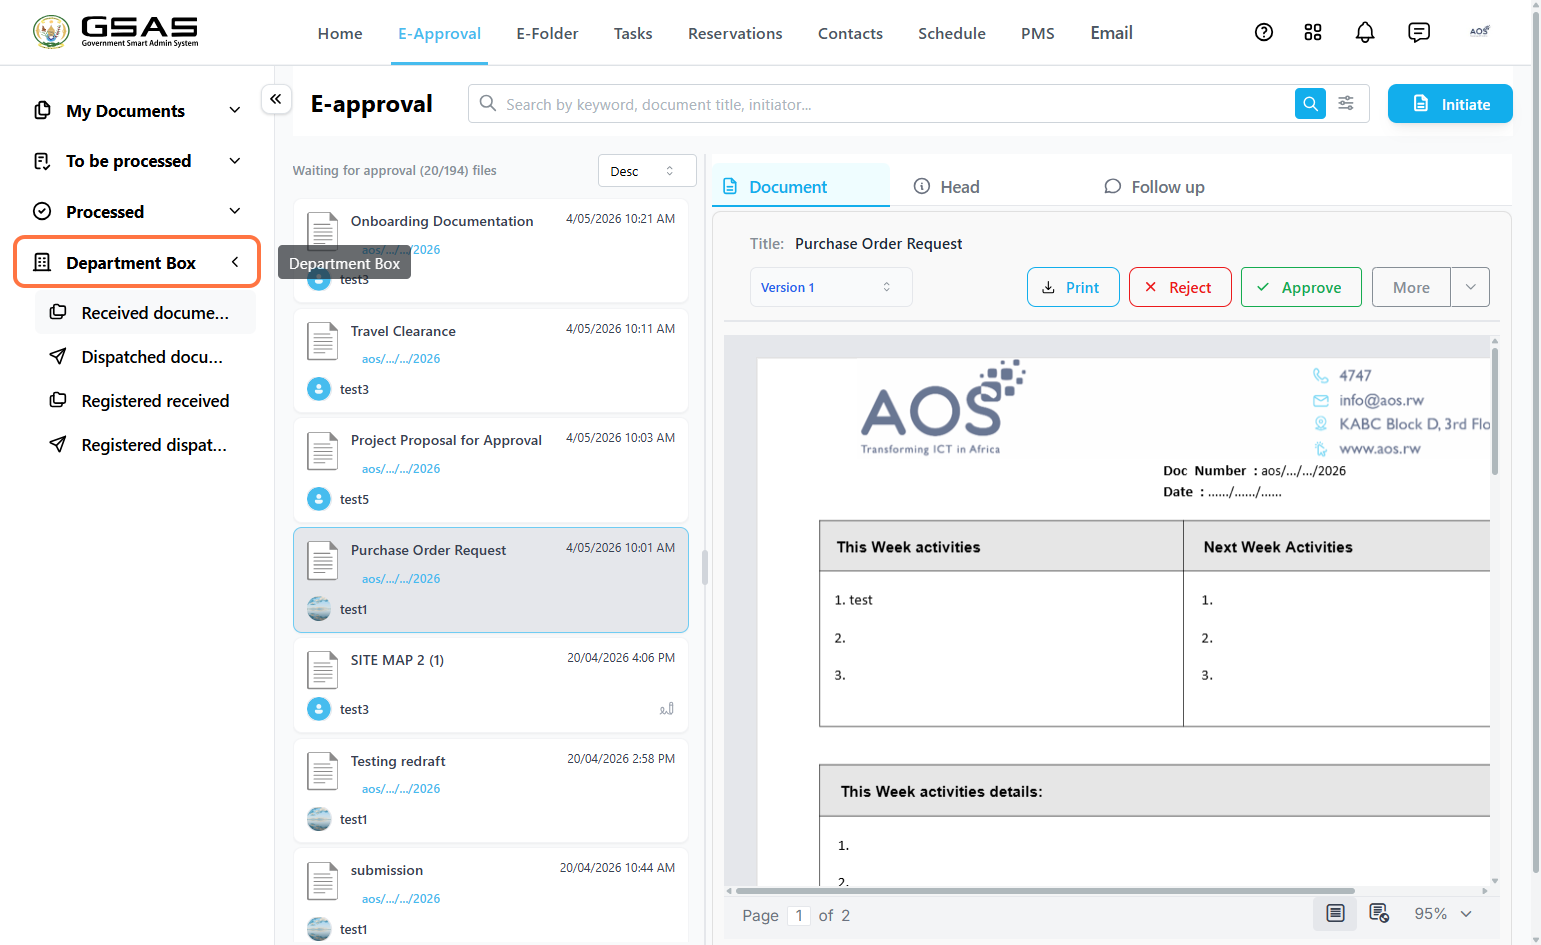
| Received Documents | Official documents received from external institutions. |
| Dispatched Documents | Official documents your institution has dispatched to external institutions. |
| Registered Received | All registered documents received from external institutions. |
| Registered Dispatched | All registered documents dispatched to external institutions. |
Searching and Filtering
Every folder in E-Approval has a search bar at the top to help you quickly find a document.
- Search
Type a keyword into the search bar to search by document title, then press Enter or click the search icon.
- Filters
Click the filter icon next to the search bar to open the filter panel. Available filters include:
| Document Title | Filter by the title of the document. |
| Document Reference Number | Filter by the reference number assigned once a document is completed. |
| Initiated By | Filter by the person who created the request. |
| Approved By | Filter by an approver who has acted on the request. |
| Form Name | Filter by the form template used to create the request. |
| Date From / Date To | Filter by a date range. |
| Attachments | Filter by whether the document has an attachment or not. |
| Document Status | Filter by the document's current status. |
| Note: Not all filters apply to every folder. |
Once you have set your filters, click Search to apply them. Click Clear All to reset the filter panel.
Internal Approval Requests
Submitting an Internal Approval Request:
This page covers everything you need to get an internal approval request submitted.
Step 1
Initiate
Click on the Initiate button in the top right corner of the E-Approval page.

Step 2
Choose a form template
A dialog will appear listing available templates. Select the one that matches your request type and click it to proceed.
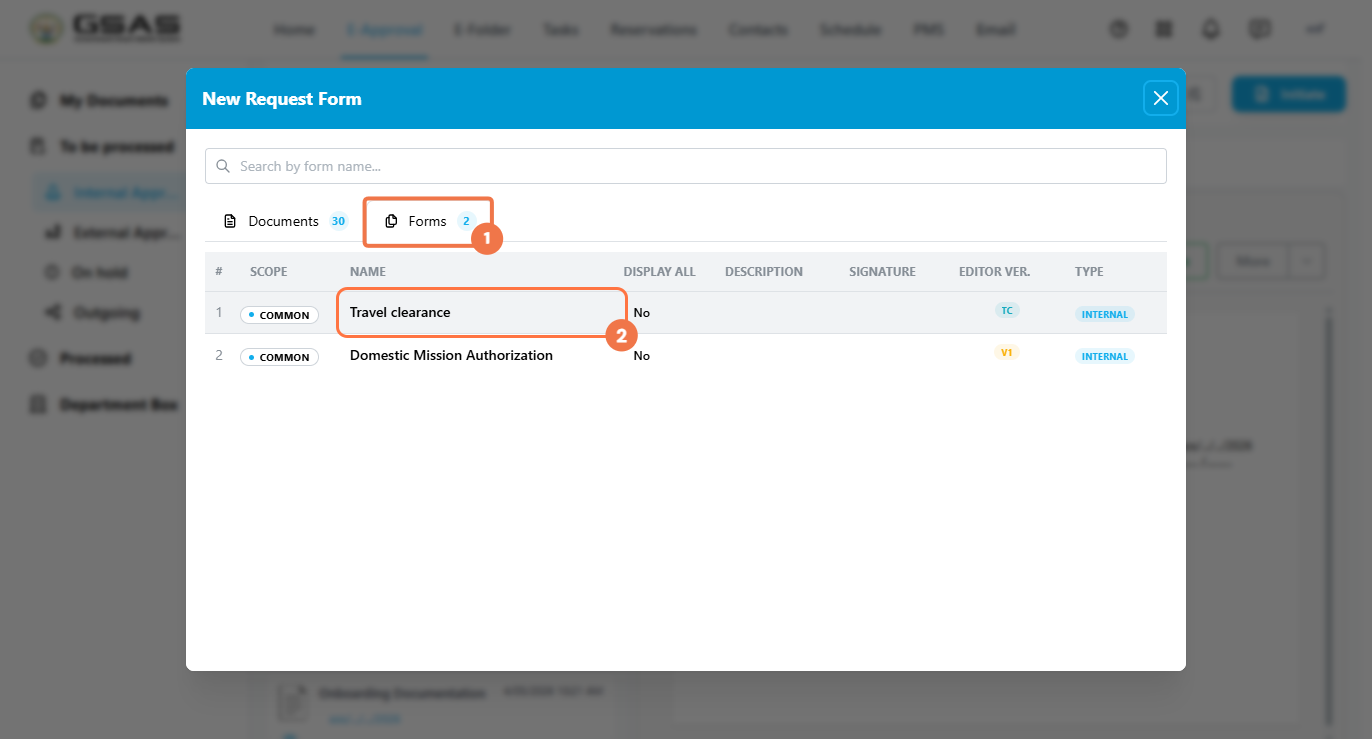
Templates are organized into two tabs: Documents for forms created by your institution's administrator, and Forms for common templates shared across all institutions.
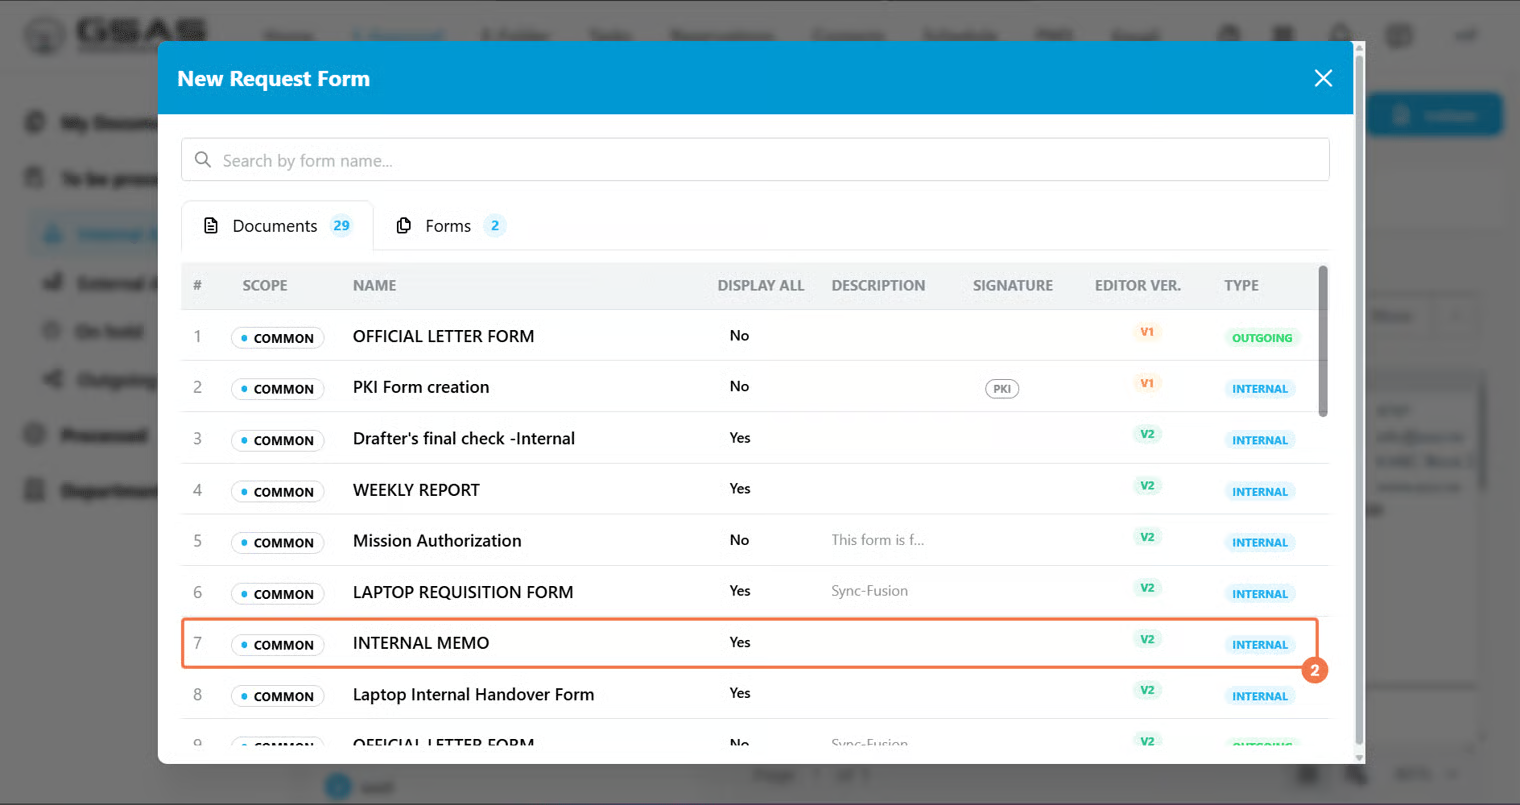
Not sure which template to pick? Use the columns in the list to guide you:
| Scope | Whether the template is common to your whole institution or specific to your department |
| Display All | If Yes, all approvers' and the drafter's signatures appear on the completed document. If No, only the final approver's signature is shown. |
| Signature |
Whether the form requires a PKI signature or not to be submitted/approved. (If you choose to use a PKI form, you will be asked to enter your PKI password before you submit. Learn to register your PKI here) |
| Type | Whether the request is internal or outgoing. |
Step 3
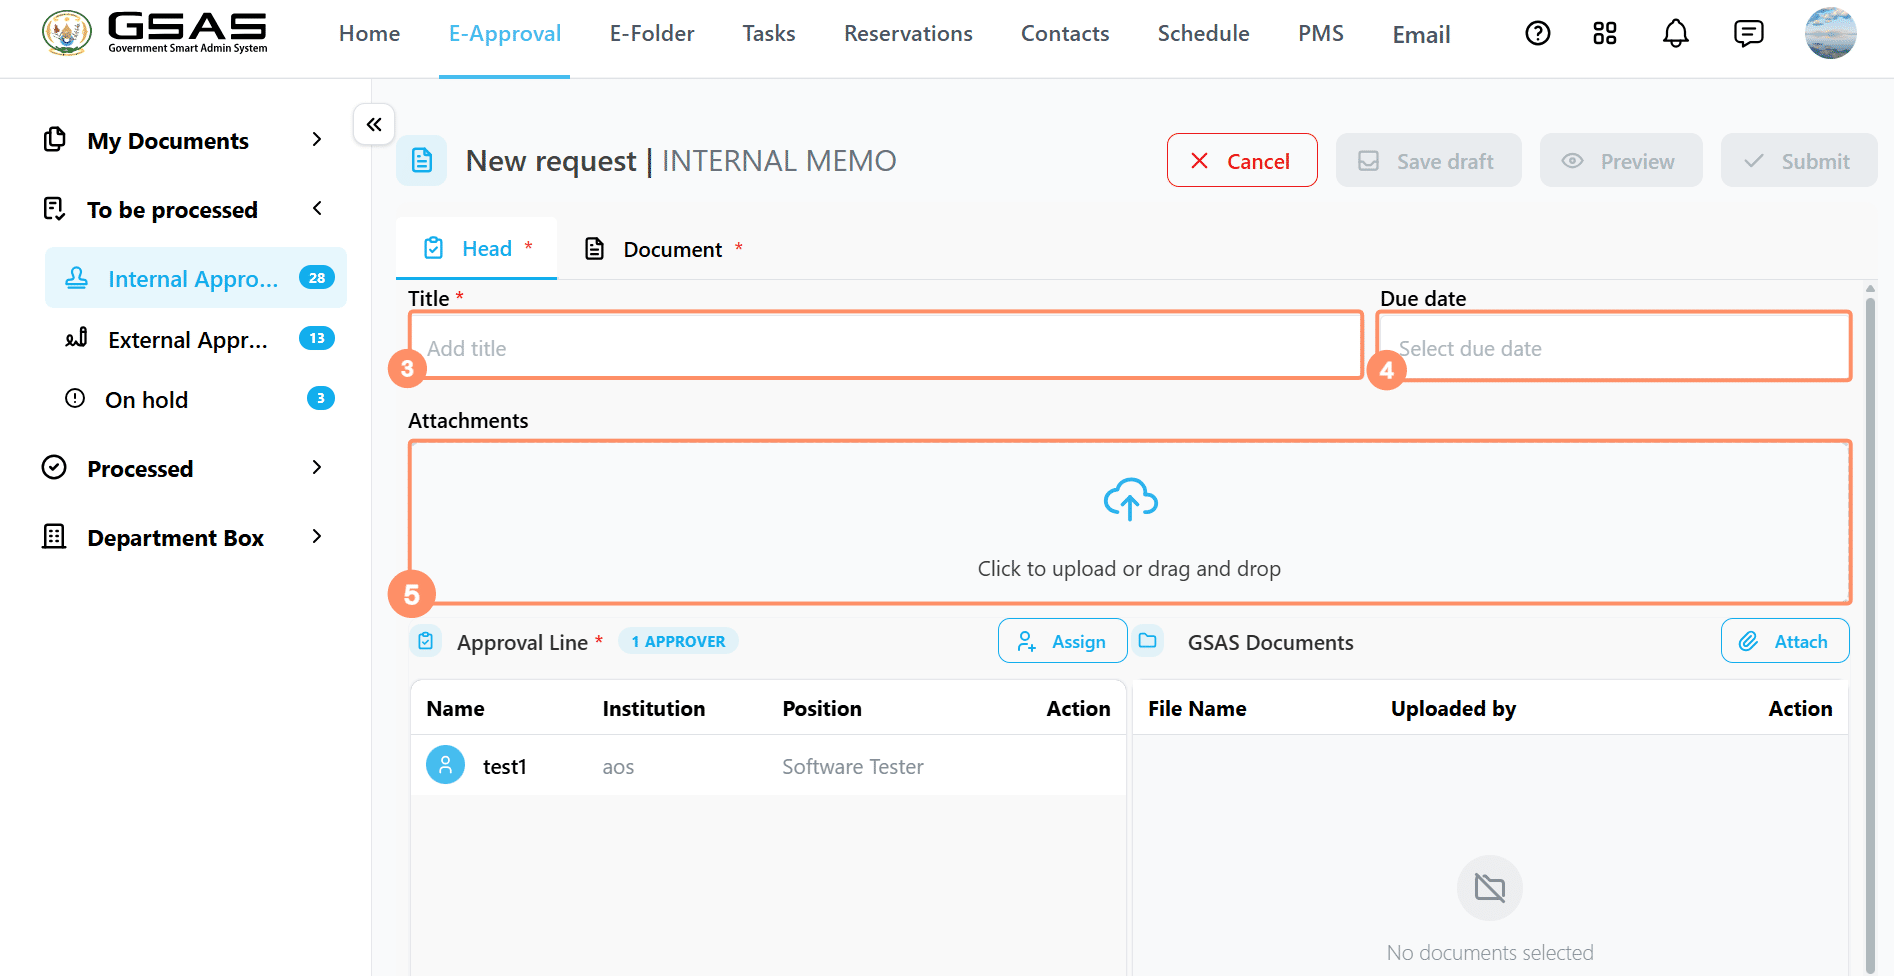
Fill in the Head tab
- Enter a Title for your request and optionally set a Due Date.
- You can also upload any supporting files in the Attachments area. This is not mandatory.
Step 4
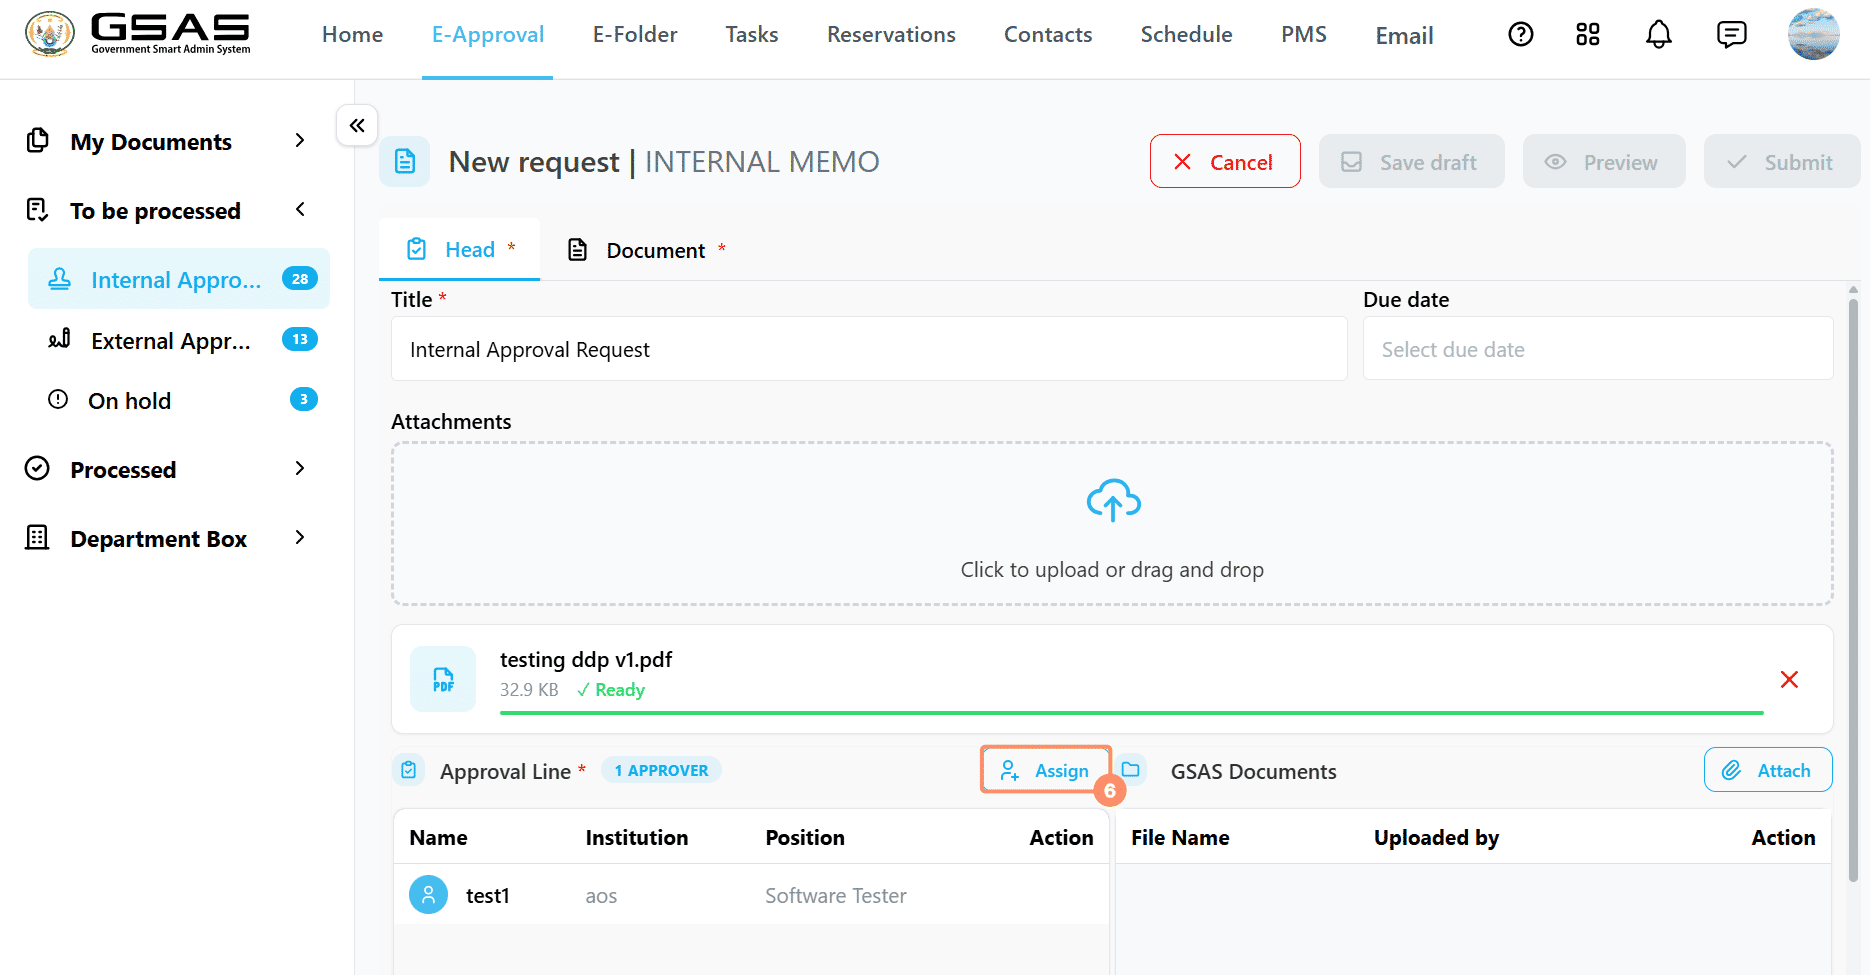
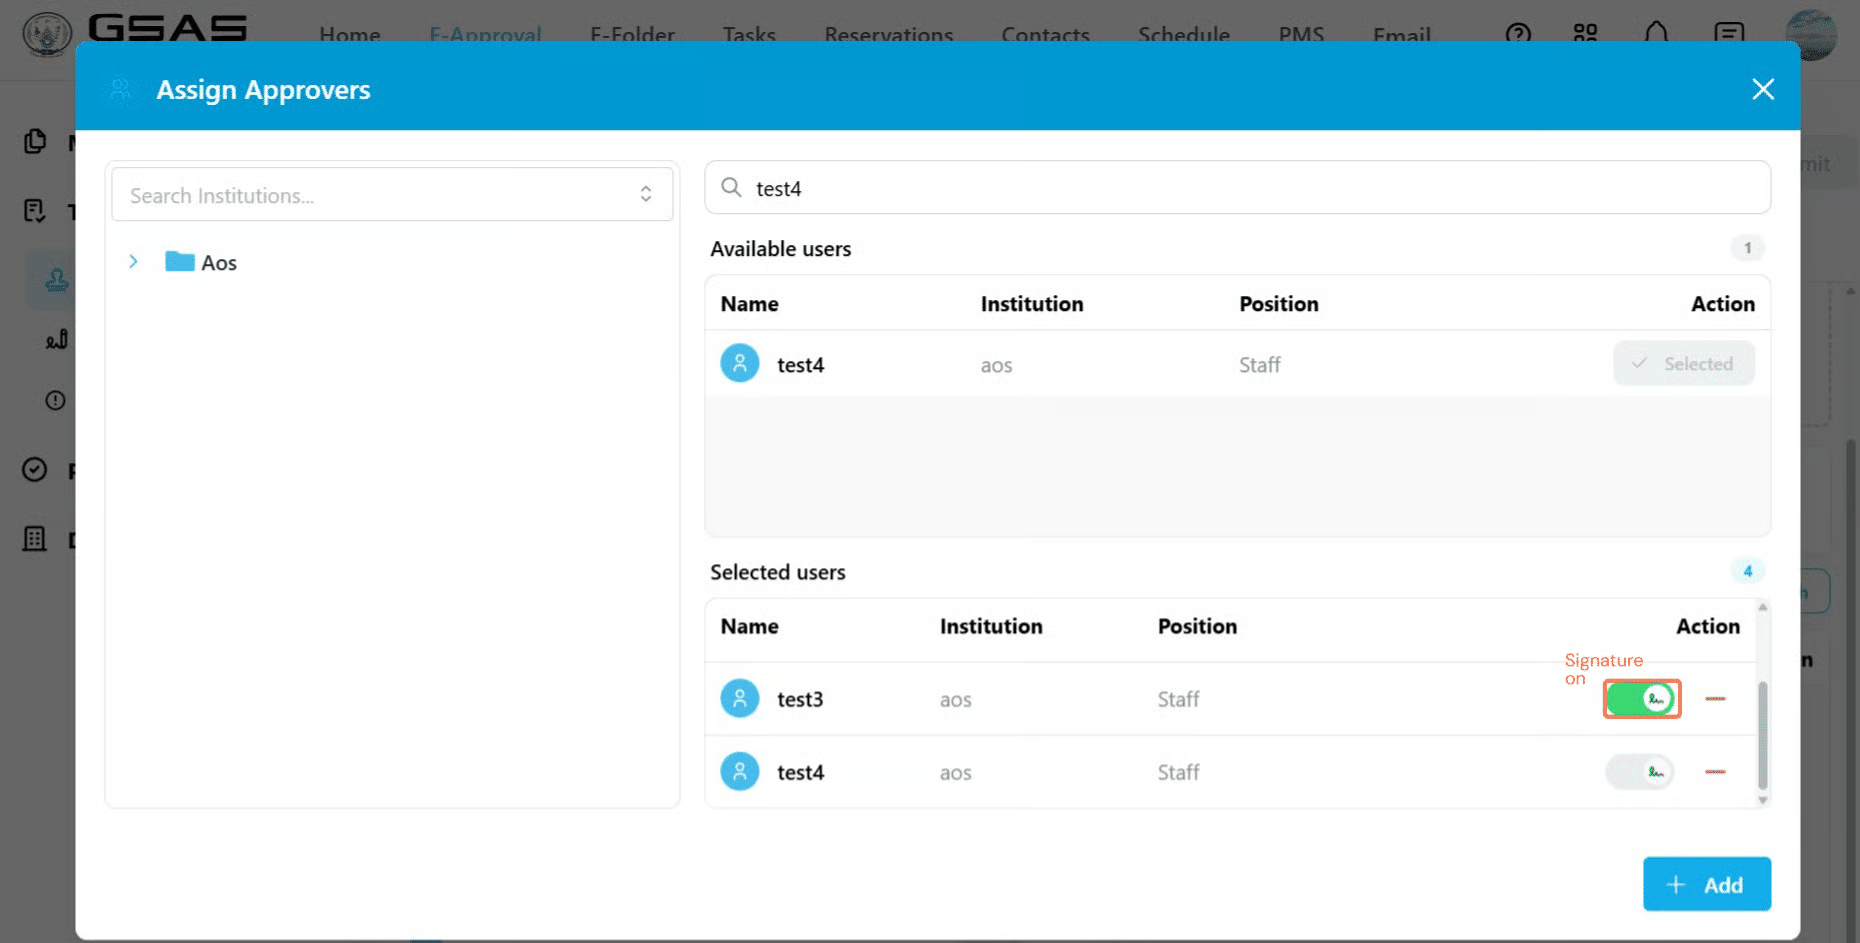
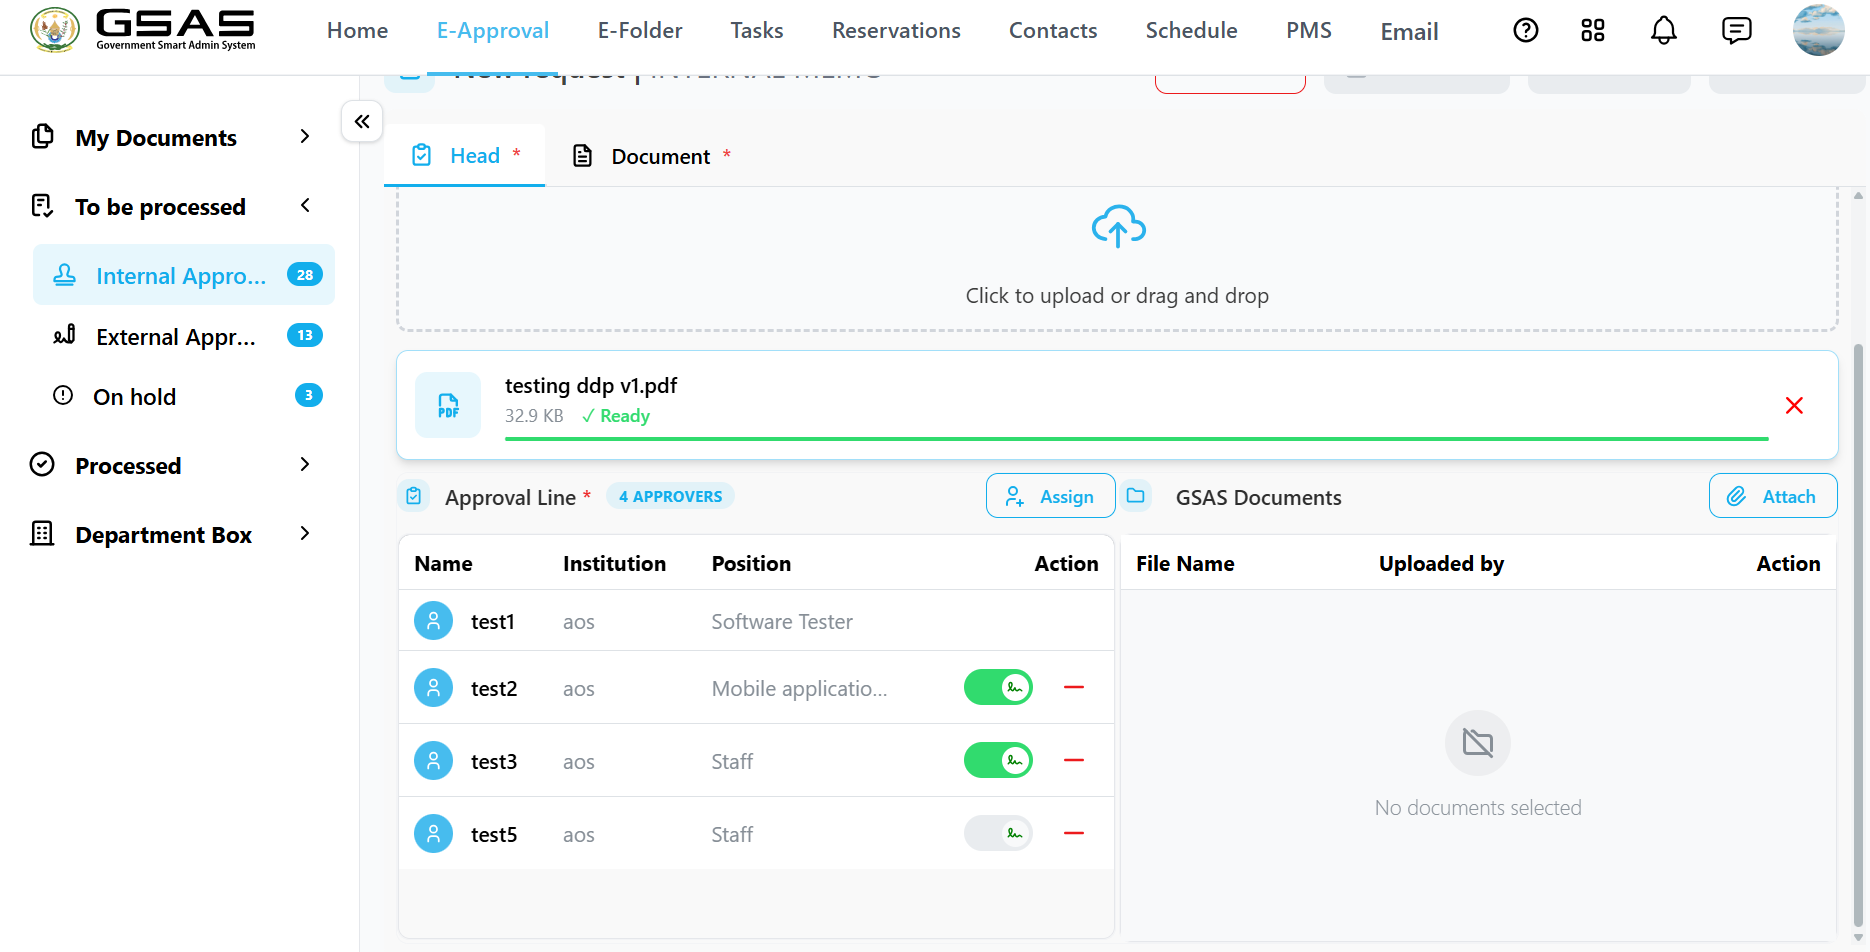
Assign approvers
- Click Assign to add approvers to the approval line.
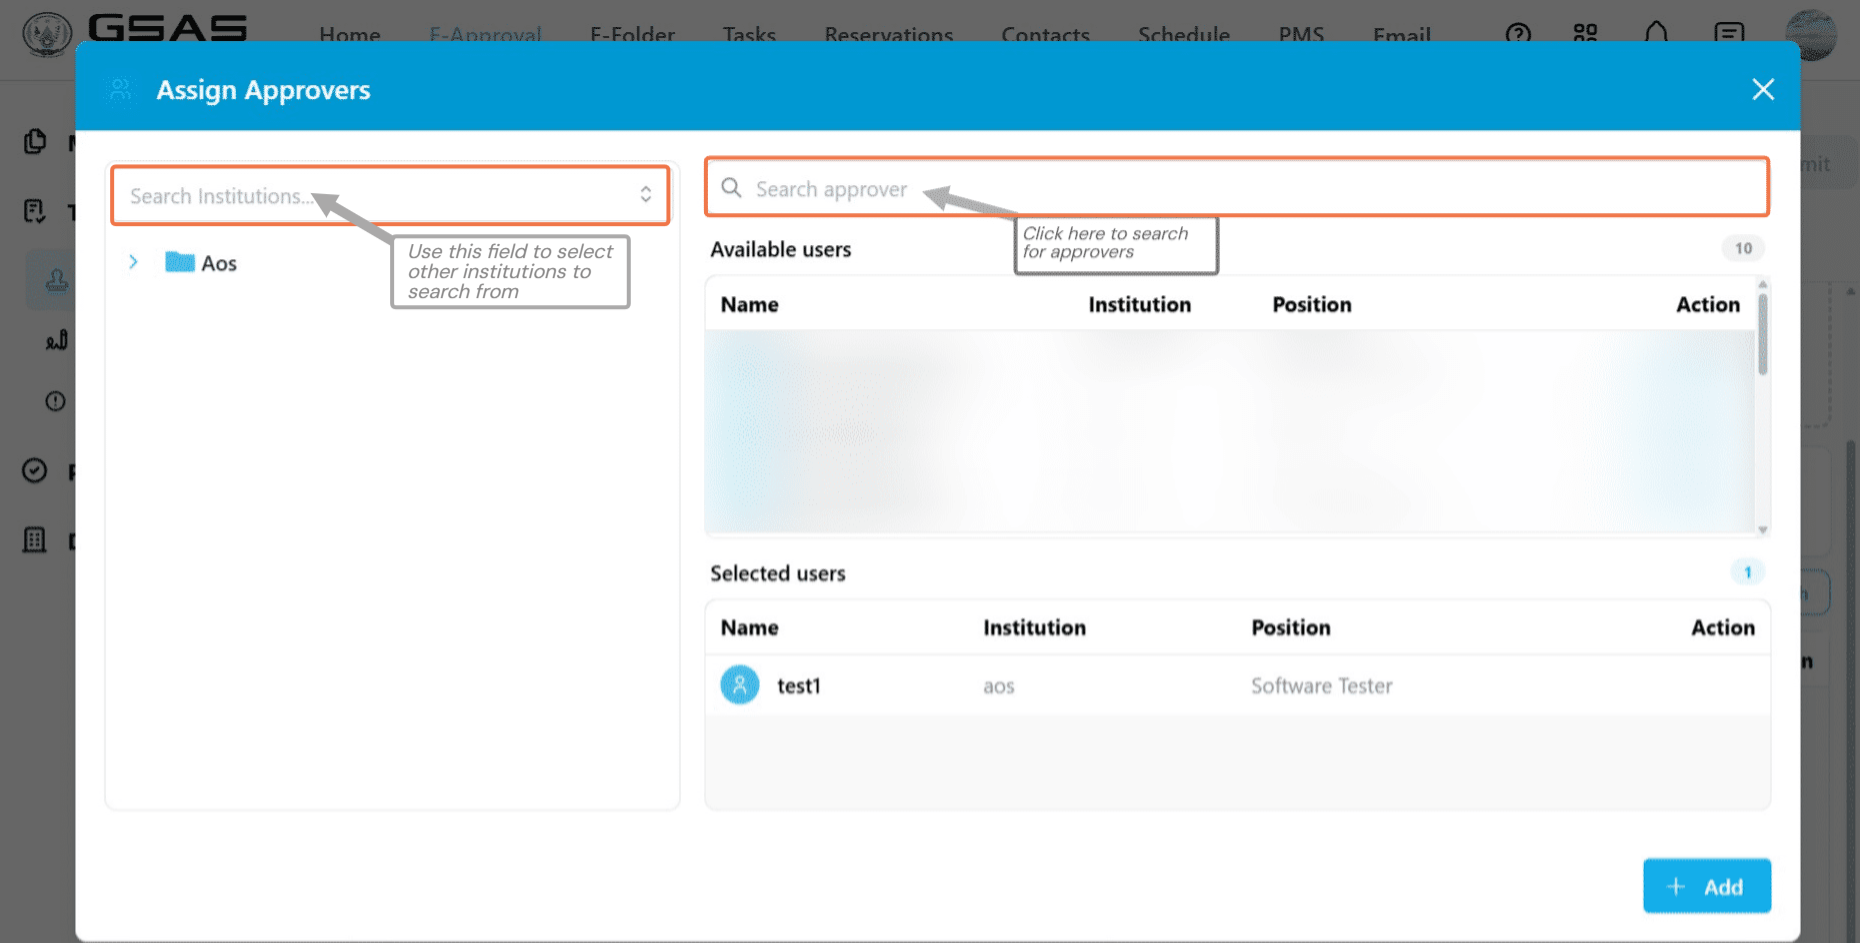
- Search for approvers to assign the request to and select them. You can assign people from within your institution or from other institutions that use the system (Select another institution using the Search institutions... dropdown on the left).
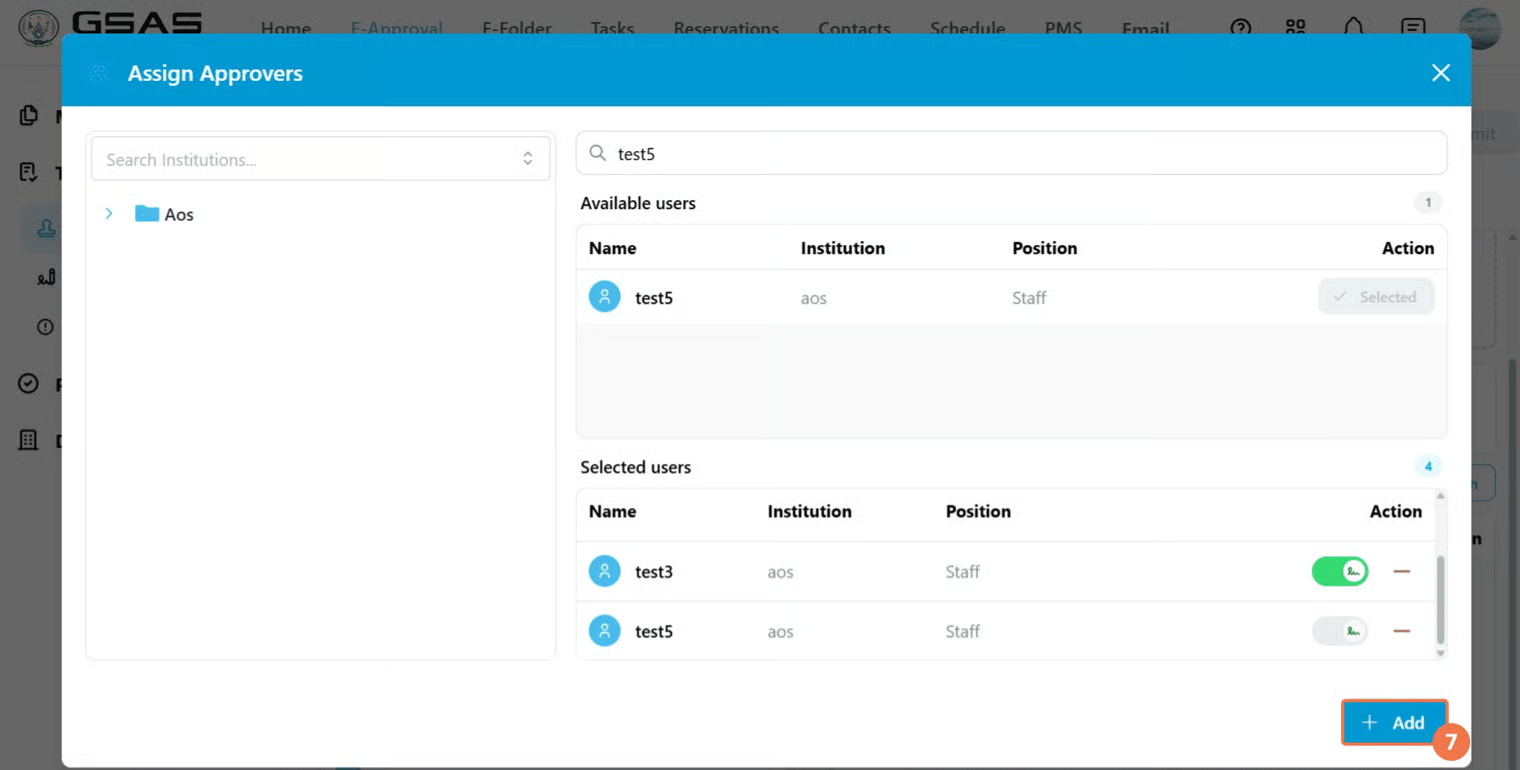
- Click on Add once you're done selecting the approvers.
- The request will move through the approvers in order.
- The next approver can only see the request once the previous one has approved.
- You must have at least one approver before submitting.
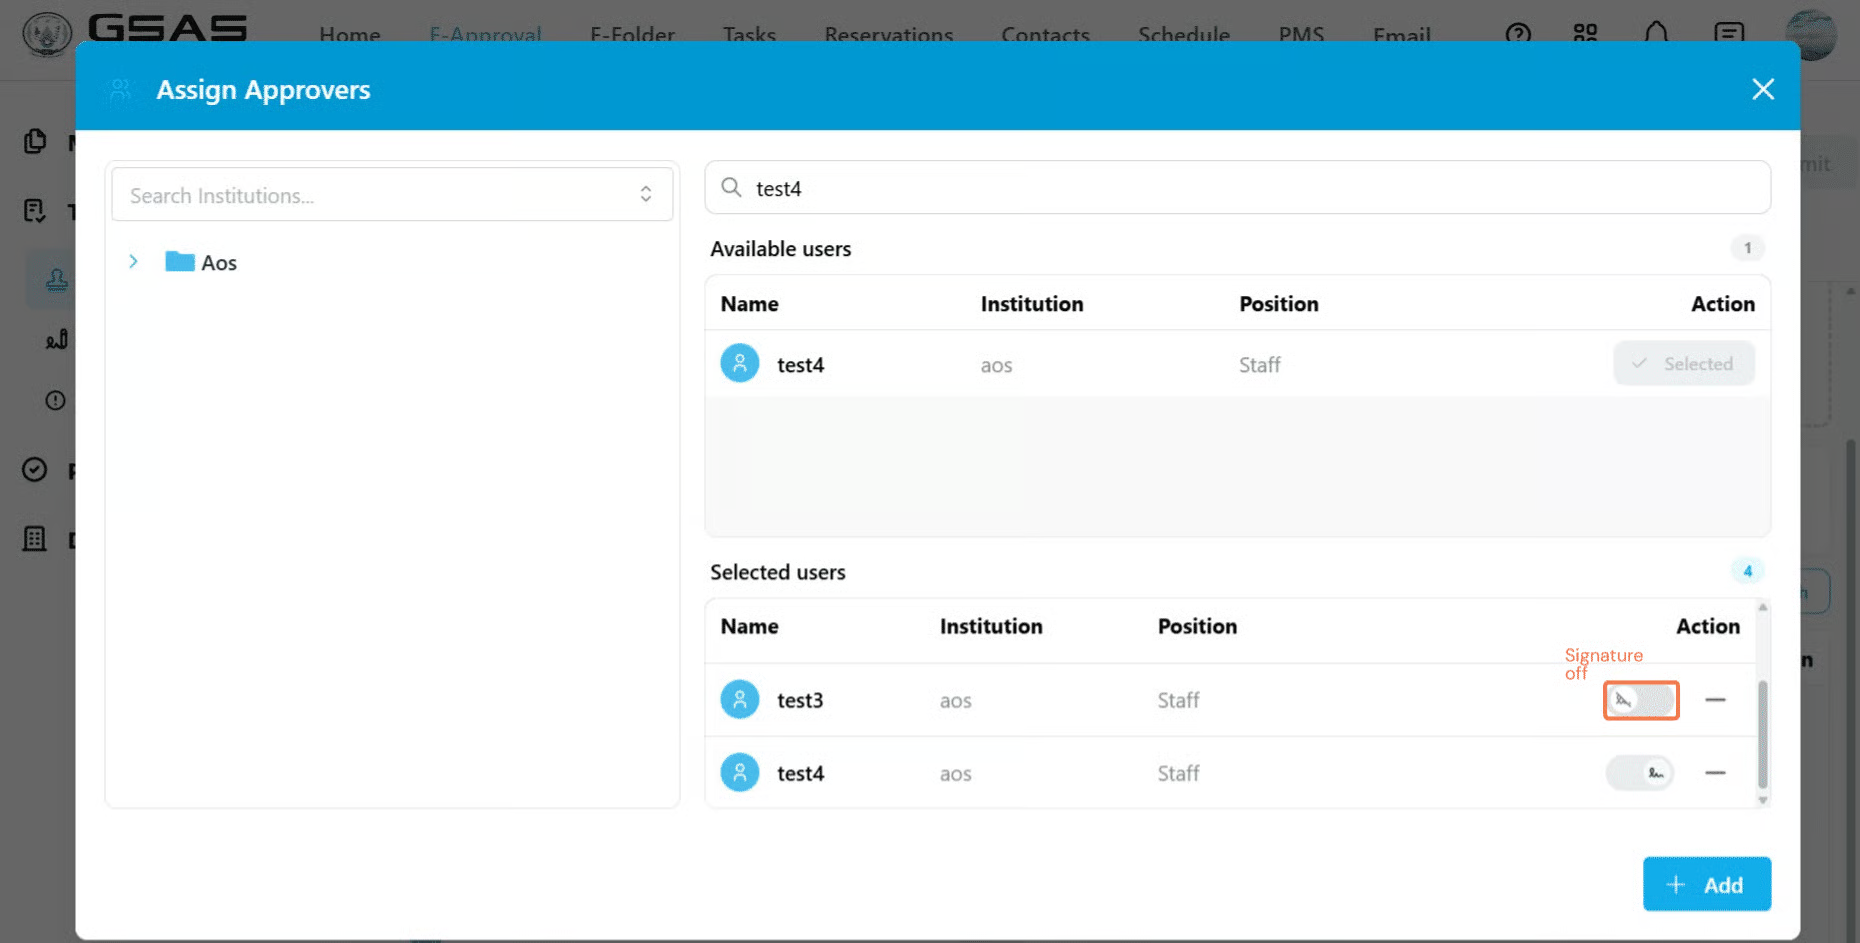
Signatures:
Toggle on and off approvers' signatures (click to open)The toggle looks like this when the approver's signature is ON
The toggle looks like this if the approver's signature is OFF
Note that some forms are configured by your administrator to display only the final approver's signature, in which case this toggle will not appear. |
Step 5
Fill in the Document tab
- Click on the Document tab to edit the content of your request.
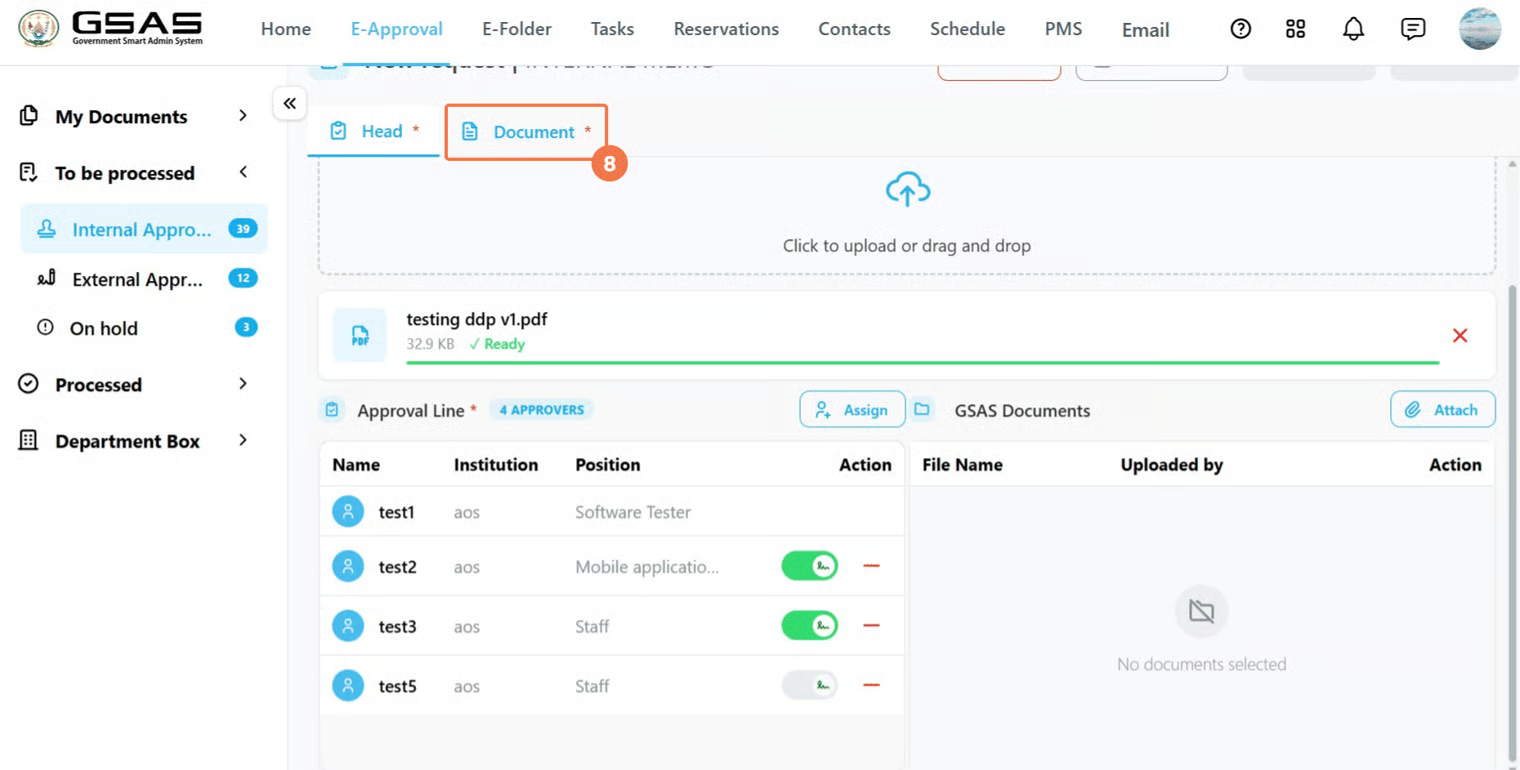
- Enter your content directly or paste it in from elsewhere.
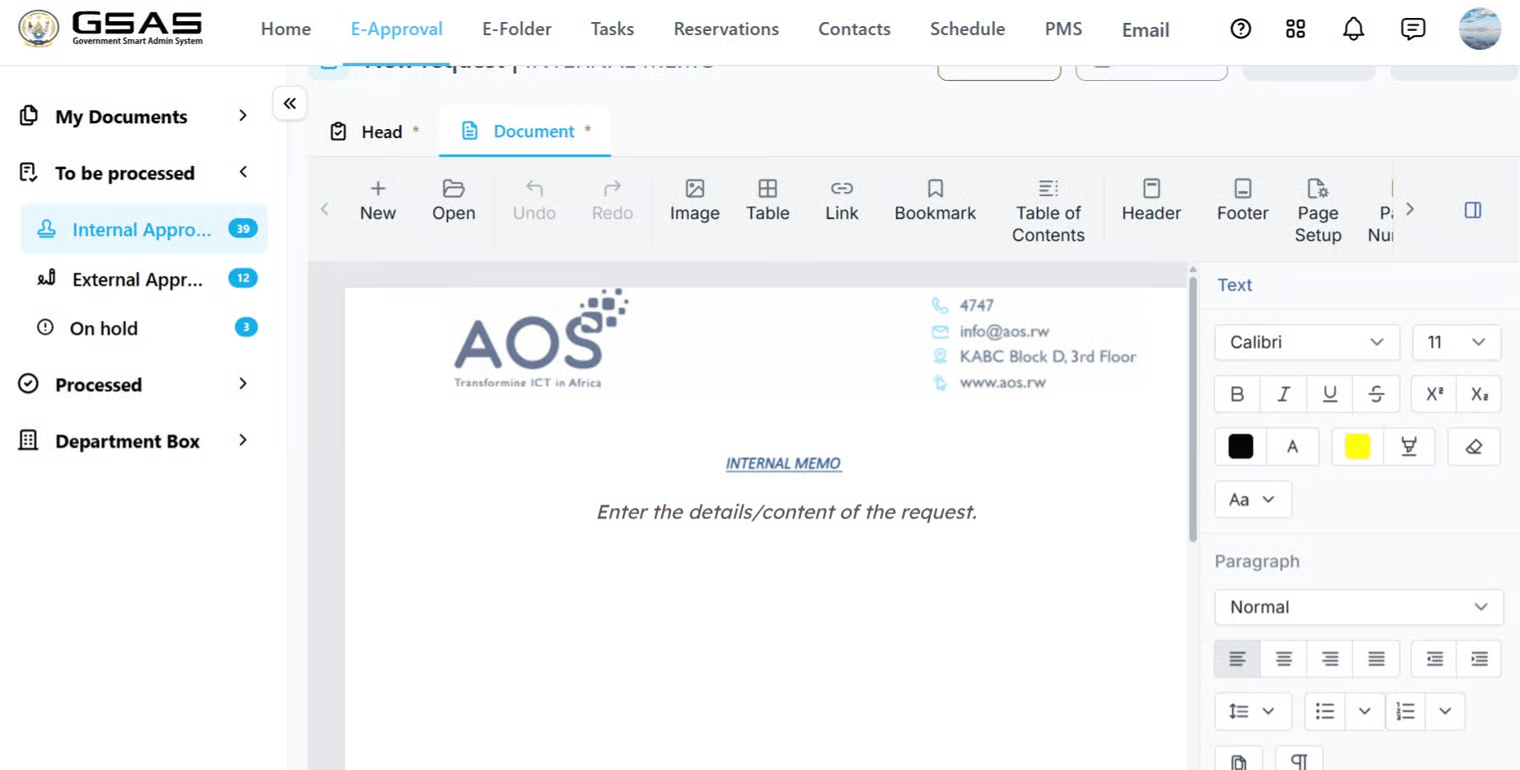
You do not need to add a date or leave space for signatures. The date & time of completion, and reference number of the document are generated automatically once the request is completed, and each approver's signature along with their date and time of signing appears on the form the moment they approve it.
Step 6
Submit your request
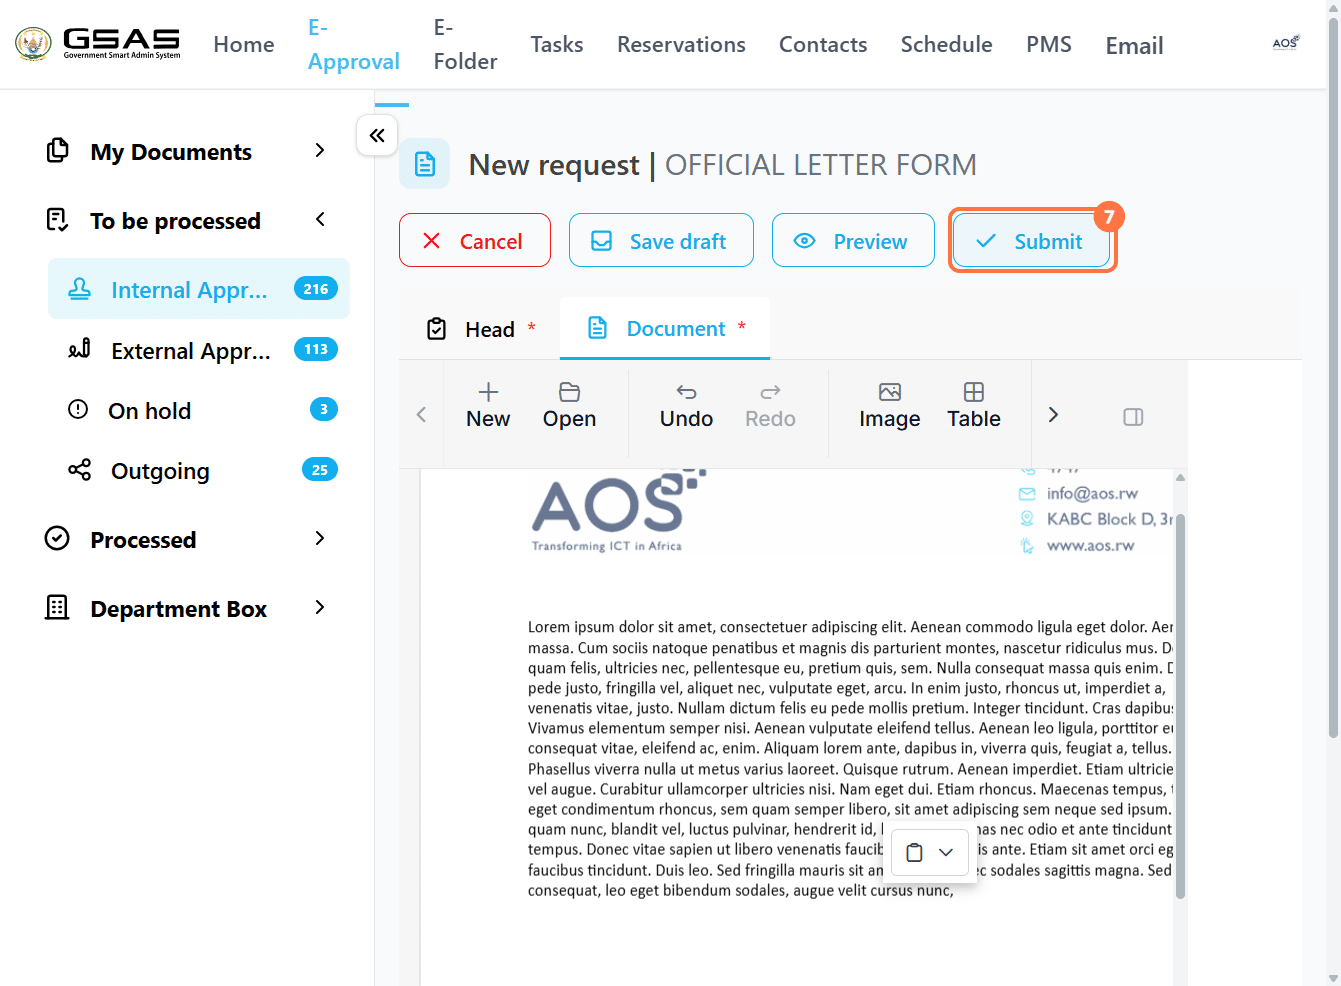
- Once both tabs are filled in, click Submit in the top right corner. (You can Preview the document before submitting by clicking on the preview button).
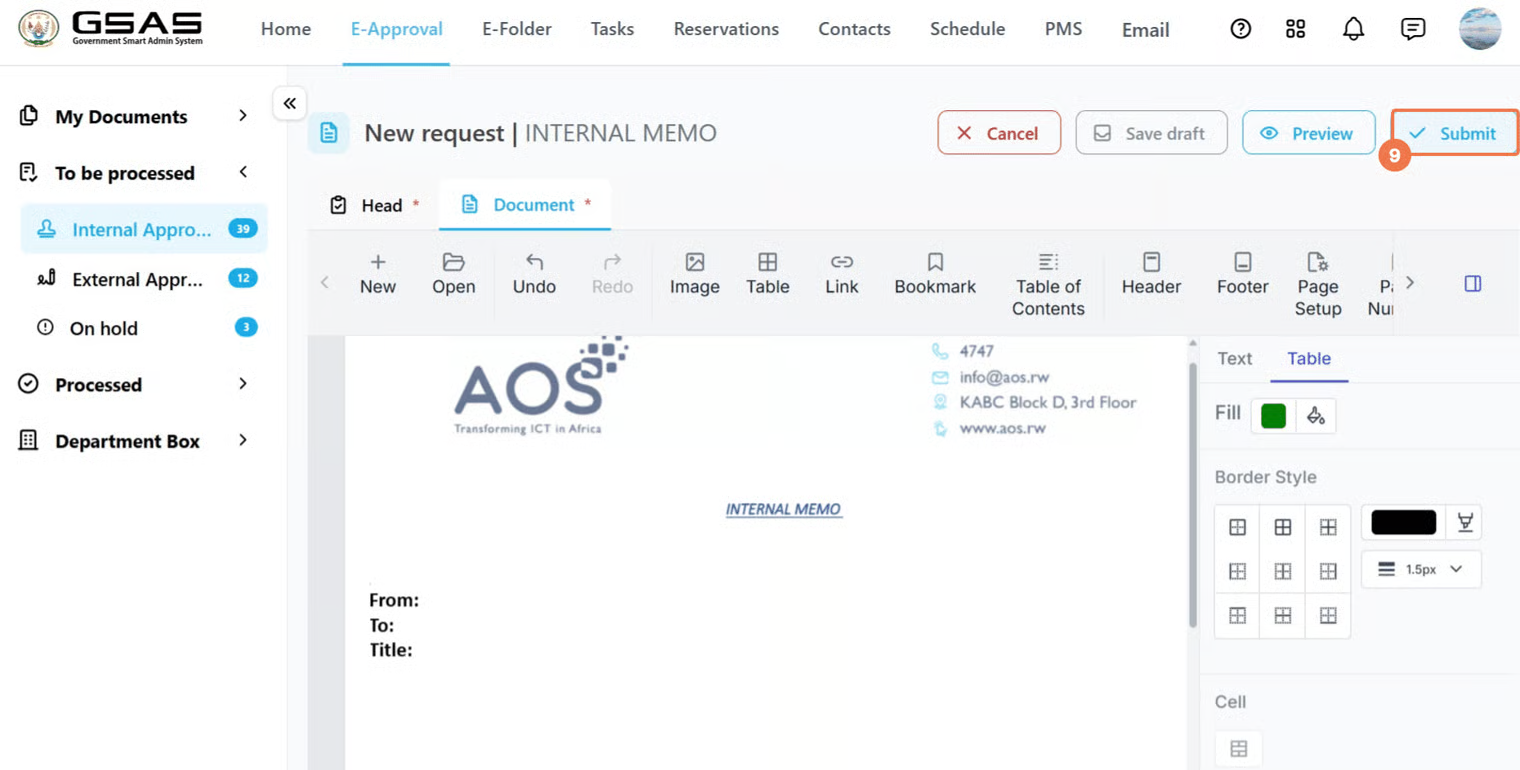
Not ready to submit? Click on the Save Draft button at any point to save your progress. You can find the document later under My Documents → Saved Drafts to continue editing before submitting. |
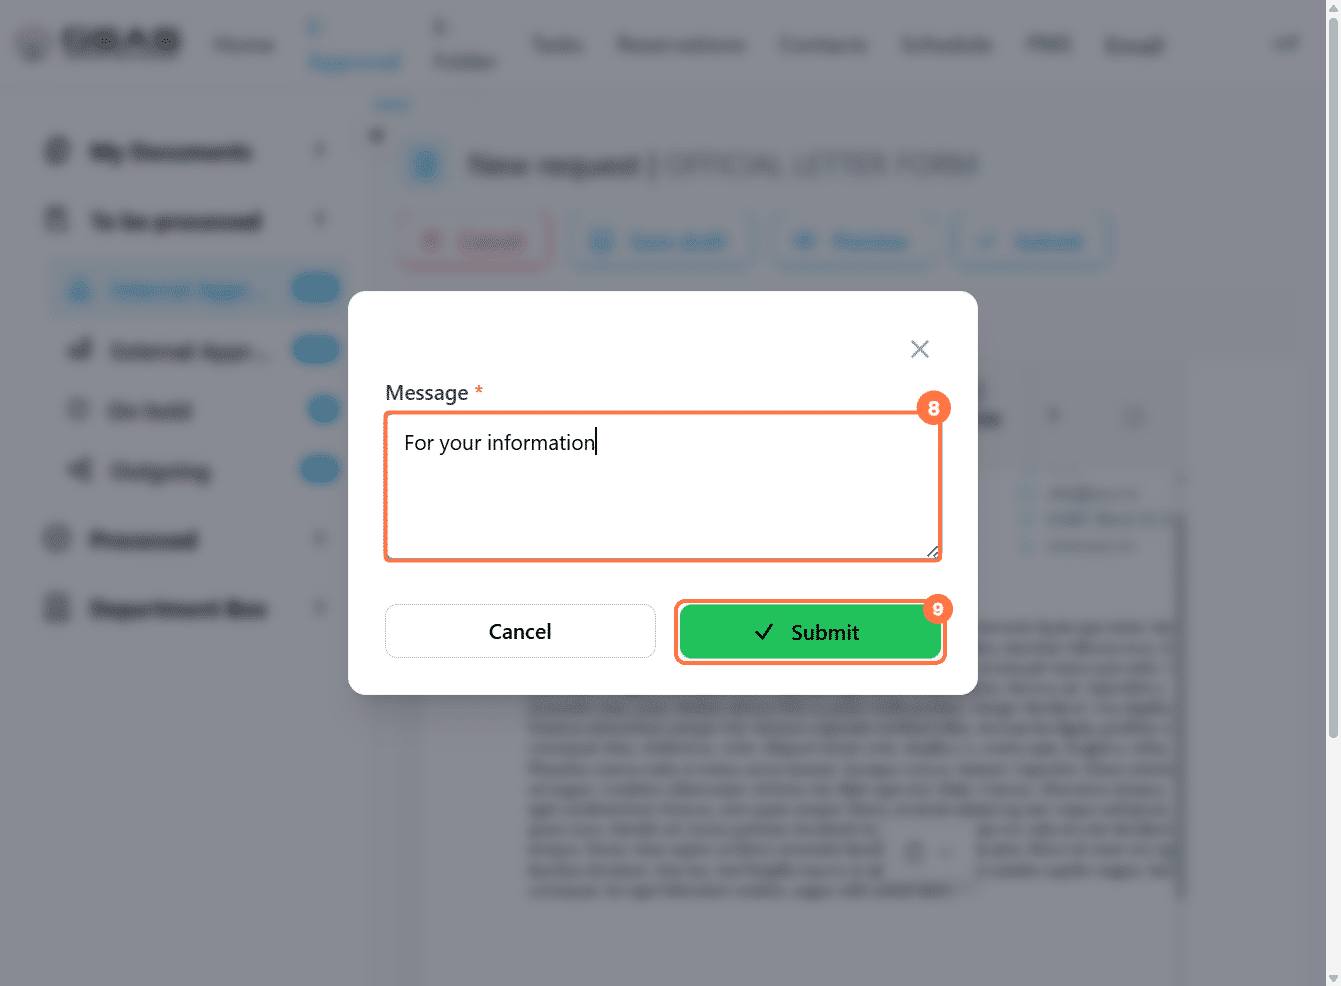
- A confirmation dialog will appear, click Submit again to confirm.
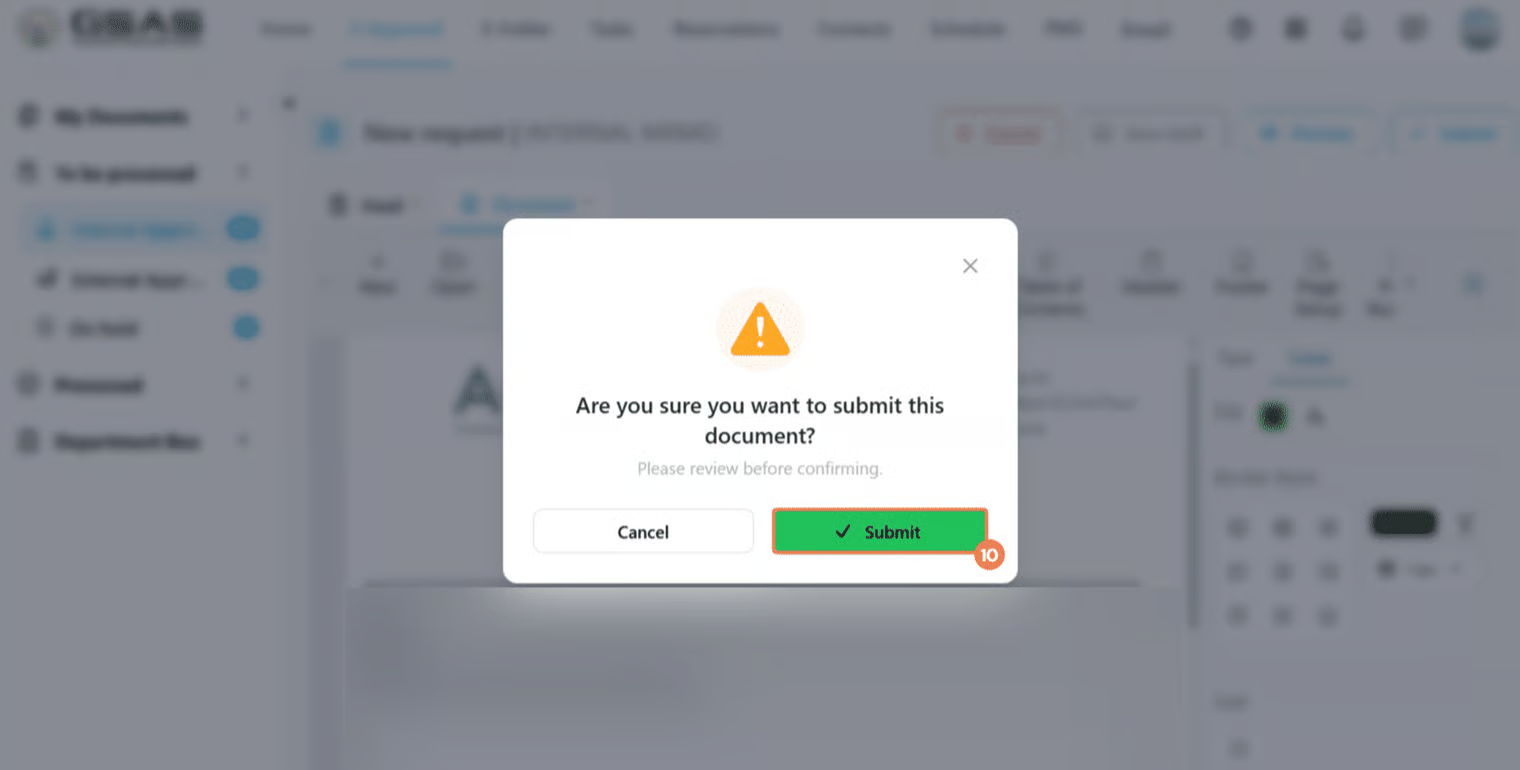
- Your request will be submitted successfully and sent directly to the first approver in the line, they can view it from their Internal Approval folder if they're from your institution. If not, it will be in their External Approval folder.
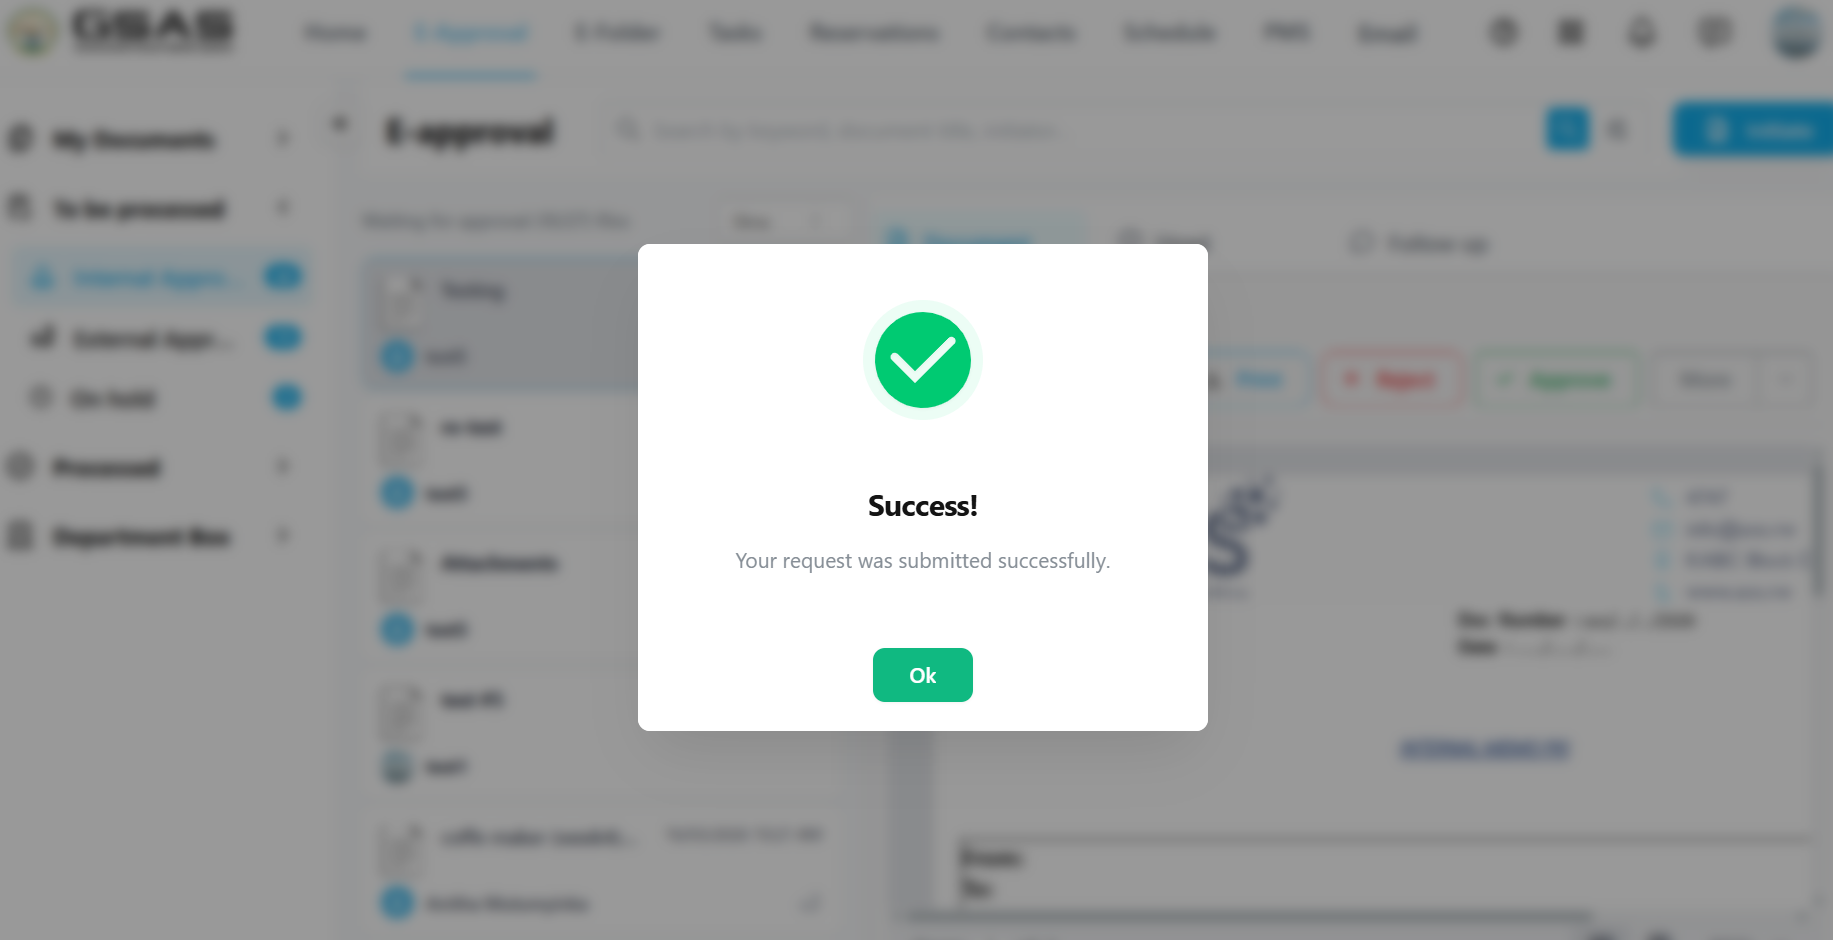
- It will appear under My Documents → Submitted on your side.
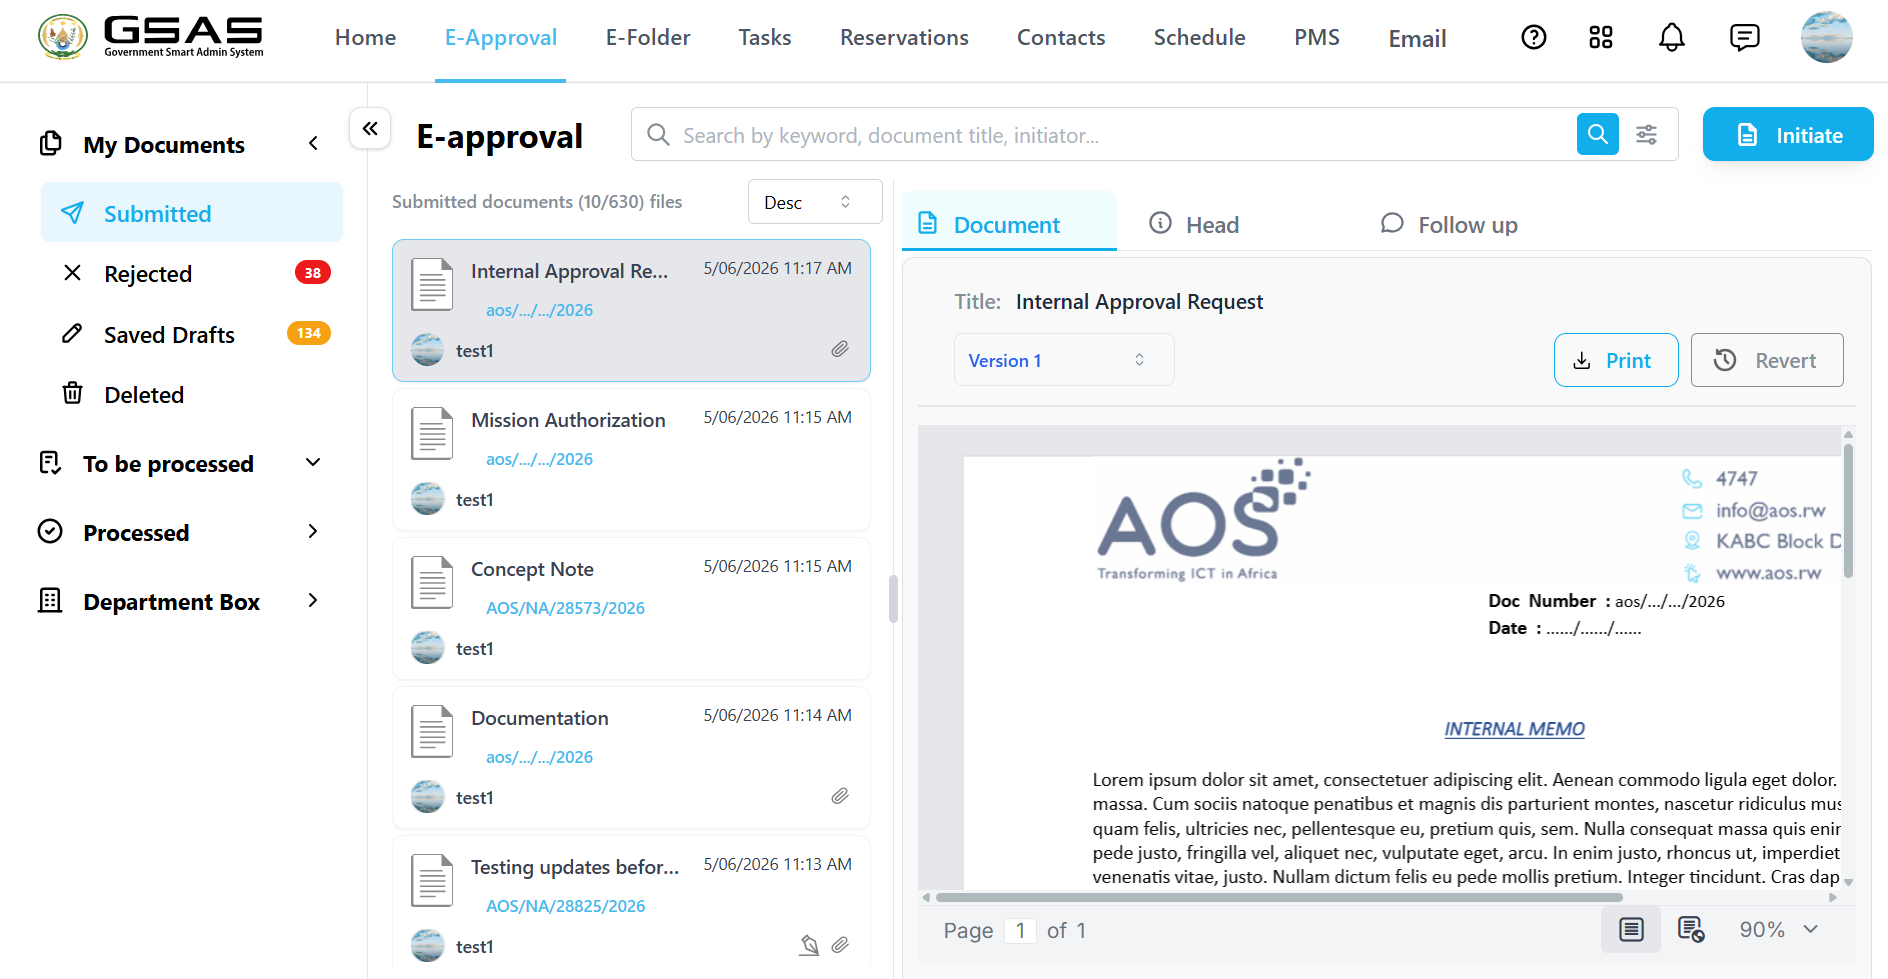
Need to make further edits? Click on the Revert button before any approver takes action. The document will be moved from Submitted to Saved Drafts. You can resubmit once you've made necessary changes. Your type will be updated from Drafter to Redrafter on the document. |
Proceed to the Managing approval requests page to learn how to keep track of your request after it's been submitted.
Outgoing Approval Requests
Submitting an Outgoing Approval Request
Outgoing requests are used when you need to send an official document to another institution, both those that use Smart Admin and those that do not. The process is largely the same as submitting an internal request, but with two key differences: you select a template with the type Outgoing, and you specify who the document is being sent to before submitting.
| Before you begin: This page focuses on what is unique to outgoing requests. If you have not tried submitting an internal request before, it is worth reading the Internal Approval Requests page first, it covers the shared steps in full detail. |
Step 1
Choosing a template
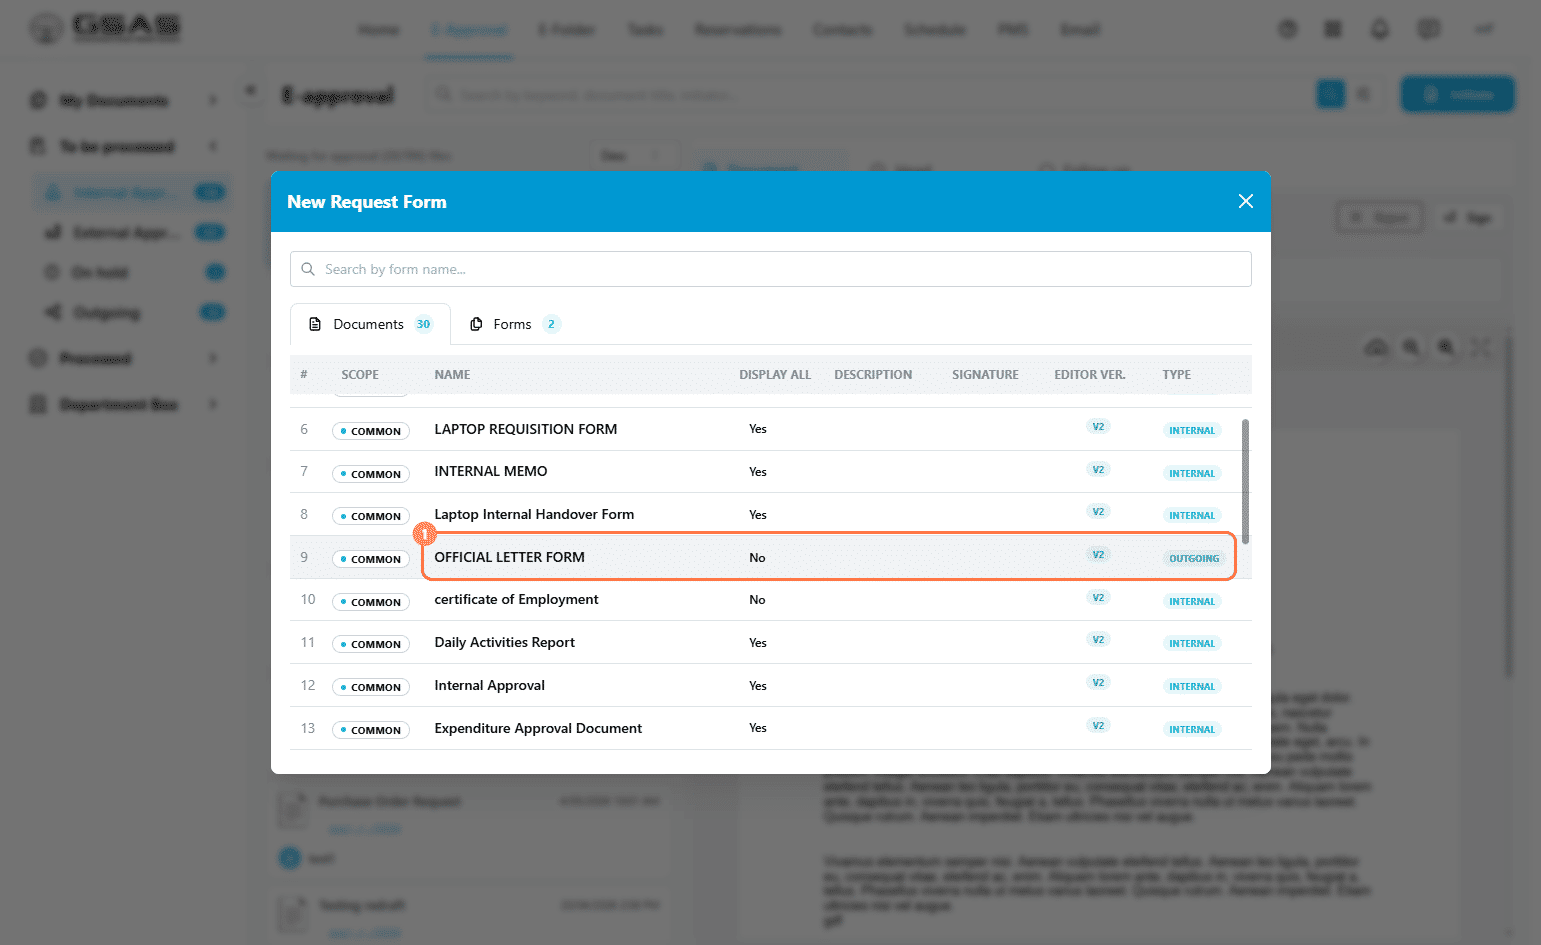
Click Initiate and select a template from the list. For outgoing requests, look for templates with the type Outgoing in the last column.
Step 2
Filling in the Head tab
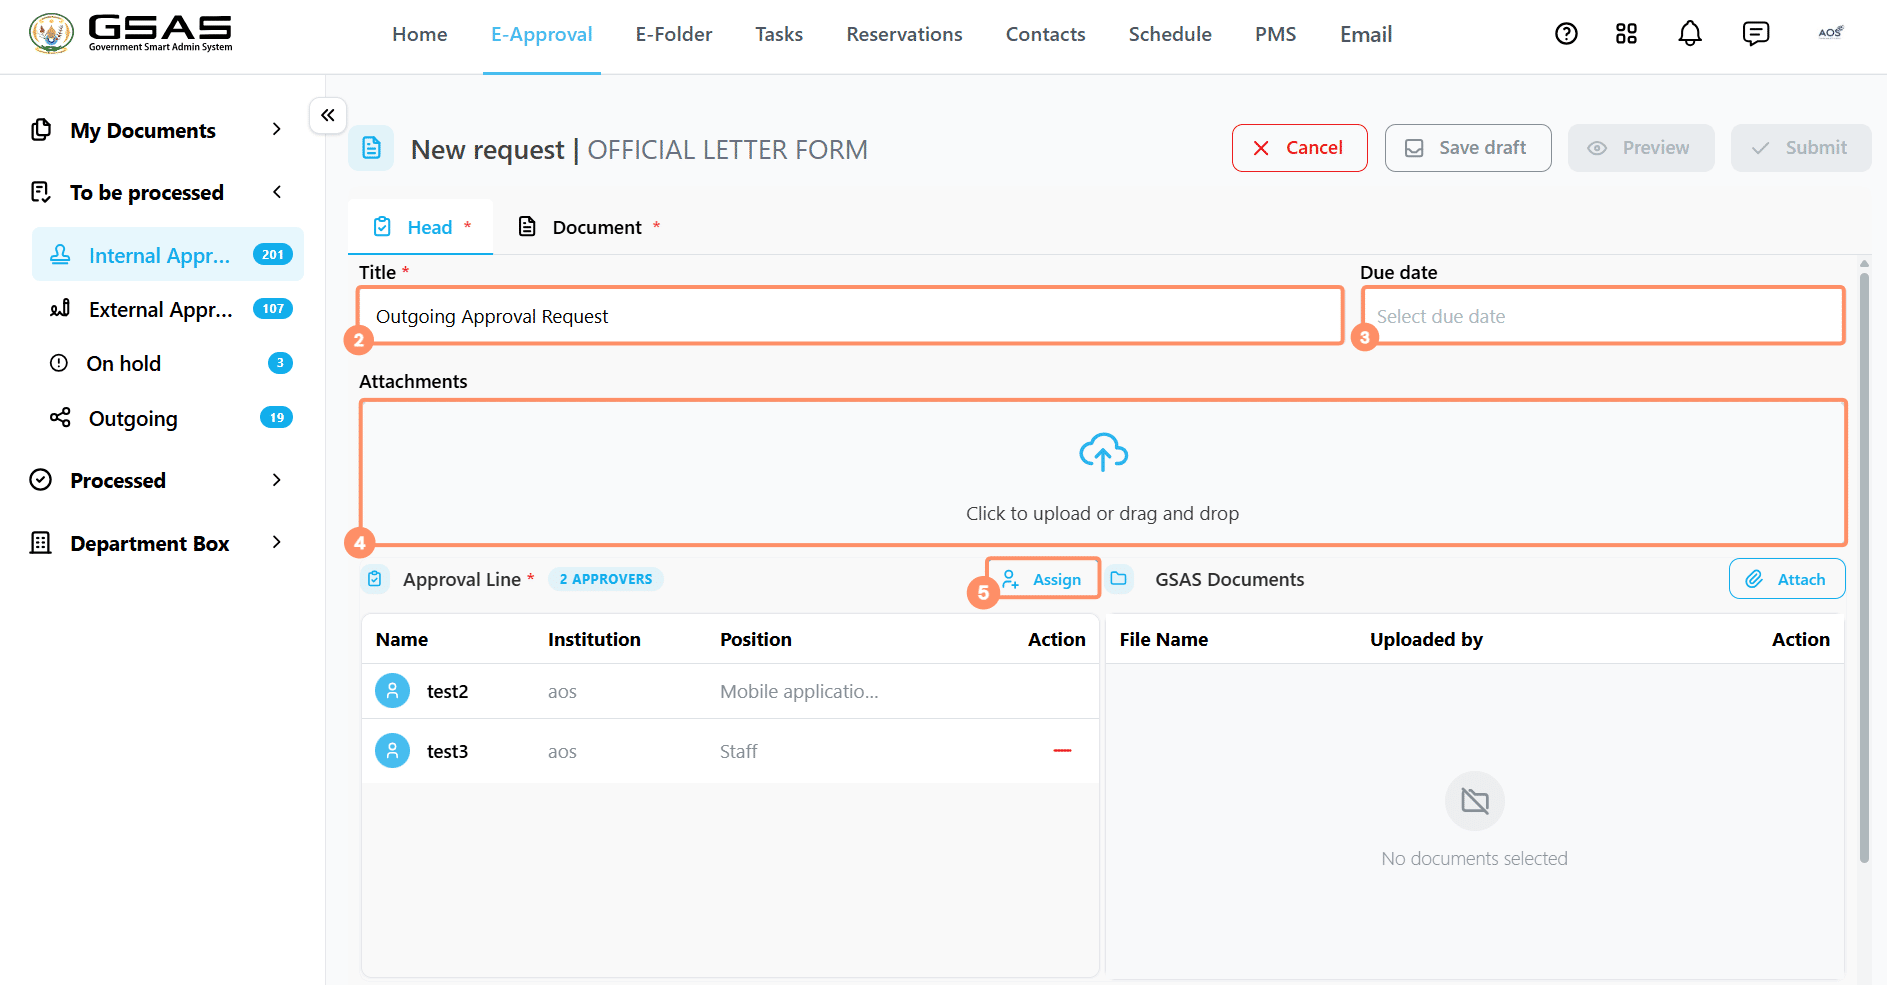
Fill in the title, due date, attachments, and aassignees as you would for an internal request. You can also attach documents from E-Folder using the GSAS Documents section on the right.
Step 3
Adding recipients
You will see two sections — Internal Recipients for institutions and individuals who use Smart Admin, and External Recipients for those who do not. You can fill in one or both.
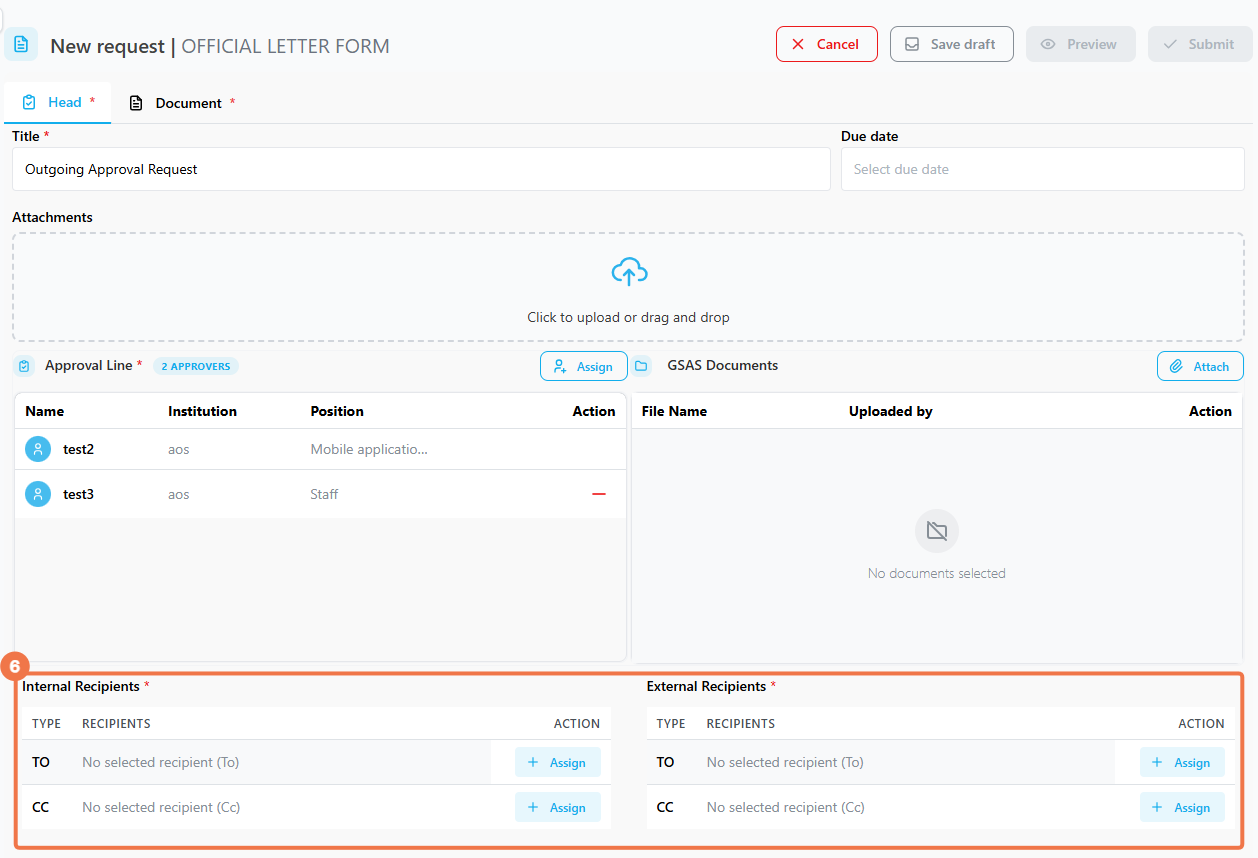
3.1 Internal Recipients/Public InstitutionsRecipients that use Smart Admin
→ Send to an institution (Internal)
→ Send to an individual (Internal)
CC To copy someone in, click Assign next to the CC field and follow the same steps above. |
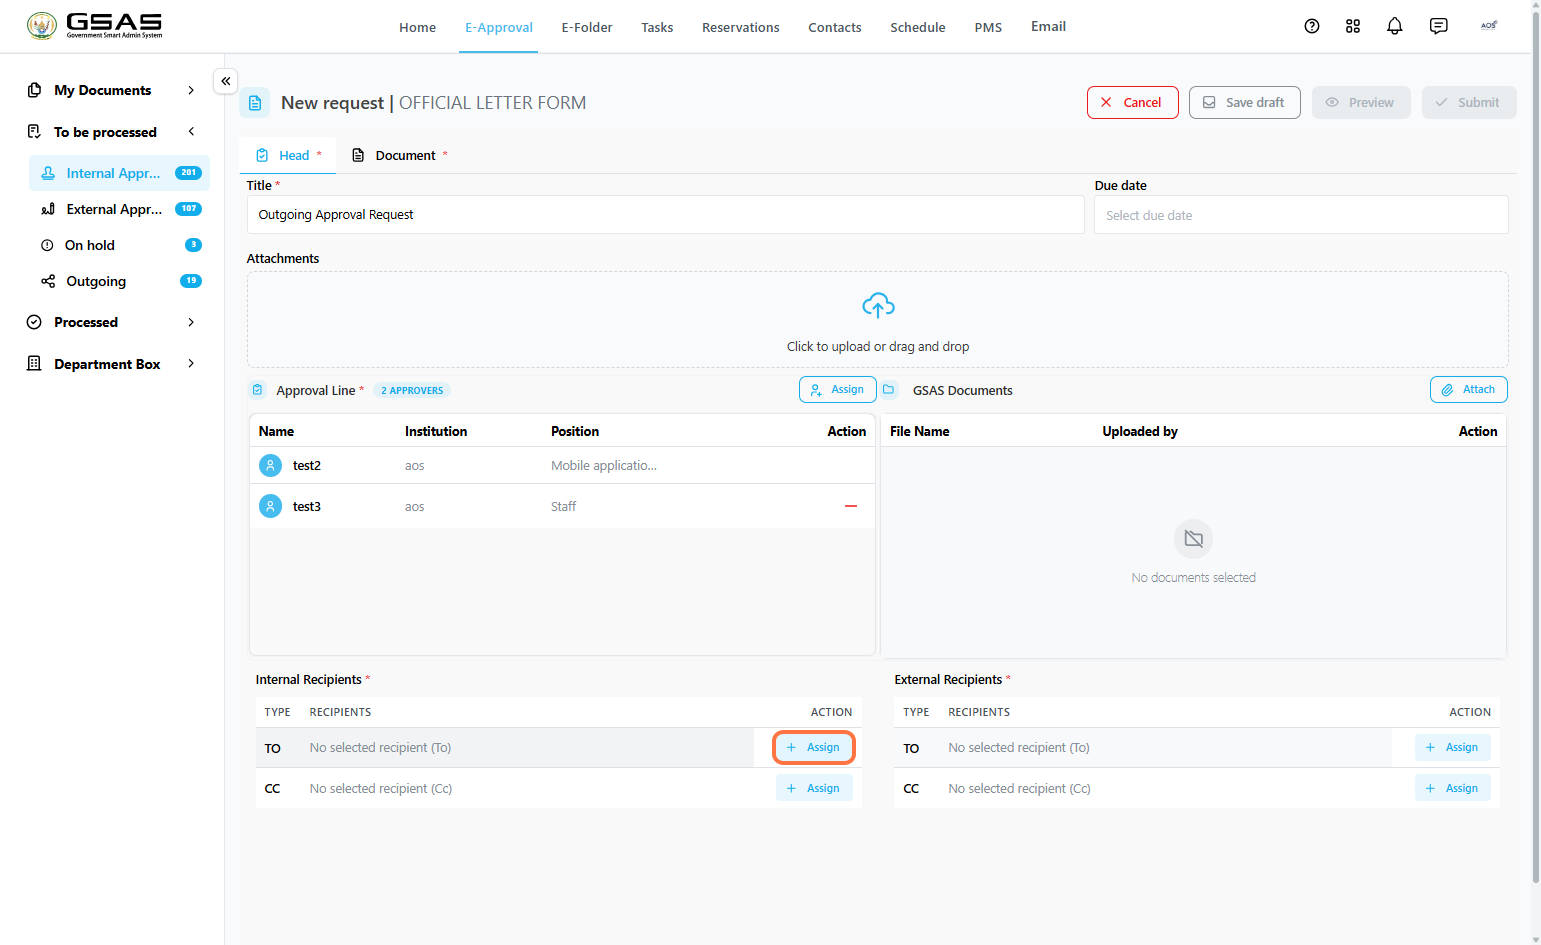
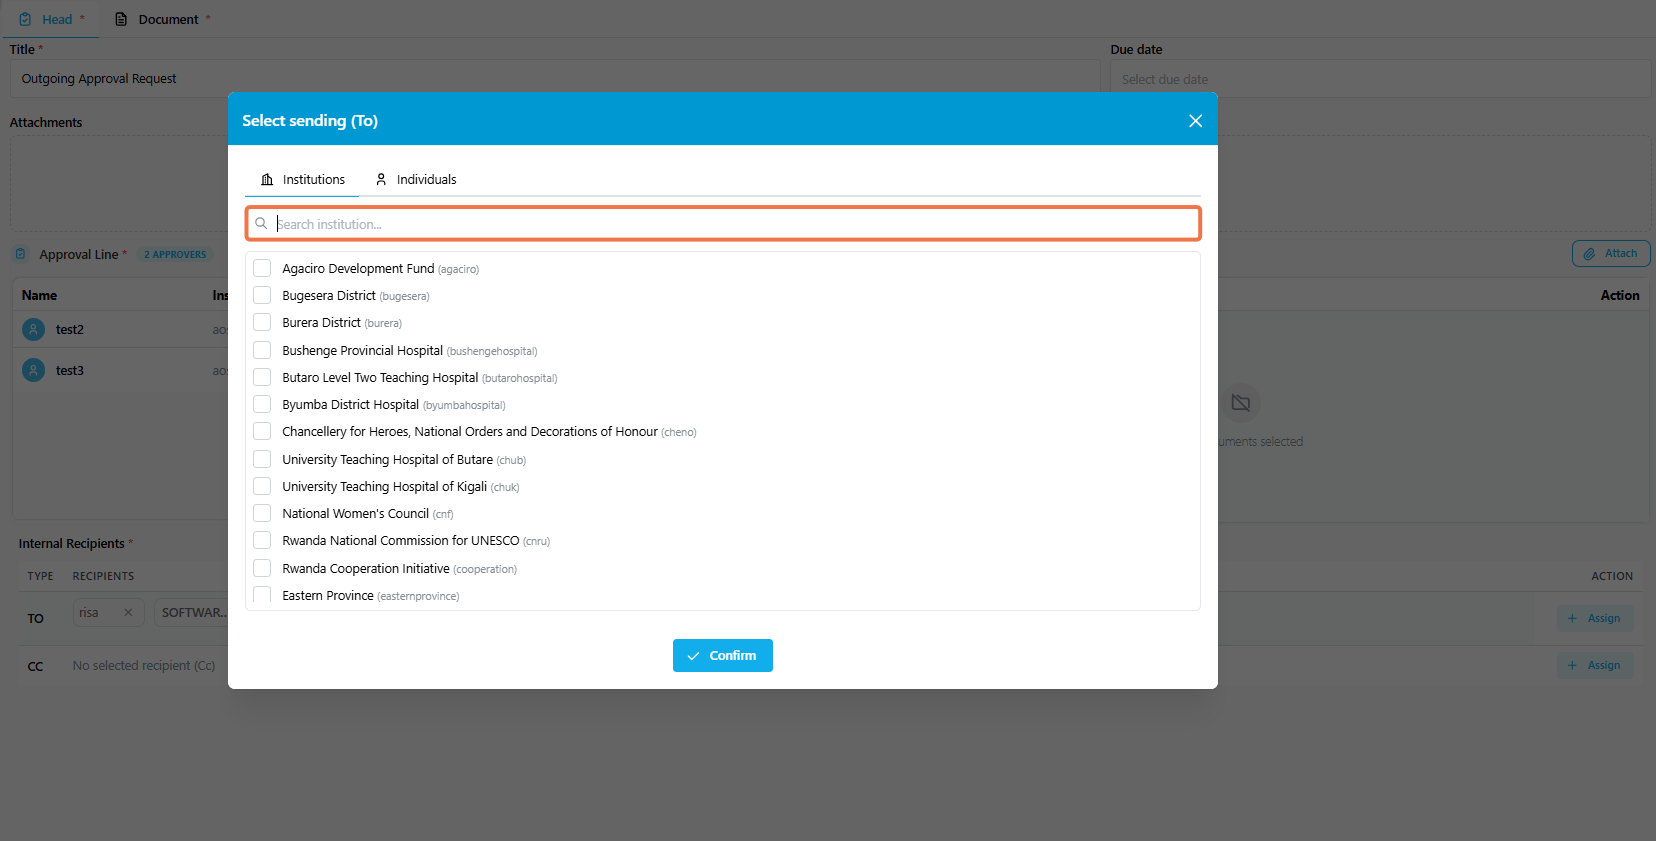
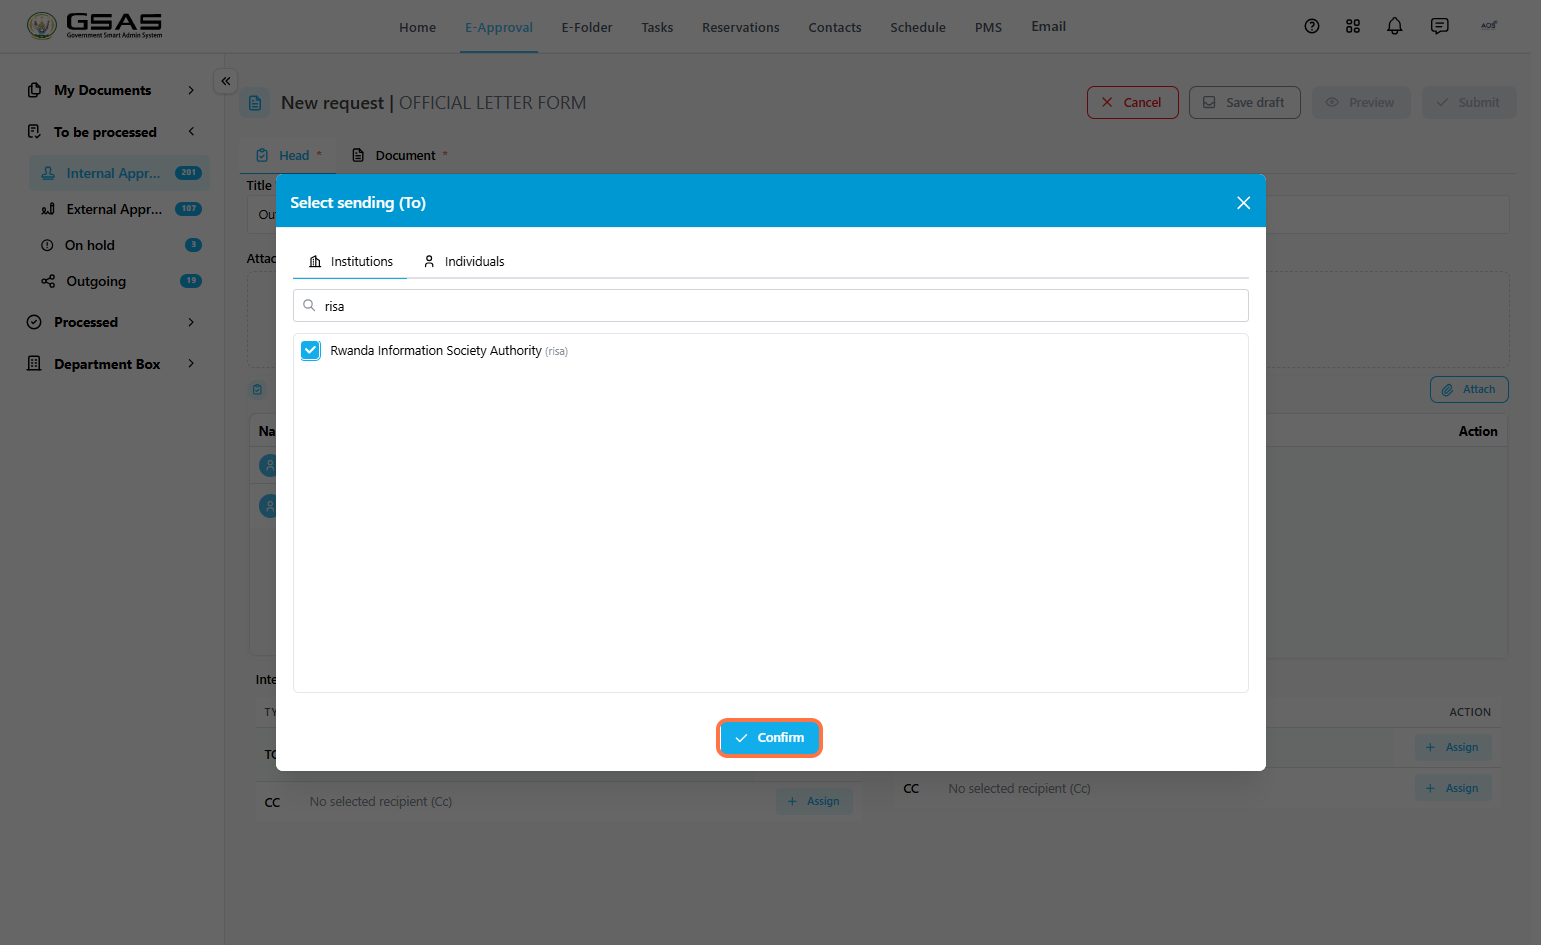
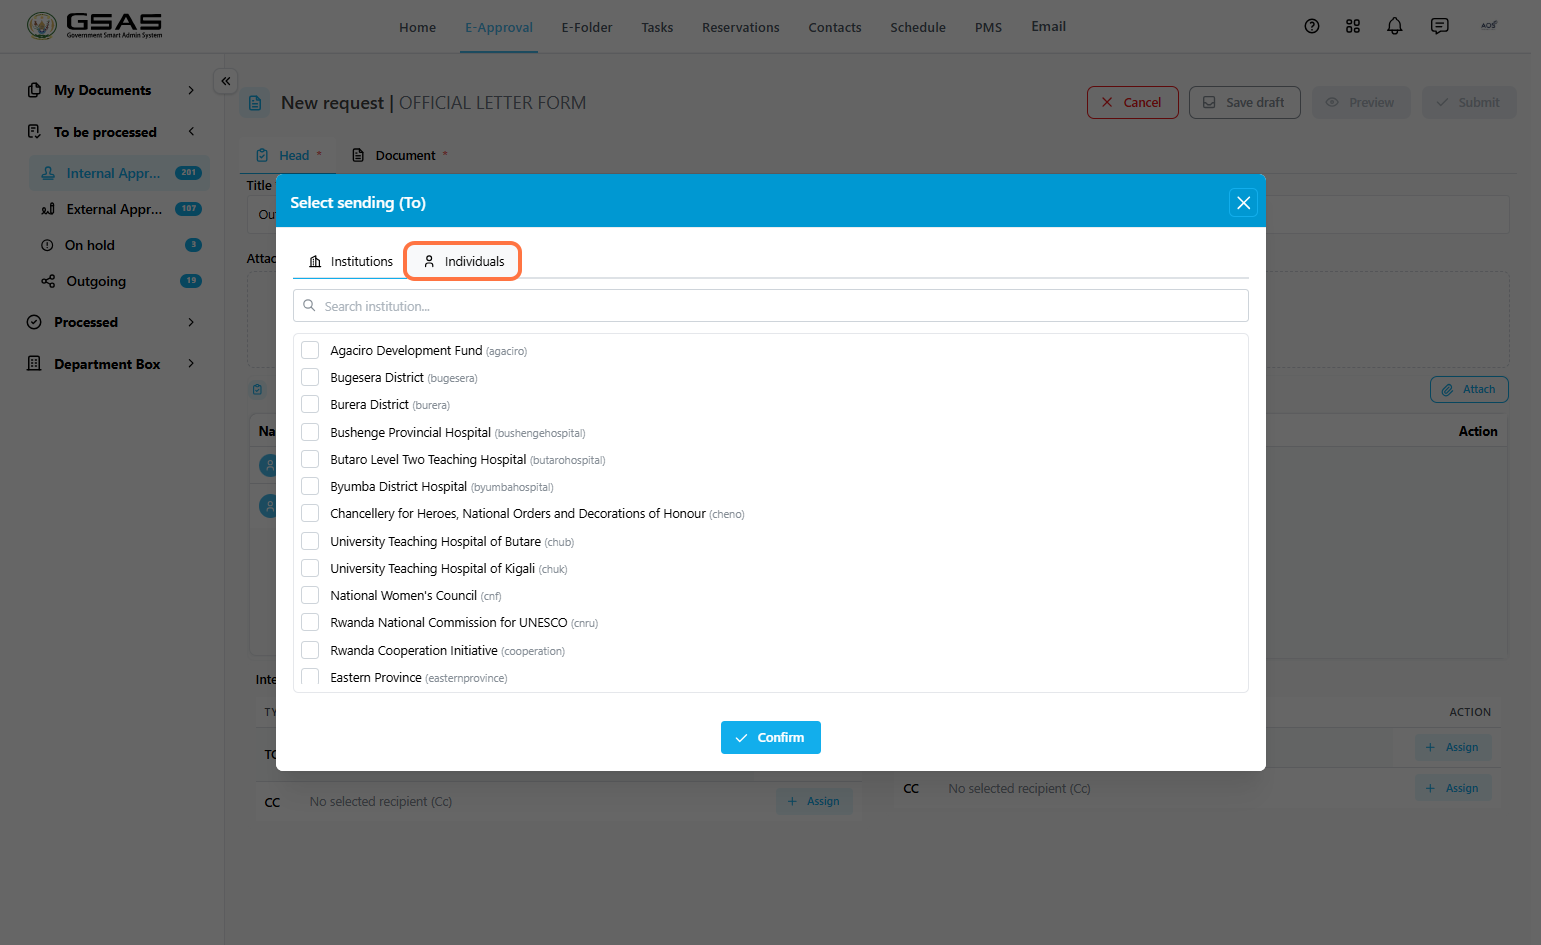
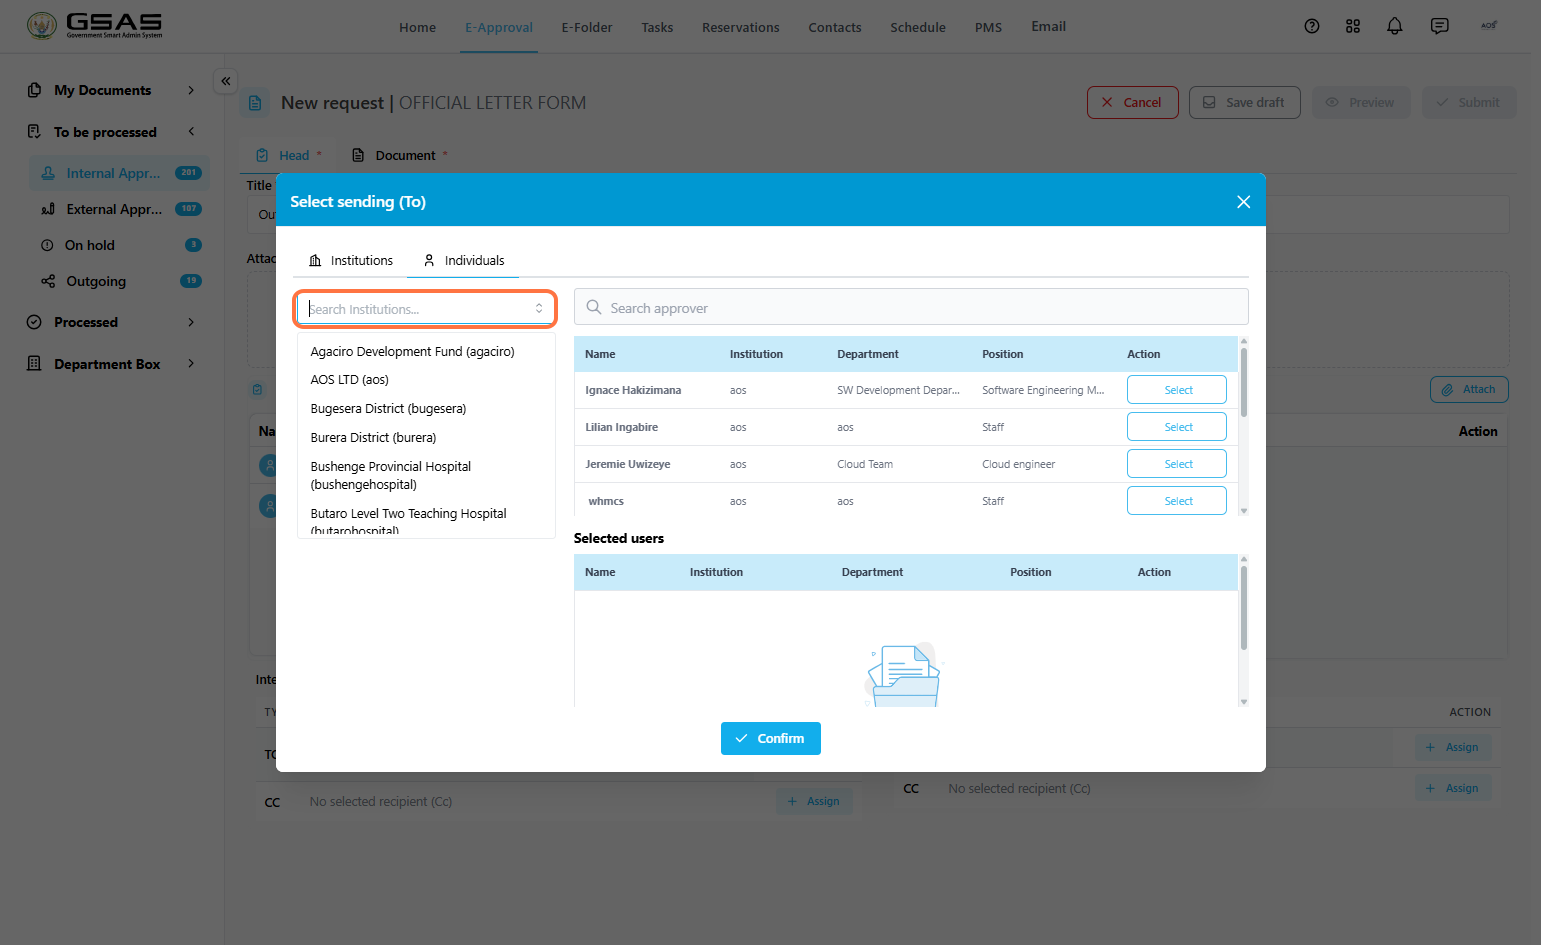
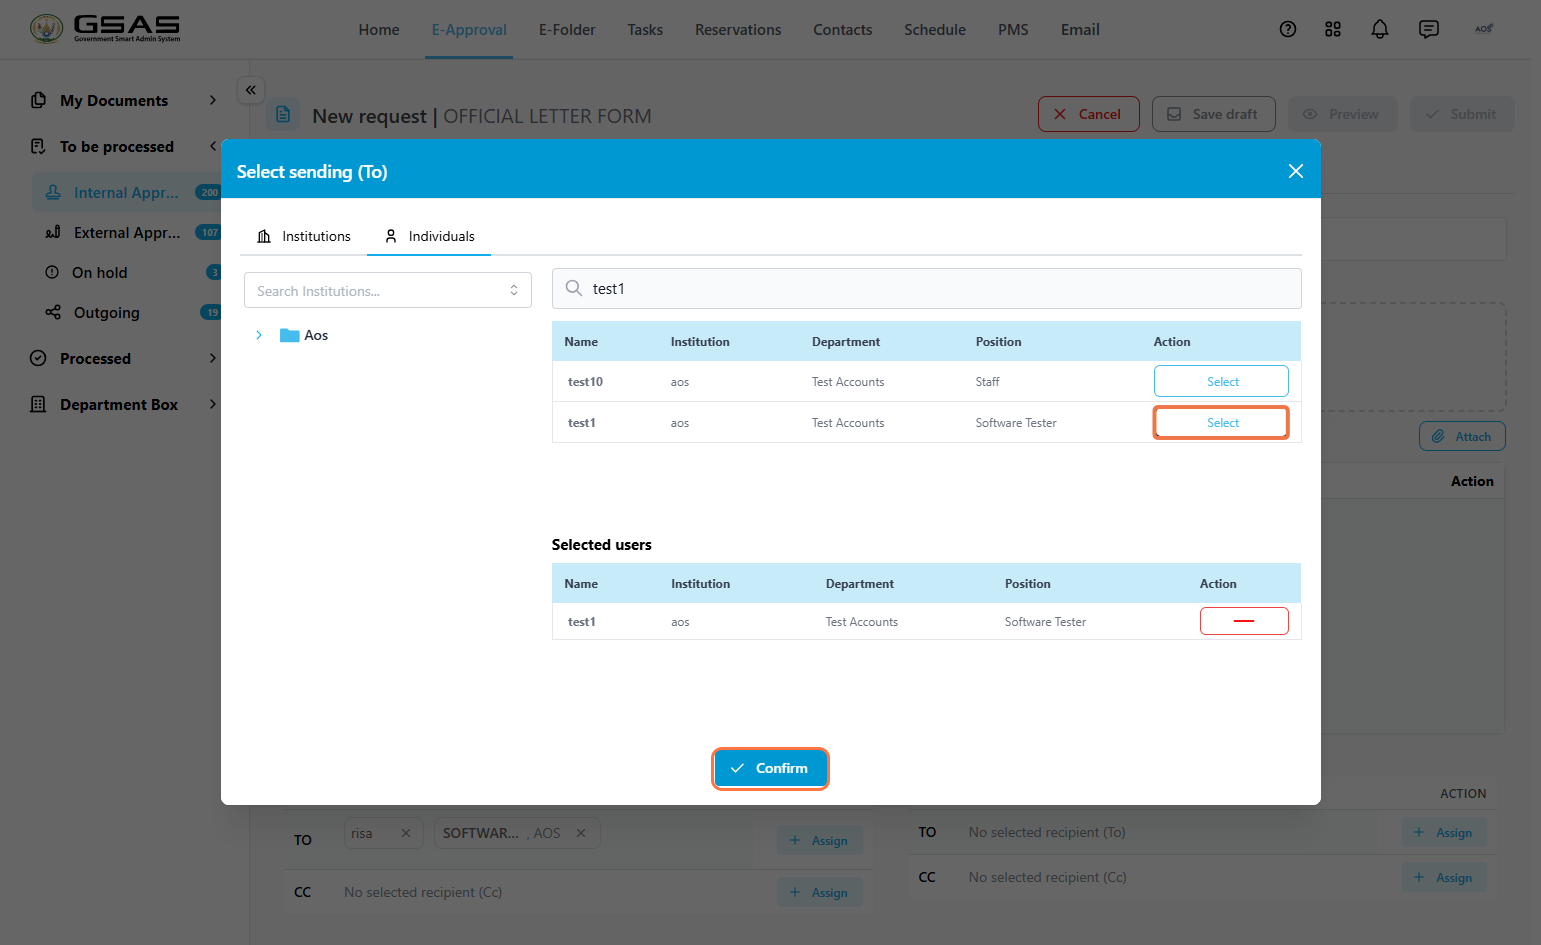
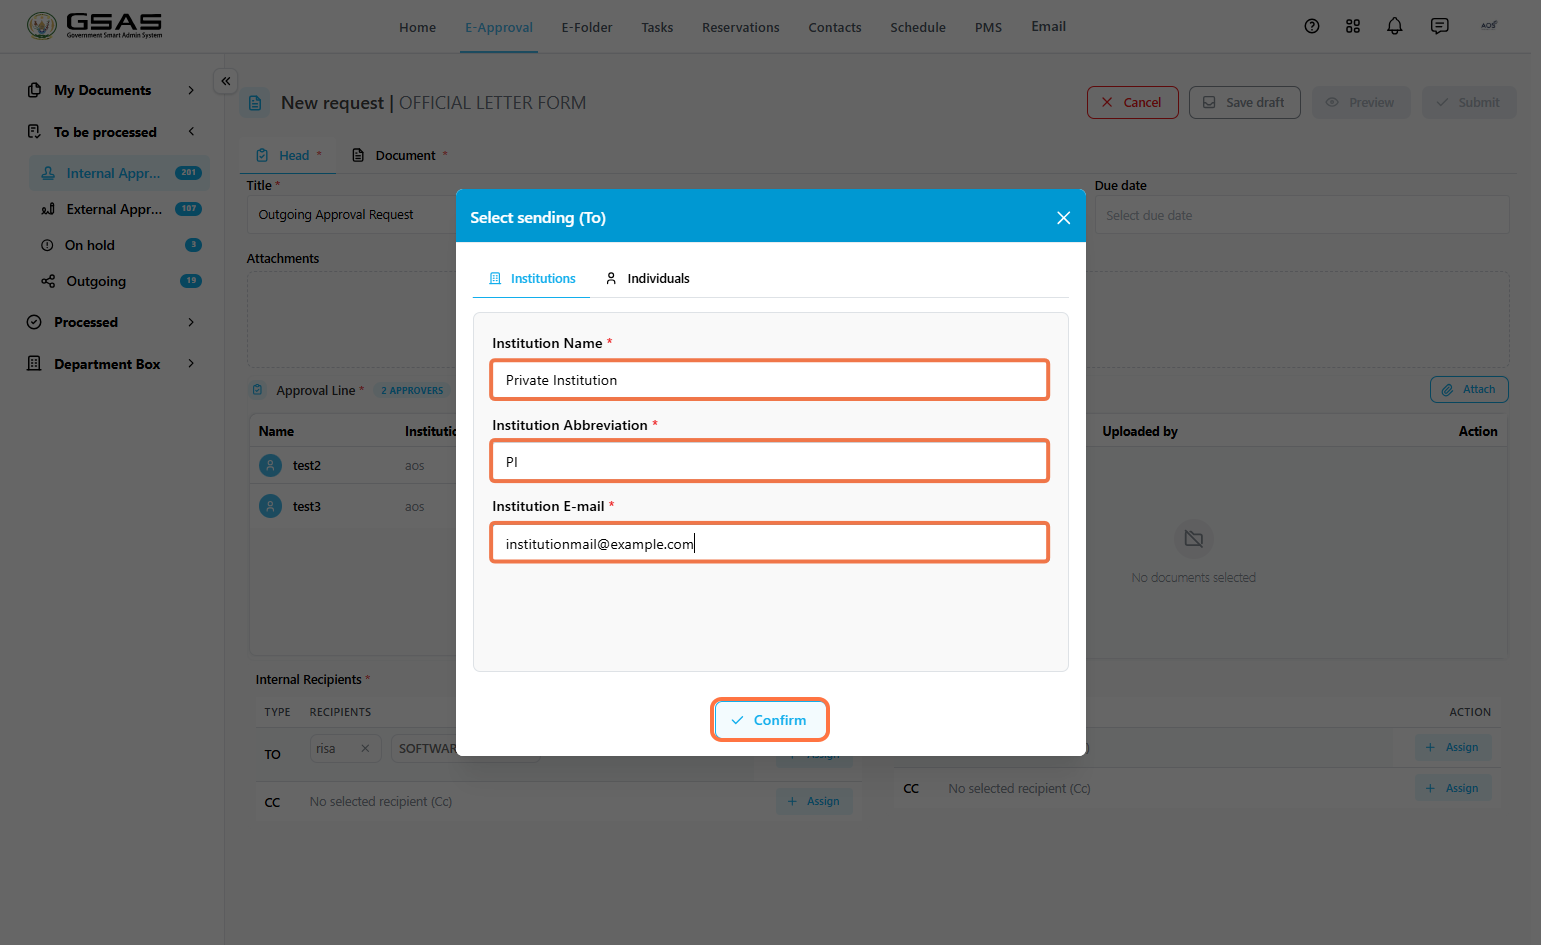
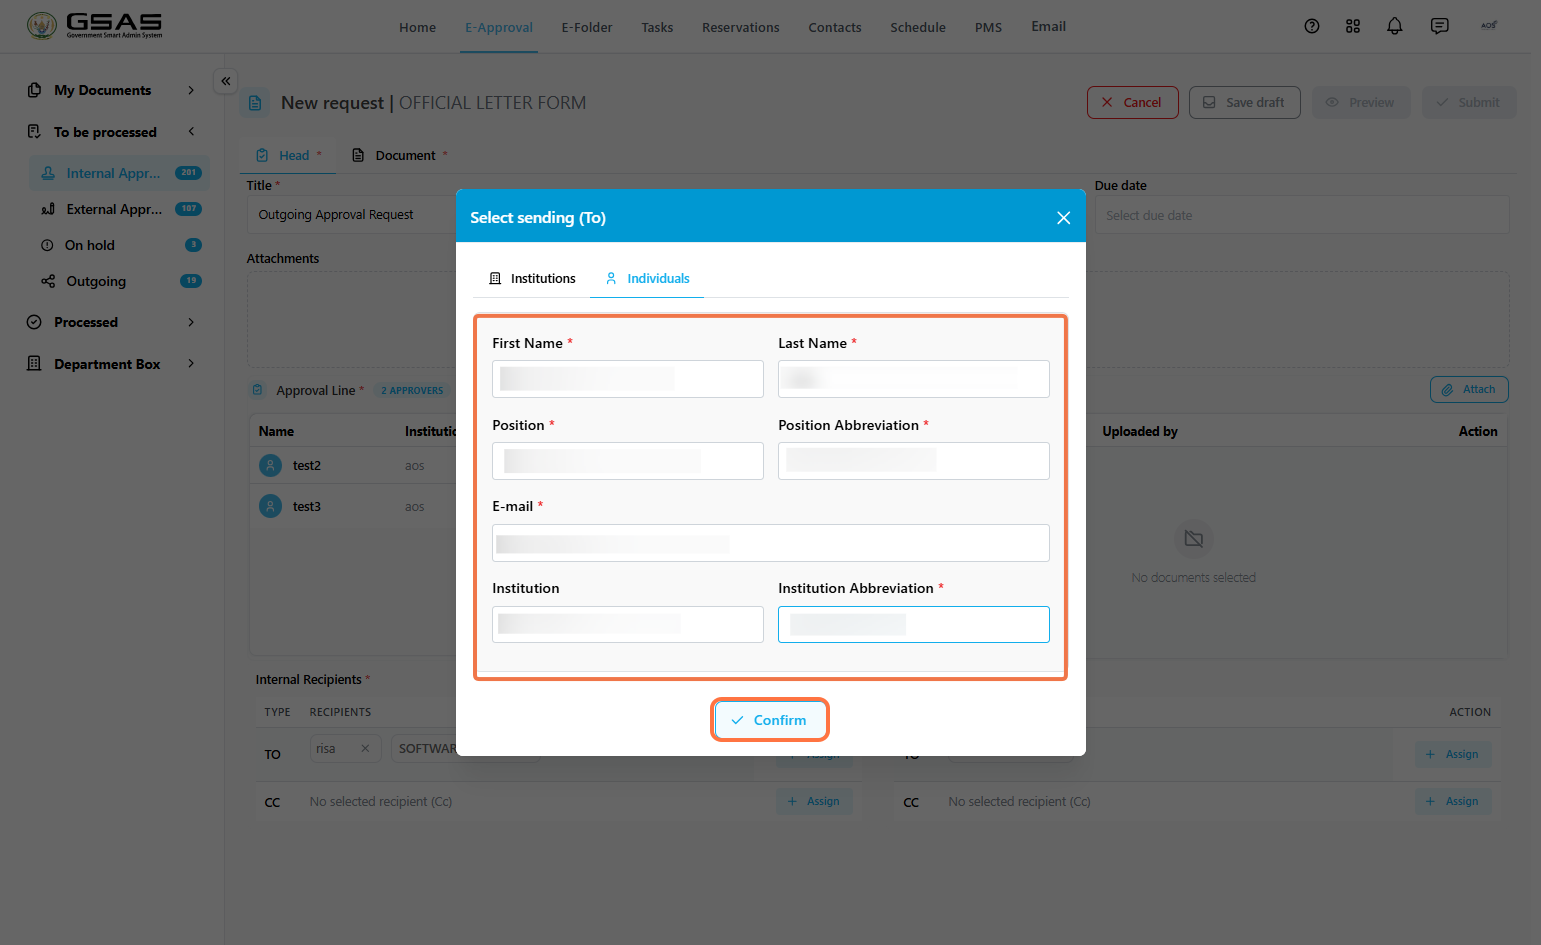
3.2 External Recipients/Private InstitutionsFor recipients who do not use Smart Admin, their details have to be entered manually. → Sending to an institution (External)
→ Sending to an individual (External)
|
Step 4
Filling in the Document tab and submitting
Fill in the content of the request in the Document tab just like it's done with internal approvals and click Submit.
Enter a message to the external recipients, it will be included in the email sent to them along with your request, then submit.
Once all approvers have approved, the request will appear in the Sender Manager's Outgoing folder to be dispatched. (See Sender and Receiver Manager Controls).
The addressed institutions and individuals will receive the request once it's been sent by the Sender Manager.
Proceed to the Managing approval requests page to learn how to keep track of your request after it has been submitted.
Dynamic forms -Travel Clearance
Use this form to request official approval for international travel.
Step 1
Initiate request
- From the E-Approval module, click Initiate.
- Select the Forms tab, then click Travel clearance from the list.
Step 2
Fill in the Head section
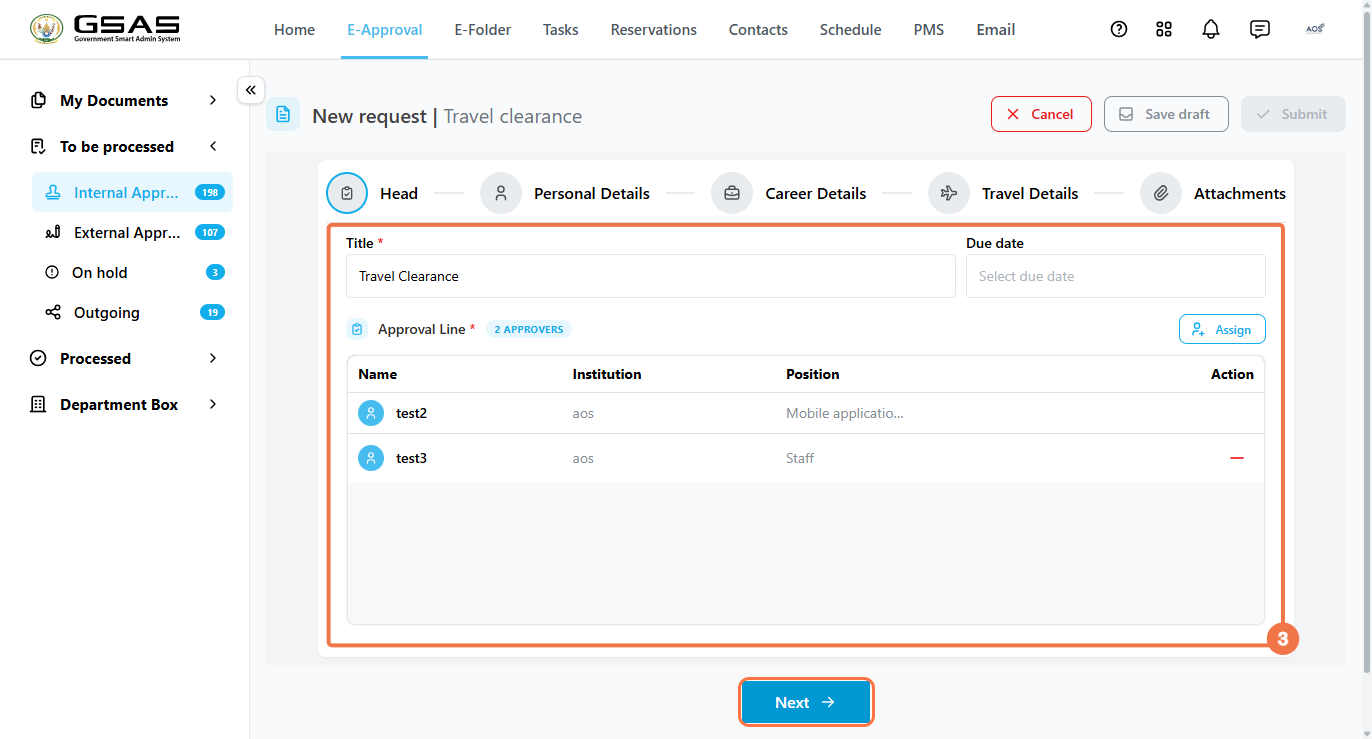
Enter a Title for the request and optionally set a Due Date. The Approval Line lists the approvers assigned to this request, click Assign to add approvers. Click Next when ready.
Step 3
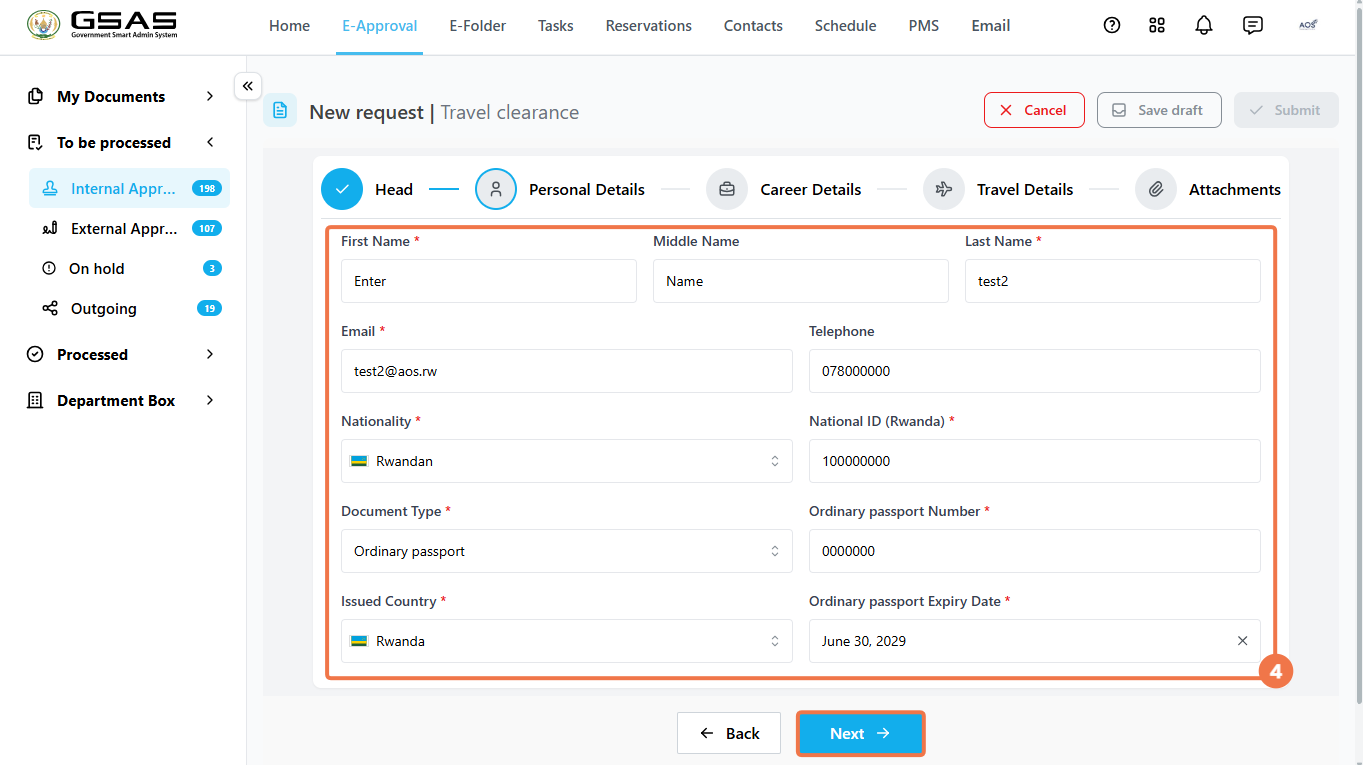
Personal Details
- Fill in your First Name, Middle Name (optional), and Last Name, along with your Email and Telephone.
- Select your Nationality and enter your National ID.
- Under document information, select your Document Type (e.g. Ordinary passport) and provide the number associated with it, Issued Country, and Expiry Date. Click Next to continue.
Step 4
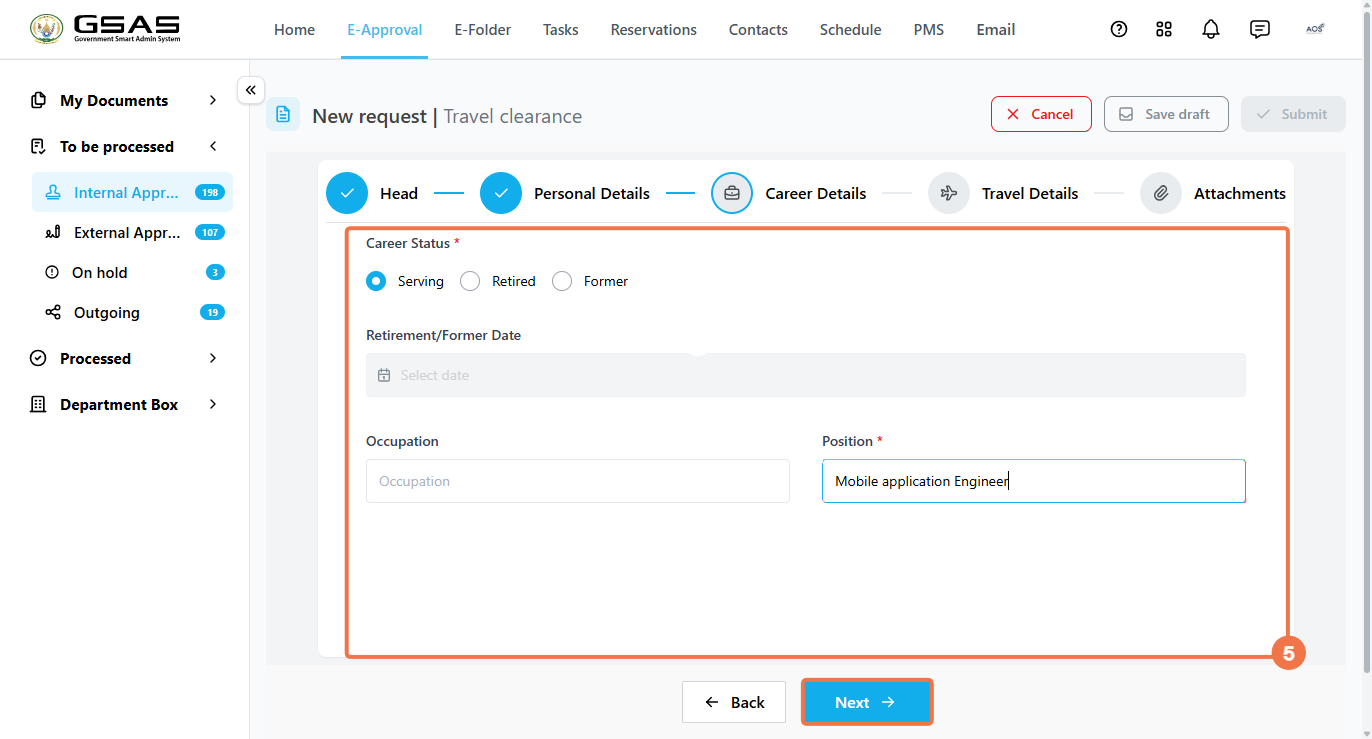
Career Details
- Select your Career Status — Serving, Retired, or Former. If Retired or Former, provide the corresponding date in the Retirement/Former Date field.
- Enter your Position (if it was not automatically filled in) and optionally your Occupation. Click Next to continue.
Step 5
Travel Details
- Select the Destination Country and enter the Destination City.
- Set the Departure Date and Returning Date, then select a Travel Reason.
The fields that follow will change depending on the reason selected. If you choose:
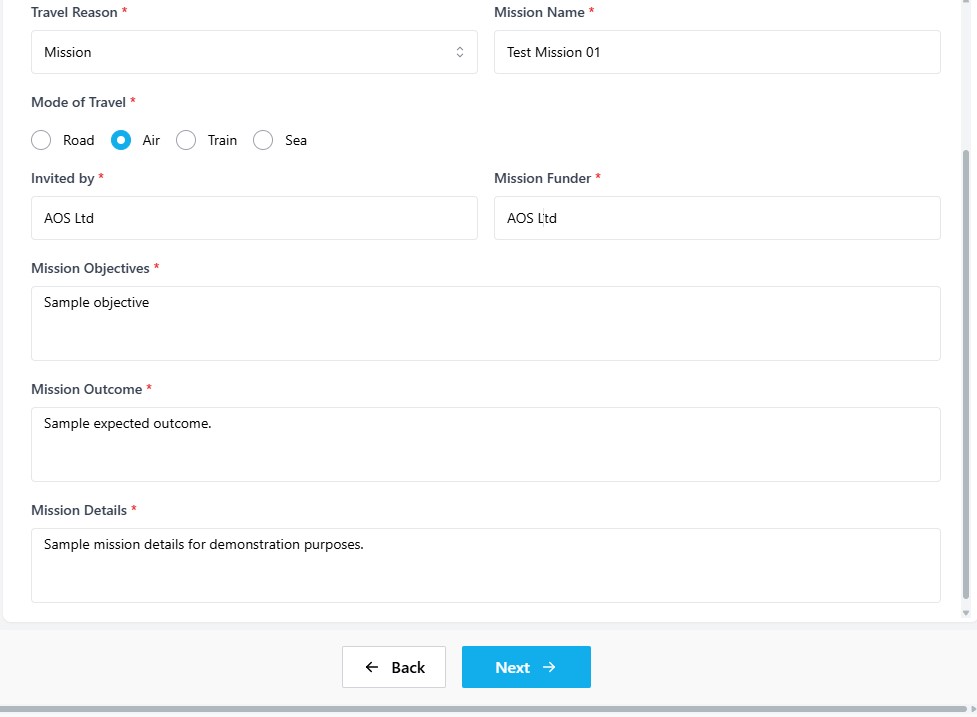
→Mission:
- Enter the Mission Name and select the Mode of Travel.
- Provide the Invited by and Mission Funder, then fill in the Mission Objectives, Mission Outcome, and Mission Details.
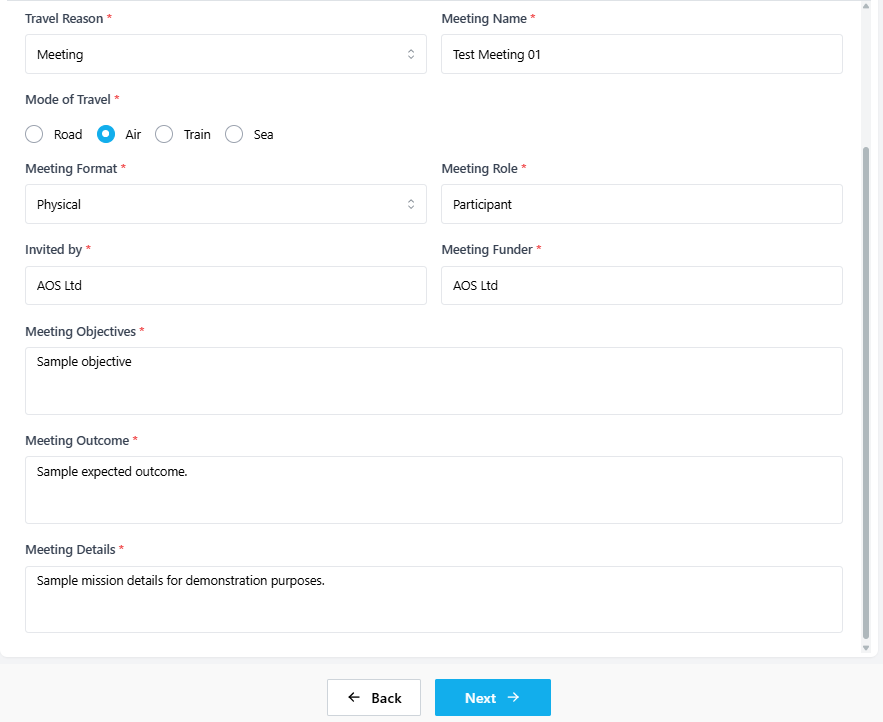
→ Meeting:
- Enter the Meeting Name and select the Mode of Travel.
- Select the Meeting Format, enter your Meeting Role, and provide the Invited by and Meeting Funder. Fill in the Meeting Objectives, Meeting Outcome, and Meeting Details.
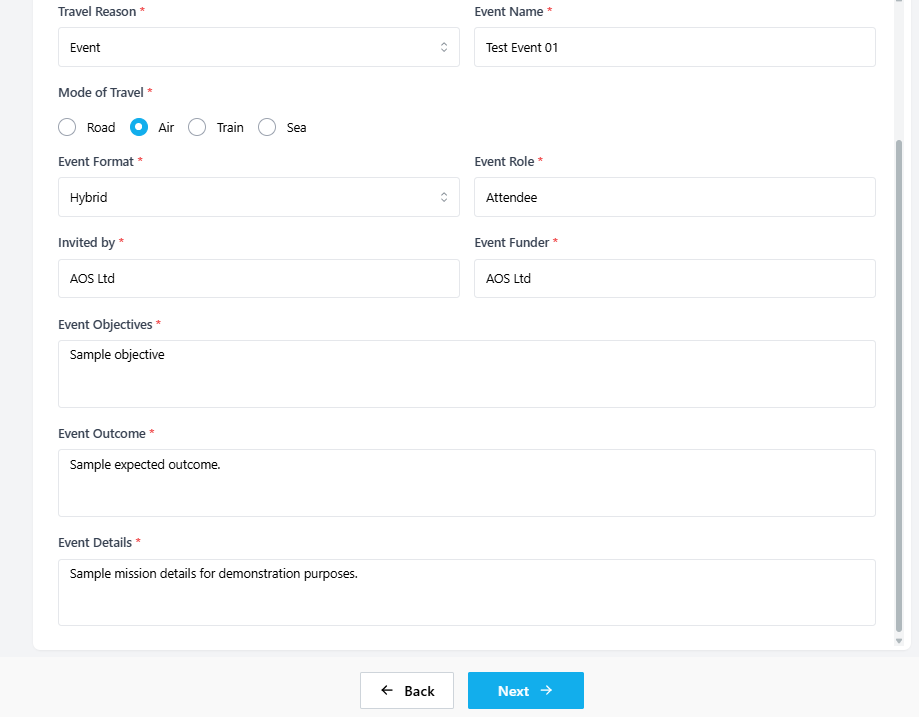
→Event:
- Enter the Event Name and select the Mode of Travel.
- Select the Event Format, enter your Event Role, and provide the Invited by and Event Funder.
- Fill in the Event Objectives, Event Outcome, and Event Details.
→Leave:
- Select the Mode of Travel (Road, Air, Train, or Sea) and enter the Leave Details describing the purpose of the trip.
- The Leave Name field is not required for this option.
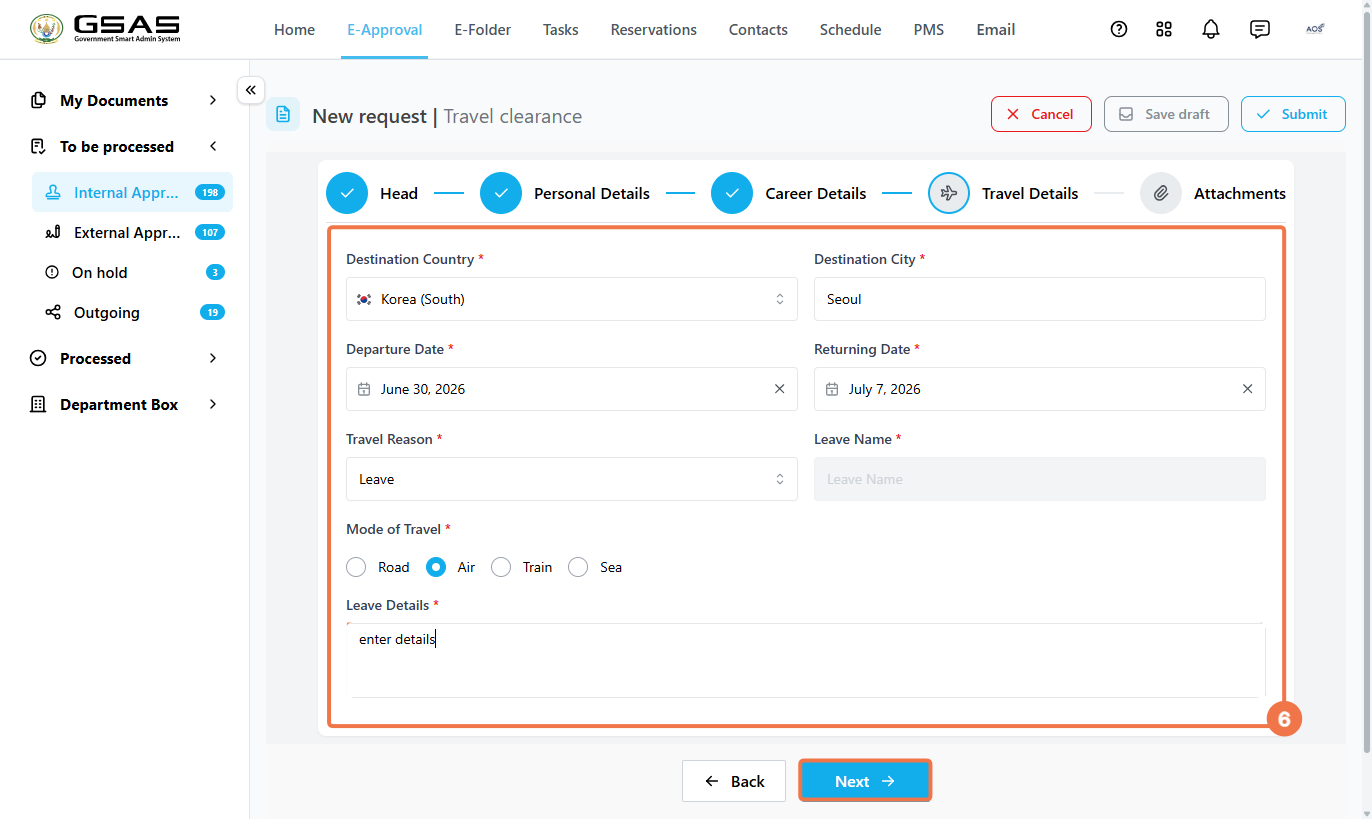
Click Next to proceed once all fields are completed.
Step 6
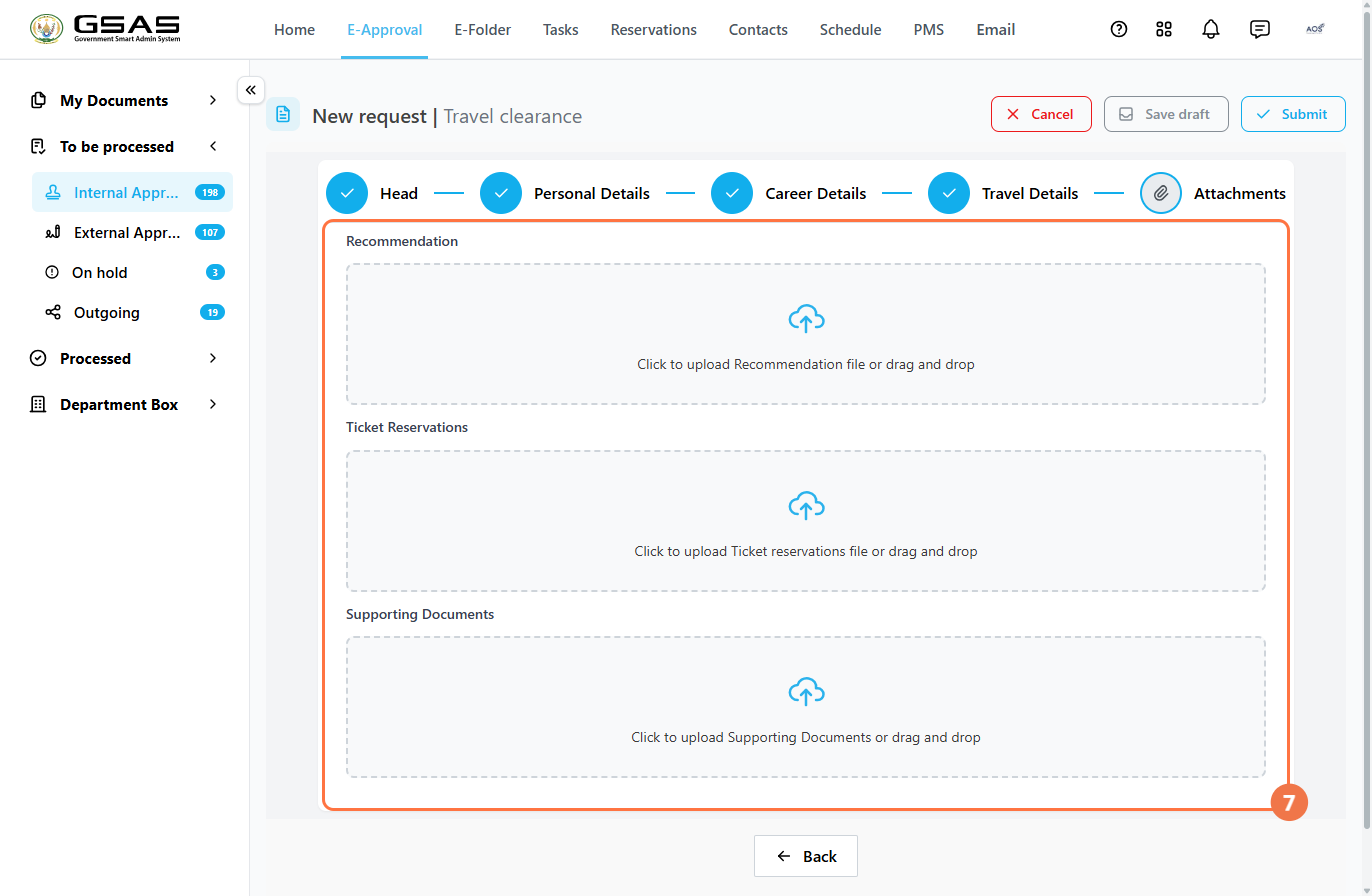
Attachments
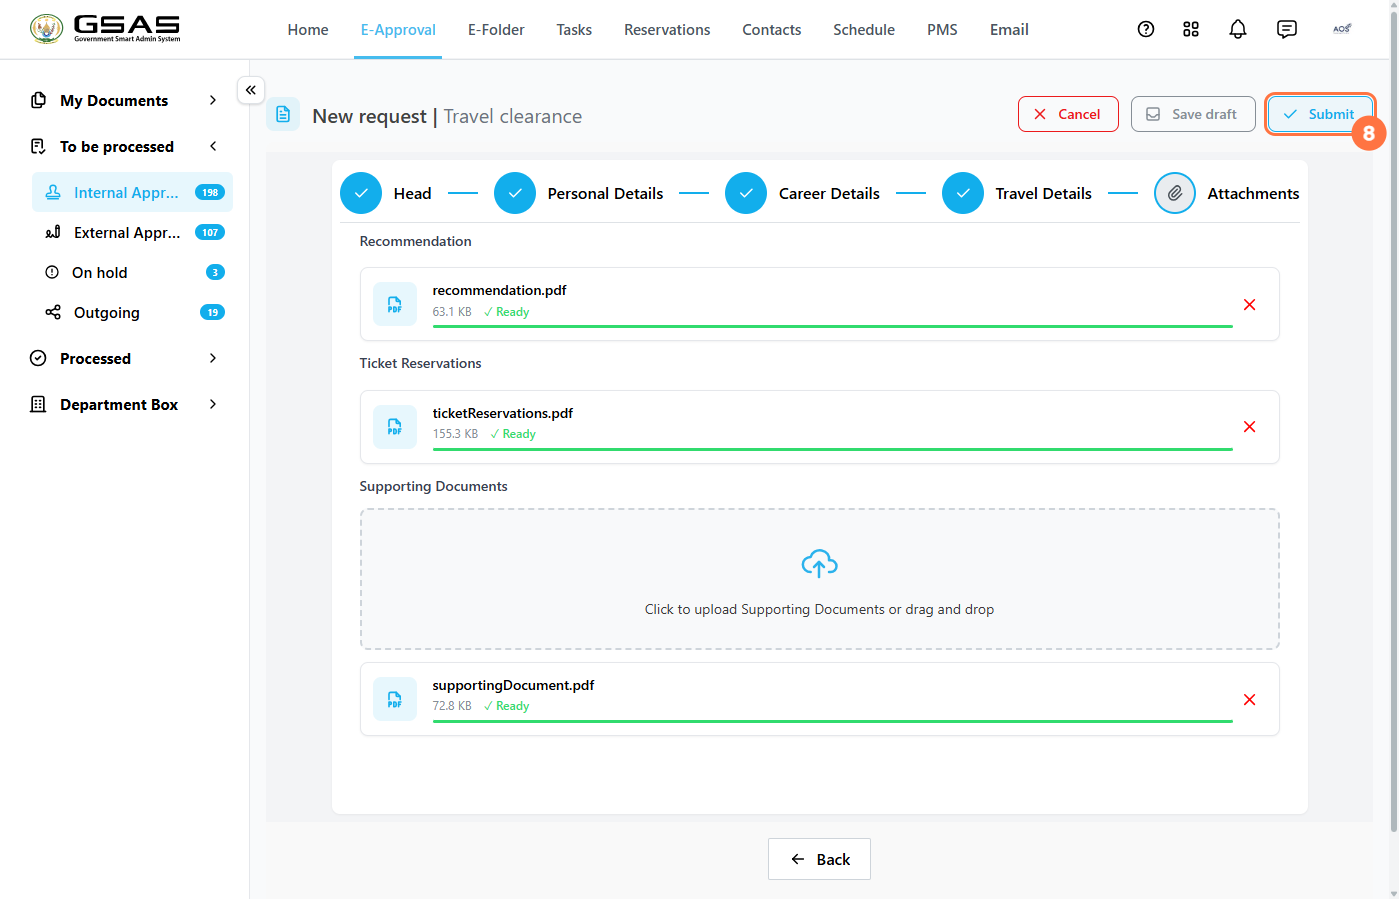
Attach any relevant documents to support your request. All attachment fields are optional. Upload files by clicking the upload area or dragging and dropping. Each file will display a green Ready status once successfully uploaded.
- Recommendation — upload a single recommendation letter.
- Ticket Reservations — upload a single file for travel booking confirmation.
- Supporting Documents — upload one or more additional files relevant to the request.
Step 7
Submit your Request
Once all sections are complete, click Submit in the top right corner. A confirmation dialog will appear, click Submit again to confirm and send the request for approval.
Managing approval requests
This page covers what happens after you submit an approval request, how you can track it's progress and how you can respond to approval requests you have been assigned.
Tracking your request as a drafter
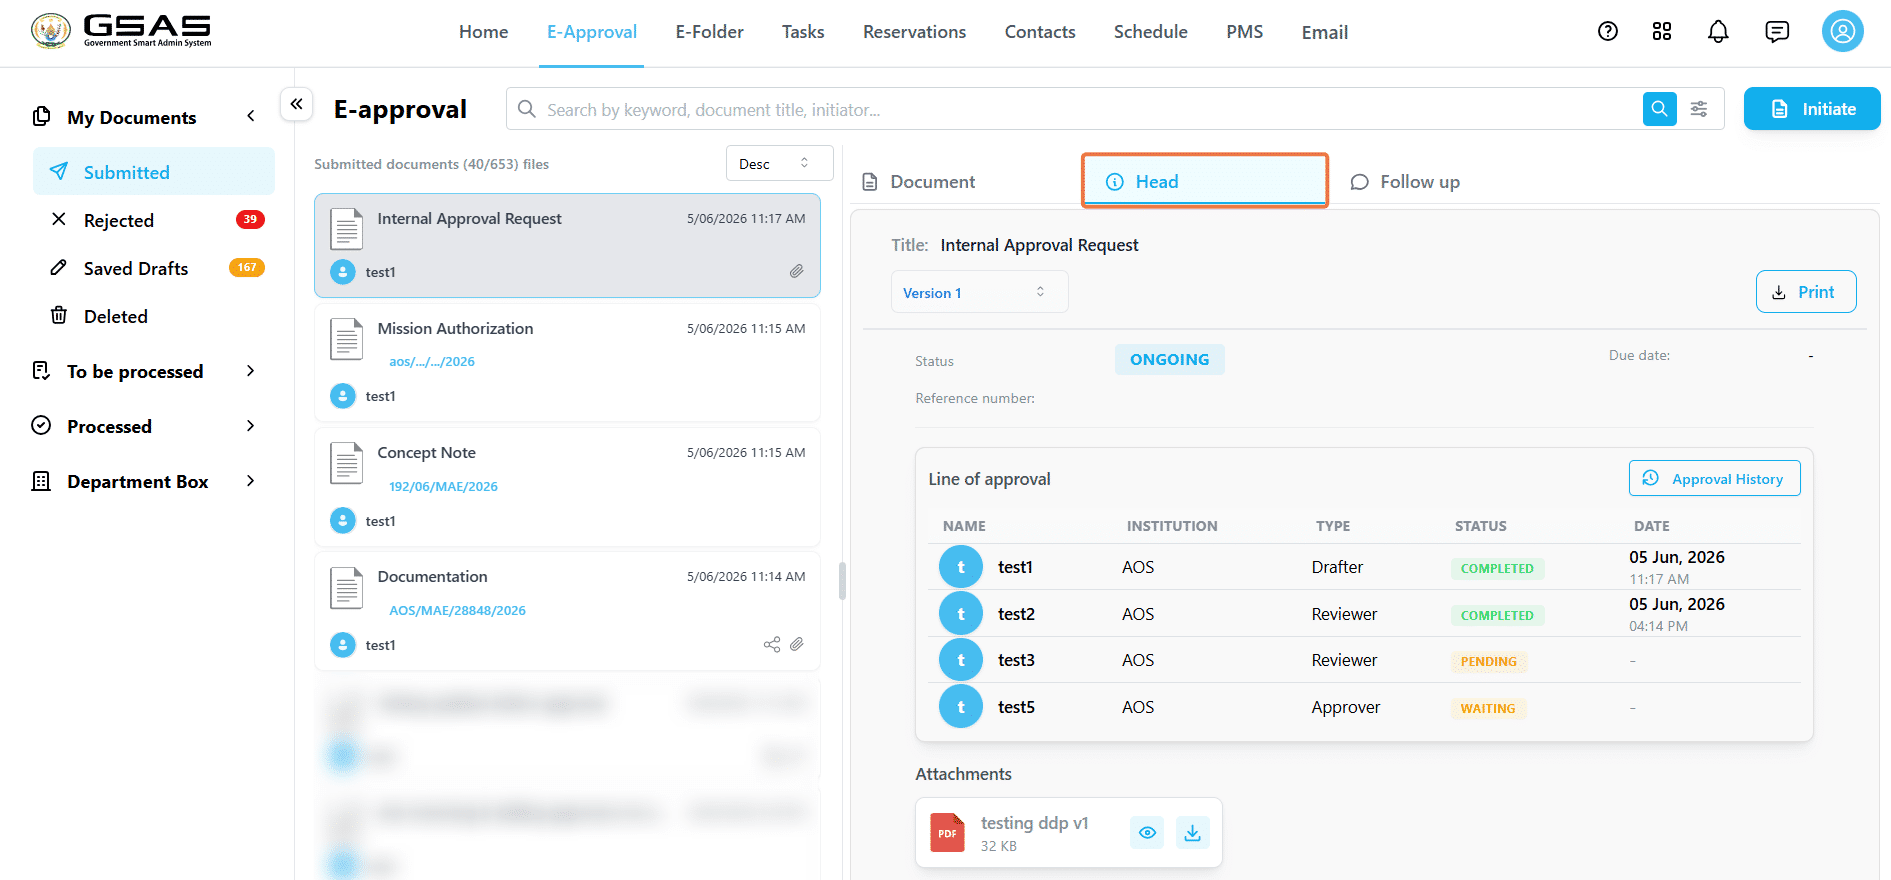
- Once submitted, your request appears under My Documents → Submitted. Click on it and open the Head tab to see a full picture of where the request stands; the approval line, each approver's status, and the date they acted.
→ Understanding request statuses
Each person in the approval line has an individual status that updates as the request moves forward.
| WAITING | The request has not yet reached this person. |
| PENDING | The request has reached this approver and is currently waiting for their action. |
| COMPLETED | This person has approved the request. The date and time of their action is recorded alongside their name. |
- If an approver approves your request, their status will update to completed, and the request will move to the next approver in the line of approval.
- If your request is rejected, you'll find it in My Documents → Rejected. The approver's reason for rejecting will appear as a comment icon alongside their date & time of rejection in the approval line, which you can see by clicking on the View icon.
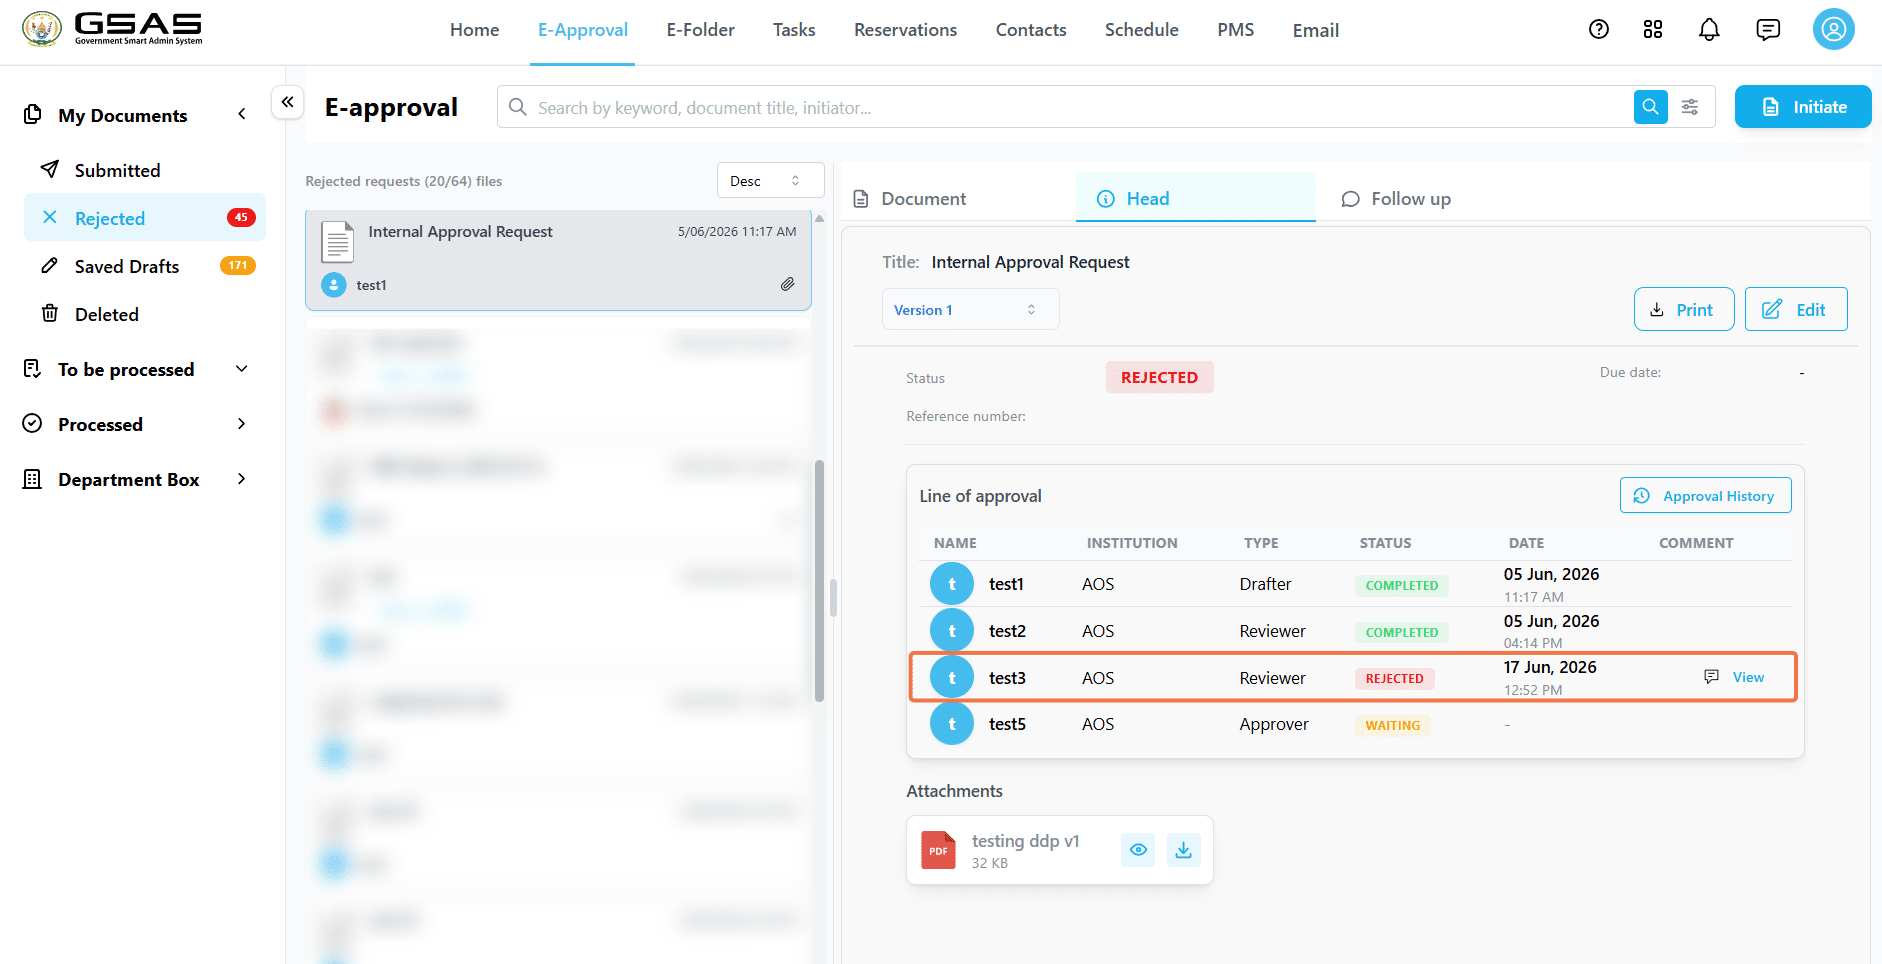
- Click on "Edit" to make the necessary changes, and resubmit.
- Once resubmitted, the request returns to the first approver again, and moves through the approval line in order.
If a request has been edited and resubmitted by you, it gets updated to a new version. The Version dropdown lets you view and compare with earlier versions of the document.

Responding to a request as an approver
When a request reaches your turn in the approval line, you will be notified. You will find it in:
- To Be Processed → Internal Approval if a user from your institution assigned it to you, or
- To Be Processed → External Approval if a user from another institution assigned it to you.
Open the request and review its content before taking any of the following actions:
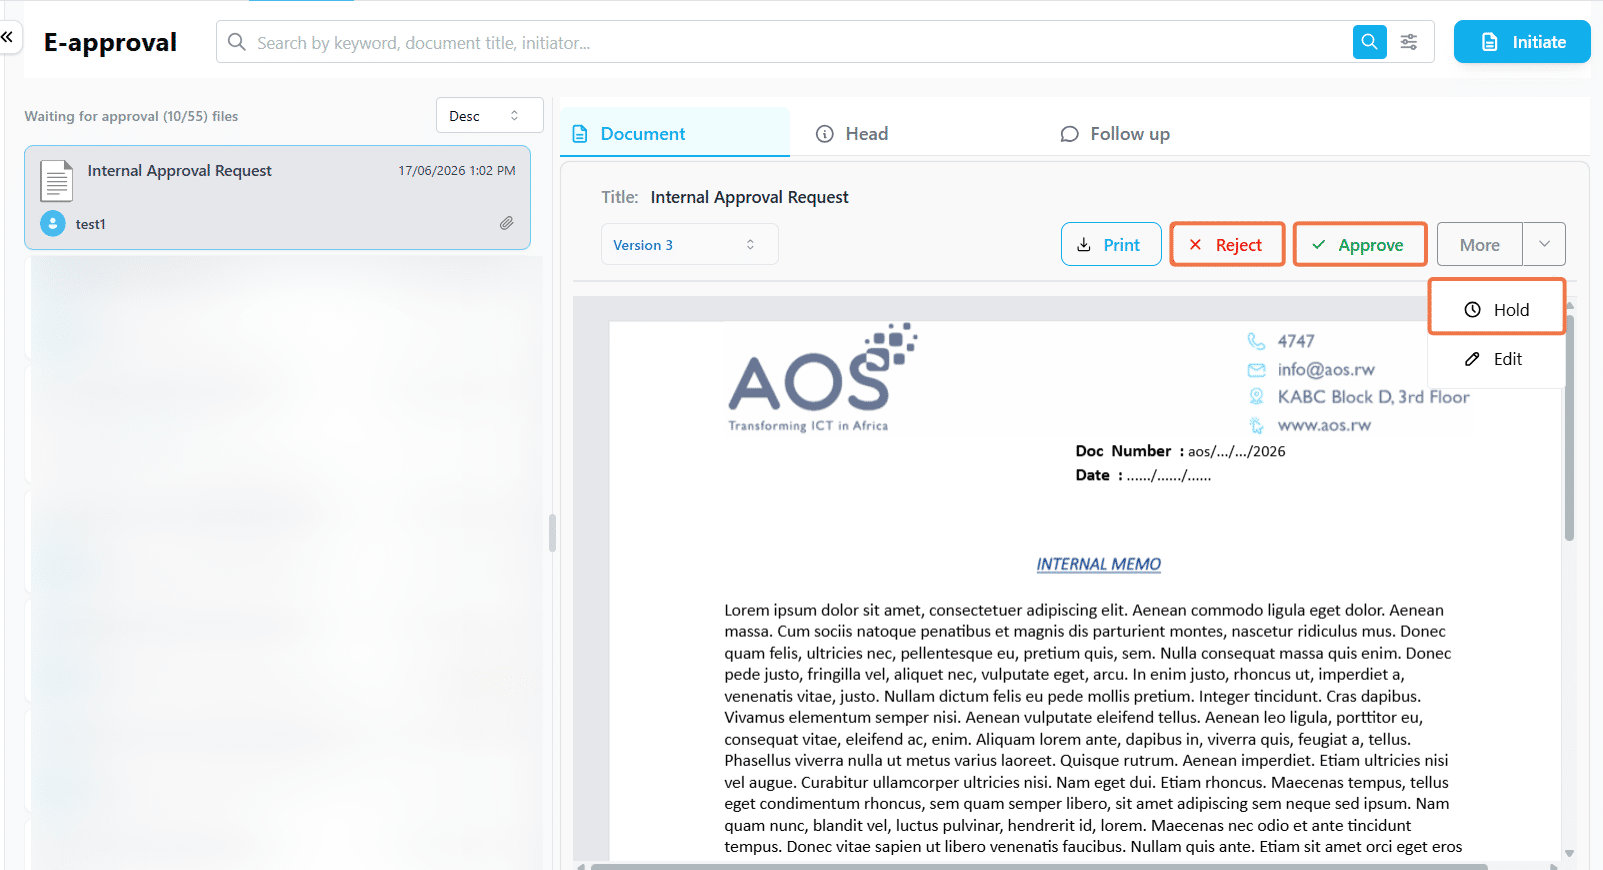
| Approve |
Approves the request and moves it to the next approver in line. |
| Reject |
Rejects the request after you leave a mandatory comment explaining the reason. The request will be in your Rejected folder until the drafter resubmits. |
| Hold | Moves the request to your On Hold folder for quick access if you are not ready to act on it yet. The drafter is not notified. You can approve or reject it from the on hold folder at any time. (Click on the More dropdown to see this option). |
→ Editing before approving
| Important: Some form templates are configured as editable by your admin. When forms are editable, you can make changes to the request's details or content before approving. When you edit and update a request, its version updates. Click the Version dropdown to compare with earlier versions. |
How to edit a request as an approver
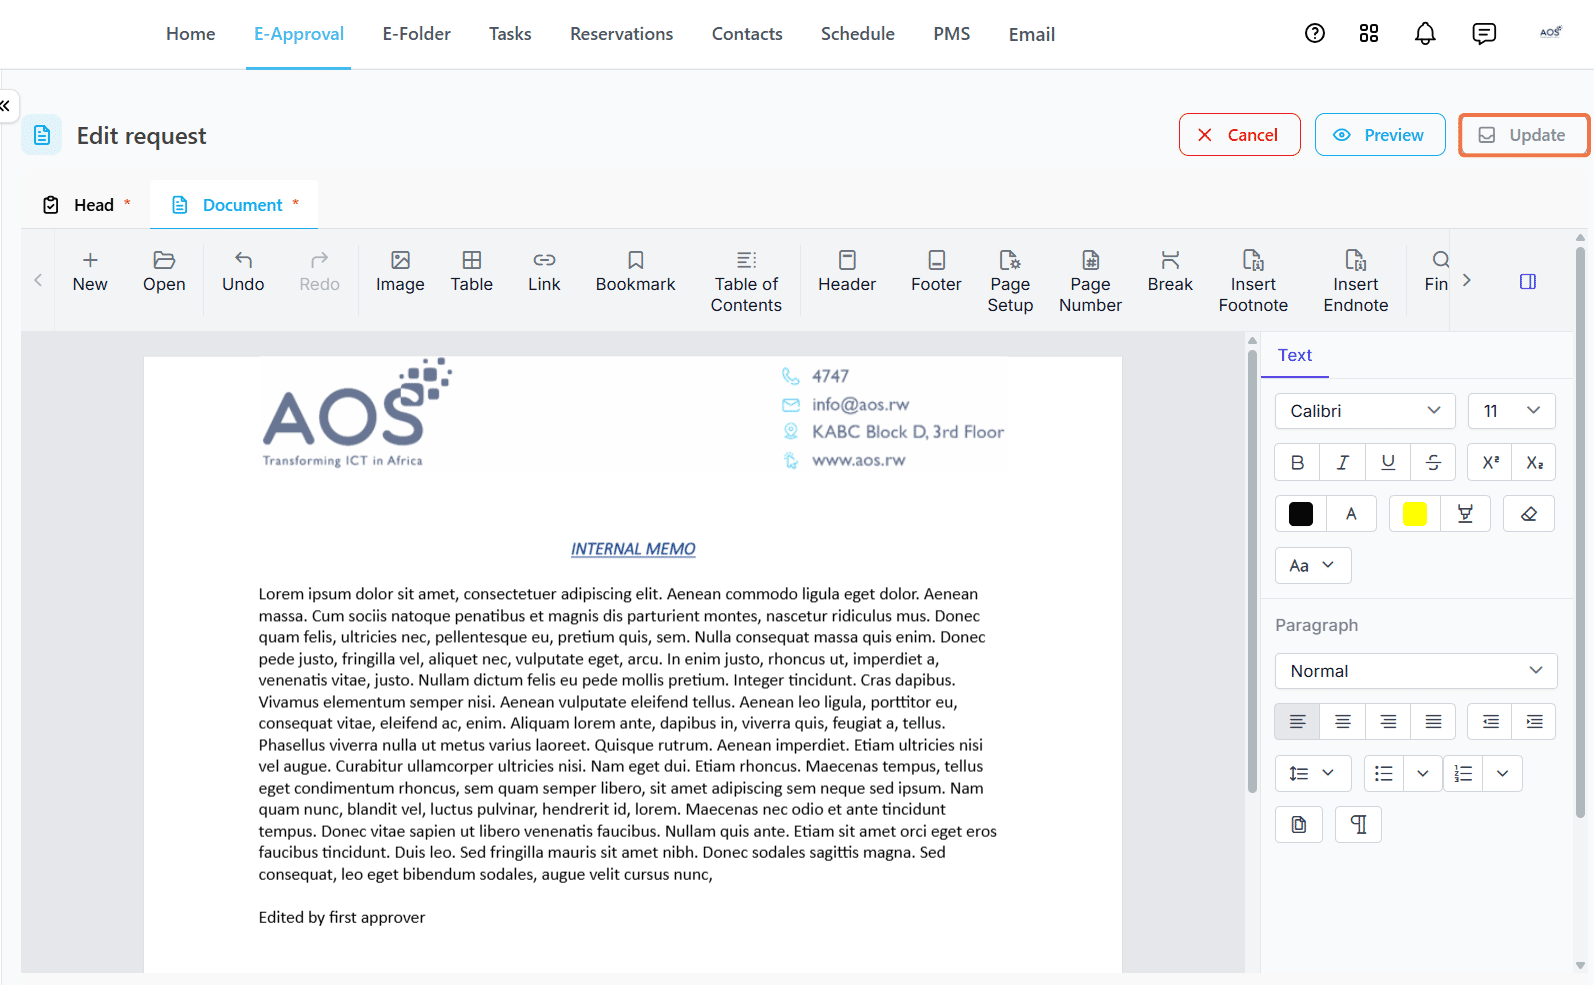
- Open the request and click the More dropdown, then click Edit.
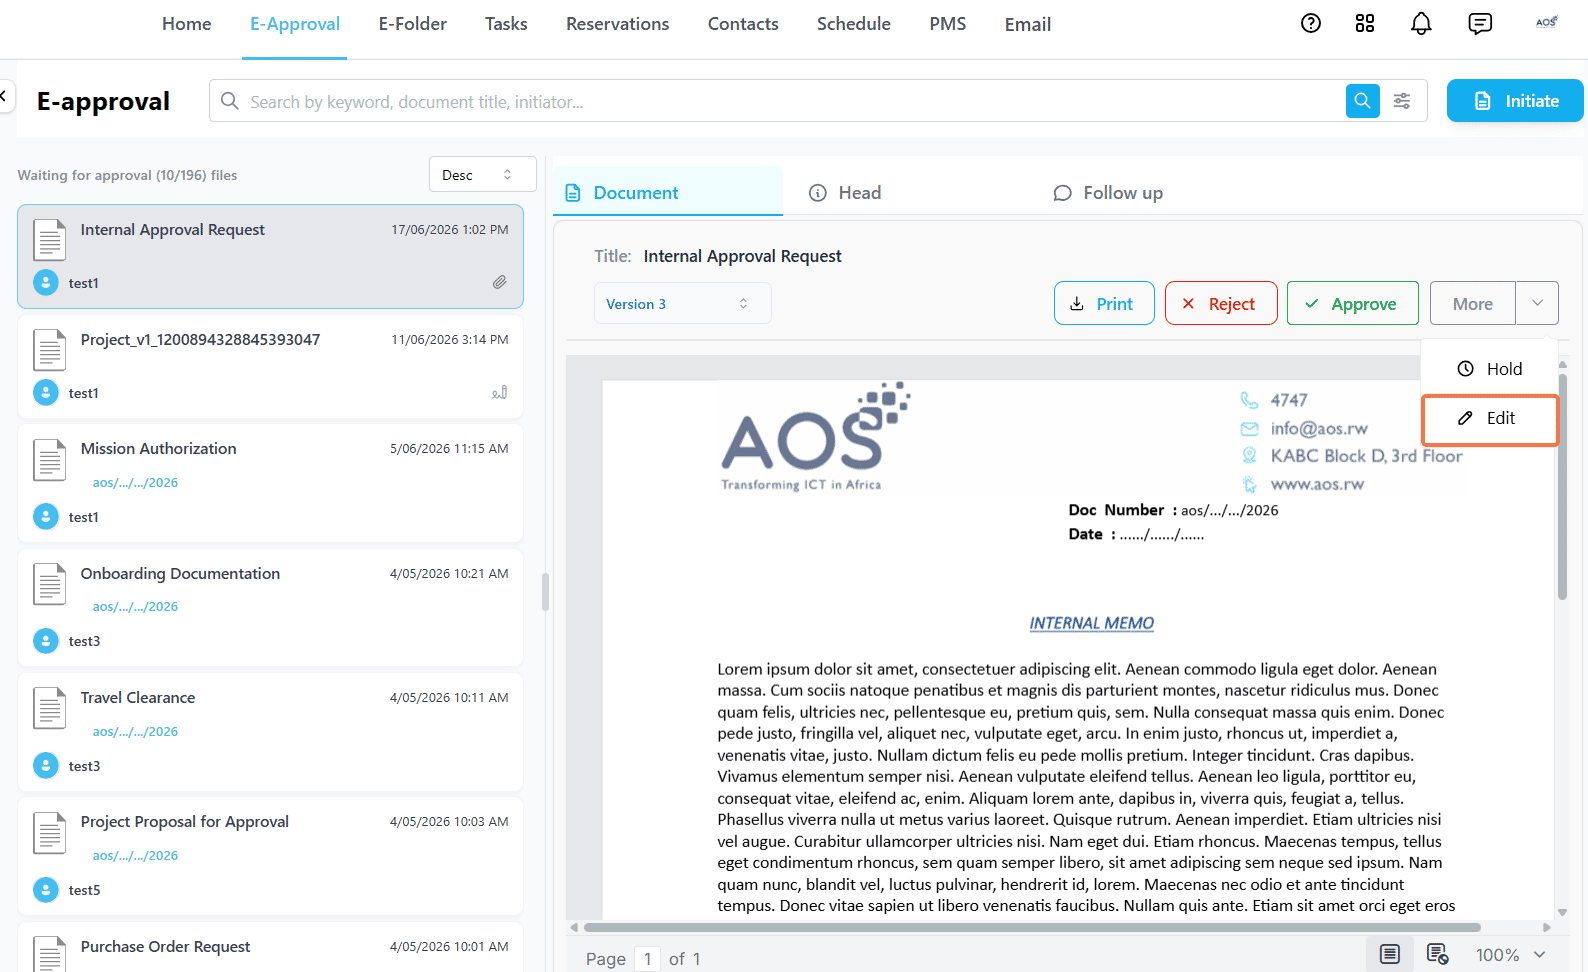
- Make any necessary changes on the Head or Document tab, then click Update.
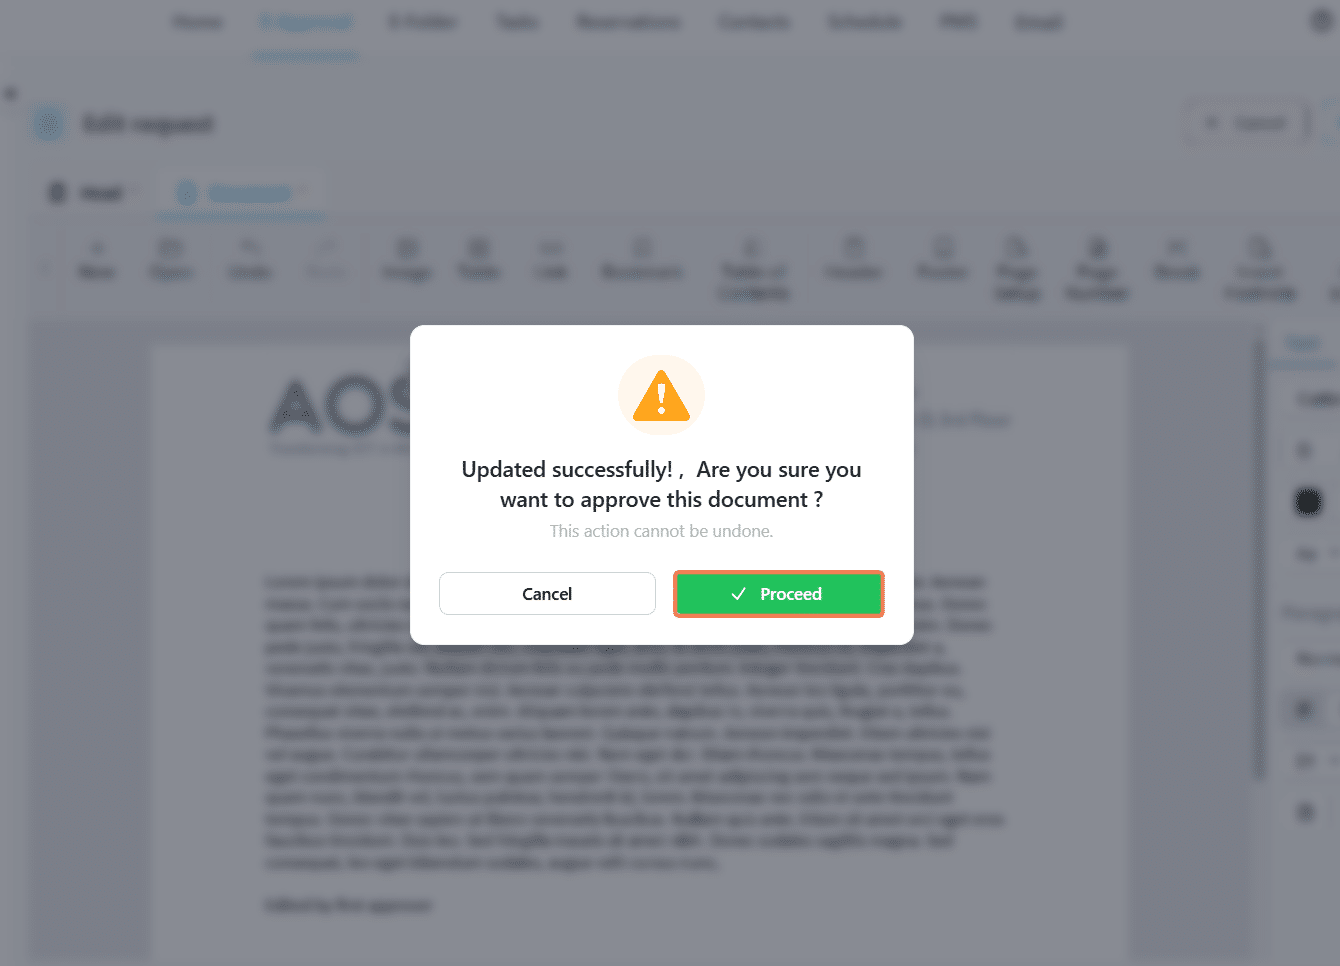
- A confirmation dialog will appear. Click Proceed to save the changes and approve the document, or Cancel to save the changes without approving.
Drafter's final check
Some forms are configured with a Drafter's Final Check. When enabled, the request returns to the drafter after all approvers have approved for confirmation, before it is marked as completed. Once it is returned to the drafter, they will find it in To Be Processed → Internal Approval with their role listed as Confirmer. They can then review the document and click Confirm to finalize it.
Completed requests
Once a request is fully approved, the reference number, date of completion, and each approver's signature with their date and time of signing are all visible on the document.
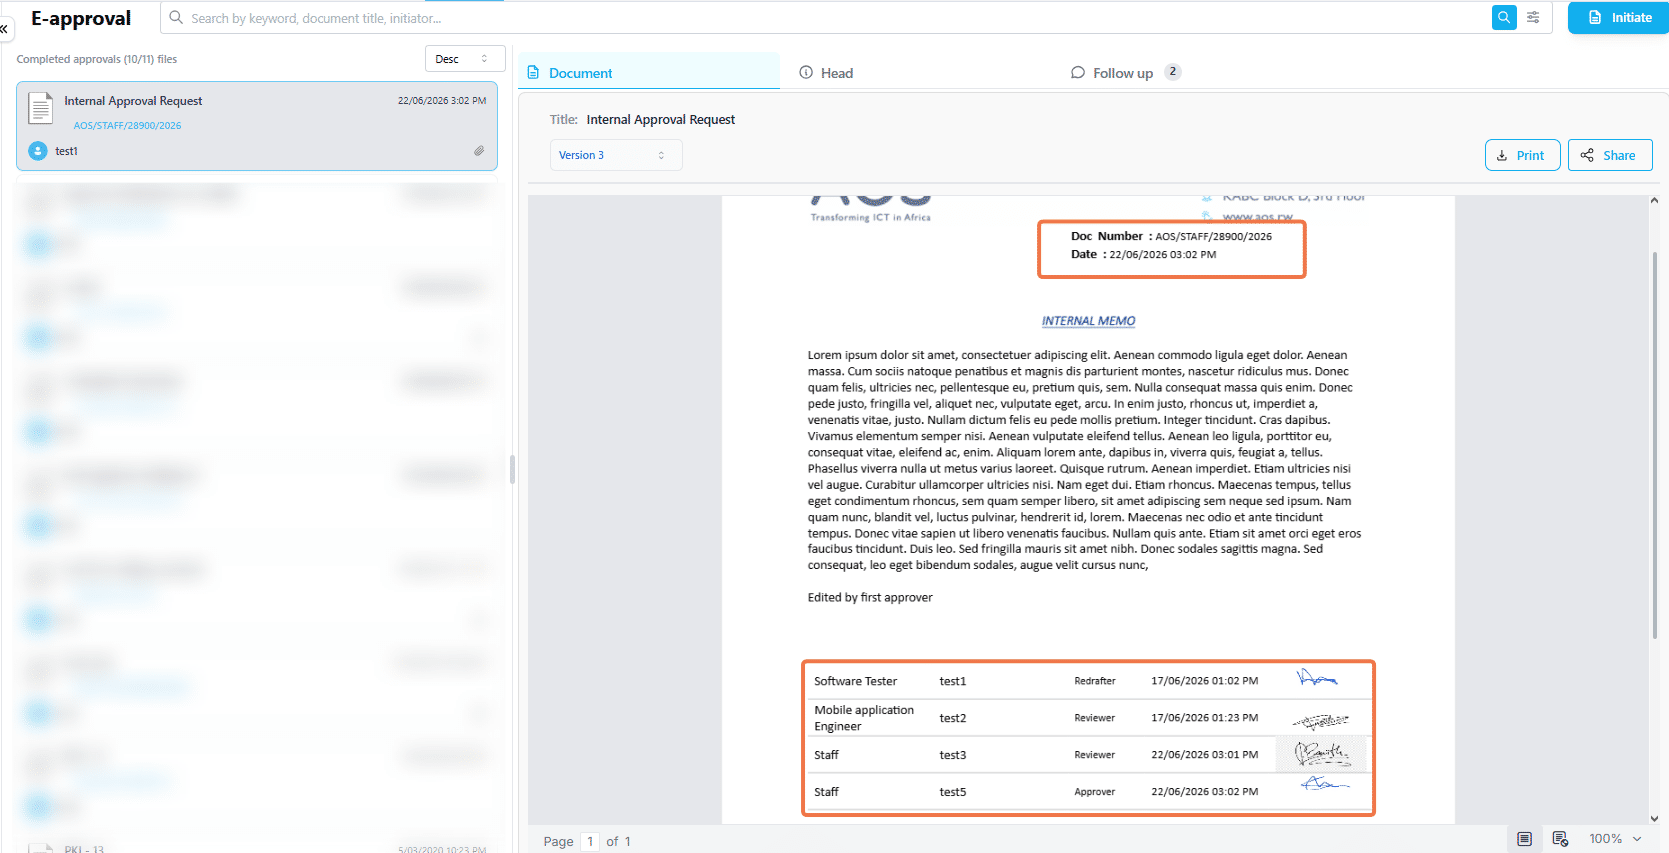
- For outgoing requests, once completed the document appears in the Sender Manager's Outgoing folder to be dispatched to the recipients.
The Sender Manager of your institution can edit the details of the request before sending, i.e. Attachments, Title, and Assigned institutions or individuals.
Forwarded requests
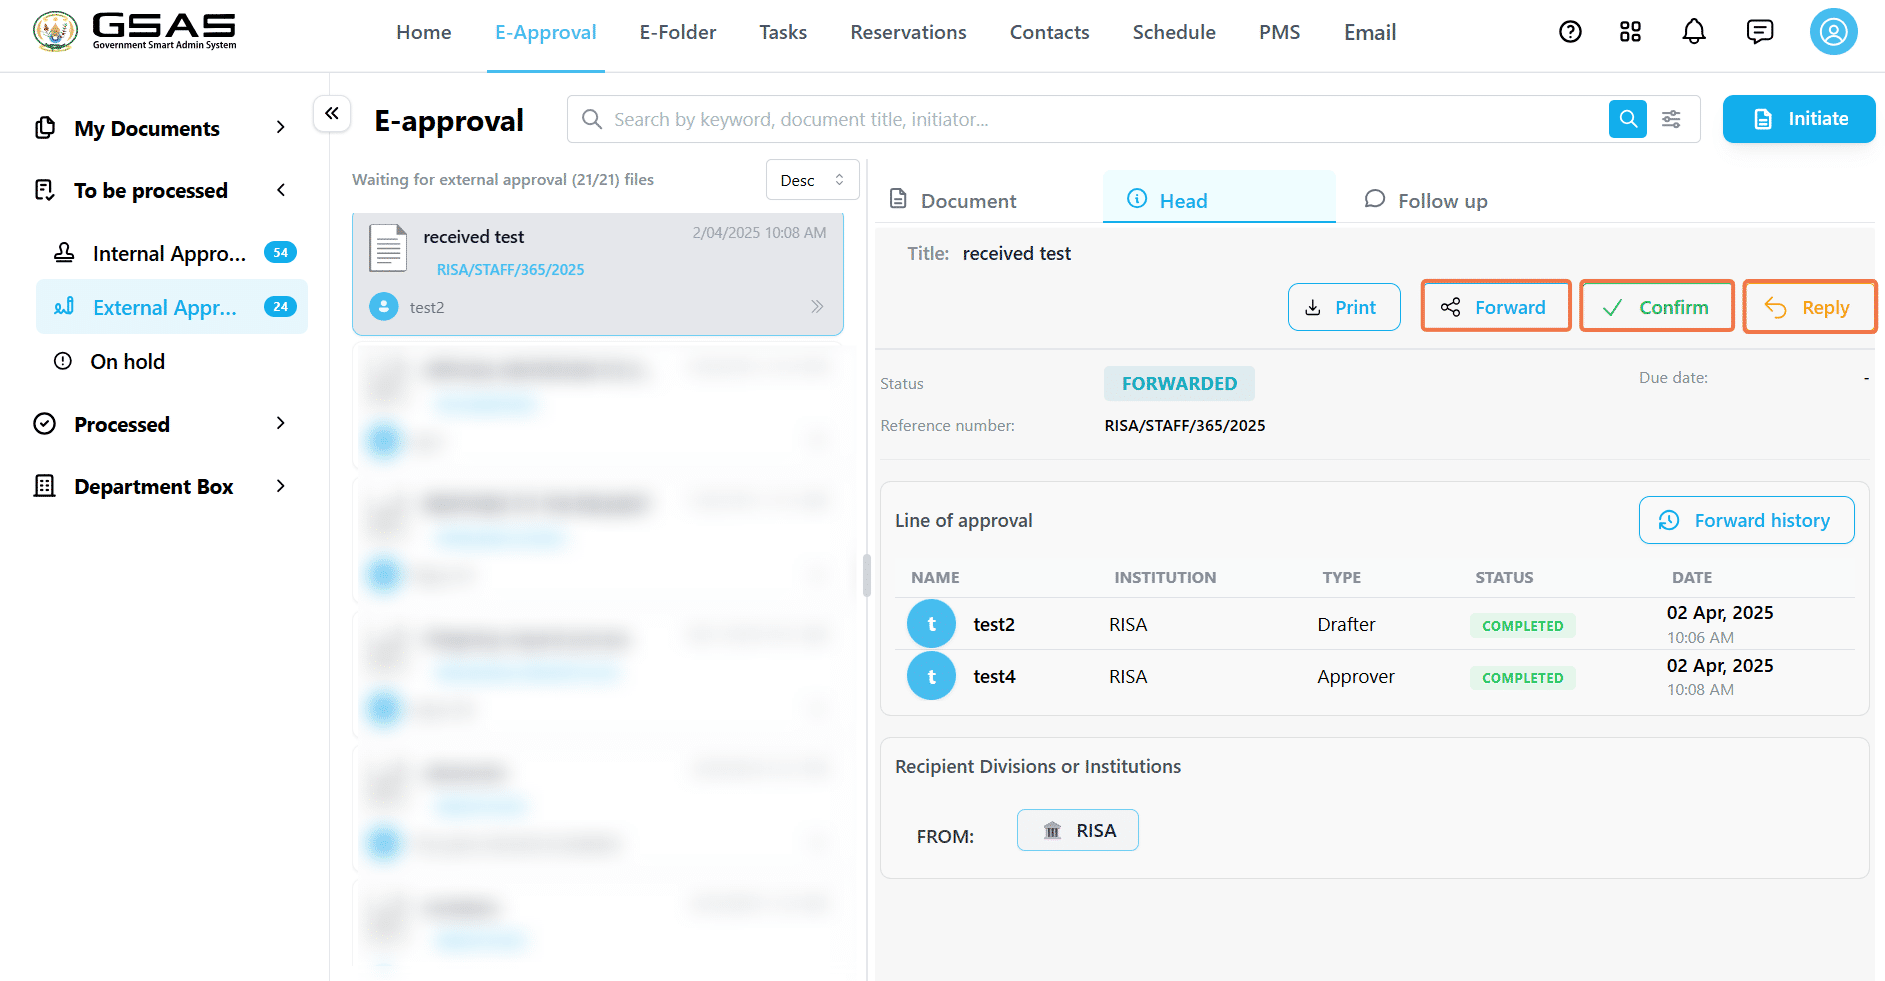
- These are requests received from external institutions that your institution's Receiver Manager has forwarded to you for action.
- You will find them in your External Approval folder. As a recipient you can; Forward to any other relevant parties, Confirm receipt or Reply with a request of your own.
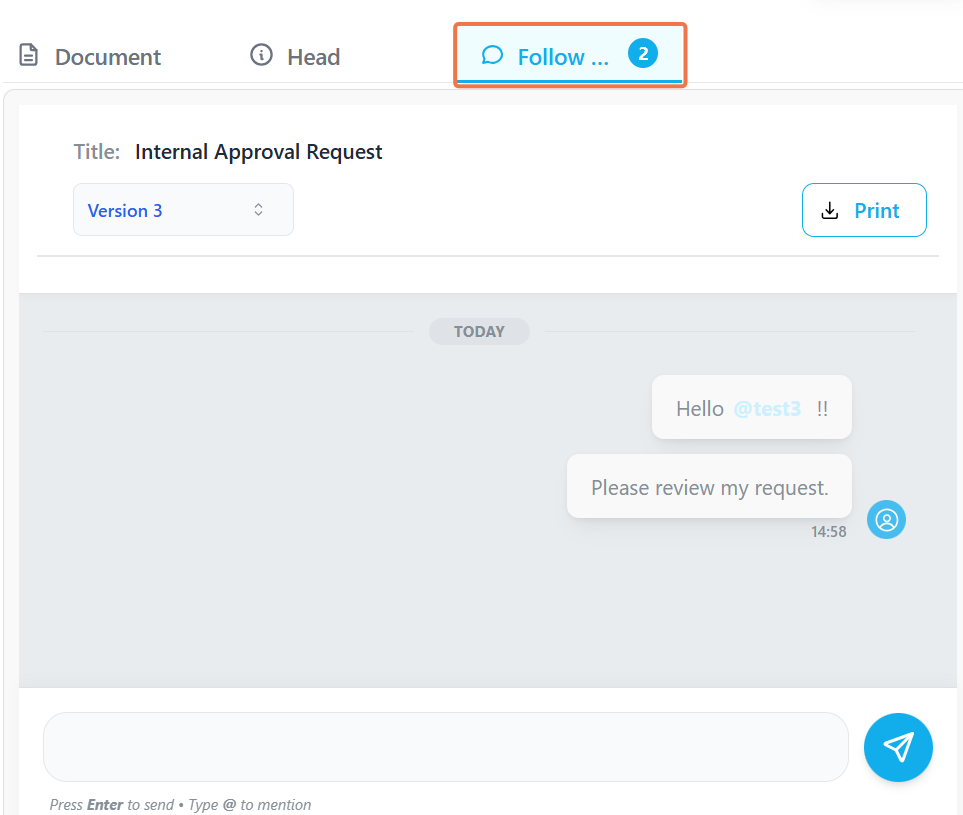
Follow up
The Follow Up tab is available on any request to everyone in the approval line. Use it to ask questions or provide additional context at any point during the process.
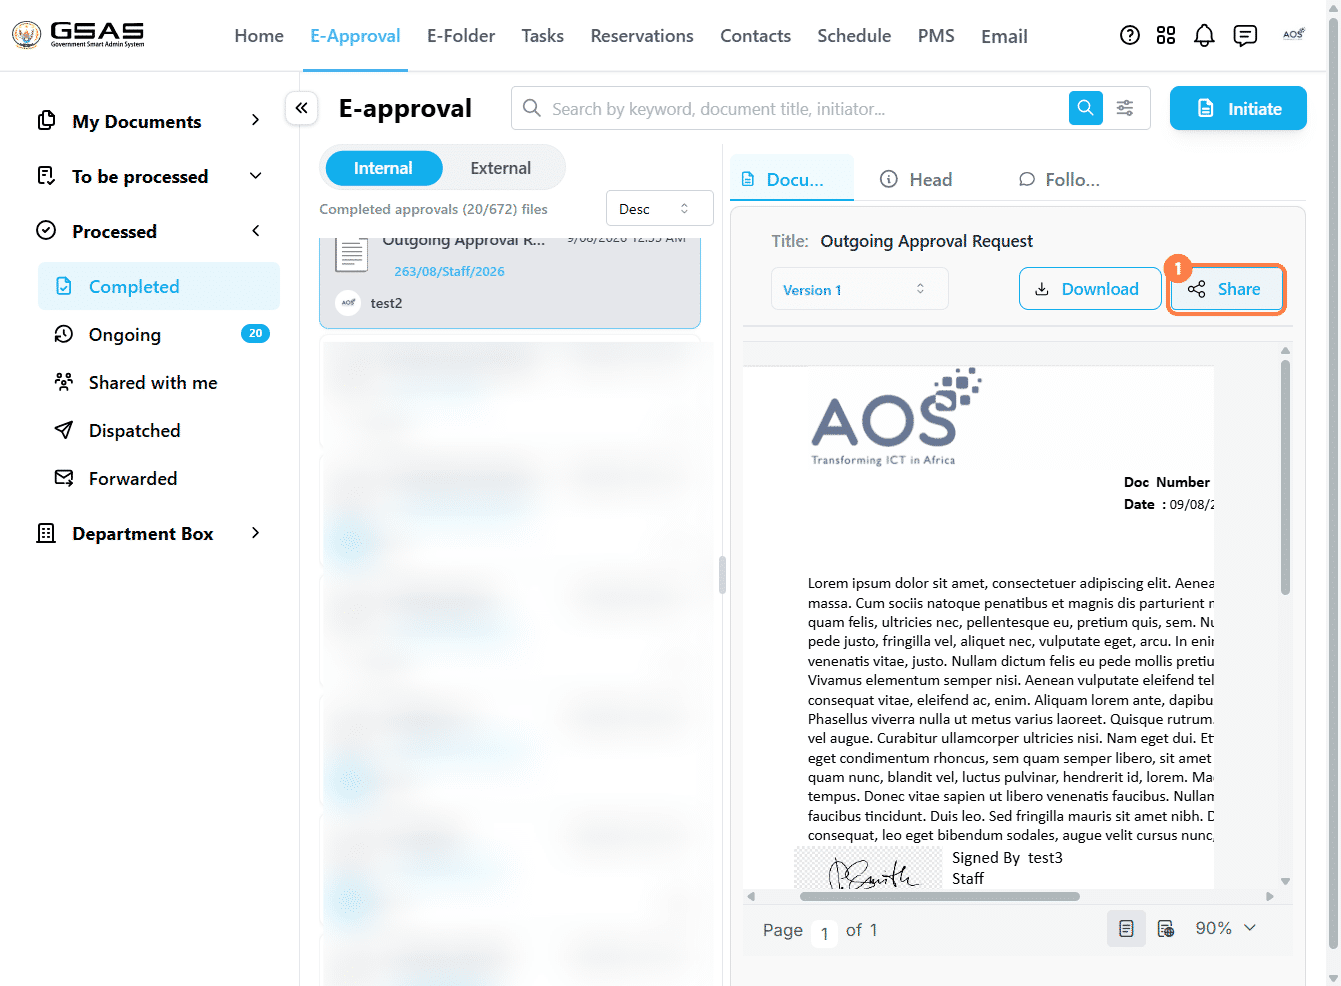
Sharing a completed request
Once a document is completed, everyone with access to it (drafters, approvers) can share it with other users within their institution
The document can be shared either with a single user or a group of users.
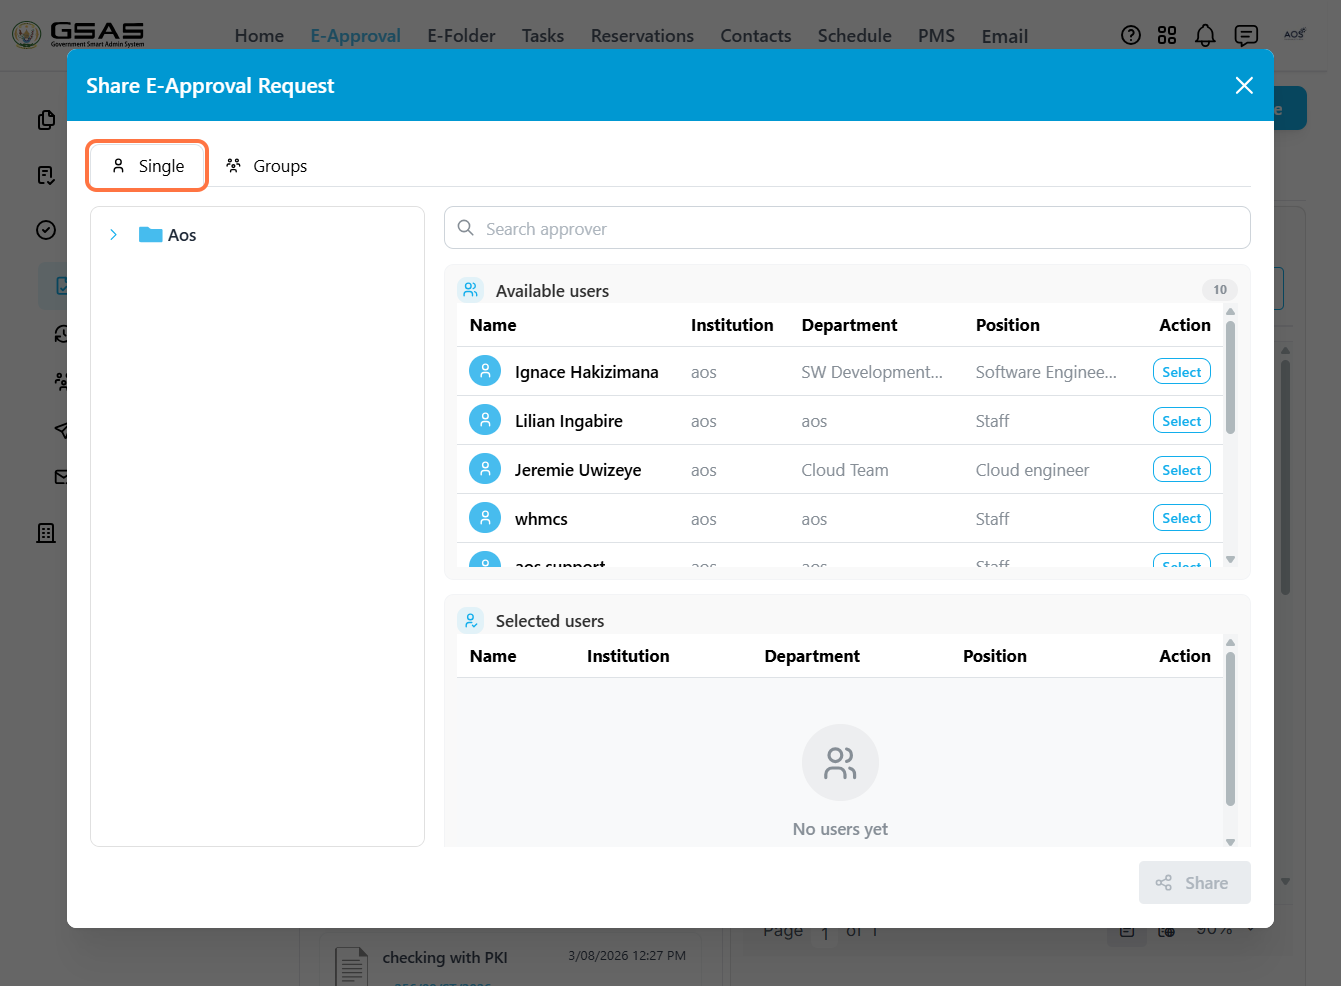
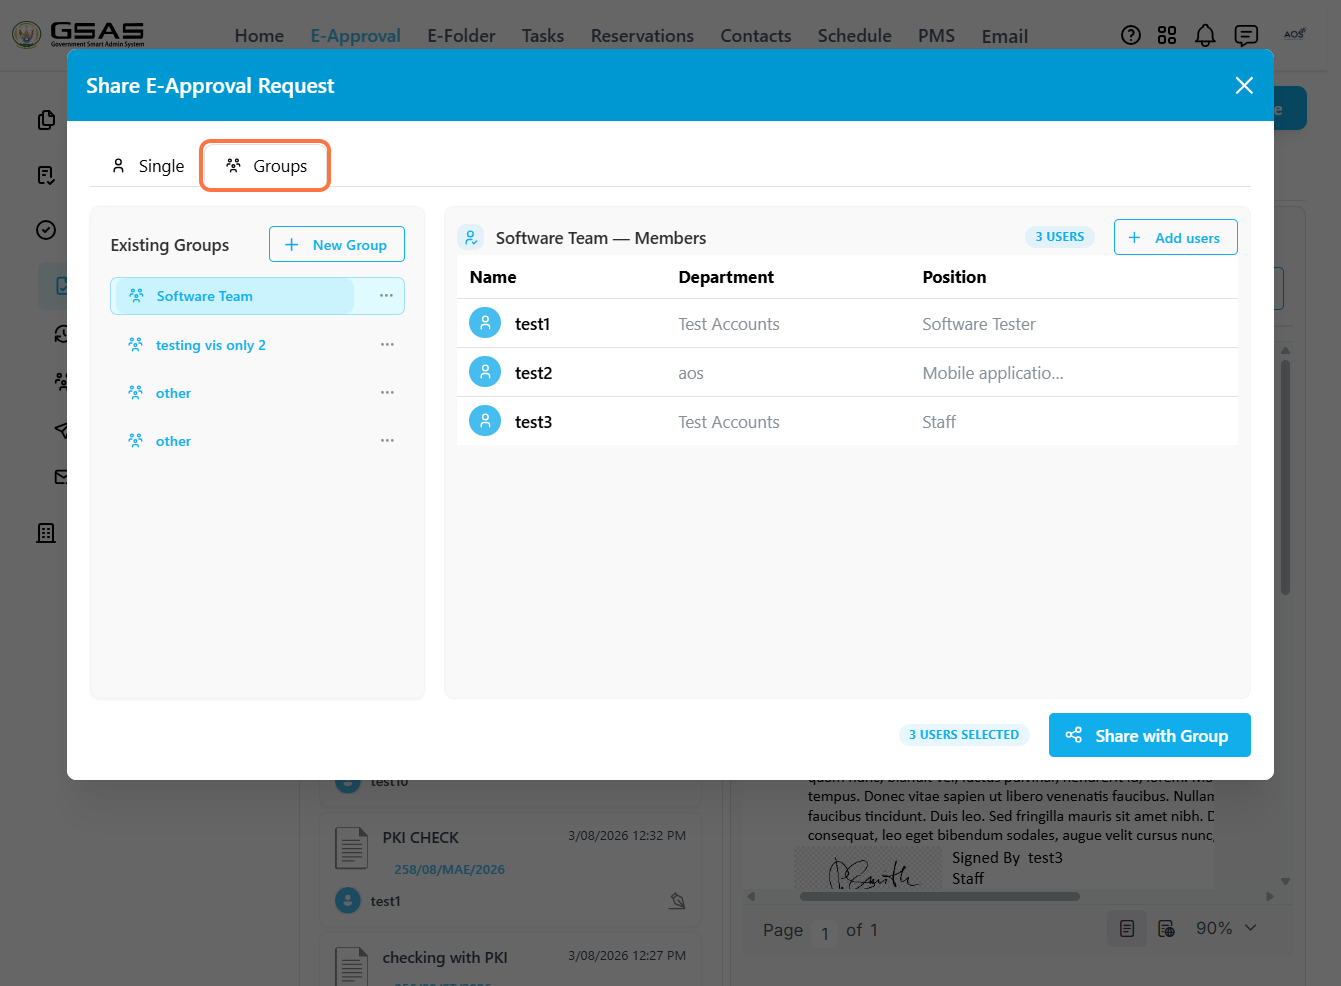
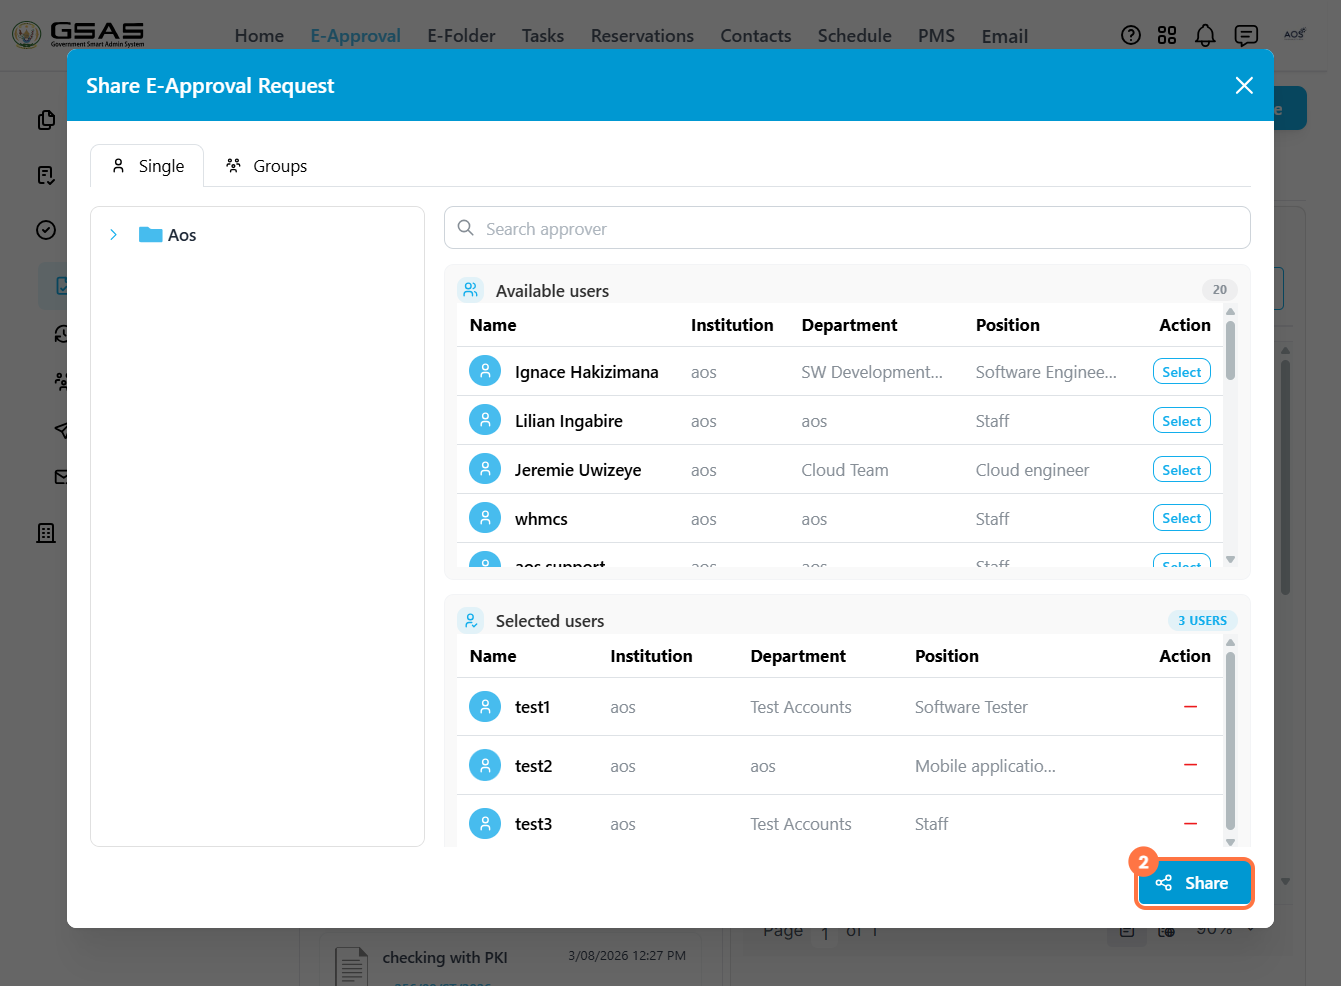
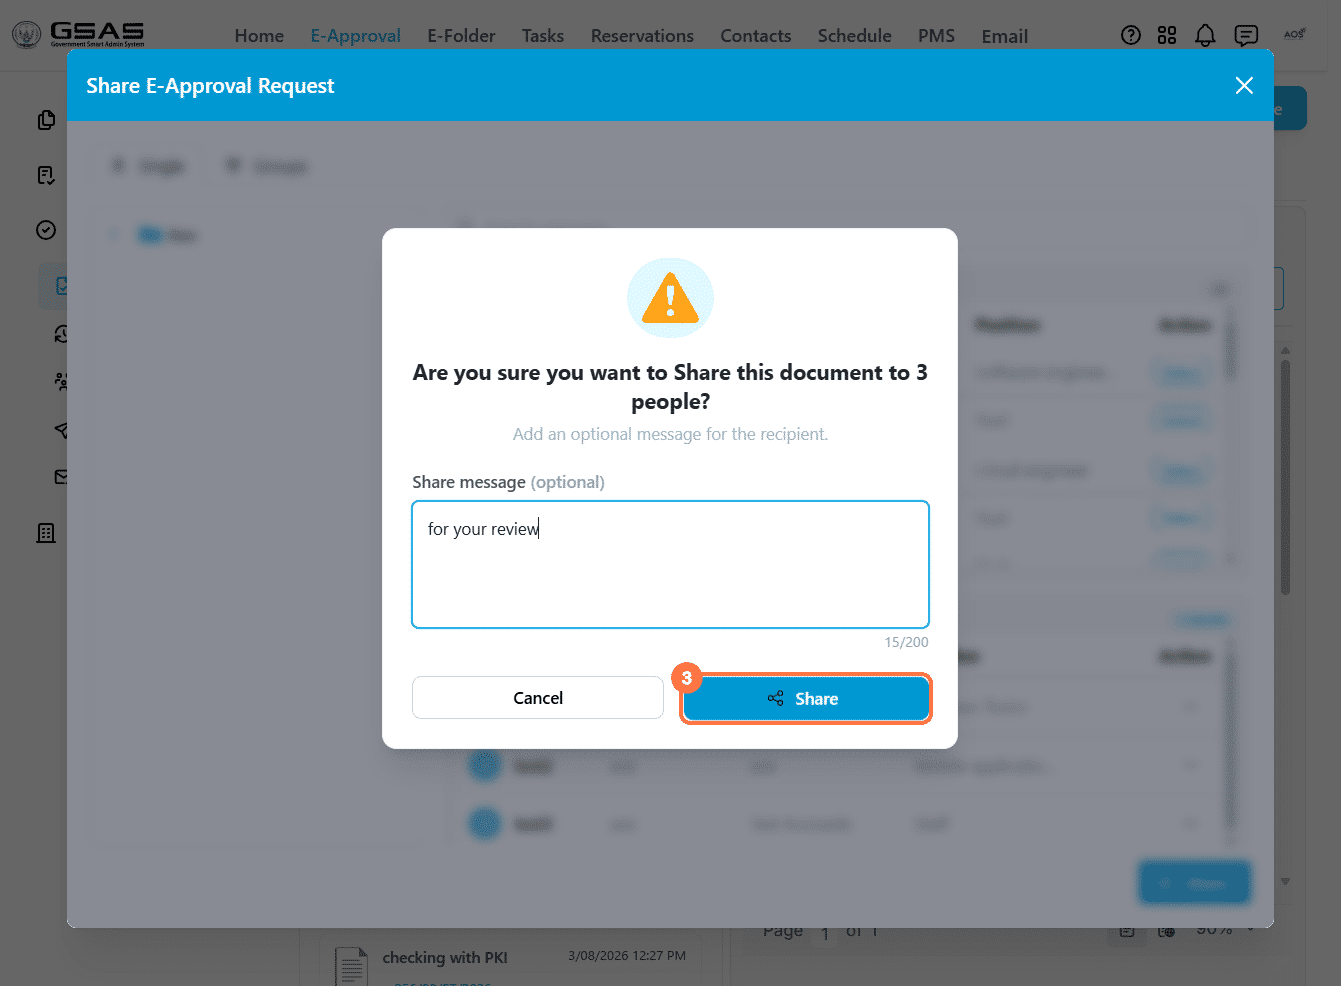
Enter an optional message to the recipients, then click Share
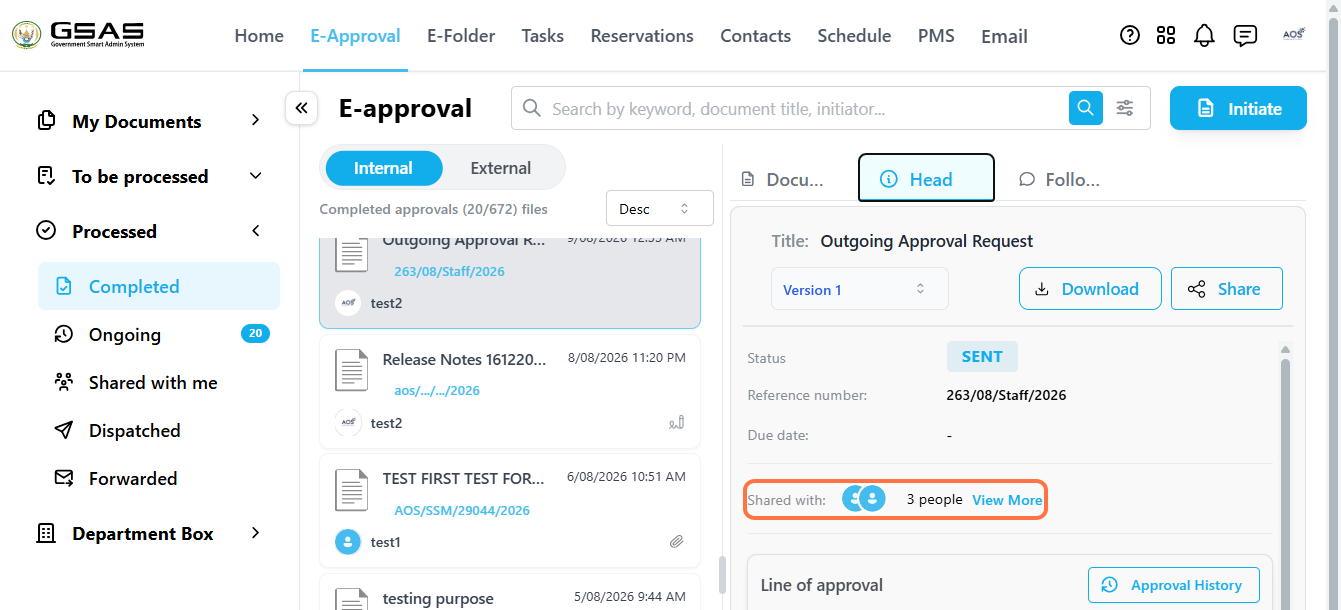
Recipients will find it in their Processed → Shared with Me folder, and they will also be able to share it. All people with access to the document will see who it has been shared with.
Registering documents
This section outlines the steps for users to register incoming documents that were not received or sent through the Government Smart Administration System for archiving and sharing.
Step 1
Access eApproval


Step 2
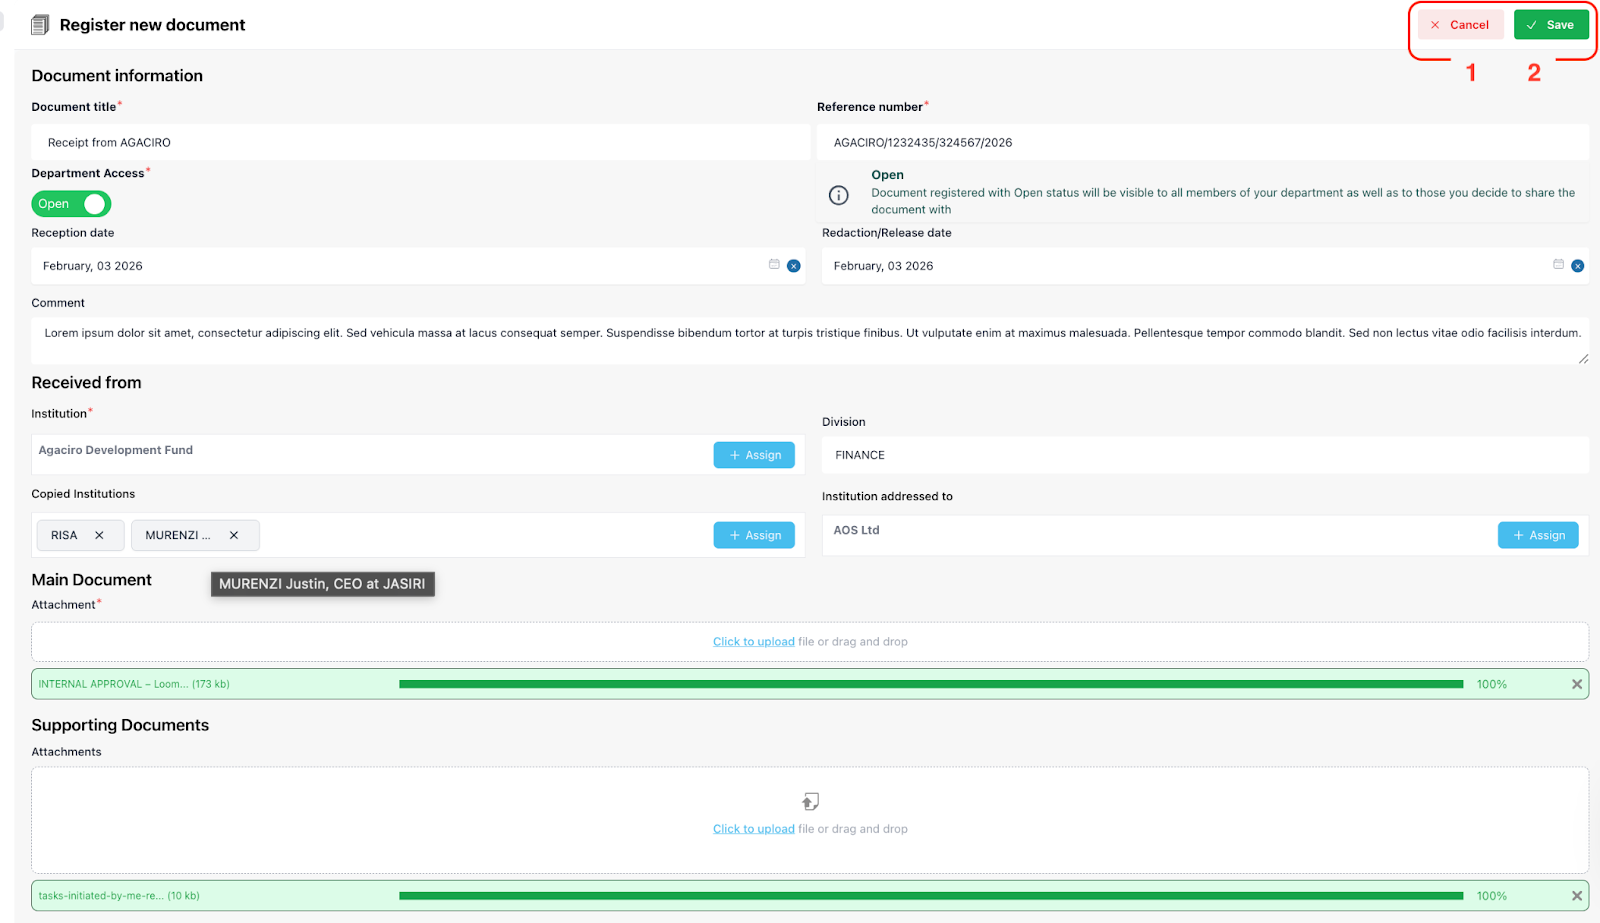
Document Details Entry
-
Input the title of your document.
-
Add the document’s reference number.
-
Determine access to the document for other team members in your department. (Refer to the cautious message on the side.)
-
Add reception date
-
Add redaction date (Date of when the document is/will be handled)
-
Optionally, add comments summarizing your document.
-
Enter the institution name (e.g., AOS).
-
Specify the division (e.g., HR) if necessary.
-
Select/Enter the copied institution or type it using the add (+) button.
-
Select/Enter the addressed institution or type it using the add (+) button.

→ After clicking the “+ Assign” button, a new model will open.

-
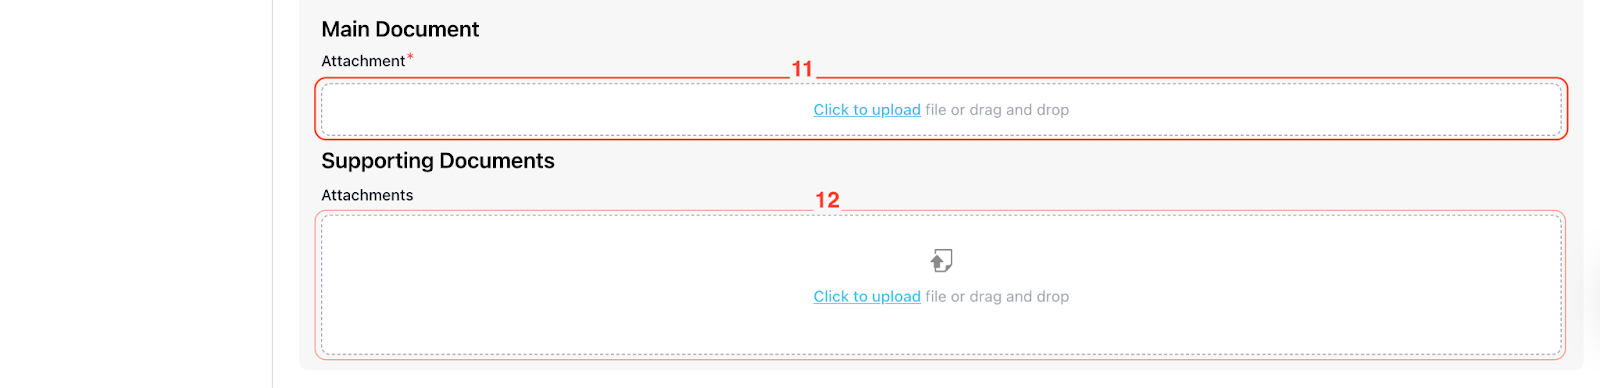
Attach the main PDF document.
-
If applicable, attach any supporting documents.
Step 4
Save the Document
-
Click ‘Cancel’ to stop the registration.
-
Click on 'save' to store the document in the system.
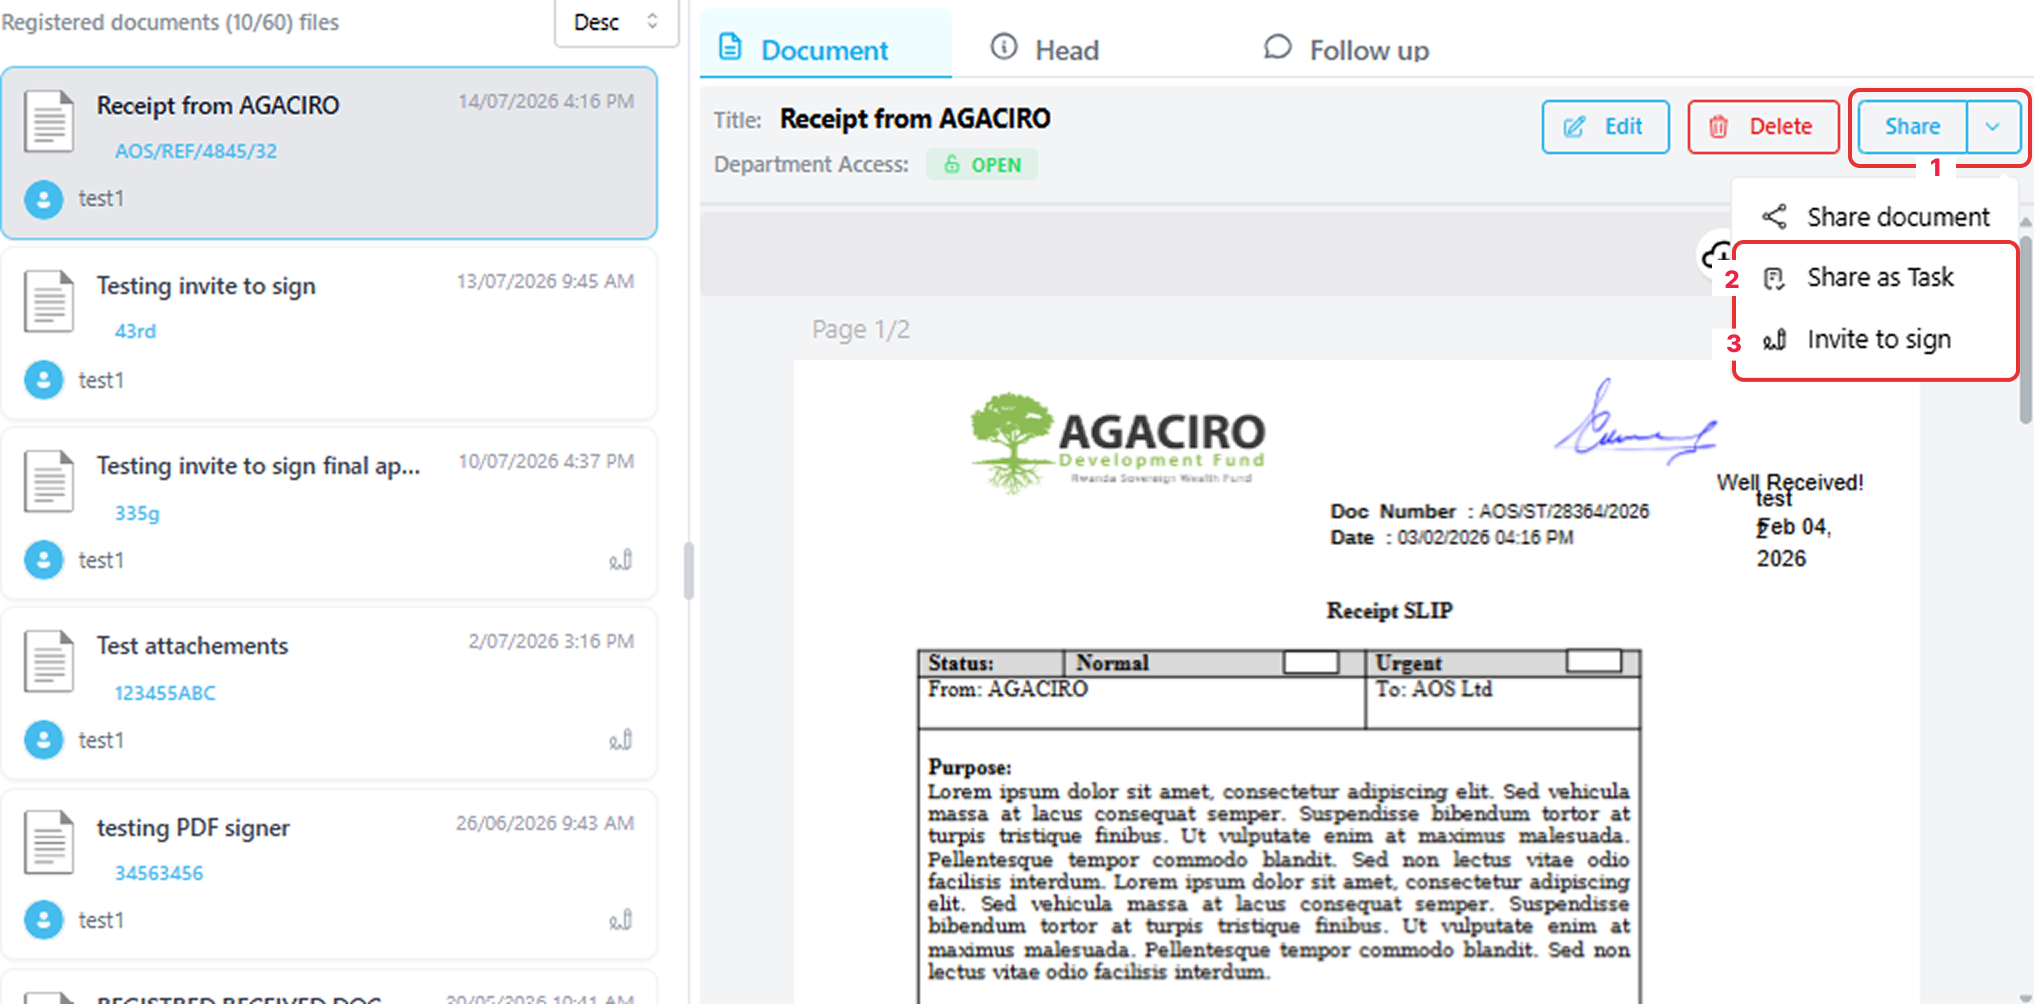
Once the document is saved, you will be able to find it in the folder. Members of your department will also be able to find it there if Department Access was set to open.
- You can click on the Share(1) dropdown to view actions that can be taken on the document.
- Share as task (2) and Invite to sign (3) are covered in the following pages.
Invite to sign on Received PDF documents
This feature allows you to invite internal users to sign a PDF document directly within GSAS.
Step 1
Open the document

Step 2
Share via Invite to Sign

Step 3
Assign signers
Search for the user(s) who need to sign the document, then drag and drop the signature field to the desired location on the document. Adjust the signature fields as needed, then click Send Invitation to notify the selected users.

Step 4
Signing the document
- The invited user will find the document in their To Be Processed → Internal Approval folder.
- They can open it and click Sign. In the newly opened tab, drag and drop their signature to the highlighted field.
- Other fields such as date, name, or custom text can also be added. Once done, click Complete.


Step 5
Access the completed document
Once all signatures have been collected, the document is marked as complete. It can now be downloaded, shared, or viewed by the drafter or any of the signers from their Completed folder.


Share document as Task
This page explains how to create a task directly from a registered document in E-Approval. The task is linked to the original document, assigned to selected users, and can be tracked from both the document view and the Tasks module.
| Before you begin: The document must already be registered under Registered received or Registered dispatched. See the Registering documents page to learn how to register documents. |
Step 1
Open the registered document
- Go to E-Approval.
- Open Department Box.
- Click Registered received or Registered dispatched, depending on where the document was registered.
- Select the document you want to share as a task.
Step 2
Share the document as a task
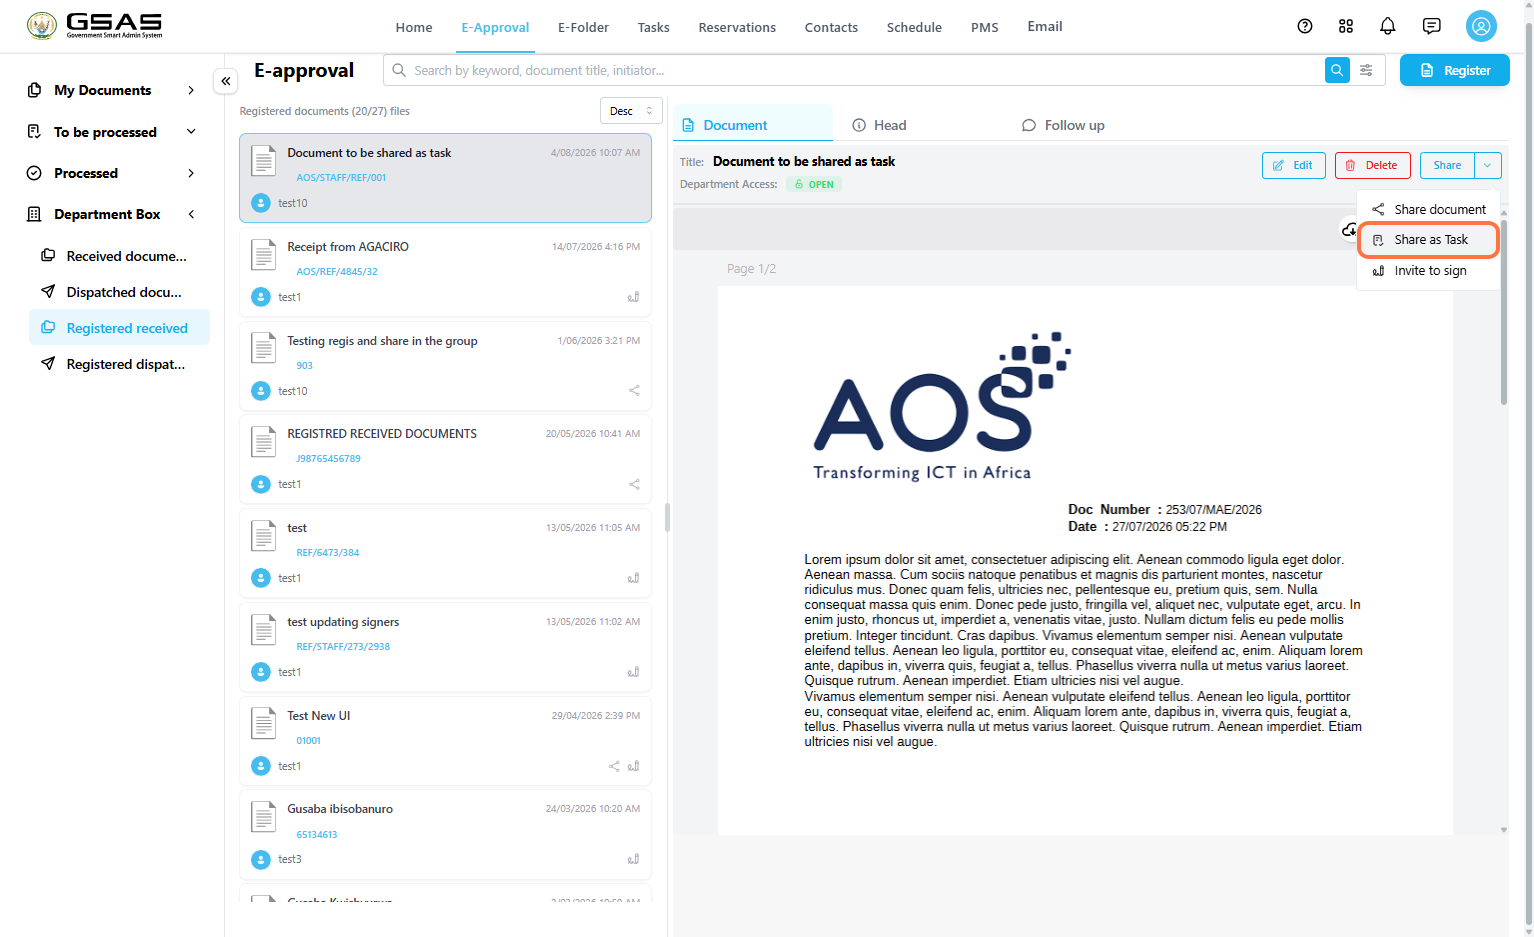
- Click the arrow next to the Share button.
- Select Share as Task.

Step 3
Fill in the task details
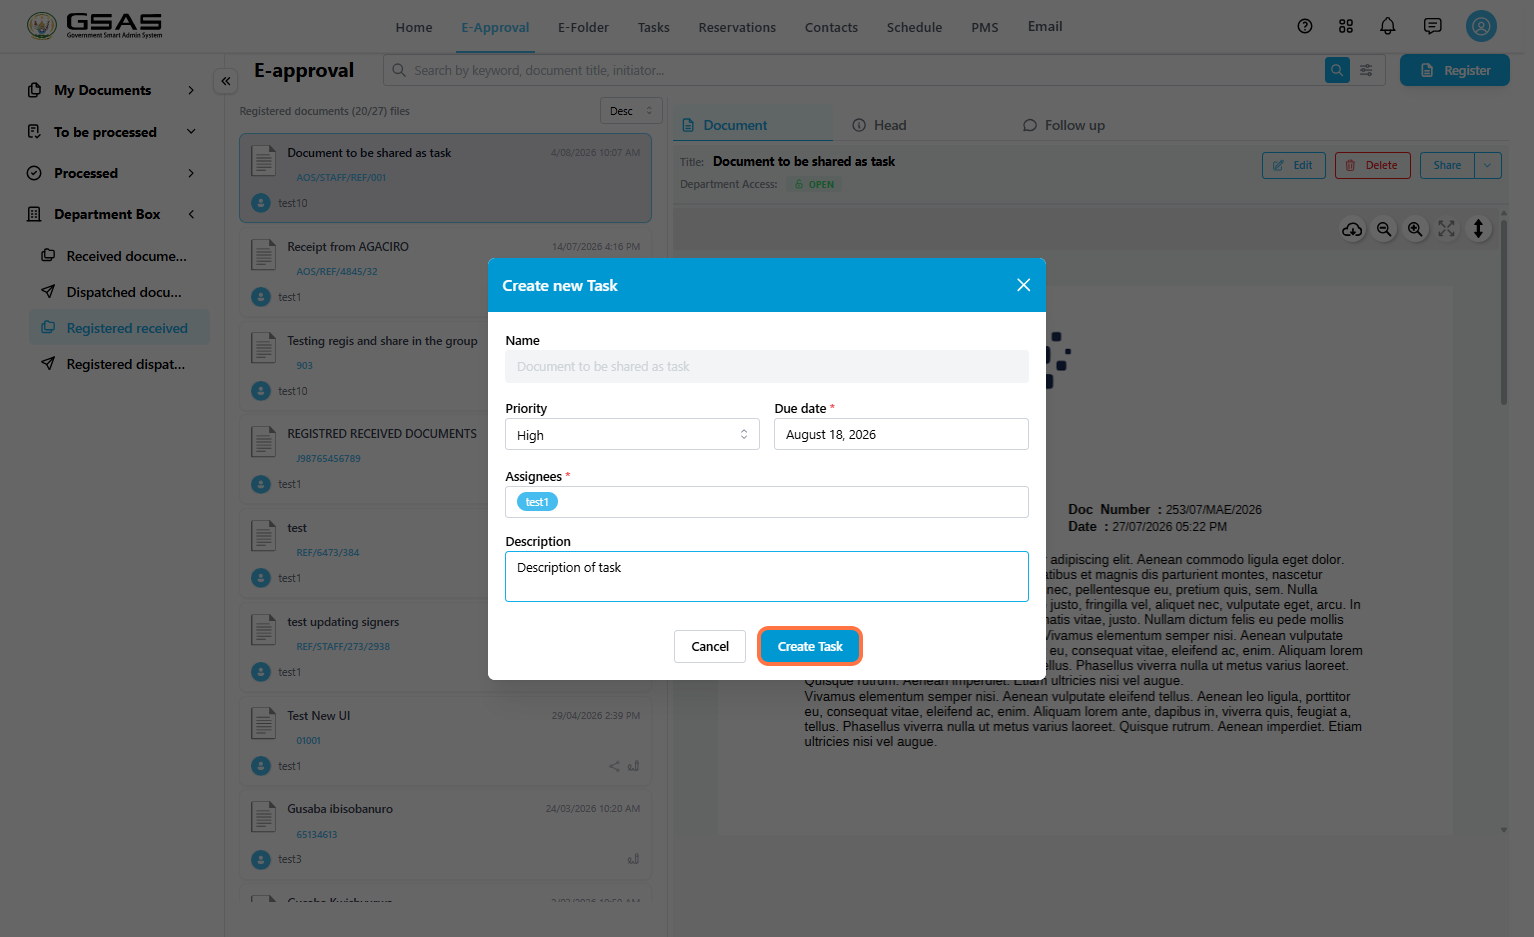
The Create new Task window opens. The task name is filled automatically as the document title.
1. Select the task Priority.
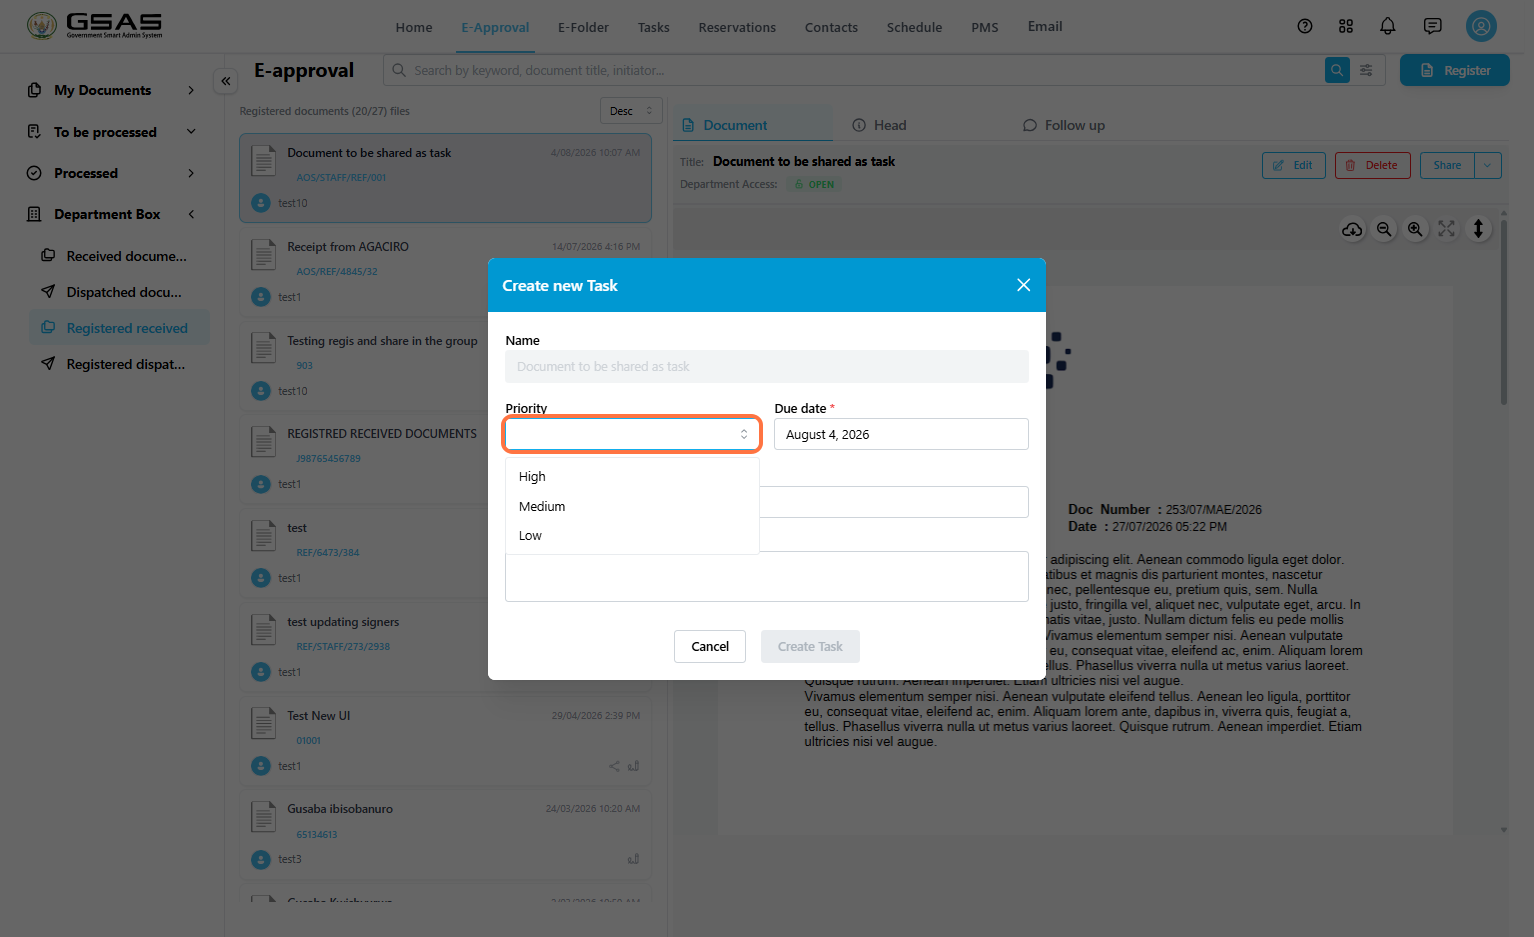
2. Click the Due date field and choose the deadline.
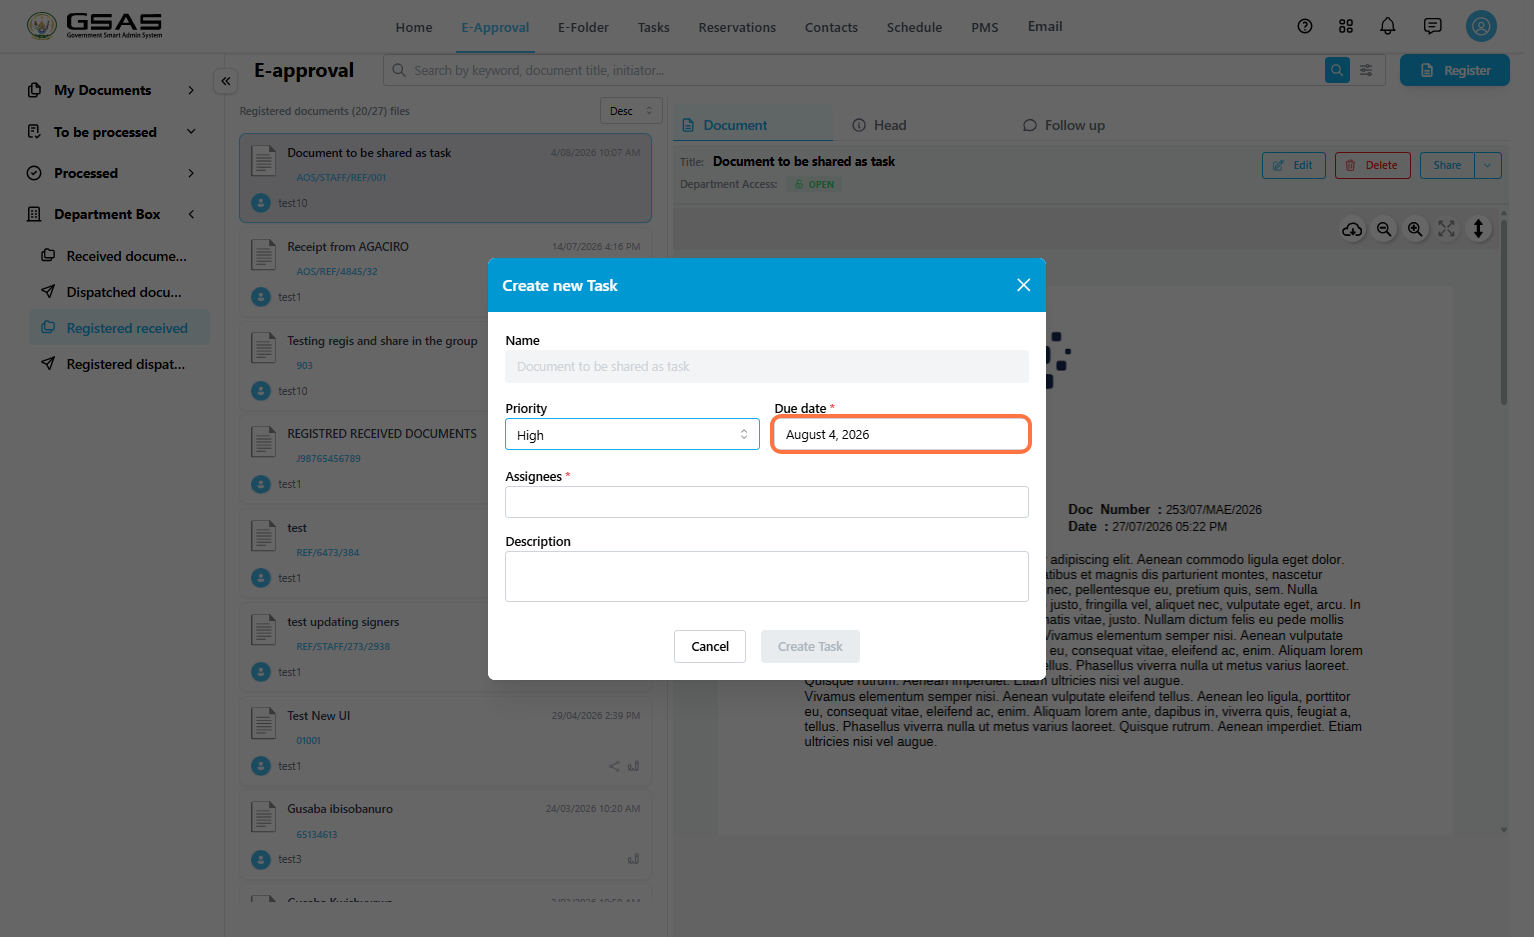
3. Click the Assignees field to add users.
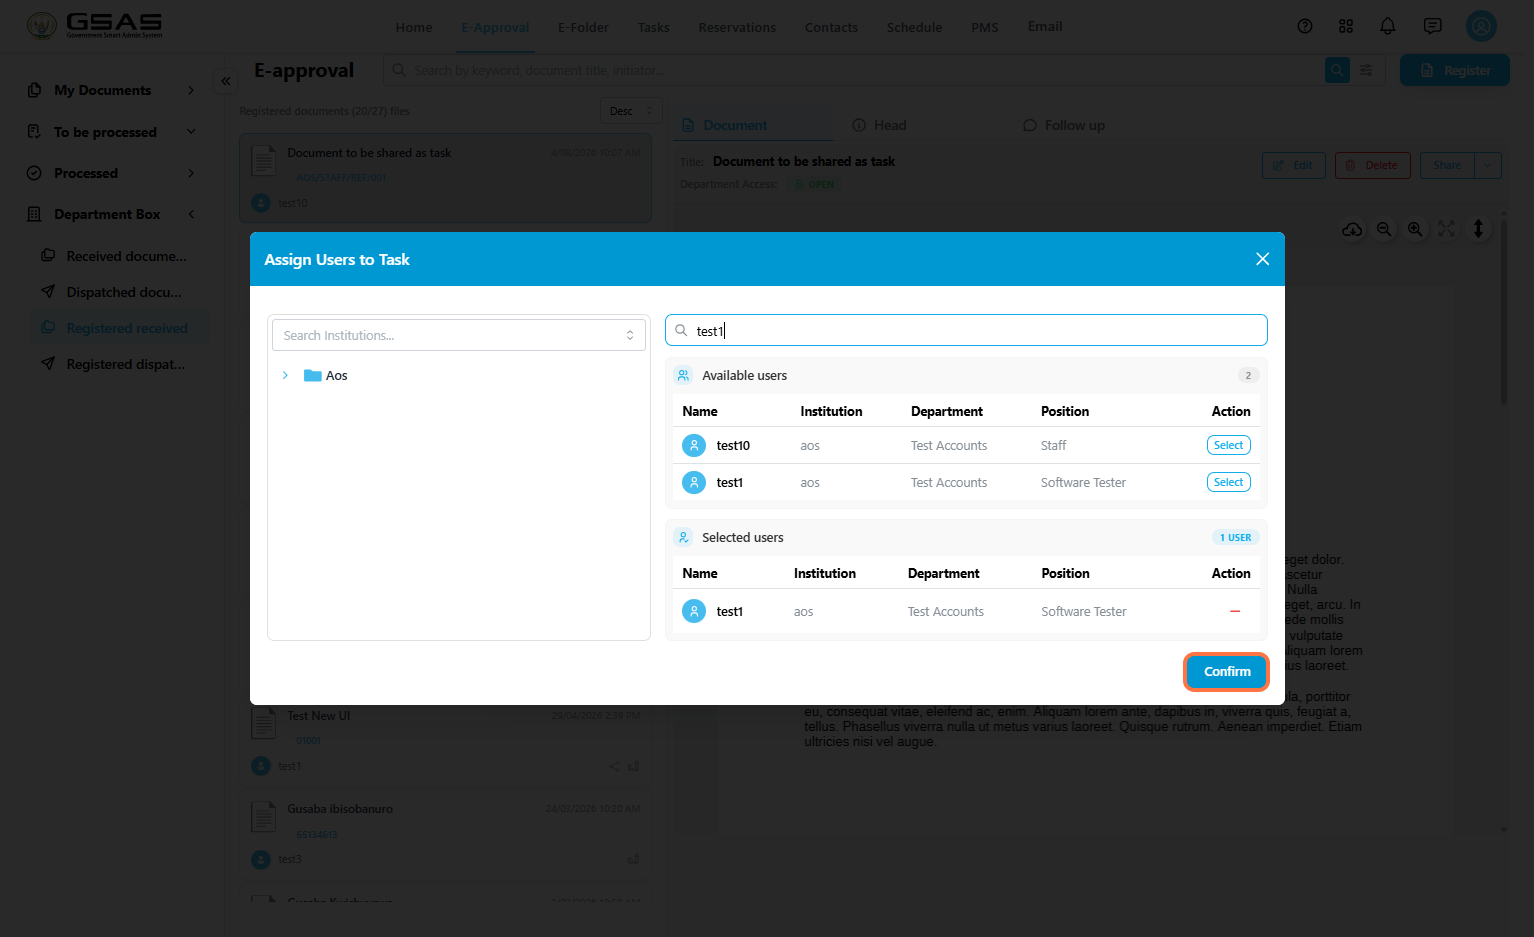
4. Search for the users you want to assign. Click Select next to the correct user.
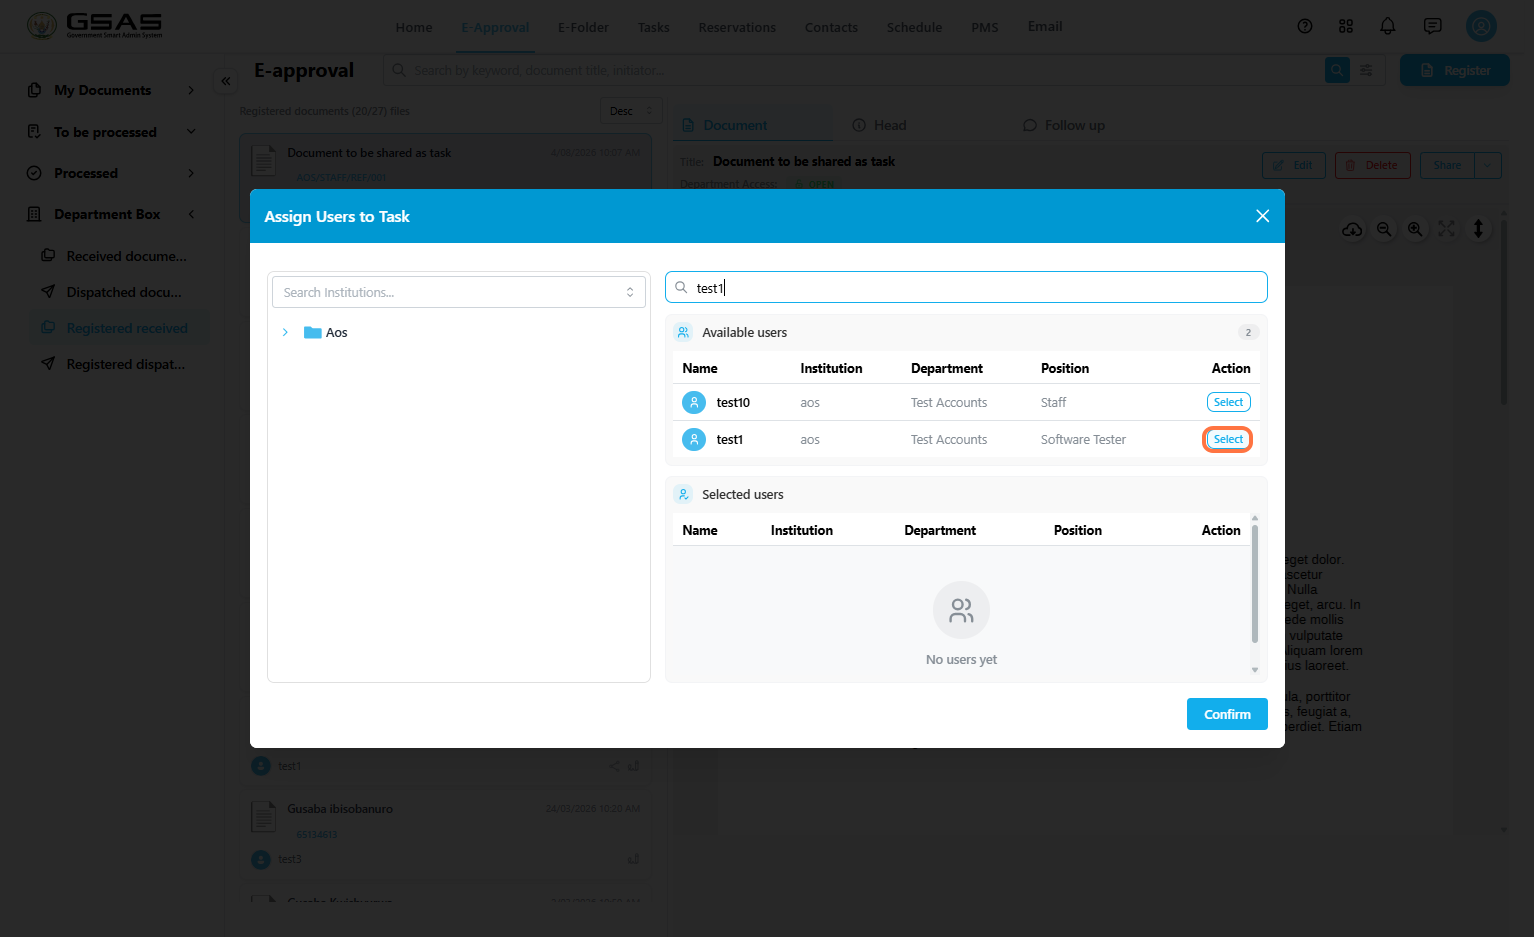
5. Confirm that the user(s) appears under Selected users. And click Confirm once all assignees are selected.
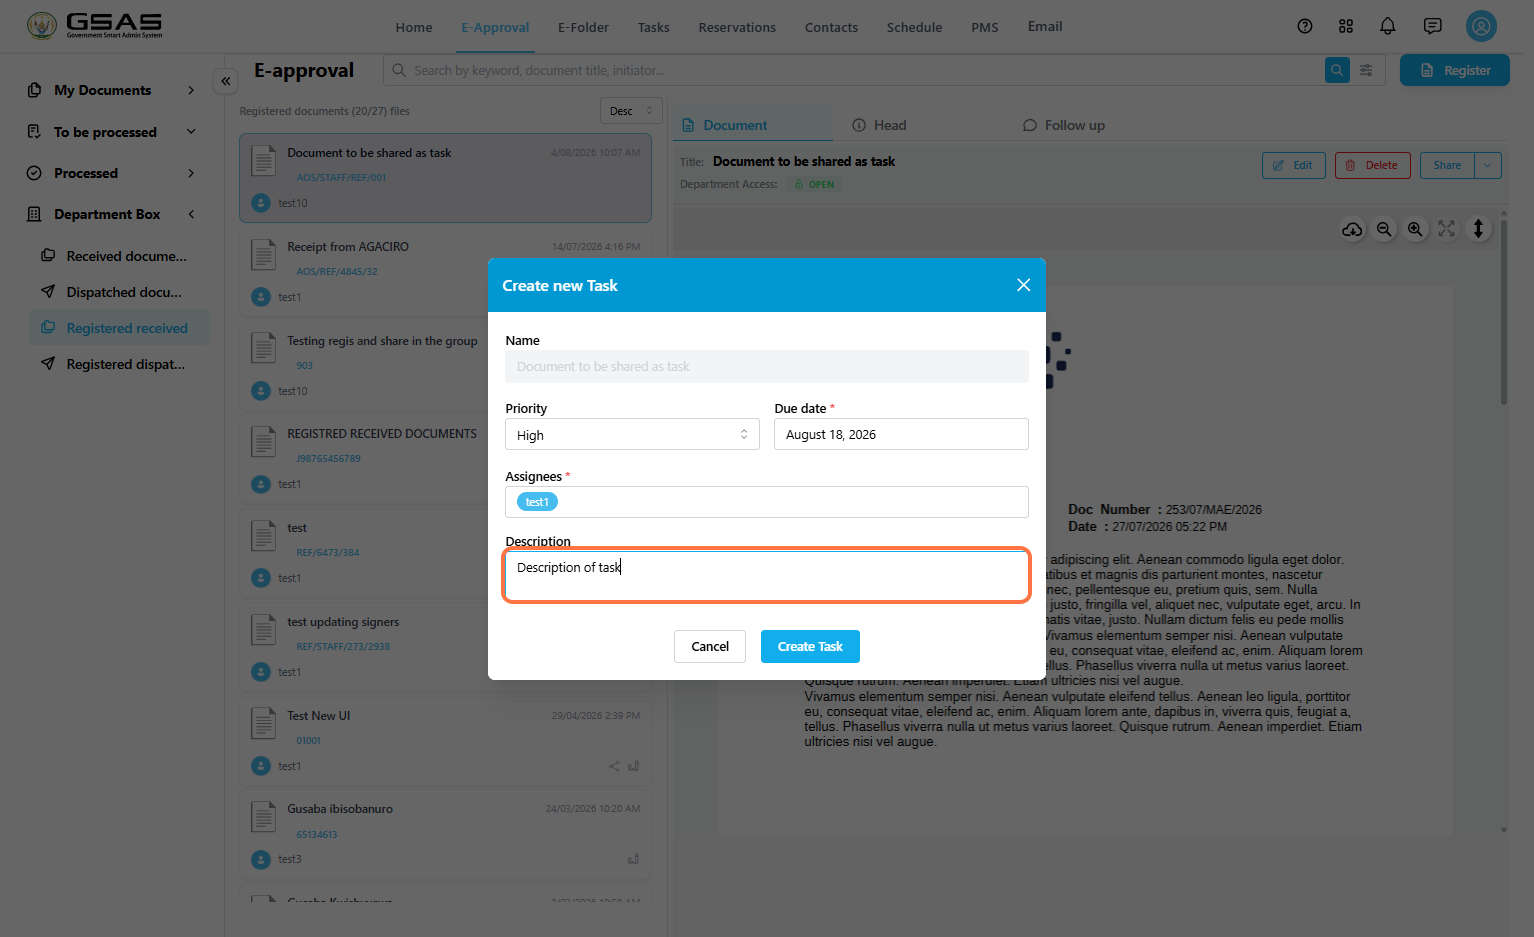
6. Optionally, enter a short Description explaining what the assignee needs to do.
Step 5
Create the task
After the assignee and description are added, the Create Task button becomes active.
- Review the priority, due date, assignee, and description.
- Click Create Task.

Step 6
View the created task
After the task is created, the system creates or updates a related task project in the Tasks module.
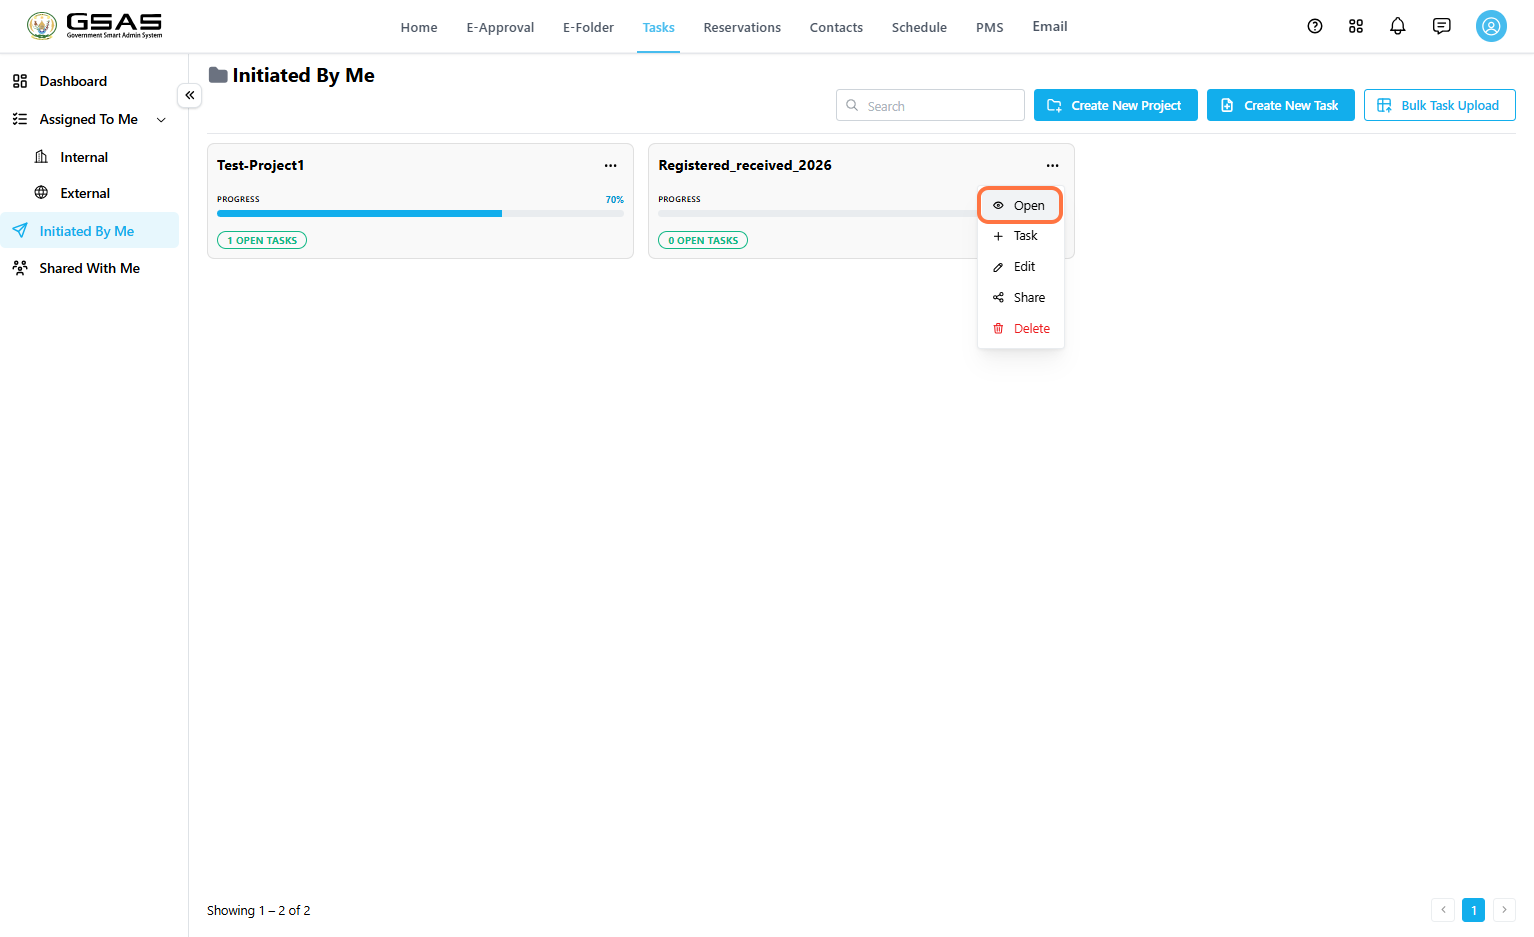
- Go to Tasks.
- Click Initiated By Me.
- The task project containing the task is titled "Registered_Received_Year"
- Click the three-dot menu on the project card, then click Open.

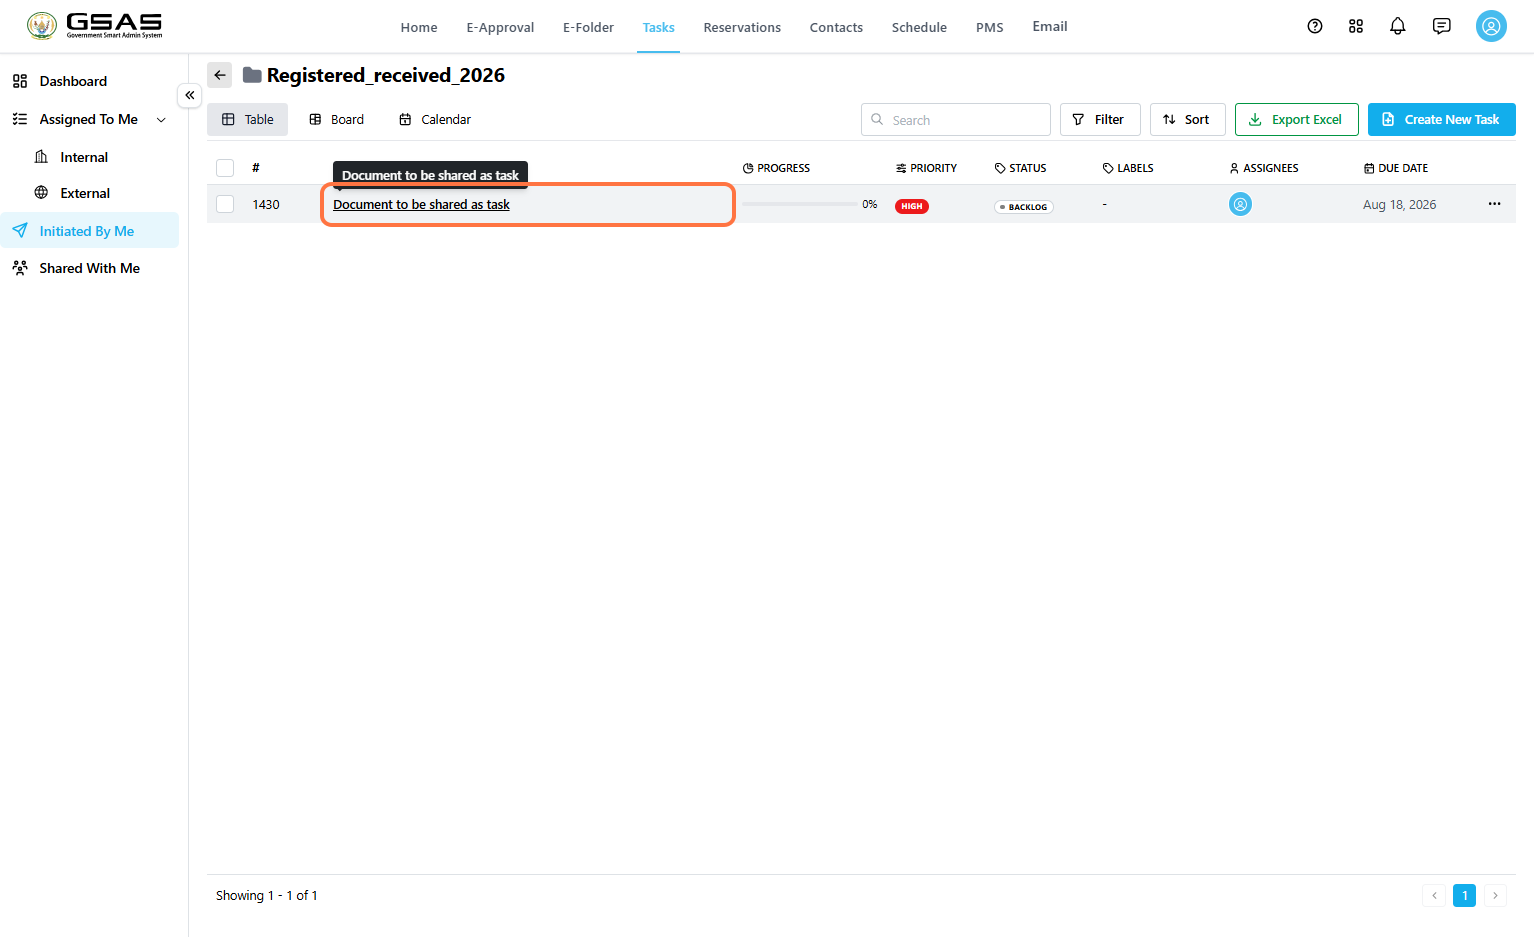
Inside the project workspace, the task appears in the task table. You can view the task name, progress, priority, status, assignee, and due date.
The task assignees will open the task from Tasks → Assigned To Me - Internal if it was assigned to them by a user within their institution or External if it was by a user from another institution.
Proceed to the Responding to and Tracking tasks page to see how to update a task assigned to you.
Step 7
Track the task progress from the document
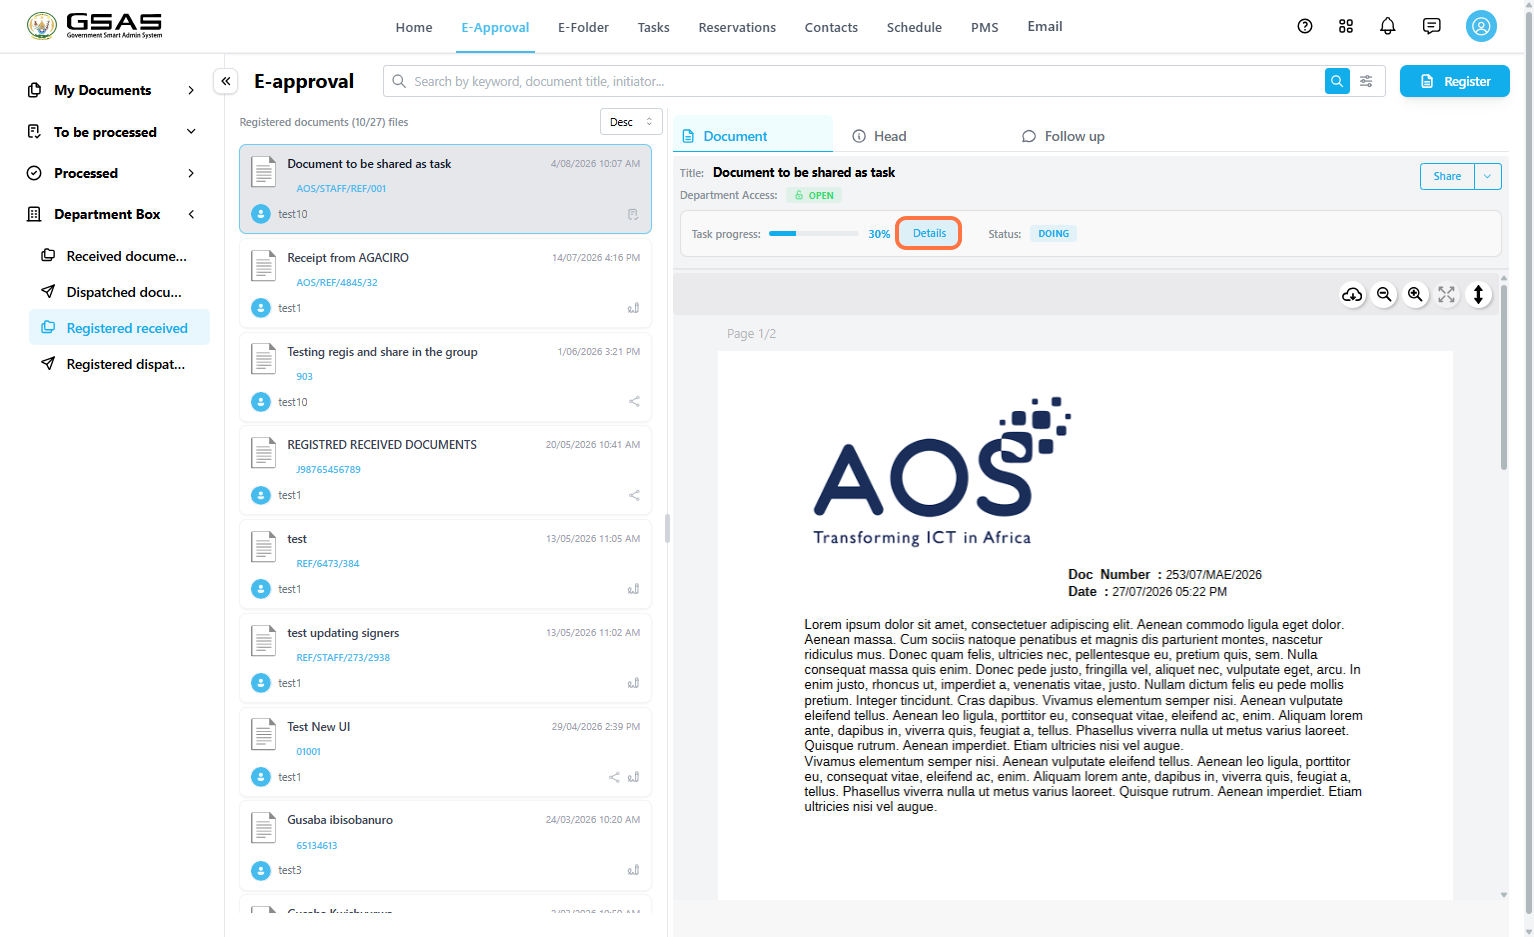
Return to the original document in E-Approval. The document displays task progress, completion percentage, and task status.
- Select the original registered document.
- Review the Task progress section.
- Click Details to open the task details panel.


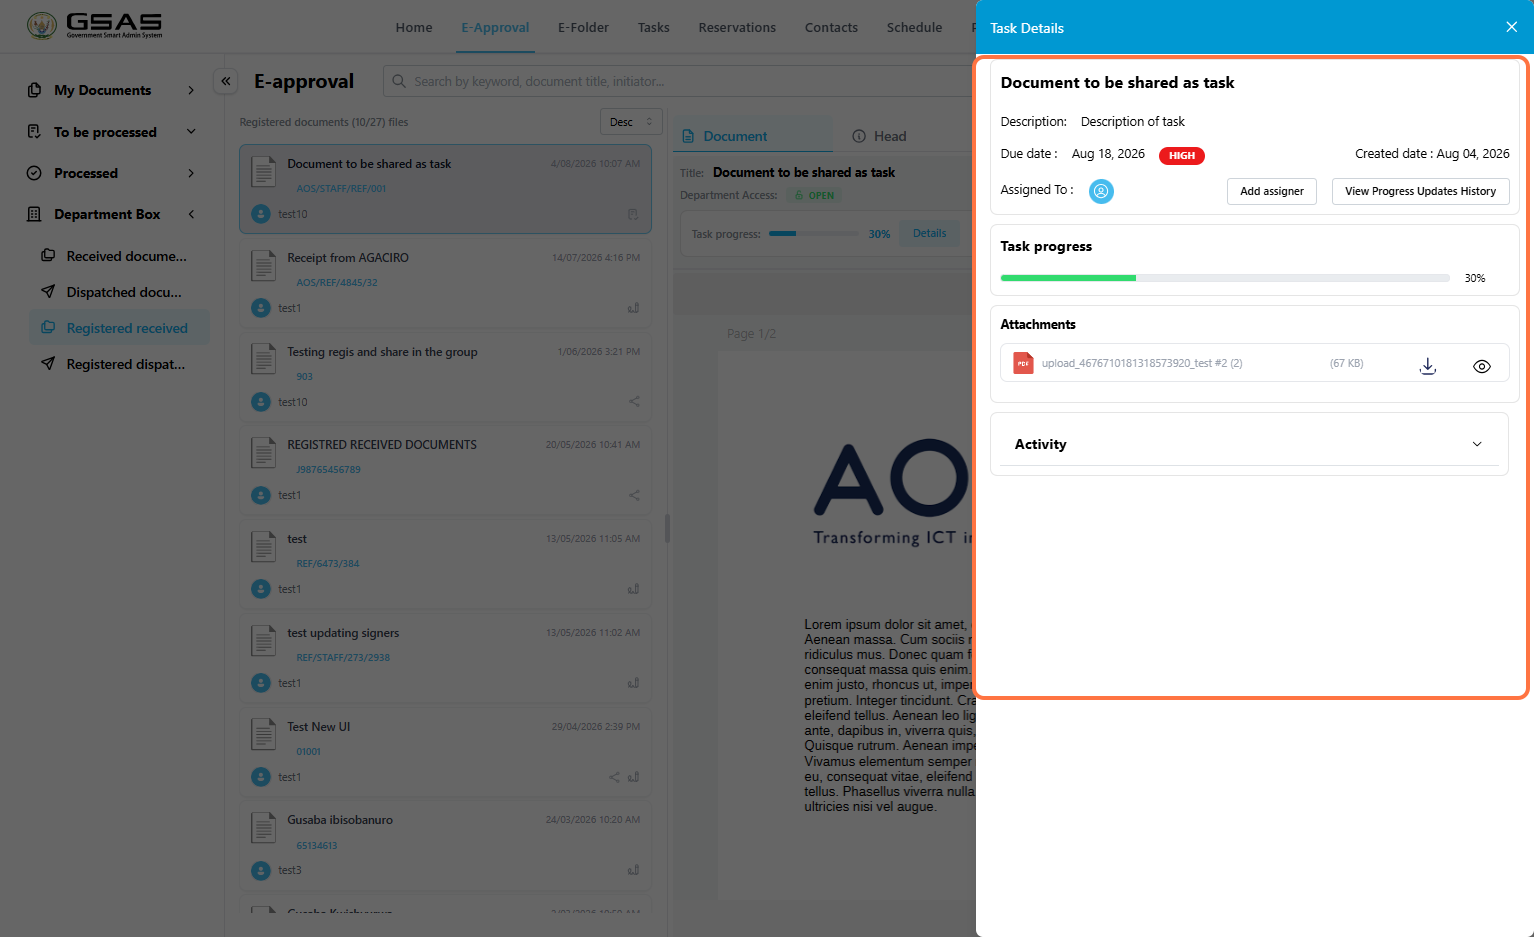
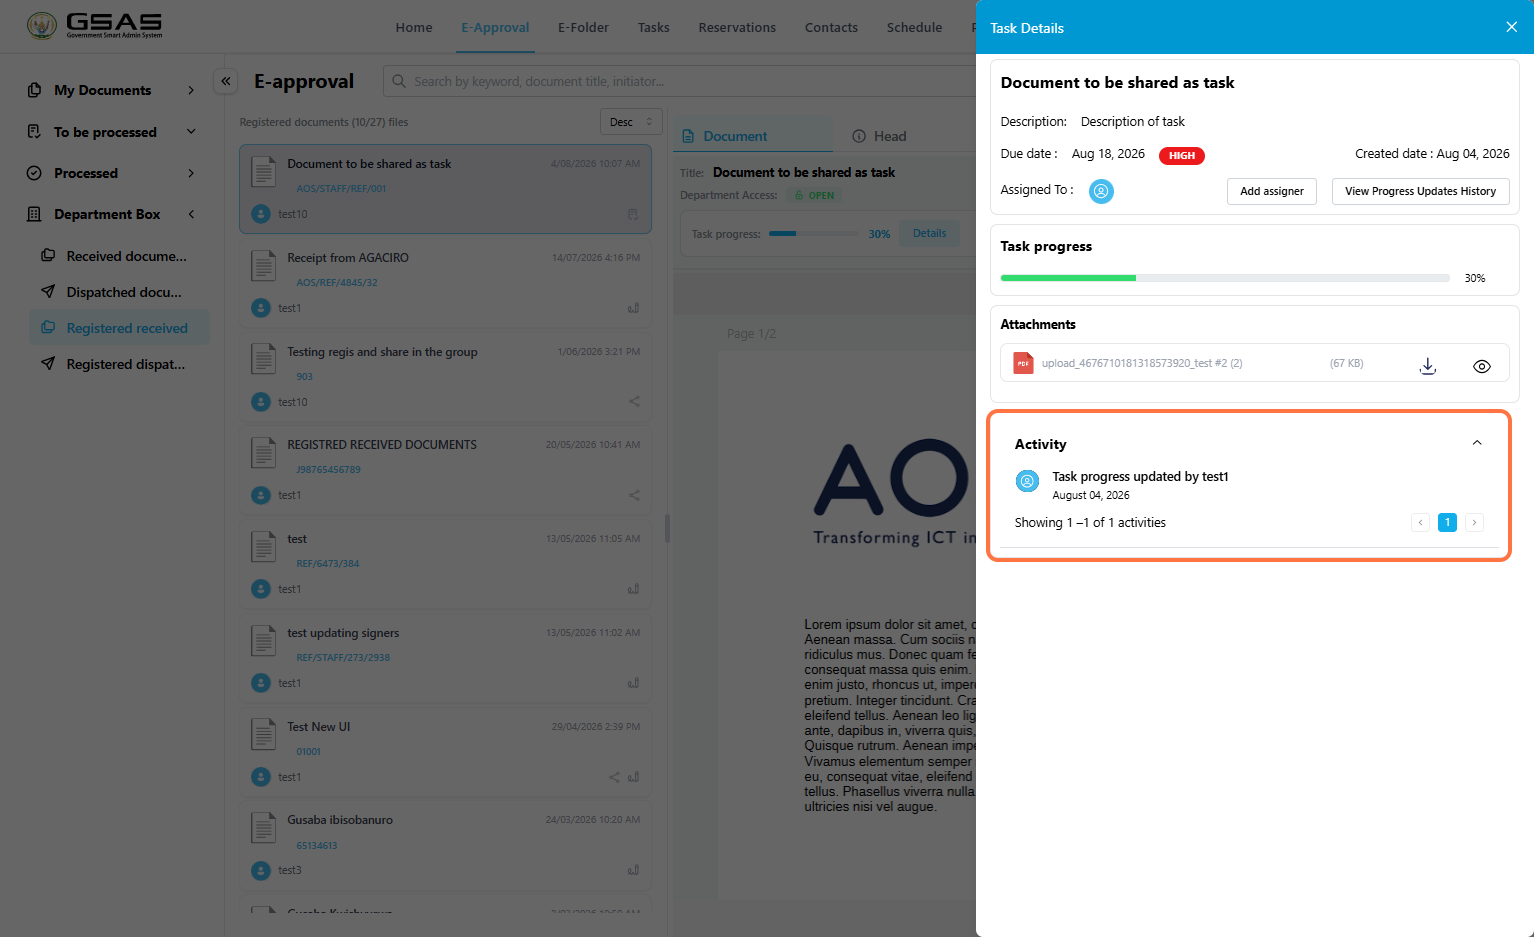
4. Expand Activity to view recent task activity.
5. Click View Progress Updates History to see submitted progress updates.
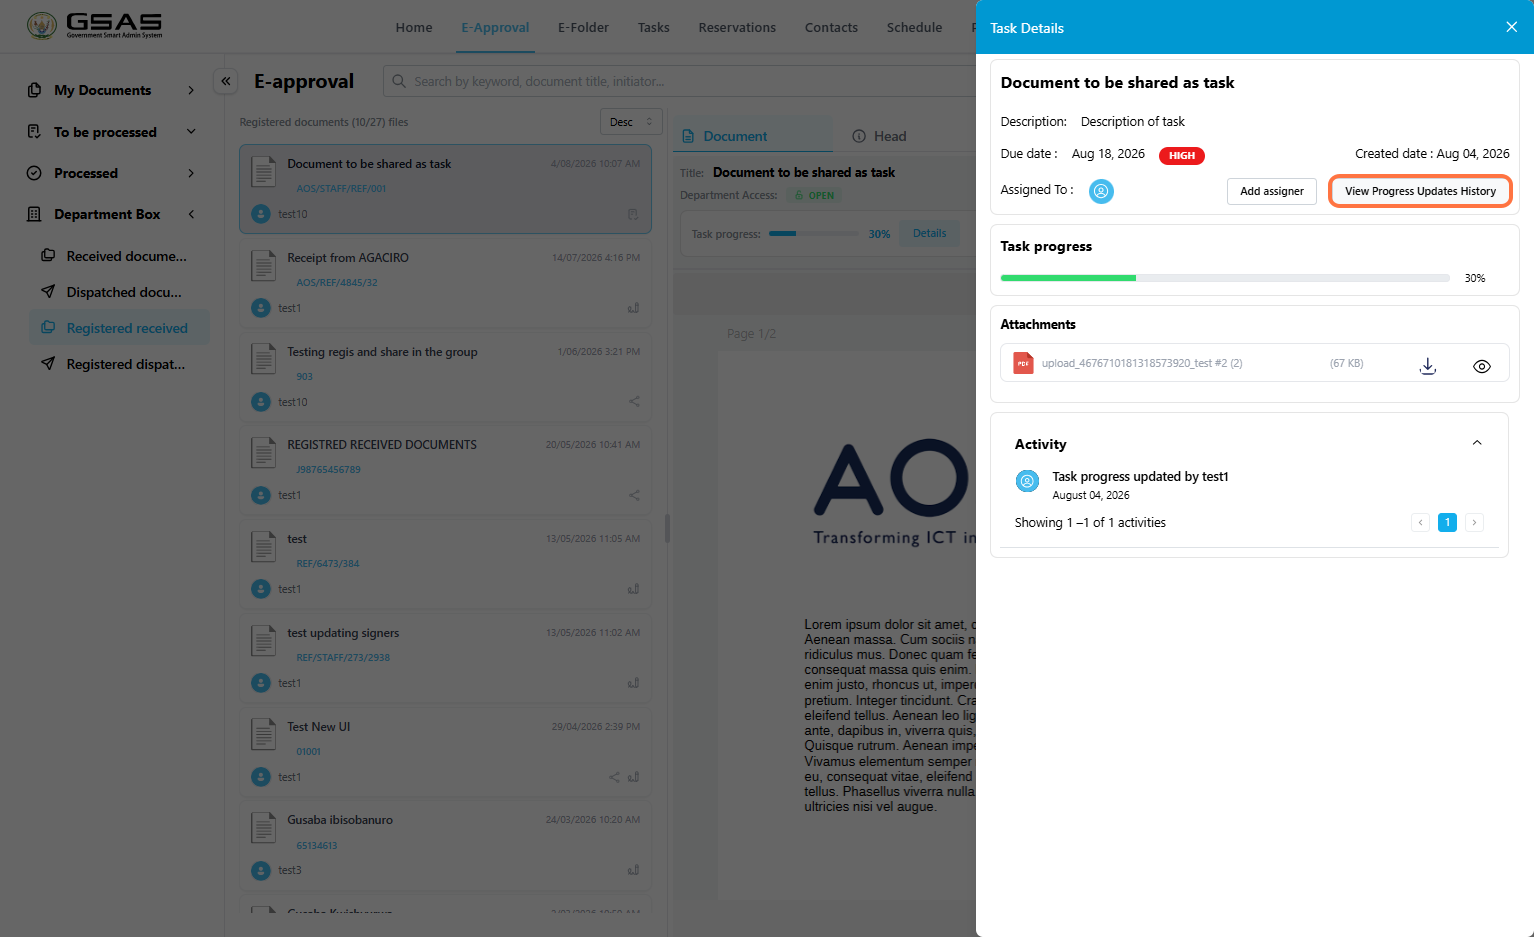
Review the update details, attachments, update date, and the user who submitted the update.
Proceed to the Responding to and Tracking tasks page to see how to keep track of tasks you create and delegate from the Tasks module.
Sender and Receiver Manager Controls
Sender Manager
Once an outgoing request has been approved by everyone in its approval line, it lands in the Sender Manager's To Be Processed > Outgoing folder. This is the last stop before the document actually leaves the institution.
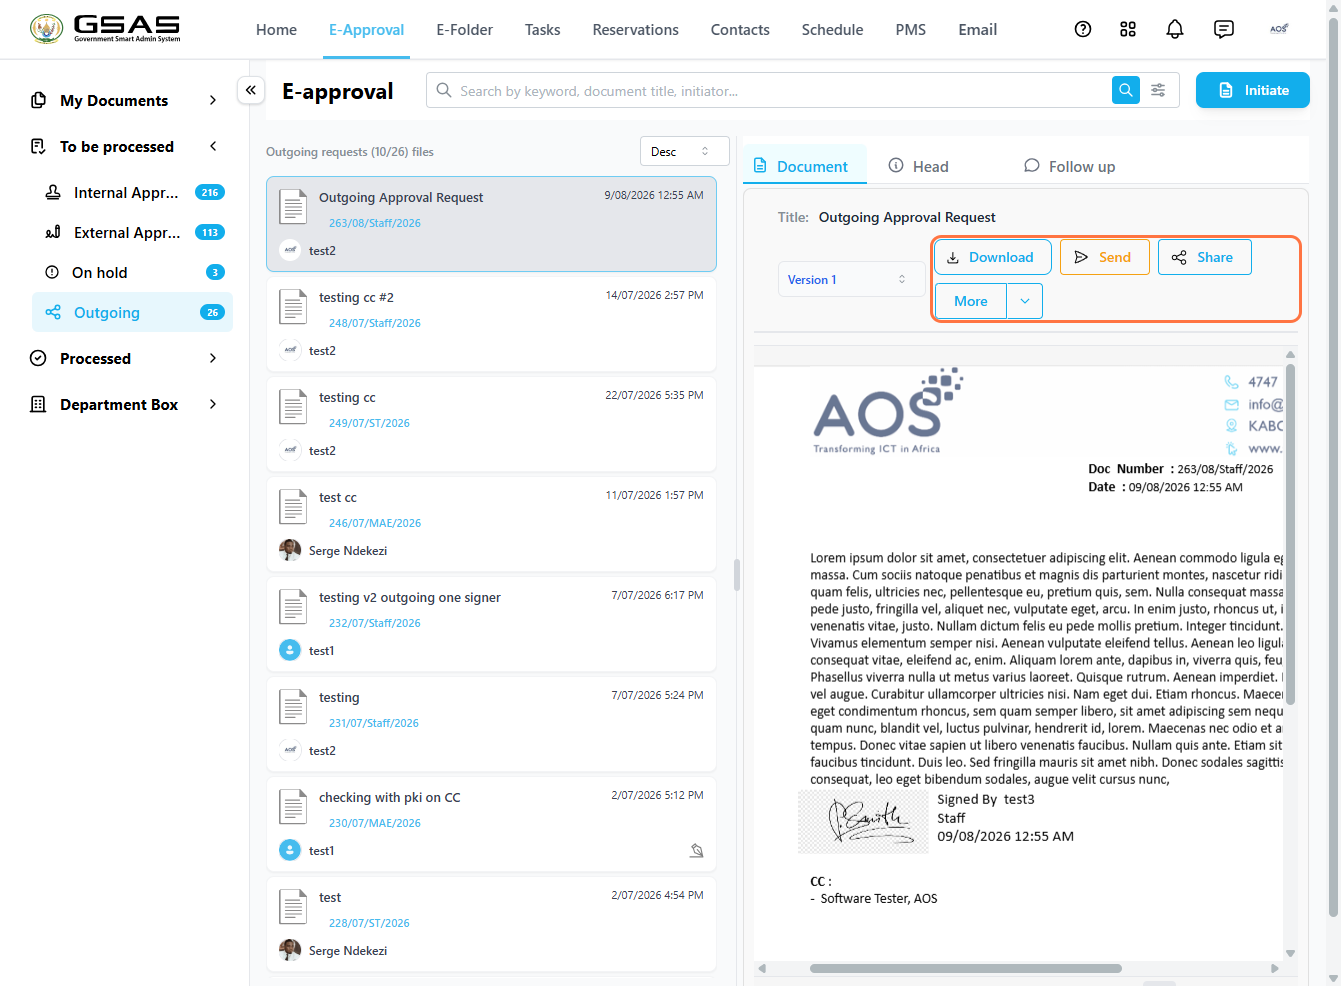
| Send | Dispatches the document to the addressed institutions and/ or individuals electronically. |
| Mark as sent | Found under More. This logs that you've sent it by other means and moves it out of the Outgoing folder. |
| Share | Gives another user inside your own institution visibility into the document. |
| Edit | Found under More. Lets you make changes to the details of the document before sending. |
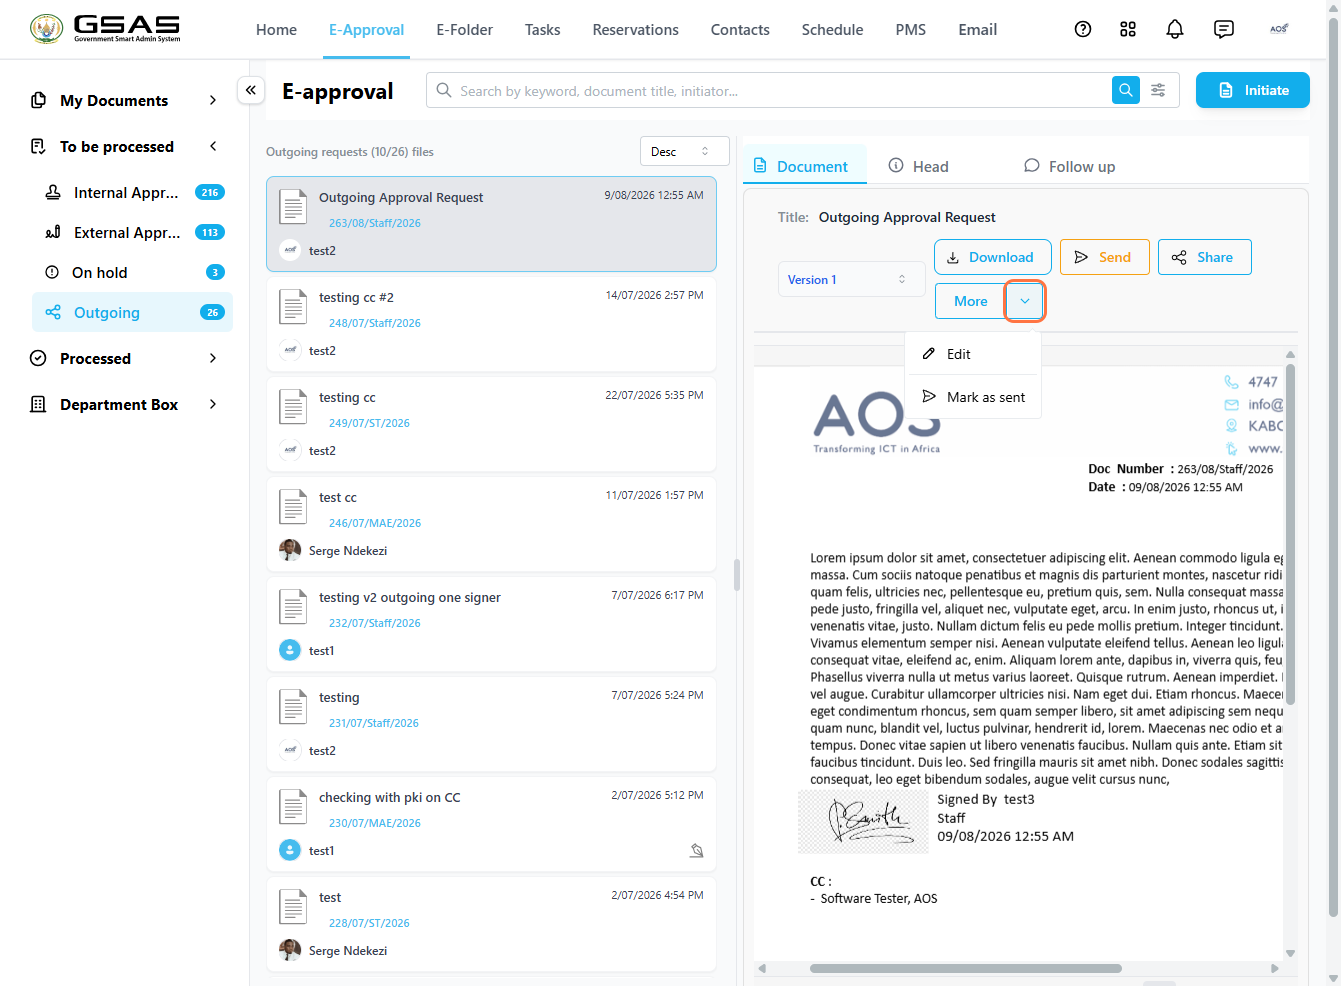
| Note: Once a document is sent or marked as sent, it moves out of Outgoing and into Processed > Dispatched. |
Receiver Manager
Every document your institution receives from an external institution lands first in the Receiver Manager's To Be Processed > External Approval folder before being routed to anyone else.
| Confirm | Acknowledges that the document has been officially received into the system. |
| Forward | Routes the document to whoever internally needs to see or act on it. |
| Reply | Opens a new outgoing request addressed back to the external sender. |
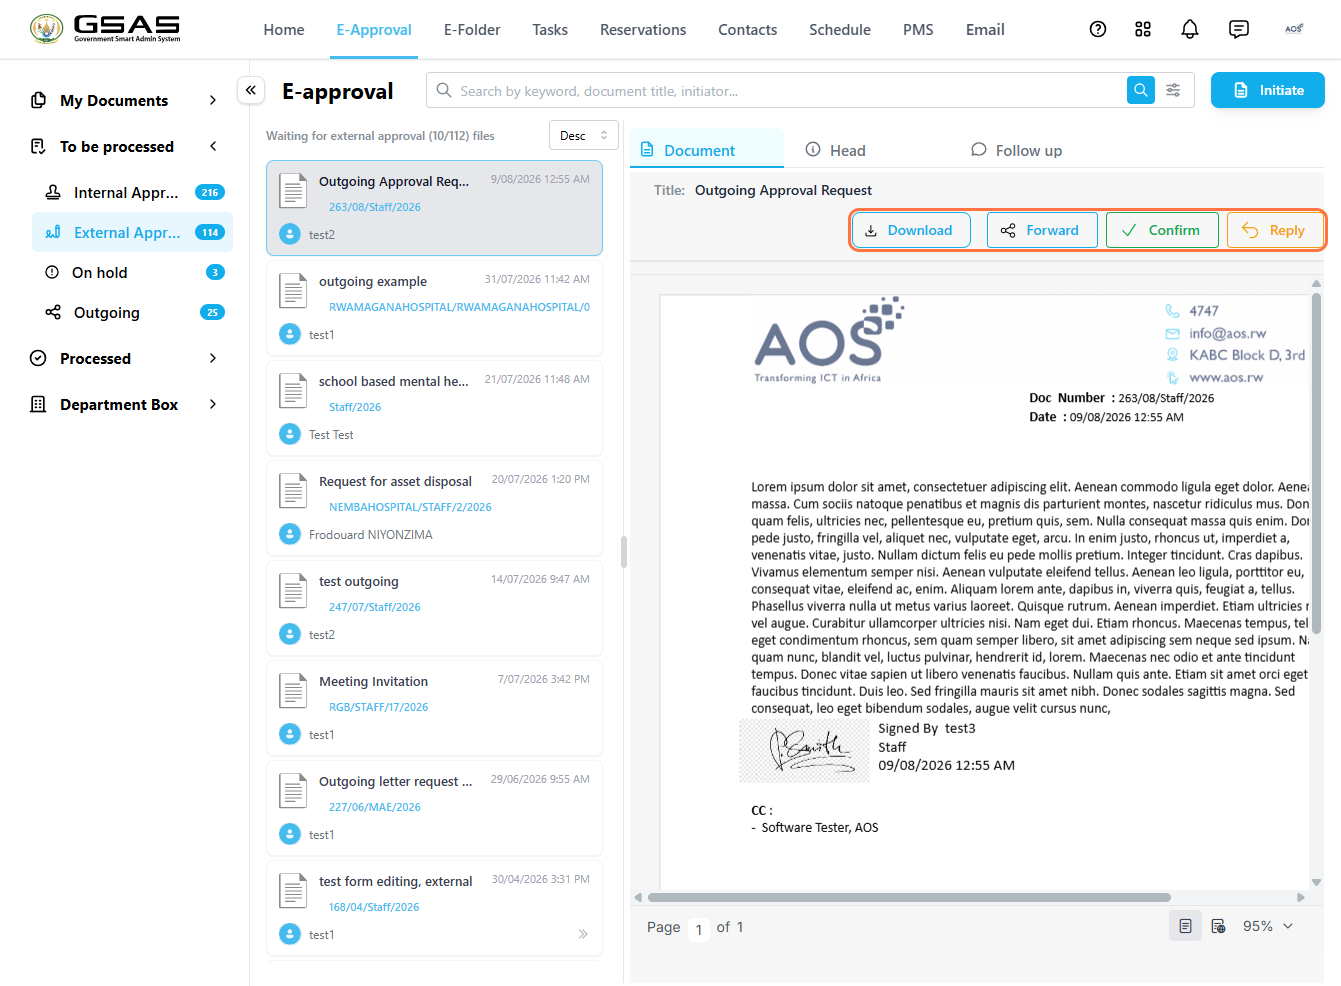
Forwarding a document
- Click Forward.
- Search for and select the people who need to see the document.
- Click Forward again, optionally add a message, then confirm.
Receiving a Forwarded Document
If a document is forwarded to a user, it appears in their own To Be Processed > External Approval folder. They'll have the same options the Receiver Manager had; Download, Forward, and Reply except Confirm, since that's the Receiver Manager's responsibility alone.